
Generate summary with AI

Screen timeout settings sit at the intersection of two things IT teams care about equally: security and user experience. Get the balance wrong in either direction and you’re either leaving devices exposed to anyone who walks past an unattended desk, or you’re fielding complaints from users who have to re-authenticate every 90 seconds to read an email. According to Ponemon Institute’s 2026 Cost of Insider Risks Global Report , organizations now face an average annual cost of 19.5 million dollars from insider‑related incidents, representing roughly a 20% increase over the last two years. Physical access to an unlocked, unattended device is one of the most direct on-ramps to that exposure.
This guide covers how to configure display timeout and lock screen settings across Windows 10, Windows 11, macOS, iOS, Android, and Linux Mint, including both the GUI paths and the command-line methods for teams that need more control than the settings menu offers.
Why timeout and lock screen settings matter
Display timeout and lock screen are related but distinct controls:
- Display timeout governs power management, which means how long a screen stays active before the OS dims or cuts it entirely.
- Lock screen governs access control, which means how long a session stays open before requiring re-authentication.
The two settings work in sequence, and the gap between them is where exposure lives. The threat model also looks different depending on the device. For example:
- Mobile devices sit in a different risk category than desktop workstations.
- Laptops carried between meetings, onto public transit, or into a coffee shop is exposed to environments an organization has no control over. It can be lost, left on a seat, or picked up by someone with two minutes and a curious streak. For devices in that category, short Auto-Lock intervals and strong authentication requirements are the appropriate response to the actual risk surface.
- Desktop workstations operate in a more controlled environment, which gives IT management teams more flexibility on timeout duration without meaningfully increasing exposure. That said, “controlled environment” doesn’t mean risk-free. An unlocked session on an unattended desk is still accessible to anyone who walks into the office, whether that’s a contractor, a visitor, or a colleague with the wrong intentions. A longer timeout is defensible; no timeout at all is not.
Removing the user from the equation
The deeper issue with display and lock screen settings is that leaving them to individual users doesn’t work at scale. Users optimize for convenience, not security. A five-minute lock timer gets extended to thirty, then to never, because the re-authentication friction adds up across a workday.
This is where Group Policy Objects (GPOs) and Mobile Device Management (MDM) profiles come in. On Windows, GPOs apply timeout and lock screen configurations at the machine or user level during startup and login, with periodic background refreshes that catch any manual changes. On managed Apple devices, MDM configuration profiles push the same settings to enrolled devices without requiring any action from the user. The result is a baseline that holds regardless of individual preference, and that survives the inevitable moments where someone decides their timeout setting is a personal choice instead of a security control.
» Learn more about Group Policy management with Atera
How to configure timeout and lock screen settings by OS
The navigation paths below cover the standard GUI method for each OS, followed by the command-line alternatives for teams that need more granular control or want to script configurations across multiple devices.
Windows 10
Display timeout
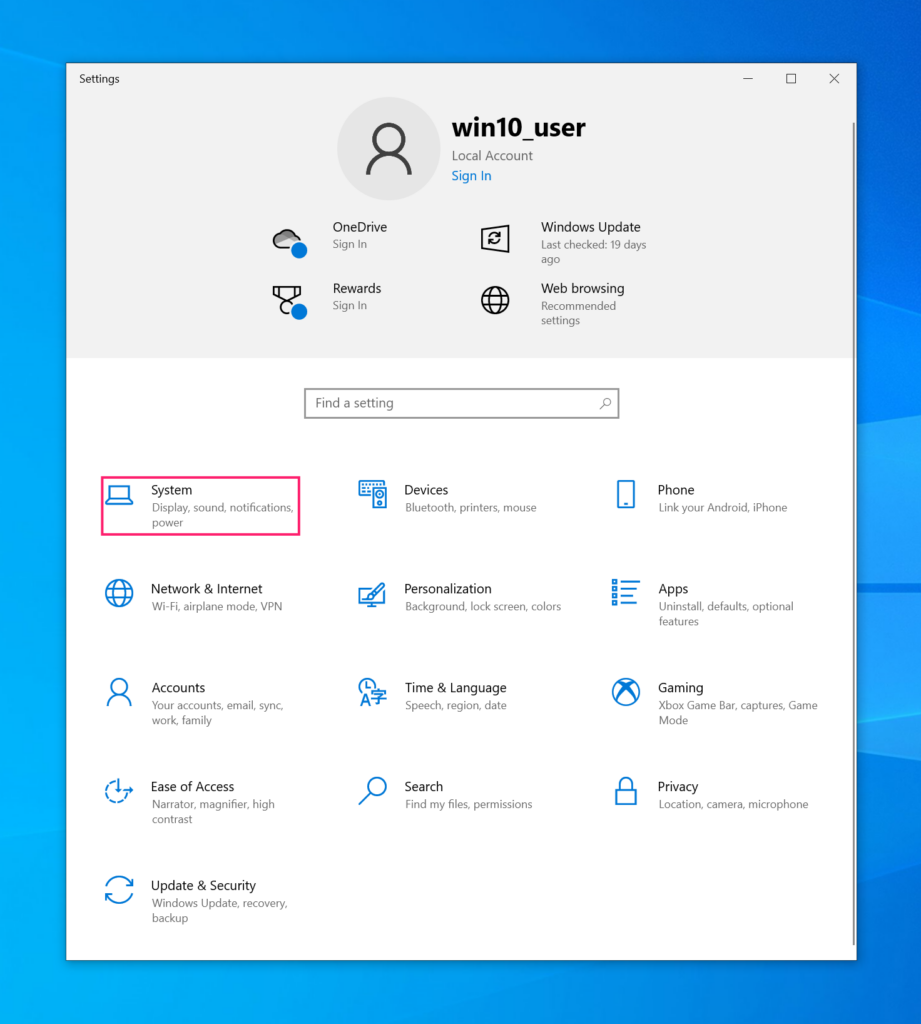
1. Open Settings by pressing Win + I
2. Go to System > Power & Sleep
3. Under the Screen section, set your preferred timeout interval using the “When plugged in, turn off after” dropdown
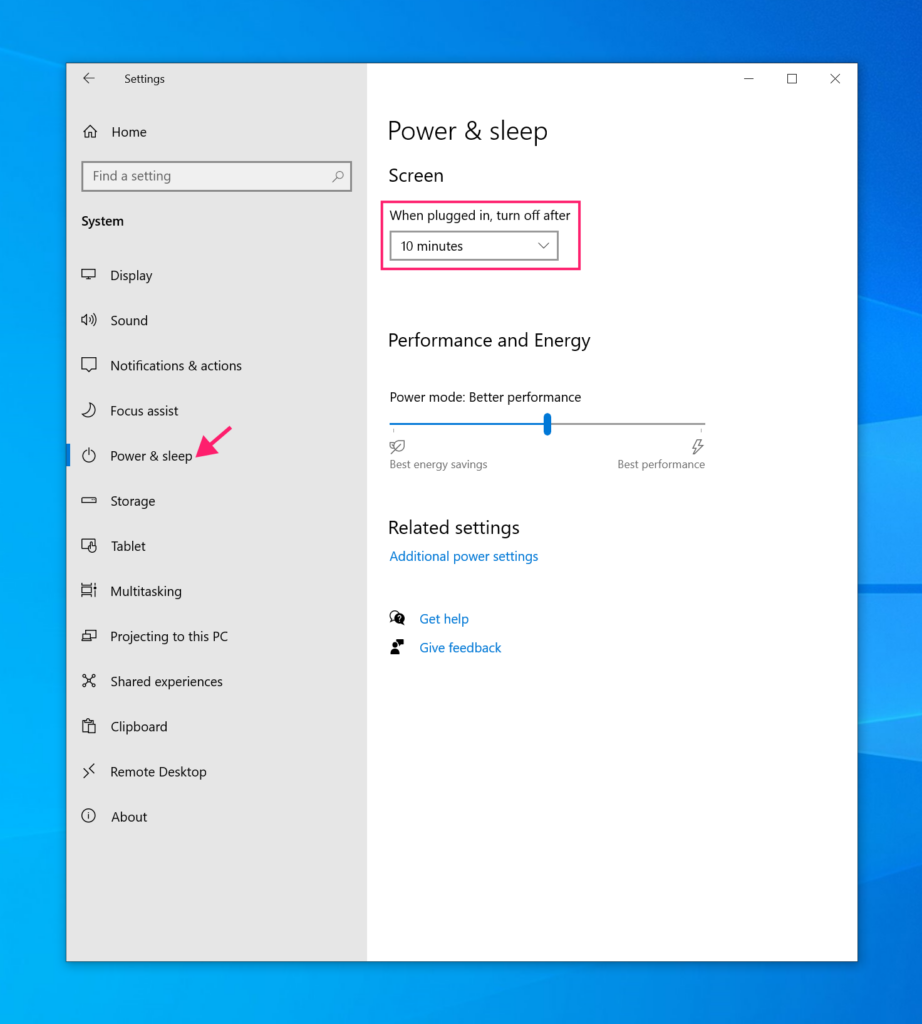
4. On battery-powered devices, a second “On battery power, turn off after” option will also appear
Lock screen
1. Open Settings by pressing Win + I
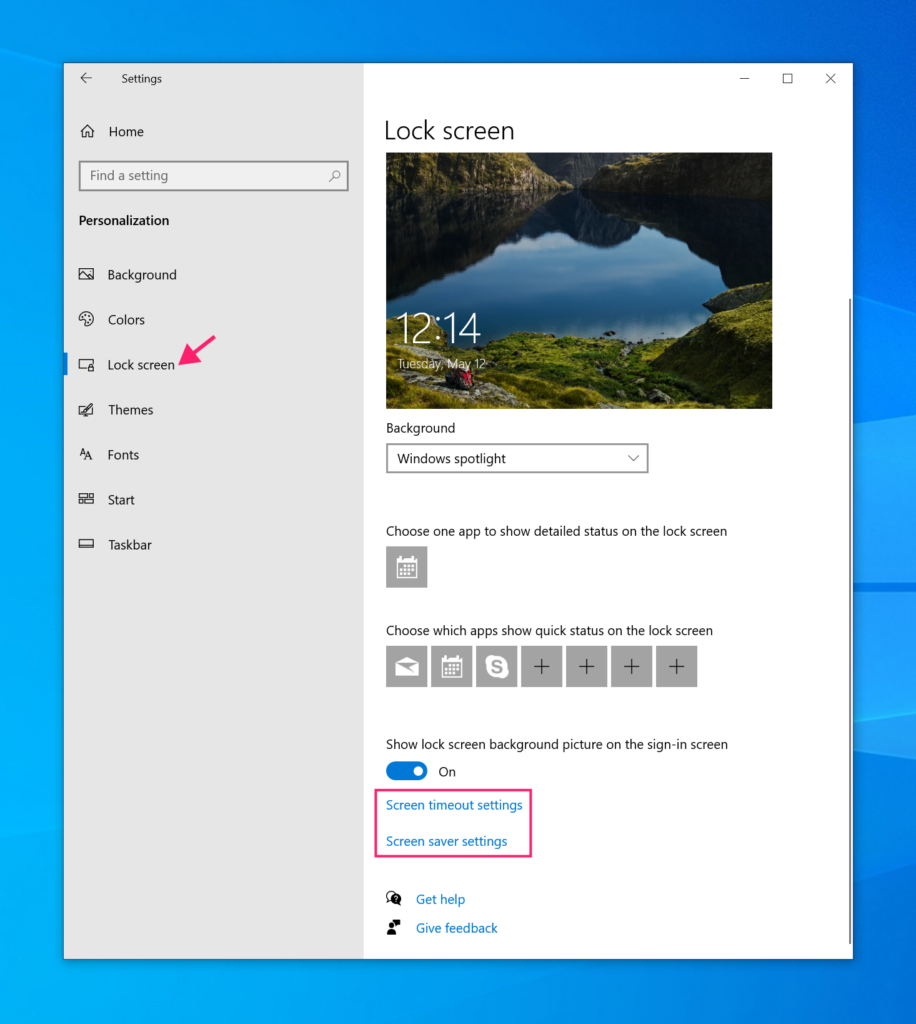
2. Go to Personalization > Lock screen
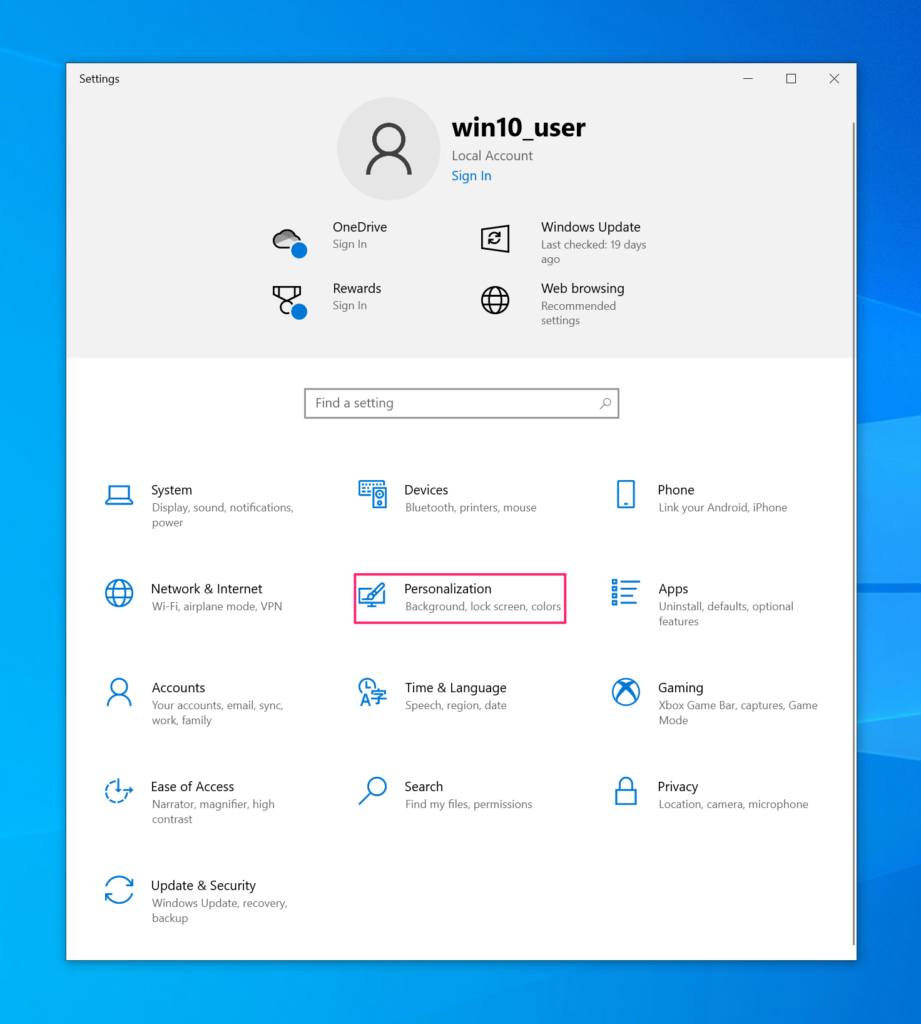
3. From here you can configure which apps display information on the lock screen and access related timeout settings via the “Screen timeout settings” link at the bottom of the page
Command line (PowerShell, run as administrator)
Use powercfg to set timeout values directly without opening the settings menu:
-
powercfg /change monitor-timeout-ac 10sets the display timeout to 10 minutes when plugged in -
powercfg /change monitor-timeout-dc 5sets the display timeout to 5 minutes on battery
Values take effect immediately and will reflect in the Power & Sleep settings panel. Full powercfg documentation is available from Microsoft.
One of the best things about PowerShell and other command-line utilities is that scripts can be scaled to work across entire environments. For example, IT managers using Atera can generate comprehensive and specific PowerShell scripts with AI Copilot , then deploy those scripts remotely to every machine using the RMM platform .
Windows 11
Display timeout
1. Open Settings by pressing Win + I
2. Go to System > Power
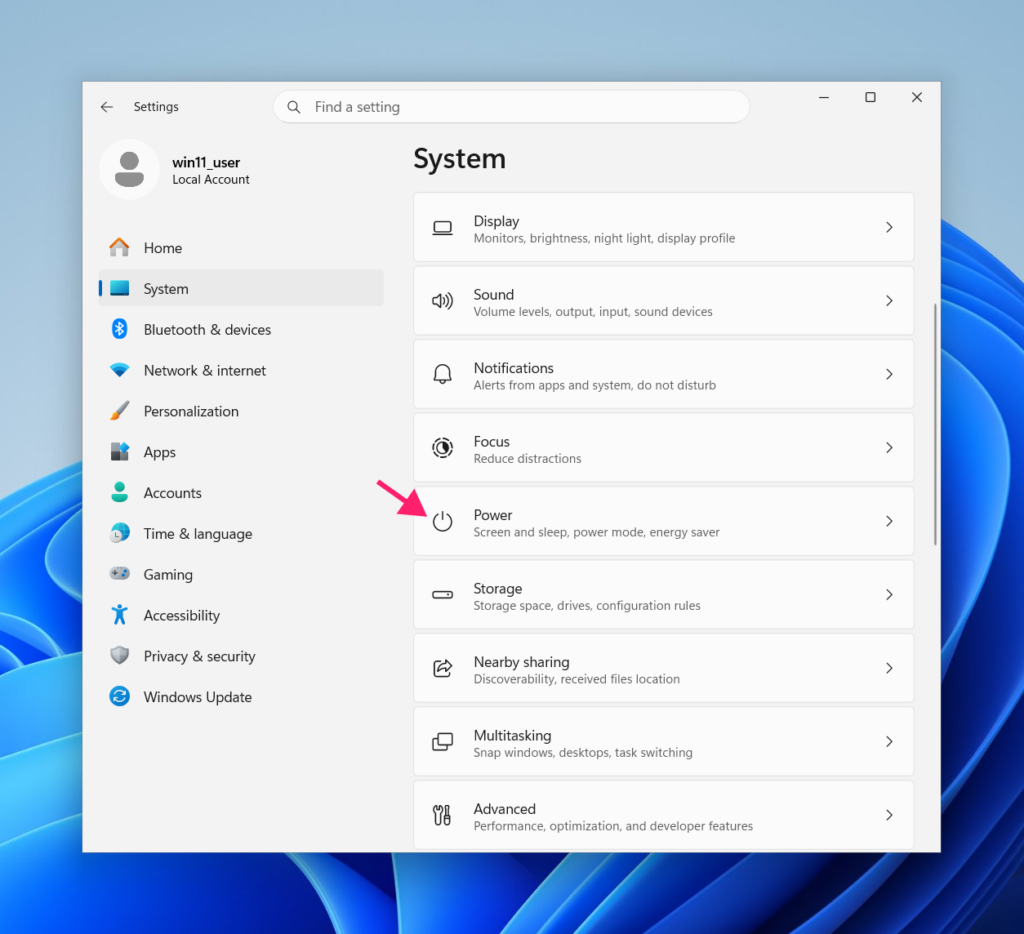
3. Expand the Screen timeout section and set your preferred interval
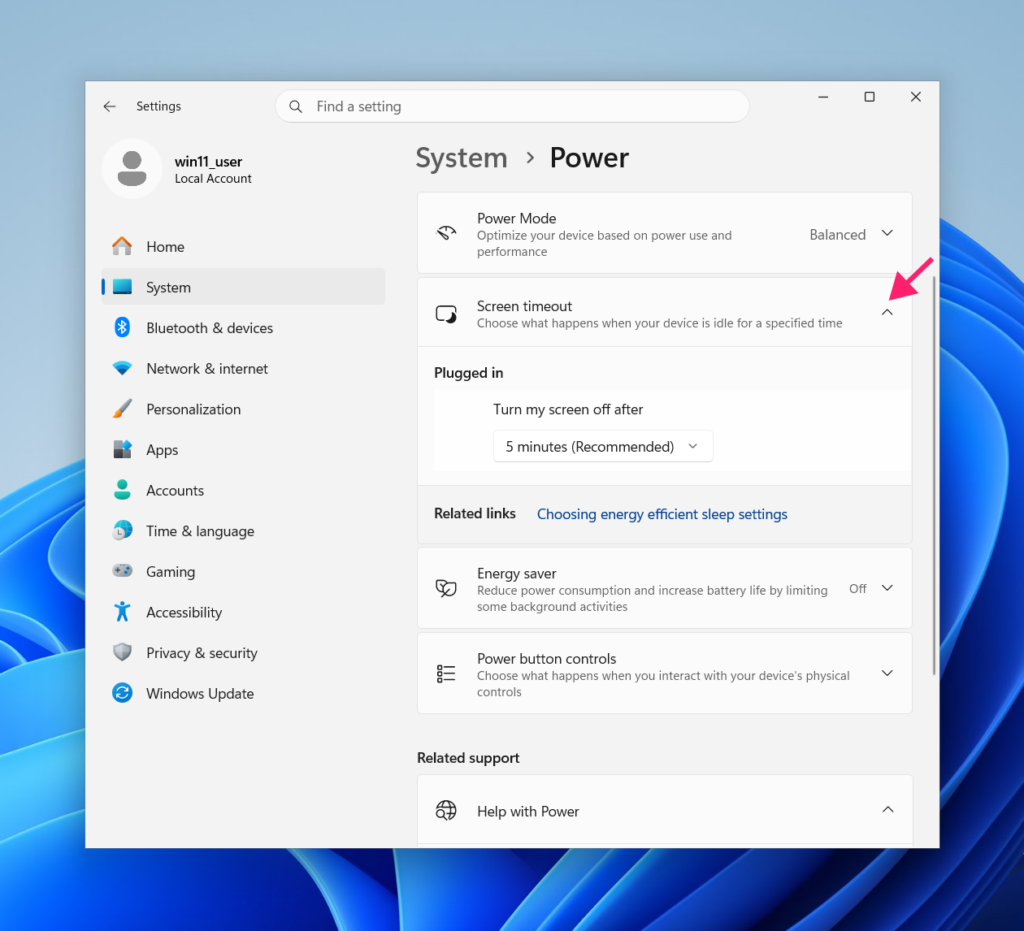
4. On battery-powered devices, an “On battery power” option will appear alongside the plugged-in setting
Lock screen
1. Open Settings by pressing Win + I
2. Go to Personalization > Lock screen
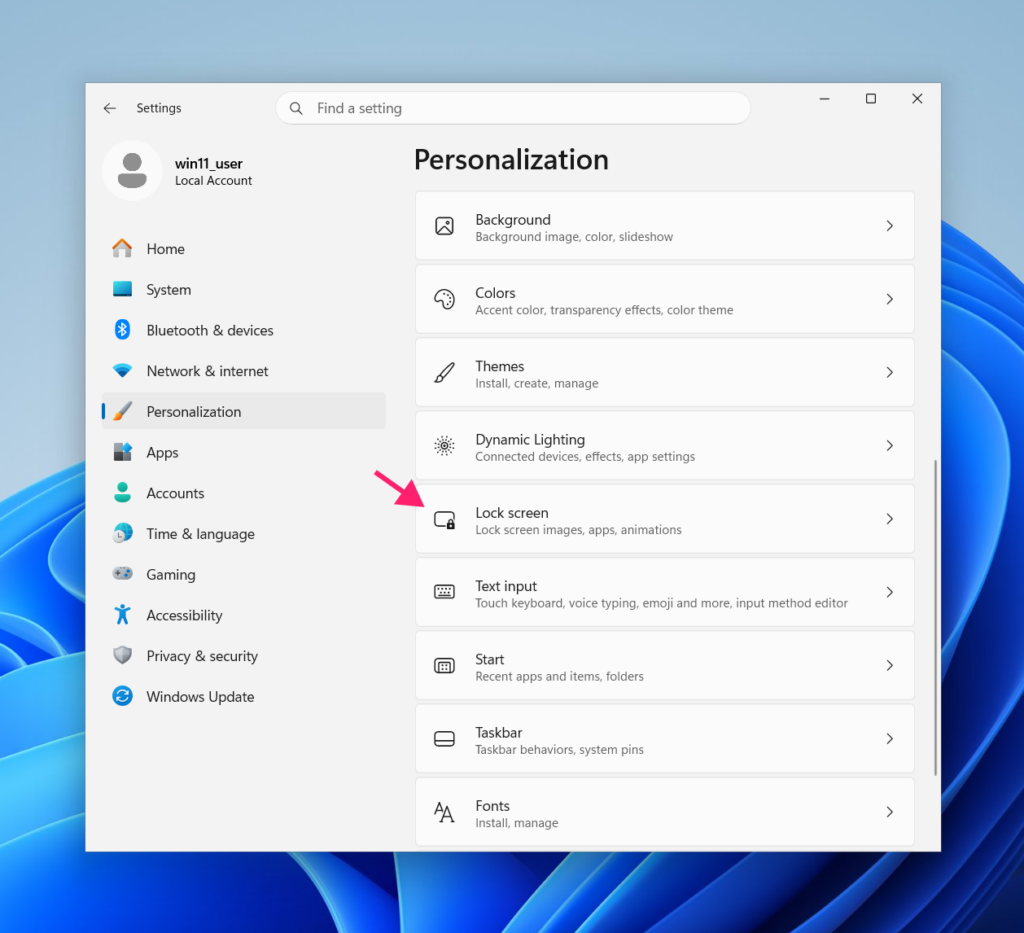
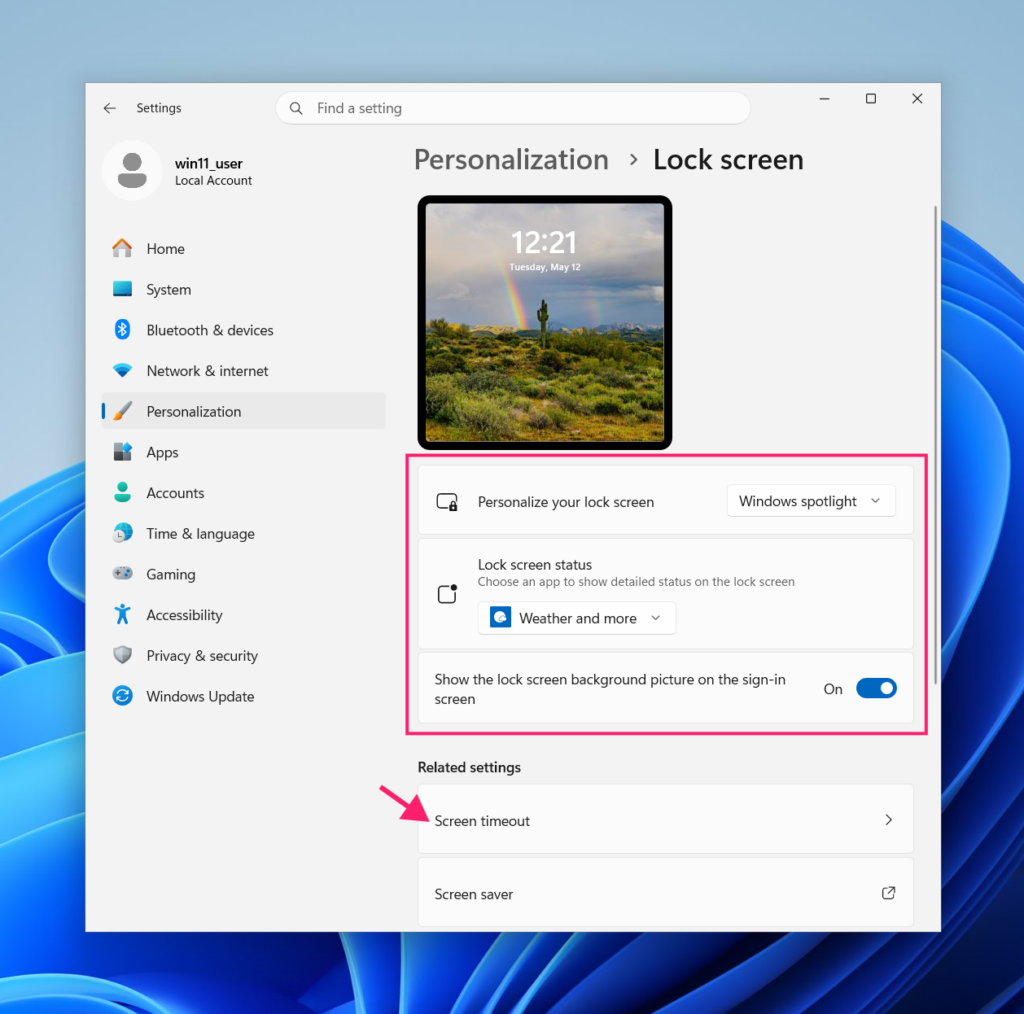
3. Scroll to Related settings at the bottom of the page and select Screen timeout to adjust the interval from here as well
Command line (PowerShell, run as administrator)
The same powercfg commands used in Windows 10 apply in Windows 11:
-
powercfg /change monitor-timeout-ac 10sets the plugged-in display timeout to 10 minutes -
powercfg /change monitor-timeout-dc 5sets the battery timeout to 5 minutes
Note: On Windows, display timeout settings are stored within whichever power plan is currently active. If the active plan switches (from Balanced to High Performance, for example, triggered automatically by a change in power source or battery level), the new plan’s timeout values take effect immediately, which can make it look like settings have changed on their own.
Battery Saver mode on Windows adds a wrinkle here. It isn’t a full power plan, it’s a performance overlay that adjusts CPU behavior to reduce consumption. It doesn’t directly modify display timeout values, so if your timeout appears to be ignoring Battery Saver, that’s expected behavior rather than a misconfiguration.
macOS
Display timeout and lock screen
Both settings live in a single panel on macOS, which keeps configuration straightforward:
1. Open System Settings
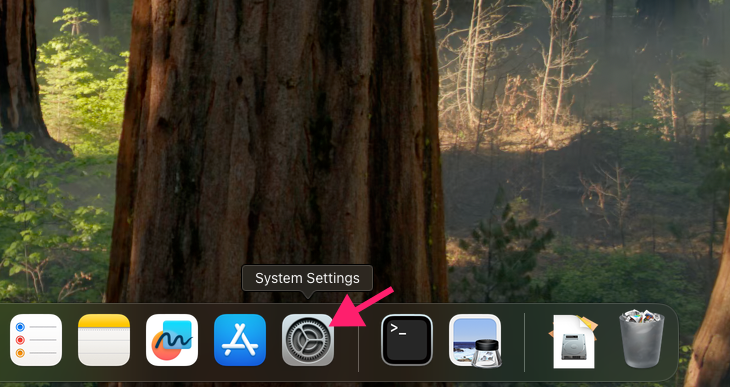
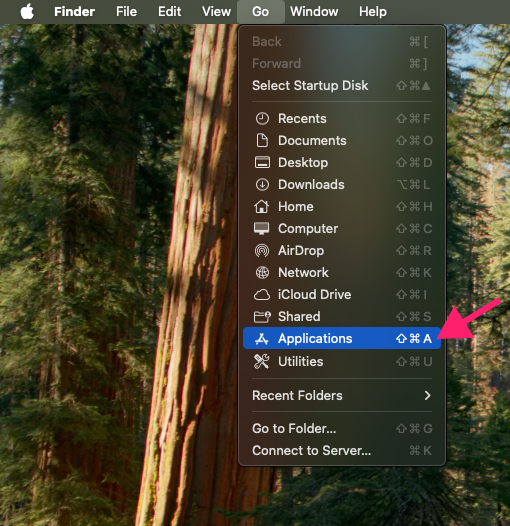
2. If it’s not in your Dock, go to the top menu bar and select Go > Applications > System Settings
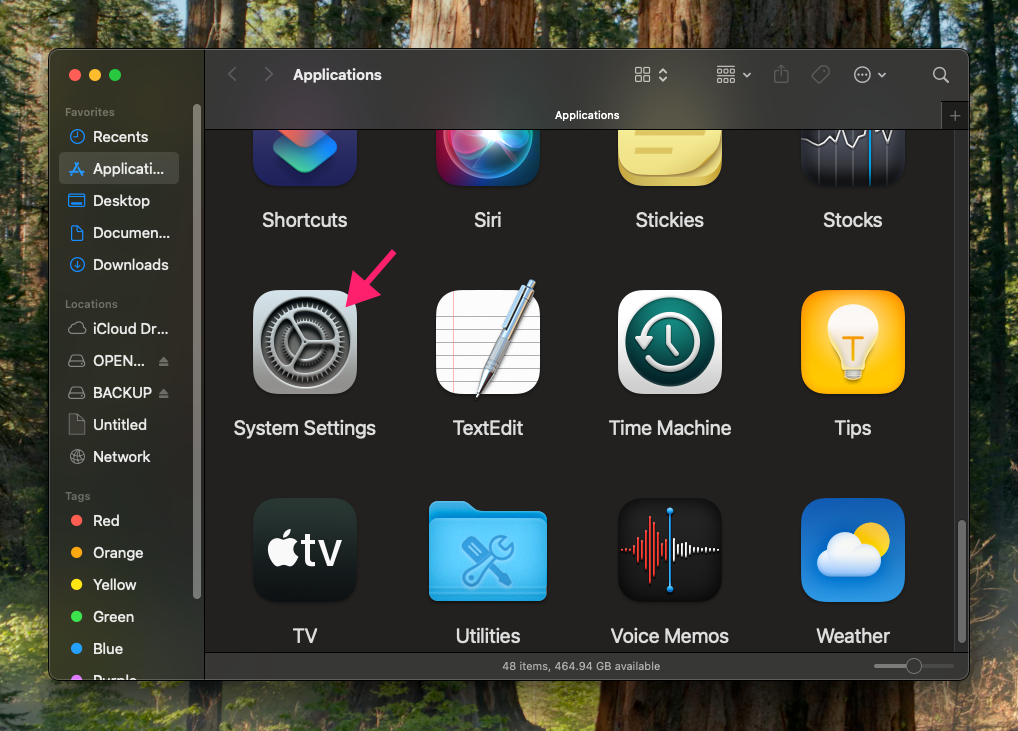
3. In the left sidebar, select Lock Screen
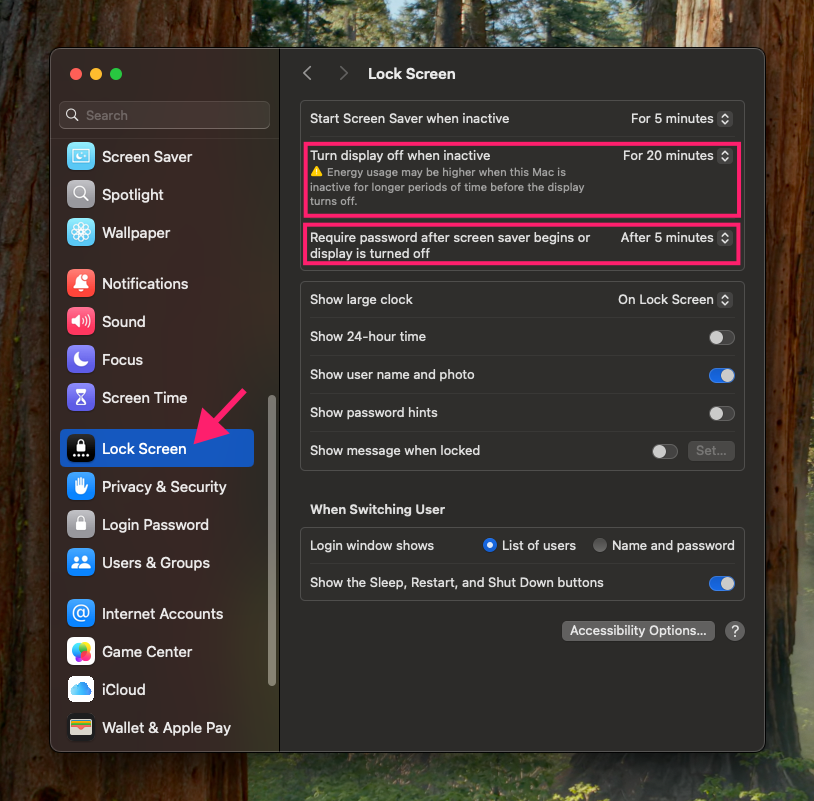
Three settings are relevant here:
- “Start Screen Saver when inactive”: Controls the screen saver delay.
- “Turn display off when inactive”: Controls the display timeout.
- “Require password after screen saver begins or display is turned off”: Sets the grace period before a password is required. Set this to “Immediately” for highest security.
Command line (Terminal)
Use pmset to read or set display sleep values:
-
sudo pmset -gdisplays all current power settings -
sudo pmset -a displaysleep 10sets the display sleep timeout to 10 minutes across all power sources
Full pmset documentation is available via man pmset in Terminal.
iPhone (iOS)
Auto-Lock (display timeout)
1. Open Settings
2. Go to Display & Brightness > Auto-Lock
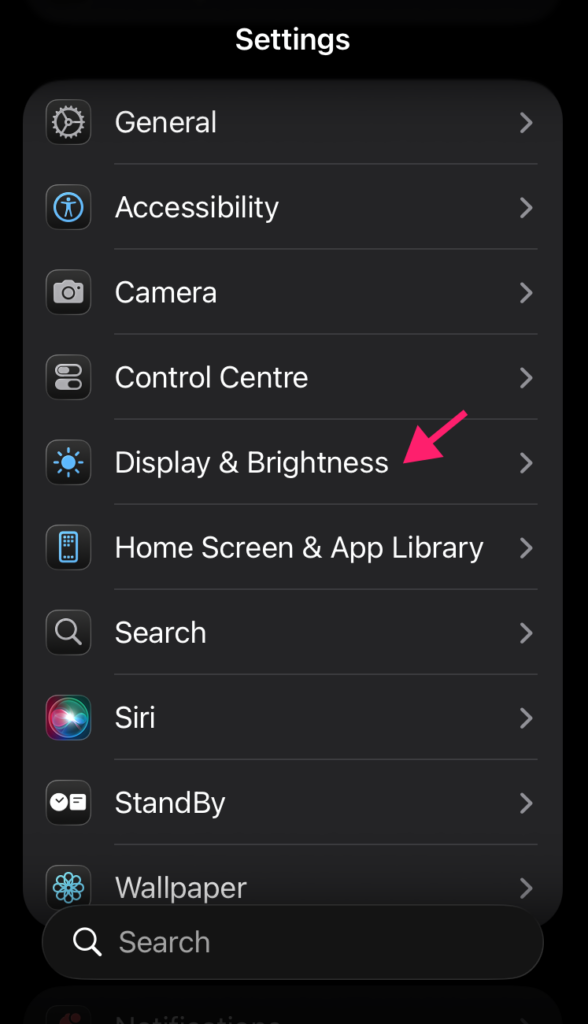
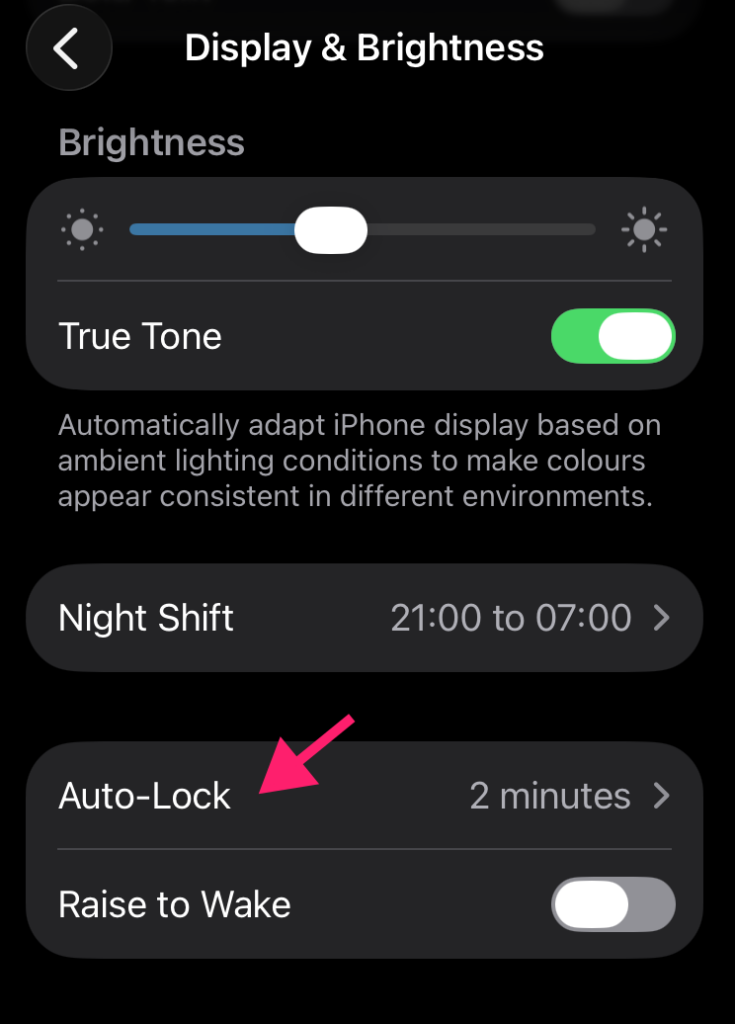
3. Select your preferred interval; options range from 30 seconds to 5 minutes, plus “never” (not recommended on managed devices)
Face ID/Touch ID and Passcode
1. Open Settings
2. Go to Face ID & Passcode (or Touch ID & Passcode, depending on the device model)
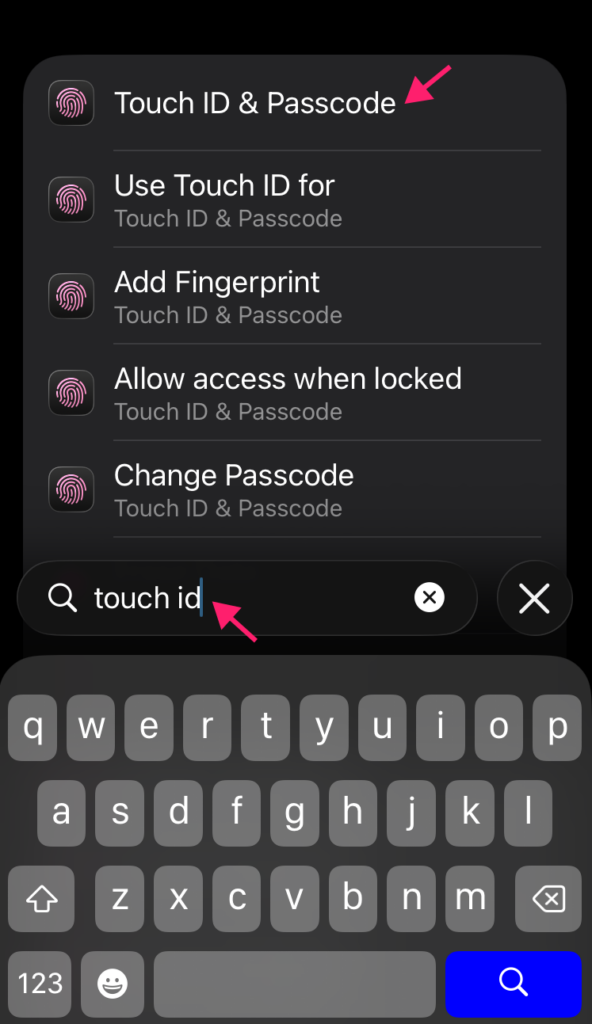
3. Enter your passcode to access lock screen configuration options
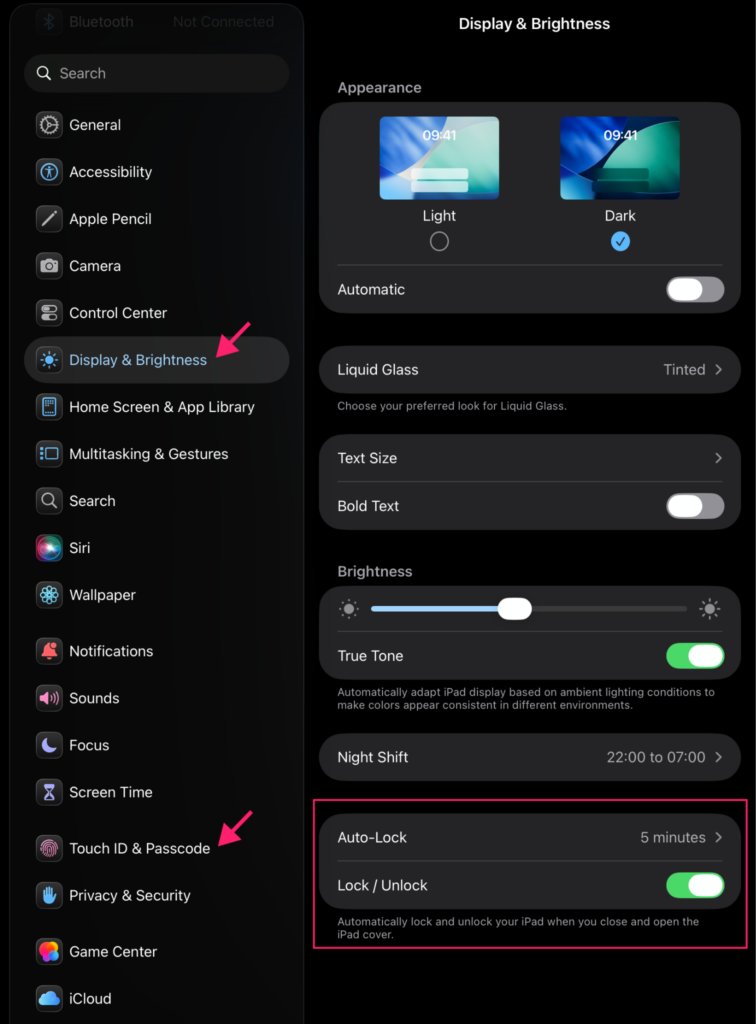
Note: The navigation path on iPads is identical to iPhone. The visual difference is that the iPad uses a persistent two-column sidebar layout rather than the full-screen stack navigation on iPhone, so Display & Brightness and Touch ID & Passcode appear in the left panel with settings loading on the right. The Auto-Lock setting appears directly within the Display & Brightness panel on iPad, alongside a “Lock/Unlock” toggle for devices using a compatible cover.
Android
Android provides a consistent baseline framework for these settings, but menu names and hierarchy vary significantly depending on the device manufacturer and UI layer (Samsung One UI, Google Pixel UI, OnePlus OxygenOS, and so on).
These paths reflect standard Android:
Screen timeout
1. Open Settings
2. Go to Display > Screen timeout
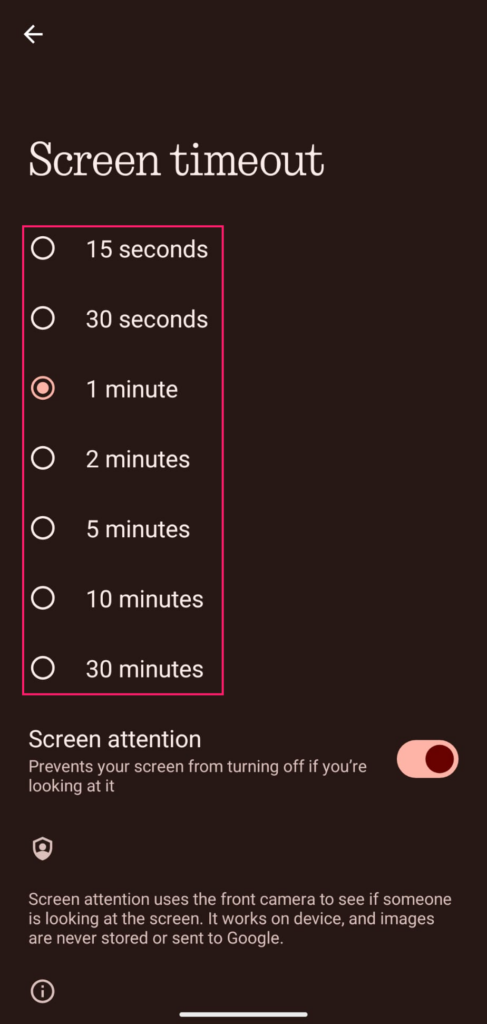
3. Select your preferred interval. The Settings search box can locate this panel directly if the menu path differs on your device
Lock screen
1. Open Settings
2. Go to Security > Screen lock (some manufacturers label this Device unlock)
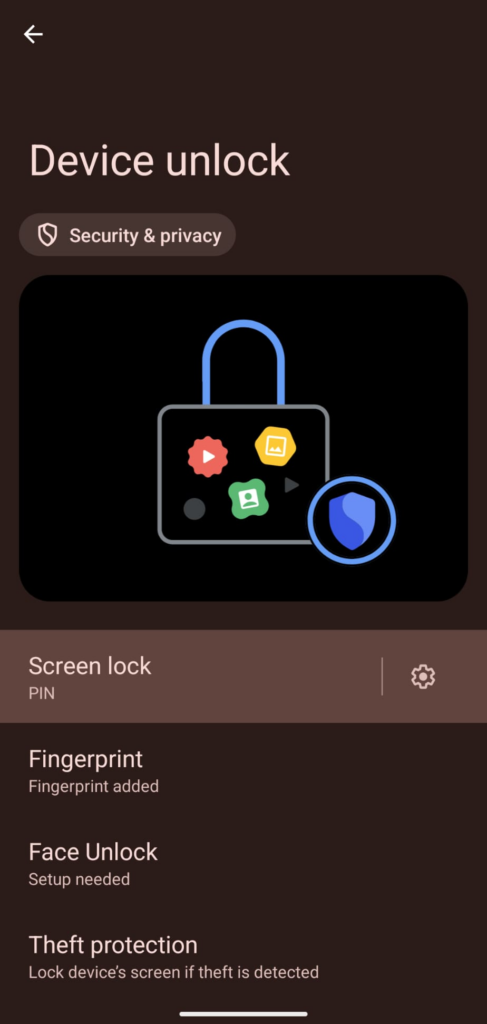
3. Configure your preferred lock method and associated settings
Linux Mint
Linux Mint uses two separate panels to control display timeout and lock behavior, and both need to be configured to get the intended result.
Screensaver (timeout and lock settings)
1. Open System Settings from the application menu or taskbar
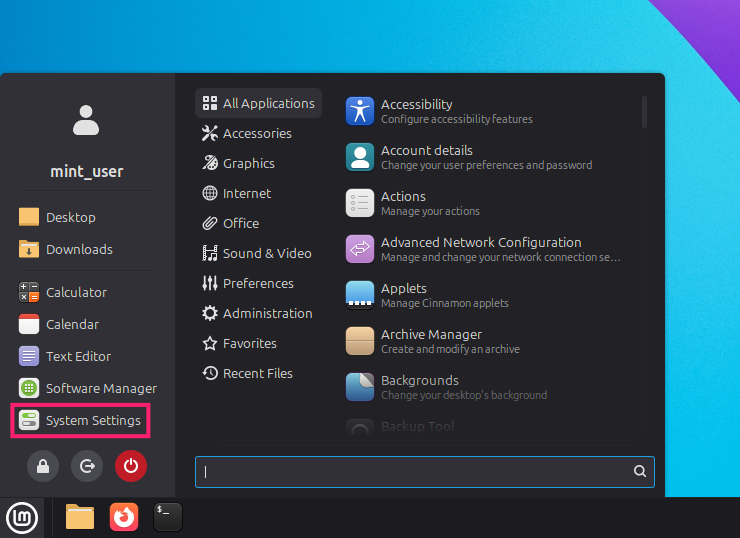
2. Under Preferences, select Screensaver
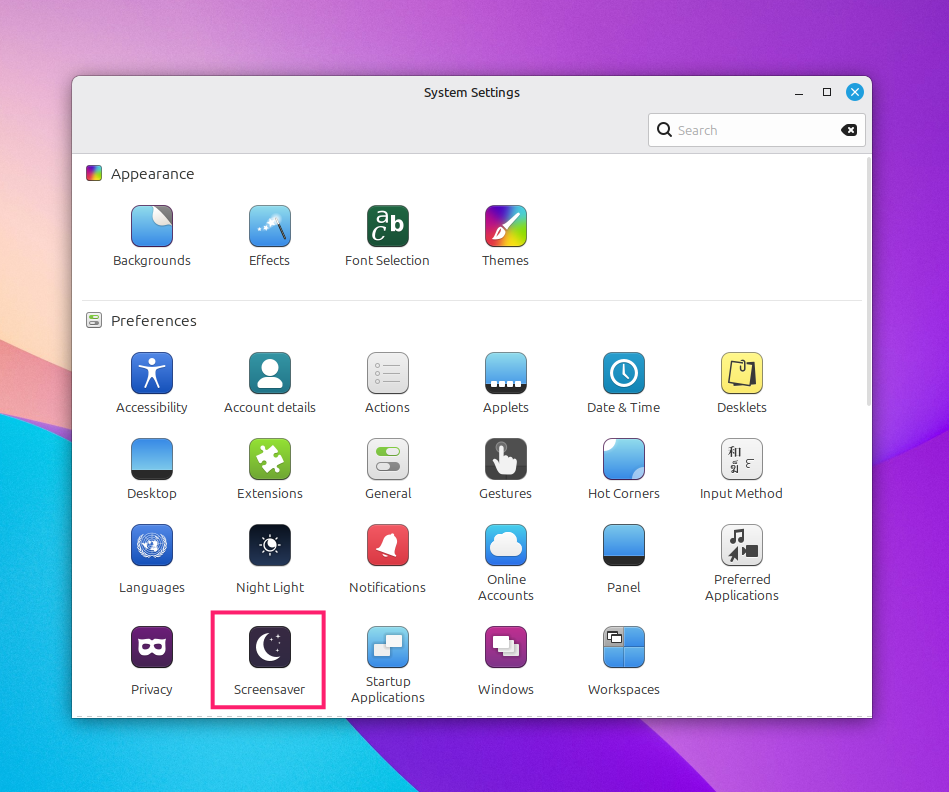
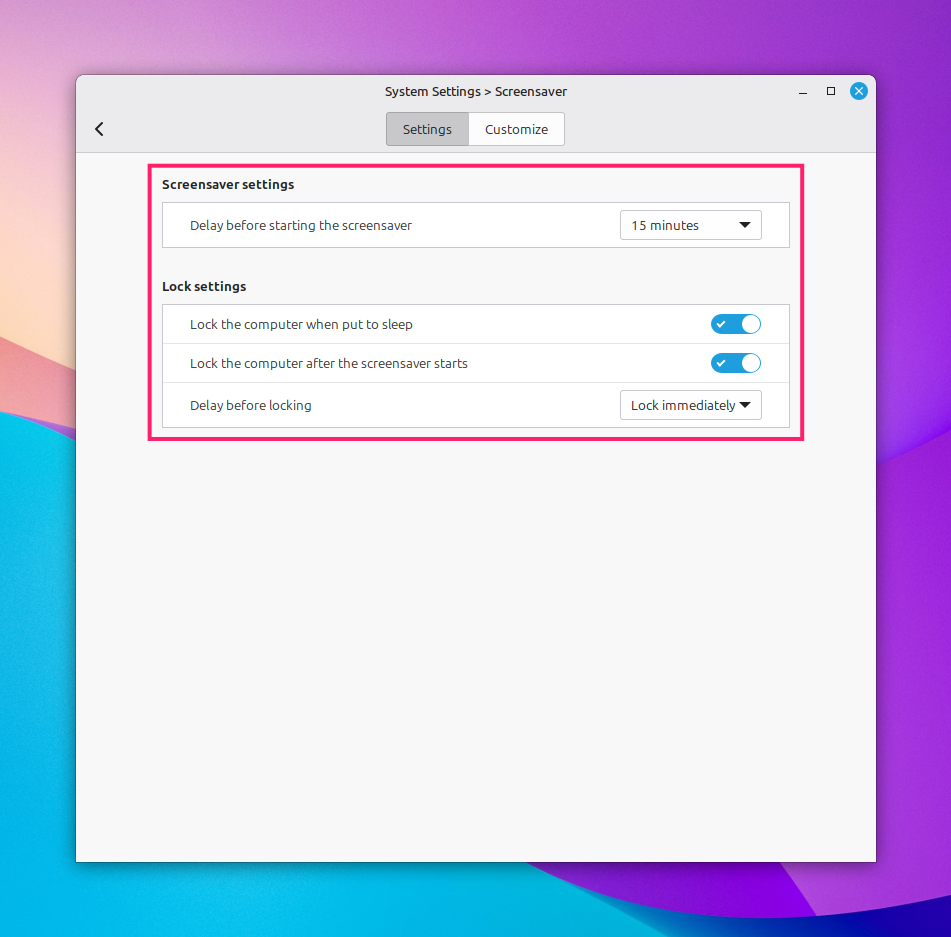
3. In the Settings tab, configure:
- “Delay before starting the screensaver”: Controls how long before the screensaver activates.
- “Lock the computer after the screensaver starts”: Toggle this on to require authentication on wake.
- “Delay before locking”: Sets the grace period between screensaver activation and lock enforcement.
Power Management (display timeout)
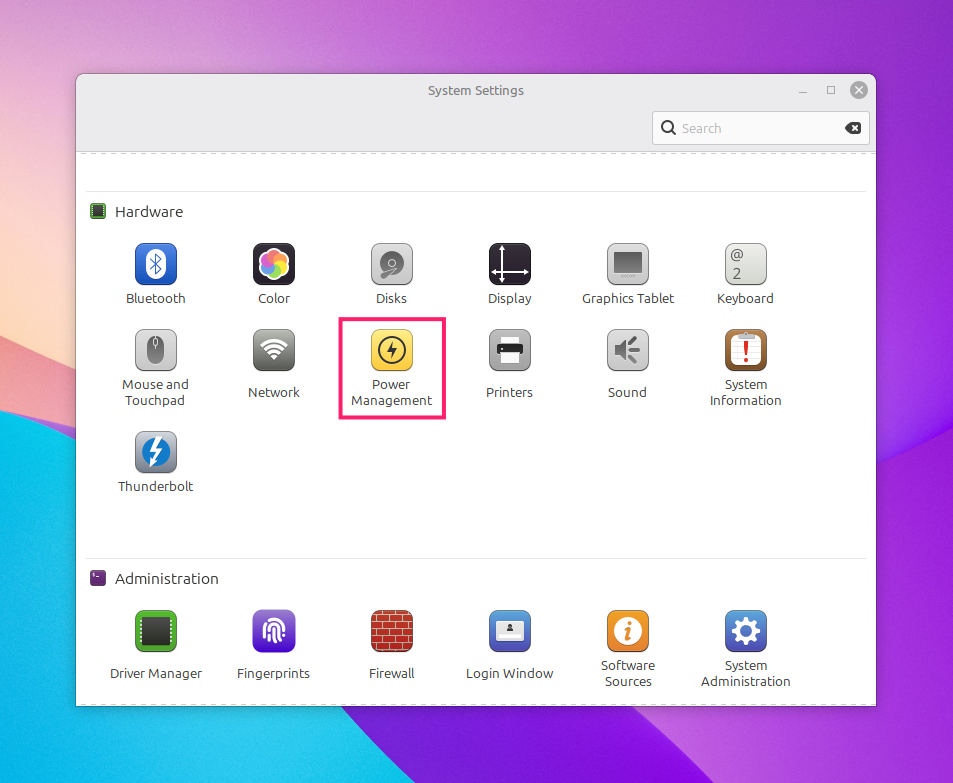
1. Open System Settings
2. Under Hardware, select Power Management
3. Set “Turn off the screen when inactive for” to your preferred interval
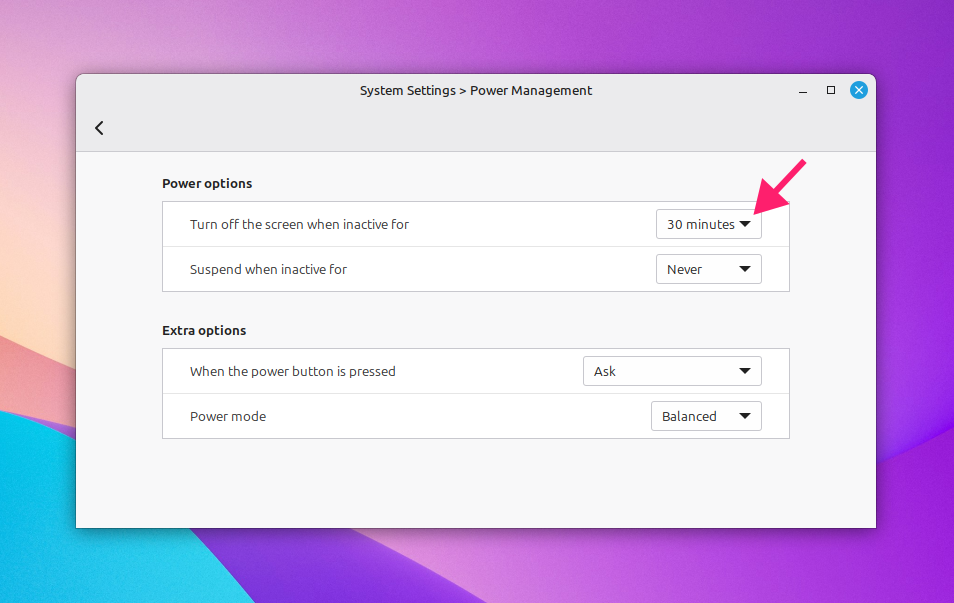
4. On battery-powered devices, separate battery and AC settings may be available.
Command line (Terminal)
Use gsettings to read and set power management values directly:
-
gsettings list-recursively org.cinnamon.settings-daemon.plugins.powerlists all available keys in the power schema. -
gsettings get org.cinnamon.settings-daemon.plugins.power sleep-display-acshows the current AC display timeout value. -
gsettings set org.cinnamon.settings-daemon.plugins.power sleep-display-ac 600sets the display timeout to 10 minutes on AC power (values are in seconds).
GUI elements may not update to reflect non-standard values set via gsettings . Full documentation is available via man gsettings in Terminal.
Note: AC and battery timeout values are stored as separate GSettings keys and read independently by the power daemon. All power-based actions chain downstream from the session idle timer, so a conflict between those values can produce inconsistent behavior depending on whether the device is plugged in.
Timeout settings are a security control, not a preference
Display timeout and lock screen settings are easy to overlook precisely because they feel too simple to matter. They’re not a firewall, not an EDR policy, not a zero-trust architecture decision. They’re just a number in a dropdown. But they’re also the last line of defense when a device gets left unattended, and in environments where physical access is relatively open, that matters more than most teams give it credit for.
For IT teams and MSPs managing devices at scale, the individual navigation paths in this guide only go so far. What enforces these settings consistently, and keeps them from reverting after a major OS update, is centralized policy, whether that’s Group Policy, MDM, or a platform like Atera that lets you monitor device compliance and deploy configuration scripts without touching each machine individually.
Frequently Asked Questions
Related Articles
How to set up secure printing across your organization
A secure print checkbox protects exactly one moment in a document's life. Everything else, from unencrypted traffic and unhardened devices to payroll printouts forgotten in a tray, stays exposed. Real secure printing covers the whole lifecycle: release policy, authentication, encryption, hardening, and a fleet that stays monitored long after rollout.
Read now
How to reduce alert fatigue in healthcare IT
In a hospital, a dismissed alert isn't a delayed ticket. It can be a patient deteriorating while the monitor keeps sounding. Cutting alert volume won't fix that on its own, and switching alerts off can make it worse.
Read now
How to prevent configuration drift across your IT infrastructure
Configuration drift rarely breaks anything the day it happens. It hides in a hotfix, a reset default, or a vendor installer, then surfaces weeks later as a failure nobody can trace. Stopping it means defining exactly what approved looks like, closing every side door into production, giving each setting one owning tool, and checking that the baseline itself hasn't gone stale.
Read now
How to reduce alert fatigue across your IT team
Your technicians aren't ignoring alerts because they're careless. They're ignoring them because most alerts have taught them to. Once the stream stops being trustworthy, real failures slip past with the noise. Fixing it means deciding what deserves an interruption, tuning out transient spikes, collapsing alert storms, and automating the fixes you've run a hundred times.
Read nowEndless IT possibilities
Boost your productivity with Atera’s intuitive, centralized all-in-one platform









