
Table of contents
Generate summary with AI

Persistent blue screen crashes tied to system drivers can disrupt operations and stall productivity across your entire network infrastructure. When the core DirectX Graphics Kernel Subsystem encounters an unhandled violation, Windows proactively triggers a full system reboot to protect data integrity. Pinpointing whether the failure stems from an unstable vendor driver, conflicting software, or physical hardware requires a methodical isolation approach.
By utilizing native Windows utilities and structural diagnostics, you can accurately uncover the root cause behind these critical system interruptions. In this blog, we’ll cover how to analyze crash dumps and implement advanced remediation steps to stabilize your environment.
» Here’ s how to solve common IT issues
What is the dxgkrnl.sys file?
The dxgkrnl.sys file is the core system driver for the DirectX Graphics Kernel Subsystem in Windows. It implements the Windows Display Driver Model (WDDM) kernel subsystem, serving as the essential link between user-mode graphics applications and your vendor-specific GPU drivers.
Because it operates within highly privileged kernel space (Ring 0), it shares memory space with other core operating system components.
When an unhandled exception or system violation occurs within this layer, the failure can’t be safely isolated to a single application. To protect overall data integrity and prevent widespread memory corruption, Windows intentionally triggers Bug Check 0x113 (VIDEO_DXGKRNL_FATAL_ERROR), forcing a full system reboot.
Specific system conditions that force this fatal error include:
- Driver protocol violations: Occur when an unexpected deferred destruction happens, meaning a GPU object was destroyed while still being actively referenced by the kernel scheduler.
- Timeout detection and recovery (TDR) failures: When the GPU stops responding, Windows attempts to reset the graphics driver in the background. If the driver fails to respond to this reset request within a specific time window, or triggers consecutive recovery scenarios, the kernel escalates the issue to a fatal crash.
- Hybrid graphics power state transitions: Failures or excessive delays during the handshake sequence when the system attempts to transition workloads from an integrated GPU to a dedicated one.
- Guardrail violations by third-party drivers: Occur when a vendor kernel-mode driver executes unauthorized calls or triggers a page fault in non-pageable memory within the shared graphics subsystem.
» Find out how to update drivers on PC
Step-by-step diagnostic isolation procedures
To isolate a dxgkrnl.sys BSOD and determine if the root cause is a software conflict or failing hardwareS, use these native troubleshooting steps:
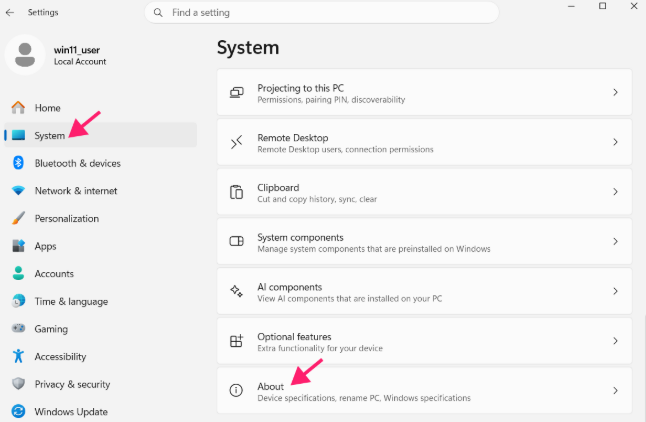
1. Enable memory dump generation by pressing Win + I to open Settings > System > About
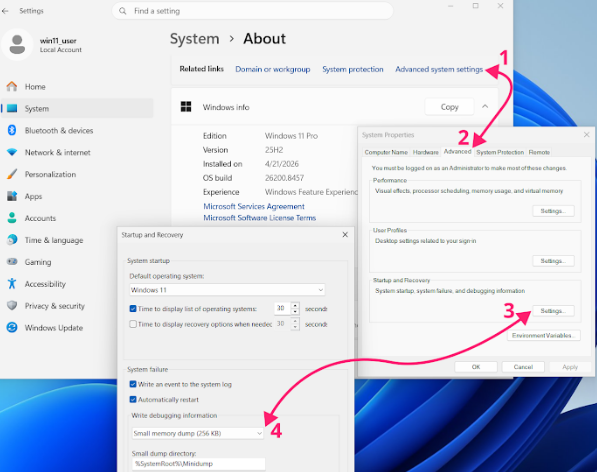
2. Click the Advanced system settings button, navigate to the Advanced tab and press the Settings button corresponding to the Startup and Recovery section
3. Install WinDbg (a debugger that can be used to analyze crash dumps)

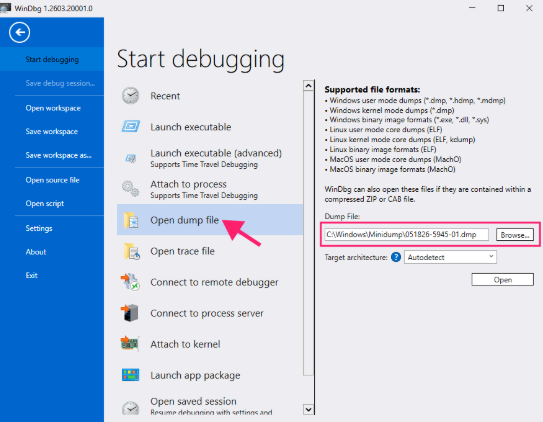
4. Launch WinDbg and go to File > Open dump file, browse to C:\Windows\Minidump, and select your file
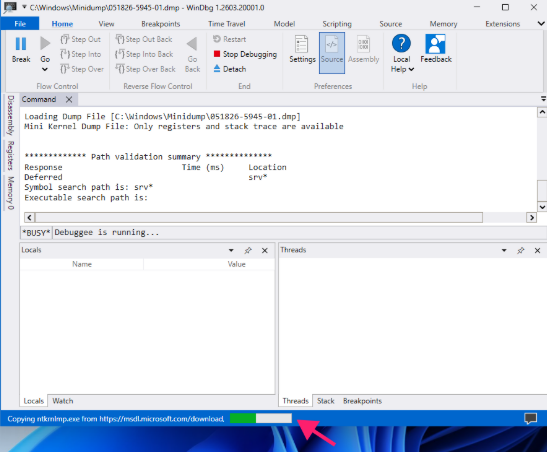
5. Wait for the status bar to finish downloading required resources
6. Run !analyze -v to analyze the dump file
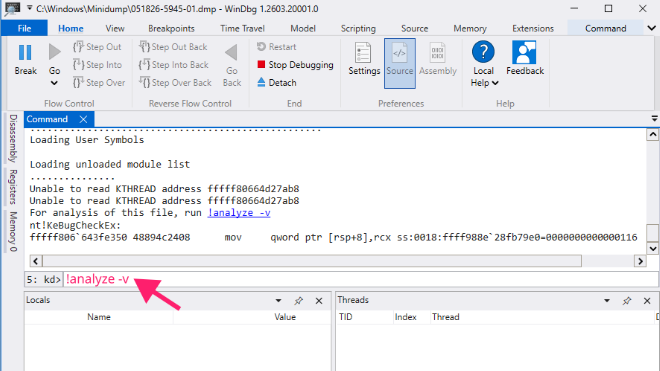
7. Inspect the report
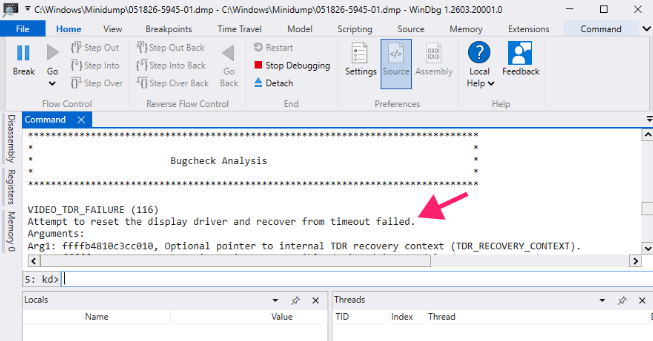
» Looking for specific software? Here are the best driver updater software options
The extreme dangers of manual file replacement
Attempting to fix this error by downloading a replacement dxgkrnl.sys file from a third-party website introduces severe stability and security implications:
- Unrestricted kernel access: Because this subsystem operates in Ring 0, a compromised or malicious third-party file gains unrestricted access to system memory, enabling deep rootkit or malware injection.
- Boot loops: Modern Windows security enforces strict kernel-mode code signing policies. An unverified or altered file will fail cryptographic signature verification, preventing the operating system from booting at all.
- Component store desynchronization: Bypassing native OS repair tools like System File Checker (SFC) and Deployment Image Servicing and Management (DISM) breaks the integrity of the Windows Component Store (WinSxS), rendering native validation mechanisms unreliable for future updates.
» Here’s how to disable Windows updates and manually re-enable Windows updates
Advanced system remediation strategies
When kernel-level graphics exceptions threaten infrastructure stability, you must deploy targeted technical fixes to eliminate driver conflicts, hardware instability, and power state mismatches.
Method 1: Clean graphics driver wipe via DDU
When to use: Use this when a standard driver update fails, or when corrupted registry keys and leftover driver fragments cause persistent dxgkrnl.sys conflicts.
Follow these steps:
1. Navigate to your GPU manufacturer’s official website and download the display drivers for your specific GPU without installing them yet
2. Navigate to Display Driver Uninstaller’s official website and download the removal tool
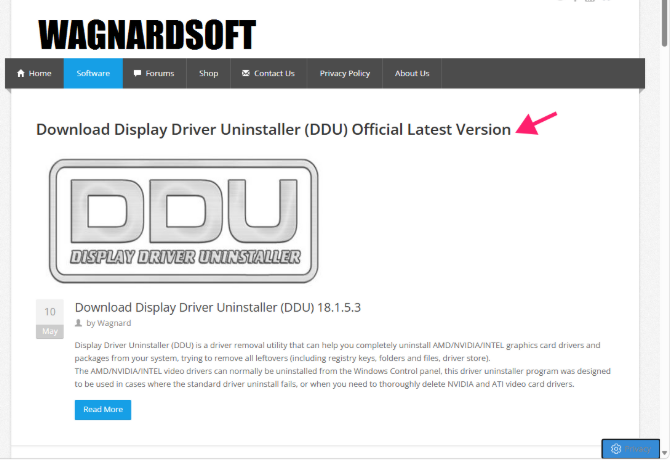
3. Double-click the downloaded exe file and extract it to your preferred location
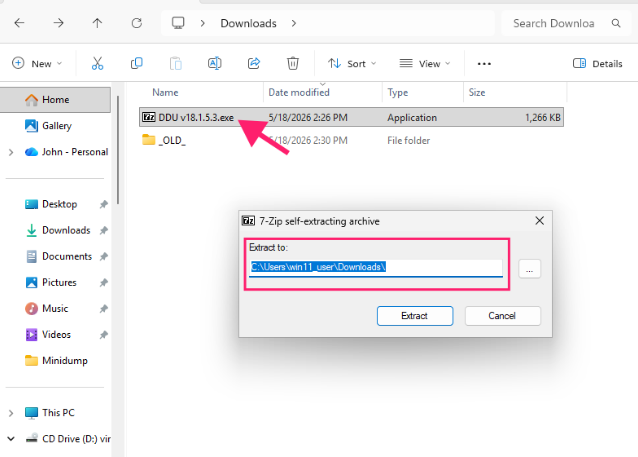
4. The first time you launch DDU you will be prompted with an options dialog. Check the Enable Safe Mode dialog and restart DDU
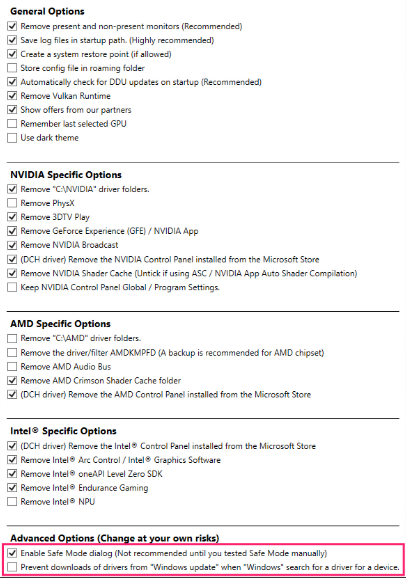
Tip: You can also check the Prevent Downloads of drivers from “Windows update” options to stop Windows from automatically downloading GPU drivers
5. The next time you launch DDU, select Safe Mode in the Launch option section and click Reboot to Safe Mode
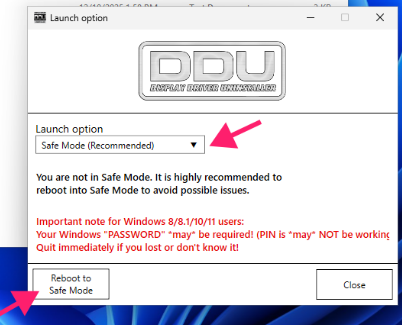
6. You may be prompted to enter your BitLocker recovery key if BitLocker drive encryption is enabled
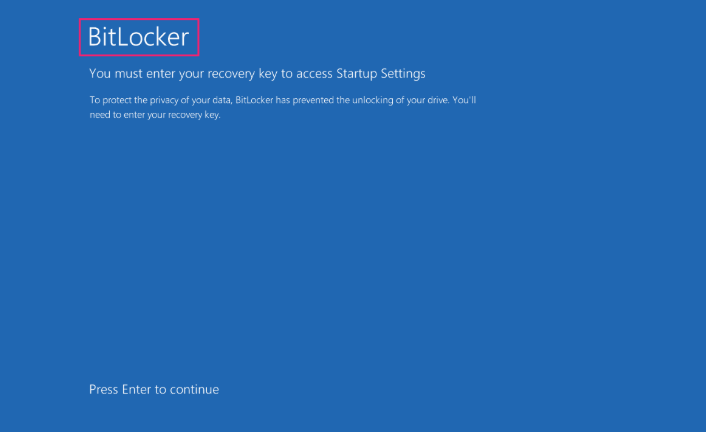
7. Press Win + I to open Settings and go to Privacy & security > Device encryption > BitLocker drive encryption (under Related settings)
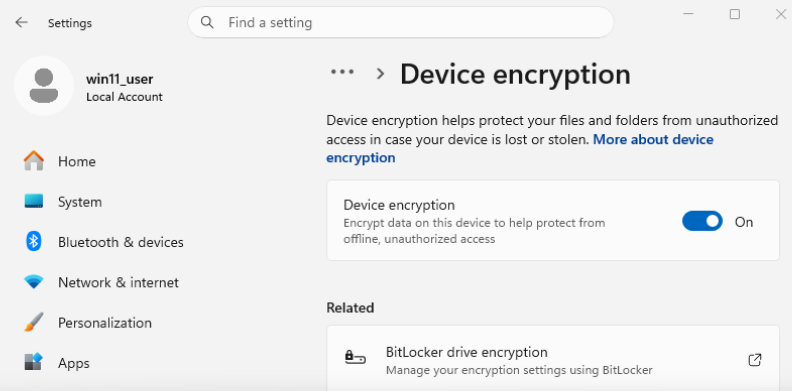
8. Select Suspend protection. This temporarily pauses encryption until the next restart, preventing BitLocker recovery prompts during the process
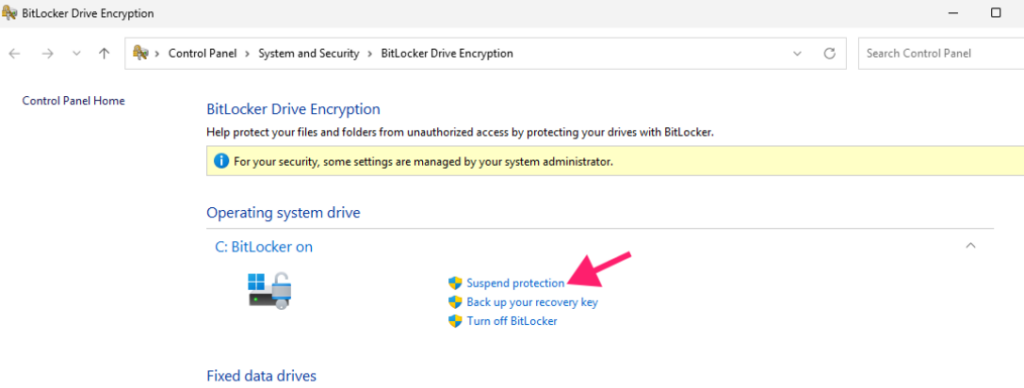
Take note: If you haven’t enabled the option to block automatic driver downloads from Windows Update, disconnect from the internet before continuing. This prevents Windows from reinstalling a broken or older GPU driver during cleanup. If you used DDU to reboot into Safe Mode, it’ll launch automatically. If not, go to the folder where you extracted DDU and open it manually.
9. In DDU, select your GPU type (NVIDIA / AMD / Intel)
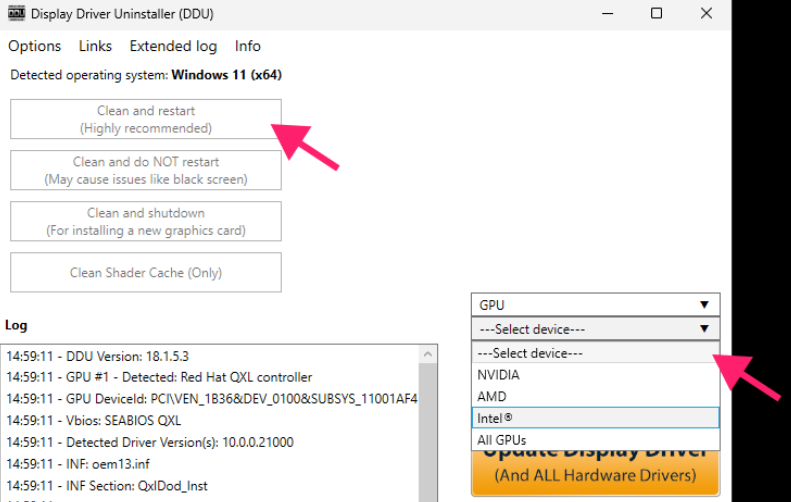
10. Click Clean and restart. This removes all existing graphics drivers and restarts your PC with a clean baseline
11. Before connecting to the internet, install the graphics drivers your downloaded in step 1
» Here’s how to restart a remote computer using Windows
Method 2: Disable Hardware-Accelerated GPU Scheduling (HAGS)
When to use: Use this when immature or unstable vendor driver implementations cause high-frequency context switching errors or incomplete handshakes in the kernel scheduler.
Follow these steps:
1. Press Win + I to open Settings > System > Display
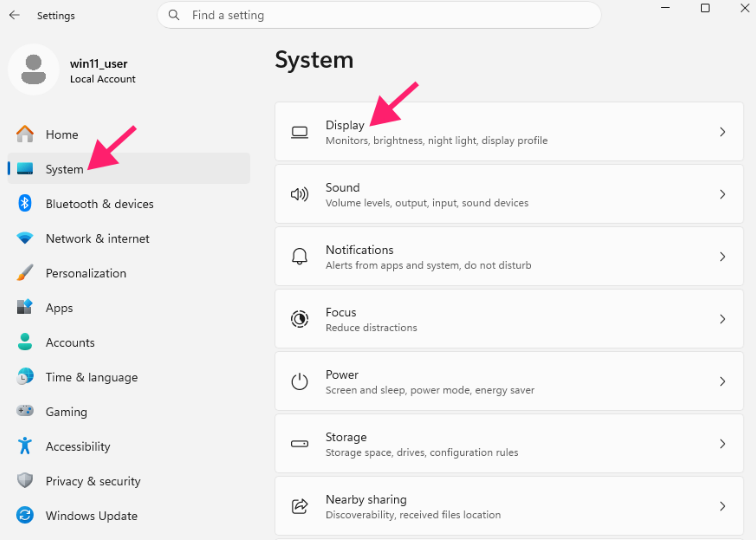
2. Select Graphics
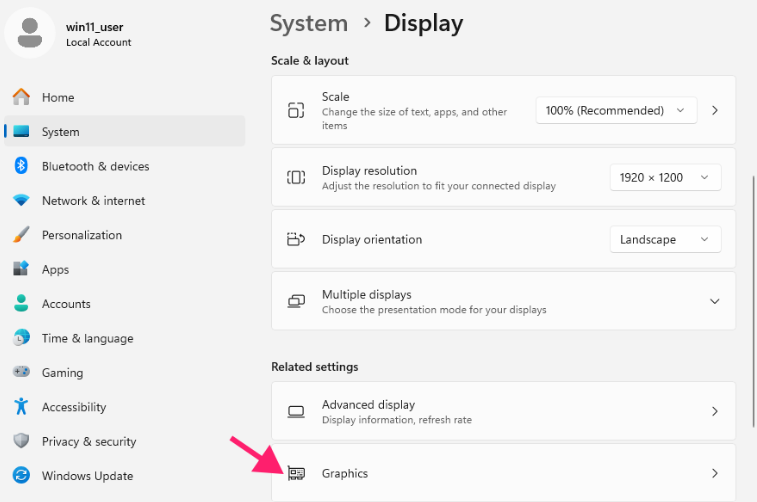
3. Click the Change default graphics settings link
Take note: This UI option will only appear if both your GPU and driver natively support WDDM hardware scheduling)
4. Toggle Hardware-Accelerated GPU Scheduling to Off and restart your system for the change to take effect
» Here are the best hardware monitoring software to keep a close eye on your GPU performance
Method 3: Natively repair the OS via DISM and SFC
When to use: Use this to repair a natively corrupted dxgkrnl.syscore file or fix a damaged Windows Component Store without performing a full operating system reinstallation.
Follow these steps:
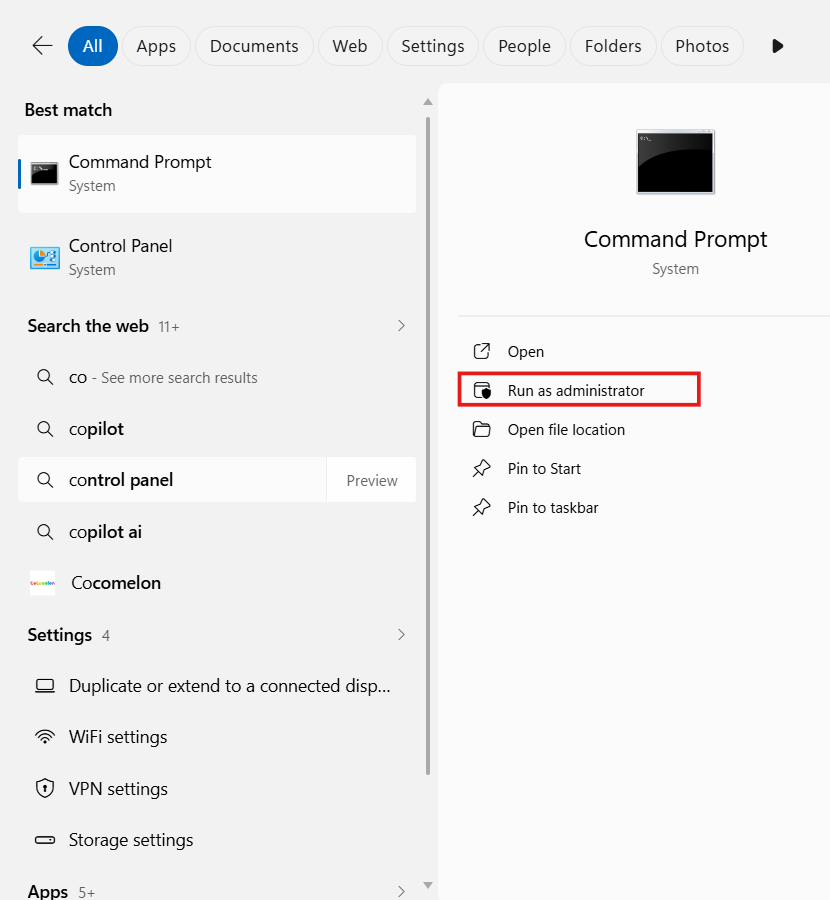
1. Open a Command Promptor Terminal window with elevated administrative privileges
2. Execute the following command first to provide verified recovery files: DISM.exe /Online /Cleanup-image /Restorehealth

3. Once the DISM scan completes successfully, execute: sfc /scannow
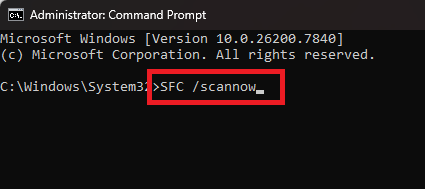
Running sfc /scannow will revert any modified system files, including Windows DLL files, back to their default state while DISM provides the files required to repair your corrupted files
» Learn more about the DISM command
Method 4: Reset tuning profiles and custom overclocks
When to use: Use this when unstable RAM timings generate memory corruption that affects kernel-mode GPU memory allocation, forcing a 0x113 bug check, or when custom overclocks run the device outside standard operating parameters.
Follow these steps:
1. Restart your PC and enter the BIOS/UEFI setup menu using your device’s BIOS key (commonly Del, F2, F10, F12, or Esc, depending on the motherboard or laptop)
2. Inside BIOS, go to the memory/overclocking section and set XMP (Intel), EXPO (AMD), or DOCP (ASUS) to Disabled or Auto to remove unstable RAM timing profiles
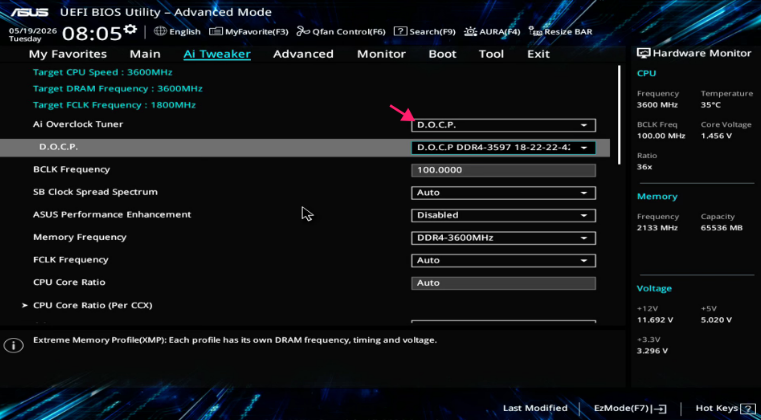
Take note: After saving changes and booting back into Windows, you should also reset any GPU-level overclocking. To do this, follow these steps:
1. Open AMD Software: Adrenalin Edition (this is AMD’s graphics control panel). You can open it in one of the following ways:
- Click Start and type AMD Software
- Right-click on your desktop and select AMD Software: Adrenalin Edition
- Open the system tray (bottom-right corner), click the AMD icon, and launch it
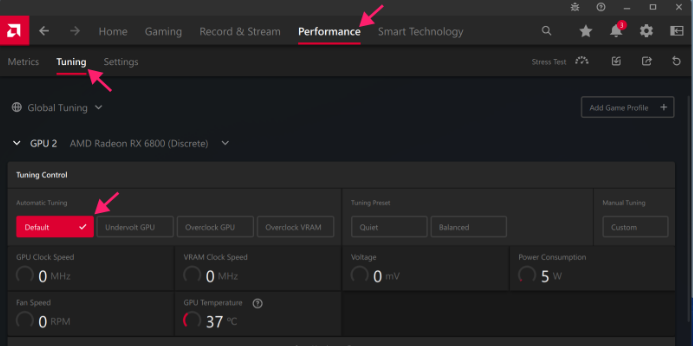
2. Go to Performance > Tuning and select the Default profile to reset any CPU/GPU overclocks
3. Open MSI Afterburner (if installed) and click the Reset button on the main interface to restore default GPU settings
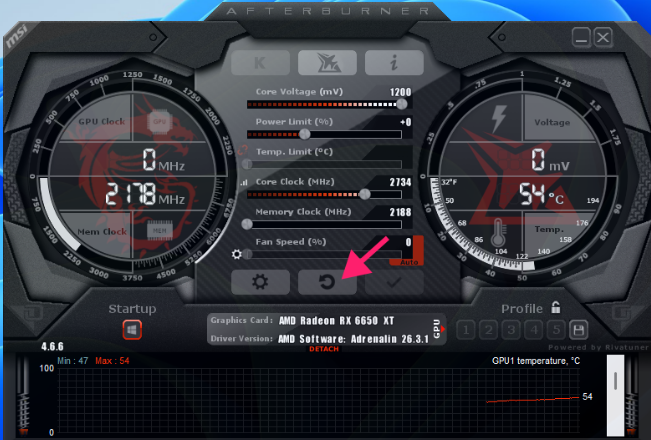
4. Restart your system again to ensure all changes fully apply and instability states are cleared
» Don’t miss our guide to finding your Windows PC serial number
Method 5: Optimize performance and power management states
When to use: Use this when the WDDM kernel scheduler encounters crashes or latency failures specifically while transitioning the hardware between low-power states and active workloads.
Follow these steps:
1. Press Win + I > System > Power
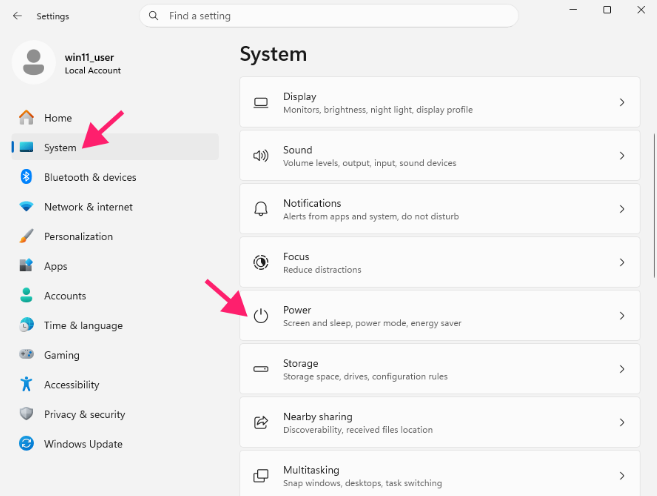
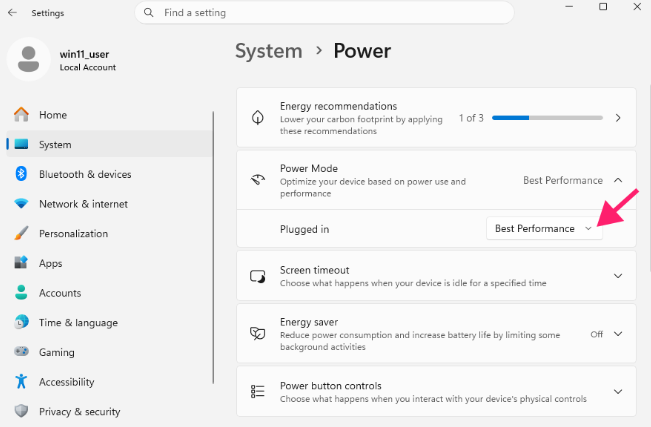
2. Look for the Power Mode section. Switch Power Mode to Best Performance
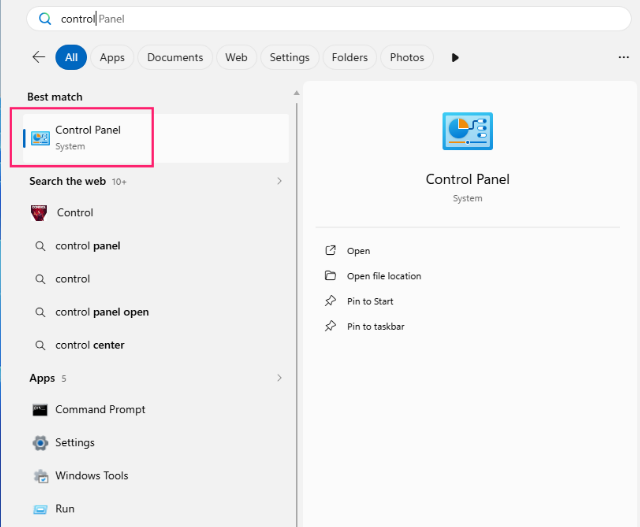
3. Type control in the Start Menu search box and select theControl Panel app
4. Go to System and Security > Power Options
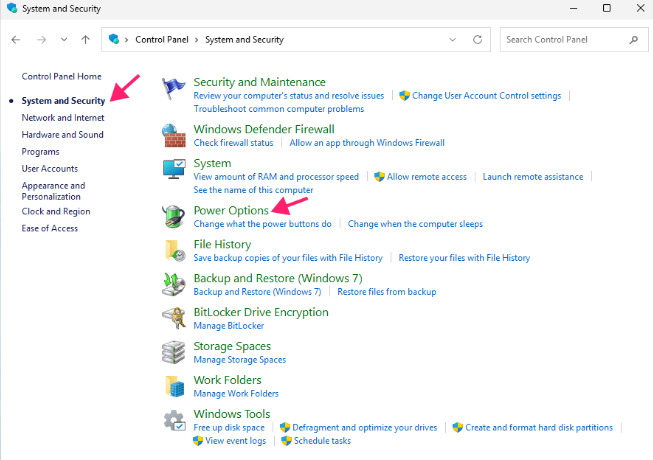
5. Disable fast startup by clicking the Choose what the power buttons do (on the left)
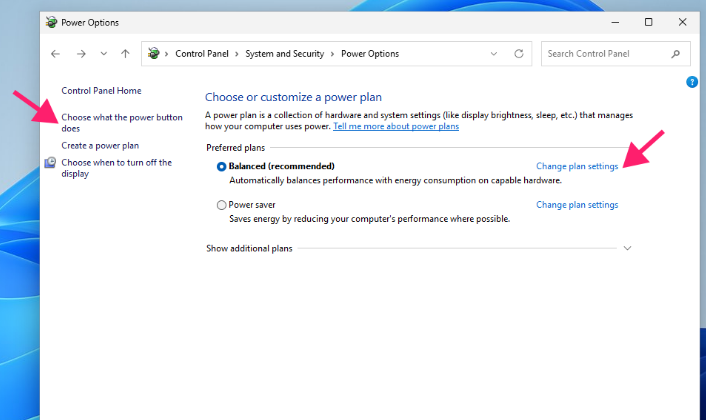
6. Uncheck the Turn on fast startup checkbox
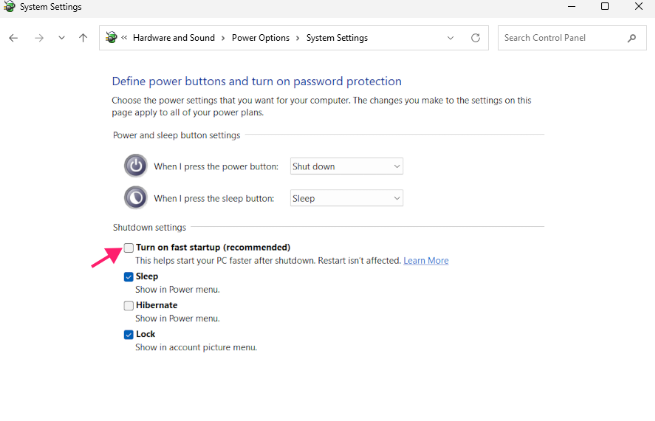
Take note: If the option isn’t visible or grayed out, click the Change settings that are currently unavailable button (in the upper part of the window) to enable modifying the setting as seen in the image below:

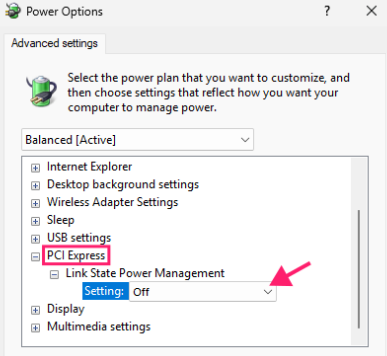
7. To disable PCI Express Link State Power Management click the Change plan settings button (for the active power plan) and navigate to the PCI Express section; switch the setting to Off
How Atera can help
Managing kernel-level graphics exceptions and tracking hardware bottlenecks across multiple workstations can quickly drain your team’s time.
Through its RMM capabilities, Atera provides real-time visibility across devices, helping you quickly identify systems showing signs of instability such as repeated crashes, driver failures, or TDR-related events. Its proactive monitoring and alerting features flag early indicators of system degradation, allowing you to respond before rendering conflicts escalate into full system reboots.
This centralized visibility makes it easier to isolate problematic endpoints, track recurring driver-related issues, and maintain overall system stability across distributed environments.
» Interested? Try Atera for free
Frequently Asked Questions
Related Articles
How to decide if you need a dedicated DEX platform, or already have one
"IT feels slow" is the complaint that often sells DEX platforms. Sometimes it signals a real blind spot, but just as often already catches and fixes the problem, and a new scoring layer would only add another console. Telling the two apart takes evidence, and the real gap usually isn't visibility at all.
Read now
How to set up secure printing across your organization
A secure print checkbox protects exactly one moment in a document's life. Everything else, from unencrypted traffic and unhardened devices to payroll printouts forgotten in a tray, stays exposed. Real secure printing covers the whole lifecycle: release policy, authentication, encryption, hardening, and a fleet that stays monitored long after rollout.
Read now
How to reduce alert fatigue in healthcare IT
In a hospital, a dismissed alert isn't a delayed ticket. It can be a patient deteriorating while the monitor keeps sounding. Cutting alert volume won't fix that on its own, and switching alerts off can make it worse.
Read now
How to prevent configuration drift across your IT infrastructure
Configuration drift rarely breaks anything the day it happens. It hides in a hotfix, a reset default, or a vendor installer, then surfaces weeks later as a failure nobody can trace. Stopping it means defining exactly what approved looks like, closing every side door into production, giving each setting one owning tool, and checking that the baseline itself hasn't gone stale.
Read nowEndless IT possibilities
Boost your productivity with Atera’s intuitive, centralized all-in-one platform









