
Table of contents
Generate summary with AI

Every network conversation about “slow internet” eventually runs into the same wall where bandwidth and latency aren’t the same problem, and treating them like they are wastes hours on the wrong fix. A user with a fast connection can still have brutal ping if the delay is coming from Wi-Fi interference, a congested hop three networks away, or a router doing nothing more than deciding which packet goes first.
That’s what makes ping troubleshooting different from most “quick fix” advice online. The win isn’t in any single tweak, it’s in knowing which layer of the path is actually responsible before you touch anything. Get that sequence right, and the fix that follows is usually simple. Here’s everything you need to know.
Why your ping might be high
High ping rarely comes from a single point of failure and can originate from many places, such as:
- The local machine (high CPU load, a failing network adapter, a weak Wi-Fi signal, or a damaged cable).
- Inside the local network itself (an overloaded router or switch).
- Further out along the path (ISP congestion, inefficient routing or peering, VPN overhead, or a server that’s simply far away).
Treating all of these as the same problem is why so many fixes miss. A DNS flush does nothing for a congested ISP hop, and a new router won’t fix a server that’s geographically far away.
Some of that distance is a hard floor no configuration change can remove. For example, fiber-optic cable transmits light at roughly 200,000 km/s, which sets a minimum round-trip time regardless of how clean the rest of the path is. On top of that, traffic follows the provider’s routing topology rather than the shortest geographic line, often passing through multiple cities, internet exchanges, or undersea cable systems before reaching its destination.
Optimizing Wi-Fi, drivers, or DNS can remove avoidable delay, but it can’t shorten a genuinely long physical path. In cases where an application’s server sits far from its users, choosing a closer cloud region will often cut more latency than any endpoint tweak.
» Don’t miss our guide to network performance management
How to reduce ping, step by step
Once you know roughly where high ping originates, the fix is usually straightforward. The methods below are organized by cause, so the goal isn’t to work through all of them in order; it’s to confirm the source first, then apply the one or two that actually match it.
Note: Before making any local change, you’ll need elevated permissions, such as an administrator account on Windows (running PowerShell, Device Manager, or Network Connections elevated), sudo or root access on Linux, and an administrator password on macOS.
First, find out where the delay is coming from
Every method that follows only works if it’s aimed at the right target, so this step comes first regardless of what you suspect is wrong.
1. Ping your default gateway
First find the gateway address:
- Windows: Open Command Prompt and run
ipconfig. Look for “Default Gateway” under your active adapter - macOS: Run
netstat -nr | grep default, or check System Settings > Network > [your connection] > Details - Linux: Run
ip route | grep default
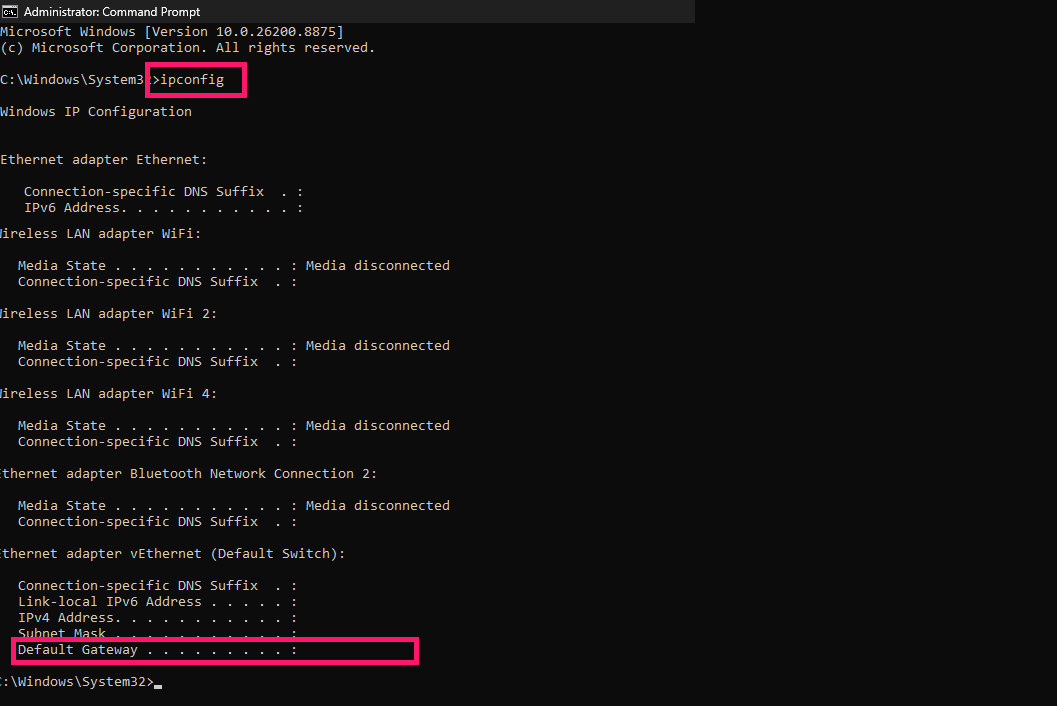
Then ping it:
- Windows:
ping 192.168.1.1(use your actual gateway IP) - macOS/Linux:
ping 192.168.1.1(same syntax)
Let it run for at least 10-20 packets. You’re checking for consistently low latency (under 1-2 ms on a wired connection, 2-10 ms on Wi-Fi) and 0% packet loss. If the gateway itself shows high or unstable latency, the problem is local, so stop here and check hardware, drivers, or Wi-Fi signal before going further.
» Struggling with the Macs on your network? Here’s how to enable RMM on Mac
2. Ping an external IP
Use a stable, well-known IP so you’re not also testing DNS resolution at this stage:
ping 1.1.1.1(Cloudflare) orping 8.8.8.8(Google)
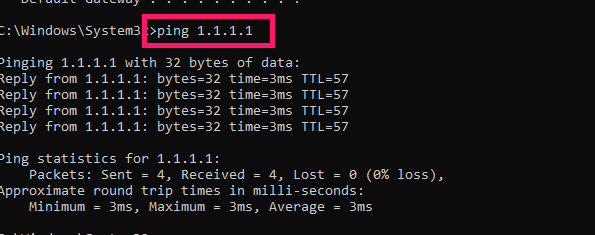
Same syntax on all three OSes. Compare this result to your gateway ping. If the gateway was clean but this shows elevated latency or loss, the problem is beyond your router.
3. Run tracert/traceroute
- Windows:
tracert 1.1.1.1 - macOS/Linux:
traceroute 1.1.1.1
This prints a numbered list of every hop (router) between you and the destination, with round-trip time for each. Each line shows the hop number, the IP or hostname of that hop, and typically three latency samples.
4. Read the output
Scan down the hop list for the first row where the latency jumps significantly and every hop after it stays elevated too. That hop is roughly where the delay is introduced, which might be your ISP’s first router, a peering point, or a distant hop overseas. A single high-latency hop with normal latency immediately after it is usually just that hop being slow to respond to traceroute probes specifically (common and not a real problem. You’re looking for a sustained increase, not a one-off spike.
If the increase starts at a specific hop and continues downstream, the issue is beyond your local network and the methods below won’t resolve it. If everything stays clean until the very last hop, the problem is local, and one of the following methods should address it.
For IT teams troubleshooting this across more than one machine, running these diagnostic steps manually on every affected endpoint doesn’t scale well. Atera’s RMM platform gives technicians real-time device data and infrastructure monitoring across a network, so gateway and adapter status can be checked without a remote session, and remote scripting lets you push the same ping or traceroute test across selected devices or device groups at once instead of repeating it machine by machine. Atera’s Network Discovery add-on also lets you run scheduled scans across a network to flag new or unauthorized devices that could be contributing to congestion.
» Here’s why you need network monitoring software
Method 1: Switch from Wi-Fi to Ethernet
Use this when your diagnostic sequence points to the local network and you’re currently on Wi-Fi since it removes radio interference entirely rather than working around it.
Confirm your computer has a Gigabit or faster Ethernet adapter
On Windows, open Settings > Network & internet > Advanced network settings to check all adapters
Alternatively, you can use
Get-NetAdapterin PowerShell for a clean table showing adapter name, interface description, MAC address, link speed, and status.On macOS, it’ll be in System Settings > Network, or
networksetup -listallhardwareportsin the Terminal.On Linux, it’s either
ip link showto list all network interfaces by name with status, orlshw -class networkto give the actual hardware model, driver, and link speed.
- Obtain a Cat5e, Cat6, or higher-rated cable
- Connect the cable directly from the computer to the router or network switch
- Disable Wi-Fi on the device to prevent traffic from switching between interfaces
- Confirm the Ethernet link is active and negotiating the expected speed (1 Gbps or higher)
- Update the network adapter driver if needed
- Re-run the ping test from the diagnostic sequence to confirm improvement
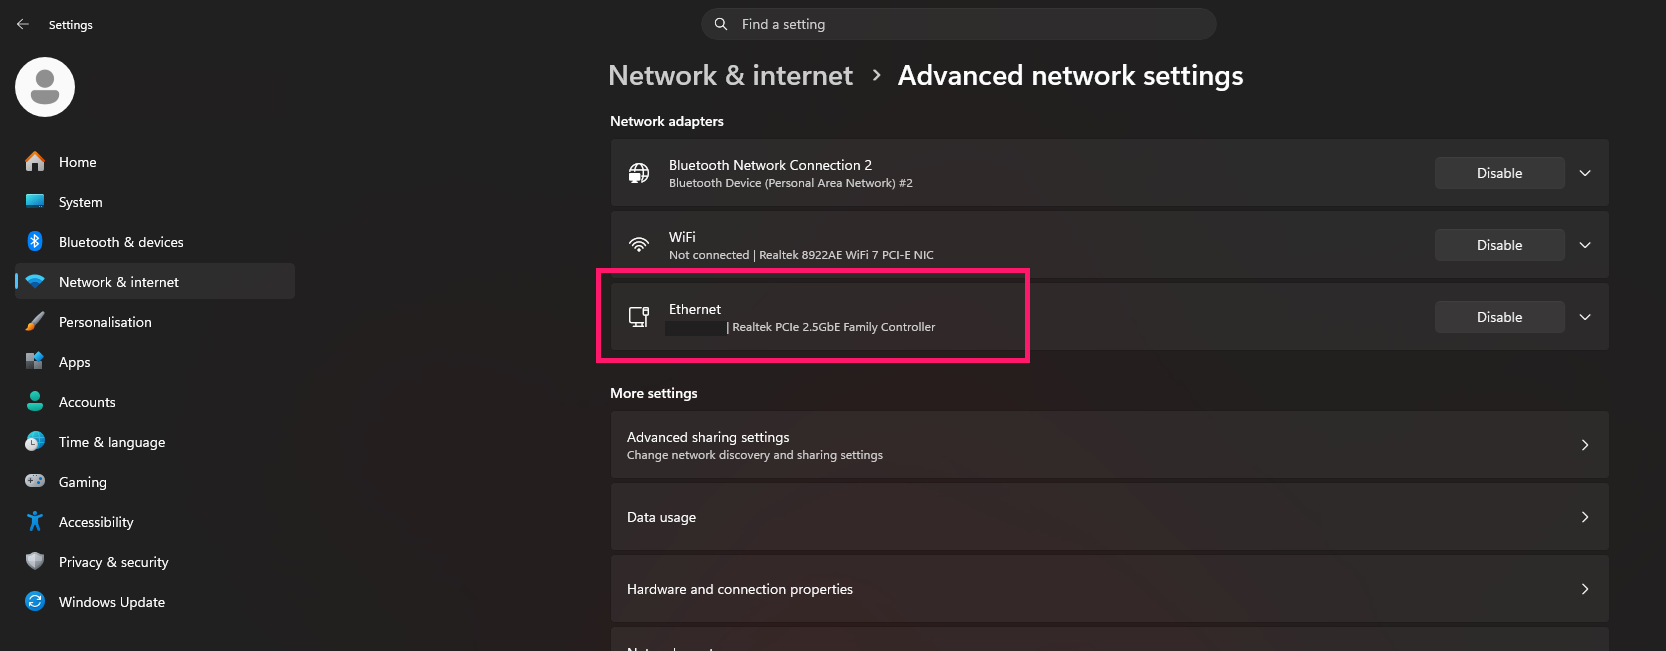
A wired connection typically produces lower jitter, fewer retransmissions, and more consistent latency than Wi-Fi, which matters most for VoIP, gaming, video conferencing, and cloud applications.
Method 2: Identify and throttle bandwidth-hogging processes
Use this method when local latency is inconsistent and something in the background is likely competing for bandwidth, most commonly Windows Delivery Optimization or an unnecessary startup application.
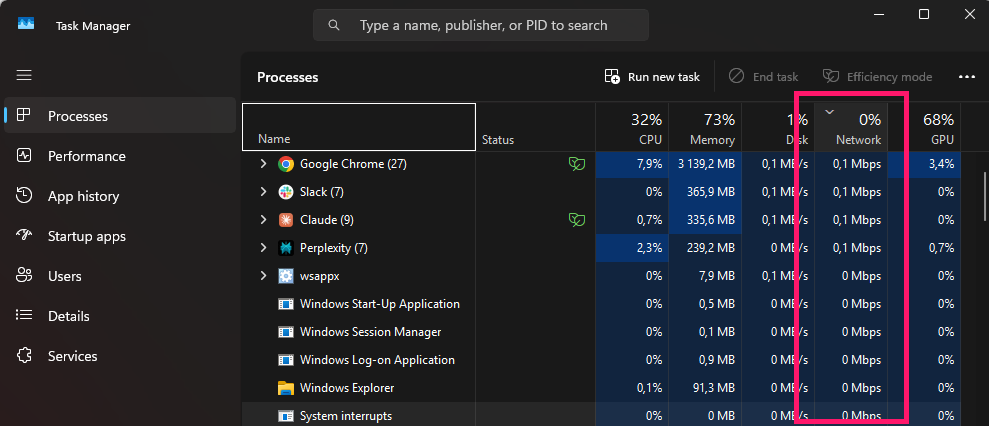
Open Task Manager (CTRL + Shift + Escape) and check the Network column to identify which processes are using bandwidth

- For more granular data, open Resource Monitor (
resmon) and check the Network tab for per-process send/receive rates Run
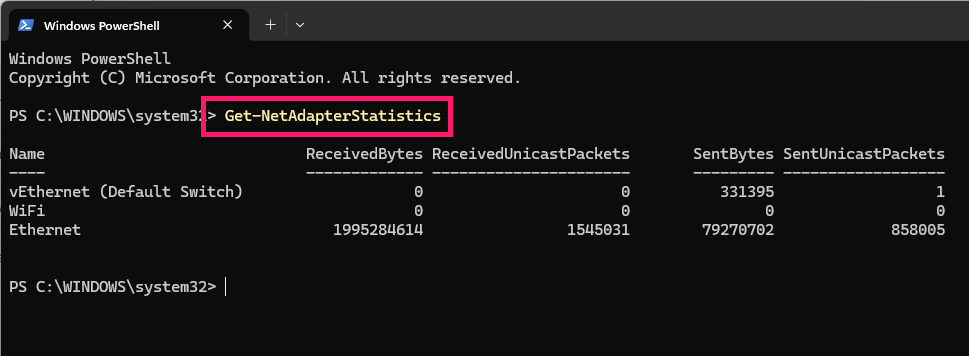
Get-NetAdapterStatisticsin PowerShell for adapter-level throughput
- Check Delivery Optimization activity specifically with
Get-DeliveryOptimizationStatusandGet-DeliveryOptimizationPerfSnap - If Delivery Optimization is consuming significant bandwidth, restrict it through Settings > Windows Update > Advanced options > Delivery Optimization
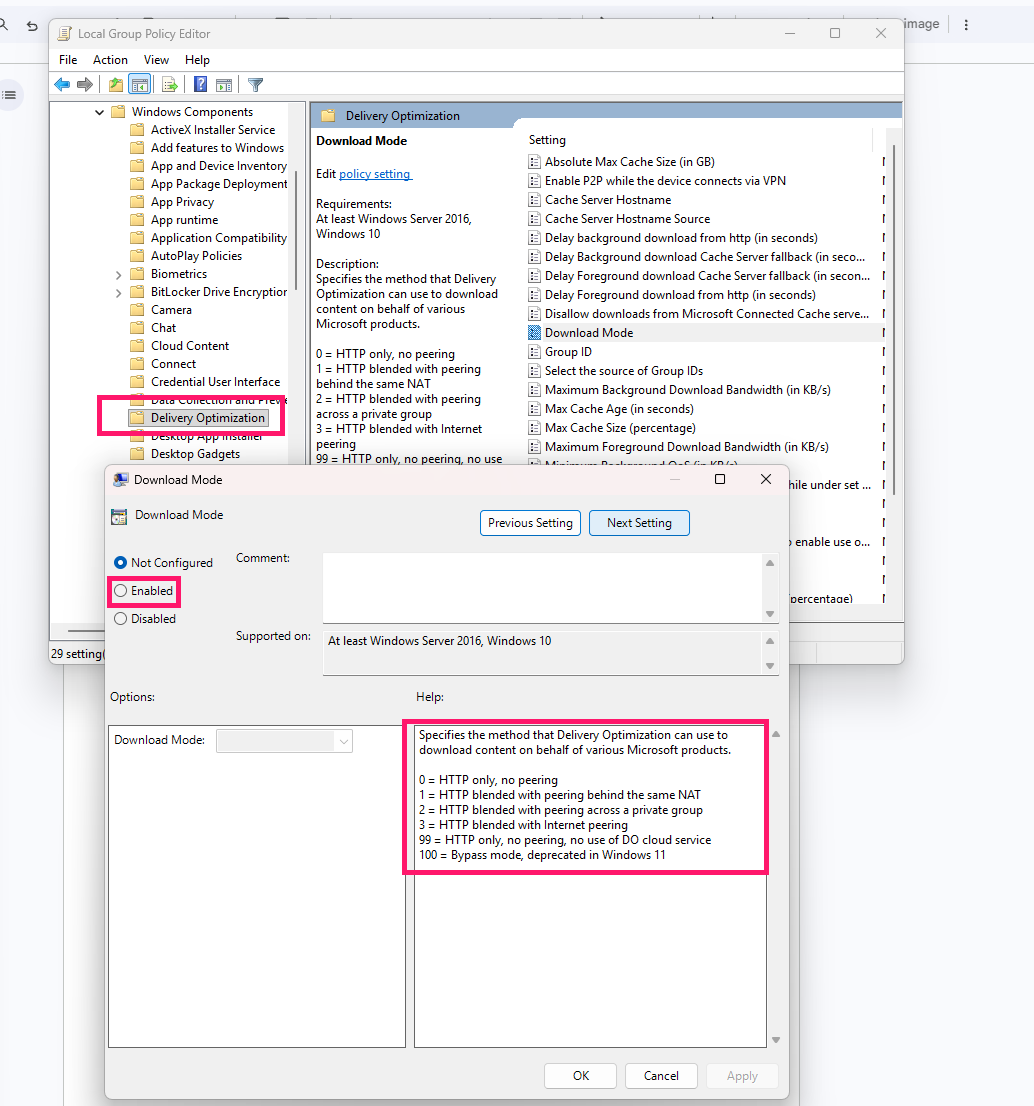
- You can also enforce limits via Group Policy by navigating to Computer Configuration > Administrative Templates > Windows Components > Delivery Optimization
Set Download Mode to control whether Delivery Optimization uses peer-to-peer sharing at all (setting it to “Simple” or “Bypass” disables peer sharing, which is often the biggest bandwidth contributor)

- Disable unnecessary startup applications and scheduled tasks generating background traffic
- Re-test ping and compare to your baseline
» Learn more about simplifying group policy management with Atera
Method 3: Reconfigure and flush DNS
Use this method when DNS lookups are adding delay before connections even establish, which shows up as inconsistent response times on new connections rather than steady-state latency.
1. Set a reliable DNS server on the network adapter or DHCP server; for example, Cloudflare (1.1.1.1 / 1.0.0.1) or Google (8.8.8.8 / 8.8.4.4)
2. Flush the existing DNS cache so new queries use the updated resolver:
ipconfig /flushdnson Windowssudo dscacheutil -flushcache && sudo killall -HUP mDNSResponderon macOS- The appropriate resolver flush on Linux, such as
resolvectl flush-cachesfor systemd-resolved
3. Validate the new configuration with nslookup, dig, or Resolve-DnsName
4. Compare DNS lookup times and application responsiveness before and after
Method 4: Optimize MTU and TCP stack settings
Use this method only after confirming fragmentation or serialization delay through testing, since it’s a more invasive change and shouldn’t be a first move.
- Determine the optimal MTU by pinging with the Don’t Fragment flag set, increasing the packet size until it fails: for example,
ping example.com -f -l 1472on Windows - Configure the network adapter or router to use the largest non-fragmenting value, typically 1500 bytes for Ethernet or 1492 bytes for PPPoE
- Verify the setting with
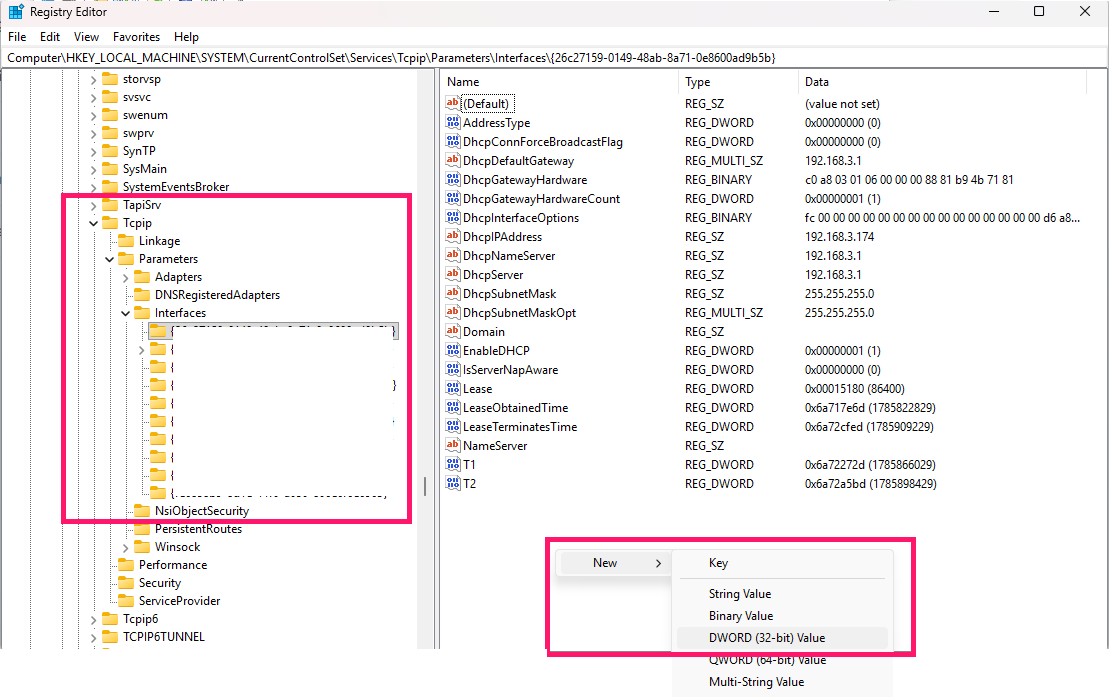
netsh interface ipv4 show subinterfaceson Windows - For latency-sensitive applications, disable Nagle’s Algorithm through the Registry Editor by creating the
TCPNoDelayregistry value at HKEY_LOCAL_MACHINESYSTEMCurrentControlSetServicesTcpipParametersInterfaces{adapter-GUID} Right-click inside that adapter’s key and select New > DWORD (32-bit) Value

- Name the new value TCPNoDelay
- Double-click it and set the value data to 1 (Hexadecimal or Decimal, either works since it’s just 1)
- Restart the affected application or system for changes to take effect
- Re-test latency, packet fragmentation, and throughput to confirm improvement
» Don’t miss these Registry Editor challenges and solutions
Step 6: Tune advanced network adapter properties
Use this method for real-time workloads like VoIP, gaming, or remote desktop, where NIC-level settings are prioritizing throughput over responsiveness.
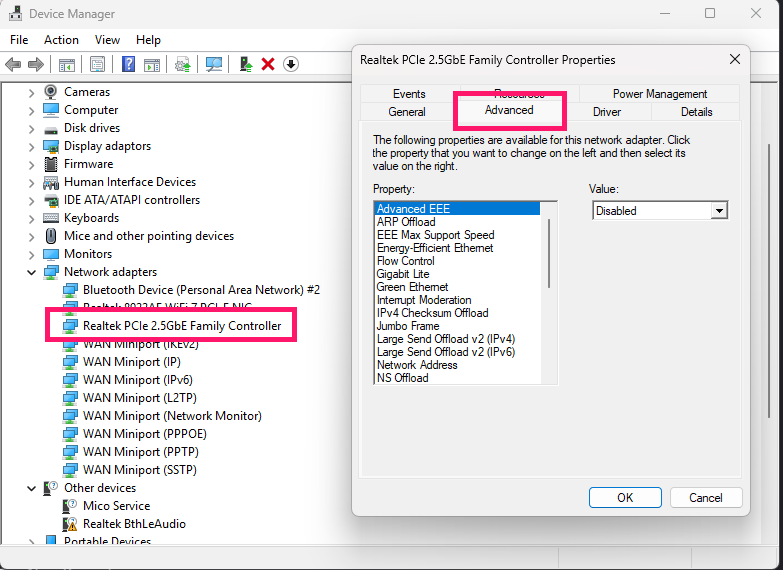
Open Device Manager (CTRL + X > Device Manager), navigate to your network adapter’s properties, and select the Advanced tab (or use
Get-NetAdapterAdvancedPropertyin PowerShell)
- Disable Interrupt Moderation to reduce packet processing delay
- Disable Large Send Offload (LSO) to prevent large packets from being buffered before transmission
- Disable Energy-Efficient Ethernet (EEE) or Green Ethernet features, which can introduce latency through power-saving states
- Leave Receive Side Scaling (RSS) enabled on multi-core systems, since it distributes network processing efficiently rather than adding delay
Apply one change at a time and re-test latency and packet loss after each, since the ideal configuration depends on the specific adapter and workload.
» Make sure you know how to reset network adapters
Step 7: Apply QoS and traffic shaping at scale
Use this method when the latency problem isn’t one device but an entire network under load, and critical traffic needs to be protected from everything else competing for bandwidth.
- Identify which applications are latency-critical, such as VoIP, video conferencing, ERP, RDP, and similar business traffic
- Classify that traffic using DSCP values, application signatures, VLANs, or ports
- Assign it to higher-priority queues on your routers, switches, firewalls, or SD-WAN platform
- Rate-limit or schedule bandwidth-intensive traffic (patch management, software updates, backups, multimedia streaming, etc.) outside business hours
- Apply the QoS policy consistently across the network rather than at a single device
- Monitor effectiveness using NetFlow, SNMP, or telemetry, and review regularly to confirm priority applications maintain low latency and packet loss during congestion.
» Learn more about scheduling software deployments with Atera’s Patch Management tool
Common mistakes with high ping
A common misconception is that a faster internet plan automatically lowers ping, but that’s not really true. Higher bandwidth increases download and upload capacity, but it does nothing to reduce latency, so a gigabit connection can still show high ping if the delay is happening somewhere bandwidth doesn’t touch.
A few other common mistakes include:
- Relying on Wi-Fi instead of Ethernet when a wired connection is available, then troubleshooting everything except the interface itself.
- Assuming any DNS change improves latency, when DNS only affects how quickly a hostname resolves before a connection starts, not the connection’s ongoing latency.
- Enabling Jumbo Frames or changing MTU values without verifying end-to-end support across every device in the path, which causes fragmentation or connectivity issues instead of the intended improvement.
- Replacing hardware before confirming where the bottleneck actually is, when the cause may be ISP routing or congestion that new equipment won’t touch.
- Running outdated network drivers or firmware and ruling out every other cause first.
» Here’s how to update your firmware
Stop guessing at your network’s weak point
Every method in this guide only works if it’s aimed at the right target. Ethernet migrations don’t help a problem that starts at the ISP, and DNS flushes don’t fix a router silently dropping packets under load. The diagnostic sequence is what makes the rest of the fixes worth applying.
That discipline gets harder to hold onto once it’s not just one machine. When the same latency complaint is coming from a dozen endpoints at once, pulling adapter stats and pushing a DNS or registry fix one device at a time isn’t sustainable. Atera’s RMM platform gives IT teams and MSPs the monitoring and alerting to catch latency-related issues as they surface across network nodes, and remote scripting lets a technician push the same fix across selected devices or device groups without touching each one by hand.
» Take control of your network with a free trial of Atera
Frequently Asked Questions
Related Articles

How to decide if you need a dedicated DEX platform, or already have one
"IT feels slow" is the complaint that often sells DEX platforms. Sometimes it signals a real blind spot, but just as often already catches and fixes the problem, and a new scoring layer would only add another console. Telling the two apart takes evidence, and the real gap usually isn't visibility at all.
Read now
How to set up secure printing across your organization
A secure print checkbox protects exactly one moment in a document's life. Everything else, from unencrypted traffic and unhardened devices to payroll printouts forgotten in a tray, stays exposed. Real secure printing covers the whole lifecycle: release policy, authentication, encryption, hardening, and a fleet that stays monitored long after rollout.
Read now
How to reduce alert fatigue in healthcare IT
In a hospital, a dismissed alert isn't a delayed ticket. It can be a patient deteriorating while the monitor keeps sounding. Cutting alert volume won't fix that on its own, and switching alerts off can make it worse.
Read now
How to prevent configuration drift across your IT infrastructure
Configuration drift rarely breaks anything the day it happens. It hides in a hotfix, a reset default, or a vendor installer, then surfaces weeks later as a failure nobody can trace. Stopping it means defining exactly what approved looks like, closing every side door into production, giving each setting one owning tool, and checking that the baseline itself hasn't gone stale.
Read nowEndless IT possibilities
Boost your productivity with Atera’s intuitive, centralized all-in-one platform









