
Generate summary with AI

Every open port on a Linux server is a decision, whether it was made deliberately or left over from a default install nobody revisited, and that decision matters a lot more than it used to. Verizon’s 2026 Data Breach Investigations Report found that vulnerability exploitation has overtaken stolen credentials as the leading way attackers get in, now responsible for nearly a third of all breaches. Every one of those exploits needs a listening service to land on.
Running ss or netstat and skimming the output isn’t the same as actually knowing what’s exposed. Getting a reliable answer means knowing which tool to trust, what LISTEN really tells you versus an active connection, and how to catch the difference between a port that’s genuinely open and one that only looks that way from inside the box.
» Don’t miss our guide to network performance management
Why “open” is harder to confirm than it looks
“Open” gets used loosely, but a port check can be wrong in at least four different ways:
1. Privilege level changes what you can attribute, not what you can see
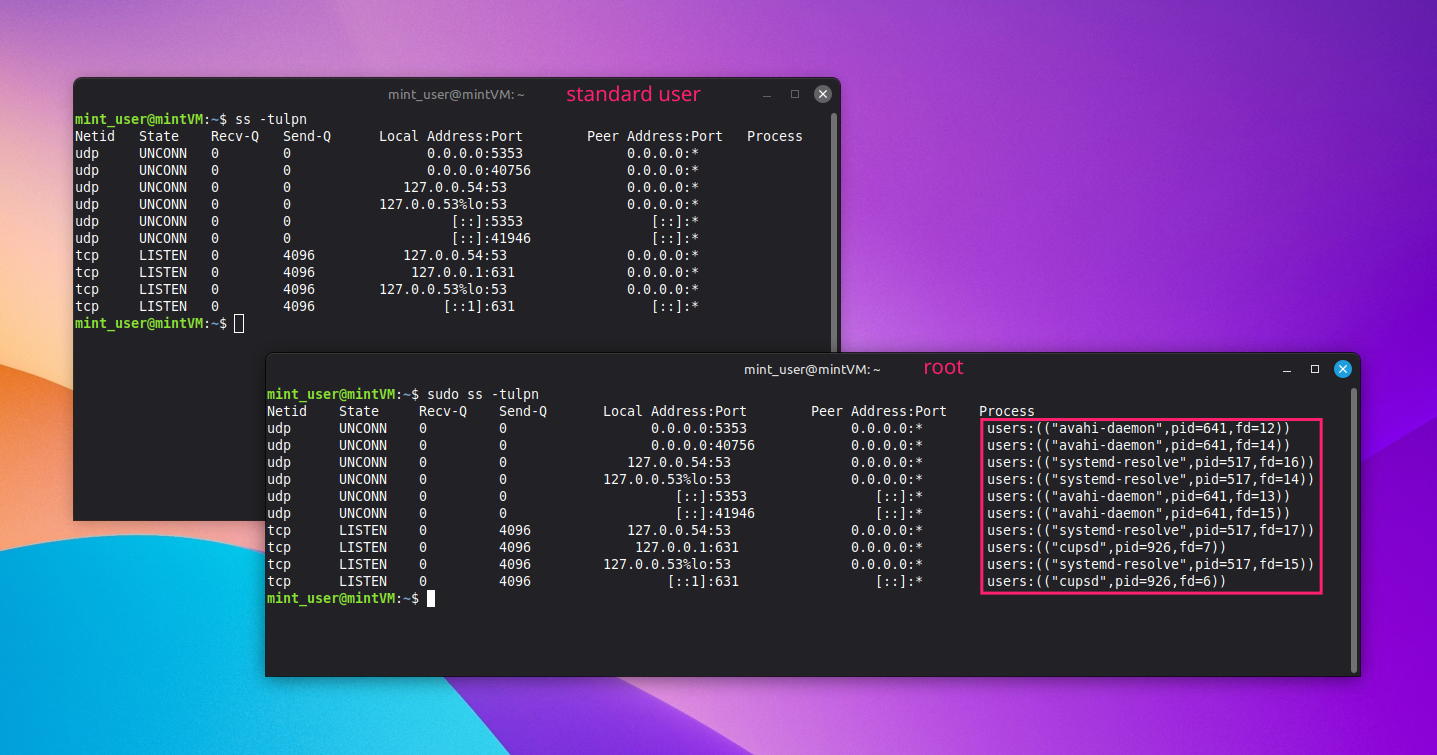
Whether you’re logged in as a standard user or running as root doesn’t change what you can see. Both can list every open port on the box, listening or established, because that information comes straight from the kernel regardless of who’s asking.
What changes is process attribution. Run ss -tulpn or netstat -tulpn as a non-root user and any socket owned by another user’s process shows up with the port and state intact, but no PID and no process name attached. Run the same command with sudo and that gap closes. If a port check script is coming back with blank process columns, that’s a privilege problem, not a broken tool.
» Wrong permissions? Here’s how to change file permissions on Linux and fix Linux permission denied errors
2. LISTEN and ESTABLISHED aren’t the same kind of “open”
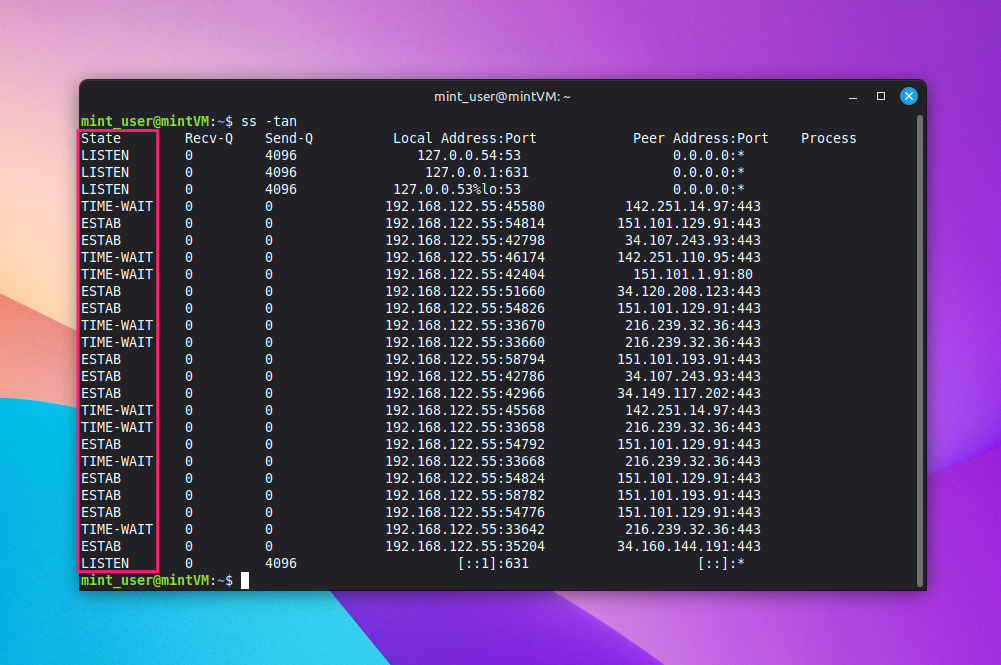
A socket in a LISTEN state is bound to a port and waiting for a connection, which is what most people mean when they say a port is open.
A socket in an ESTABLISHED state is a live, active connection between a specific local and remote address and port.
The two show up side by side in the same ss -tan or netstat -tan output, and mixing them up leads to bad conclusions like counting established connections as evidence a service is listening, or missing a listening service because you were only scanning for active traffic. The state column is the only thing that matters here, and it’s worth reading before drawing any conclusion from the rest of the row.
3. TCP and UDP don’t get verified the same way
TCP’s three-way handshake means a connection attempt either succeeds and lands in an ESTABLISHED state or it doesn’t, so testing whether a TCP port is open is deterministic.
UDP has no handshake. A bound UDP socket is a reliable sign that something’s listening, but probing a UDP port externally isn’t. A lack of response could mean the port is closed, or it could mean the packet was silently dropped by a firewall with no reply sent either way. External UDP results are probabilistic, not confirmed, and treating a non-response as proof of anything is a mistake.
4. Ports are a kernel construct, not a physical thing
None of this happens at the network card. A port is a kernel-level abstraction where each bound socket is backed by a data structure, and the kernel keeps hash tables that route incoming packets to the right socket and process.
Every tool covered below is just reading and formatting that internal state. Once you know that, it’s obvious why root and standard users see the same underlying data. The kernel doesn’t check who’s asking before it decides what’s listening; it only matters when the tool tries to attach a process name to the answer.
6 Ways to check open ports on Linux
Each of these tools answers a slightly different question, so the right one depends on what you’re actually trying to confirm: what’s listening, what’s holding a specific port, or what’s reachable from outside the box.
Method 1: Check open ports with ss
ss is the modern default for this because it queries the kernel directly instead of parsing text, which makes it faster and the right first stop for most port checks.
- Run
sudo ss -tulpnto list every listening TCP and UDP socket along with its process ID - Read the flags to interpret the output:
-tshows TCP sockets-ushows UDP sockets-llimits results to listening sockets-pattaches the process using each socket-nshows numeric ports and addresses instead of resolved names
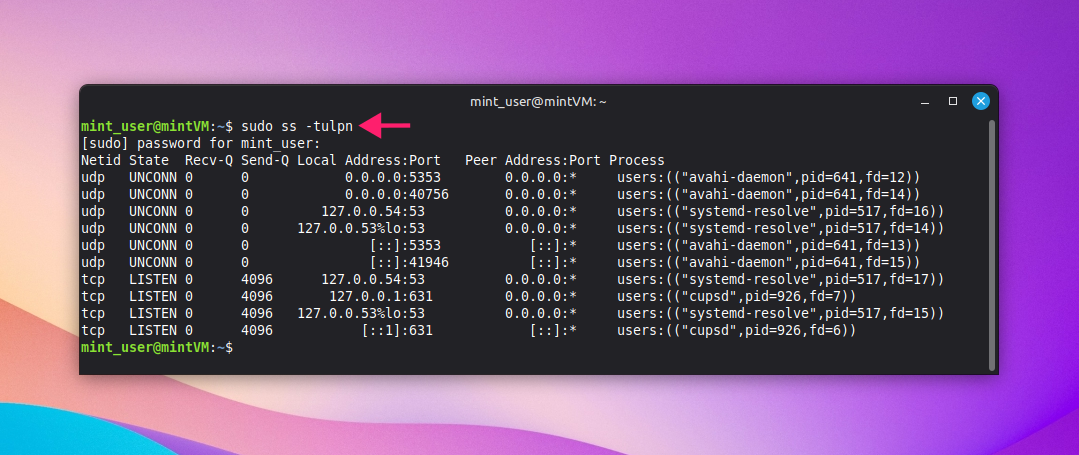
Running the command without sudo still shows every port and its state, but any socket owned by another user’s process will be missing its PID and process name.
Method 2: Check open ports with netstat
netstat covers the same ground on older systems where ss isn’t available or where existing scripts and documentation still reference it.
- Run
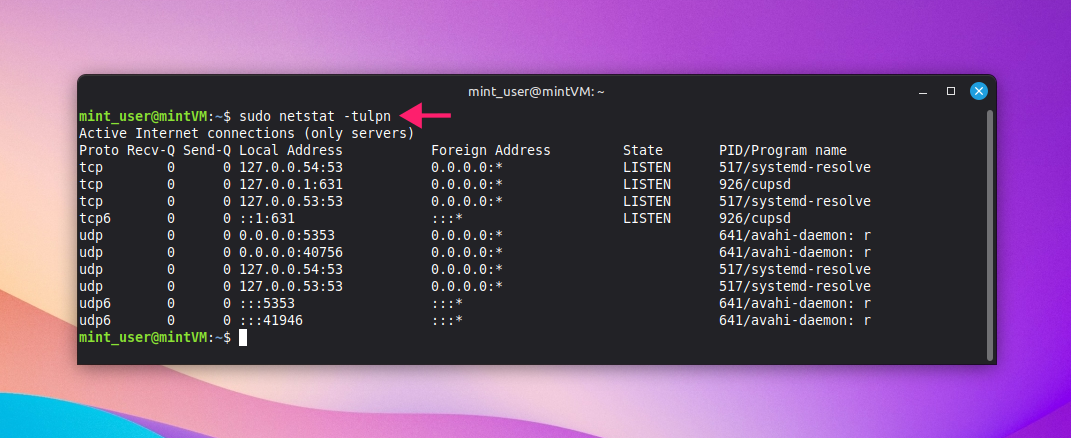
sudo netstat -tulpn, using the same flag combination asss Expect the command to take noticeably longer on systems with a high number of active connections, since
netstatreads and parses text from/proc/netinstead of querying the kernel’s socket interface directly
Method 3: Find what’s holding a specific port with lsof
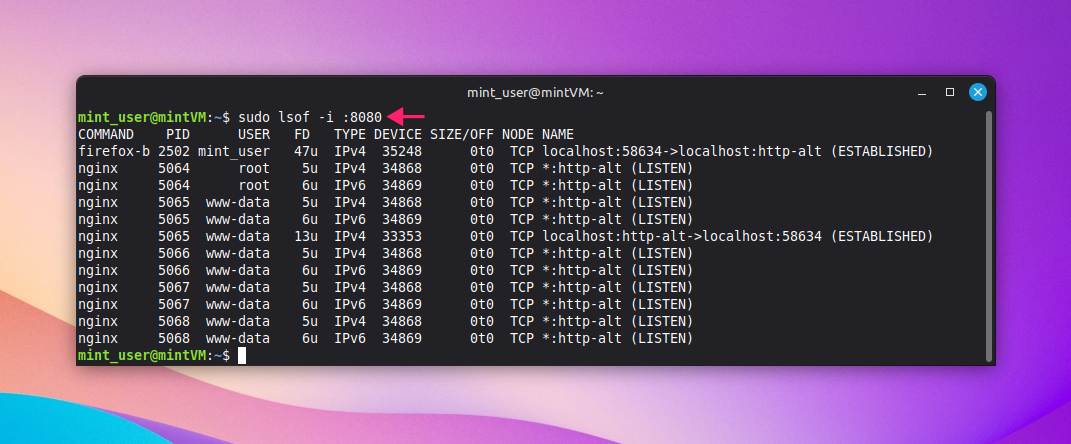
lsof is the right tool once you already know the port and need to pin down exactly which application, user, or process is using it.
Run
sudo lsof -i :8080, replacing8080with the port you’re investigating. The-iflag selects sockets matching the specified address, and:8080filters the results to that port
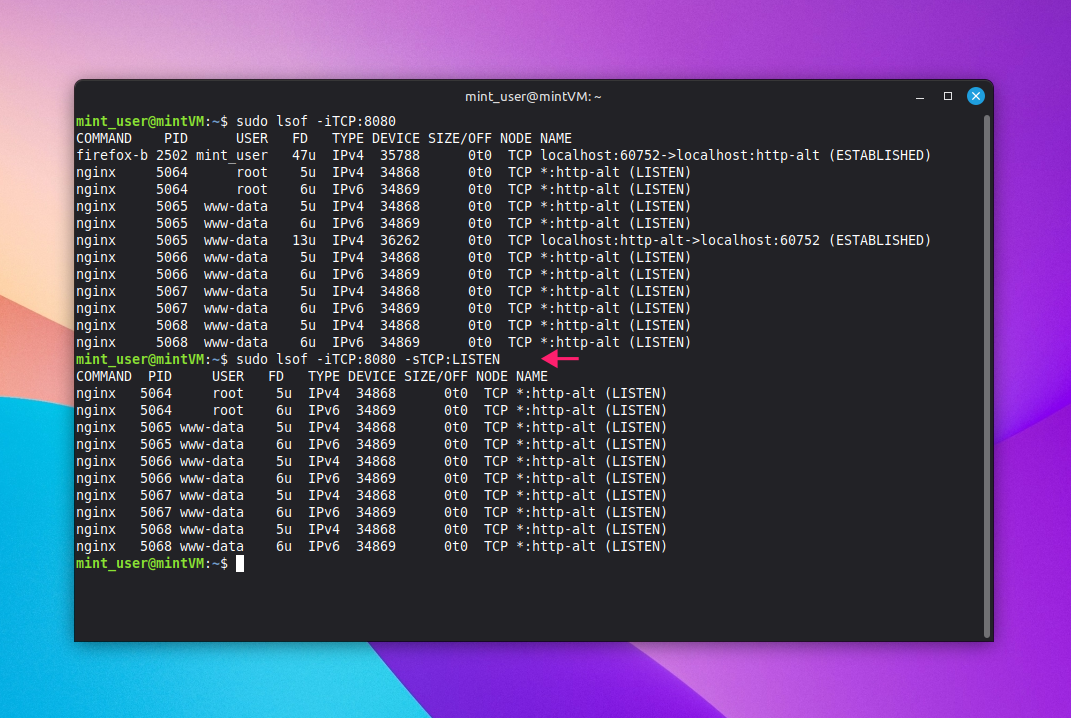
Narrow the results further if needed by protocol and state:
sudo lsof -iTCP:8080 -sTCP:LISTENrestricts the output to TCP sockets on port 8080 that are actively listening
Method 4: Test reachability from outside the box with nmap
nmap is the method for confirming a port is actually reachable over the network, not just bound locally, which none of the tools above can tell you.
- Install
nmapif it isn’t already present:sudo apt install nmapon Debian-based distros, orsudo dnf install nmapon RHEL and Fedora - Find the target machine’s IP address by running
ip addron that machine if you don’t already have it - Run
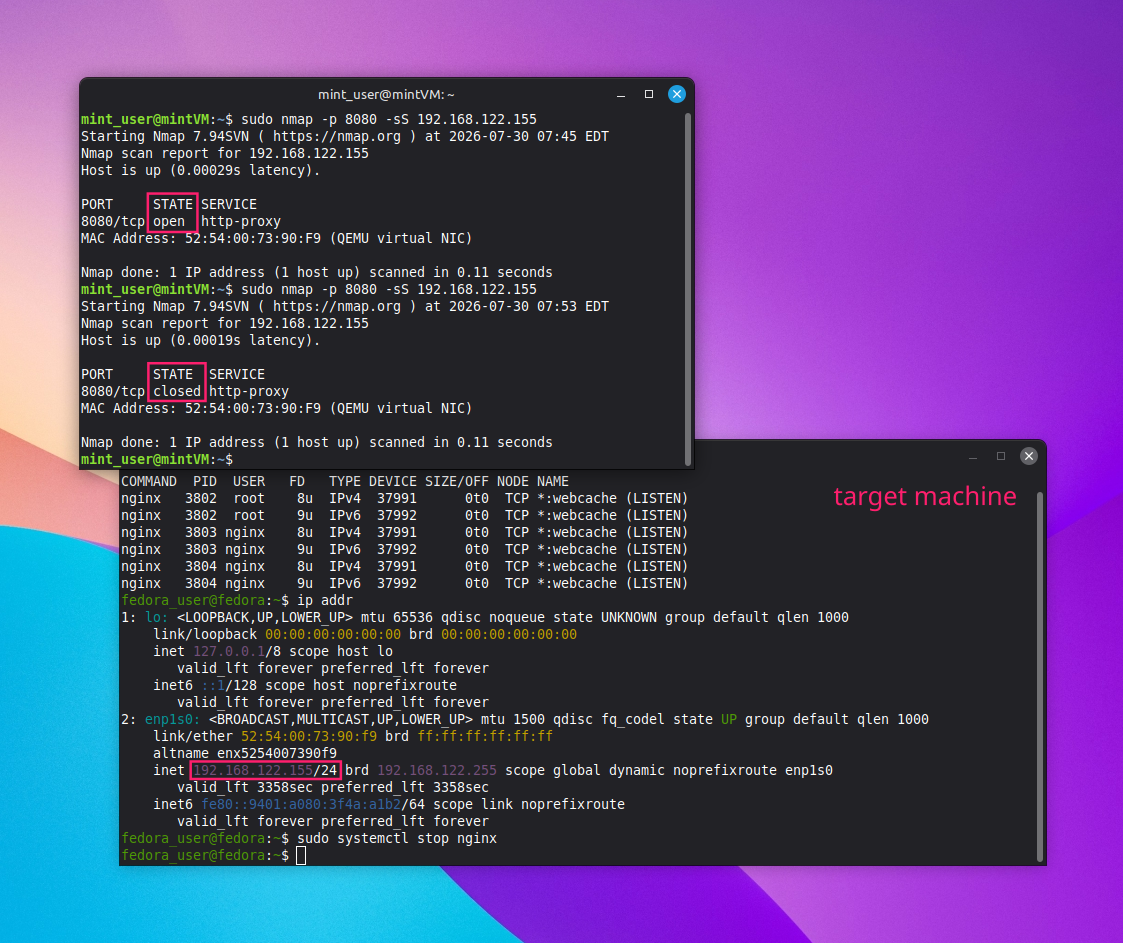
sudo nmap -p 8080 <target-ip-or-hostname>from a separate machine on the network, substituting the port and target as needed
The result will report one of three states:
openmeans the port is reachable and a service respondedclosedmeans the port is reachable but nothing is listeningfilteredmeans there was no response, which usually points to a firewall blocking the traffic rather than the port itself being closed
» Need help? See our complete guide to using nmap for network blind spots
Method 5: Confirm the port is actually permitted through the firewall
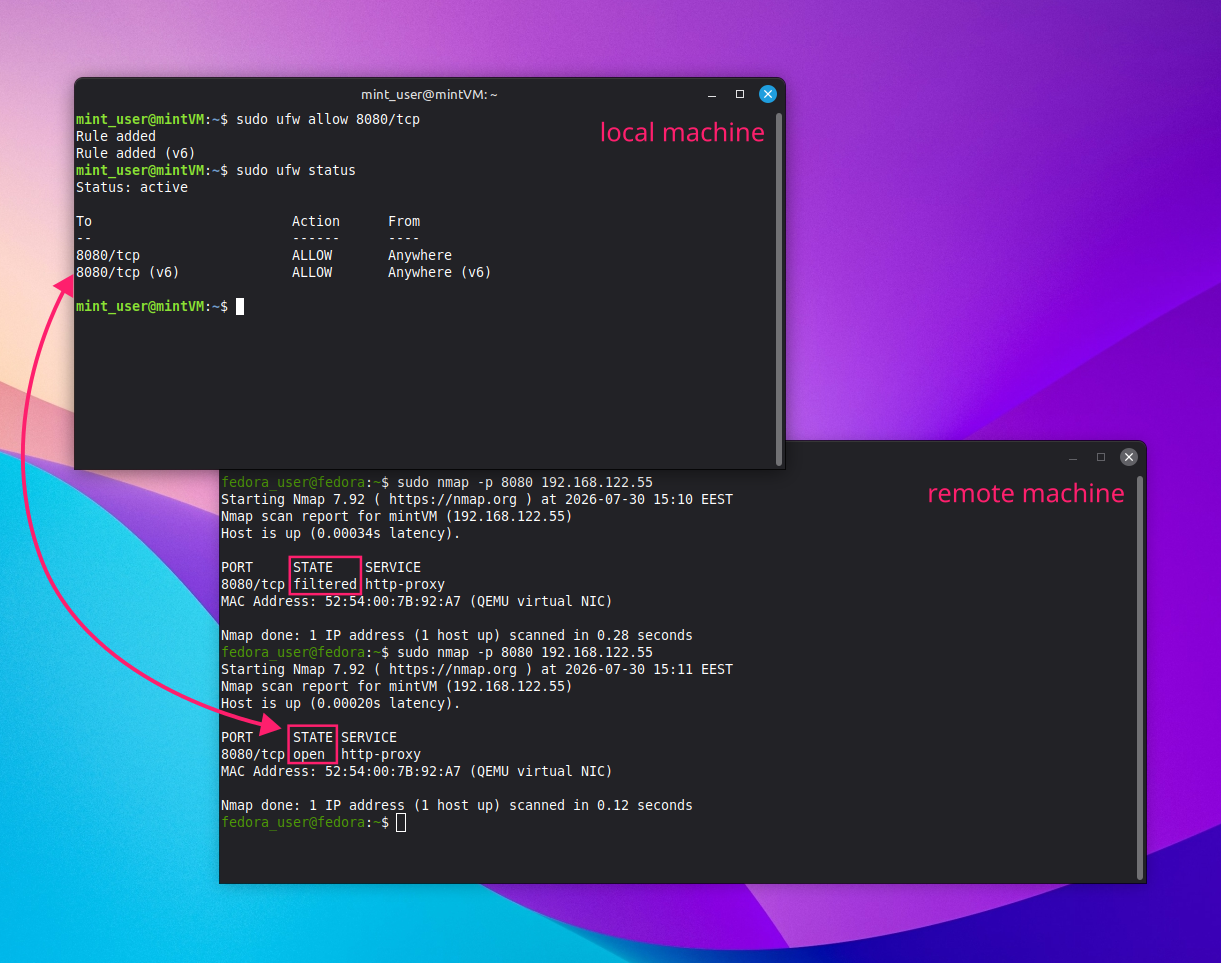
A port can show as open at the system level and still be blocked at the firewall, so this step catches the gap between what the kernel reports and what traffic is actually allowed through.
- On Debian-based distros, check the firewall’s current status with
sudo ufw statusorsudo ufw status verbosefor more detail Add a rule if the port isn’t yet permitted, for example
sudo ufw allow 8080/tcpto allow incoming TCP traffic on port 8080
On RHEL and Fedora distros, where
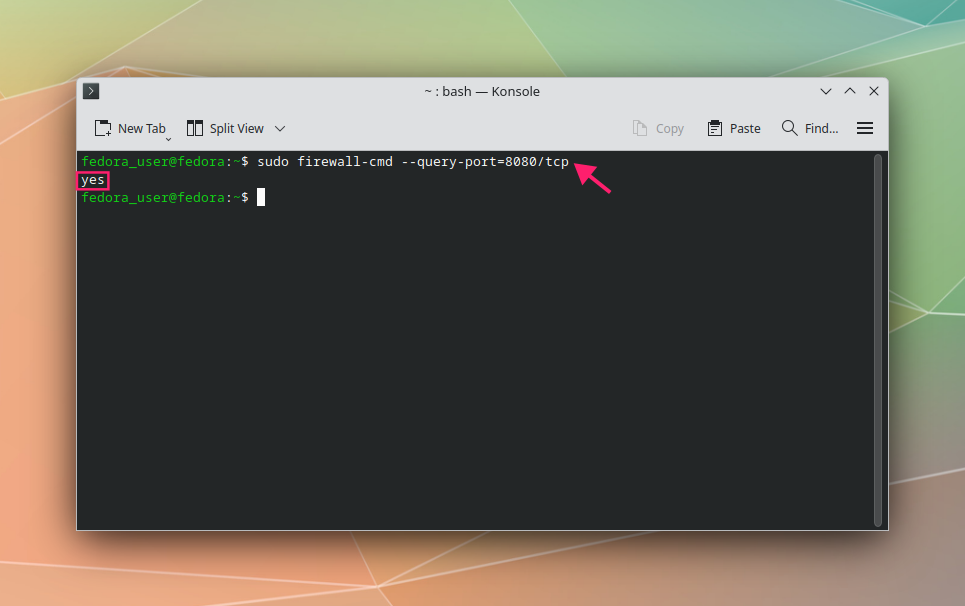
firewall-cmdis the default, query a specific port directly withsudo firewall-cmd --query-port=8080/tcp
Both ufw and firewalld are high-level tools that translate their rules into iptables or nftables syntax, which then gets loaded into the kernel’s Netfilter subsystem to actually enforce them.
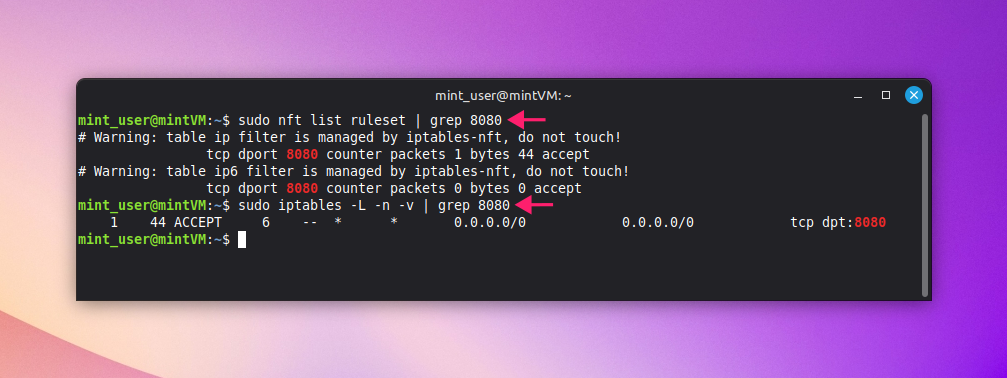
To inspect the raw rules directly, sudo nft list ruleset | grep 8080 or sudo iptables -L INPUT -v -n | grep 8080 will show whether a rule covering that port exists. Keep in mind that a rule covering a range, such as ports 8000 through 9000, won’t textually contain “8080” even though it covers that port.
» Not sure what you’re using? Here’s how to check your Linux version
Method 6: Scale the check across a fleet
Running any of the above one server at a time doesn’t hold up once you’re responsible for more than a handful of machines, so this is where the same verification gets automated rather than repeated by hand.
With Ansible, the community.general.listen_ports_facts module maps every bound TCP and UDP port across your inventory, and modules like community.general.ufw or ansible.posix.firewalld can enforce that only approved ports stay open, correcting drift on the next playbook run.
Atera’s remote scripting through the RMM platform pushes the same ss, netstat, or lsof check out to selected devices or device groups on demand, so a fleet-wide audit doesn’t mean logging into machines one at a time. Scheduling that same script catches deviations from the expected baseline automatically, and running scheduled nmap scans against an approved baseline catches open ports independent of whatever the firewall rules say should be happening. You don’t even need to write the script yourself. AI Copilot can do it for you.
Getting from “looks open” to actually confirmed
Running the right command isn’t the same as reading it correctly. Two mistakes account for most of the false confidence that shows up after a port check.
Loopback binding that looks like a public port if you don’t check the address
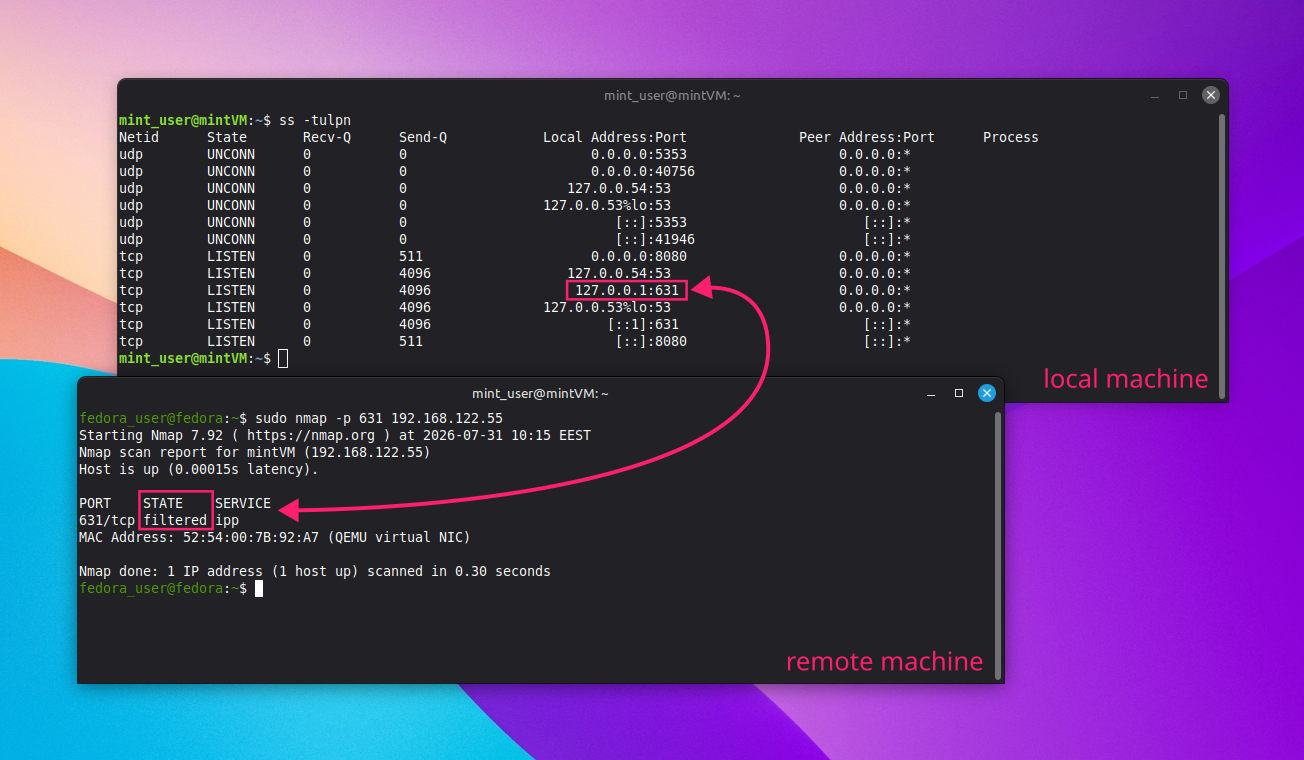
Admins commonly assume a port is publicly open because a tool like ss -tulpn or netstat -tulpn shows it in a LISTEN state, without checking the address field the port is bound to. A port bound to 127.0.0.1:<port_number> is only reachable from the machine itself. It shows as LISTEN, but no service on it is available to anything outside the box.
To diagnose:
Confirm the issue by running
sudo nmap -p <port> <machine_ip>from a different machine on the same network. A result ofclosedorfilteredwhen the local check showedLISTENpoints to a loopback-only binding
- Cross-check against the
ss -tulpnoutput rather than assuming it’s a firewall issue. If the address is127.0.0.1, no firewall rule is going to change the outcome
The same logic applies to any specific interface binding. A port bound to 192.168.1.50:<port_number> only accepts traffic arriving through that interface, while 0.0.0.0:<port_number> accepts it on any interface.
A port that shows open locally but external connections still fail
A local check showing LISTEN doesn’t rule out a connection problem elsewhere in the stack. The failure signature tells you which layer to check first: a timeout means packets are being dropped silently, while a refused connection means the server actively sent back an RST or an ICMP unreachable message.
To diagnose:
- Check the local binding status with
sudo ss -tulpn. If the port is bound to the loopback interface, the fix is to reconfigure the service to bind to an externally reachable address - If the binding is correct, inspect the local OS firewall rules to confirm incoming packets on that port aren’t being silently dropped or explicitly rejected
Working through binding first and firewall rules second keeps you from chasing the wrong layer. A dropped connection and a rejected one point to different fixes, and neither one looks like a loopback problem from the outside.
Port visibility shouldn’t be a guessing game
Checking one box for open ports is a five-minute job. Checking it consistently across every server in the fleet on a schedule you can actually keep to is the part that quietly falls off the list.
Atera’s remote scripting through the Linux Agent lets you push the same ss or lsof check out to selected devices or device groups on demand, so verifying what’s actually listening doesn’t depend on remembering to SSH into forty machines one at a time.
Related Articles

How to reduce alert fatigue across your IT team
Your technicians aren't ignoring alerts because they're careless. They're ignoring them because most alerts have taught them to. Once the stream stops being trustworthy, real failures slip past with the noise. Fixing it means deciding what deserves an interruption, tuning out transient spikes, collapsing alert storms, and automating the fixes you've run a hundred times.
Read now
How to close the IT skills gap on your team
Course completions don't close skills gaps. Technicians finish the training, then hand the first unfamiliar failure straight back to a senior engineer. Real capability gets built on live tickets, incidents, and maintenance windows, with guidance that fades as competence grows.
Read now
How to calculate cost per ticket (and why most teams get it wrong)
Most cost-per-ticket figures are wrong before anyone reads them. Missing overhead, tickets that were opened but never closed, spam and duplicates padding the count, and one month's costs divided by another month's tickets all make support look cheaper than it is. Fix both sides of the division and the number finally shows where technician time and money actually go.
Read now
How to prepare for a software license audit
A vendor audit notice doesn't wait for you to get organized. It demands proof, right now, that every install matches every entitlement you've paid for, and most IT teams find out the hard way how much they don't actually know about their own environment. Getting audit-ready before the letter arrives is the difference between negotiating from strength and paying for months of scrambling.
Read nowEndless IT possibilities
Boost your productivity with Atera’s intuitive, centralized all-in-one platform









