
Every Linux admin has experienced this at least once, where a permission error is blocking something at 2 AM, and chmod 777 makes the error go away. It works (technically) but it also means every user on that system can now read, write, and execute a file you were just trying to unblock. Six months later, nobody remembers why /var/www/uploads is wide open to anyone with an account.
Permission errors are almost never really about permissions. They’re about not knowing exactly what read, write, and execute are doing under the hood, or how Linux decides whether you’re being evaluated as the owner, the group, or “everyone else.” Once that model actually makes sense, chmod and chown stop being commands you paste from a forum thread and start being tools you use with intent.
» Not sure what Linux version you’re running? Here’s how to check your Linux version
Understanding Linux permissions and ownership
Every file and directory on a Linux system carries two separate control mechanisms: a set of permissions and a set of ownership assignments. Get either one wrong and you’ll either lock yourself out of something you need or leave a door open that should’ve been shut. Before touching chmod or chown, it’s worth being precise about what each one actually governs.
The three permission categories
Linux permissions come down to three bits (read, write, and execute), but what each one does depends on is whether you’re looking at a file or a directory:
Permission | File | Directory |
Read (r) | View file contents | List entries (ls) |
Write (w) | Modify or delete | Create, delete, rename entries |
Execute (x) | Run as program or script | Enter or search (cd) |
The directory column is the one that trips people up. Read access on a directory only tells you what’s inside it and doesn’t let you actually enter it or touch anything in it. That requires execute. This is why you can sometimes see filenames in a directory listing but get “Permission denied” the moment you try to cd into it.
The three ownership classes
Every file has three ownership classes attached to it. Linux checks them sequentially, then stops at the first match.
Class | Description | Priority order |
User/Owner (u) | The account that owns the file | Checked first |
Group (g) | Users belonging to the file’s assigned group | Checked second, if you’re not the owner |
Others (o) | Everyone else | Checked last, if you’re neither the owner nor in the group |
That evaluation order matters more than it looks like it should. If you’re the file’s owner but your own permissions are more restrictive than the group’s, you don’t fall through to the more permissive group setting. The owner check already matched, so that’s the one that applies.
It’s a common source of “why can’t I access my own file” confusion, and the answer is almost always sitting in the owner permission bits, not the group’s.
4 ways to change permissions and ownership
Note: All these steps need you to either own the file or be running as root/sudo.
Method 1: Transfer ownership with chown and chgrp
Use this when a file or directory needs to belong to a different user or group entirely, such as after a migration, a new hire taking over a project folder, or correcting ownership left behind by a deployment script.
- From an elevated command line utility, run
chown <new_user> <file>to change the file’s owner. Only a privileged process (root or sudo) can reassign ownership, since a regular user can’t hand their own files to someone else - Run
chown :<new_group> <file>orchgrp <new_group> <file>to change the group instead - Run
chown <new_user>:<new_group> <file>to change owner and group in a single command Add the
-Rflag (chown -R <new_user>:<new_group> <directory>) to apply the change to a directory and everything inside it
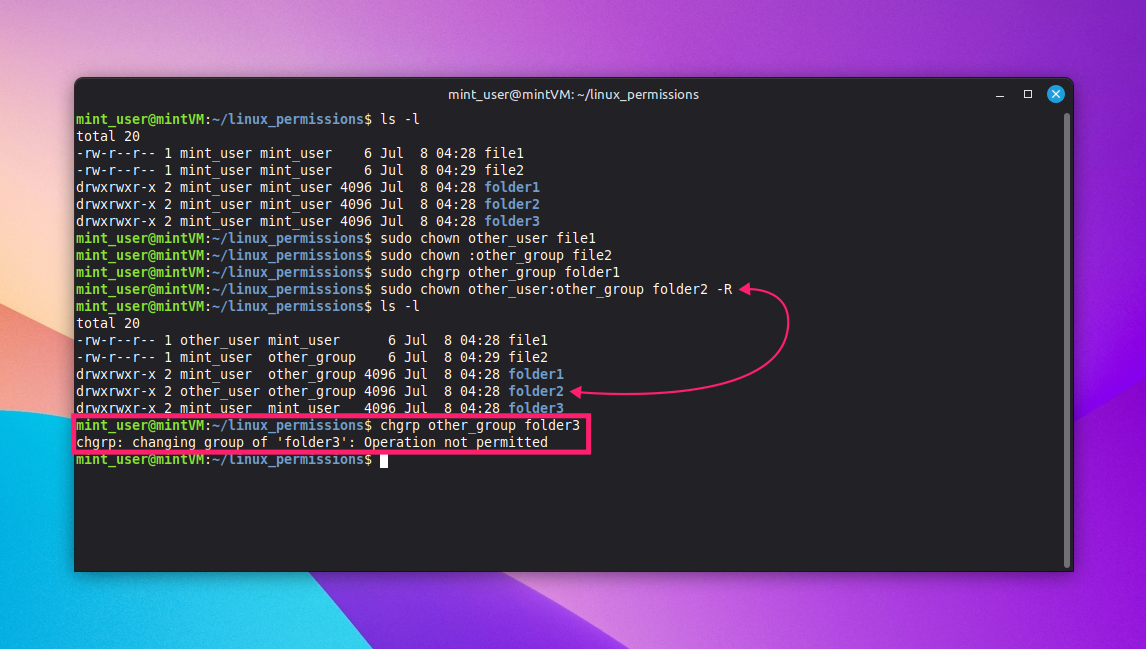
Method 2: Change permissions visually through file manager
Use this when you’re working on a desktop environment and want to check or adjust permissions without opening a terminal, which is useful for quick spot-checks or when handing a machine to someone less comfortable on the command line.
- Open the File Manager and navigate to the file or folder you want to update
Right-click the item and select Properties. If you don’t own the item and aren’t running as root, you’ll see a lock icon and won’t be able to make changes

Switch to the Permissions tab and update the access level and group ownership using the dropdown menus

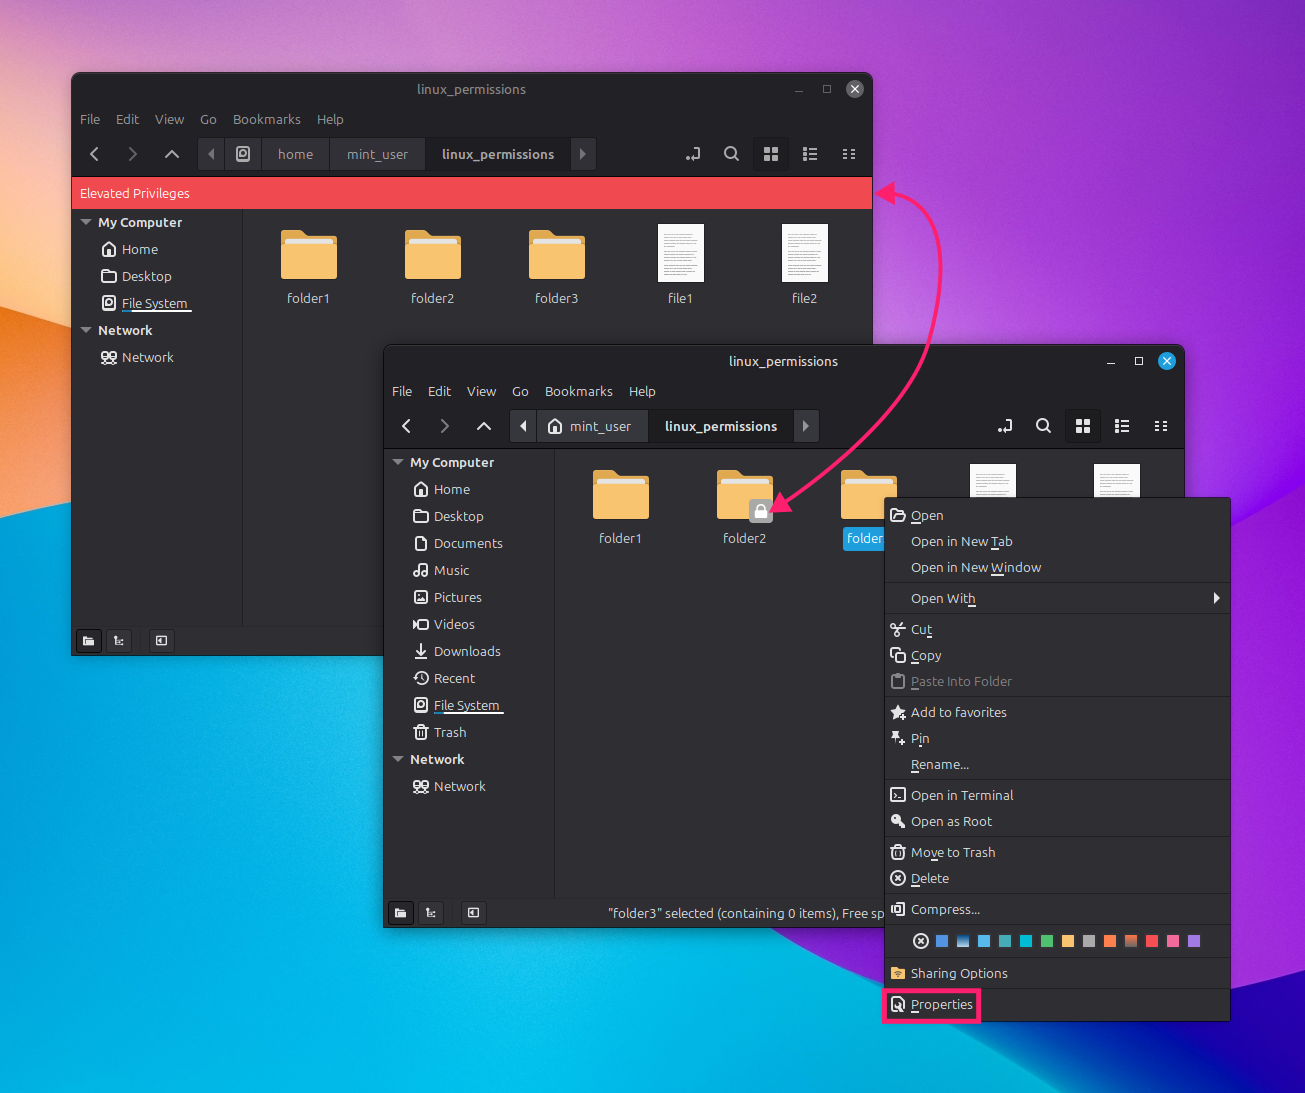
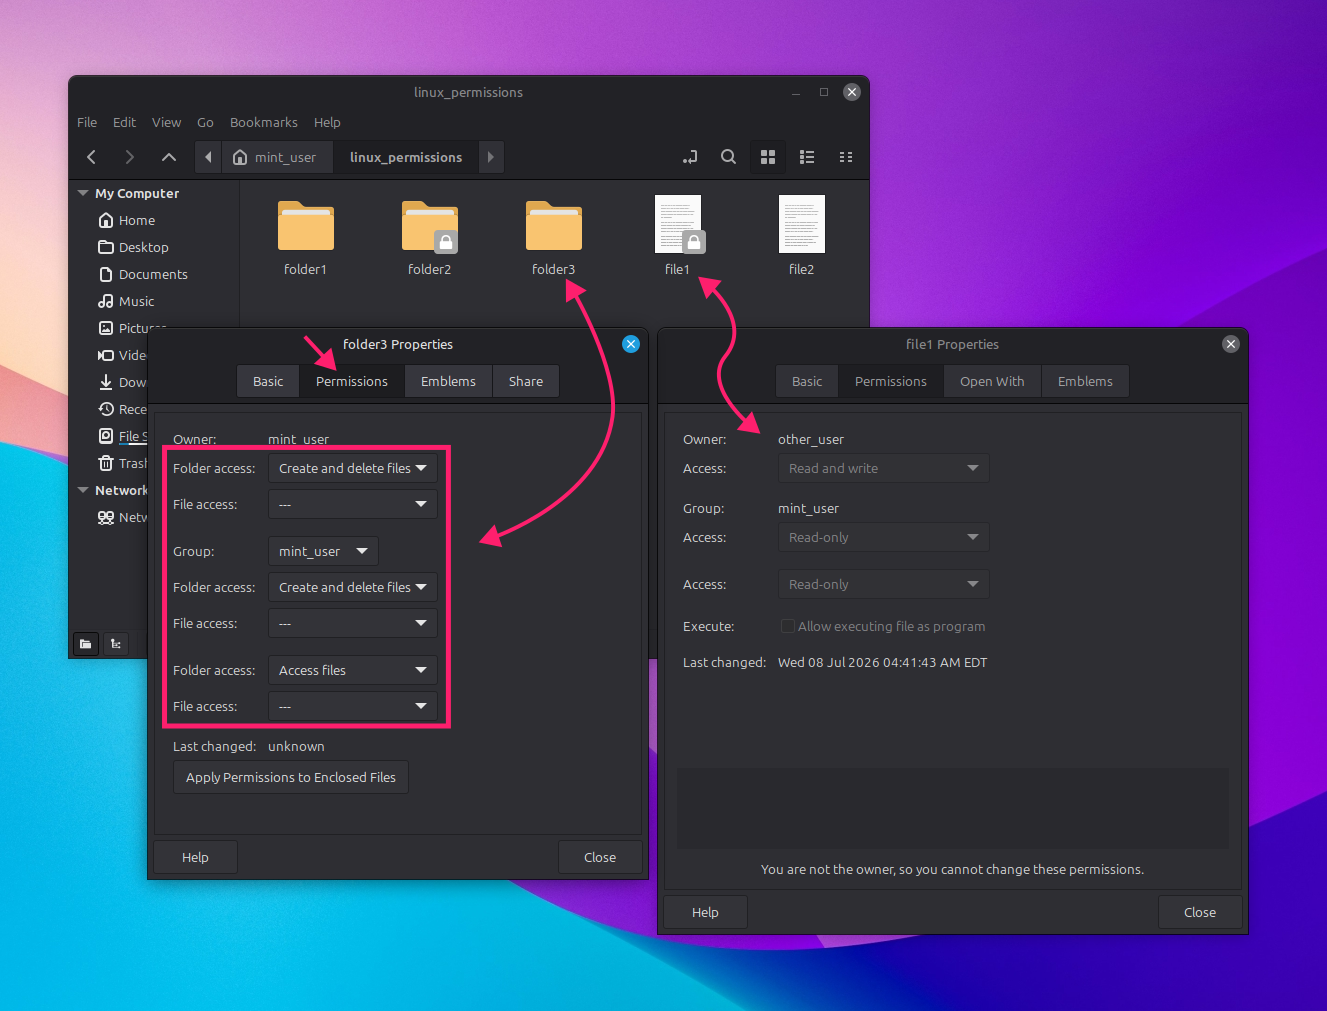
Exact menu names and steps vary slightly depending on your distro and file manager, but the Properties > Permissions path holds across nearly all of them.
Method 3: chmod with symbolic notation
Use this when you want to add or remove one specific permission without recalculating the entire set, such as making a single script executable without touching anything else about it.
Who | Operator | Permission |
u – user | + – add | r – read |
g – group | – – remove | w – write |
o – others | = – set exactly (adds specified, removes unspecified) | x – execute |
a – all |
The right syntax for this is: chmod [who][operator][permission] filename
Here are some examples:
chmod u+x script1.shadds execute permission for the ownerchmod go-w txt_file.txtremoves write permission for group and otherschmod a=r file3sets the file to read-only for everyone
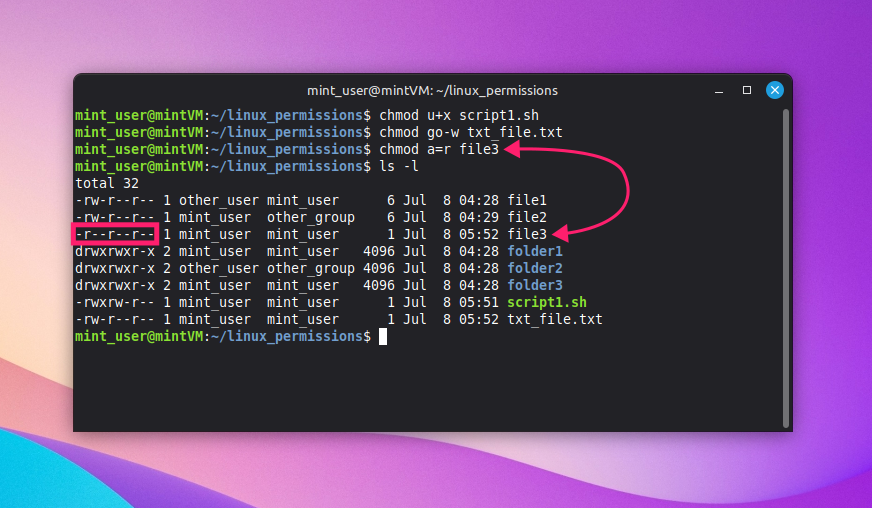
Method 4: chmod with octal (numeric) notation
Use this when you want to set a file’s entire permission set in one move, which is the standard approach for bulk changes or scripted permission policies since it’s a single fixed value rather than a series of additions and removals.
Each permission carries a fixed weight (read is 4, write is 2, execute is 1) and you add the values for each class, then combine the three sums into a 3-digit number in owner-group-others order.
For example:
Value | Owner | Group | Others | Result |
755 | 4+2+1=7 (rwx) | 4+1=5 (r-x) | 4+1=5 (r-x) | rwxr-xr-x |
644 | 4+2=6 (rw-) | 4 (r–) | 4 (r–) | rw-r–r– |
Warning: Both methods above work recursively with chmod -R <directory>. But be careful with +x since a recursive chmod -R a+x makes every file executable, not just directories, which usually isn’t what you want. Use capital X instead since chmod -R a+wX <directory> only adds execute permission to directories and files that already have it, leaving your regular files alone.
Manually running chmod and chown doesn’t hold up once you’re managing permissions across dozens or hundreds of servers rather than one. Configuration management tools handle this by defining the desired state once and applying or continuously enforcing it everywhere:
- Ansible: The ansible.builtin.file module sets owner, group, and mode per file or directory across multiple hosts in a single playbook run.
- Puppet: The file resource declares the desired ownership and mode, and the Puppet agent continuously enforces it going forward.
- Chef: The file resource enforces ownership, group, and mode on every Chef client run.
This entire process gets easier with RMM tools rather than a dedicated config management stack. For example, Atera’s AI Copilot can generate the chmod or chown script from a plain-language description of what you want enforced, and you can deploy it remotely as a scripted action or automation profile across whichever endpoints match your criteria through the RMM connection. No need to hand-write and test the syntax yourself before rolling it out fleet-wide.
Common mistakes and how to troubleshoot them
Permission problems usually don’t come from Linux being unpredictable. They come from a handful of avoidable mistakes. Here’s what causes most of them and how to confirm what’s actually going on before you change anything else.
- Using
chmod 777as a quick fix: This grants read, write, and execute to owner, group, and others, meaning any user on the system can modify or delete the file. - Recursive
chmod -R 755on a mixed directory: This blindly adds the execute bit to every file, turning plain data files into executables. - Removing execute (
x) from a directory: This makes the directory’s contents inaccessible even with read permission intact, since entering or searching a directory requires execute, not just read.
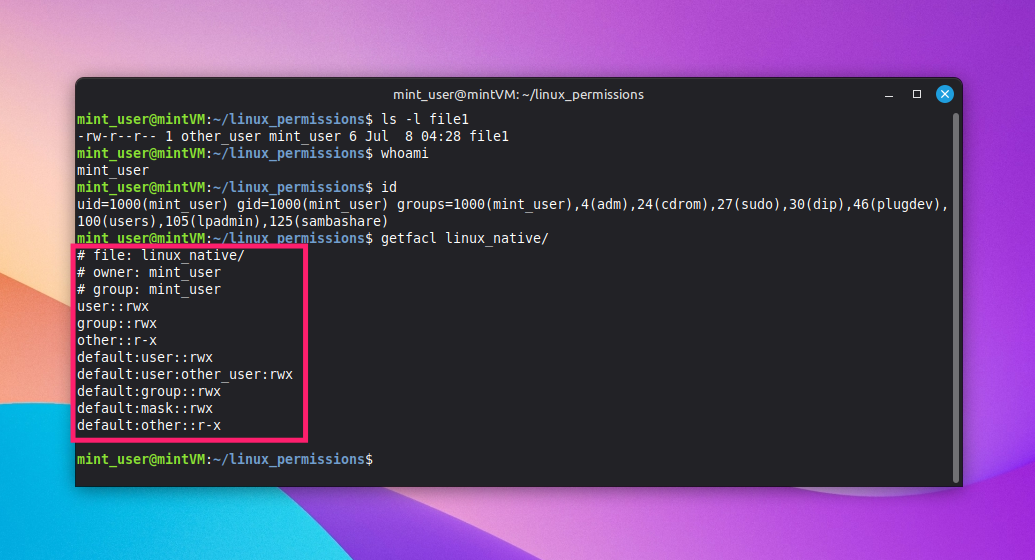
Here are the troubleshooting steps depending on what you might see:
If you see | Try this |
"Permission denied" and you’re not sure why | Run |
Uncertainty about which user or groups you’re operating as | Run |
Permissions look correct but access still fails | Run |
» Use Mint? Here’s how to update Linux Mint
Recovering from an accidental permission change
If a permission change on a critical system folder goes wrong, the recovery path depends on what was affected:
- Identify exactly what changed before running anything else since a blind fix can make things worse
- If a backup or filesystem snapshot is available, restore from it. This is typically the safest option
If the affected files belong to a system package, use your package manager to restore its default ownership and permissions instead of guessing at the correct values:
- On Debian-based systems, run
sudo apt reinstall <package_name> - On rpm-based systems like Fedora, run
rpm -V <package_name>to check against the package database non-destructively, thenrpm --restore <package_name>to restore the package orrpm --setperms <package_name>to fix permissions only. Add-vfor verbose output
- On Debian-based systems, run
Permission management doesn’t stop at one machine
Getting permissions right on one server is a habit. Keeping them right across every endpoint your team touches is a different problem entirely. Manual chmod and chown commands don’t scale to inconsistent umask defaults, ownership that drifts after a migration, and one box that never got the same hardening pass as the rest.
Atera’s Linux RMM lets you push permission and ownership changes consistently across your whole fleet through scripted actions and automation profiles, so a standard you set on one machine doesn’t quietly erode on the other 200. AI Copilot can help generate and troubleshoot those scripts from a plain-language description, but the rwx and ownership model you just worked through is what tells you whether the script is actually doing what you meant it to.
If you’re managing more than a handful of Linux servers, try out Atera’s Linux agent through the 30-day free trial to see how much of that setup work can be handled centrally instead.
Frequently Asked Questions
Related Articles

How to set Windows environment variables in PowerShell
PowerShell environment variables can be set at the Process, User, or Machine level, with each scope serving a different purpose. This blog covers how to configure these variables and deploy system-level settings across multiple Windows devices.
Read now
How to install AppImage on Linux
An AppImage that won't launch usually isn't broken. It's missing FUSE, sitting on the wrong filesystem, or lacking its execute bit. Here's every method for running one on Linux, from a single terminal command to pushing it across an entire fleet.
Read now
How to remove write protection from a USB
A drive gone read-only isn't always a two-minute registry fix. Sometimes it's flash memory quietly failing, and every write attempt afterward costs you more of the data you're trying to save. Here's how to tell which one you're dealing with and what to do once you know.
Read now
How to enable or disable Windows Subsystem for Linux WSL in Windows 10
Enabling WSL feels harmless right up until a checkbox turns into error 0x80370102 and a BIOS setting nobody documented. WSL now shows up on more professional machines than a standalone Linux install, which means more failed toggles landing on IT's desk.
Read nowEndless IT possibilities
Boost your productivity with Atera’s intuitive, centralized all-in-one platform









