
Table of contents
An update that hangs at 35% and rolls itself back and a 0x8007000d error that shows up every time you retry are two moments an admin has to decide whether the problem is worth digging into or worth just clearing out. Corrupted update cache files are one of the most common culprits behind stuck installs, and fixing it doesn’t usually require a repair, clean install, or a rebuild.
The catch is knowing when clearing the cache is actually the right move, since doing it while an update is mid-install can turn a recoverable problem into a genuinely broken one.
» Here’s how to reinstall Windows 11 and use the Windows 11 creation tool
When clearing the update cache is actually necessary
Windows Update failures aren’t a reason to reach straight for the cache. Microsoft’s own troubleshooting guidance for update problems starts with running the built-in Windows Update troubleshooter, not clearing files by hand.
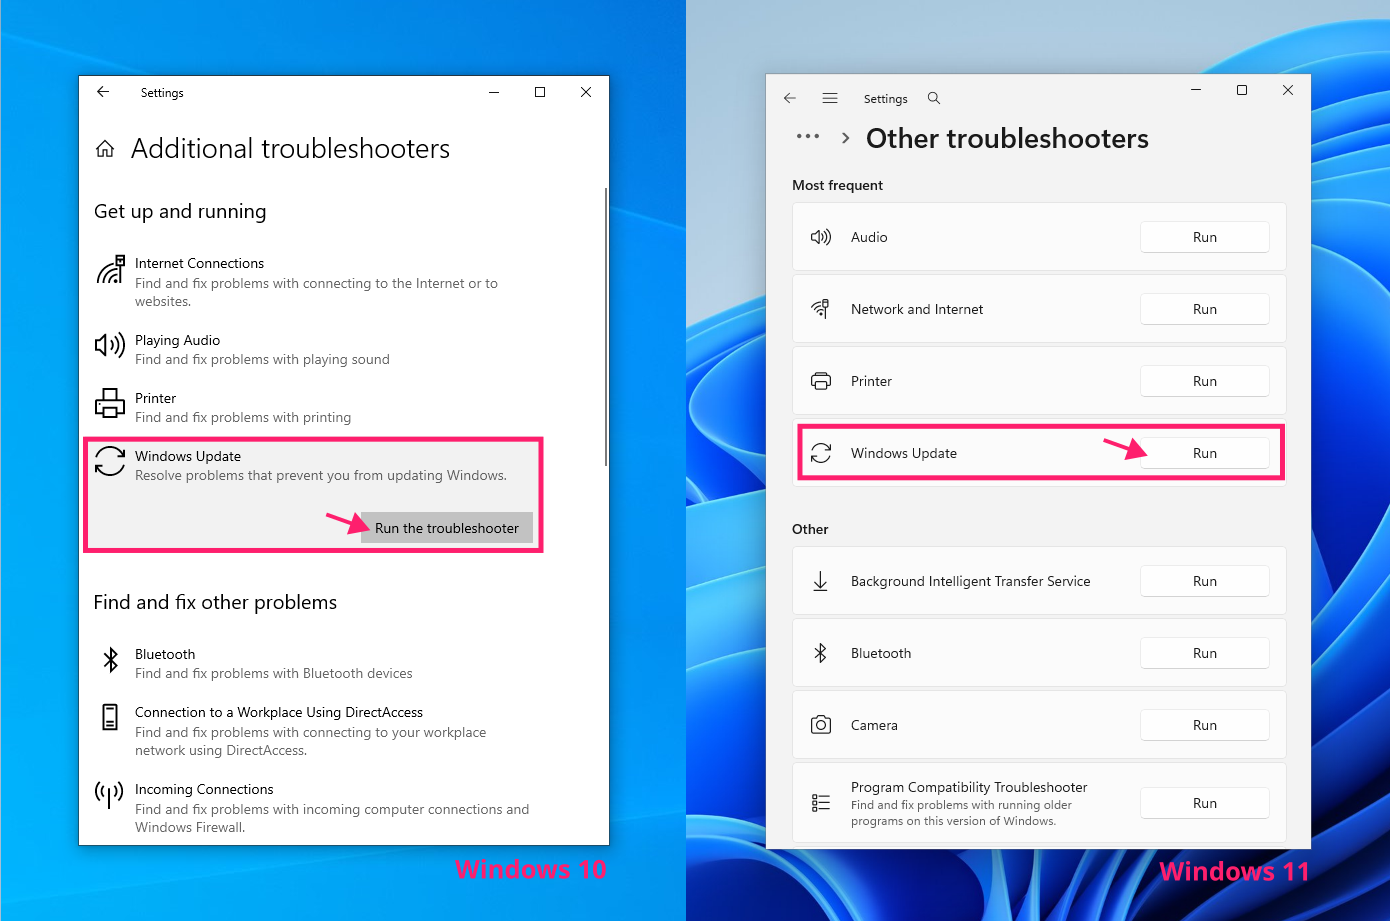
When the troubleshooter comes up empty and the error points specifically at corrupted or missing update files, that’s when you need to clear the update cache. These are the codes to watch for:
- 0x80246007: Missing download, or required update files are unavailable.
- 0x800705b4: Update took too long to install, or was interrupted.
- 0x8007000d: Update files are corrupted or invalid (Windows 11).
- 0x80070570: Windows can’t read or process files required to install an update.
Most of these happen because of an interrupted download, such as a connection drop, a forced shutdown, or a reboot mid-transfer leaving partial or truncated update files sitting in the cache. Underlying system volume corruption, whether from a failing drive or file system errors, can produce the same result even when the download itself completed cleanly.
» Did you know you can disable Windows updates and then manually re-enable Windows update
When to leave the cache alone
Don’t clear the cache while an update is actively staged or pending install and restart. The files sitting in SoftwareDistribution and catroot2 at that point are still being referenced by the in-progress install, and deleting them mid-process will interrupt it, leaving the system in a worse state than the one you started troubleshooting.
In effect, you’d be manually recreating the exact corruption scenario the cache clear is meant to fix. Let a pending update finish or fail on its own before you touch the cache.
» Here’s how to stop a Windows update in progress
3 Ways to clear the Windows update cache
Once the diagnosis points to a corrupted cache, the fix comes down to clearing two locations and restarting the services that lock them. Both directories and all three services are identical on Windows 10 and 11, so everything below applies to either OS without modification.
Where the cache lives:
%systemroot%SoftwareDistribution(typicallyC:WindowsSoftwareDistribution): Holds the downloaded update files themselves.%systemroot%System32catroot2(typicallyC:WindowsSystem32catroot2): Holds update signature validations.
Method 1: Disk Cleanup or Storage Sense
Use this method for a single device where you want a guided cleanup without opening the command line. Both tools stop the dependent services internally, so there’s no manual prep step.
Disk Cleanup:
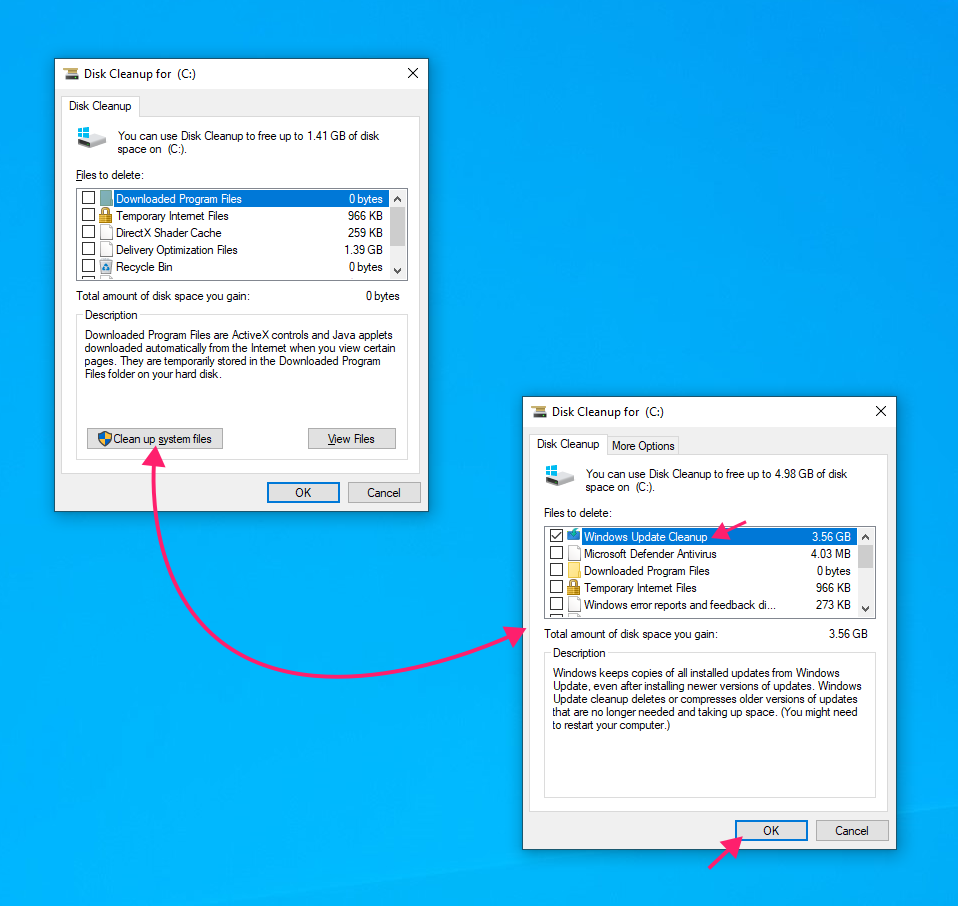
- Open Disk Cleanup
- Click Clean up system files (requires elevated privileges)
- Check the Windows Update Cleanup category
Click OK, then Delete Files in the confirmation prompt

» Confused? See our guide to using Disk Cleanup in Windows 11
Storage Sense:
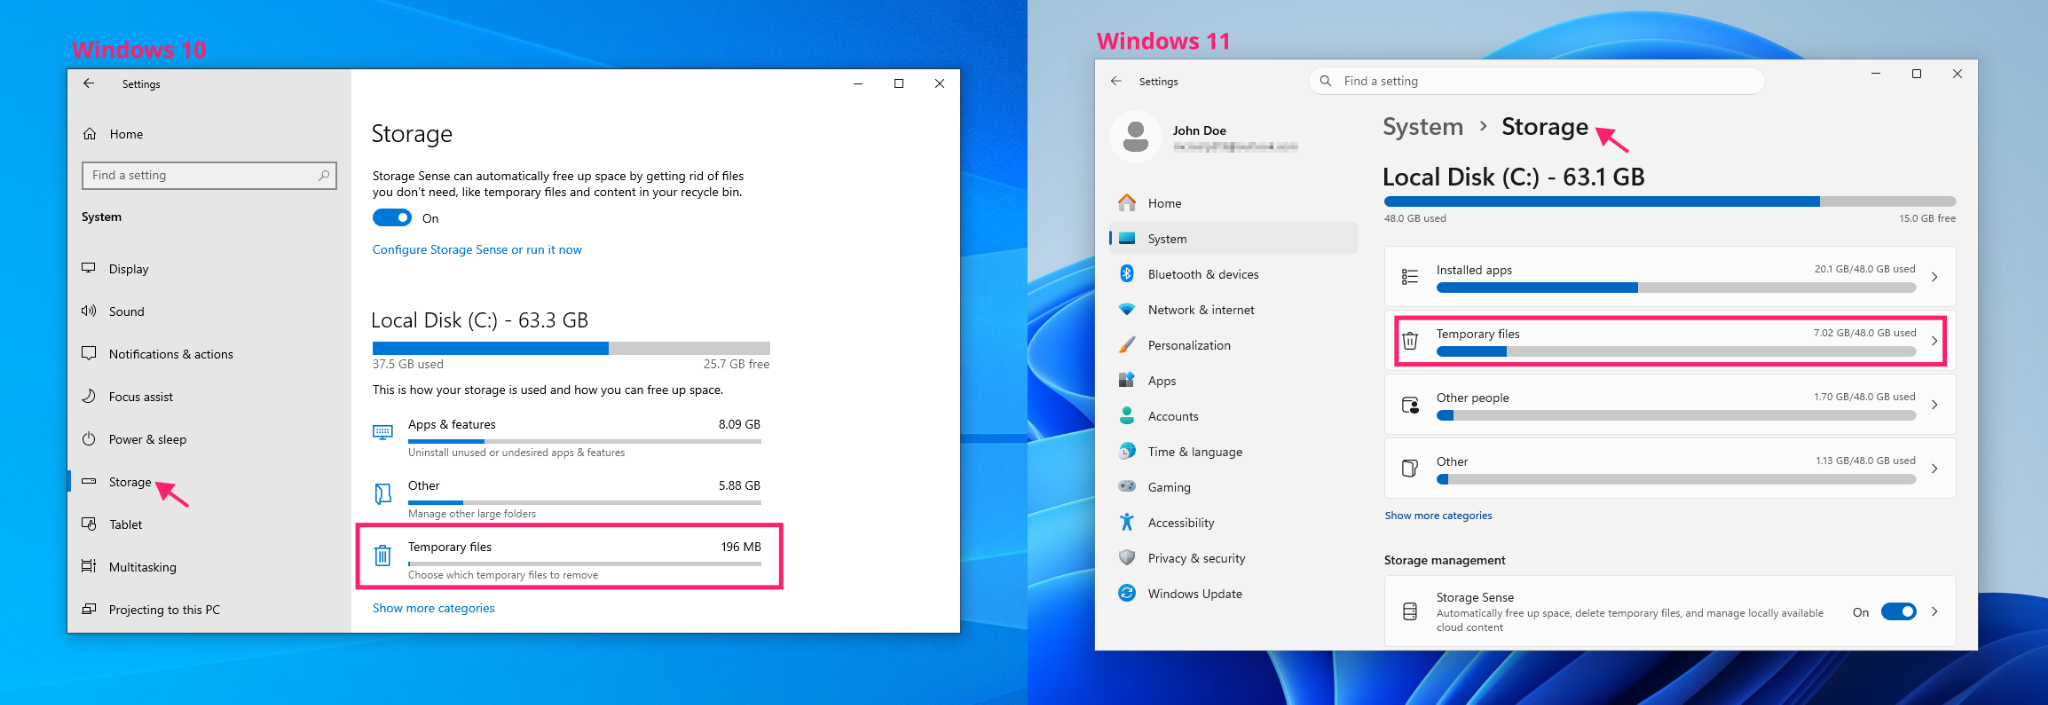
- Press
Win + Ito open Settings, then go to System > Storage Select Temporary Files

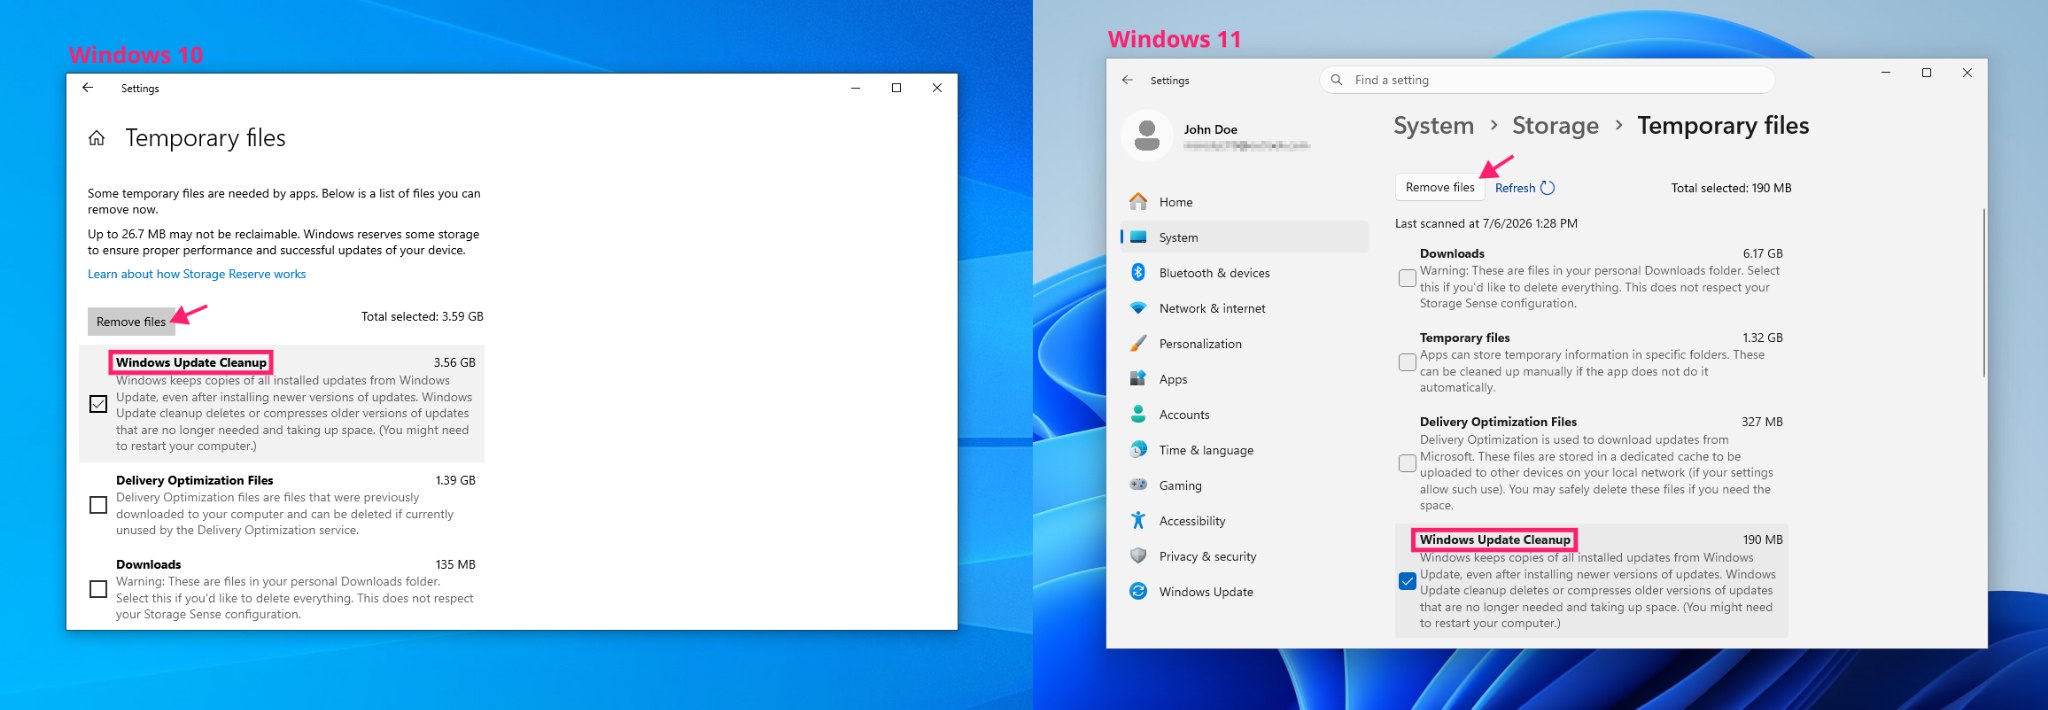
- Check the Windows Update Cleanup category
Click Remove files

Method 2: Command Prompt or File Explorer
Use this method when Disk Cleanup doesn’t show the option, which is common once the cache has grown unusually large or when you want direct control over the process. The services need to stop first regardless of which tool you use to delete the files.
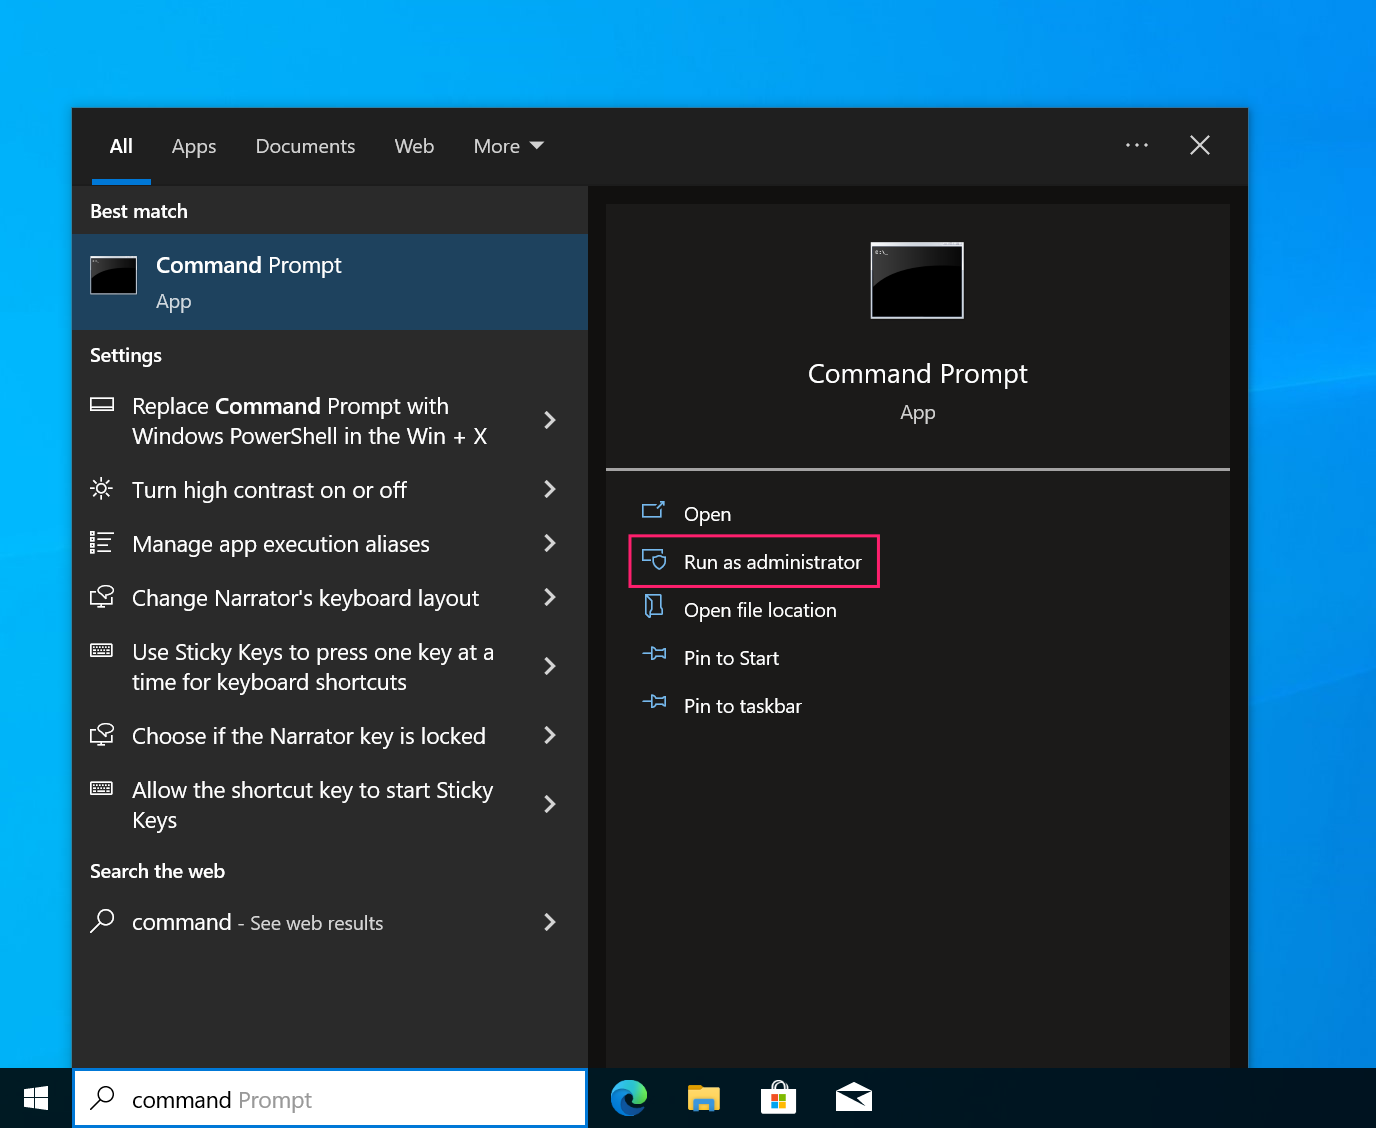
1. Open Command Prompt as administrator
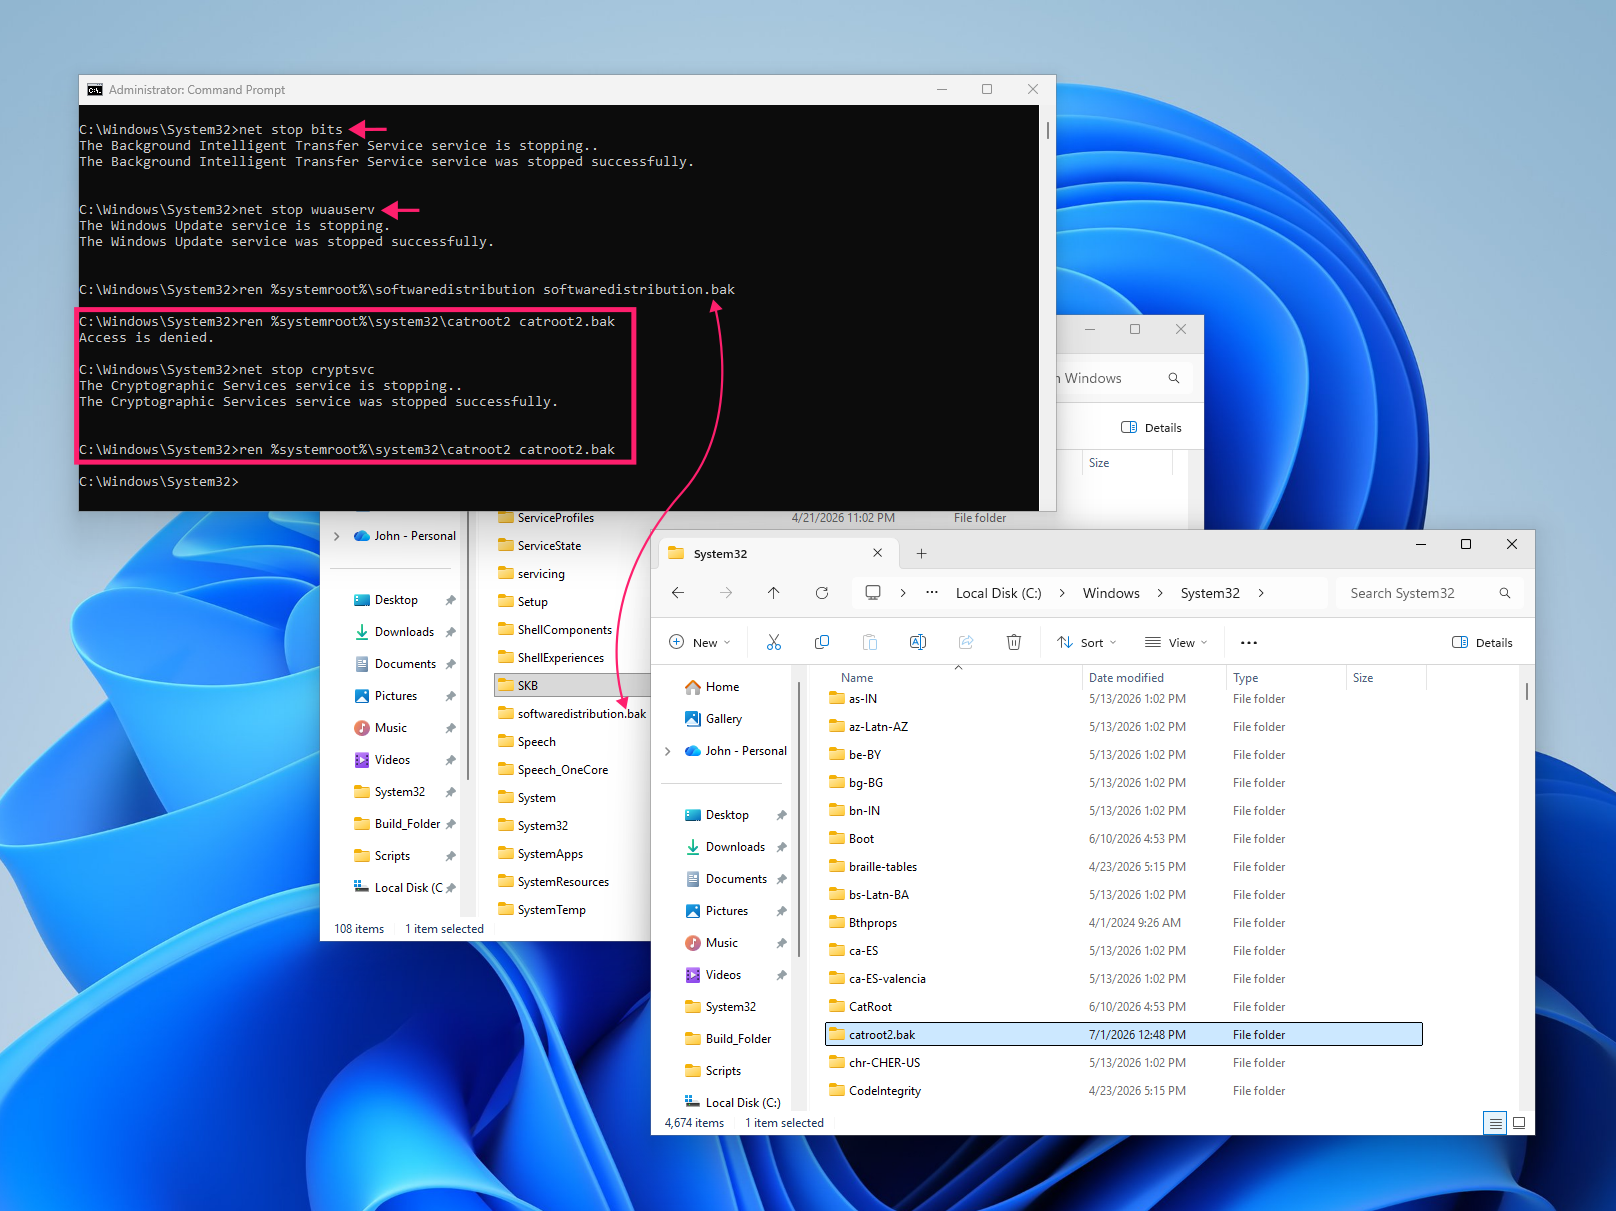
2. Stop the dependent services with these commands: net stop bits, net stop wuauserv, and net stop cryptsvc. Skipping this step produces an “Access is denied” or “file in use” error on the next step, no matter which deletion method you use
3. Delete the cache contents using either option:
- Command Prompt: Rename the folders rather than deleting them outright, so you can roll back if something goes wrong:
ren %systemroot%softwaredistribution softwaredistribution.bakandren %systemroot%system32catroot2 catroot2.bak. Once you’ve confirmed updates install normally again, delete the renamed folders:rmdir /s /q C:WindowsSoftwareDistribution.bakandrmdir /s /q C:WindowsSystem32catroot2.bak
- File Explorer: Navigate to
C:WindowsSoftwareDistribution, select everything inside the folder (not the folder itself), and delete it
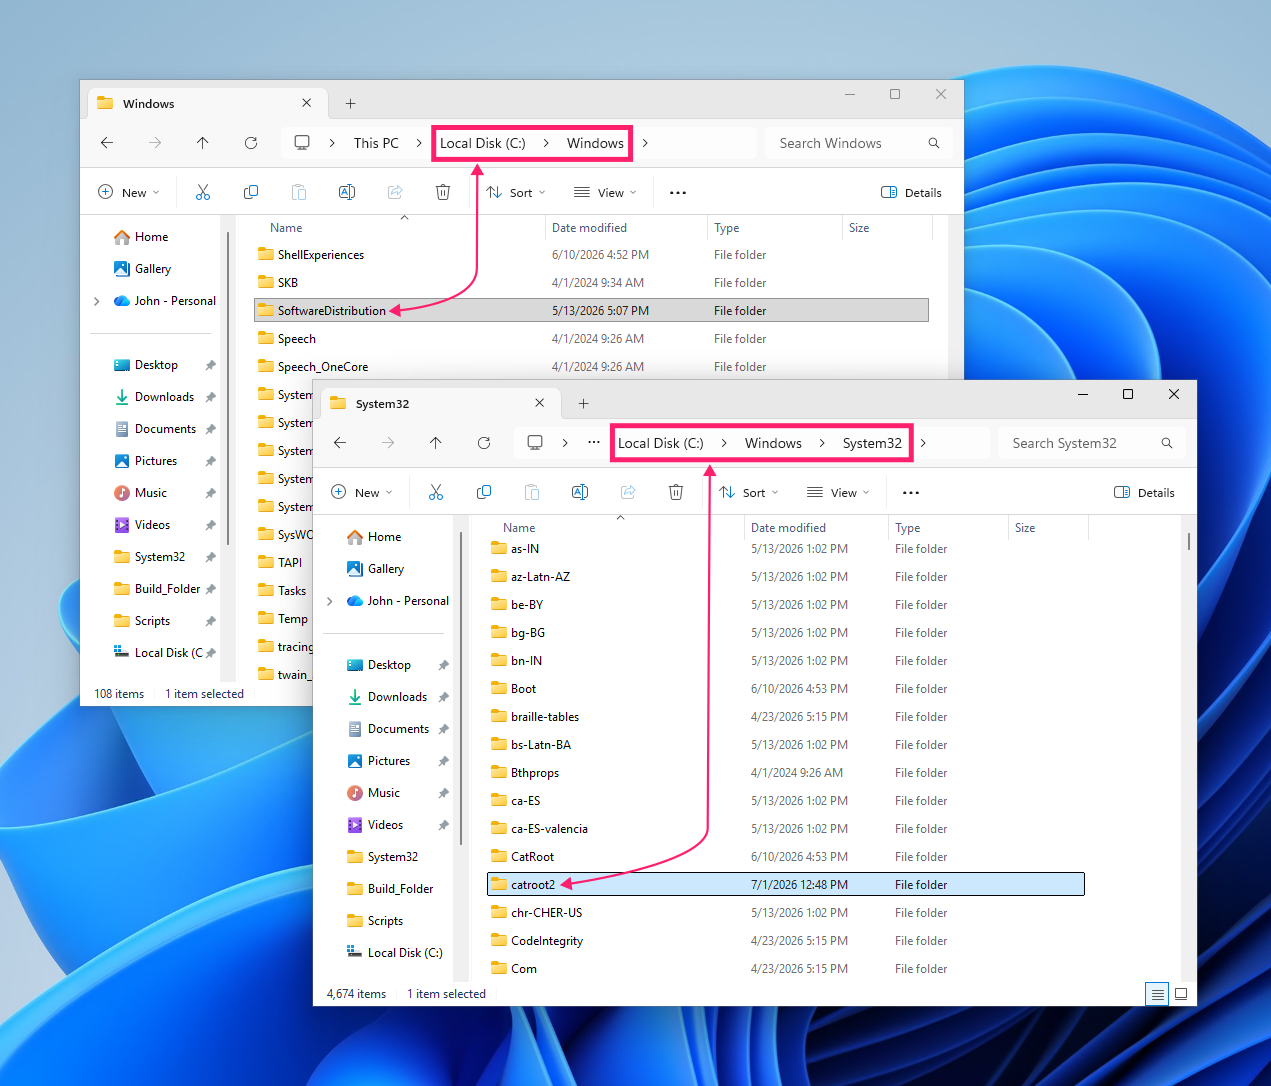
- Repeat for
C:WindowsSystem32catroot2
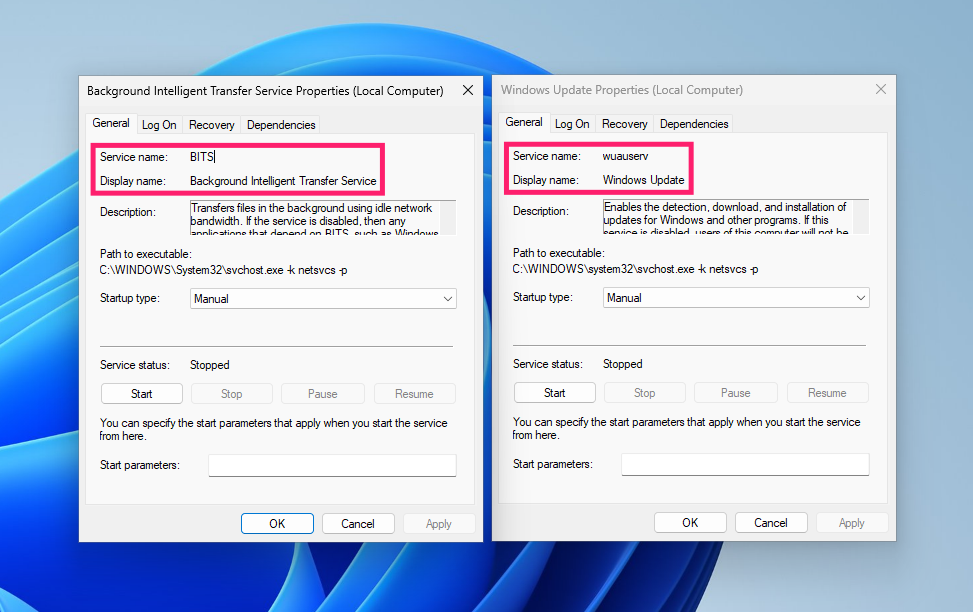
4. Restart the services with net start bits, net start wuauserv, net start cryptsvc
» Did you know you can clear cache in Edge?
Method 3: PowerShell script
Use this method when you’re clearing the cache across more than a handful of machines and want a repeatable, one-command process instead of running the same sequence manually each time.
Here’s a script you can use:
The Script:
Atera does not guarantee the integrity, availability, security, virus-free, safety, lawfulness, non-infringement, rights’ status, or functionality of the scripts. The use of the shared scripts is at your own risk. Scripts are provided “AS IS”. *
# requires Administrator privileges
Write-Host "Stopping dependent services..." -ForegroundColor White

$services = @(
"wuauserv", # Windows Update
"bits", # Background Intelligent Transfer Service
"cryptsvc" # Cryptographic Services
)

foreach ($service in $services) {
if (Get-Service -Name $service -ErrorAction SilentlyContinue) {
Stop-Service -Name $service -Force -ErrorAction SilentlyContinue
}
}
Start-Sleep -Seconds 5

Write-Host "Removing Windows Update cache..." -ForegroundColor Yellow
$folders = @(
"C:WindowsSoftwareDistribution",
"C:WindowsSystem32catroot2"
)

foreach ($folder in $folders) {
if (Test-Path $folder) {
try {
Remove-Item "$folder*" -Recurse -Force -ErrorAction Stop
Write-Host "Cleared: $folder" -ForegroundColor Green
}
catch {
Write-Warning "Failed to clear $folder"
Write-Warning $_.Exception.Message
}
}
}

Write-Host "Restarting services..." -ForegroundColor Yellow
foreach ($service in $services) {
if (Get-Service -Name $service -ErrorAction SilentlyContinue) {
Start-Service -Name $service -ErrorAction SilentlyContinue
}
}

Write-Host "Windows Update cache has been cleared." -ForegroundColor GreenTo use this script:
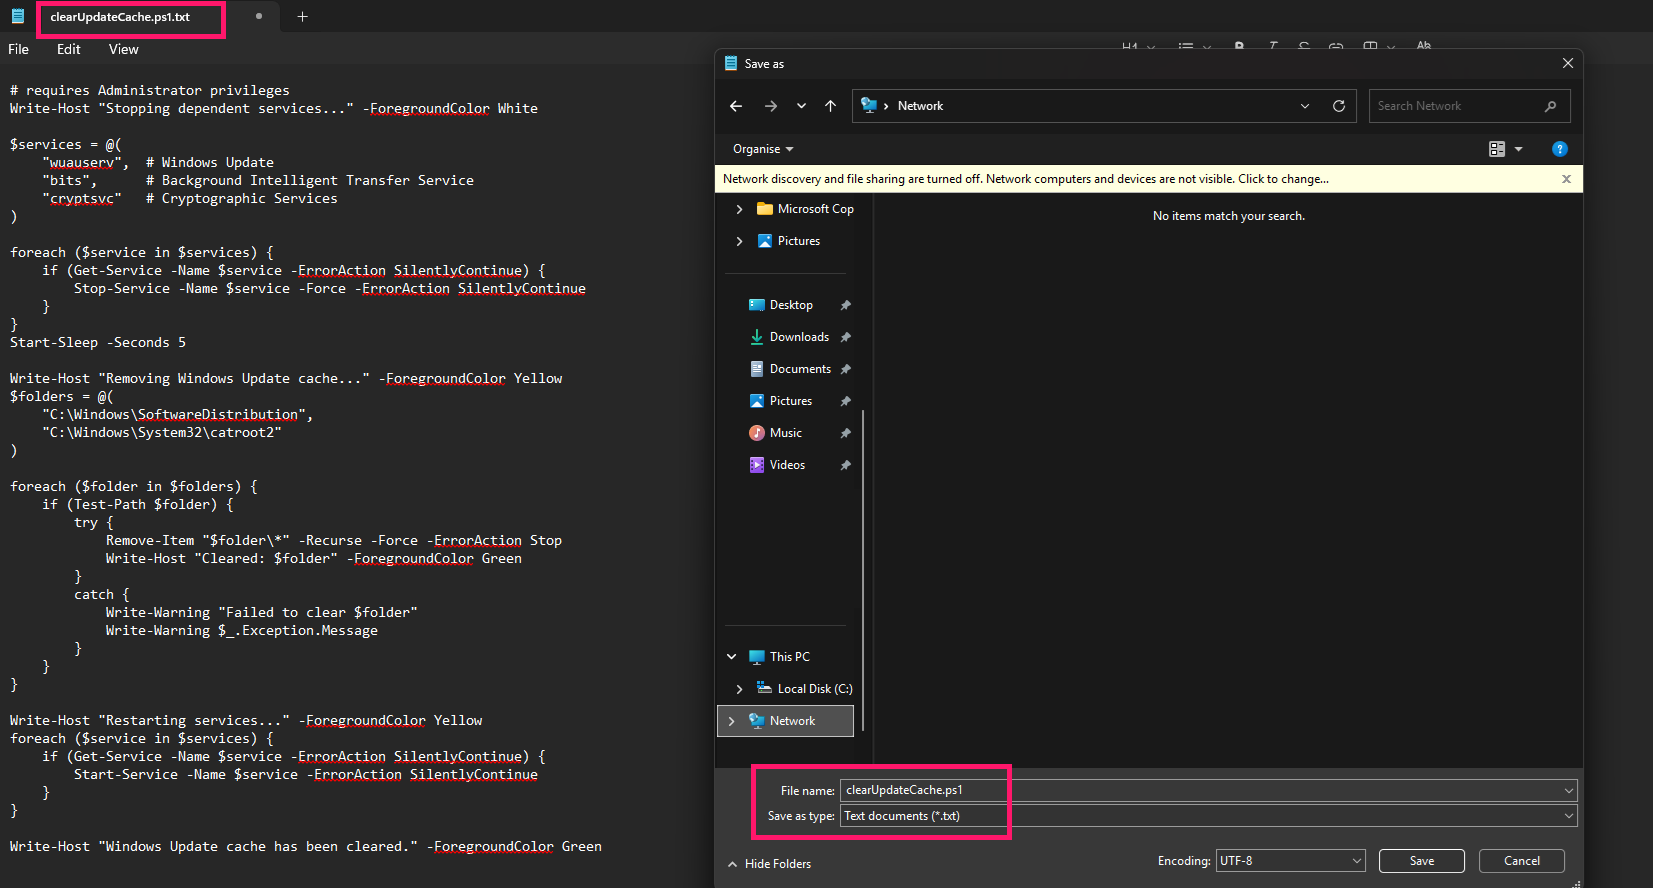
Save the script as
clearUpdateCache.ps1in a text document somewhere where all endpoints on the network can access it
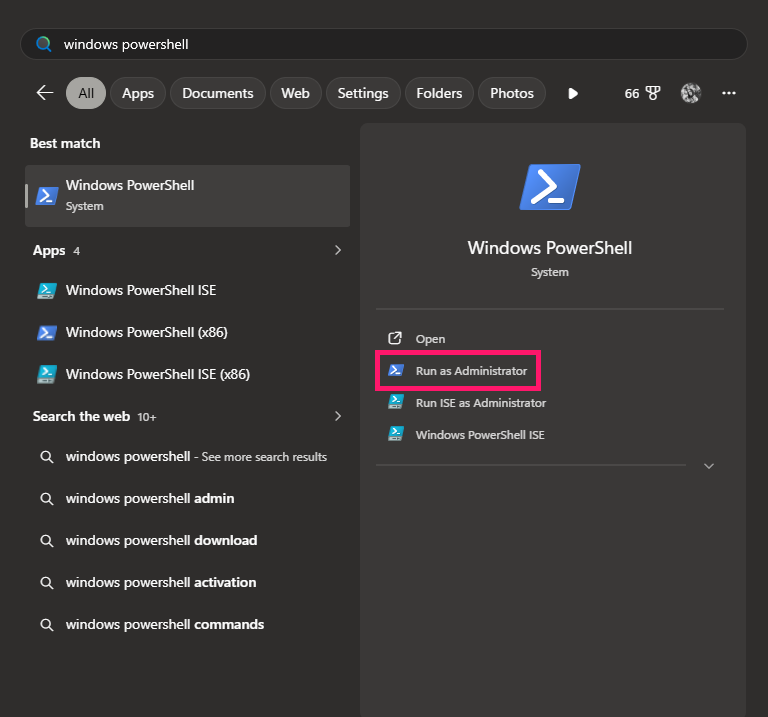
Open PowerShell (Terminal) as administrator

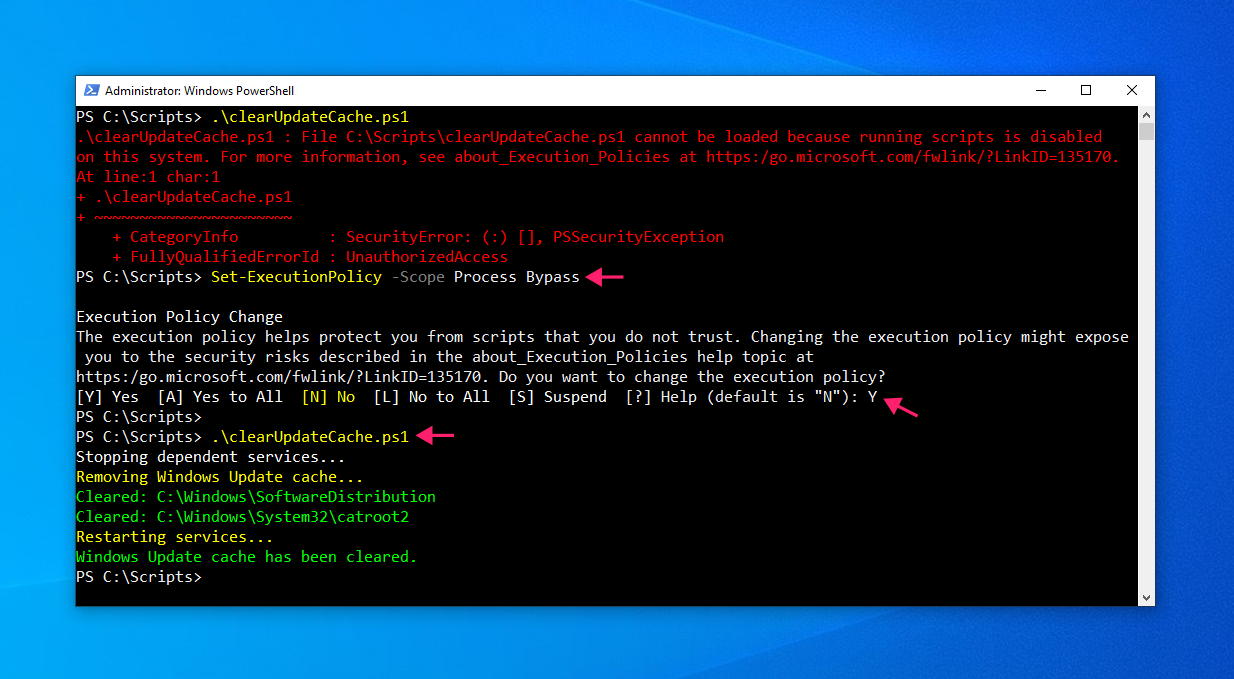
- Navigate to the script’s location with
cd C:PathToScript - Run it with
.clearUpdateCache.ps1
If you hit an execution policy error, run Set-ExecutionPolicy -Scope Process Bypass and confirm with Y to allow the script to run for the current session only.
Pro tip: It might seem overwhelming, but you don’t need to know anything about coding to use PowerShell. With Atera, AI Copilot can generate the script you need for you from simple natural language queries, and you can then deploy that script remotely to all endpoints on your network with the RMM platform.
Clearing the cache is a fix, not a first resort
Stuck updates are rarely a mystery once you know what to look for. The error codes point to corruption, the fix is a handful of commands, and the process is the same on Windows 10 and 11. What matters is diagnosing before you act, since clearing a cache that isn’t actually the problem just adds a step to your troubleshooting instead of skipping one.
Atera’s RMM platform gives technicians the remote access and scripting tools to run this exact fix, including the PowerShell route, across any endpoint in the fleet without a site visit, and to catch failed updates through automated patch management and deployment before they turn into a stuck-update ticket in the first place.
» Interested? Try Atera for free
Frequently Asked Questions
Related Articles

How to reduce alert fatigue across your IT team
Your technicians aren't ignoring alerts because they're careless. They're ignoring them because most alerts have taught them to. Once the stream stops being trustworthy, real failures slip past with the noise. Fixing it means deciding what deserves an interruption, tuning out transient spikes, collapsing alert storms, and automating the fixes you've run a hundred times.
Read now
How to close the IT skills gap on your team
Course completions don't close skills gaps. Technicians finish the training, then hand the first unfamiliar failure straight back to a senior engineer. Real capability gets built on live tickets, incidents, and maintenance windows, with guidance that fades as competence grows.
Read now
How to calculate cost per ticket (and why most teams get it wrong)
Most cost-per-ticket figures are wrong before anyone reads them. Missing overhead, tickets that were opened but never closed, spam and duplicates padding the count, and one month's costs divided by another month's tickets all make support look cheaper than it is. Fix both sides of the division and the number finally shows where technician time and money actually go.
Read now
How to prepare for a software license audit
A vendor audit notice doesn't wait for you to get organized. It demands proof, right now, that every install matches every entitlement you've paid for, and most IT teams find out the hard way how much they don't actually know about their own environment. Getting audit-ready before the letter arrives is the difference between negotiating from strength and paying for months of scrambling.
Read nowEndless IT possibilities
Boost your productivity with Atera’s intuitive, centralized all-in-one platform









