
Generate summary with AI

You SSH into a server, pull up tmux to check on a long-running process, and go to scroll back through the output, but the mouse wheel and Page Up don’t work. Instead of scrolling, the cursor jumps through your command history or nothing happens at all. It looks broken, but it isn’t.
tmux isn’t ignoring your input, it’s intercepting it. Every mouse and keyboard event goes to tmux first, not straight to your terminal’s native scrollback, because tmux is managing its own history for every pane independently. Here’s how to fix the problem.
» Here’s how to check your Linux version
Why normal scrolling doesn’t work in tmux
tmux is a terminal multiplexer, which means it lets you create, access, and control multiple terminal sessions from a single window. It can keep running in the background even after you close the window, reattaching later from anywhere.
That’s what makes it indispensable for remote server work, since an unstable SSH connection or a closed laptop lid doesn’t kill your session, you just reattach and pick up where you left off. Sessions, windows, and panes can also be scripted and configured from outside tmux itself, which is a big part of why it’s become the standard for long-running processes on remote infrastructure.
But that same architecture is exactly what breaks normal scrolling.
“tmux doesn’t just sit inside your terminal, it sits between your terminal emulator and the shell, acting as its own virtual terminal manager.”
Bogdan Stefan, Embedded Software Developer
Each pane you open has its own independent screen and its own scrollback history, tracked by tmux, not by your terminal emulator. So when you scroll your mouse wheel, that event goes to tmux first, not to the terminal’s native scrollback. Your terminal simply isn’t in the loop anymore.
This is also why there’s no way to “just scroll” without doing anything else first. In its normal state, a tmux pane routes all input straight to whatever’s running in it, including your shell, vim, top, whatever it is. There’s no built-in path to browse previous output while that program still has control of the screen.
Switching a pane into copy mode makes it stop behaving like a live terminal and become a read-only view over its own history buffer instead. It’s structurally required because the alternative would mean the running program and the scrollback view are both trying to own the same screen at once.
» Don’t miss our guide to infrastructure monitoring
How to scroll up and navigate history
Once you know copy mode is the gateway to tmux’s scrollback, there are a few ways to get in and move around, from the default keyboard-driven approach to full mouse support.
Keyboard navigation, the default method
Use this method if you want scrollback access without changing any tmux configuration, it works out of the box on any tmux install.
- [Press
Ctrl+bthen[(left square bracket) to enter copy mode - Press Page Up or Page Down to scroll by a full page
- Use the Up and Down arrow keys to move the cursor one line at a time
- Press
Alt+UporAlt+Downto scroll by half a page - Press q or Esc to exit copy mode and return to the live pane
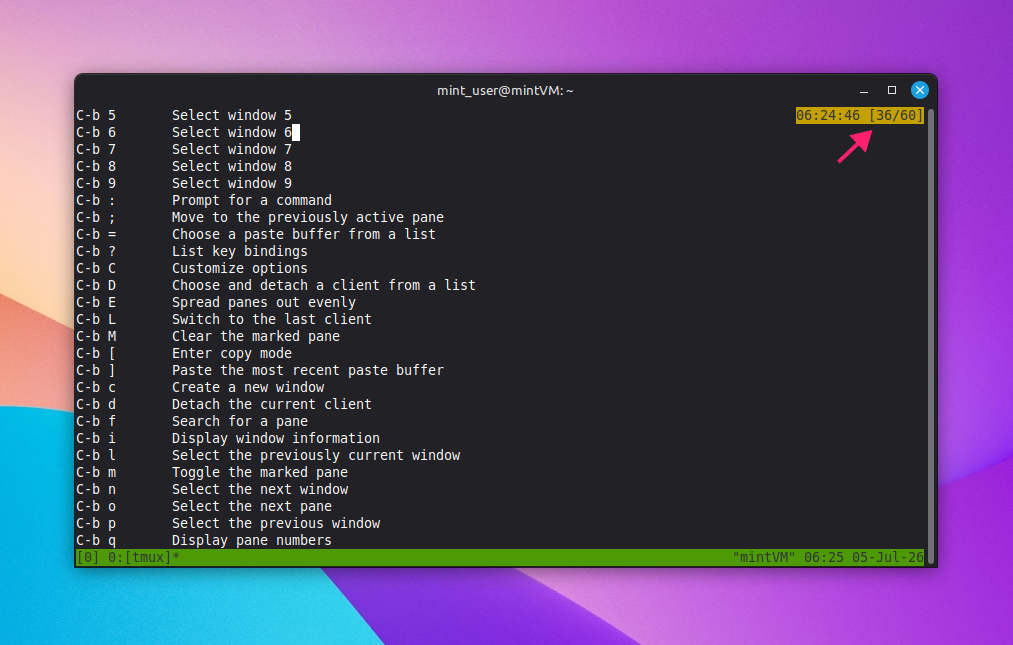
While copy mode is active, the top-right corner of the pane shows your position in the buffer as [current line offset / total history], so you always know how far back you’ve scrolled and how much history is left.
» Linux version outdated? Here’s how to update Linux Mint
Vi-style keybindings for keyboard-centric workflows
Switch to this method if you’re already comfortable with vi/vim navigation and want to move through scrollback using j, k, Ctrl+u, and Ctrl+d instead of arrow keys and Page Up/Down.
- Run
tmux show -g mode-keysto check your current keybinding mode Run
tmux set -g mode-keys vito switch to vi-style keybindings
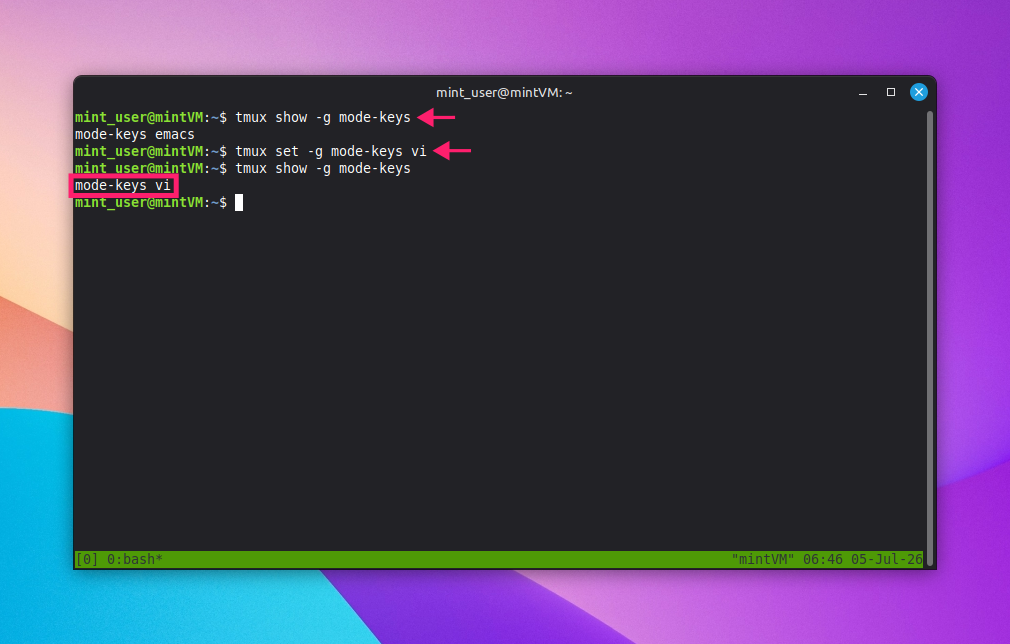
Once set, copy mode navigation follows standard vi conventions, j/k for line-by-line movement and Ctrl+u/Ctrl+d for half-page scrolling, without changing anything else about how copy mode works.
Enabling mouse support
Use this method if you want to scroll with a standard mouse wheel or trackpad instead of memorizing key sequences, it’s the closest tmux gets to feeling like a normal terminal.
- Run
tmux set -g mouse onto enable mouse support for the current session Add
set -g mouseto~/.tmux.confto make the change persistent across sessions
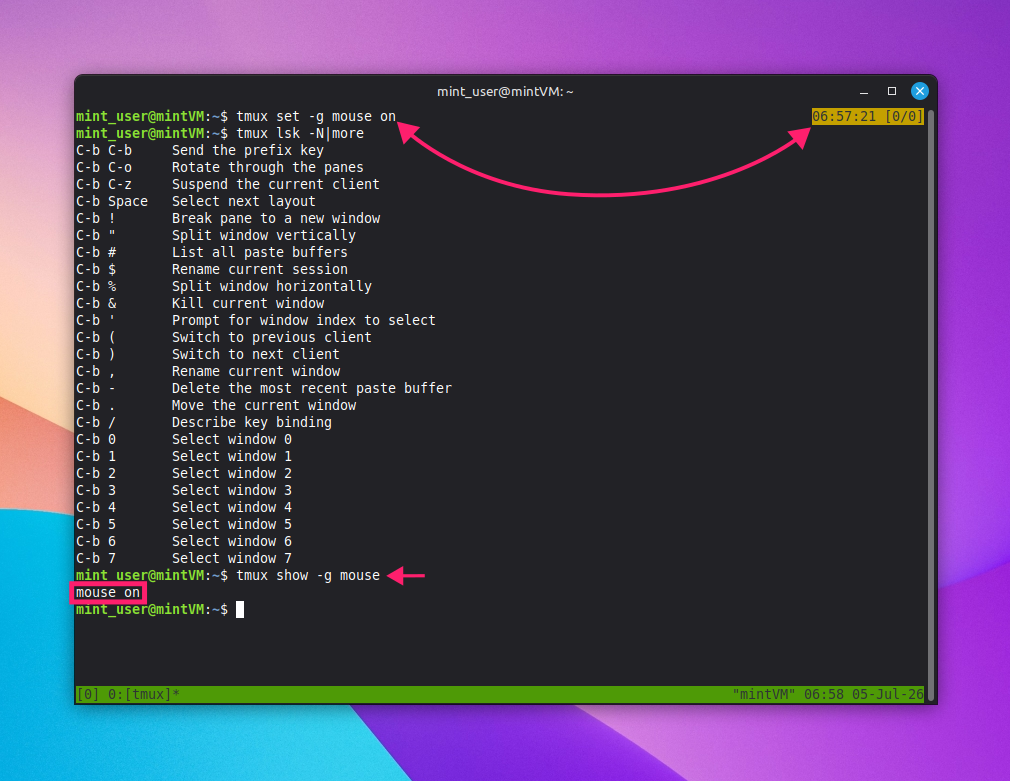
With mouse mode on, scrolling up automatically enters copy mode using the default WheelUpPane binding, no manual Ctrl+b [ required.
macOS terminal configuration
If you’re on a Mac and mouse scrolling still isn’t reaching tmux even with mouse mode on, the terminal emulator itself needs to be configured to report mouse events.
- Confirm mouse support is enabled in tmux
In Apple Terminal, open the View menu and check Allow Mouse Reporting

In iTerm2, go to iTerm2 > Settings > Profiles > Terminal and check both Enable mouse reporting and Report mouse wheel events

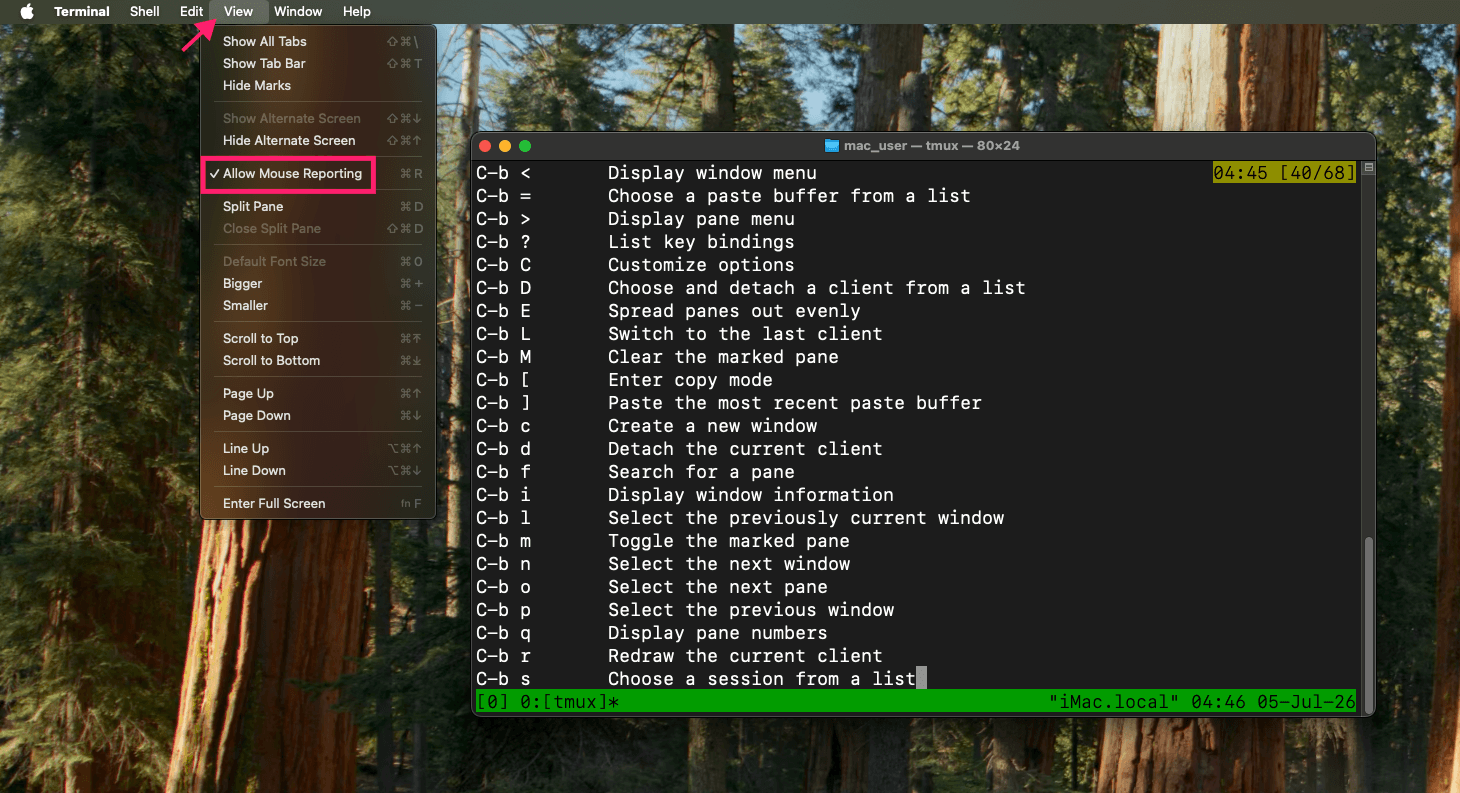
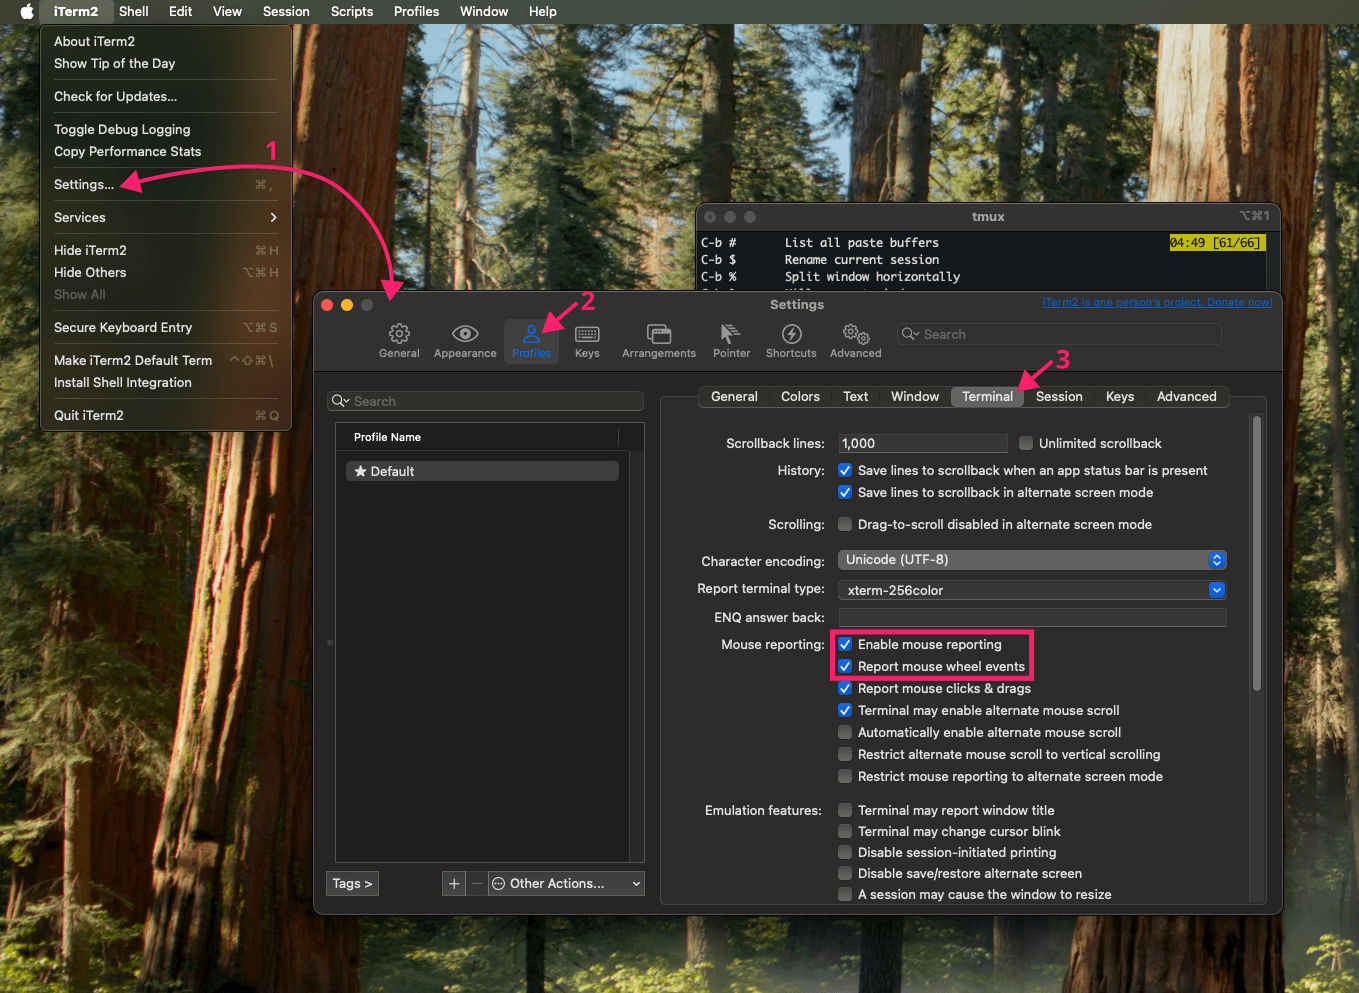
Both Apple Terminal and iTerm2 have mouse reporting enabled by default. If it’s off, the mouse wheel falls back to scrolling the terminal emulator’s own window instead of tmux’s scrollback, which is the most common cause of scrolling not working on Mac.
» Here’s how to enable RMM on macOS
Configuring and maintaining scrollback at scale
Getting scrollback working on one machine is one thing. Keeping it consistent, tuned, and clean across dozens or hundreds of servers is a different problem. Here’s how to control scrollback behavior completely and at scale:
Deploying a standardized config across many servers
Use this method when you need every server on your team to have identical scrolling behavior, rather than relying on each engineer to configure tmux by hand.
- Store your
.tmux.conffile in version control (for example, git) as the single source of truth Use your existing configuration management tool to push the file to every server:
> In Ansible, use the copy module to place the file in each user’s home directory
>In Puppet, use the file resource to manage both the file’s content and its target pathFor smaller deployments or testing, use a
pssh-based Bash script to loop over a list of server IPs and copy the file directly:#!/bin/bash
# Pull tmux.conf from the internal repo and install it system-wide
curl -fsSLhttps://internal-repo.com/configs/tmux.conf -o /etc/tmux.confchmod 644 /etc/tmux.confecho “tmux.conf deployed on $(hostname)”
- Run it across your fleet with
pssh -h hosts.txt "sudo deploy_tmux_conf.sh", wherehosts.txtlists the target IP addresses
Note: tmux also supports a system-wide config at /etc/tmux.conf, so a single file placed there applies to every user on that server without needing a per-user copy.
Did you know? Through Atera’s RMM platform, you can deploy scripts remotely across multiple endpoints, with Bash support.
» Learn how to rename a directory in Linux
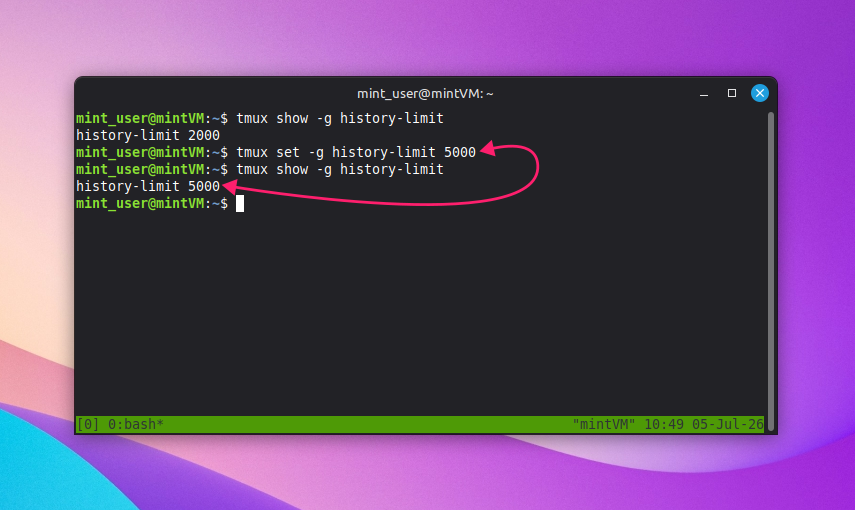
Increasing the scrollback history limit
Use this when the default buffer isn’t capturing enough output, for example when reviewing long build logs or verbose troubleshooting sessions.
- Run
tmux show -g history-limitto check the current limit (the default is 2000 lines) - Run
tmux set -g history-limitto change it for the current session - Add
set -g history-limitto~/.tmux.conf(or the system-wide/etc/tmux.conf) to make the change persistent Run
tmux source-file ~/.tmux.confto apply the updated config without restarting tmux
Clearing the scrollback buffer
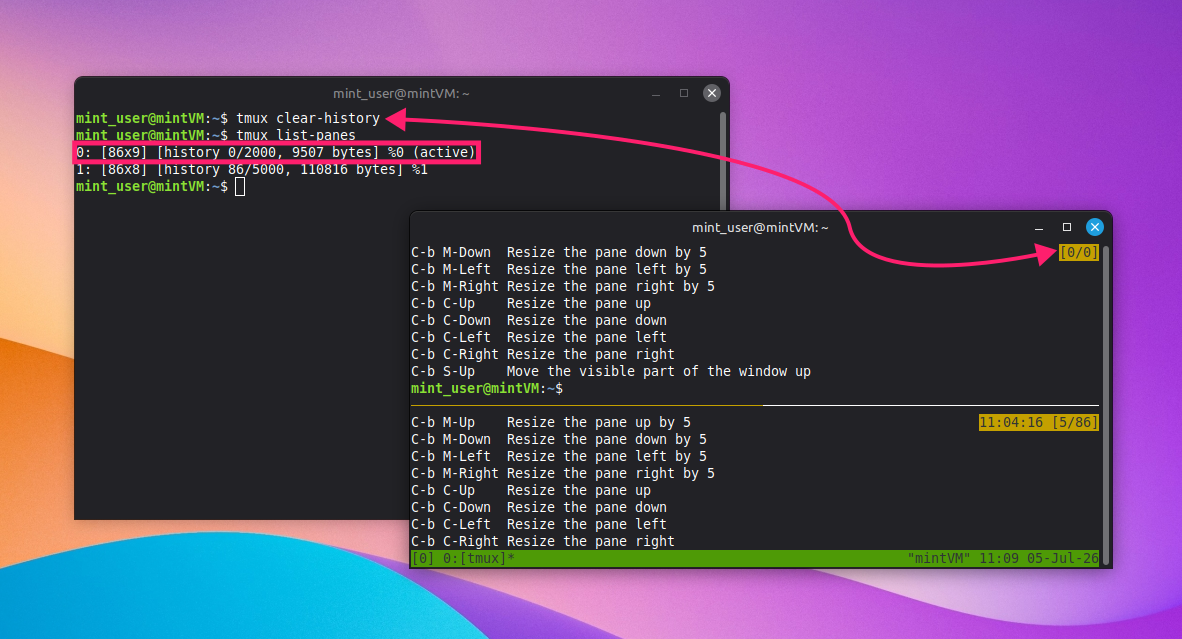
Use this method when you want to free up memory immediately or remove sensitive output from a pane’s history.
- Press
Ctrl+bfollowed by:to open the tmux Command Prompt - Type
clear-historyand press Enter to clear the active pane’s buffer Alternatively, run
tmux clear-historydirectly from outside tmux
To target a specific pane rather than the active one, run
tmux clear-history -t :.
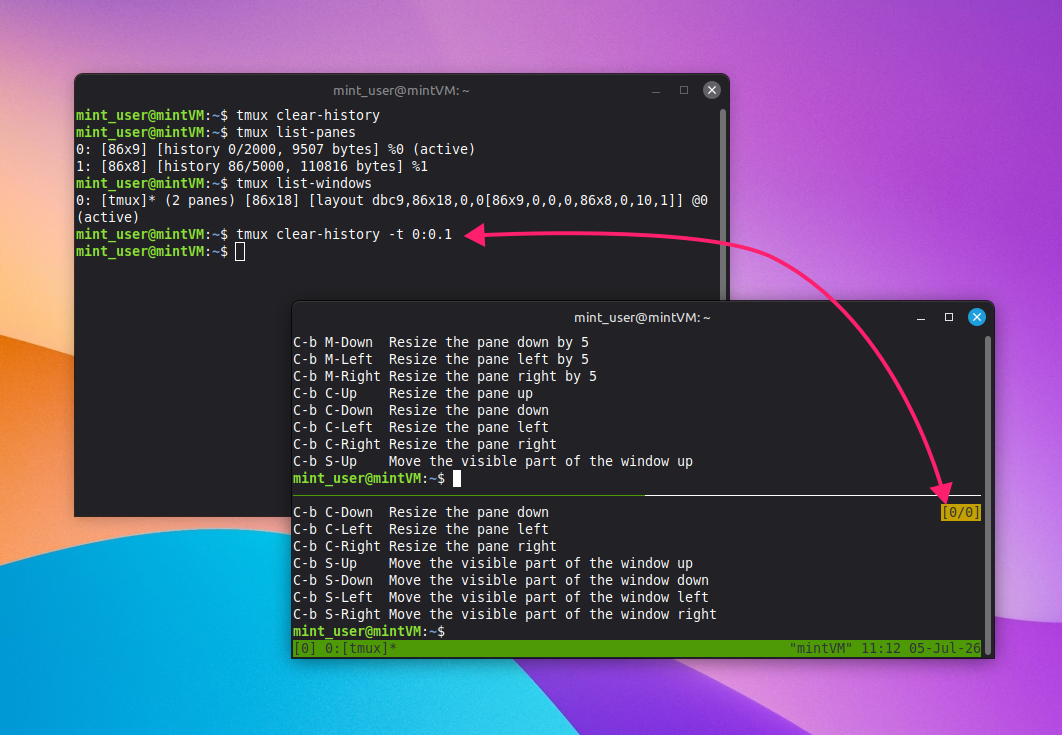
The clear shell command works too, clearing both the screen and history of the pane it’s run from.
Make tmux scrolling feel native again
Once mouse support is on and you know your way around copy mode, scrolling in tmux stops being a workaround and starts feeling like a natural extension of the terminal. The friction was never really about tmux being difficult, it was about not knowing which mode you were in and how to move between them.
The same principle scales beyond a single pane. Manually configuring scrollback, mouse support, and history limits on one server is manageable, but doing it consistently across a growing fleet of Linux machines is exactly the kind of repetitive setup work that eats into time better spent elsewhere.
Atera’s RMM gives IT teams and MSPs centralized visibility and remote script deployment across Linux servers, so pushing a standardized .tmux.conf (or any other config) doesn’t mean looping through hosts by hand. If you’re managing more than a handful of Linux servers, try out Atera’s Linux agent to see how much of that setup work can be handled centrally instead.
» Take control of your IT environment with a free trial of Atera
Related Articles

How to reduce alert fatigue across your IT team
Your technicians aren't ignoring alerts because they're careless. They're ignoring them because most alerts have taught them to. Once the stream stops being trustworthy, real failures slip past with the noise. Fixing it means deciding what deserves an interruption, tuning out transient spikes, collapsing alert storms, and automating the fixes you've run a hundred times.
Read now
How to close the IT skills gap on your team
Course completions don't close skills gaps. Technicians finish the training, then hand the first unfamiliar failure straight back to a senior engineer. Real capability gets built on live tickets, incidents, and maintenance windows, with guidance that fades as competence grows.
Read now
How to calculate cost per ticket (and why most teams get it wrong)
Most cost-per-ticket figures are wrong before anyone reads them. Missing overhead, tickets that were opened but never closed, spam and duplicates padding the count, and one month's costs divided by another month's tickets all make support look cheaper than it is. Fix both sides of the division and the number finally shows where technician time and money actually go.
Read now
How to prepare for a software license audit
A vendor audit notice doesn't wait for you to get organized. It demands proof, right now, that every install matches every entitlement you've paid for, and most IT teams find out the hard way how much they don't actually know about their own environment. Getting audit-ready before the letter arrives is the difference between negotiating from strength and paying for months of scrambling.
Read nowEndless IT possibilities
Boost your productivity with Atera’s intuitive, centralized all-in-one platform









