
Table of contents
Generate summary with AI

An outdated system is a vulnerable one. Security patches, bug fixes, and compatibility improvements all come through regular updates, so skipping them long enough means you’re running software with known exploits and no safety net. Linux Mint makes updating straightforward, but you need to know what to check before you start, which method suits your situation, and how to recover cleanly if something goes wrong.
This guide covers all of it from pre-update preparation and Timeshift snapshots to the Update Manager GUI, APT commands, and kernel management.
What to do before you update Linux Mint
Before running any updates, it’s worth taking a few minutes to check your system’s current state and get everything in order. A failed update on an unprepared system can mean lost data, broken packages, or a system that won’t boot, all of which are significantly harder to fix than they are to prevent.
Here are the steps you should take:
1. Check your current Linux version
Knowing which version of Linux Mint you’re running tells you whether you’re eligible for a direct upgrade or need to follow a specific upgrade path first.
Here’s how:
From the GUI, open the System Information utility from the application menu.
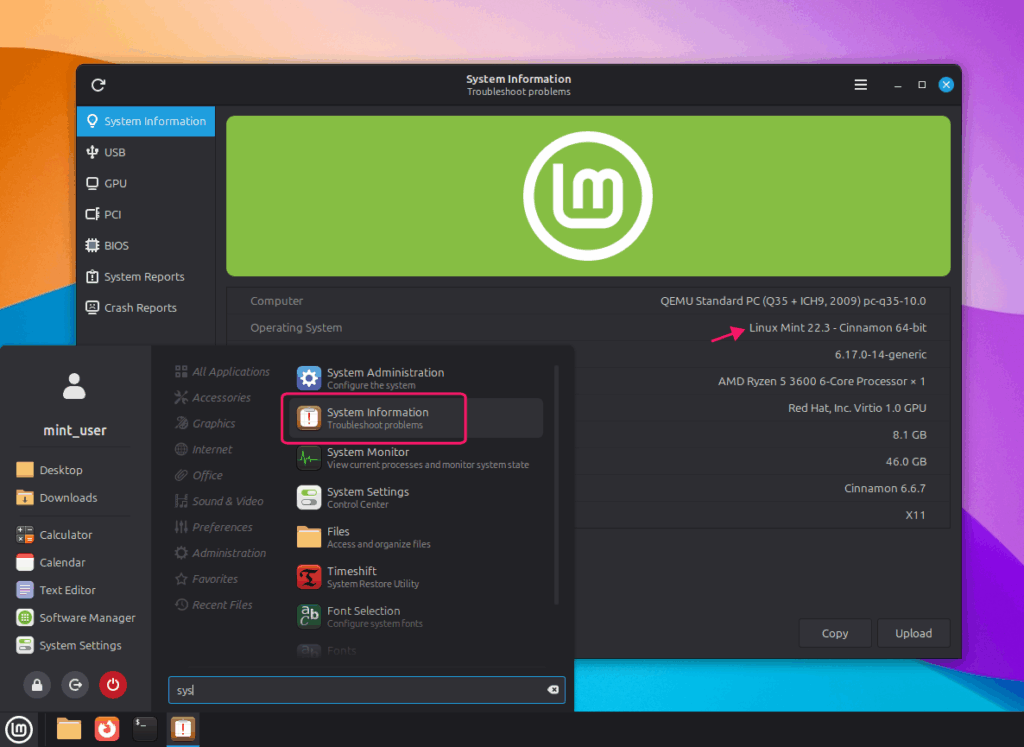
From the terminal, run any of the following:
cat /etc/linuxmint/info
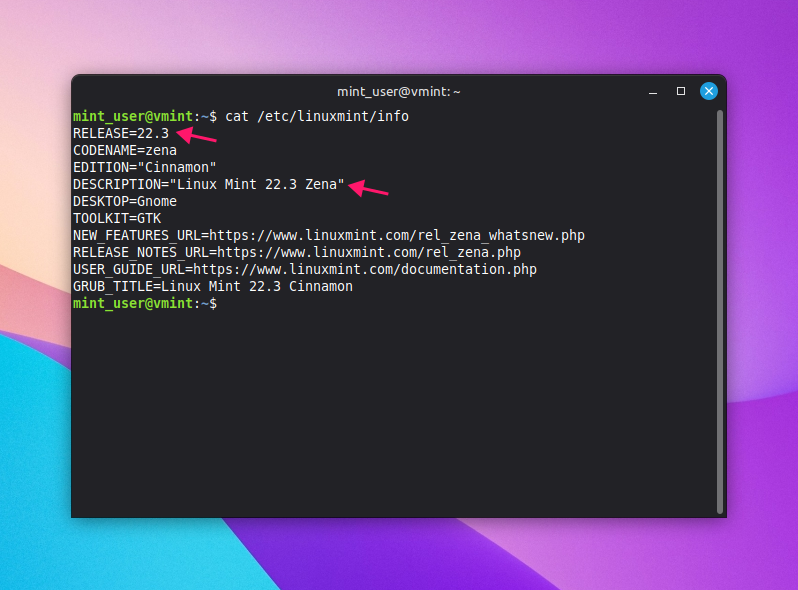
screenfetch(install first withsudo apt install screenfetch)

inxi -F(add| grep Distroto show only the version)
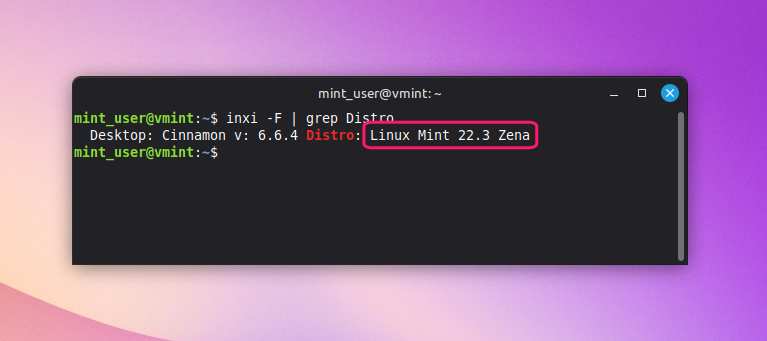
At the time of writing, the latest stable releases are Linux Mint 22.3 (codename Zena) and LMDE 7 (codename Gigi). To check whether your version is eligible for a direct upgrade, navigate to Update Manager.
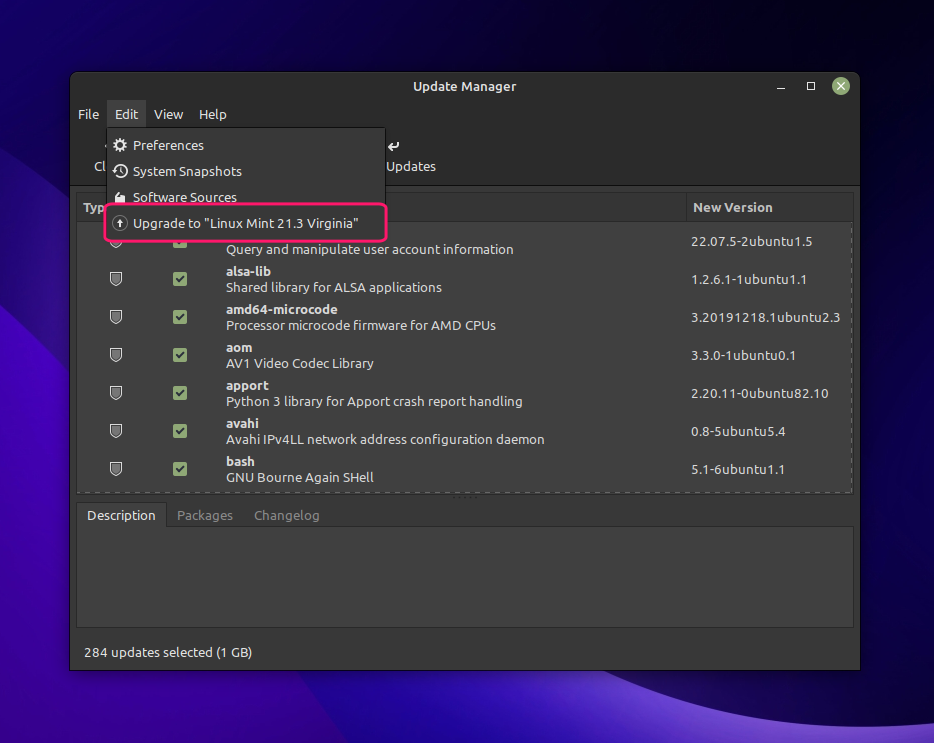
» Learn more: How to check Linux version
2. Prepare your system
Timeshift creates system snapshots you can restore from if an update causes problems. It’s the single most important thing you can do before updating. Snapshots should be saved to a separate drive where possible.
To set up Timeshift via the GUI:
1. Open Timeshift from the application menu
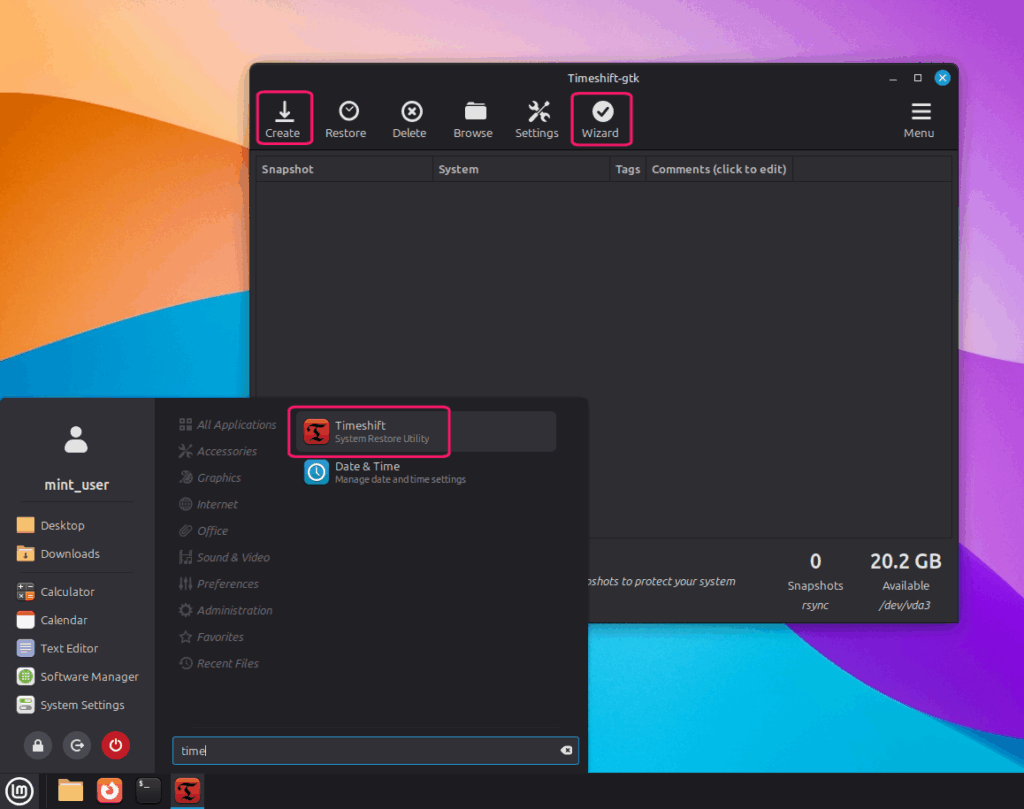
2. Click the Wizard button to launch the setup guide
3. Select your snapshot type and location
4. Click Finish to save your configuration
5. Click Create to take a snapshot before proceeding
» Did you know you could rename directories in Linux?
3. Clean up packages
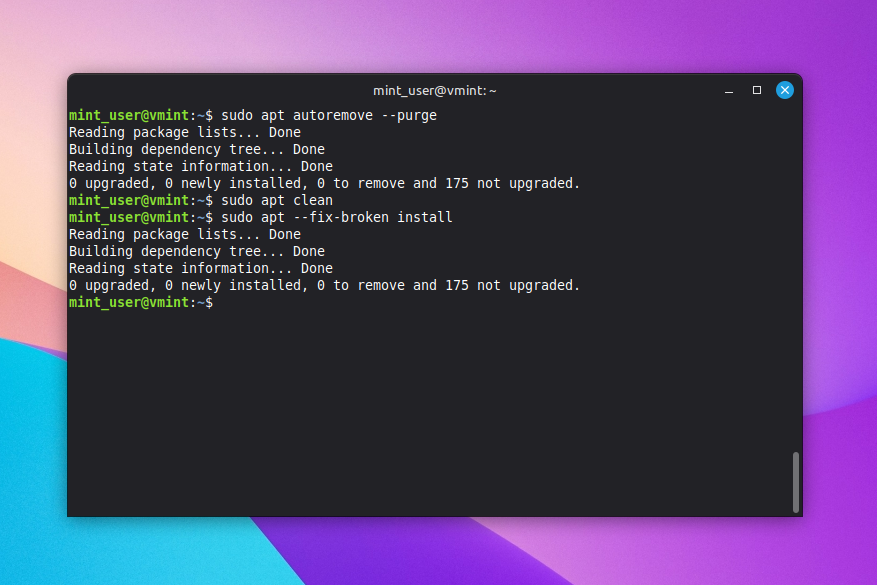
Run the following commands to remove unused packages and check for dependency issues before updating:
1. Run sudo apt autoremove --purge to remove unused packages
2. Run sudo apt clean to clear the package cache
3. Run sudo apt --fix-broken install to check for and resolve broken dependencies
4. Disable third-party repositories
Third-party repositories that haven’t been updated for the latest Linux Mint version can cause conflicts during an update. Disable them temporarily before proceeding.
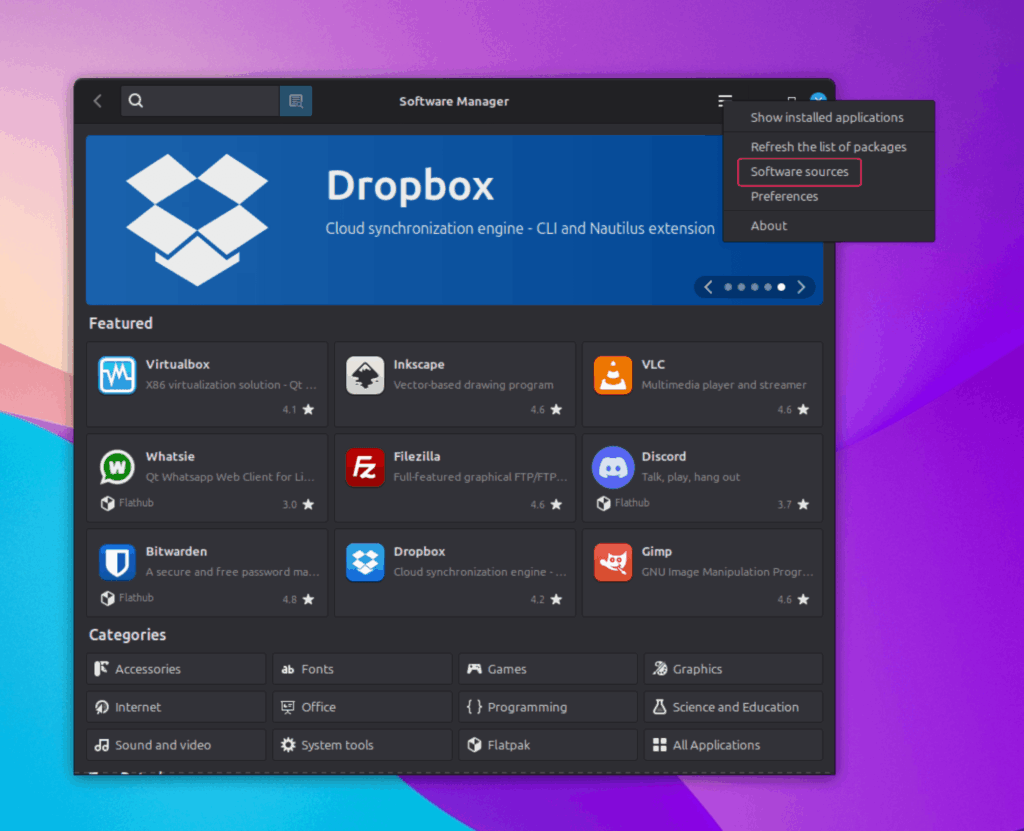
1. Open Software Manager and go to Menu > Software Sources
2. Navigate to the PPAs or Additional Repositories sections
3. Uncheck any active third-party entries
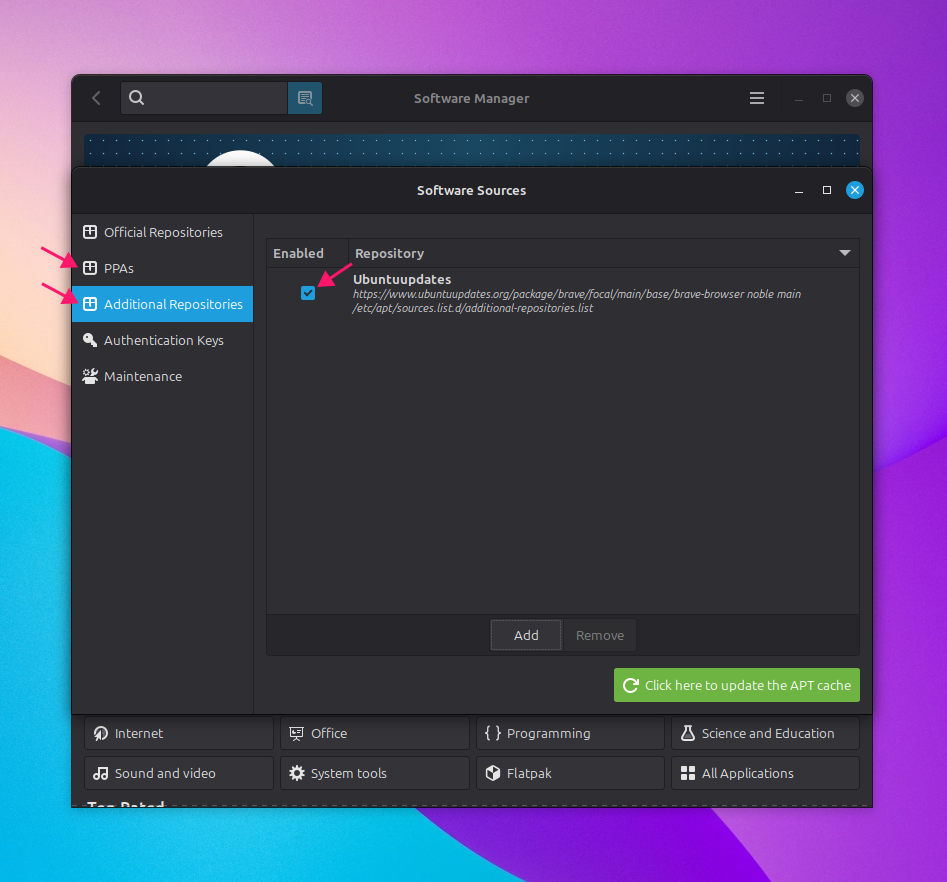
4. Re-enable them after the update is complete
3 Easiest methods to update Linux Mint
There are three ways to update Linux Mint: the Update Manager GUI, the command line using APT, and directly through the kernel manager for kernel-specific updates. Most users will be well served by the GUI, but the command line gives you more control and is worth knowing.
Warning: Before proceeding with these steps, make sure you have enough disk space (2 – 3 GB beyond what the selected updates require) and reboot your system.
1. Update Manager (simplest method)
The Update Manager is the most straightforward way to update Linux Mint. It gives you a clear view of what’s available before you apply anything, including update types, version details, and changelog information.
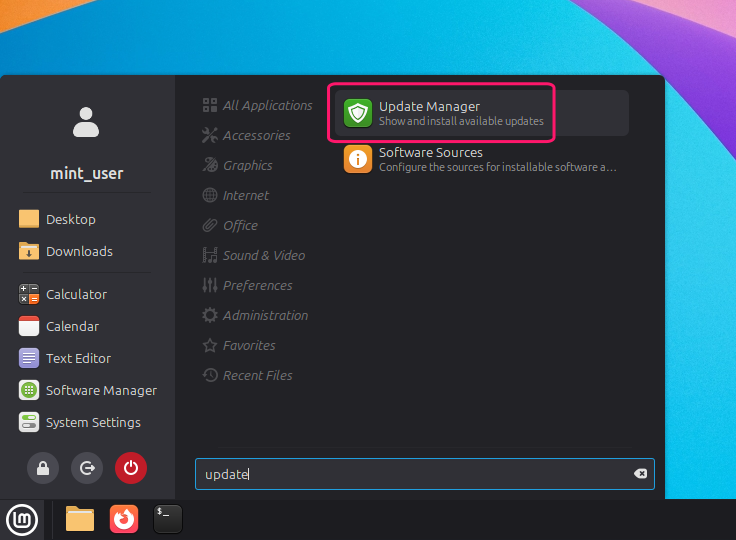
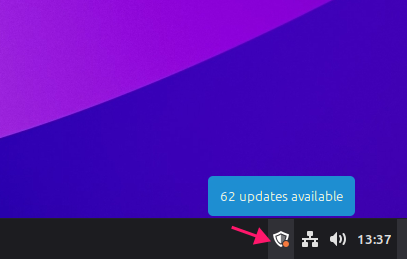
1. Open Update Manager from the application menu or the system tray icon
2. Click Refresh to fetch the latest available updates
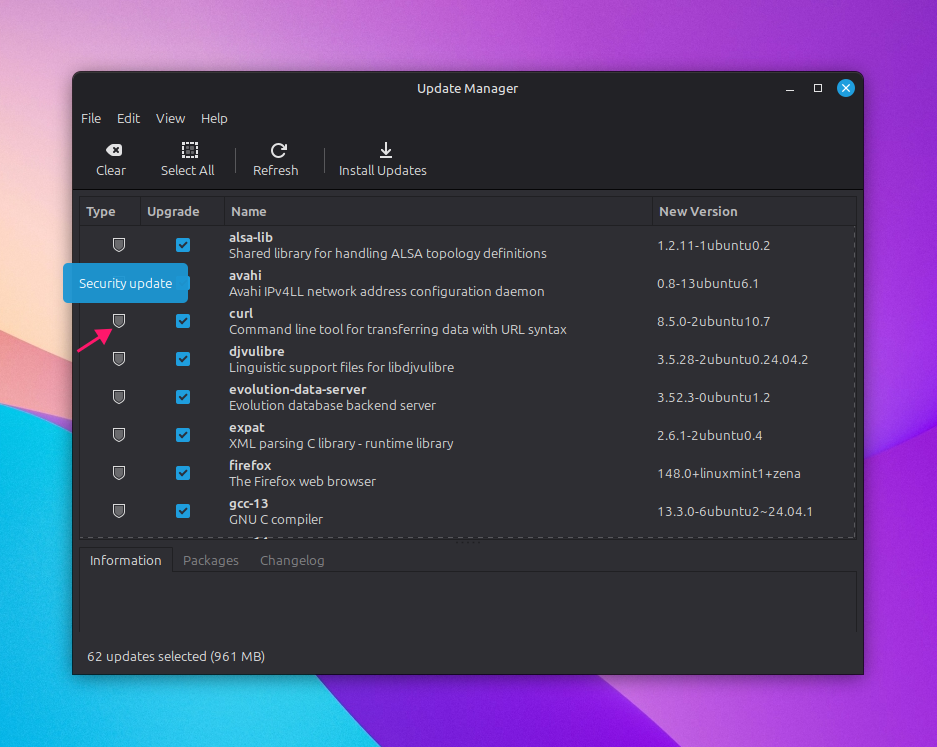
3. Hover over the Type icon next to any update to identify its category (security, kernel, software, or other)
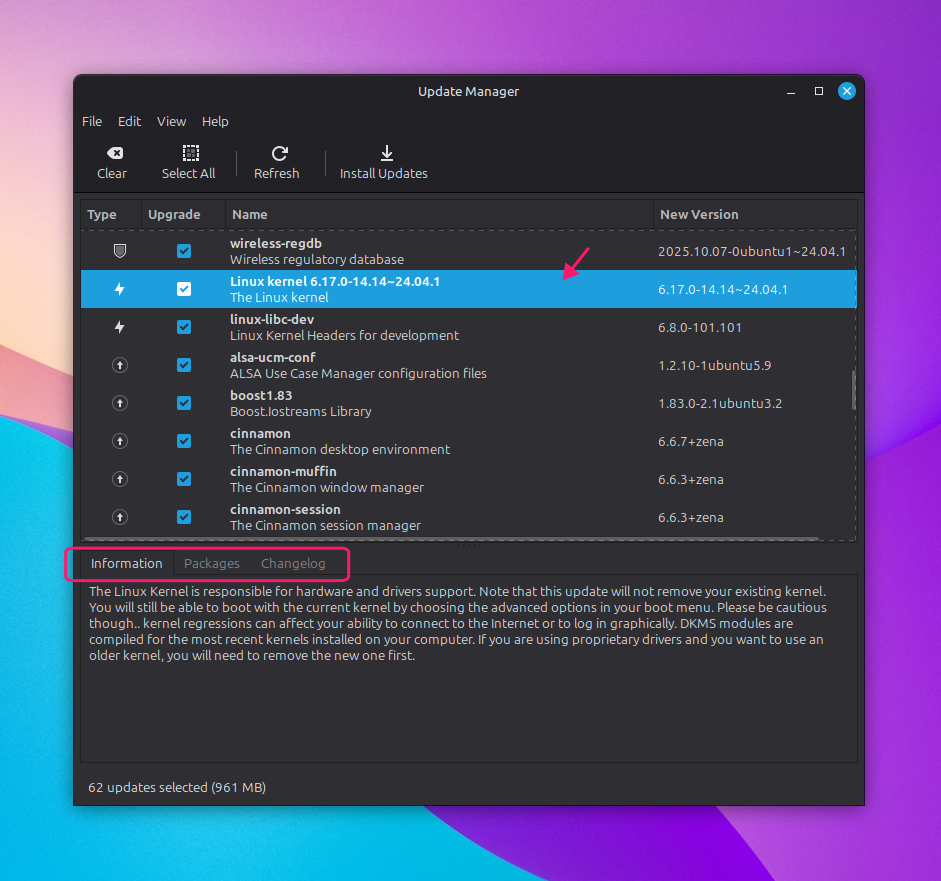
4. Click on an individual update to review its Information, Packages, and Changelog details
5. Select the updates you want to apply, or click Select All to include everything
6. Click Install Updates and wait for the process to complete
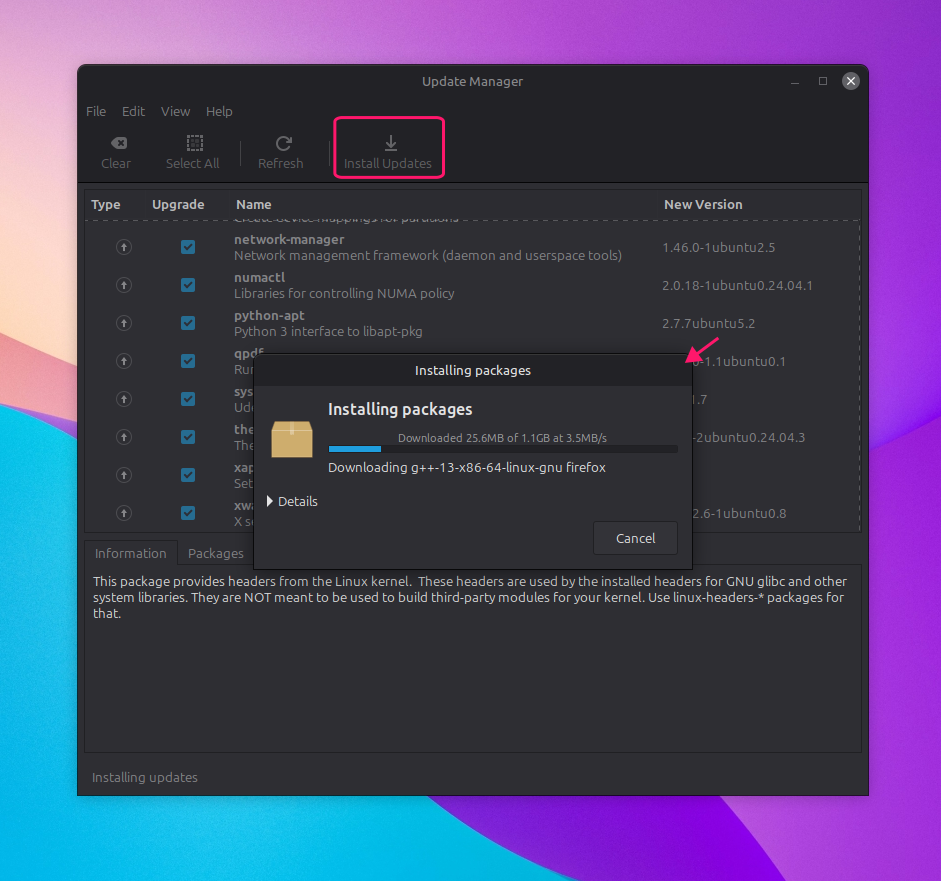
7. Restart your system when prompted
2. The command line APT (faster and more flexible)
The command line gives you a faster and more flexible way to update, and it’s the preferred approach for users comfortable with the terminal. There are three commands involved:
1. Run sudo apt update to fetch the latest package lists from your configured repositories. This should always be your first step since it doesn’t install anything, it just refreshes what’s available
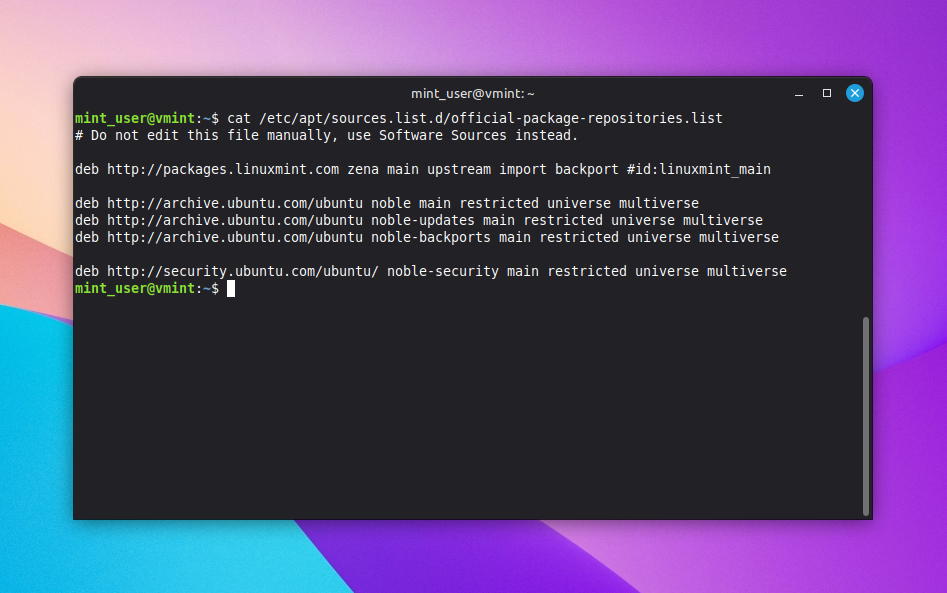
2. Run sudo apt upgrade to upgrade all installed packages to their latest versions. This is the safest option for routine updates as it won’t remove existing packages or install new dependencies
3. Run sudo apt full-upgrade if you’re doing a major upgrade or if apt update indicates that packages need to be installed or removed to complete the upgrade. Unlike apt upgrade, this command will install new dependencies and remove obsolete packages as needed
3. Kernel updates (more complicated but offers fallback options)
Kernel updates are handled separately from standard package updates and warrant extra care since a problematic kernel can prevent your system from booting. Linux Mint keeps previous kernels installed by default, giving you a fallback option if something goes wrong.
Via the Update Manager
1. Open Update Manager and go to View > Linux Kernels
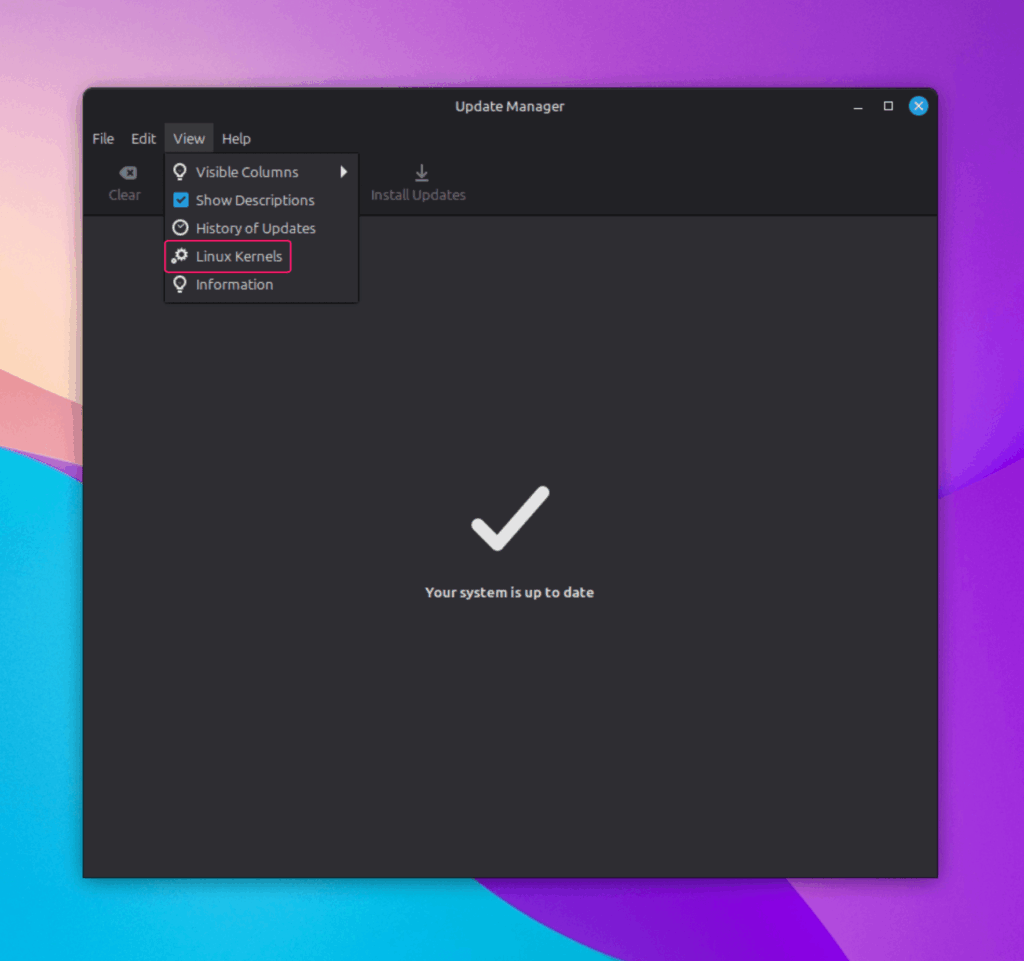
2. Read the warning message before proceeding
3. Select the kernel version you want to install or remove
4. Click Install to begin installation, or Queue Installation to add it to a batch queue
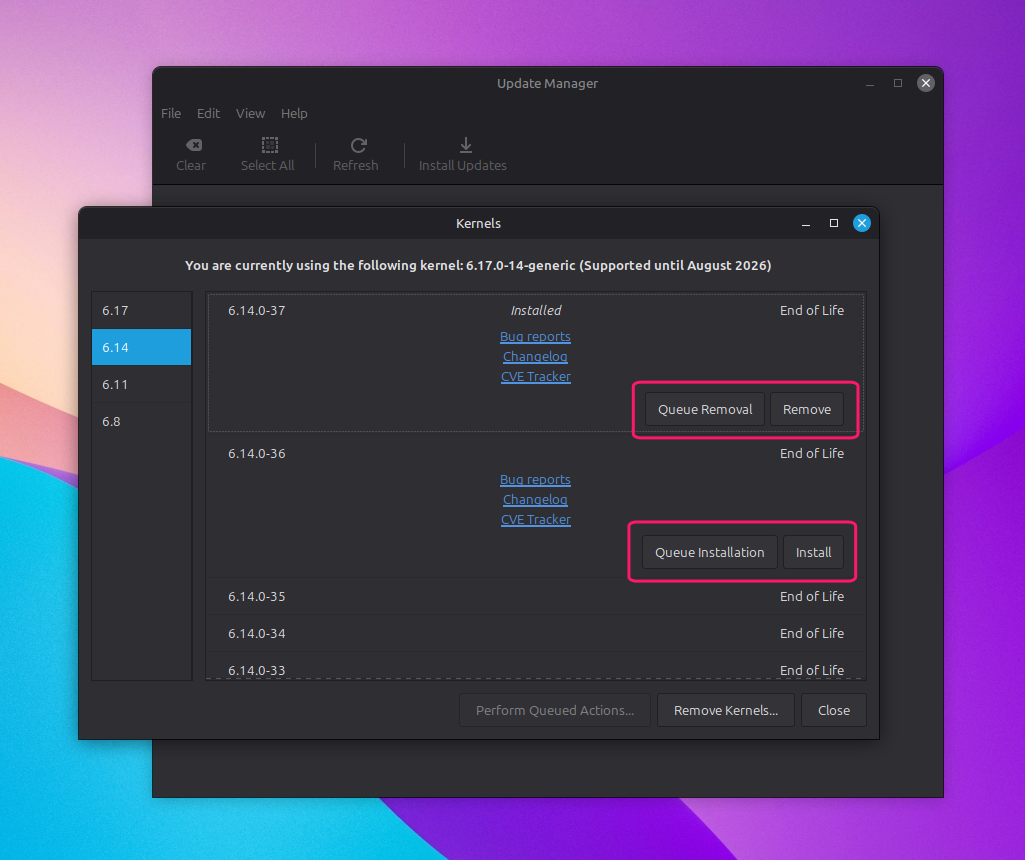
5. Click Perform Queued Actions to apply queued changes
6. To remove old kernels, click Remove Kernels, confirm the entries to remove, and click Apply
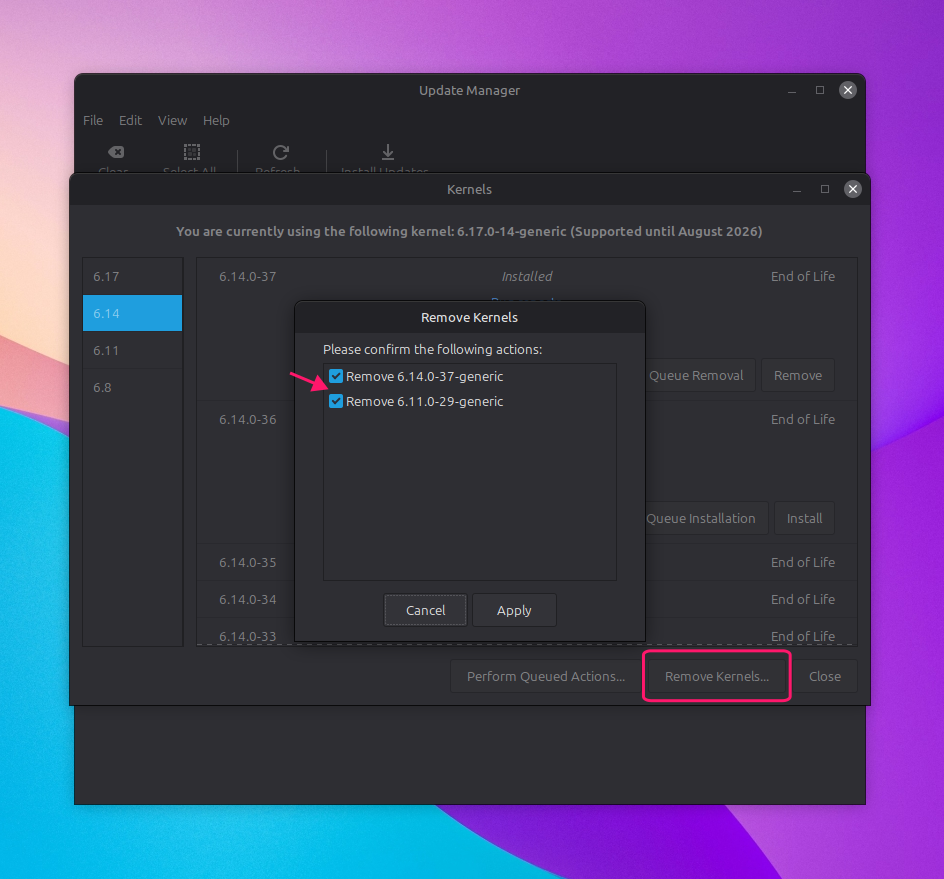
7. Restart your system after making kernel changes
8. To check your currently active kernel at any time, run uname -r in the terminal
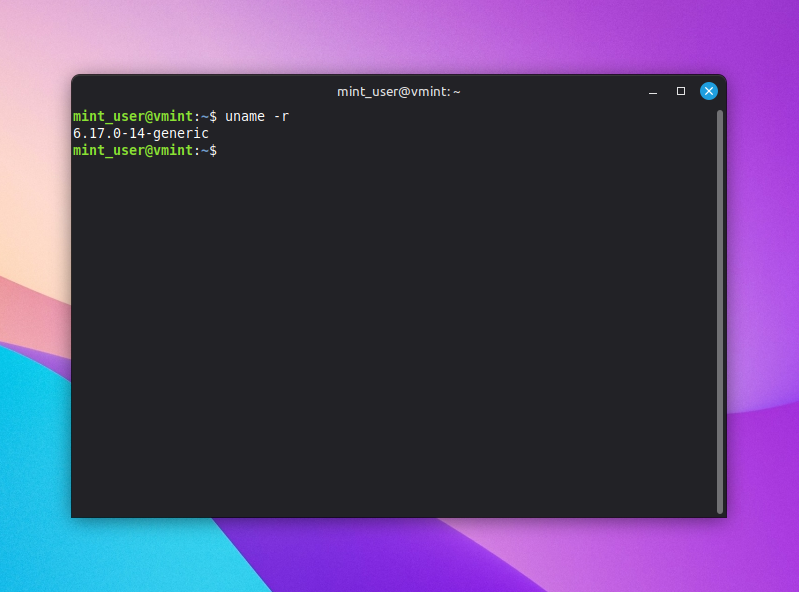
Via the terminal
1. Run sudo apt search linux-image to list available kernels, or add| grep <version> to filter for a specific version
2. Run sudo apt install linux-image-<version> and sudo apt install linux-headers-<version> to install your chosen kernel (replace <version> with the target version number)
3. Run dpkg --list | grep linux-image to confirm the installation
4. To remove a kernel, run sudo apt remove linux-image-<version> linux-headers-<version>; GRUB will update automatically
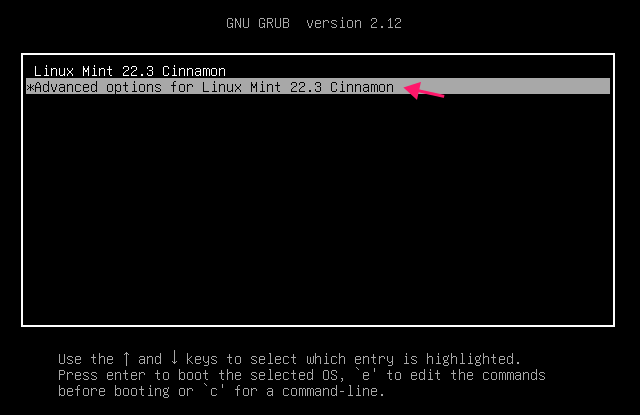
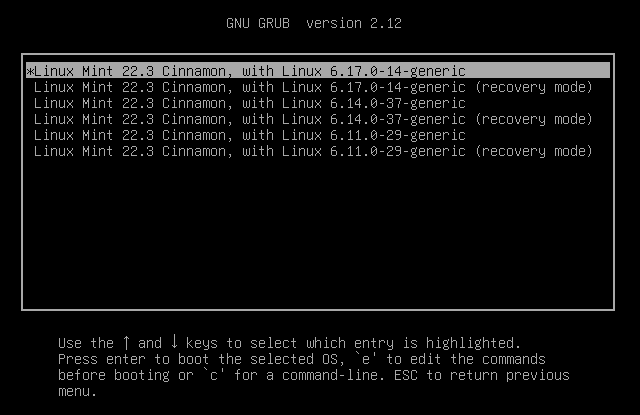
After installing a new kernel, always retain at least one older kernel as a fallback. At boot, select Advanced Options from the GRUB menu to choose which kernel to start with.
Troubleshooting Linux Mint updates
Even on a well-prepared system, updates can occasionally go wrong. Here’s how to diagnose and resolve the most common IT issues.
1. Dependency conflicts
Dependency conflicts usually show up as errors indicating that certain packages can’t be installed or updated due to version mismatches with other packages on the system.
1. Run sudo apt update && sudo apt check to identify broken or missing dependencies
2. Run sudo apt install -f to attempt an automatic fix (-f stands for fix-broken)
3. If a specific package is causing the conflict, run sudo apt remove <package-name> to remove it
4. Run sudo apt clean && sudo apt update to clear the package cache and refresh
2. Broken packages
Broken packages occur when a package fails to install or configure correctly, leaving the system in an inconsistent state.
1. Run sudo dpkg --configure -a && sudo apt install -f to fix packages that are stuck mid-configuration
2. If a specific package is broken beyond repair, run sudo apt-get remove --purge <package-name> to remove it completely
3. Run sudo apt update && sudo apt upgrade to resync the system after removal
4. If you need to reinstall a specific package, run sudo apt install --reinstall <package-name>
3. When updates aren’t available
If expected updates aren’t showing up, the issue is usually with your mirror configuration, a temporary server outage, or an end-of-life release.
Check your mirror settings
1. Open Software Manager and go to Menu > Software Sources
2. Confirm you’re pointed at the correct mirror. If unsure, switch to the main server or a closer regional one
3. Run sudo apt updatein the terminal and confirm the servers contacted match your selected mirrors
Clear the cache
1. Run sudo apt clean to clear cached package data
2. Run sudo apt update and check whether the issue persists
Keeping Linux Mint updated at scale
Keeping a single Linux Mint machine updated is manageable with the steps in this guide. Keeping dozens or hundreds of them updated consistently, on schedule, and without things slipping through the cracks is a different problem entirely. That’s where manual processes start to break down and the cost of a missed patch becomes a real risk.
Atera’s RMM platform gives IT management teams and MSPs centralized visibility and control over endpoints across their entire environment, including automated patch and software deployment, scheduled maintenance, and remote management across Linux, Windows and Mac. If you’re managing Linux at scale, it’s worth exploring what Autonomous IT can do for your patch management workflow.
» Interested? Try Atera for free
Related Articles

How to audit AI agent activity
The script ran, exit code 0, but nobody can say why the agent chose it. Standard logs prove an AI agent acted, but accountability needs the whole chain, including the request, the context it drew on, the approval, the action, and the verified outcome. Without that chain, an audit is guesswork after the damage is done.
Read now
How to decide if you need a dedicated DEX platform, or already have one
"IT feels slow" is the complaint that often sells DEX platforms. Sometimes it signals a real blind spot, but just as often already catches and fixes the problem, and a new scoring layer would only add another console. Telling the two apart takes evidence, and the real gap usually isn't visibility at all.
Read now
How to set up secure printing across your organization
A secure print checkbox protects exactly one moment in a document's life. Everything else, from unencrypted traffic and unhardened devices to payroll printouts forgotten in a tray, stays exposed. Real secure printing covers the whole lifecycle: release policy, authentication, encryption, hardening, and a fleet that stays monitored long after rollout.
Read now
How to reduce alert fatigue in healthcare IT
In a hospital, a dismissed alert isn't a delayed ticket. It can be a patient deteriorating while the monitor keeps sounding. Cutting alert volume won't fix that on its own, and switching alerts off can make it worse.
Read nowEndless IT possibilities
Boost your productivity with Atera’s intuitive, centralized all-in-one platform







