Generate summary with AI

Almost every admin has tried to paste something into a Linux terminal and sat there staring at a literal ^V on the line, wondering what happened. It’s not a bug and it’s not the terminal emulator being difficult. Ctrl+C and Ctrl+V were claimed by POSIX terminal control signals decades before GUI copy-paste conventions existed, and the terminal has never given them back.
Once you understand what’s actually happening under the hood, picking the right paste method for whatever environment you’re in stops being trial and error. Here’s everything you need to know.
Why paste doesn’t just work on Linux by default
Ctrl+C and Ctrl+V aren’t ignored in the terminal by accident, they just already have a purpose from long before GUI copy-paste conventions existed. In Unix and Linux terminals, Ctrl+C and Ctrl+V are reserved control characters:
- Ctrl+C sends
SIGINT, the interrupt signal that terminates whatever process is currently running - Ctrl+V triggers literal-next, which tells the terminal to treat the very next keystroke as a literal character instead of interpreting it
Neither has anything to do with a clipboard. POSIX (Portable Operating System Interface) is the IEEE Computer Society’s set of standards for keeping software portable across operating systems, and termios, the terminal I/O interface those control characters are defined in, predates the idea of a system clipboard entirely.
Primary vs. Clipboard
At the core protocol level, “Primary” and “Clipboard” aren’t actually different things. Both are selection atoms, and the protocol itself doesn’t distinguish between them.
The distinction is conventional and enforced by applications, not by the windowing system. In practice, they behave as two separate buffers:
Primary | Clipboard | |
|---|---|---|
Trigger | Highlighting text with the cursor; no explicit command needed | An explicit action, like Ctrl+C or Copy from a context menu |
Paste mechanism | Middle-mouse-button click, or Shift+Insert | Ctrl+V, or Paste from a context menu |
Persistence | Overwritten automatically whenever new text is highlighted | Holds its content until a new manual copy action replaces it |
That’s the whole reason middle-click paste and Ctrl+V paste can produce two completely different results on the same machine. They’re not reading from the same place.
Which of these two buffers a terminal reaches for by default varies by emulator:
- GNOME Terminal and Konsole use both by default. Clipboard handles the explicit shortcuts, Ctrl+Shift+C / Ctrl+Shift+V, along with Copy and Paste from the right-click menu. Primary is driven by mouse selection, with middle-click to paste.
- XTerm uses Primary by default: auto-copy on selection, with middle-click or Shift+Insert to paste. To get Clipboard behavior in XTerm, the
selectToClipboardoption has to be explicitly set toTrue.
That’s why a workflow that feels automatic in GNOME Terminal or Konsole can feel broken the first time you drop into a bare XTerm session.
» Did you know you can rename a directory in Linux?
6 ways to paste into terminal
Once you know which buffer you’re targeting, the actual paste methods are straightforward. Here’s every option, in order from most casual to most automated.
Method 1: Right-click context menu
The default fallback in any graphical terminal, useful when you don’t want to remember a shortcut or aren’t sure what the terminal supports.
- Right-click anywhere inside the terminal window
Select Paste from the context menu that appears

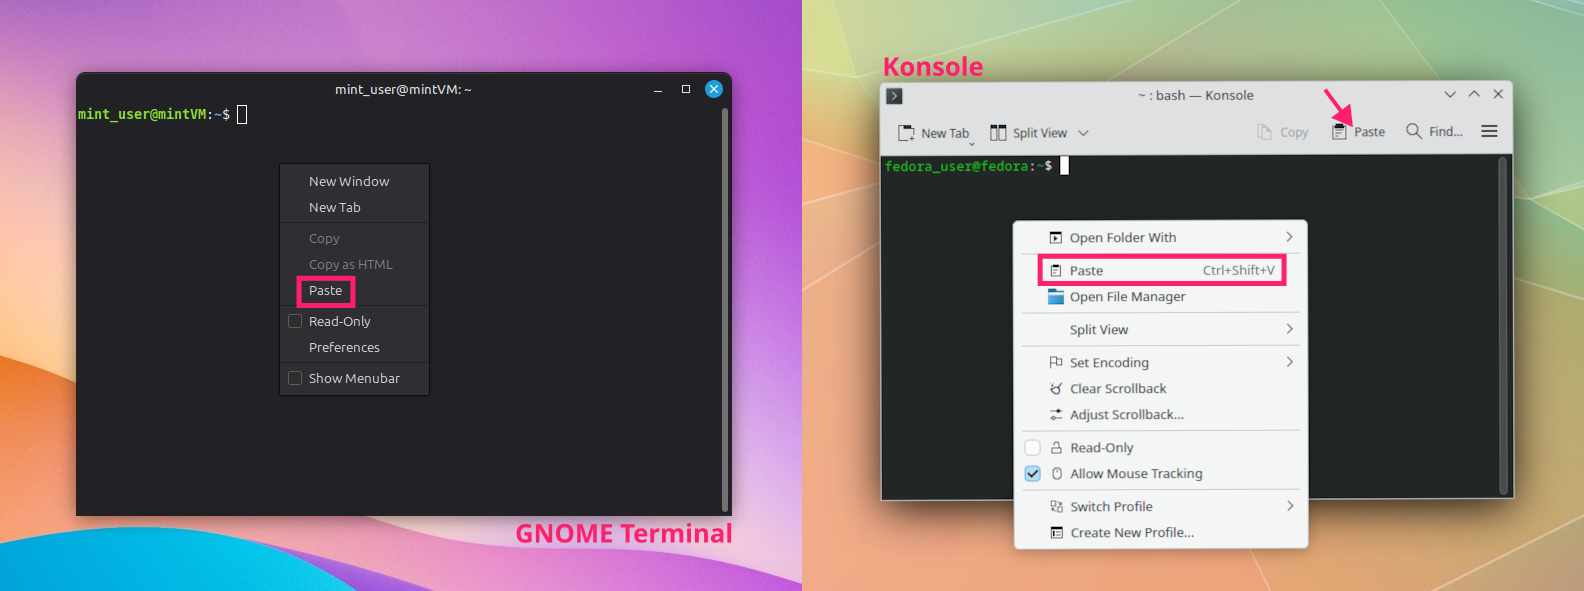
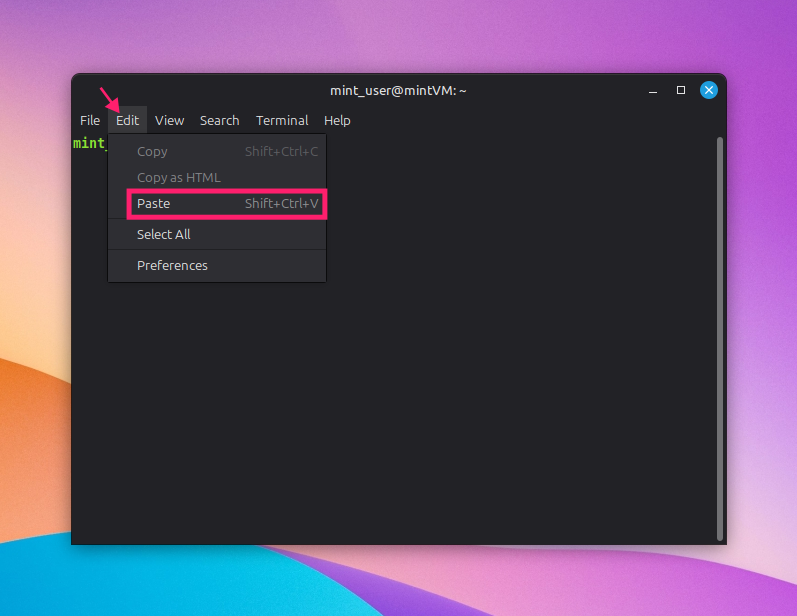
Some emulators also have a dedicated paste button in their UI, and if the terminal exposes a menu bar, Paste is typically found under the Edit menu instead of (or in addition to) the right-click menu.
Method 2: Ctrl+Shift+V and the Shift Rule
The standard keyboard shortcut once you’ve moved past right-clicking, and the one worth building as muscle memory since it works consistently across GNOME Terminal and Konsole.
- Position your cursor where you want the pasted content to land, using the arrow keys if needed
Press
Ctrl+Shift+Vto execute the paste
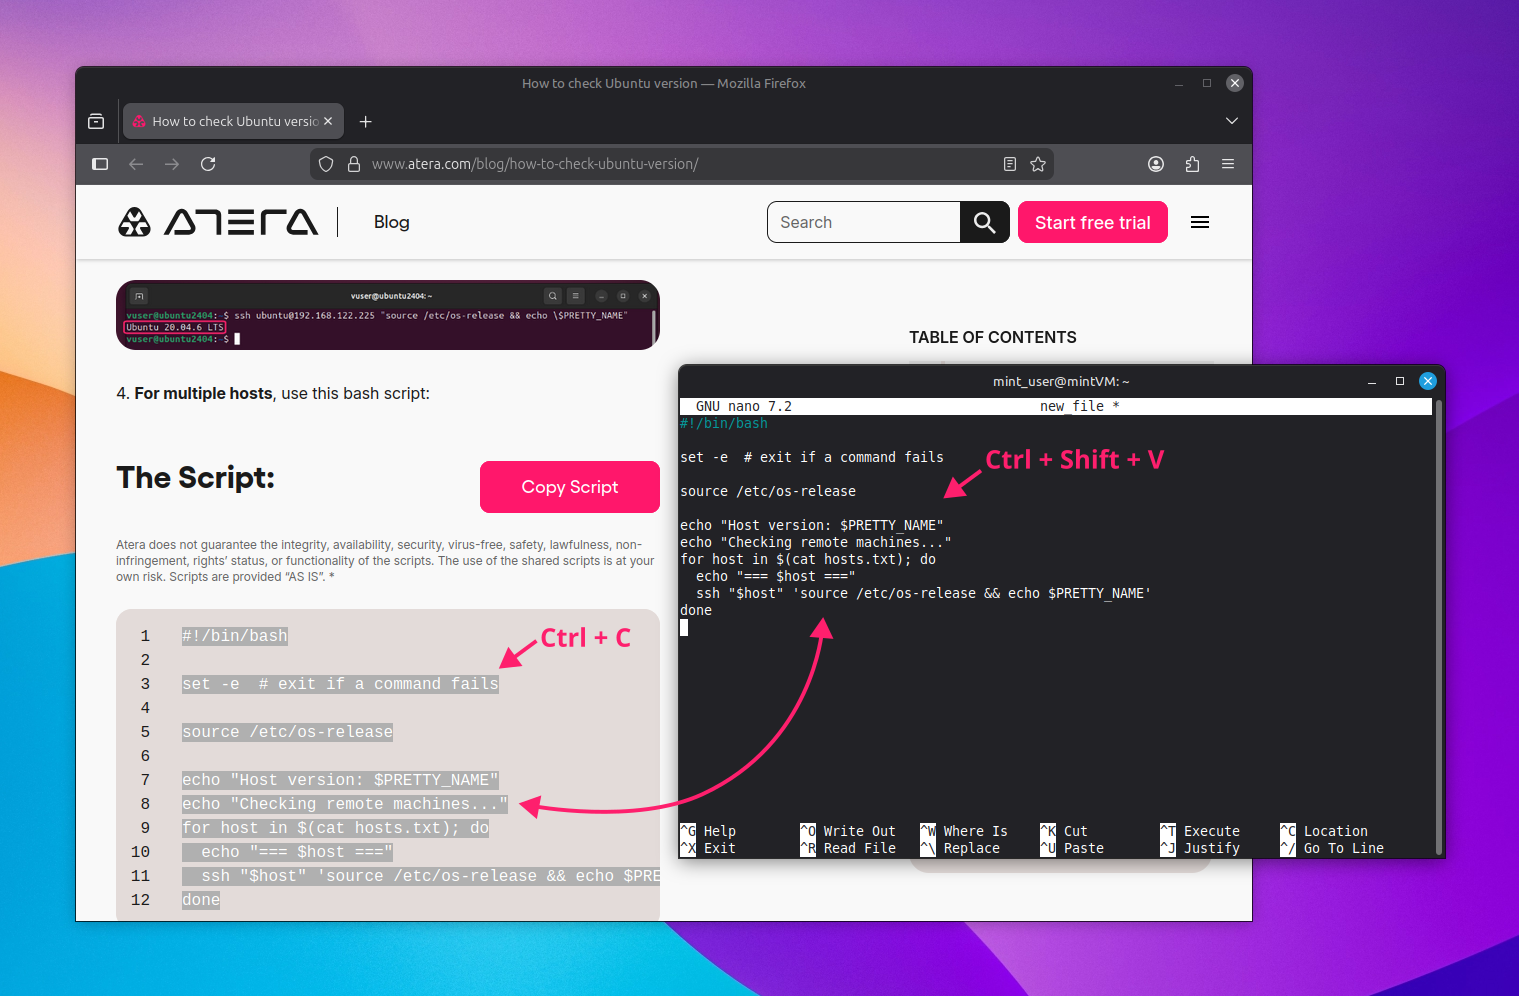
The Shift Rule (holding Shift) bypasses the terminal’s own keyboard capture and forces the keystroke through to the underlying windowing system instead. This lets Ctrl+Shift+V reach the Clipboard buffer when plain Ctrl+V can’t.
Method 3: Middle-mouse-button paste
The fastest option when you’re working from the Primary selection, since it skips the keyboard entirely.
- Highlight the text you want to copy anywhere on screen. No explicit copy command is needed; highlighting alone populates the Primary buffer
Click the middle mouse button at the location where you want to paste

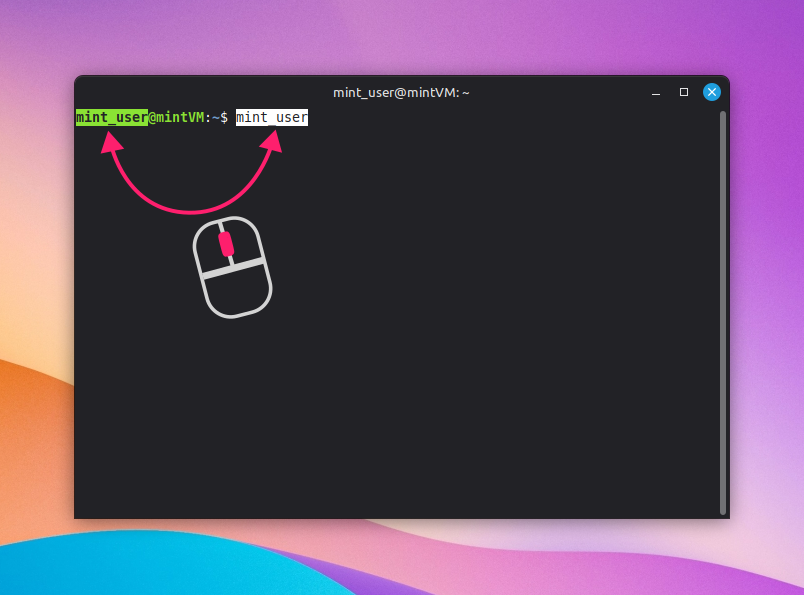
The buffer content only changes when new text is highlighted, so previously selected text stays available to paste until you highlight something else.
Method 4: Shift+Insert
The closest thing to a universal paste shortcut across Linux terminal emulators and worth defaulting to when you’re not sure what else a given environment supports.
- Position your cursor where you want to paste
Press
Shift+Insert
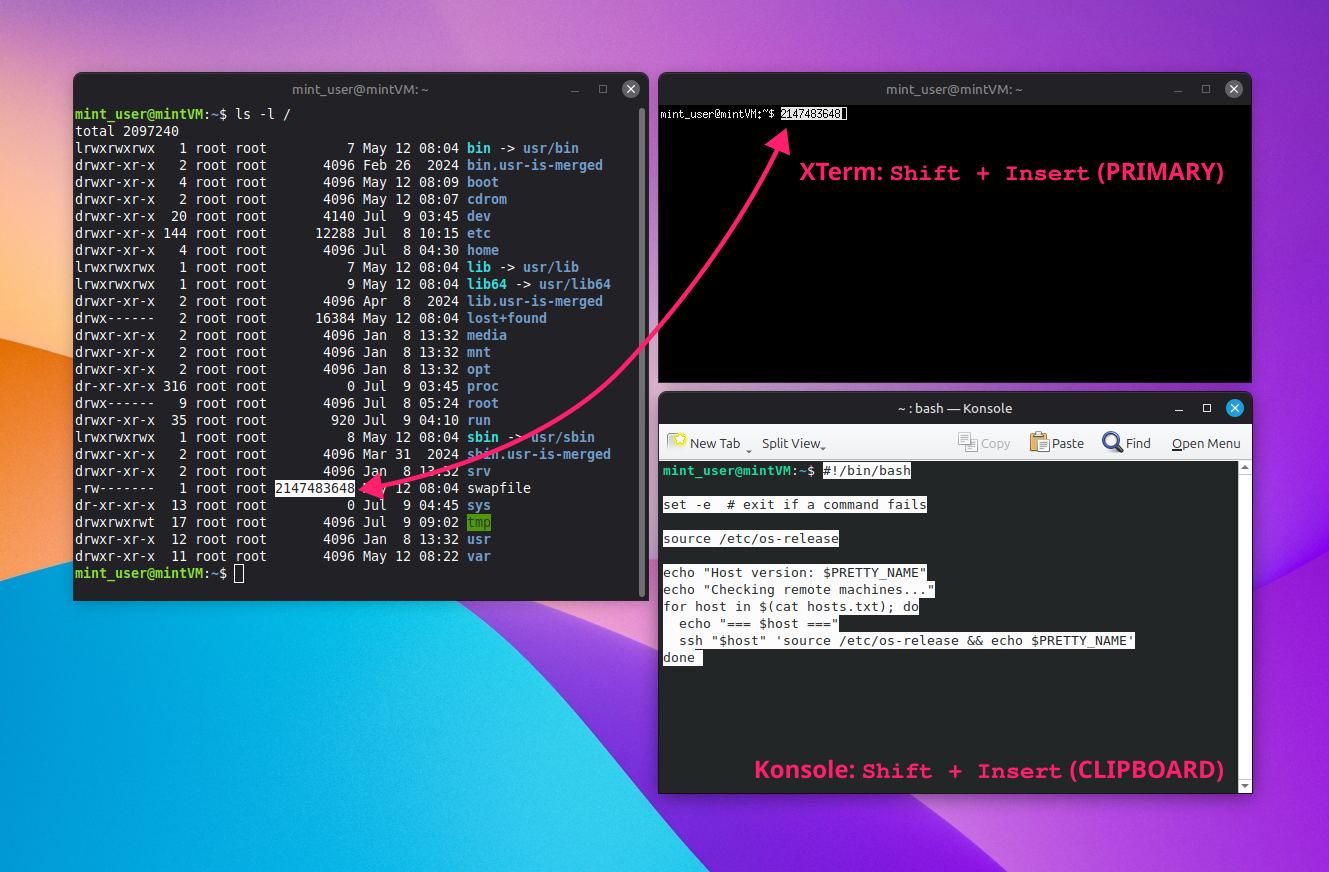
This shortcut doesn’t collide with any POSIX terminal control characters, so the terminal passes it straight through to the window system without interference. On many emulators and legacy tools it’s mapped to the Primary selection, though some modern GUI applications map it to Clipboard instead.
Method 5: Bracketed paste, for multi-line commands
Relevant specifically when you’re pasting multi-line scripts or commands and want to avoid the terminal executing each line as it’s pasted rather than treating it as a block.
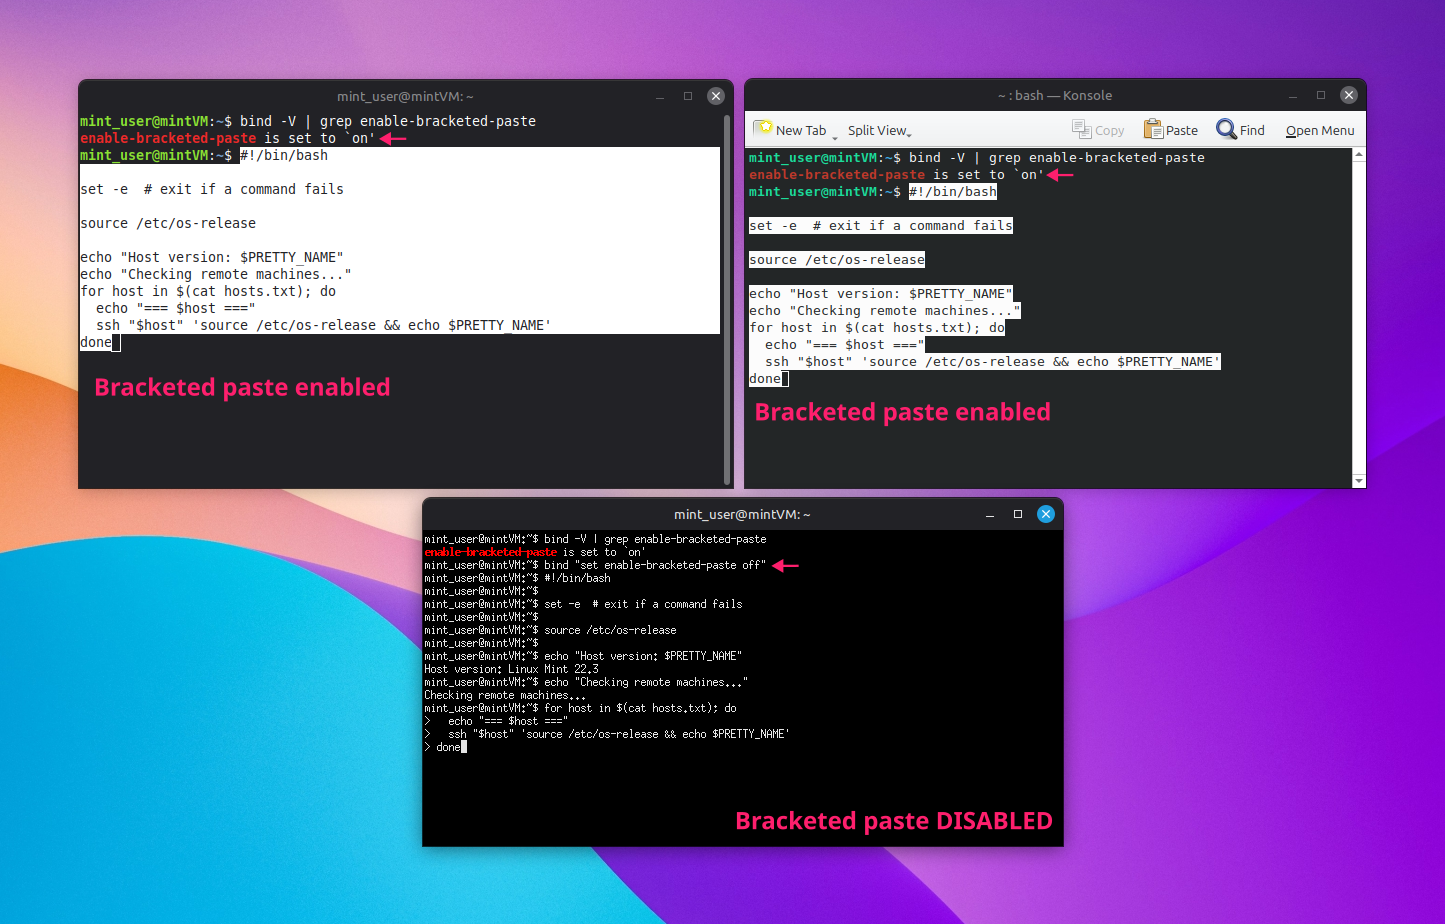
Bracketed paste is a terminal capability that distinguishes human-typed keystrokes from pasted text block transfers. Pasted content gets wrapped in the escape sequences ESC[200~ and ESC[201~, and everything between those markers is treated as a single literal block, so embedded newlines aren’t interpreted as Enter keypresses.
- Check whether bracketed paste is already enabled by running
bind -v | grep enable-bracketed-paste. It’s on by default in most modern shells If it’s off, enable it with
bind 'set enable-bracketed-paste on'
Method 6: Piping into the clipboard with xclip or wl-paste
The right approach when you need to move clipboard content between scripts, background processes, or a remote session and the command line, rather than pasting interactively. Unlike the previous methods, this isn’t a single action. It’s two separate utilities, each tied to a specific display server, so the steps differ depending on which one your system is running.
Using xclip (X11 systems)
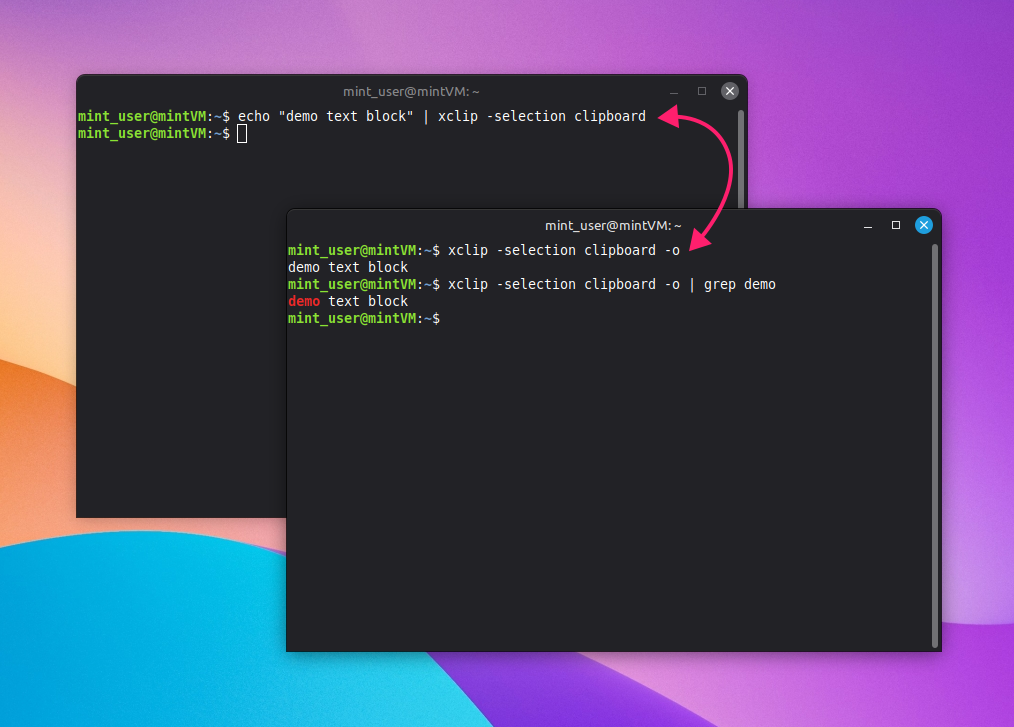
xclip requires an X11 server. Under Wayland it only works indirectly, through the XWayland compatibility layer, so this is the tool to reach for on traditional X11 setups or when scripting for compatibility across older systems.
- Pipe text into the Clipboard buffer:
echo "text to copy" | xclip -selection clipboard Retrieve it from the Clipboard buffer:
xclip -selection clipboard -o
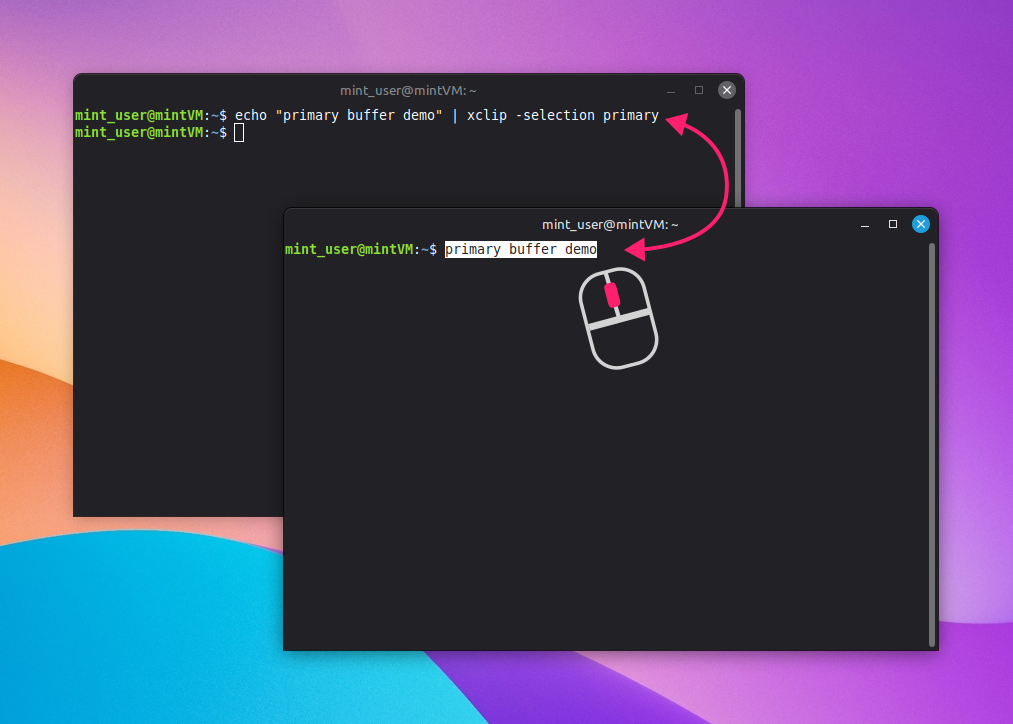
- If you want to use the Primary buffer instead, pipe into it the same way:
echo "text to copy" | xclip -selection primary Paste Primary buffer content with a middle-click, or retrieve it directly with
xclip -selection primary -o
» Outdated Mint? Here’s how to update Linux Mint
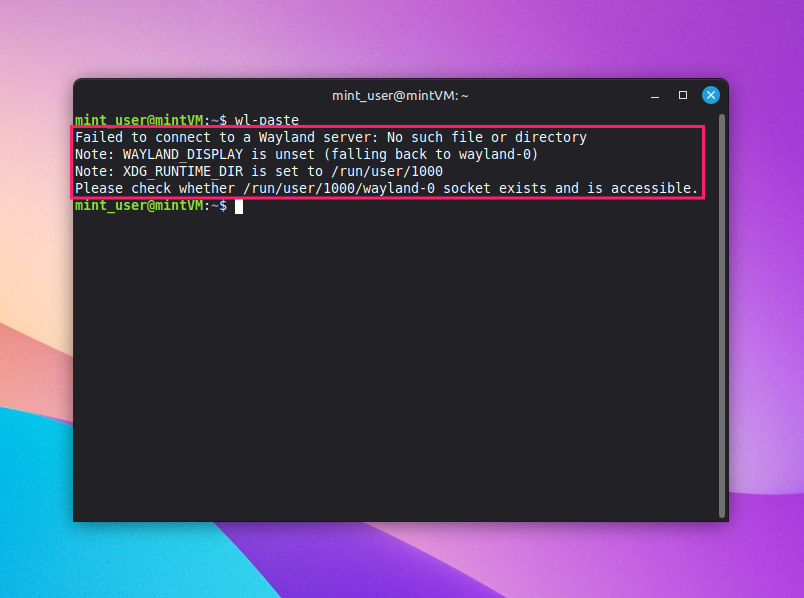
Using wl-clipboard (Wayland systems)
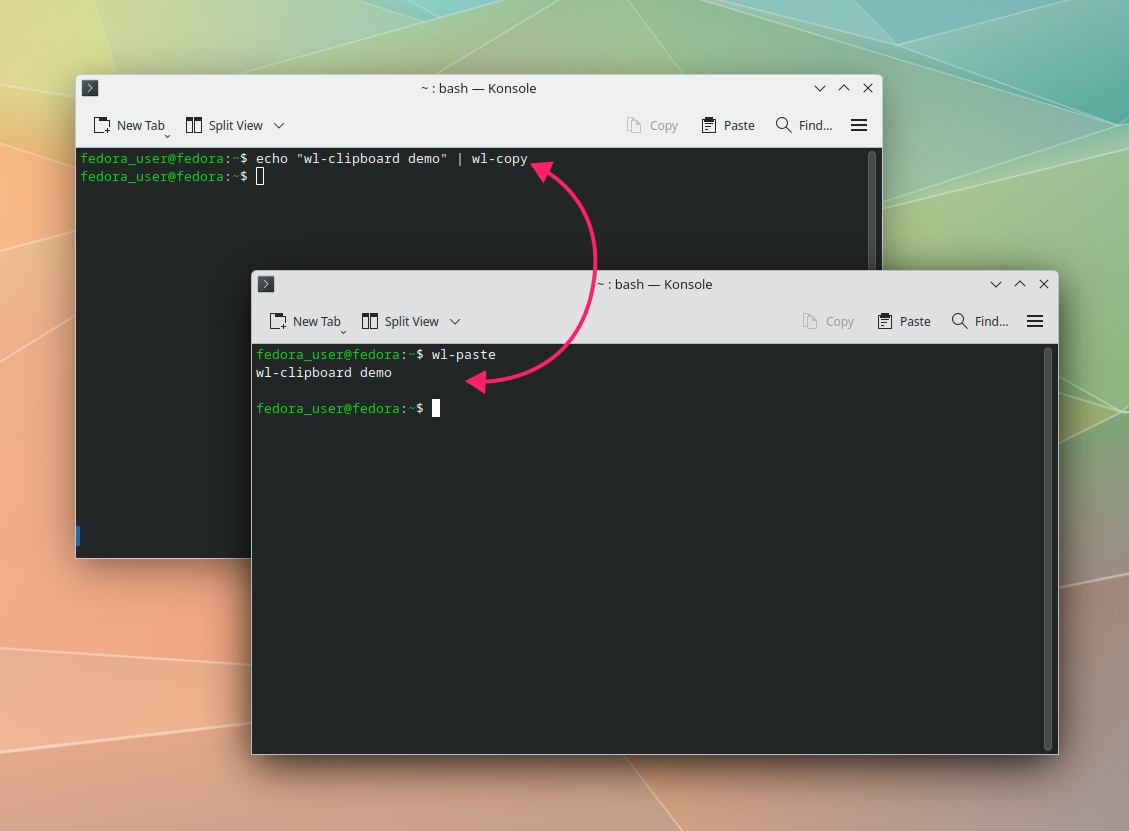
wl-clipboard requires a native Wayland compositor, and its two commands, wl-copy and wl-paste, default to the Clipboard buffer rather than Primary.
- Pipe text into the clipboard:
echo "text to copy" | wl-copy Retrieve clipboard content:
wl-paste
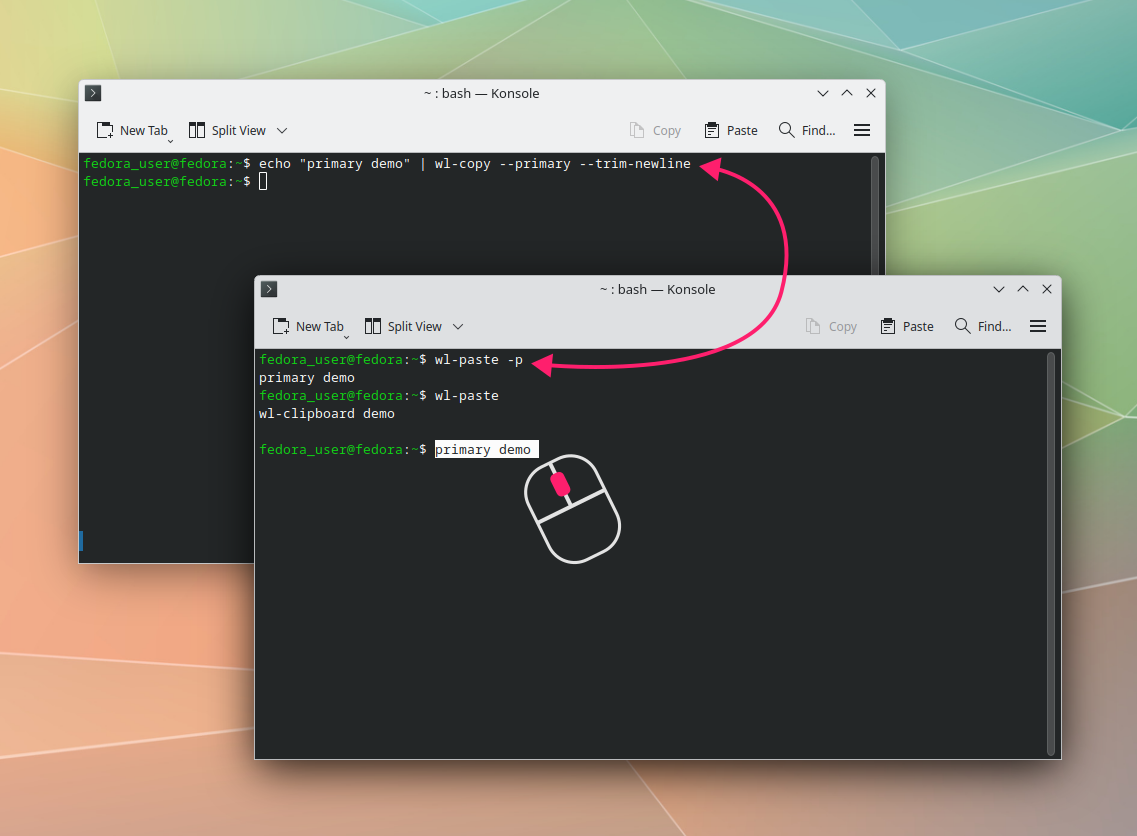
- If the output has an unwanted trailing newline, suppress it:
wl-paste --trim-newline To target the Primary buffer instead of Clipboard, add the flag to either command:
wl-copy --primaryorwl-paste --primary(-palso works as shorthand)
» Not sure what you’ve got? Here’s how to check Linux version
Customizing and scaling clipboard behavior
Once paste is working reliably, the last piece is making it work exactly how you want it across all the machines in your network.
Remapping keybindings to match your OS habits
Worth doing if you’re tired of context-switching between Ctrl+V on your desktop and Ctrl+Shift+V in the terminal, and want one consistent muscle memory across both.
Most modern graphical Linux terminal emulators expose keybinding customization through their GUI preferences, though the exact path differs by emulator.
Warning: Be wary of remapping Ctrl+C. It’s normally bound to SIGINT, which interrupts a running process, and overriding it can break that functionality in ways that cause more problems than the remap solves.
GNOME terminal:
Right-click the terminal and select Preferences

- Switch to the Shortcuts tab
- Locate the entry you want to change and double-click it
Input the new key combination

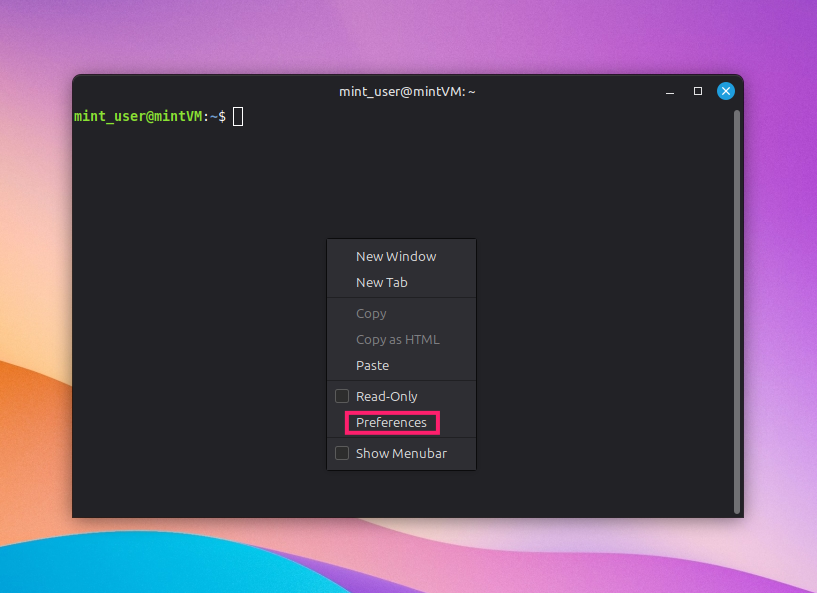
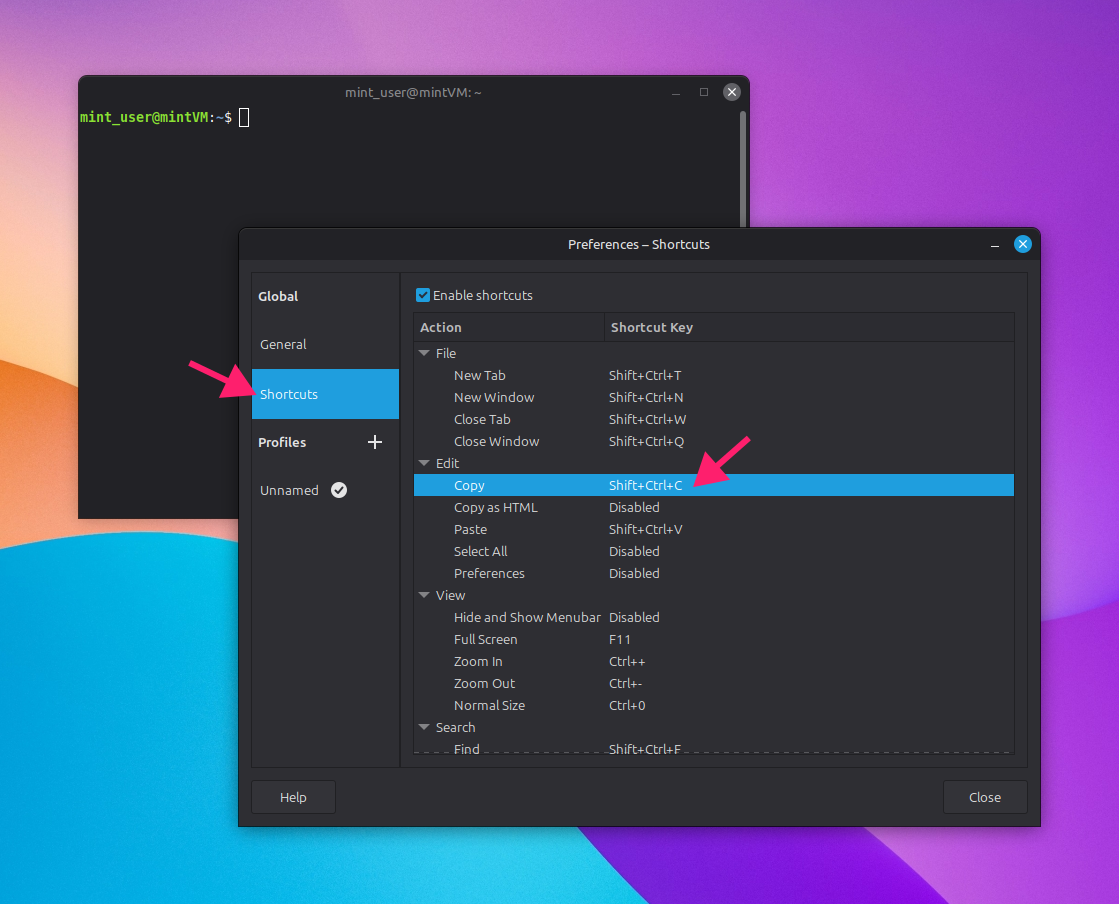
Konsole:
Open the menu and go to Settings > Configure Keyboard Shortcuts

- Locate the action you want to update
- Click the button next to the Custom option
Input the new key combination

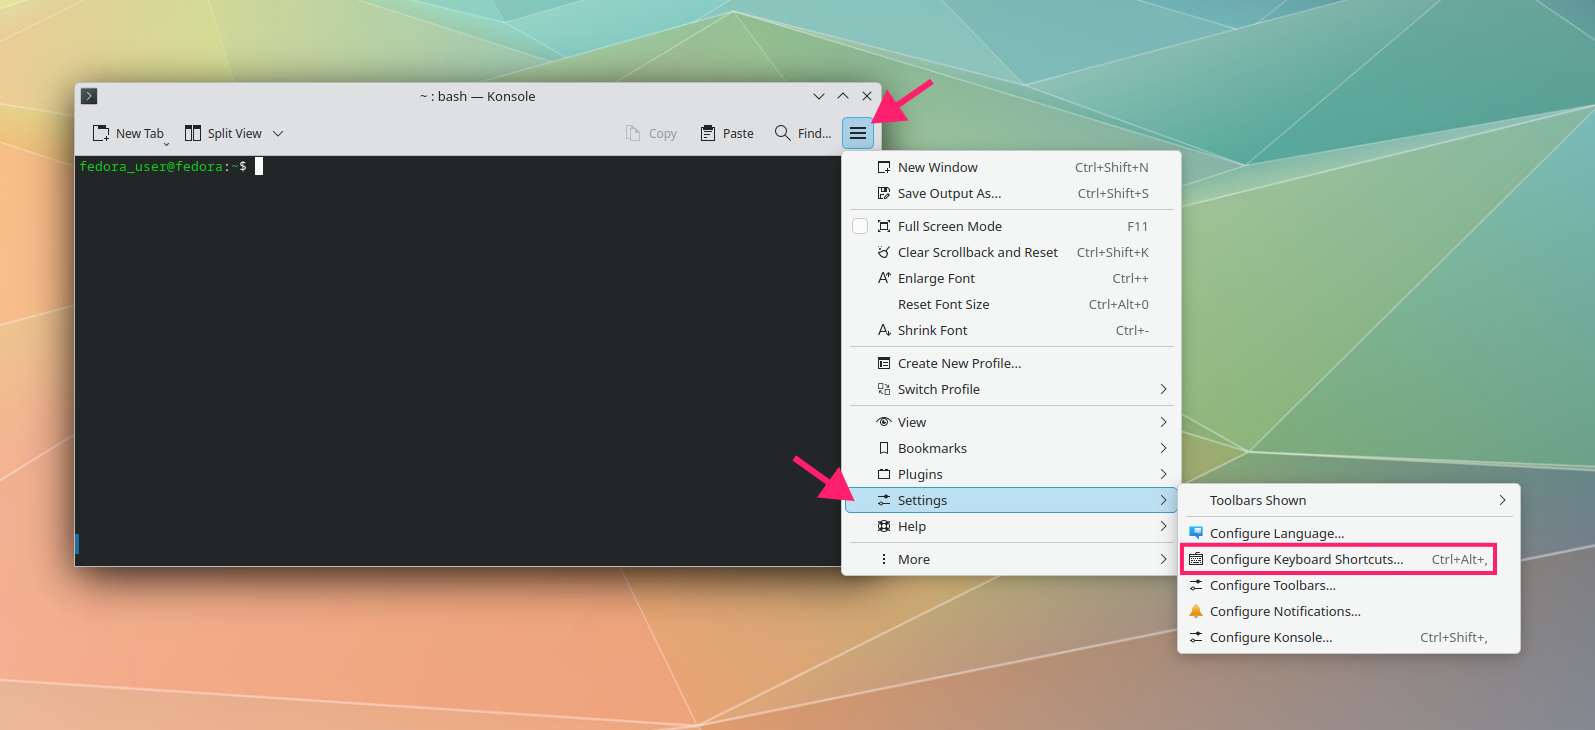
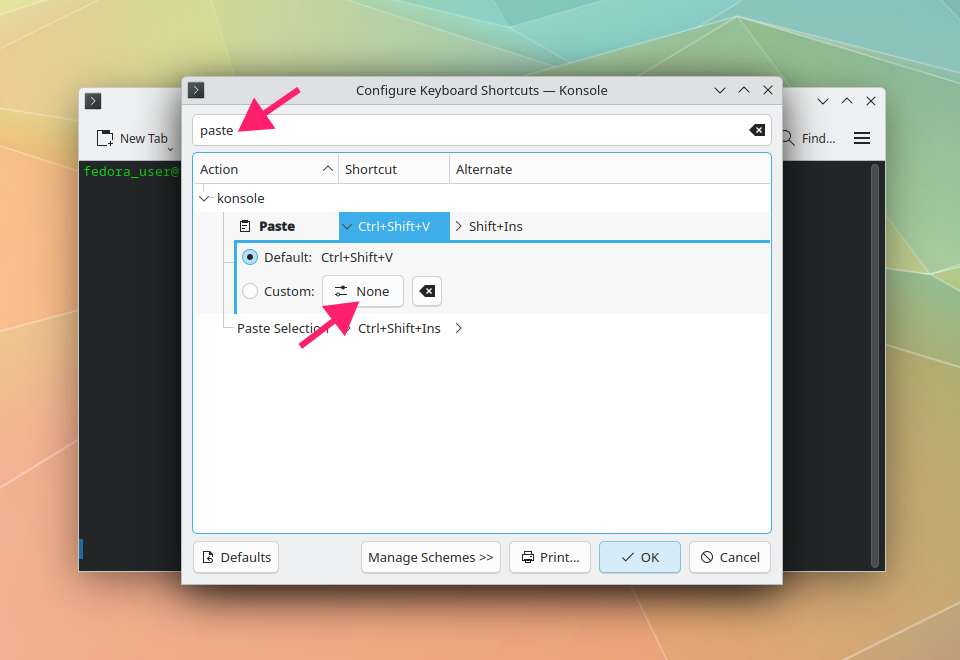
XTerm:
XTerm doesn’t have a GUI for this. It uses X resources instead, so the process is file-based rather than menu-based.
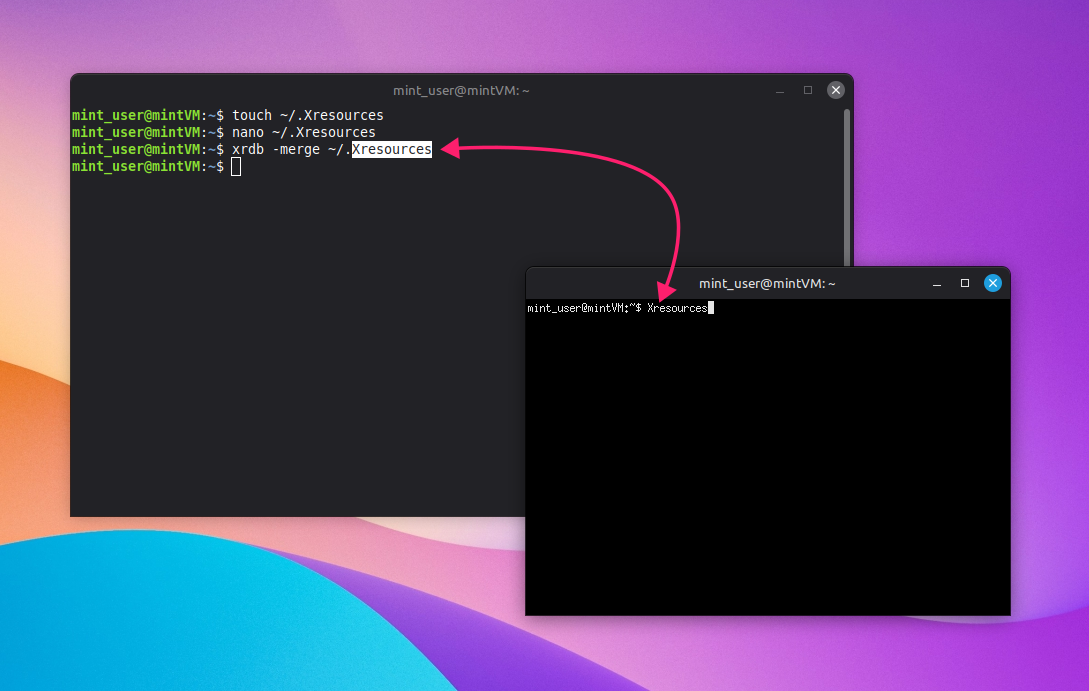
- Create the resources file if it doesn’t already exist:
touch ~/.Xresources(use~/.Xdefaultson older systems) - Open it for editing:
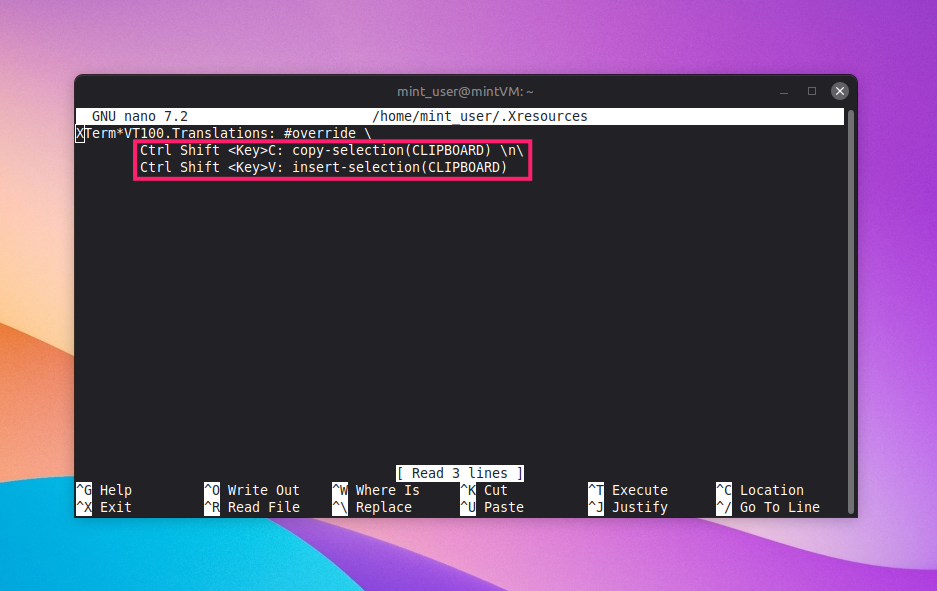
nano ~/.Xresources Add your custom bindings, for example:
XTerm*VT100.Translations: #override Ctrl Shift <Key>C: copy-selection(CLIPBOARD) n
Ctrl Shift <Key>V: insert-selection(CLIPBOARD)

Load the changes:
xrdb -merge ~/.Xresources
- Restart XTerm for the new bindings to take effect.
Clipboard sync over SSH and inside VMs
Over a standard SSH session, terminal-level copy and paste is inherited from your local terminal automatically. No extra configuration is required. The only exception is if you need a remote process to interact with your local clipboard directly, in which case X11 forwarding plus xclip or wl-clipboard on the remote end handles it.
Inside a VM, shared clipboard support depends entirely on the hypervisor:
- VirtualBox: Install Guest Additions on the guest OS, then enable Shared Clipboard from the settings menu.
- VMware: Install VMware Tools on the guest, then enable copy/paste in the VM settings.
- Hyper-V: Enable the Enhanced session mode policy and setting, then enable the local resource in VMConnect.
- QEMU/KVM: Run
spice-vdagenton the guest.
Where this stops being a one-machine problem
Everything above assumes you’re pasting into one server or one VM at a time. That falls apart fast once you’re responsible for a fleet of Linux endpoints instead of a single box. Remapping ~/.Xresources by hand, checking Guest Additions on every VM, or confirming bracketed paste is enabled one SSH session at a time doesn’t scale, and it’s exactly the kind of repetitive manual work that eats a technician’s day without needing to.
This is where Atera’s Linux agent simplifies the job. Remote sessions run through Splashtop’s built-in integration, so you’re not troubleshooting clipboard sync differently depending on which hypervisor or SSH client you happened to use to get there. And instead of applying a config change like the XTerm remap above one server at a time, IT automation and remote scripting through the RMM platform let you push the same change across your whole Linux fleet in one pass.
The terminal isn’t broken, it’s just different to your expectations
None of this really comes down to memorizing six separate paste methods. It’s about knowing that the terminal draws a hard line between the character stream a shell process reads and the two selection buffers a window manager tracks, and every method on this list is just a different way of getting text across that line. Once that clicks, GNOME Terminal, Konsole, xterm, and every SSH session in between stop feeling inconsistent. They’re all solving the same problem with different defaults.
For IT teams and MSPs managing more than a handful of Linux endpoints, that same distinction matters at scale. Getting a script onto one box through copy-paste is a two-minute task; getting it onto two hundred boxes reliably is not. Atera’s RMM handles that gap, letting you push and run scripts across your Linux fleet remotely instead of pasting the same command into one terminal at a time.
Related Articles

How to set Windows environment variables in PowerShell
PowerShell environment variables can be set at the Process, User, or Machine level, with each scope serving a different purpose. This blog covers how to configure these variables and deploy system-level settings across multiple Windows devices.
Read now
How to install AppImage on Linux
An AppImage that won't launch usually isn't broken. It's missing FUSE, sitting on the wrong filesystem, or lacking its execute bit. Here's every method for running one on Linux, from a single terminal command to pushing it across an entire fleet.
Read now
How to remove write protection from a USB
A drive gone read-only isn't always a two-minute registry fix. Sometimes it's flash memory quietly failing, and every write attempt afterward costs you more of the data you're trying to save. Here's how to tell which one you're dealing with and what to do once you know.
Read now
How to enable or disable Windows Subsystem for Linux WSL in Windows 10
Enabling WSL feels harmless right up until a checkbox turns into error 0x80370102 and a BIOS setting nobody documented. WSL now shows up on more professional machines than a standalone Linux install, which means more failed toggles landing on IT's desk.
Read nowEndless IT possibilities
Boost your productivity with Atera’s intuitive, centralized all-in-one platform









