
Table of contents
Generate summary with AI

Every technician knows what it’s like when a user calls in because Windows Update won’t install, and ten minutes later you find the real problem isn’t the update at all but a C: drive sitting at 2 GB free. Windows doesn’t check for available space before it starts downloading and staging update packages, so by the time the error shows up, the fix isn’t a patch or a driver update/rollback. It’s freeing up room on the drive.
Disk Cleanup has been sitting in Windows since long before Windows 11, and it’s easy to write off as a relic. But it’s still the fastest built-in way to reclaim space without guessing which files are safe to touch.
» Still on Windows 10? Here’s how to upgrade to Windows 11
What disk cleanup actually does and why it matters
A full drive doesn’t just cost you storage, it costs you performance, security, and stability. When free space runs low, Windows slows down and updates start failing outright (like KB5079473), since Windows Update needs breathing room to stage and install packages before it ever touches your system files.
On the security side, clearing out temporary files and old application logs also clears out the exact clutter that malware likes to hide in and exploit. None of this is about vanity metrics on a storage bar; it’s about keeping the machine in a state where updates actually complete and nothing has an easy place to lurk.
» Did you know you can disable Windows updates and manually re-enable Windows updates?
What’s actually happening when you click “OK”
Disk Cleanup isn’t one monolithic process, it’s a central manager that hands off work to a set of specialized handlers, each responsible for a specific file category and applying its own predefined rules like:
- Target folder
- File extension
- File age
Before anything gets removed, safety guardrails kick in where each handler needs explicit permission to touch its category, and active file locks are respected so a file currently in use by a running process doesn’t get pulled out from under it and crash something. That’s the mechanism that lets the tool run safely without you having to manually verify every file it touches.
What it will never let you delete, and why
A few things are permanently off-limits, and it’s not arbitrary caution. pagefile.sys is the file that backs Windows’ virtual memory, held open by the kernel the entire time the OS is running, so it can’t be removed without shutting the system down first.
hiberfil.sys is reserved to store a snapshot of system memory for hibernation, and it stays reserved as long as hibernation is enabled (if you don’t use hibernation, disabling it is the way to reclaim that space, not Disk Cleanup). Beyond those two, anything with an active file lock, meaning a file currently in use, gets skipped for the same reason handlers respect locks in general: pulling it out mid-use risks crashing whatever has it open.
» Here’s how to disable Recall Snapshots and Windows Hibernate
3 steps to run disk cleanup
Understanding what Disk Cleanup does under the hood is one thing, actually running it is another. There are three ways to get there depending on your situation: a standard pass through the GUI for everyday temporary files, an elevated pass that unlocks system-level categories like update leftovers, and a scriptable route for when you’re not doing this on just one machine.
Step 1: The standard cleanup for everyday temporary files
Use this method first, it’s the fastest way to reclaim space from ordinary clutter like cached downloads, error reports, and temporary internet files, without needing elevated permissions.
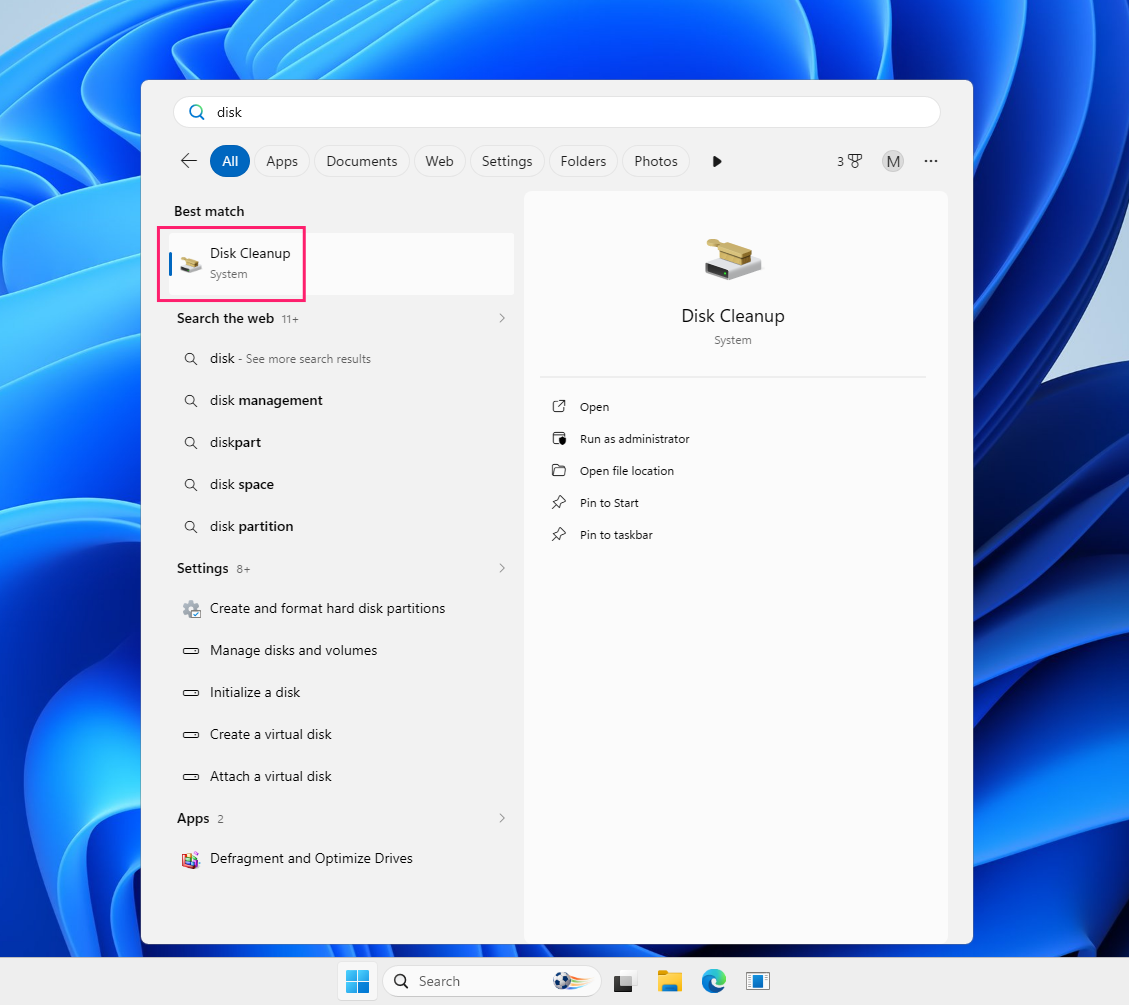
Press Win + R, type
cleanmgr, and press Enter (or search Disk Cleanup from the Start Menu)
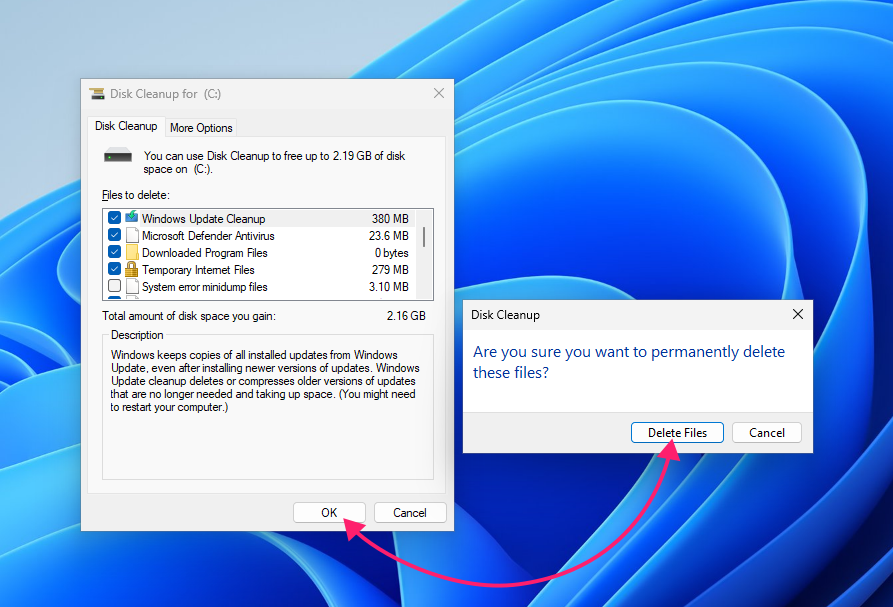
- Click any category name to see a description of what it contains before deciding whether to remove it
- Check the box next to each category you want to delete; the Total amount of disk space you gain updates below the list as you select categories
Click OK, then click Delete Files in the confirmation prompt

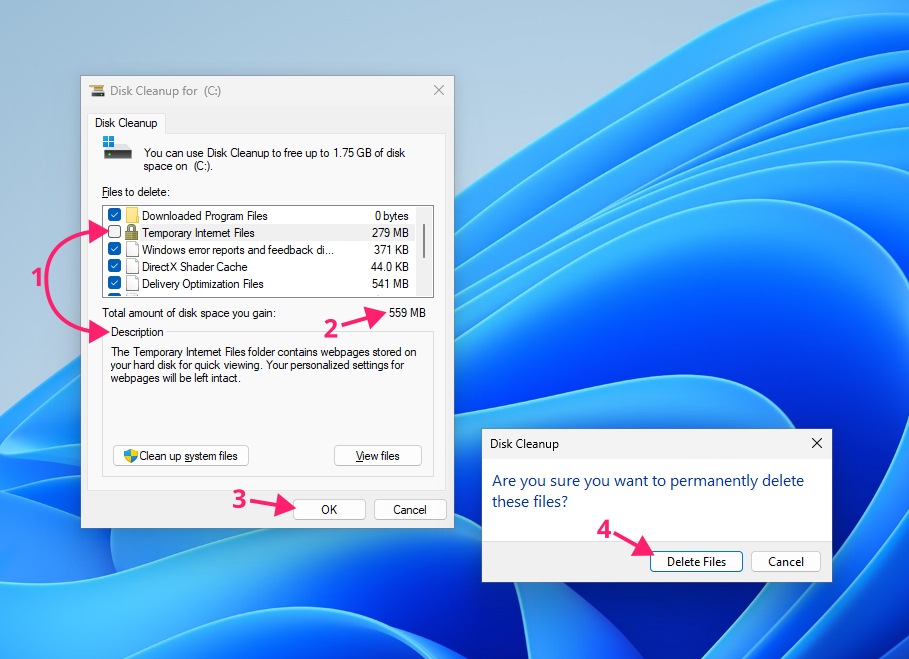
That clears the everyday temporary files. For anything Windows keeps locked behind admin permissions, you can actually use the same tool for a more thorough clean.
» Did you know you can set something to always run as an admin?
Step 2: Unlocking system files for deeper cleanup
Use this method when the standard scan doesn’t free up enough space, or when you’re specifically after update leftovers and driver rollback data, since those categories only appear once the tool rescans with elevated access.
In the Disk Cleanup window, click Clean up system files

Approve the User Account Control prompt to let Disk Cleanup rescan the drive with administrative permissions

- Review the expanded list, which now includes categories like Windows Update Cleanup, Device Driver Packages, Microsoft Defender Antivirus, and Delivery Optimization Files.
Check the categories you want to remove, click OK, then click Delete Files in the confirmation prompt

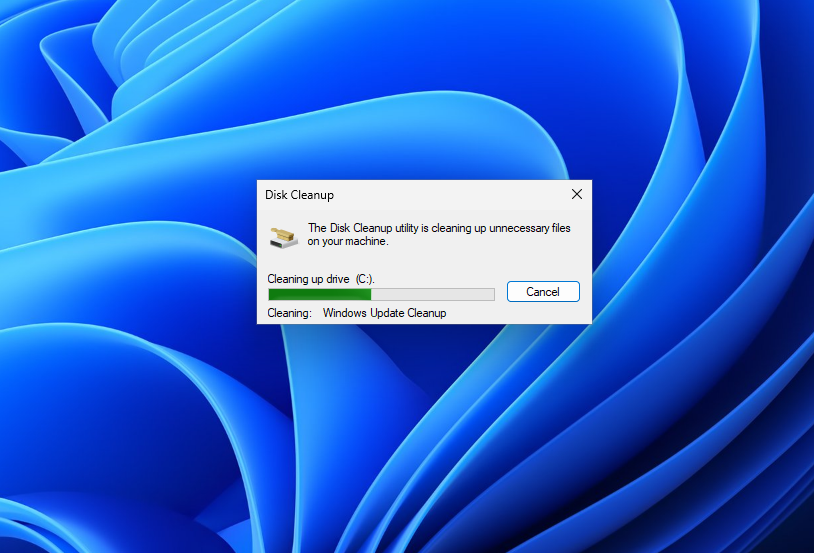
Wait for Disk Cleanup to finish; larger categories like Windows Update Cleanup can take a few minutes to process

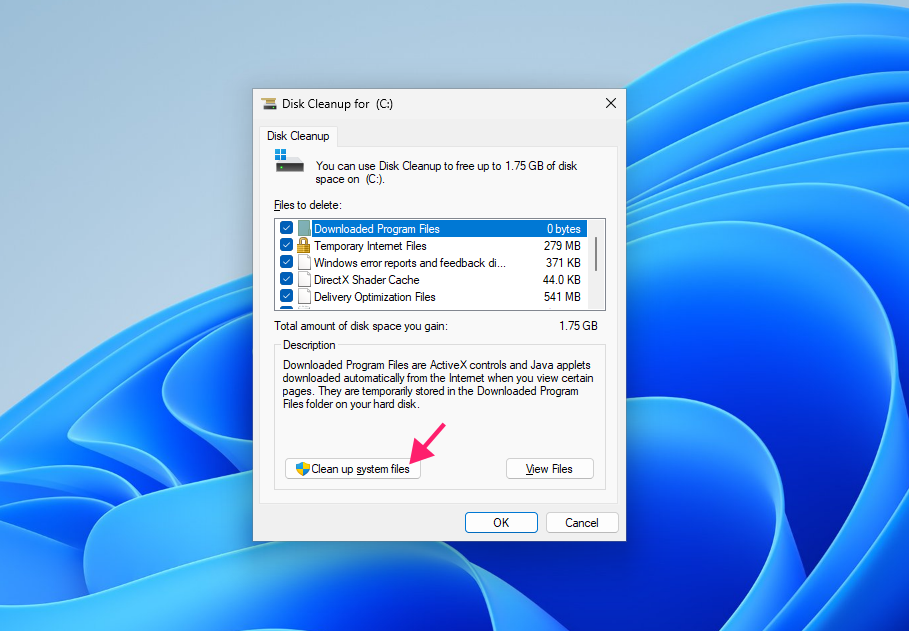
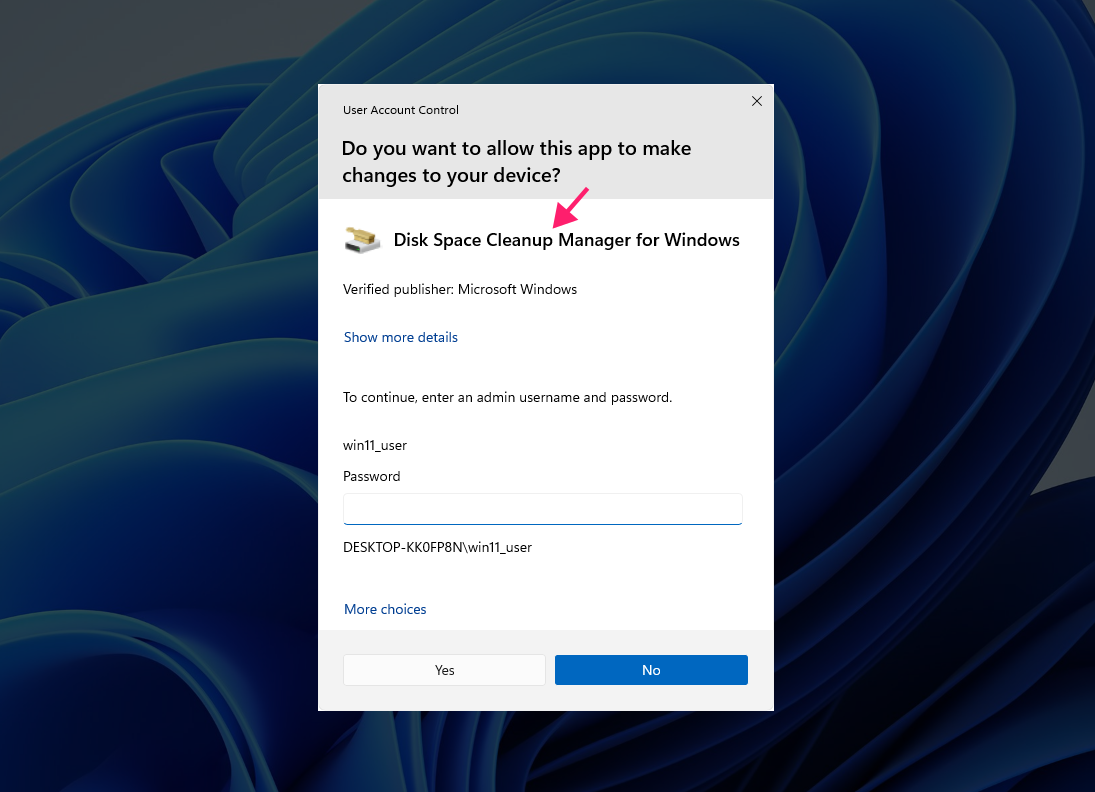
Both methods above get the job done on a single machine. Once you’re maintaining more than a handful of endpoints, clicking through the GUI on each one stops being practical.
» Here’s how to disable User Access Control and bypass the “This app has been blocked” error
Step 3: Running cleanup from the command line for repeatable, scriptable use
Use this method when you need to run the same cleanup configuration on a schedule or across more than one machine, since it skips the GUI entirely and lets you predefine exactly which categories get cleared.
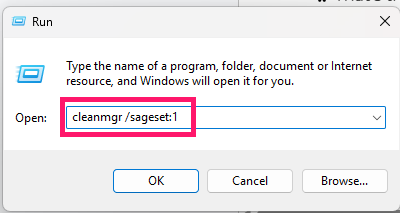
Press Win + R, type
cleanmgr /sageset:1, and press Enter. This opens the standard category checklist, but in save-only mode so nothing is deleted, and the number (1) is just a profile ID you’re assigning, so it can be any number you choose
- Check the categories you want included in this profile, then click OK. This saves your selections to the registry under that profile number instead of deleting anything
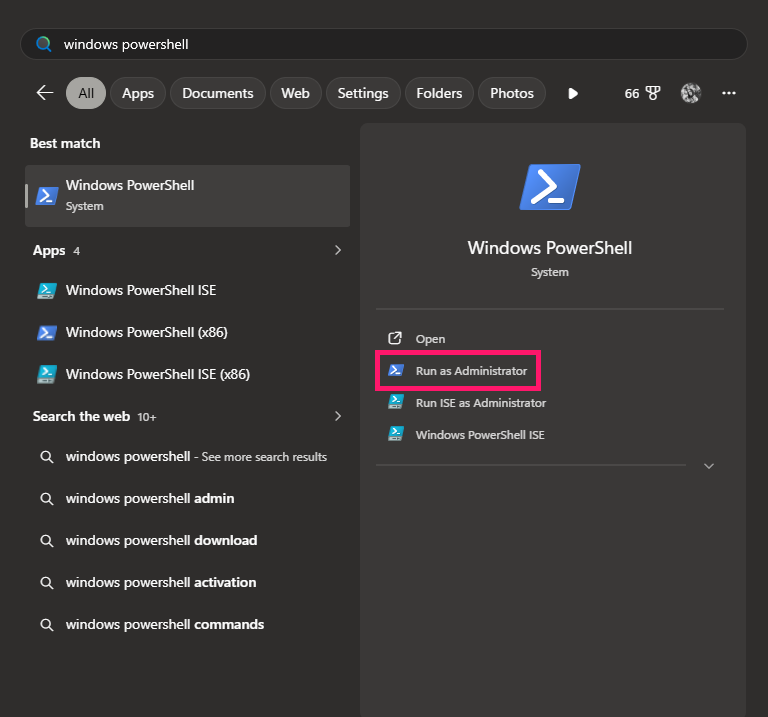
To run the saved profile going forward, open Command Prompt or PowerShell as an admin

Then run:
cleanmgr /sagerun:1. This executes the cleanup immediately using the categories saved in step 2, with no dialog boxes or confirmation prompts
- To trigger the same saved profile from within a PowerShell script (for chaining with other maintenance tasks or running remotely), use
Start-Process cleanmgr.exe -ArgumentList '/sagerun:1' -Wait
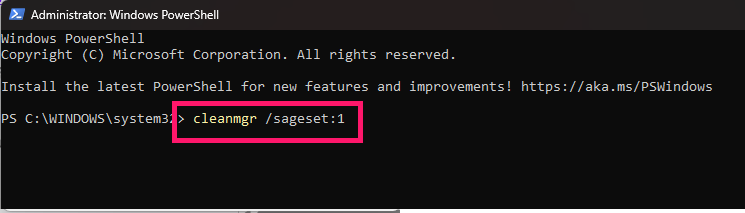
The main benefit of using PowerShell is that IT managers or admins can deploy the script remotely across endpoints instead of having to rely on the slow, manual GUI process on each endpoint.
Doing it safely and knowing its limits
Microsoft doesn’t officially document how Disk Cleanup behaves if power is lost mid-run, but the general risk holds for any active system operation, so a sudden power loss can corrupt files and an interrupted process can leave the system in an unbootable or inconsistent state.
The bigger risk is usually self-inflicted. Blindly checking every available category, including the elevated system files ones, strips out rollback data, recovery points, and driver reversion files. That’s the difference between freeing up space and removing your own safety net the next time something needs troubleshooting or restoring.
How this differs from defragmentation, and why the drive type matters
Freeing up space and defragmenting solve two different problems:
- Disk Cleanup removes unnecessary files to increase available capacity
- Defragmentation moves data fragments around so files sit in more contiguous space
That distinction matters most based on what kind of drive is doing the sitting. On a traditional HDD, fragmentation is a real performance hit, since the read/write head has to physically seek across multiple locations to reassemble a file, and defragmenting reduces that seek time.
On an SSD, there’s no physical head to seek, so defragmenting doesn’t just fail to help, it actively wastes write cycles for no benefit. SSDs are optimized differently, through the TRIM command, which tells the SSD controller which data blocks are no longer in use so it can erase and prepare them ahead of time, keeping write performance up and reducing write amplification.
Disk Cleanup doesn’t handle either of these, so defragmentation has to be run separately:
Press Win + R, type
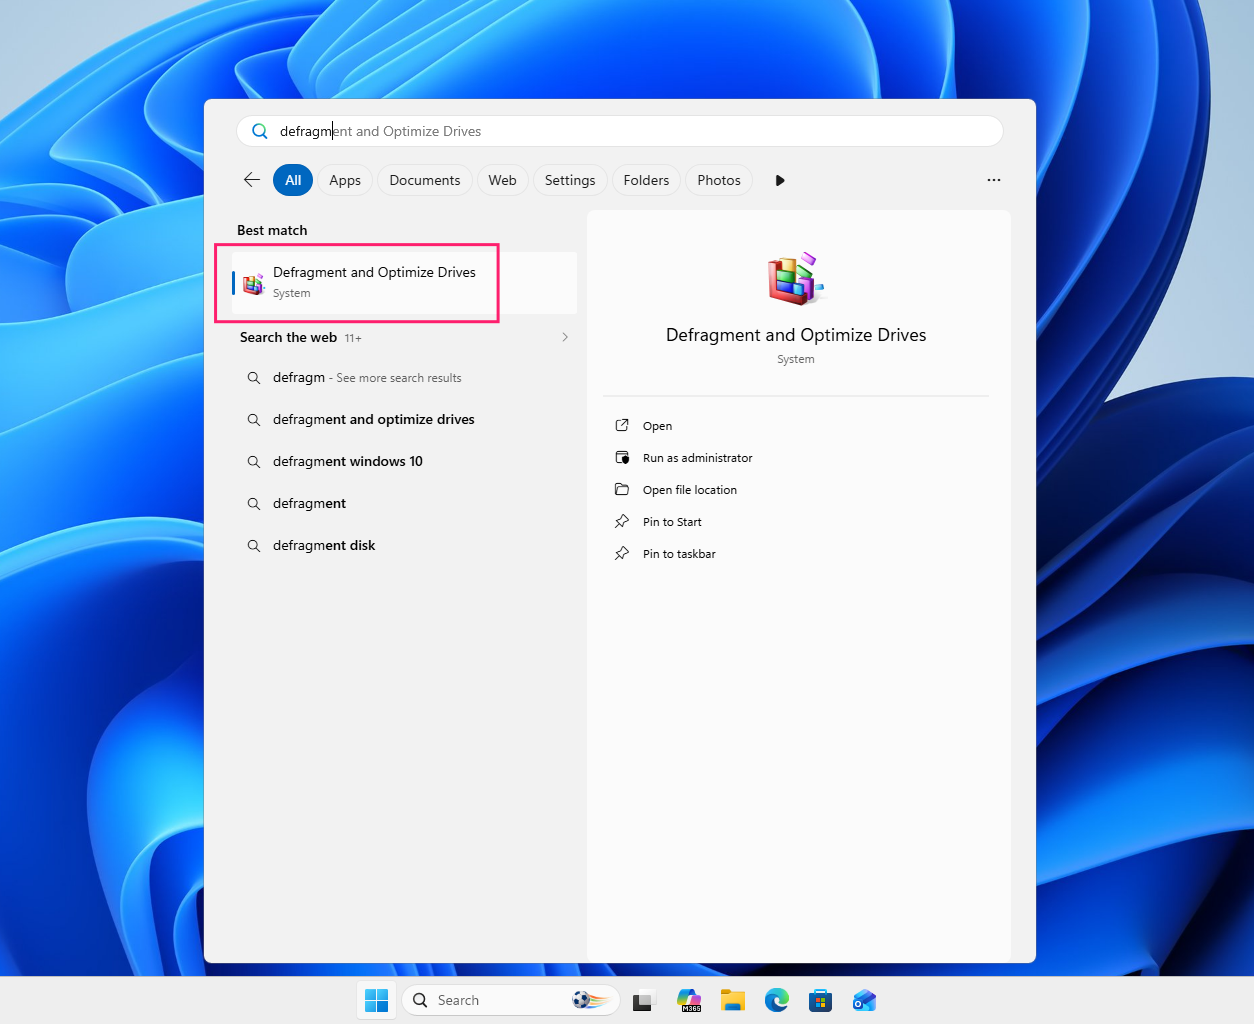
dfrgui, and press Enter (or search Defragment and Optimize Drives from the Start Menu)
Select the drive, then click Optimize

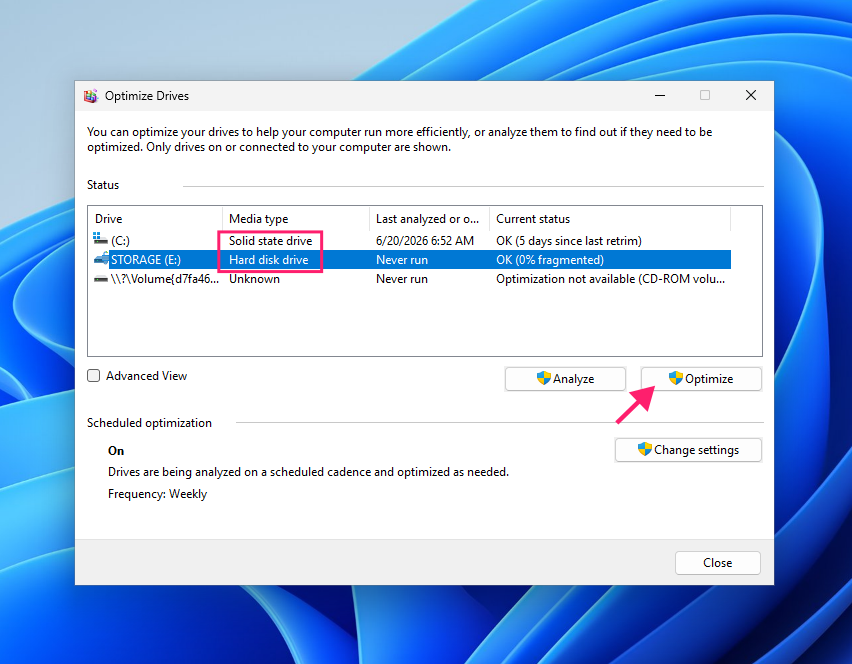
Windows detects the drive type automatically. An HDD runs the standard defragmentation process, while an SSD gets issued the TRIM command instead.
» Make sure you know how to check SSD health
Scaling past the single-machine fix
Running Disk Cleanup on one machine is a five-minute job. Running it on fifty, or five hundred, by walking through the same GUI clicks on each one is a punishment instead of a workflow. The scripted approach gets you there faster on a single device, but it still leaves you logging into each endpoint individually to kick it off.
That’s the gap Atera’s RMM platform closes. The same cleanup logic that runs manually or via script on one machine can be pushed out as an automation profile and triggered through remote PowerShell execution across every endpoint you manage, without touching each one by hand.
Related Articles

How to decide if you need a dedicated DEX platform, or already have one
"IT feels slow" is the complaint that often sells DEX platforms. Sometimes it signals a real blind spot, but just as often already catches and fixes the problem, and a new scoring layer would only add another console. Telling the two apart takes evidence, and the real gap usually isn't visibility at all.
Read now
How to set up secure printing across your organization
A secure print checkbox protects exactly one moment in a document's life. Everything else, from unencrypted traffic and unhardened devices to payroll printouts forgotten in a tray, stays exposed. Real secure printing covers the whole lifecycle: release policy, authentication, encryption, hardening, and a fleet that stays monitored long after rollout.
Read now
How to reduce alert fatigue in healthcare IT
In a hospital, a dismissed alert isn't a delayed ticket. It can be a patient deteriorating while the monitor keeps sounding. Cutting alert volume won't fix that on its own, and switching alerts off can make it worse.
Read now
How to prevent configuration drift across your IT infrastructure
Configuration drift rarely breaks anything the day it happens. It hides in a hotfix, a reset default, or a vendor installer, then surfaces weeks later as a failure nobody can trace. Stopping it means defining exactly what approved looks like, closing every side door into production, giving each setting one owning tool, and checking that the baseline itself hasn't gone stale.
Read nowEndless IT possibilities
Boost your productivity with Atera’s intuitive, centralized all-in-one platform









