
Generate summary with AI

Windows Recall is an opt-in feature, but that doesn’t mean it’s off by default on every device or even that users always know it’s running. As Copilot+ PC adoption accelerates, Gartner projects worldwide AI PC shipments will total 114 million units in 2025, a 165% increase over 2024, which means Recall-capable hardware is landing in fleets at scale, and IT teams need a position on it before the question lands on their desk.
Whether the concern is compliance, data residency, litigation risk, or the straightforward reality that snapshotting employee screens every few seconds is hard to justify to a legal or HR team, disabling Recall is a legitimate policy decision. The methods range from a quick Settings toggle for a single user to Group Policy and registry edits for managed fleets. Here’s everything you need to know.
What Recall is and why IT teams need to control it
Windows Recall is a feature exclusive to Copilot+ PCs, which have hardware that meets Microsoft’s minimum threshold of a Neural Processing Unit (NPU) capable of 40+ TOPS, 16 GB of DDR5/LPDDR5 RAM, and a 256 GB SSD with at least 50 GB of free space. On qualifying devices running Windows 11 version 24H2 or later, Recall periodically captures snapshots of whatever is on screen and stores them in a local, searchable database. The idea is kind of like a photographic memory for your PC that’s searchable with natural language queries.
By default, certain content is excluded automatically:
- Sound and other audio
- DRM-protected media (in line with other Windows apps like the Snipping Tool)
- Private or incognito browsing sessions in supported Chromium-based browsers (Edge, Chrome, Opera) and Firefox
- Remote desktop sessions when supported clients are used
- Sensitive fields such as passwords and credit card numbers, which are typically filtered
Those exclusions are meaningful, but they leave a wide surface area. Anything outside those categories (internal applications, file contents, web activity in non-private tabs, business data on screen, etc.) is fair game for capture.
» Still on Windows 10? Here’s how to upgrade to Windows 11
Why disabling it is a legitimate policy call
None of this requires an argument that Recall is malicious by design. The case for disabling it is more straightforward: continuous screen capture is difficult to align with most data handling policies, and the blast radius of a compromise includes everything a user has looked at, not just what they stored intentionally.
For organizations under GDPR, HIPAA, or similar frameworks, the question of where that data lives, who can access it, and how long it persists isn’t optional. Recall stores snapshots locally, but local storage on an endpoint isn’t inherently safer than cloud storage if that endpoint is compromised. Legal and HR teams tend to have a short fuse for features that capture everything on screen without granular organizational controls in place.
On managed devices, Recall is disabled by default. Microsoft made that call for enterprise IT environments. On unmanaged or personally provisioned Copilot+ PCs that end up in a corporate environment and might be running shadow IT, no such protection exists. That gap is where the policy work happens.
How to disable Recall for individual users
For individual devices, there are two ways to turn Recall off: a full disablement through the Settings app, or a temporary pause through the system tray.
Turning Recall off through Settings
This is the most direct method and the one to use when you want snapshots stopped permanently on a single device.
1. Open Settings and navigate to Privacy & Security > Recall & Snapshots
2. Toggle off “Save snapshots”
3. Authorize the change when prompted
Windows requires Windows Hello verification (face, fingerprint, or PIN) to confirm the action. This is part of the security architecture introduced in the post-2024 overhaul.
Pausing Recall temporarily
If the requirement is a temporary hold rather than a permanent off, there are two ways to pause without going into Settings:
Via the system tray:
1. Locate the Recall icon in the system tray on the right side of the taskbar
2. Select the icon and press “Pause until tomorrow”
3. Snapshots will resume automatically at midnight
Via Settings:
1. Navigate to Privacy & Security > Recall & Snapshots
2. Toggle “Save snapshots” off manually
3. Toggle it back on when you want capture to resume
The system tray method is the faster option for end users who need a quick pause. The Settings toggle is more deliberate and gives the IT team a clear on/off state to verify if needed.
Filtering specific apps and websites
For environments where full disablement isn’t required but certain applications or content need to be excluded, Recall supports per-app and per-website filtering without turning the feature off entirely.
1. Navigate to Settings > Privacy & Security > Recall & Snapshots
2. Under “Apps to filter,” select “Add app” and choose the applications you want excluded from capture
3. Under “Websites to filter,” select “Add website” and enter the URLs you want excluded
Website filtering only works in supported browsers, and filtering applies when the site is in the foreground or the currently active tab. Backgrounded tabs from filtered sites are not a concern, but this also means filtering isn’t a substitute for full disablement if the goal is comprehensive data protection.
How to enforce Recall disablement across managed devices
The Settings toggle works for individual devices, but it’s a user-level control, which means a user can turn it back on. For managed environments, the goal is enforcement of policies that stick, survive reboots, and hold through Windows feature updates.
Relying on the Settings toggle alone is the weakest form of control and the most likely to be overridden after a major Windows update. Layering both registry values or policies is the more durable approach.
Method 1: Group Policy Editor
Group Policy is the right tool for domain-joined environments without MDM. There are two distinct policies to configure: one that disables snapshot saving, and one that disables the Recall component entirely.
Policy 1: Disable snapshot saving
1. Open the Run dialog by pressing Win + R, type gpedit.msc, and press Enter to open the Local Group Policy Editor
2. Navigate to Computer Configuration > Administrative Templates > Windows Components > Windows AI
3. Locate the policy titled “Turn off saving snapshots for use with Recall”
4. Double-click the policy to open it, set it to Enabled, and click OK
This policy can also be applied at the user level via User Configuration > Administrative Templates > Windows Components > Windows AI > Turn off saving snapshots for Recallif per-user control is preferred over a system-wide setting.
Policy 2: Disable Recall entirely
1. Return to Computer Configuration > Administrative Templates > Windows Components > Windows AI
2. Locate the policy titled “Allow Recall to be enabled”
3. Double-click the policy, set it to Disabled, and click OK
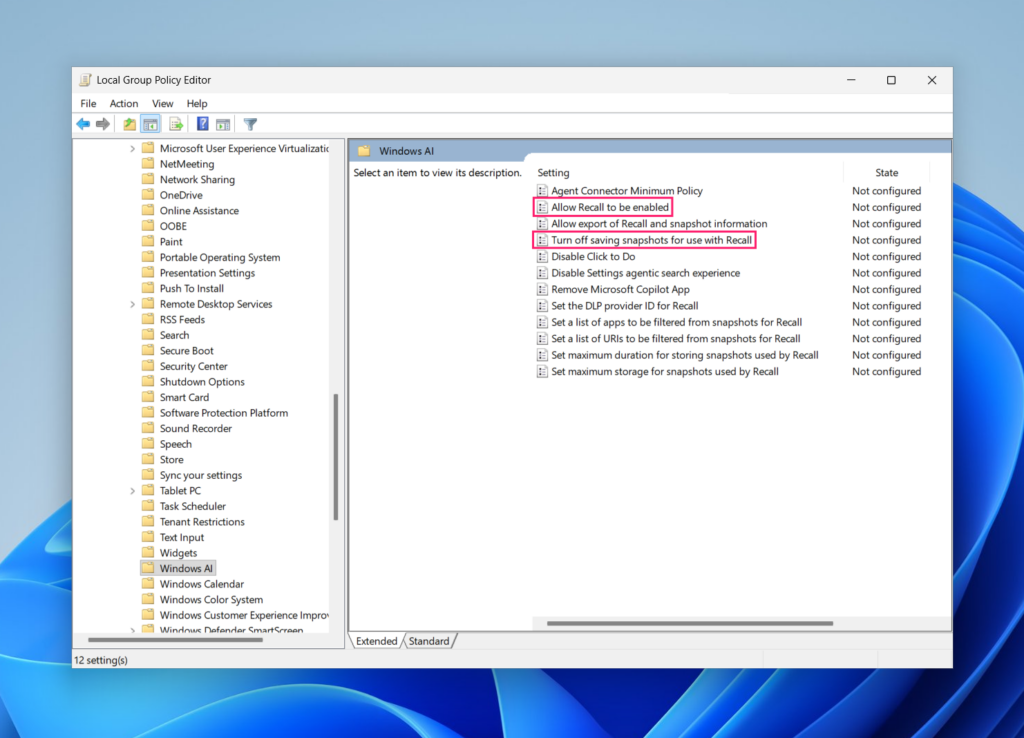
Setting this policy to Disabled puts the Recall component in a disabled state at the system level, not just at the snapshot capture level. You’ll need to restart the PC for this policy to fully remove the Recall component, which you can do remotely by running gpupdate /force will refresh the policy but is not sufficient on its own.
» Learn more about restarting remote computers and managing group policies with Atera
Method 2: Registry Editor
Registry edits are the right approach for non-domain devices, scripted provisioning workflows, or any situation where Group Policy isn’t available.
Key 1: Disable snapshot saving system-wide
1. Open the Run dialog, type regedit, and press Enter
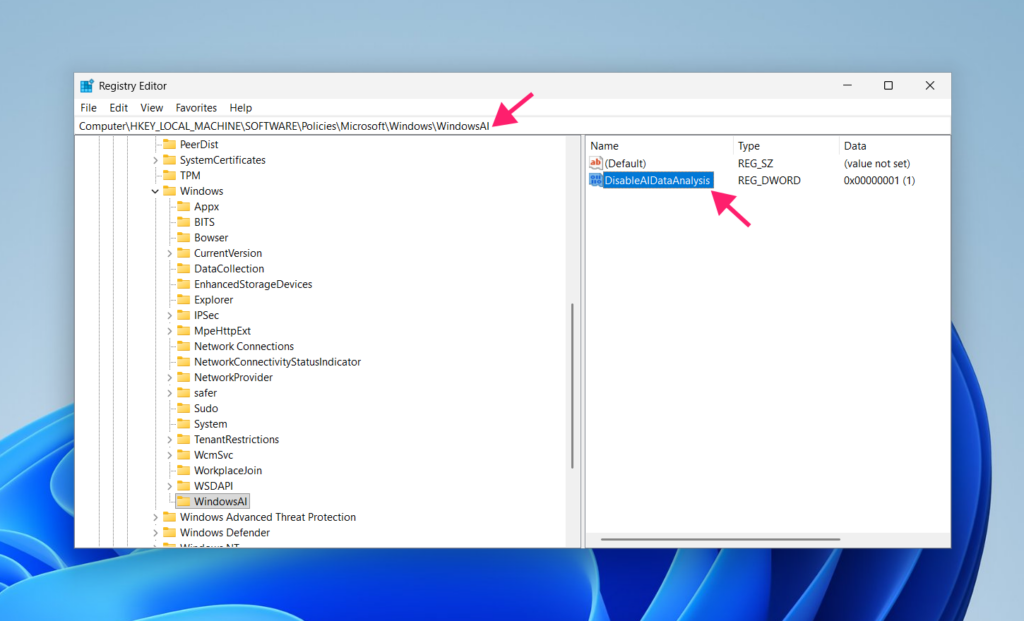
2. Navigate to Computer\HKEY_LOCAL_MACHINE\SOFTWARE\Policies\Microsoft\Windows\WindowsAI.
3. Set the DisableAIDataAnalysis value to 1
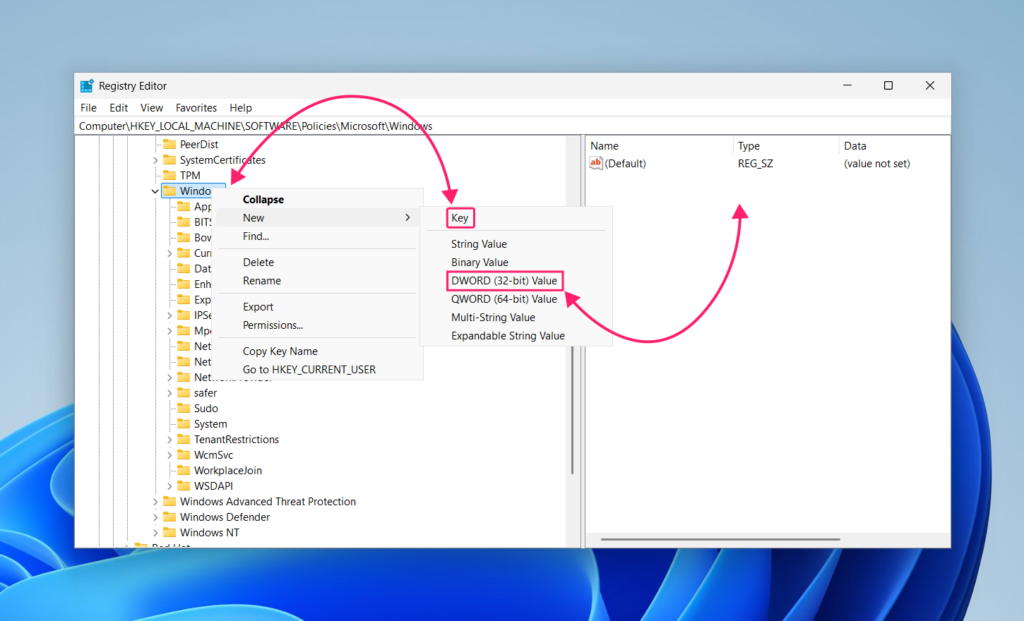
4. If the WindowsAI key does not exist at that path (which is common on fresh OS installs) you will need to create it manually. Right-click the Windows key, select New > Key, and name it WindowsAI
5. Then right-click inside the new key, select New > DWORD (32-bit) Value, name it DisableAIDataAnalysis, and set the value to 1
Key 2: Disable snapshot saving per-user
1. In Registry Editor, navigate to Computer\HKEY_CURRENT_USER\Software\Policies\Microsoft\Windows\WindowsAI
2. Set the DisableAIDataAnalysis value to 1, creating the key and value as above if they don’t exist
» Here are the top registry editor challenges and solutions
Method 3: .reg file and PowerShell script
For environments where manual registry navigation isn’t practical (provisioning workflows, repeated deployments, or scripted baselines), the registry values can be applied via a .reg file or a PowerShell script without touching the registry editor directly.
Creating and applying a .reg file
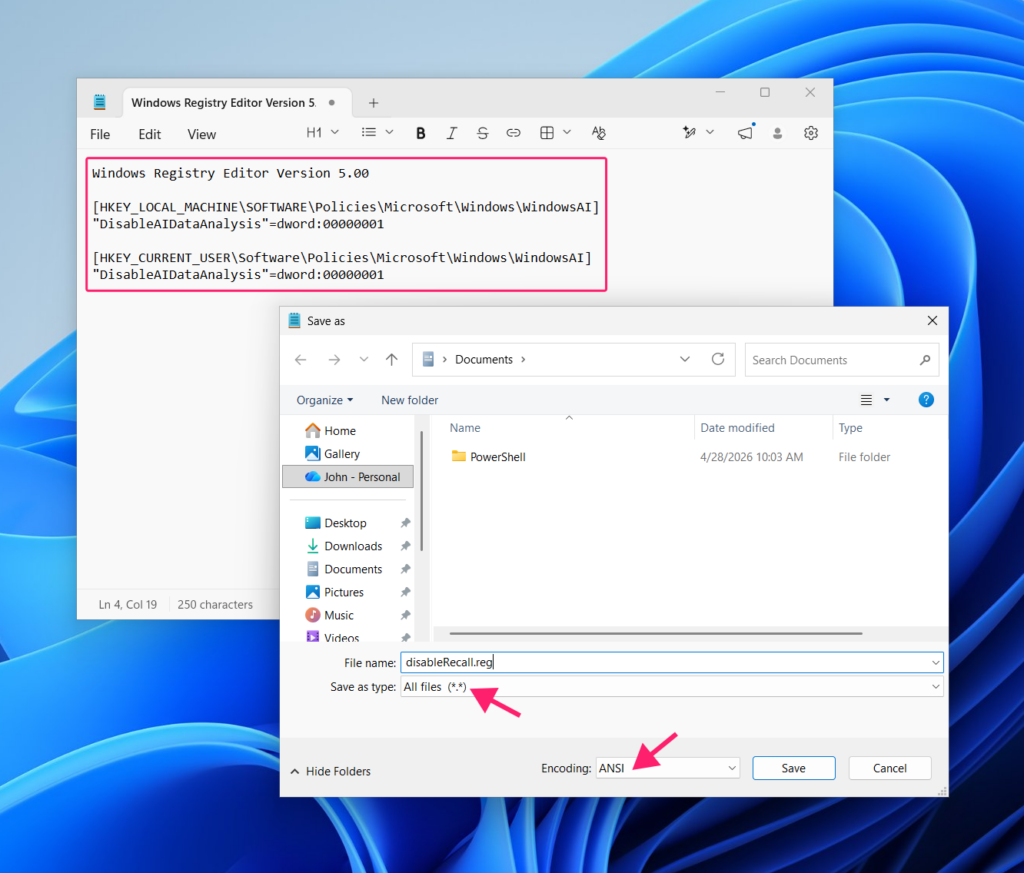
1. Open Notepad and enter the following content exactly:
Windows Registry Editor Version 5.00

[HKEY_LOCAL_MACHINE\SOFTWARE\Policies\Microsoft\Windows\WindowsAI]

"DisableAIDataAnalysis"=dword:00000001

[HKEY_CURRENT_USER\Software\Policies\Microsoft\Windows\WindowsAI]

"DisableAIDataAnalysis"=dword:000000012. Go to File > Save As
3. Set Save as type to All files (.) and name the file with a .reg extension (for example, disableRecall.reg)
4. Set Encoding to ANSI
Then, you can apply the file using one of the following methods:
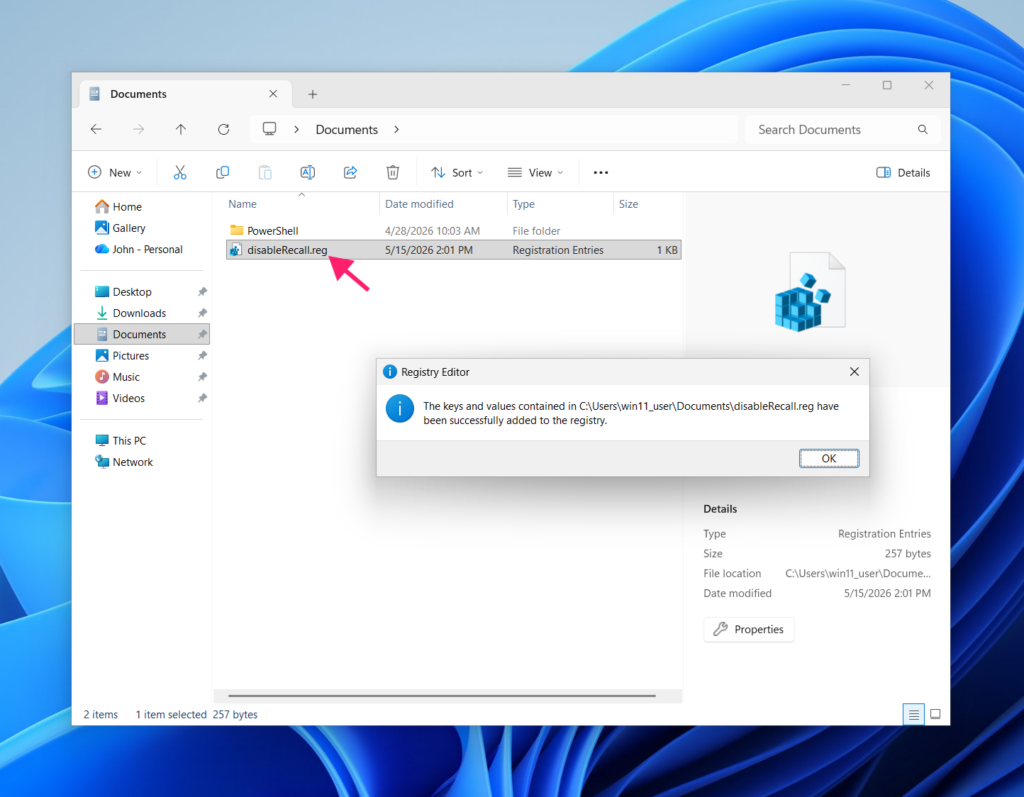
- Double-click the file in File Explorer to merge it into the registry directly
- Run
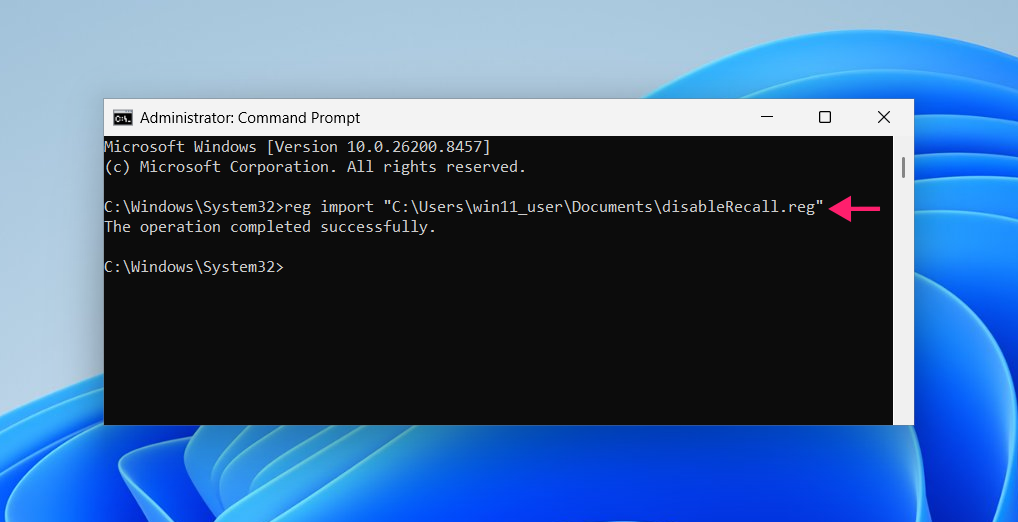
reg import "C:\Path\To\disableRecall.reg"in a Command Prompt window launched with elevated privileges
- Run
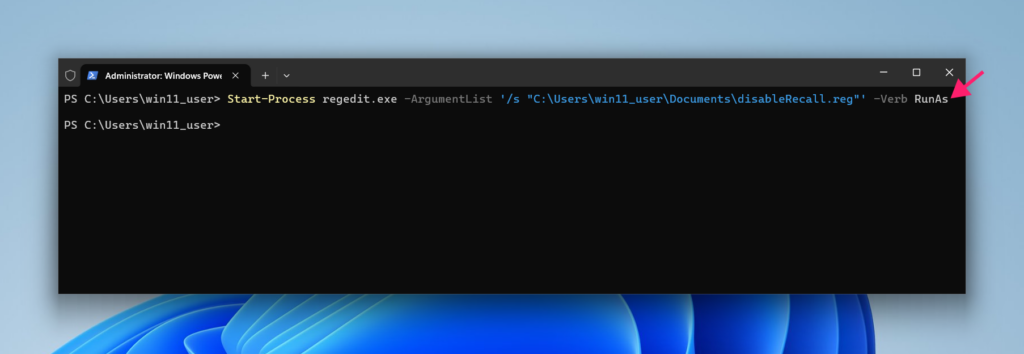
Start-Process regedit.exe -ArgumentList '/s "C:\Path\To\disableRecall.reg"' -Verb RunAsin a PowerShell window launched with elevated privileges
If you prefer to update the registry values inside a script without a separate .reg file, useful when Recall disablement is part of a broader provisioning script, the equivalent PowerShell is:
The Script:
Atera does not guarantee the integrity, availability, security, virus-free, safety, lawfulness, non-infringement, rights’ status, or functionality of the scripts. The use of the shared scripts is at your own risk. Scripts are provided “AS IS”. *
$path = "HKLM:\SOFTWARE\Policies\Microsoft\Windows\WindowsAI" if (-not (Test-Path $path)) { New-Item -Path $path -Force } New-ItemProperty -Path $path -Name DisableAIDataAnalysis -Value 1 -PropertyType DWORD -Force $path = "HKCU:\Software\Policies\Microsoft\Windows\WindowsAI" if (-not (Test-Path $path)) { New-Item -Path $path -Force } New-ItemProperty -Path $path -Name DisableAIDataAnalysis -Value 1 -PropertyType DWORD -ForceThis script checks whether the key exists before writing to it, creates it if needed, and sets the value in a single pass, which is suitable for inclusion in any provisioning or onboarding script.
Did you know? You don’t have to be a coding pro to come up with advanced PowerShell scripts like this. With Atera, you can use AI Copilot to create specific PowerShell scripts using vibe coding, then deploy those scripts remotely with the RMM tool.
Take control of Recall with Atera
Disabling Recall is straightforward once you know which method fits your environment. The Settings toggle handles individual cases; Group Policy, registry enforcement, and Intune handle everything else. The real risk isn’t the feature itself, it’s the gap between Copilot+ hardware arriving in your environment and the policy being in place to control it.
For IT teams managing endpoints at scale, that kind of gap is exactly what Atera’s RMM platform is built to close. Whether it’s deploying a PowerShell remediation script remotely across a device group, enforcing compliance checks post-update, or keeping tabs on which machines have drifted from a known-good configuration, Atera gives you the visibility and control to stay ahead of it, not clean it up after the fact.
» Interested? Try Atera for free
Frequently Asked Questions
Related Articles

How to decide if you need a dedicated DEX platform, or already have one
"IT feels slow" is the complaint that often sells DEX platforms. Sometimes it signals a real blind spot, but just as often already catches and fixes the problem, and a new scoring layer would only add another console. Telling the two apart takes evidence, and the real gap usually isn't visibility at all.
Read now
How to set up secure printing across your organization
A secure print checkbox protects exactly one moment in a document's life. Everything else, from unencrypted traffic and unhardened devices to payroll printouts forgotten in a tray, stays exposed. Real secure printing covers the whole lifecycle: release policy, authentication, encryption, hardening, and a fleet that stays monitored long after rollout.
Read now
How to reduce alert fatigue in healthcare IT
In a hospital, a dismissed alert isn't a delayed ticket. It can be a patient deteriorating while the monitor keeps sounding. Cutting alert volume won't fix that on its own, and switching alerts off can make it worse.
Read now
How to prevent configuration drift across your IT infrastructure
Configuration drift rarely breaks anything the day it happens. It hides in a hotfix, a reset default, or a vendor installer, then surfaces weeks later as a failure nobody can trace. Stopping it means defining exactly what approved looks like, closing every side door into production, giving each setting one owning tool, and checking that the baseline itself hasn't gone stale.
Read nowEndless IT possibilities
Boost your productivity with Atera’s intuitive, centralized all-in-one platform









