
Table of contents
Table of contents
- What you need to know before starting
- Verify your hardware meets the requirements
- Download and run the tool from Microsoft
- Step-by-step: Running the upgrade
- Troubleshooting errors during the upgrade
- Validate your Windows 11 upgrade
- What happens to your existing software
- Making Windows 11 upgrades manageable with Atera
Generate summary with AI

You already know the Windows 10 era is over. The good news is that upgrading to Windows 11 isn’t complicated. The Installation Assistant handles all the heavy lifting, including checking compatibility, downloading files, managing reboots, and preserving your files and applications. No USB drives, command lines, or reinstalling everything from scratch.
This guide walks you through the entire process: what to verify before you start, how to download and run the tool, what to expect at each stage, what to do if something goes wrong, and how to validate the upgrade when it’s finished.
What you need to know before starting
The Windows 11 Installation Assistant is built for one specific job: upgrading Windows 10 (version 2004 or later) to Windows 11 on the machine where it’s running. It preserves all your files, applications, and settings, it checks hardware compatibility automatically, and it requires minimal user interaction once you start.
But it does have some hard requirements and if your system doesn’t meet them, the assistant will stop and tell you why. Here’s what you need to do first.
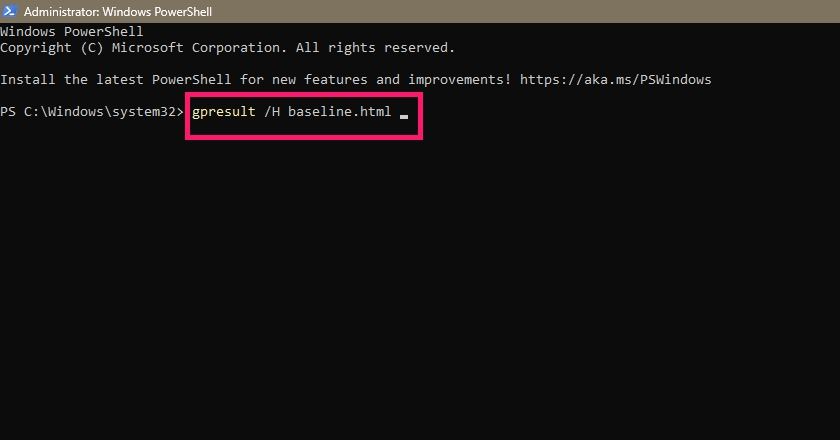
1. Document the current state: Open PowerShell as administrator and run gpresult /H baseline.html to capture your current policy state. Run winver (Win + R) to record your exact Windows build. Take screenshots of your current desktop as you’ll want these comparison points after the upgrade finishes.

» See our guide to PowerShell vs. Command Prompt
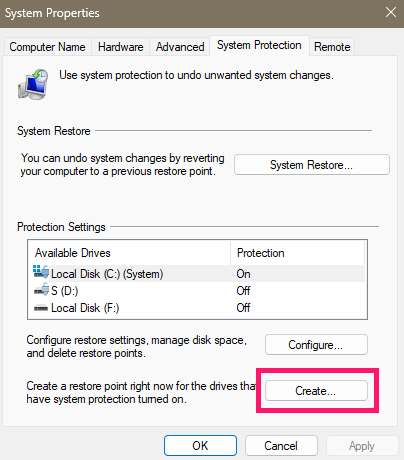
2. Create a System Restore point: Search for “Create a restore point” in the Search box and create one before making changes. This gives you a full-state recovery option if something goes wrong.
3. Back up your data: Copy Documents, Pictures, and Desktop to cloud storage (OneDrive, Google Drive) or an external drive. If you’re managing multiple machines, document which systems you’re upgrading, and in what order.
4. Plan for downtime: The upgrade takes 1-2 hours total. Schedule this when users aren’t relying on their machines.
Now that you’re prepared, it’s time to begin the process and verify your system meets Windows 11’s requirements.
Verify your hardware meets the requirements
The Installation Assistant checks these automatically, but you should verify before you start downloading. If your system fails any of these checks, the upgrade will stop.
Step 1. Check if your PC can run TPM 2.0
- Run Settings > Update & Security > Windows Security > Device Security
- No Security processor section visible? TPM is likely disabled. Check your PC manufacturer’s support site for enable instructions.
- Once enabled, select “Security processor details.”
- Verify “Specification version” shows 2.0 or higher.
- If version is less than 2.0, your device doesn’t meet Windows 11 requirements.
Step 2. Check Secure Boot
Open PowerShell as administrator and run:
Confirm-SecureBootUEFI- If Secure Boot is enabled, you’ll see “True”. If it returns an error, Secure Boot is disabled or not supported. Enable it in UEFI settings.
» Unsure? here’s our guide on enabling and disabling Secure Boot
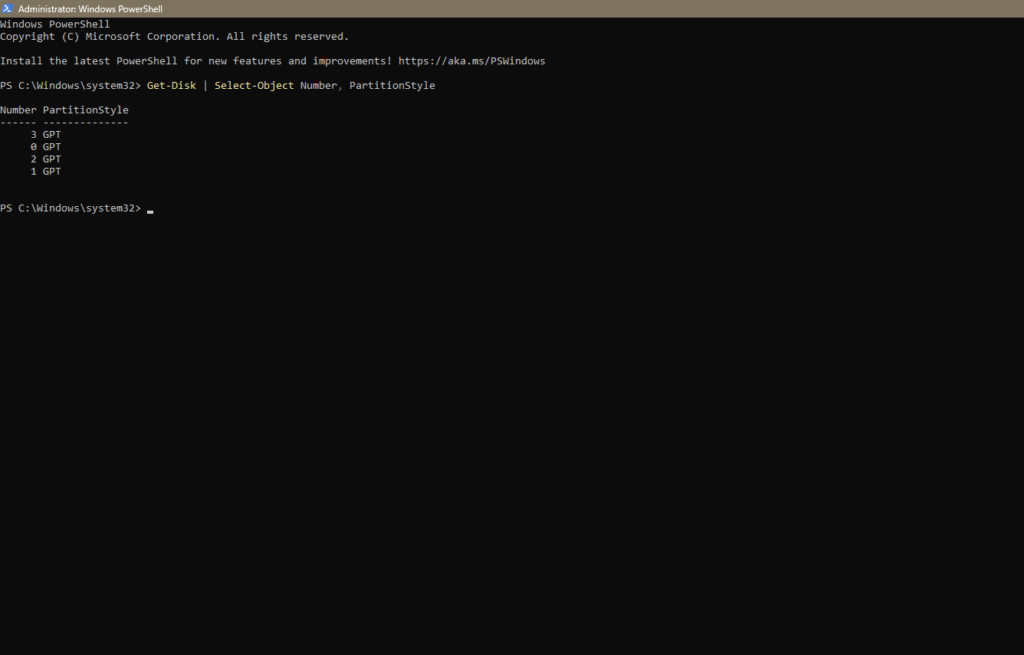
Step 3. Check UEFI mode
- In the same PowerShell window run:
Get-Disk | Select-Object Number, PartitionStyle - Look at the “PartitionStyle” column in the output:
GPT = you’re in UEFI mode (correct).
MBR = you’re in legacy BIOS mode and need to convert the drive before upgrading.
Step 4. Check CPU compatibility
- Open Settings (Win + I) and go to About to see what processor you have.
- Check Microsoft’s approved processor list. Your CPU must be 64-bit and on the approved list.
Step 5. Check available disk space
- Settings (Win + I) > System > Storage.
- Check “Available” under your primary drive. You need at least 9 GB free.
If you’re below that, delete temporary files, uninstall unused programs, or run Disk Cleanup (search in Start menu).
Step 6. Check RAM
- Also in Settings > About, you’ll see your RAM listed.
- Windows 11 requires 4 GB minimum (8 GB recommended). If you’re below 4 GB, the upgrade will fail.
» Learn more about Windows 11 readiness and compatibility
Download and run the tool from Microsoft
Only download from Microsoft’s official page as malware creators love distributing fake Windows tools.
1. Go to Microsoft’s official Software Download page for Windows 11.
2. Verify the URL and check that your browser address bar shows microsoft.com with a padlock icon next to it (indicating SSL/TLS encryption). If the URL looks suspicious or there’s no padlock, navigate away immediately.
3. Look for the “Windows 11 Installation Assistant” section and click the blue “Download Now” button
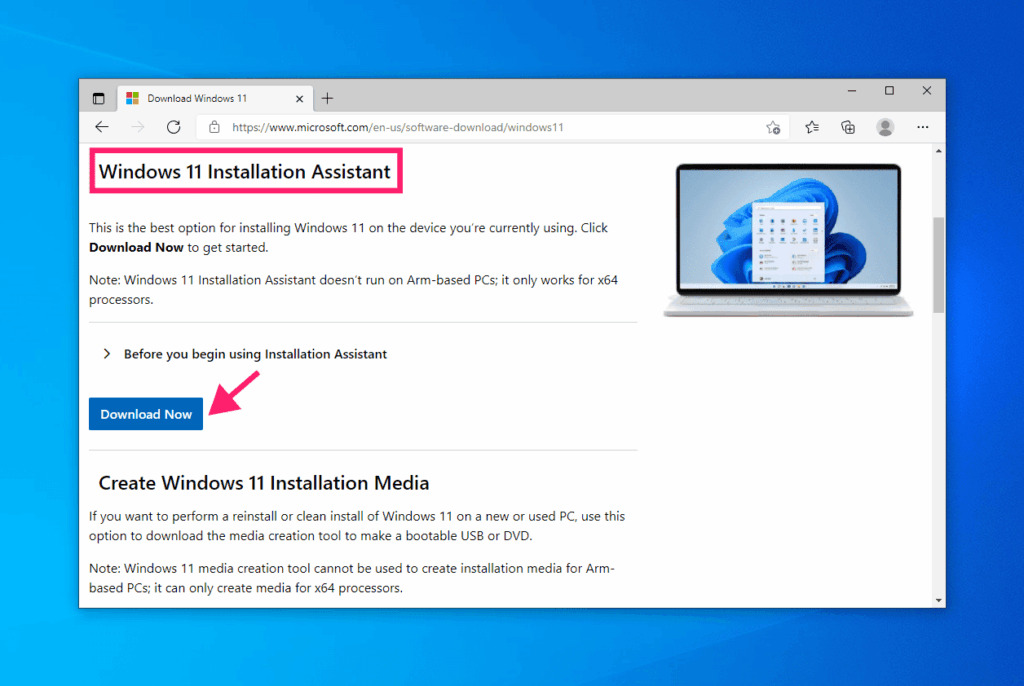
4. The file will download as Windows11InstallationAssistant.exe
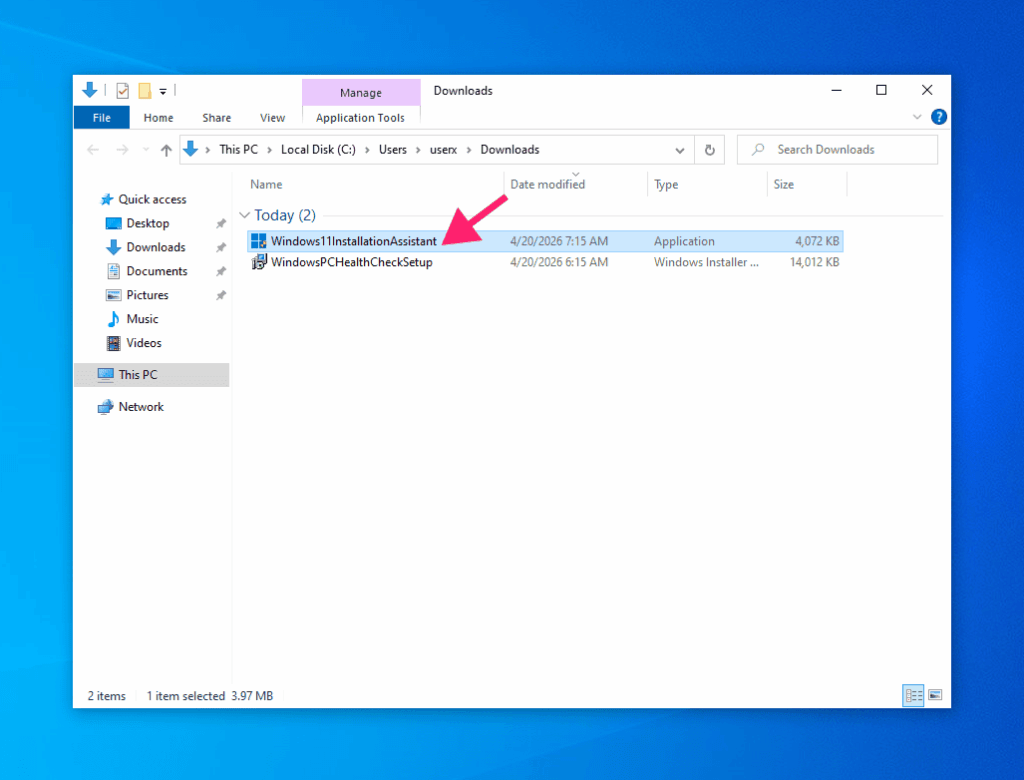
5. Right-click the downloaded file and select “Run as administrator.”
6. A Windows security prompt will appear asking “Do you want to allow this app to make changes to your device?” Click “Yes.”
7. The Installation Assistant window opens and runs a compatibility check automatically.
Step-by-step: Running the upgrade
The Installation Assistant guides you through distinct phases. Here they are:
Phase 1: Compatibility check and license acceptance
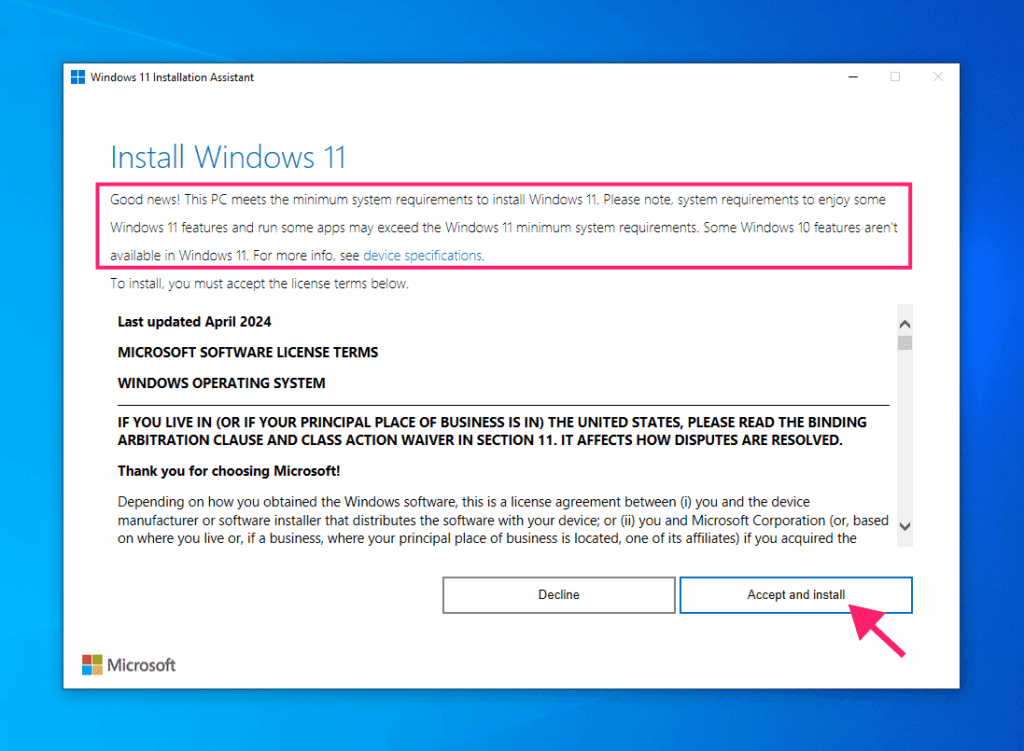
The assistant displays a compatibility check in progress. It’s verifying your TPM 2.0, Secure Boot, CPU, RAM, disk space, and other requirements.
If your system passes, you’ll see a green checkmark. If something fails, you’ll see a red X with an explanation of what’s missing (we cover fixes below).
Next, you’ll see the Windows 11 License Terms. Read them if you want, or click “Accept and install” to proceed.
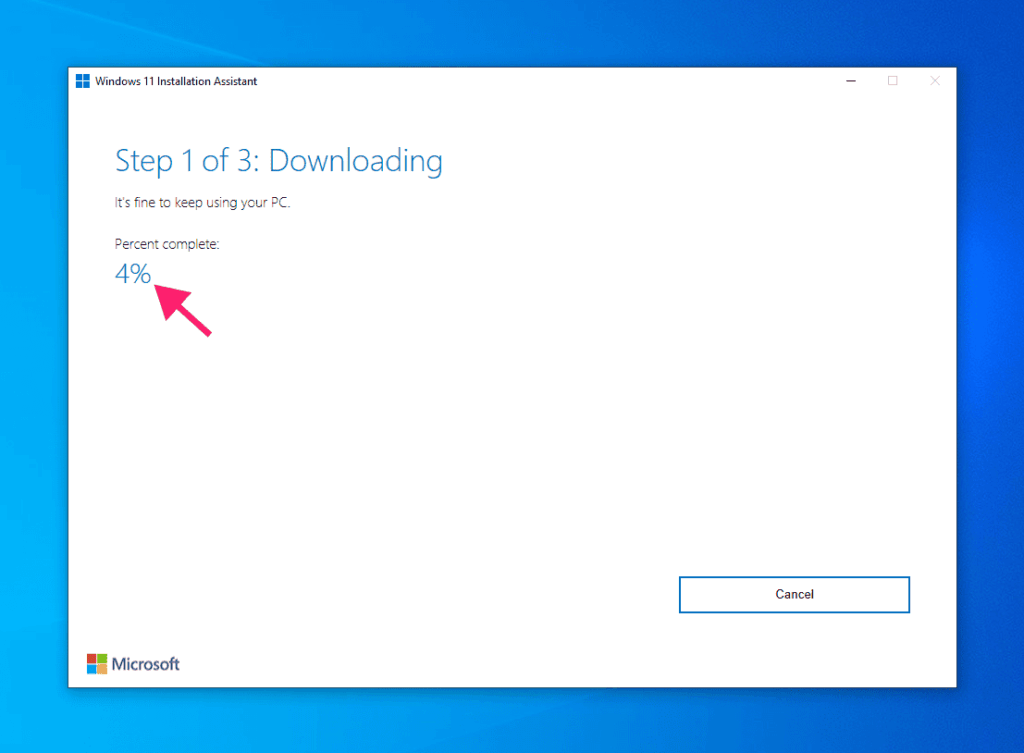
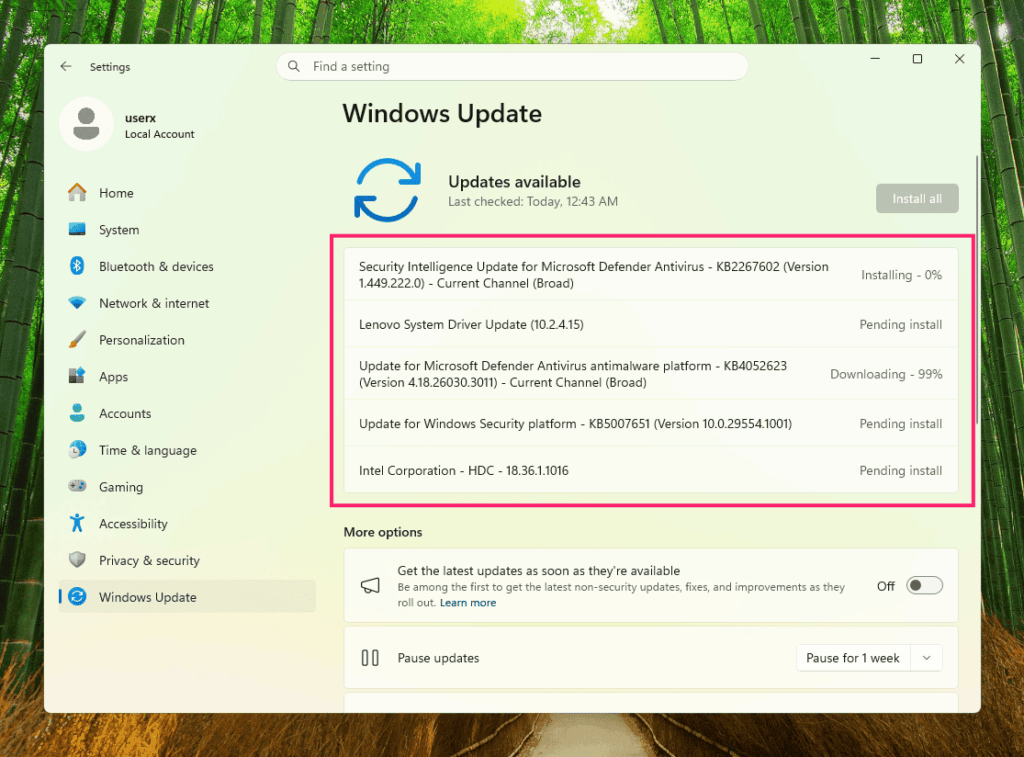
Phase 2: Download (you can keep working during this)
Once you accept the license, the assistant begins downloading Windows 11 files from Microsoft’s servers. This is several gigabytes, so it can take 20 minutes to 1 hour depending on your internet speed.
You can keep using your PC during this phase. Open email, browse the web, work in spreadsheets, normal usage is fine. Just don’t disconnect the internet or shut down.
The tool uses chunk-based downloading, so if your internet drops, it notifies you. Once you’re back online, it resumes from exactly where it left off rather than starting over.
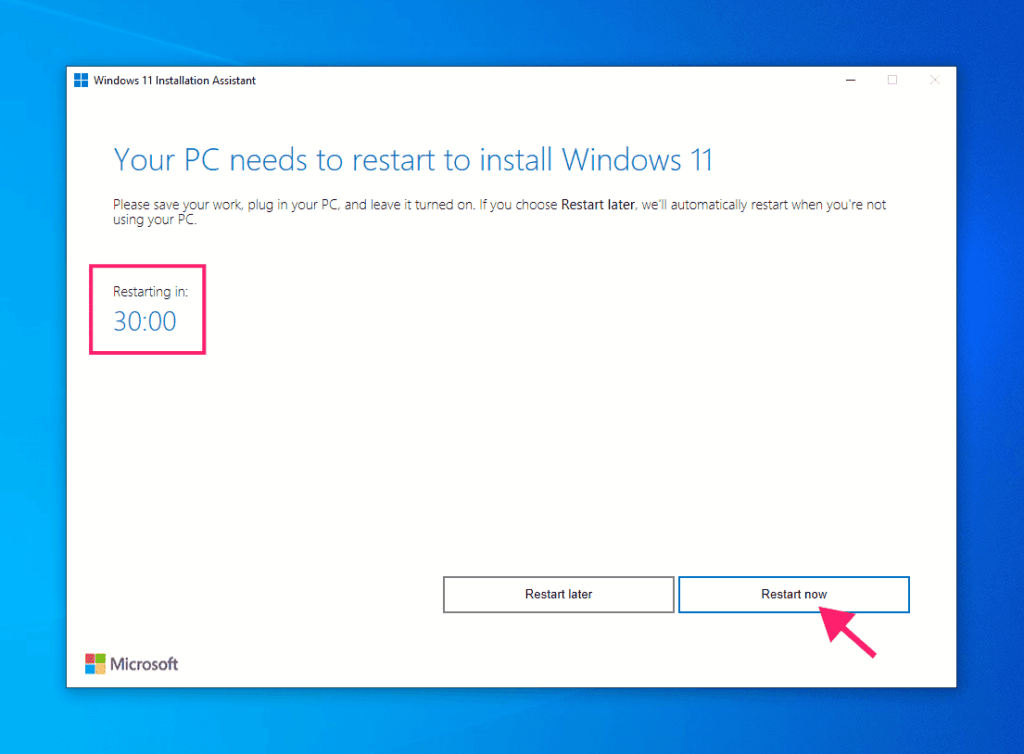
Phase 3: Restart notification (30-minute window)
After downloading and staging files, you’ll see a notification: your PC will restart in 30 minutes.
You have that 30-minute window to save open work, close applications, and prepare for the reboot. If you need more time, you can extend the window, but the restart will happen.
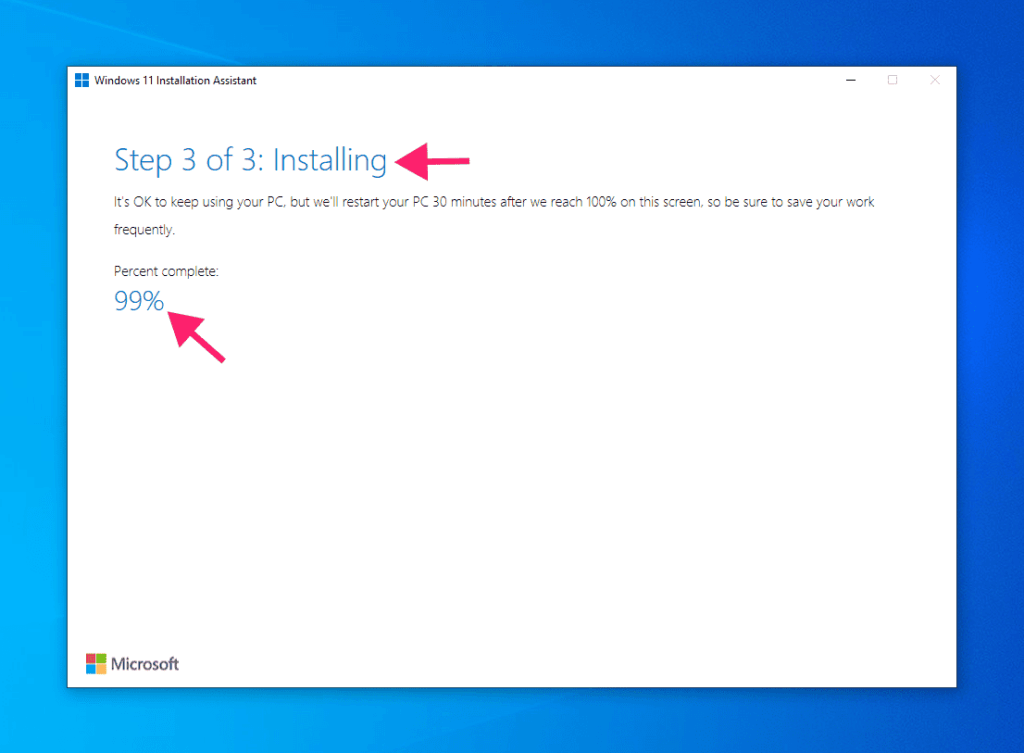
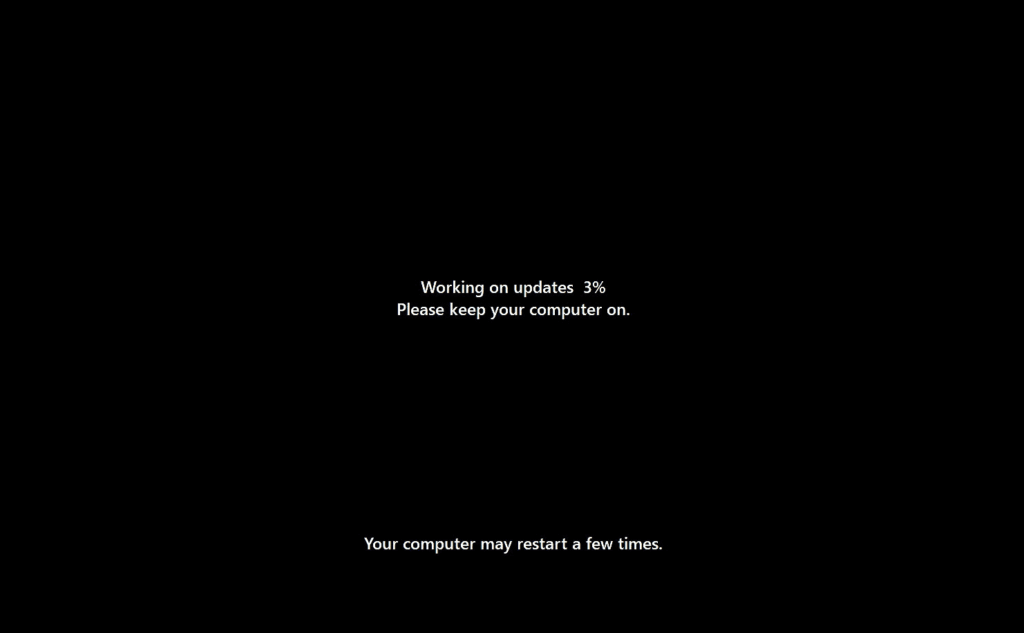
Phase 4: Automated installation (no user interaction)
The PC restarts, windows exits the normal desktop and boots into a specialized installation mode. This stage is completely automated, so there’s no input required.
The installation process takes 30 minutes to 1 hour, and should remain uninterrupted. Progress isn’t always linear (it may seem stuck on one percentage for several minutes, this is normal).
Once installation finishes, Windows boots normally into Windows 11 for the first time. Your files, applications, and user profile are preserved.
Troubleshooting errors during the upgrade
If the Installation Assistant encounters an error, it displays an error code. These codes tell you specifically what went wrong.
Error 0xC1900101 (driver or compatibility issue)
A driver or piece of hardware didn’t respond correctly during the upgrade. Often accompanied by “Windows couldn’t complete the update. Undoing changes.”
How to fix it:
- Disconnect all USB devices except your mouse and keyboard. Remove USB hubs, external drives, printers, webcams, and any other peripherals. Third-party USB devices often conflict with OS upgrades.
- Update your drivers. Visit the manufacturer’s website for your graphics card (NVIDIA, AMD, Intel), network adapter (Realtek, Qualcomm, Intel), and motherboard chipset. Download and install the latest drivers for Windows 11.
- Disable third-party antivirus temporarily. Software like Avast, Norton, and McAfee often block the installer from modifying protected system resources. Uninstall or disable the antivirus, run the upgrade, and reinstall it afterward.
Once you’ve made these changes, restart and run the Installation Assistant again.
Error 0xC1900208 (hardware not compatible)
Your system doesn’t meet Windows 11’s hardware requirements. A piece of hardware is explicitly blocked by Microsoft.
How to fix it:
- Check Microsoft’s list of blocked devices. Your exact CPU or chipset may be on this list.
If your hardware is blocked, you’ll need to either:
- Upgrade your hardware to a compatible processor.
- Stay on Windows 10.
- Use a different machine.
There’s no workaround for hardware blocks.
Error 0x80070070 (not enough disk space)
The installer ran out of disk space during staging. You need at least 9 GB free.
How to fix it:
- Go to Settings (Win + I) > System > Storage
- Delete unnecessary files like large items in Downloads or temporary folders.
- Uninstall unused programs. Go to Settings > Apps > Installed apps and remove software you no longer need.
- Run Disk Cleanup. Search for “Disk Cleanup” in the Start menu, select your system drive, and delete temporary files.
- Once you’ve freed up at least 9 GB, run the Installation Assistant again.
Error 0xC1900104 (system corruption)
Your current Windows 10 installation is corrupted or damaged. The installer can’t use it as a foundation for Windows 11.
How to fix it:
- Open Command Prompt as administrator and run:
sfc /scannow(This scans and repairs corrupted system files. It takes 15-60 minutes depending on your system.) - Once it finishes, restart and try the Installation Assistant again.
- If that doesn’t work, run the DISM repair tool:
DISM /Online /Cleanup-Image /RestoreHealth
This is a more thorough repair. Once it finishes, restart, and attempt the upgrade again.
For more error codes and solutions, see Microsoft’s troubleshooting guide.
Validate your Windows 11 upgrade
Once Windows 11 boots for the first time, spend 15 minutes validating the upgrade. This catches any issues before users start relying on the machine.
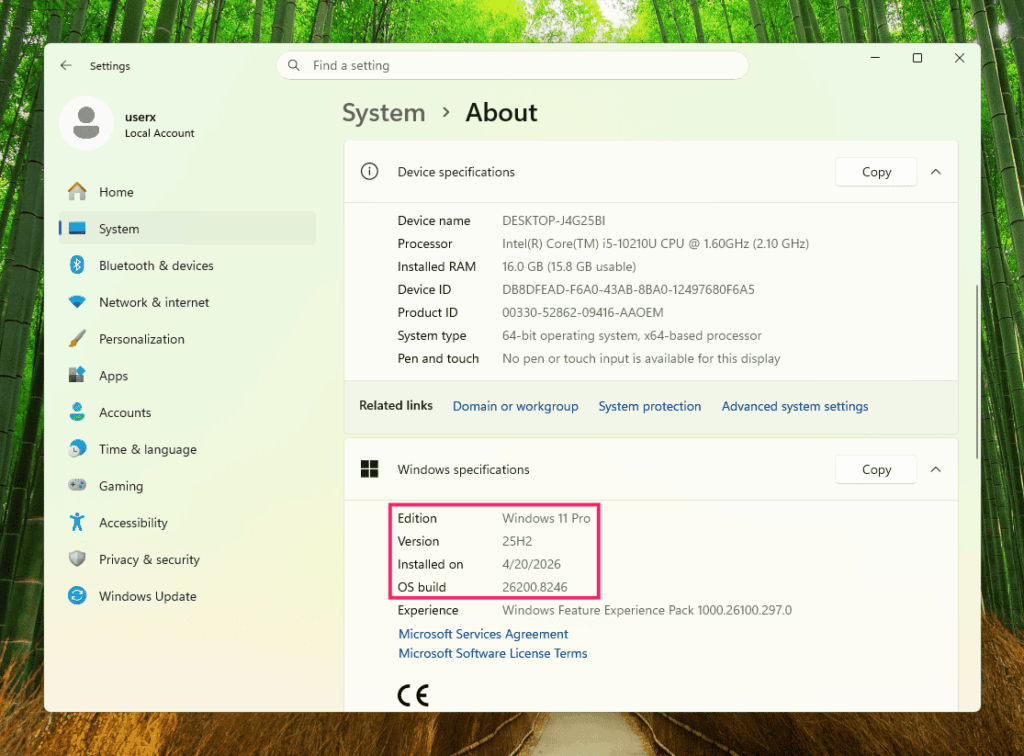
Step 1: Verify Windows version
Press Win + I to open Settings, go to About, and confirm you’re on Windows 11. “Edition” should show Windows 11 and “Version” should show a recent build number.
If you’re still seeing Windows 10, something went wrong during the installation. Contact Microsoft Support.
Step 2: Check Device Manager for driver issues
Right-click Start > Device Manager. Scan the list for yellow exclamation marks (!). These indicate drivers that failed to migrate or are missing.
Check specifically under:
- Display Adapters (graphics drivers).
- Network Adapters (Wi-Fi and Ethernet drivers).
- System Devices (chipset and system drivers).
If you find yellow marks, note which devices they’re on. Windows Update usually downloads the correct drivers within a few days. If they don’t resolve within a week, visit the hardware manufacturer’s support page, and download the latest driver manually.
» Learn more about Device Manager and its capabilities


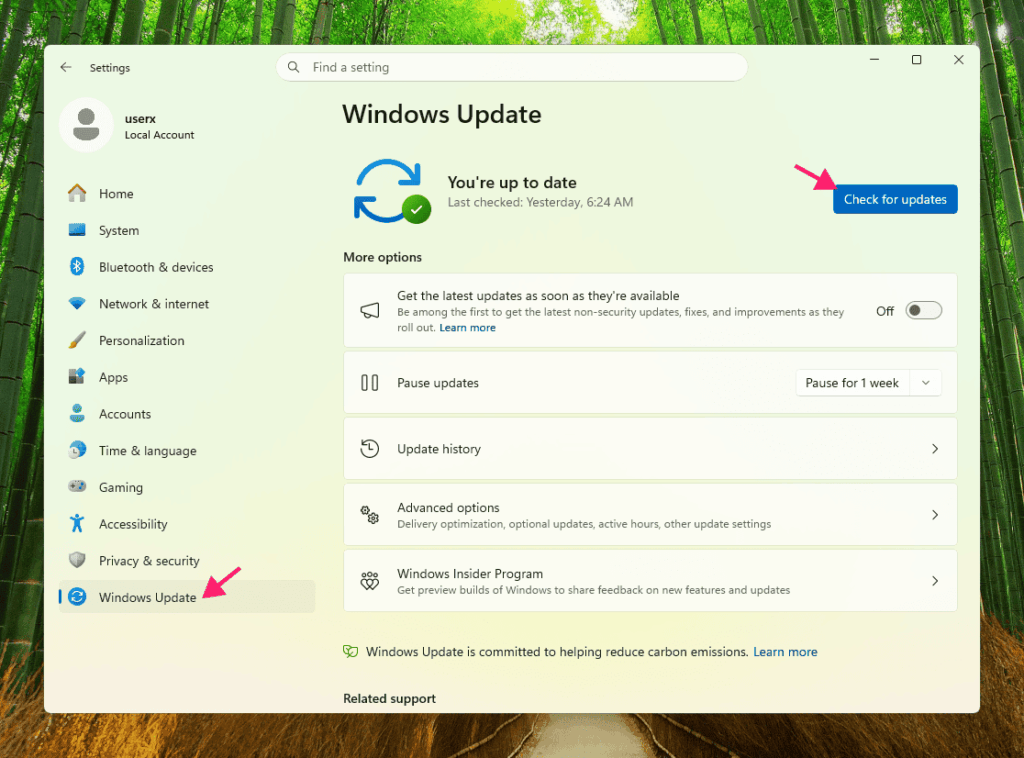
Step 3: Run Windows Update
Go to Settings > Windows Update and click “Check for updates.” Windows 11 may have post-release updates available.
Install all available updates and restart if prompted.
Some applications and peripherals may not work correctly if drivers didn’t migrate properly. Test your email client, web browser, main work software, webcam, Bluetooth devices, and printer. If something fails to open or crashes, uninstall it completely and reinstall the latest version from the vendor. If issues persist, you can still roll back to Windows 10 within the 10-day window.
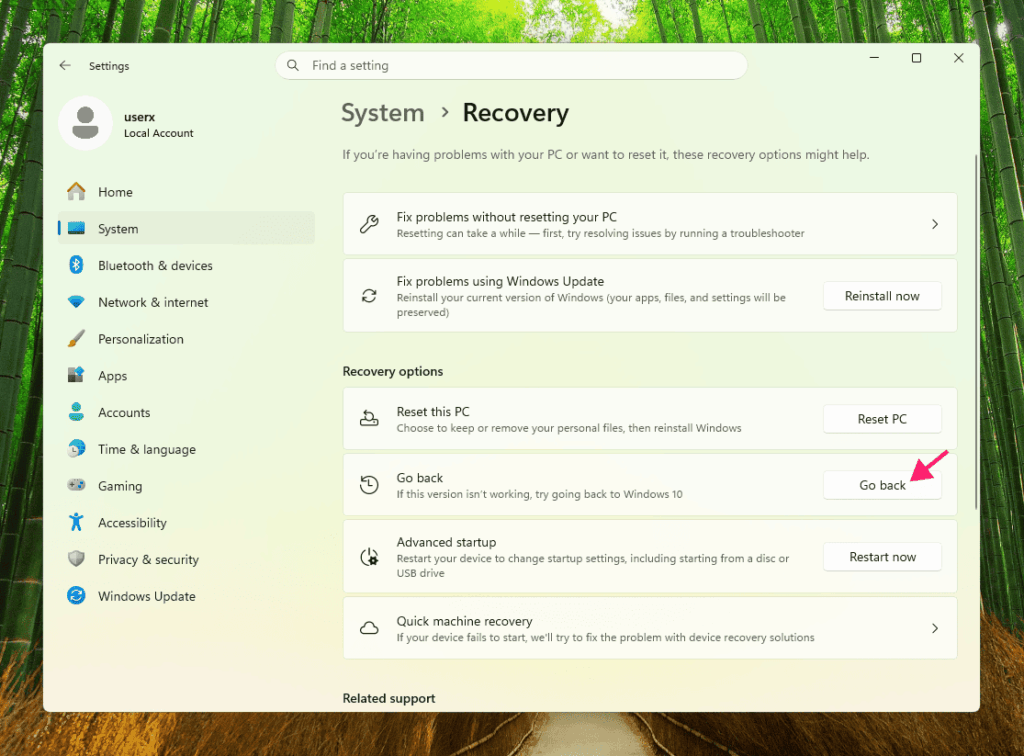
Step 4: Optional rollback (10-day window)
Windows preserves your Windows 10 installation for 10 days after the upgrade. If you find the system unstable or incompatible software fails, you can roll back.
Go to Settings > System > Recovery. If the “Go back” button appears, you’re within the 10-day window. Click it to restore Windows 10.
Important: Once you roll back, you can upgrade again later, but you’ll need to go through the entire process again.
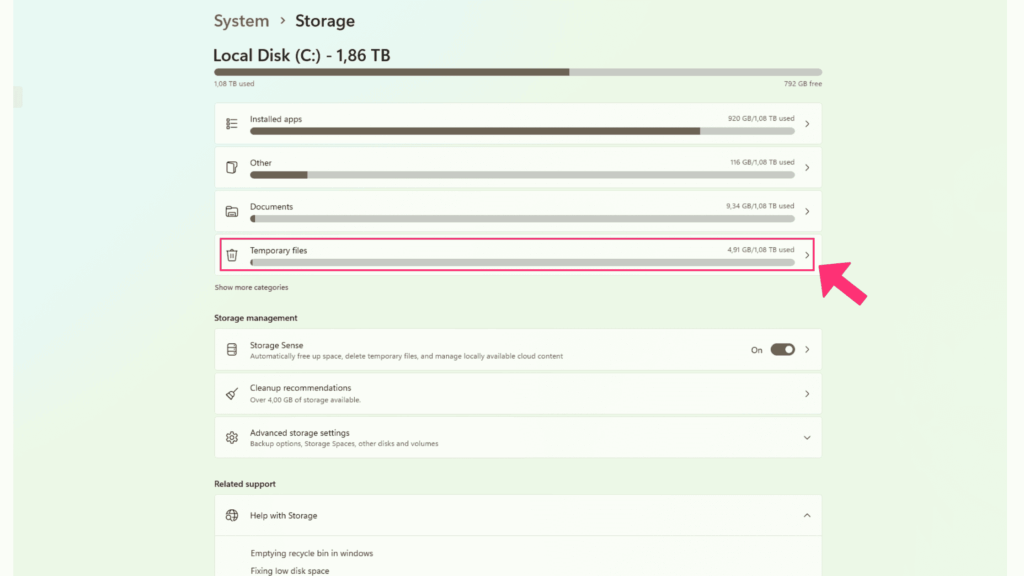
Step 5: Reclaim disk space (optional)
Once you’re confident the system is stable (after a few days of normal use), delete the old Windows installation.
Go to Settings > System > Storage > Temporary files and select “Clean up system files.” This deletes the Windows.old folder and reclaims 10-20 GB of disk space.
Important: Once you delete this folder, rollback is no longer possible.
What happens to your existing software
Your applications and settings don’t all migrate the same way. Here’s what to expect:
- Most applications migrate fine: Modern software like web browsers, office suites, email clients, and development tools move to Windows 11 without issues. Everything opens where you left it, configured the same way.
- Old or specialized software may fail: Kernel-integrated apps and legacy-dependent software are prone to breaking. If something fails after the upgrade, uninstall it completely, and reinstall the latest version from the vendor’s website.
- Antivirus needs special attention: Legacy antivirus engines often conflict with Windows 11’s enhanced Virtualization-Based Security (VBS) and Memory Integrity features.
- Best practice: Uninstall third-party antivirus before running the upgrade. Once Windows 11 is stable (after a few days), download and install the latest, Windows 11-compatible version.
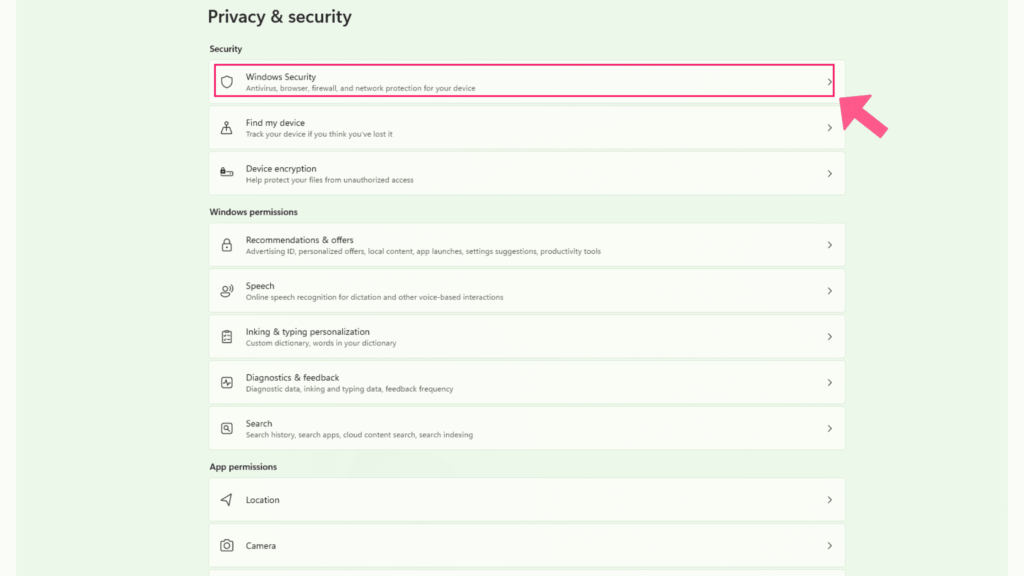
- Privacy settings are mostly preserved: Windows 11 preserves most settings from Windows 10 (location services, diagnostic data levels, privacy toggles). But you’ll see new privacy prompts on first boot.
Review these carefully in Settings > Privacy & Security and configure to your preference. Microsoft often defaults to the most permissive state.
Making Windows 11 upgrades manageable with Atera
Atera’s RMM platform lets you:
- Monitor upgrade status across your fleet in real time.
- Deploy post-upgrade driver updates remotely to catch compatibility issues before users notice.
- Validate system configurations across multiple machines without manual spot-checks.
- Capture baseline states before upgrades and compare post-upgrade to catch drift.
- Script remediation for common post-upgrade issues and deploy them remotely.
- Track which machines are still on Windows 10 and need attention.
For IT professionals managing multiple customer environments, remote visibility and scripted execution aren’t optional. Every customer still on Windows 10 is a liability and a support risk, and the gap widens every month.
For individual machines, start with the Installation Assistant. For fleets, layer RMM visibility and remote scripting on top so you can stage the rollout, catch driver conflicts early, and see upgrade status across every customer from one console.
Frequently Asked Questions
Related Articles

How to fix the “Reboot and select proper boot device” error
Your machine won't boot. The screen is black, the error is cryptic, and the instinct is to start hammering repair tools. That instinct is usually what turns a fixable problem into a real one. Most boot device errors come down to a cable, a BIOS setting, or a corrupted bootloader instead of a dead drive.
Read now
How to enable or disable the Notification Center in Windows 11
275 interruptions a day. That's what Microsoft's own data says the average employee absorbs before Windows starts layering in its own alerts, banners, and badges. The Notification Center has more control options than most people use: per-app rules, Focus sessions, Do Not Disturb, Group Policy, registry edits, and PowerShell automation. Here's how to use all of them.
Read now
How to remove OneDrive from File Explorer
OneDrive is woven into Windows more deeply than it looks. Unlink it without preparation and you lose AutoSave, version history, shareable links, and any cloud-only files that never made it to local storage. Done right, removal is clean and permanent.
Read now
How to enable and disable kernel mode
Privilege escalation made up 40% of all Microsoft vulnerabilities last year. Kernel-Mode Hardware-Enforced Stack Protection exists specifically to stop it, it's already built into Windows, and most teams have never enabled it. Here's every method to turn it on, verify it's running, and handle the driver conflicts that get in the way.
Read nowEndless IT possibilities
Boost your productivity with Atera’s intuitive, centralized all-in-one platform