
Generate summary with AI

When a Windows 11 machine won’t complete a normal boot, Safe Mode is the tool that lets a technician isolate the cause instead of guessing. Strip away third-party drivers, startup programs, and non-essential services, and a crash that seemed random usually points straight at the culprit, like a bad driver update, a corrupted system file, or malware blocking security tools from launching.
Knowing every route into Safe Mode (from the Settings app to a scripted PowerShell push across a fleet) is what separates a five-minute fix from a full day of downtime. Here are all the ways you can.
Understanding Windows 11 Safe Mode
Safe Mode is the usual last resort in the troubleshooting workflow whenever normal boot behavior can’t be trusted. It usually points towards one of three reasons:
- Startup issues: Safe Mode loads only essential drivers and services, which lets you rule out a bad driver, a misconfigured setting, or a conflicting startup app as the cause simply by seeing whether the problem disappears.
- Boot loops and BSODs: After three consecutive failed boot attempts, Windows 11 launches the Recovery Environment on its own, and Safe Mode is accessible from there.
- Malware infections: Particularly strains that block security tools from launching or lock down system utilities during a normal boot. Loading only the minimum set of drivers and services often stops that interference.
Once you’re in, the repair tasks that specifically require Safe Mode include uninstalling a problematic update or driver that’s preventing a normal boot, running disk repair utilities that can’t safely operate against a fully loaded system, and running Startup Repair itself.
» Learn more about problematic drivers in our guides to updating drivers on PC and the best driver updater software options
How the three Safe Mode variations differ
Each of Windows 11’s three Safe Mode variants loads a different set of drivers and services:
- Safe Mode (sometimes called Minimal) loads only the essential drivers and services needed to run Windows, with no networking and no extras. Reach for this when you’re isolating whether a specific driver or application is causing crashes and you don’t need network access to do it.
- Safe Mode with Networking adds the network drivers and services on top of the minimal set. Use this variant when the fix depends on internet or network access, such as downloading an updated driver, running an online malware scan, or pulling files from a network share.
- Safe Mode with Command Prompt loads the same minimal driver set as standard Safe Mode but replaces the graphical shell with a command prompt window. This is the right choice when the GUI itself won’t load, or when the fix only requires command-line tools like
dism,sfc, orchkdsk.
» Can’t find out what’s wrong? Here’s how to run a PC diagnostics report in Windows
Step-by-step methods to restart into Safe Mode
Three of the methods below (the Settings app, the Shift+Restart shortcut, and a hard power-reset) all lead through the Windows Recovery Environment’s Startup Settings screen, where you press a number key to pick your Safe Mode variant.
Choose whichever method works best for your current situation.
Method 1: Restart via the Settings app
Use this when you have a normal, responsive desktop and want the most straightforward, GUI-driven path into Safe Mode.
- Press Win + I to open Settings
Navigate to System > Recovery

- Under Advanced startup, click Restart now
Click Restart now again in the confirmation prompt

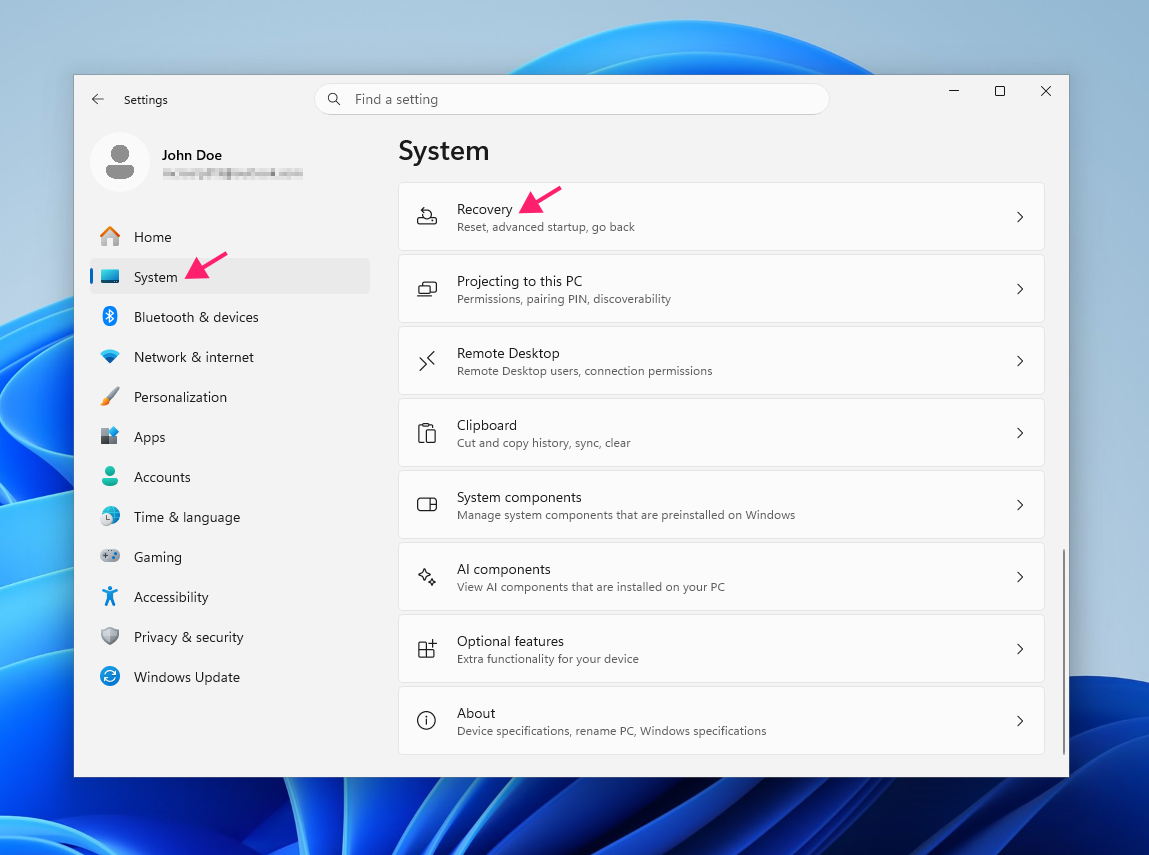
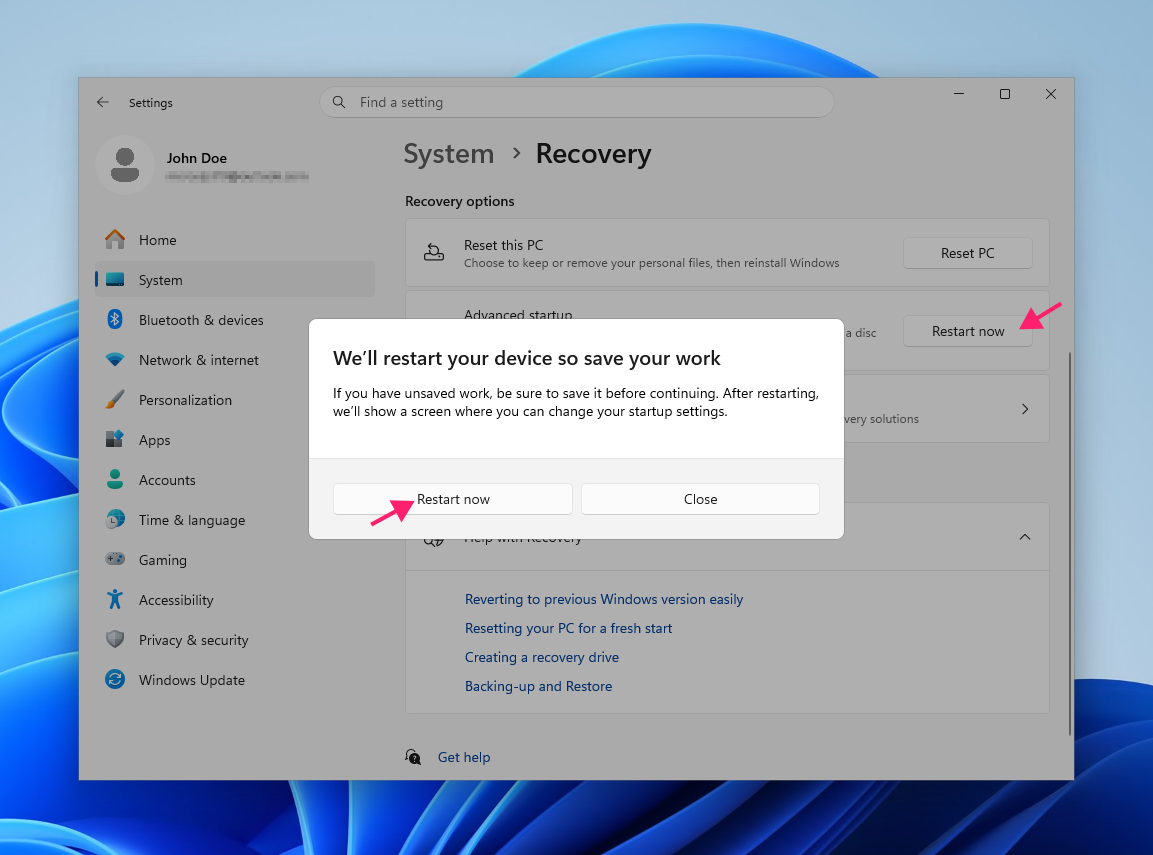
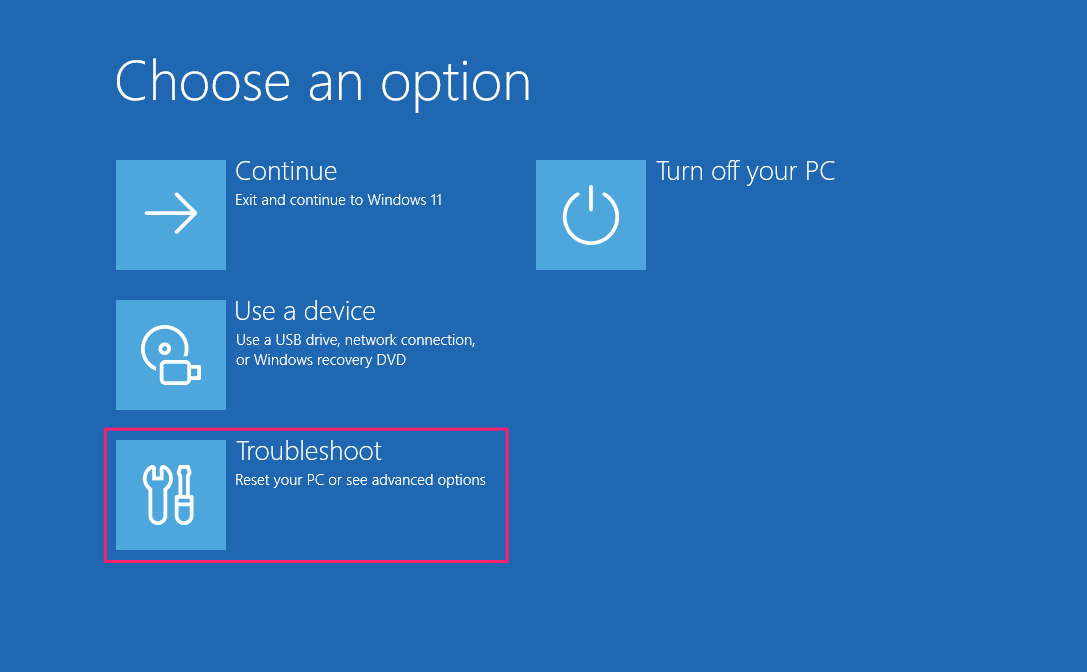
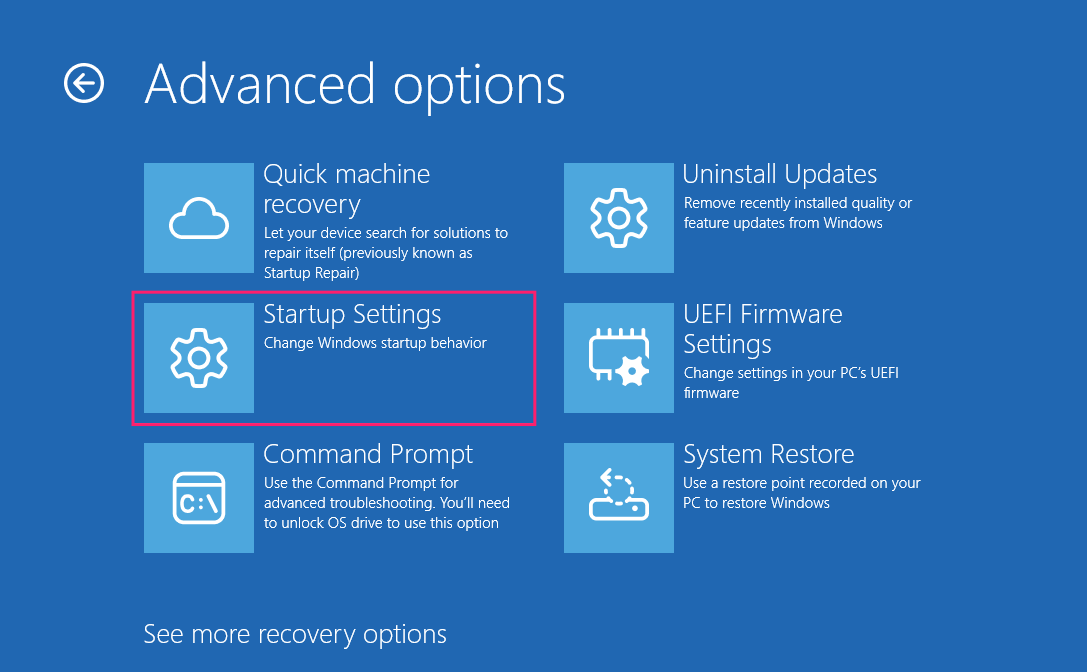
Save any open work before triggering this restart since the machine reboots immediately into the Windows Recovery Environment once you confirm. From there:
Select Troubleshoot

Select Advanced options
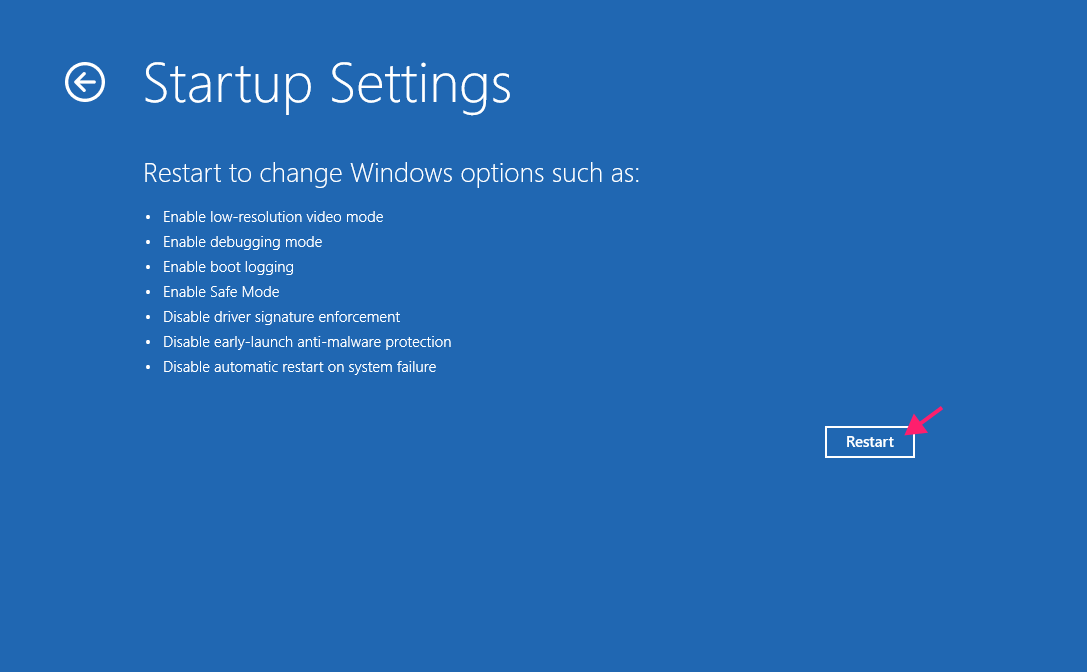
Select Startup Settings
Click Restart
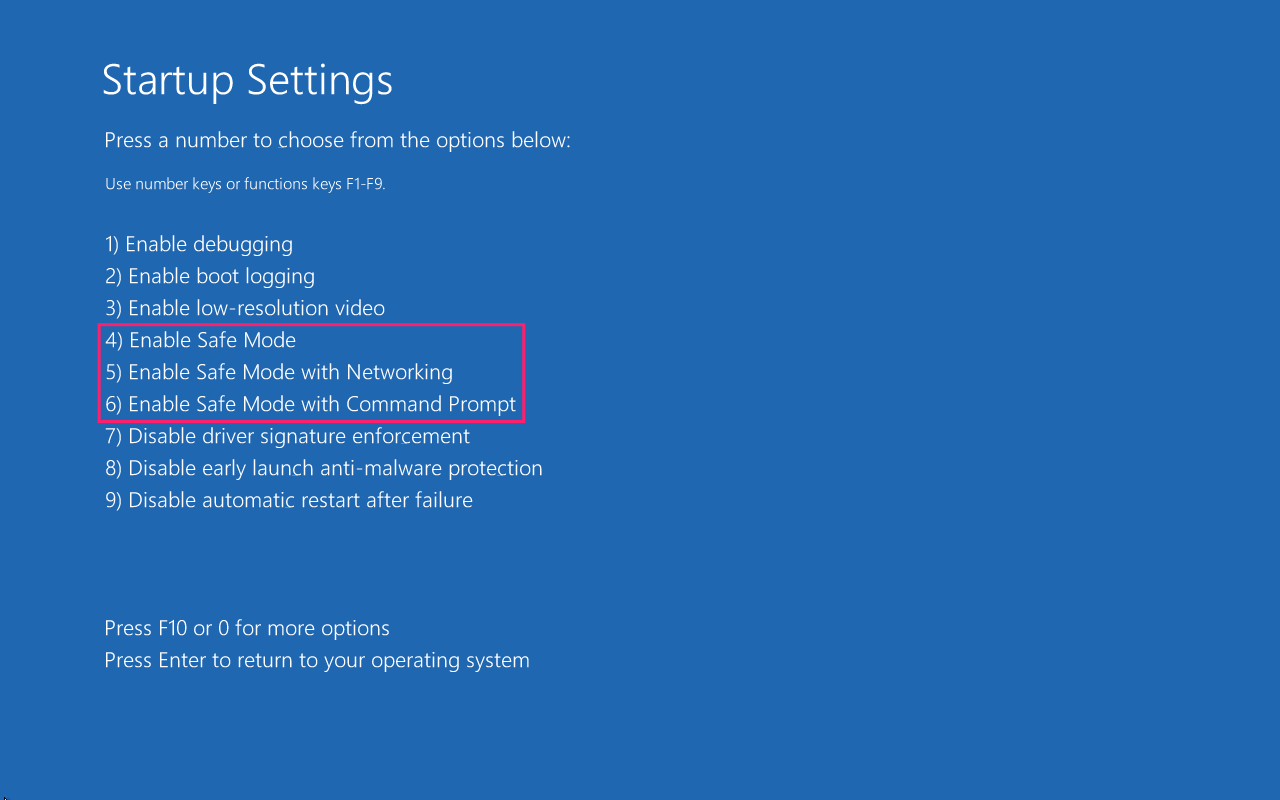
On the Startup Settings list, press the number or function key for the variant you need: 4 or F4 for standard Safe Mode, 5 or F5 for Safe Mode with Networking, or 6 or F6 for Safe Mode with Command Prompt

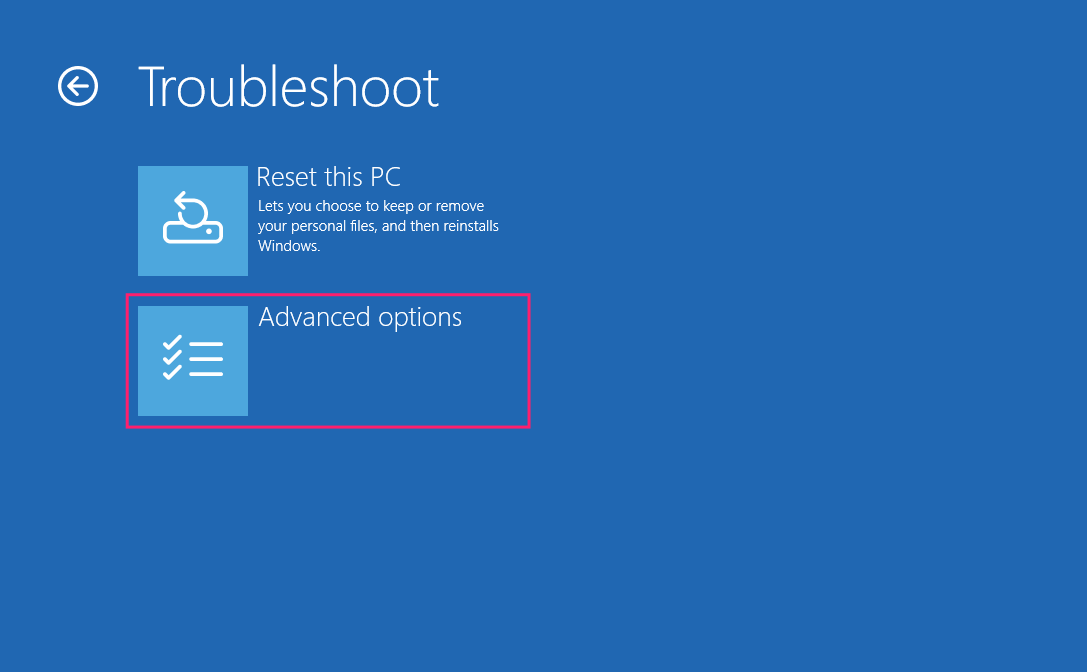
Method 2: Shift+Restart from the lock screen or Start menu
Use this when you need a faster route into the Recovery Environment without opening Settings first, which can be useful mid-session or from the lock screen without signing in.
Note that Shift+Restart does not jump directly into Safe Mode; it forces a reboot into the Windows Recovery Environment (WinRE) like method 1.
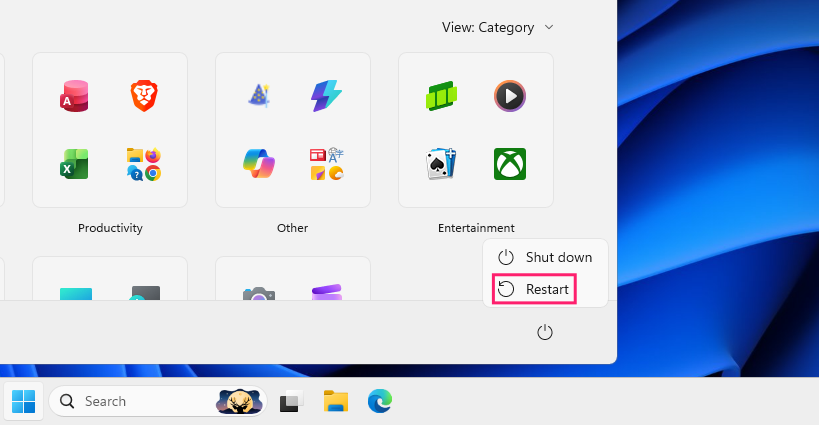
If you’re signed in, click the Start button and select the Power icon

If you’re at the lock screen, click anywhere on it and locate the Power icon in the bottom-right corner

- Hold down the Shift key
- While still holding Shift, click Restart
- Keep holding Shift until the Please wait screen with the spinner appears

Method 3: Force a persistent Safe Mode boot with msconfig
Use this when you need the machine to boot into Safe Mode on every restart going forward, not just once. For example, during an extended troubleshooting session that requires multiple reboots.
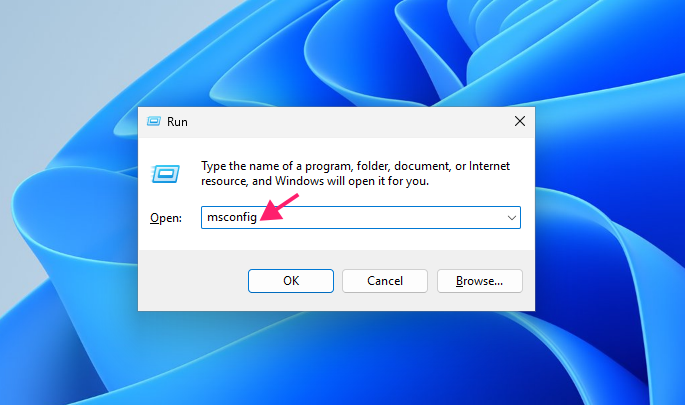
- Press Win + R
Type
msconfigand press Enter
- Switch to the Boot tab
- Check the Safe boot option
Select Minimal, Network, or Alternate shell depending on which variant you need (Minimal is selected by default)

- Click Apply, then OK
Click Restart in the confirmation prompt

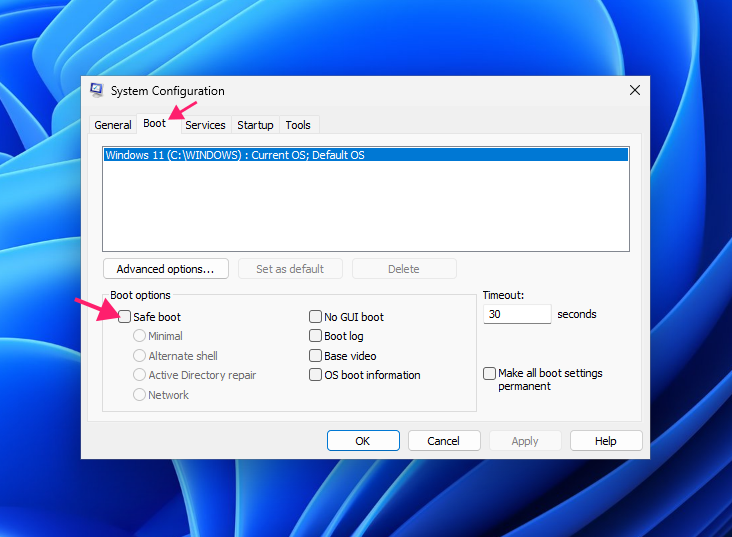
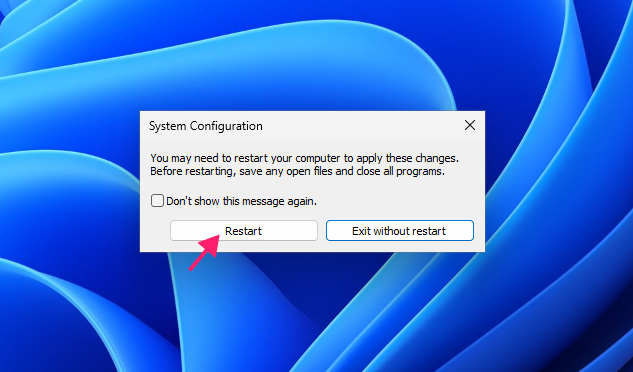
This change is persistent, so the machine will keep booting into Safe Mode until you reverse it. To revert, repeat the same steps and uncheck Safe boot before restarting.
Method 4: Force Safe Mode with bcdedit
Use this when the graphical interface is unresponsive but you have command-line access, or when you want a scriptable, precise way to set the Safe Mode flag without navigating menus.
This requires an elevated Command Prompt or Windows Terminal session, or the Command Prompt option from WinRE.
Run
bcdedit /set {current} safeboot minimalto force standard Safe Mode, orbcdedit /set {current} safeboot networkto force Safe Mode with Networking
- Run
shutdown /r /t 0to reboot the machine immediately
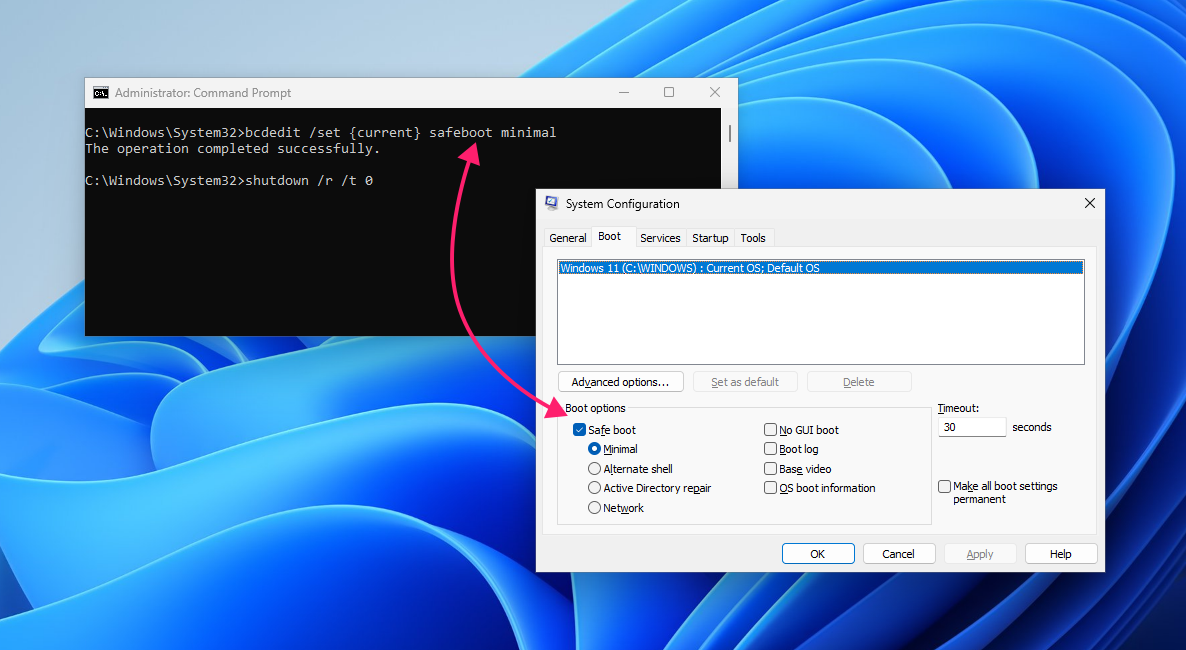
Like the msconfig method, this change is persistent, so the system will keep booting into Safe Mode on every restart until you remove the flag. To break the loop, run bcdedit /deletevalue {current} safeboot from an elevated prompt and reboot. For more detail on the command, run bcdedit /? or, for the safeboot argument specifically, bcdedit /? TYPES OSLOADER.
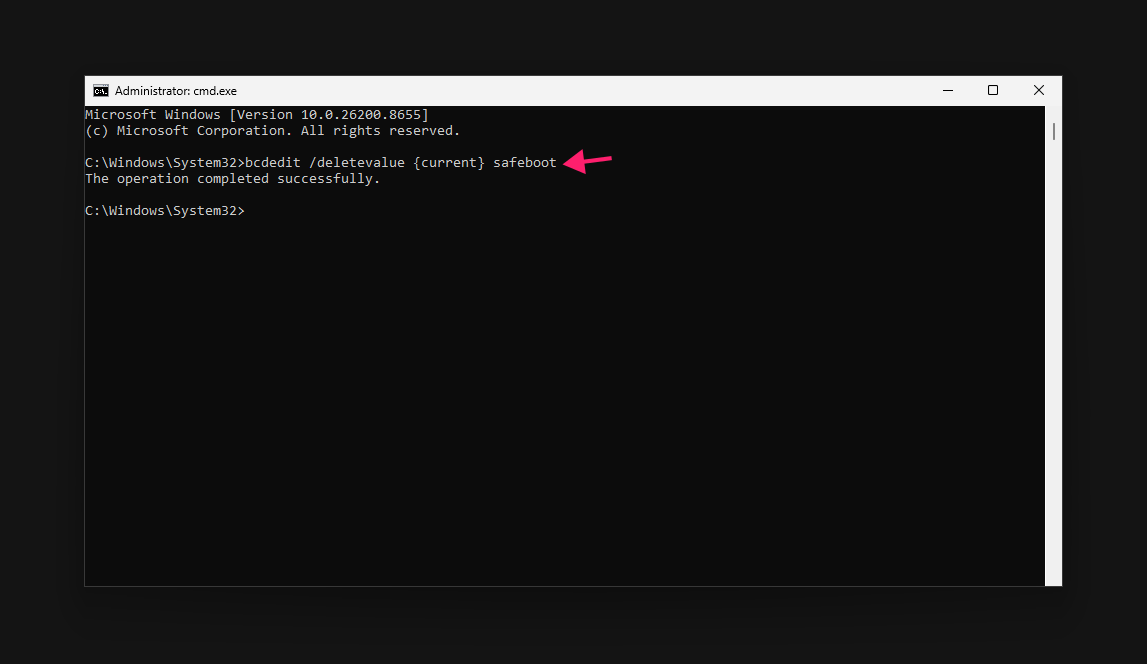
If you’ve lost the boot menu keyboard-interrupt option entirely, it’s because Windows 8 shortened the POST window so much that manually pressing F8 to reach the boot menu became unreliable, so Microsoft changed the default bootmenupolicy setting from legacy to standard.
You can restore the legacy behavior with bcdedit /set {default} bootmenupolicy legacy (expect a BitLocker recovery key prompt on the next boot if encryption is active), and reverse it later with bcdedit /set {default} bootmenupolicy standard.
Method 5: Hard power-reset for an unresponsive machine
Use this when the machine won’t load the login screen or respond to any input, and no other method is reachable.
- Power on the machine
- As soon as Windows begins loading and the spinner appears, hold the power button down to force a shutdown
- Repeat this forced shutdown two times
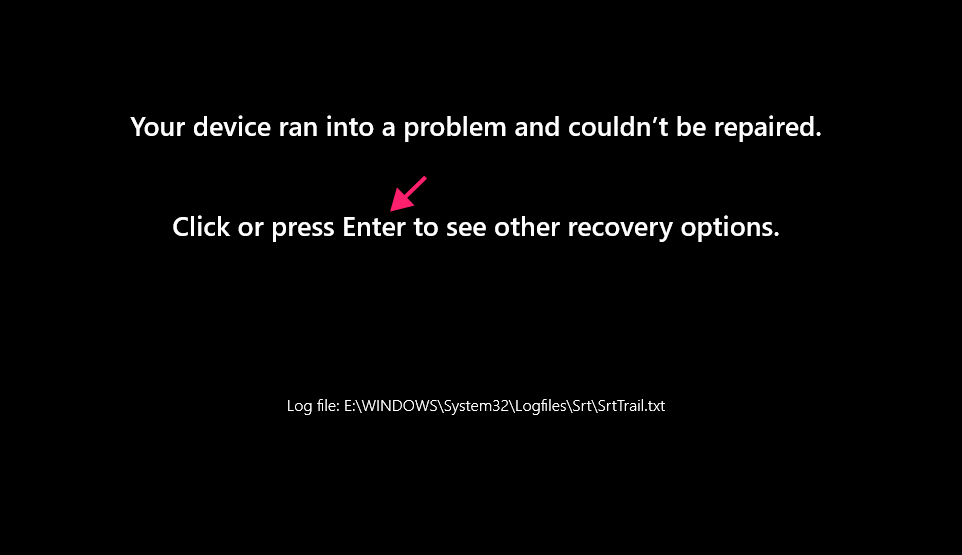
- On the next boot attempt, Windows automatically enters WinRE and may display a Preparing Automatic Repair message
If Windows can’t find a fix on its own, click or press Enter at the Your device ran into a problem and couldn’t be repaired screen to reach the WinRE options

- From here, follow the same Troubleshoot > Advanced options > Startup Settings path outlined above to select your Safe Mode variant.
» Learn more: How to use Startup Repair in Windows 11
Method 6: Trigger Safe Mode across a fleet with RMM or remote PowerShell
Use this when you’re managing multiple unresponsive Windows 11 endpoints and need to force them into Safe Mode without touching each machine.
Here’s an example of a PowerShell script that targets specific devices or groups to suspend BitLocker encryption, enables the flag for booting into Safe Mode with networking, and restarts the PC:
The Script:
Atera does not guarantee the integrity, availability, security, virus-free, safety, lawfulness, non-infringement, rights’ status, or functionality of the scripts. The use of the shared scripts is at your own risk. Scripts are provided “AS IS”. *
# force_safemode.ps1
# suspend BitLocker for the next reboot to bypass key prompts
Suspend-BitLocker -MountPoint "C:" -RebootCount 1


# set Safe Mode flag - Safe Mode with Networking
bcdedit /set {current} safeboot network


# restart endpoint
Restart-Computer -ForceThe network variant keeps the endpoint reachable after reboot, and suspending BitLocker beforehand avoids stalling on a recovery key prompt mid-remediation.
Push the script below using your RMM platform or a remote PowerShell session, targeting the devices or device groups you need. If you need something more specific, Atera’s AI Copilot can help you write the script from natural language queries, and then you can push it remotely to all your endpoints through the RMM connection.
Once repairs are complete, run a reversion script to remove the flag and bring the endpoint back to a normal boot:
The Script:
Atera does not guarantee the integrity, availability, security, virus-free, safety, lawfulness, non-infringement, rights’ status, or functionality of the scripts. The use of the shared scripts is at your own risk. Scripts are provided “AS IS”. *
# revert_safemode.ps1
# remove Safe Mode flag
bcdedit /deletevalue {current} safeboot


# restart endpoint
Restart-Computer -ForceIf a device is expected to go through several restarts before remediation finishes, suspend BitLocker indefinitely instead with Suspend-BitLocker -MountPoint "C:" -RebootCount 0, then re-enable it in the reversion script with Resume-BitLocker -MountPoint "C:".
Troubleshooting Safe Mode issues
Getting into Safe Mode is only half the job. The methods in the previous section can run into complications of their own, and a Safe Mode session doesn’t always behave the way you’d expect once you’re in it.
Here are the three issues most likely to trip up a restart or leave you stuck once you get there.
1: BitLocker complications during the boot process
If a machine has BitLocker drive encryption active, getting into Safe Mode isn’t always as simple as picking a menu option. Changing the startup profile and boot settings to enter Safe Mode triggers BitLocker’s recovery mode, because the TPM validates that the boot and recovery environment hasn’t been tampered with. If that validation check fails, BitLocker won’t auto-unlock the drive, and Windows won’t load Safe Mode until the drive is decrypted manually.
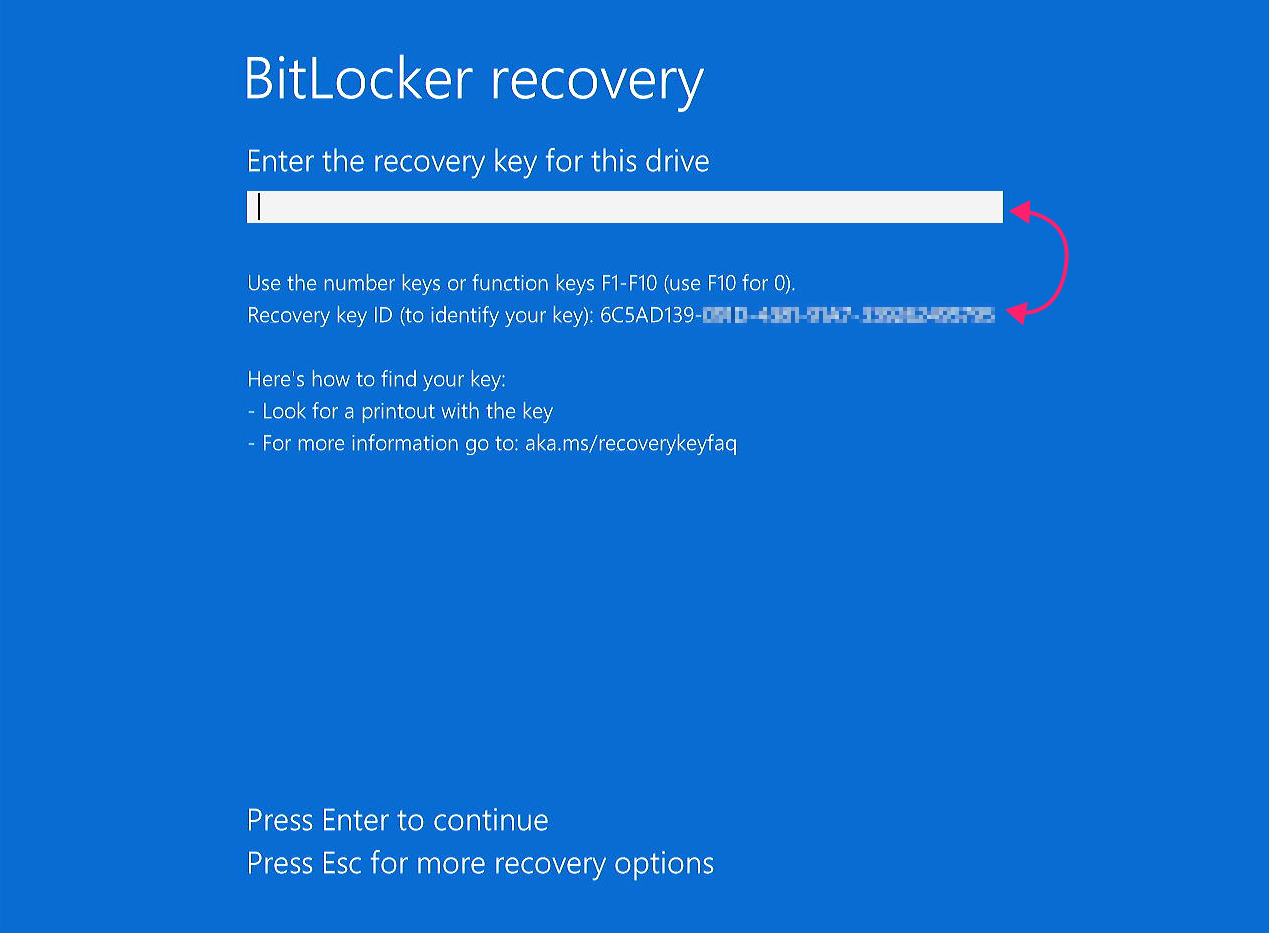
That means before you start, you need the 48-digit BitLocker recovery key on hand, along with the corresponding 8-digit key ID if the device has multiple recovery keys associated with it. Without both pieces, you’ll be stuck at the BitLocker recovery screen instead of the Safe Mode selection menu. This is worth checking for before you trigger any of the reboot methods above, not after you’re already staring at the recovery prompt.
» Need help? Here’s how to find your Windows BitLocker recovery key
2: Stuck in a persistent Safe Mode boot loop
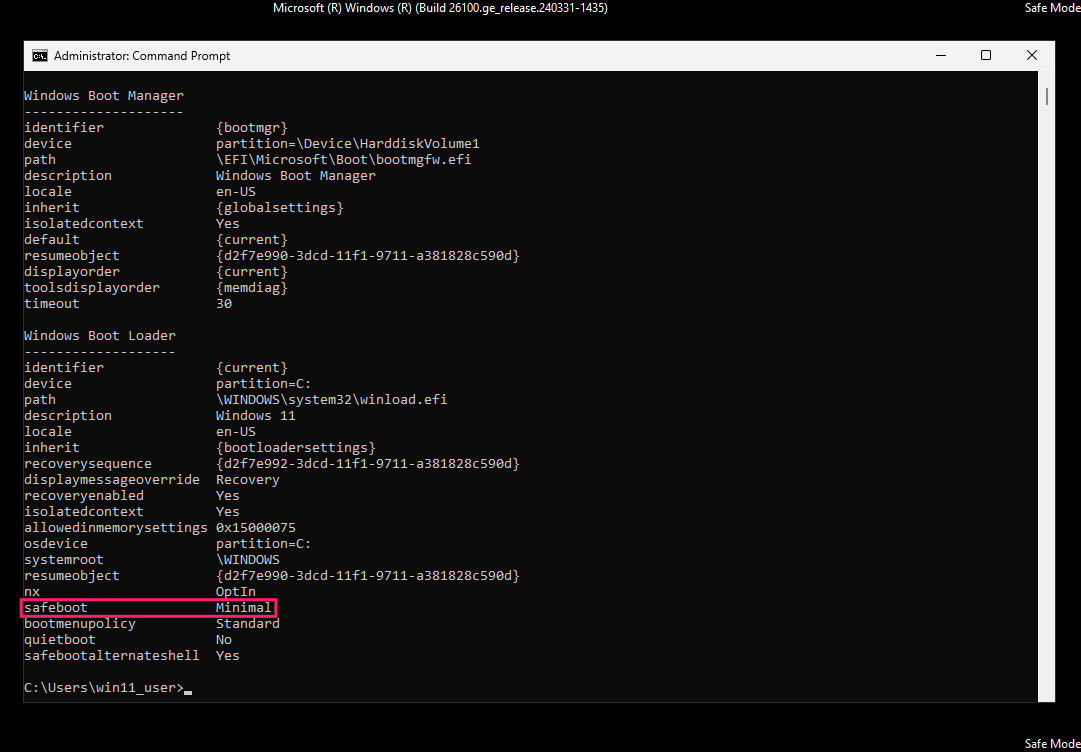
If a machine keeps booting into Safe Mode on every restart and won’t return to a normal desktop, the most likely cause is a leftover safeboot flag from the msconfig or bcdedit methods covered above that was never removed.
Check for it via msconfig, or if the GUI isn’t accessible, run bcdedit /enum from an elevated Command Prompt to list the current boot configuration data. If you see a safeboot entry in the output, remove it with bcdedit /deletevalue {current} safeboot and restart.
» Did you know that you can enable or disable Automatic Repair?
3: Windows Hello PIN not working in Safe Mode
Windows Hello PIN sign-in has been available in Safe Mode since a Windows Insider build in 2022, so this shouldn’t be a hard blocker on current systems. But if it still fails, there’s a fallback path.
- On the sign-in screen, click Sign-in options
- Click the password (key) icon
Enter the account password and sign in


Credentials are typically cached from a previous successful sign-in, so this works even without network connectivity.
If that doesn’t resolve it, try signing in with a local account instead of a Microsoft account, which removes the network verification step entirely. If you can get back into a normal Windows session afterward, either set a password on the affected account or create a new local user as a more permanent workaround.
» Learn more in our guide to fixing a broken PIN
The fastest path back to a working system
Knowing five different ways into Safe Mode is useful on one desktop, but it becomes essential once you’re managing a fleet of them. What takes a few clicks locally turns into a scripting and scheduling problem at hundreds of endpoints, and doing that manually one machine at a time stops scaling fast.
Atera’s remote scripting lets IT teams and MSPs push the same PowerShell-based Safe Mode triggers covered here to selected devices or device groups on demand, without walking to each one. Paired with Splashtop-powered remote sessions for the follow-up diagnostics, boot recovery becomes something you run from a single console instead of a stack of individual tickets.
» Interested? Try Atera for free
Related Articles

How to reduce alert fatigue across your IT team
Your technicians aren't ignoring alerts because they're careless. They're ignoring them because most alerts have taught them to. Once the stream stops being trustworthy, real failures slip past with the noise. Fixing it means deciding what deserves an interruption, tuning out transient spikes, collapsing alert storms, and automating the fixes you've run a hundred times.
Read now
How to close the IT skills gap on your team
Course completions don't close skills gaps. Technicians finish the training, then hand the first unfamiliar failure straight back to a senior engineer. Real capability gets built on live tickets, incidents, and maintenance windows, with guidance that fades as competence grows.
Read now
How to calculate cost per ticket (and why most teams get it wrong)
Most cost-per-ticket figures are wrong before anyone reads them. Missing overhead, tickets that were opened but never closed, spam and duplicates padding the count, and one month's costs divided by another month's tickets all make support look cheaper than it is. Fix both sides of the division and the number finally shows where technician time and money actually go.
Read now
How to prepare for a software license audit
A vendor audit notice doesn't wait for you to get organized. It demands proof, right now, that every install matches every entitlement you've paid for, and most IT teams find out the hard way how much they don't actually know about their own environment. Getting audit-ready before the letter arrives is the difference between negotiating from strength and paying for months of scrambling.
Read nowEndless IT possibilities
Boost your productivity with Atera’s intuitive, centralized all-in-one platform









