
Generate summary with AI

Startup Repair is a built-in diagnostic utility designed to fix common IT issues that prevent Windows from loading. It scans for problems like missing system files or corrupted boot data and repairs them automatically, all while keeping your personal files safe.
While it’s a reliable tool, it isn’t a universal fix. If the underlying system architecture is misconfigured or the hardware is failing, the tool will often fail or enter an infinite loop. In this blog, we’ll look at the technical environment required for this tool to function, when to use it, and how to troubleshoot when it fails.
» Here’s how to increase IT efficiency in your organization
Prerequisites for a successful Startup Repair
Startup Repair is highly dependent on the underlying architecture of the system. If the foundation isn’t right, the tool won’t even be able to find the Windows installation it’s meant to fix. From an enterprise management perspective, here are the critical prerequisites:
- UEFI firmware mode: Modern Windows 11 deployments must boot in UEFI mode. Legacy BIOS often prevents the Windows Recovery Environment (WinRE) from correctly locating the system partition.
- GPT disk layout: The disk must use a GPT layout with a valid EFI System Partition. Startup Repair struggles with legacy MBR layouts on modern hardware.
- BitLocker state: Encryption is a major hurdle. Startup Repair can’t access system files if the drive is locked. You must have the recovery key ready or have the drive suspended for the repair to proceed.
- Healthy WinRE image: The Windows Recovery Environment must be properly registered and present on the disk. If the WinRE image is corrupt or missing; a common issue with certain OEM shipments the repair process will fail immediately.
» Here’s how to disable Windows updates and manually re-enable Windows updates
The Logic of the “multiple run” strategy
In IT environments, you’ll often find that Startup Repair requires two or even three attempts to succeed. This isn’t a glitch; it’s by design. The tool performs incremental diagnostics rather than a blanket fix.
On the first pass, Windows focuses on the most basic boot elements:
- The Boot Configuration Data
- EFI partition entries
If these are fixed but the system still won’t boot due to deeper issues like registry hive corruption or damaged system drivers a second or third pass is required to address those specific layers. Each attempt builds upon the progress of the last, updating log files and rebuilding component caches until a stable boot state is achieved.
» Looking for specific software? Here are the best driver updater software options
When to avoid Startup Repair entirely
Startup Repair is a software-level tool, and running it in the wrong context can lead to wasted hours and further system degradation. You should bypass this method if you encounter the following patterns:
- Hardware failures: If an SSD is failing or a storage controller is malfunctioning, Startup Repair will loop indefinitely. It cannot fix physical hardware or corrupted RAID metadata.
- Firmware misconfiguration: If the UEFI boot order is wrong or Secure Boot is misconfigured, no amount of software repair will help. These must be fixed at the firmware level.
- Missing BitLocker keys: Without the recovery key, the tool can’t decrypt the volume to perform repairs.
- Corrupted partition tables: If the GPT partition itself is misaligned or missing, Startup Repair will likely fail to see the drive at all. In these cases, manual BCD rebuilds or disk diagnostics are far more efficient.
» Learn more about disabling and enabling Secure Boot
Easiest methods to run Startup Repair in Windows 11
There are several ways to trigger a Startup Repair depending on your level of access to the system. Whether you’re performing a routine check or responding to a critical boot failure, choosing the right method is essential for resolving IT issues quickly.
Method 1: Settings
This method is used when the system is still operational and you can navigate the desktop. It’s the most straightforward way to access the recovery environment for addressing startup errors or preparing for deeper troubleshooting.
Follow these steps:
1. Search “Settings” in your search bar and click “open”

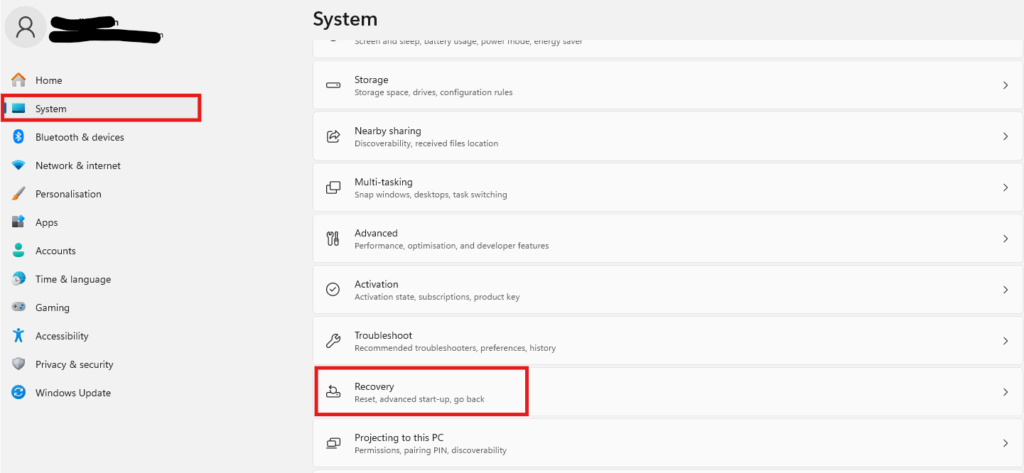
2. Select System and then click Recovery
3. Locate the Advanced startup section and click the Restart now button
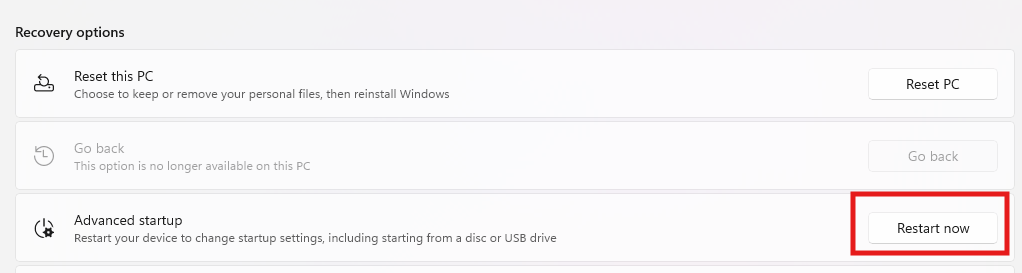
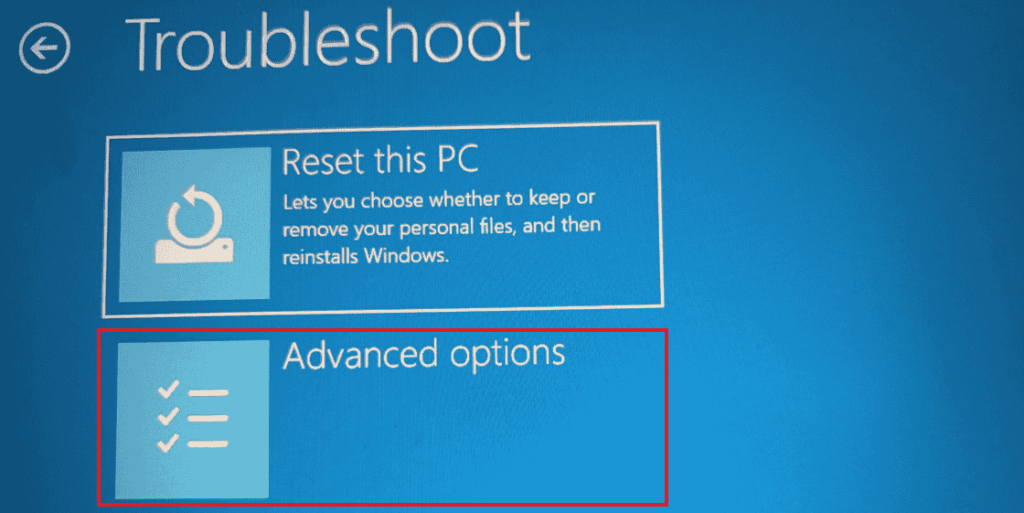
4. Once the PC reboots into the Choose an option menu, select Troubleshoot > Advanced options
5. Click Startup Repair
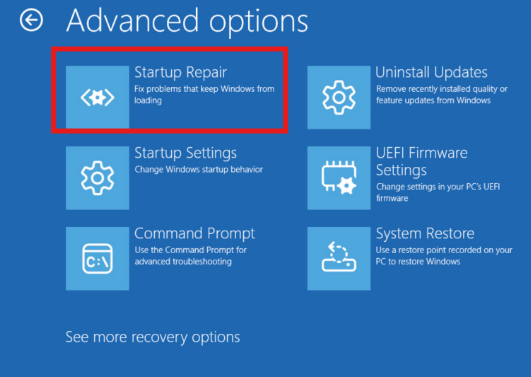
6. Windows will begin scanning for startup issues and attempt to repair them automatically
Method 2: Command Prompt (Manual Boot Repair)
Take note: Both Method 2 and Method 3 require access to Command Prompt in the Windows Recovery Environment. However, they perform different types of repairs. Method 2 focuses on rebuilding boot records, while Method 3 repairs corrupted Windows system files and the system image.
When automated tools fail to identify the problem, the Command Prompt allows you to manually rebuild essential boot records. These commands repair the components that allow Windows to locate and load the operating system during startup.
Warning: Manually modifying boot records is a sensitive operation. Ensure you follow the commands exactly to avoid making the Windows installation unrecognizable to the system firmware.
Follow these steps:
1. Access the recovery menu (via Method 1) and select Troubleshoot

2. Select Advanced Options > Command Prompt
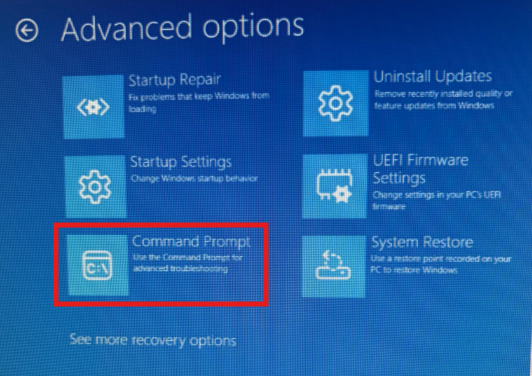
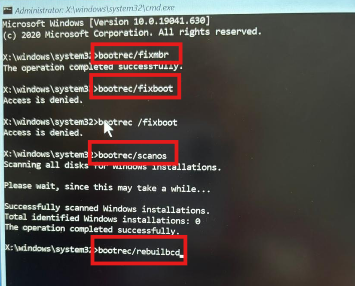
3. Type the following commands in sequence, pressing Enter after each:
bootrec /fixmbr– Rewrites the Master Boot Record to remove corruption or incompatible boot loadersbootrec /fixboot– Writes a new boot sector to the system partitionbootrec /scanos– Scans all disks for Windows installations that are not currently listed in the Boot Configuration Databootrec /rebuildbcd– Rebuilds the Boot Configuration Data (BCD) store so Windows can be located and loaded during startup
Close the Command Prompt window and click Continue to attempt to boot into Windows
» Here are essential scripts that every IT professional needs to know
Method 3: Repair system files using DISM
In some cases, startup failures occur because core Windows system files or the system image have become corrupted. The Deployment Image Servicing and Management (DISM) tool can repair the Windows image from the recovery environment.
Follow these steps:
1. Open Command Prompt within the recovery environment (Troubleshoot > Advanced Options > Command Prompt)
2. Run the following command:
DISM /Image:C:\ /Cleanup-Image /RestoreHealth– This command scans the Windows image for corruption and restores damaged components required for the operating system to start correctly

3. After the process completes, you can optionally run:
sfc /scannow /offbootdir=C:\ /offwindir=C:\Windows– This command scans and repairs corrupted system files within the Windows installation

4. Close Command Prompt, and restart the computer
» Here’s how to restart a remote computer using Windows
Method 4: Using PowerShell in Windows 11 Recovery
Take note: While technically not a core startup repair method, PowerShell can be a valuable tool for diagnostics and offline repairs in the recovery environment.
In Windows 11 enterprise environments, PowerShell can be used within the Windows Recovery Environment, but it comes with limitations compared to Command Prompt.
To access it, navigate to Troubleshoot > Advanced Options > Command Prompt and type powershell

PowerShell is useful for system inspection, offline DISM repairs, and running WMI, CIM, or BCD commands (e.g., Get-CimInstance, bcdedit /enum, Repair-WindowsImage -Offline -Path C:\ -RestoreHealth). Its object-based output and scripting capabilities make it ideal for enterprise-level validation and automation.
However, many standard modules and GUI-dependent commands are unavailable, disk access may be blocked if BitLocker is active, and offline paths must be explicitly defined. Crucially, low-level boot sector repairs (bootrec /fixmbr, bootrec /rebuildbcd) still require Command Prompt.
A combined approach works best: Command Prompt for EFI/BCD restoration, and PowerShell for inspection, offline repairs, and validation across systems.
» Make sure you know the difference between PowerShell and Command Prompt
Did you know that Atera’s AI Copilot can help you generate PowerShell scripts that you can simply copy and paste? If you’re stuck on a tricky recovery task, you can just ask Copilot to draft a specific diagnostic or repair script for your managed endpoints. This saves you the headache of trying to remember every command from scratch when you’re already under pressure to get a system back online.
» Find out how to run PowerShell commands on a remote computer
What to do when Windows fails to start
If Windows can’t start normally, you can force the system to enter the Windows Recovery Environment by interrupting the startup process. This allows you to access tools like Startup Repair even when the operating system fails to boot.
Follow these steps:
- Turn on the computer
- When the Windows logo appears, press and hold the power button until the system shuts down
- Repeat this process two more times
- On the next startup, Windows will enter Automatic Repair
- Select Advanced options, then navigate to Troubleshoot > Advanced options > Startup Repair
Windows will then attempt to diagnose and repair startup issues automatically.
Master Startup Repair with Atera
Startup Repair is a decisive tool in the Windows 11 recovery toolkit, but its success depends on a disciplined approach. Jumping straight to a repair without first checking hardware health or firmware settings often leads to frustrating loops and wasted time. By following a structured diagnostic path starting with automated GUI tools and moving toward manual Command Prompt fixes you ensure the highest probability of restoring a system with minimal risk to data.
Atera’s RMM platform turn these individual troubleshooting tasks into a streamlined operation. Instead of reacting to boot failures as they happen, you can use Atera’s RMM platform to proactively audit the health of recovery environments across your network.
» Try Atera for free to see how it can streamline your operations
Frequently Asked Questions
Related Articles

How to decide if you need a dedicated DEX platform, or already have one
"IT feels slow" is the complaint that often sells DEX platforms. Sometimes it signals a real blind spot, but just as often already catches and fixes the problem, and a new scoring layer would only add another console. Telling the two apart takes evidence, and the real gap usually isn't visibility at all.
Read now
How to set up secure printing across your organization
A secure print checkbox protects exactly one moment in a document's life. Everything else, from unencrypted traffic and unhardened devices to payroll printouts forgotten in a tray, stays exposed. Real secure printing covers the whole lifecycle: release policy, authentication, encryption, hardening, and a fleet that stays monitored long after rollout.
Read now
How to reduce alert fatigue in healthcare IT
In a hospital, a dismissed alert isn't a delayed ticket. It can be a patient deteriorating while the monitor keeps sounding. Cutting alert volume won't fix that on its own, and switching alerts off can make it worse.
Read now
How to prevent configuration drift across your IT infrastructure
Configuration drift rarely breaks anything the day it happens. It hides in a hotfix, a reset default, or a vendor installer, then surfaces weeks later as a failure nobody can trace. Stopping it means defining exactly what approved looks like, closing every side door into production, giving each setting one owning tool, and checking that the baseline itself hasn't gone stale.
Read nowEndless IT possibilities
Boost your productivity with Atera’s intuitive, centralized all-in-one platform









