
Table of contents
Table of contents
- Why your PIN stopped working
- Solution 1: Use sign-in options fallback
- Solution 2: Reset your PIN from the lock screen
- Solution 3: Boot into Safe Mode with Networking
- Solution 4: Delete the NGC folder
- Solution 5: Clear the TPM
- Solution 6: Repair system files
- Solution 7: Reset Windows Hello policies via Intune or Group Policy
- Solution 8: Rebuild your Windows profile (last resort)
- A smarter fix starts at the platform level
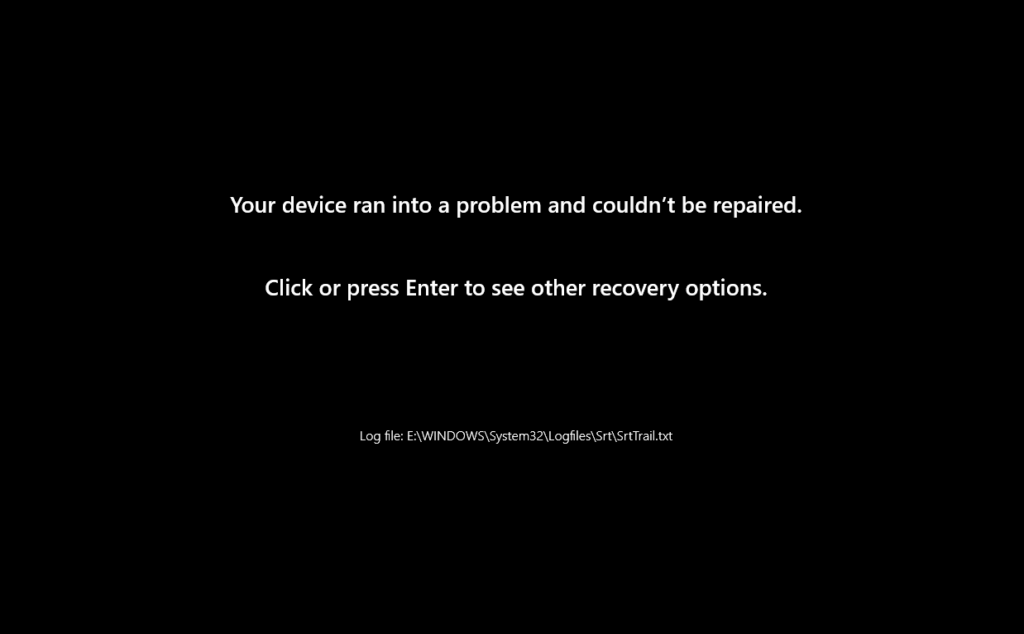
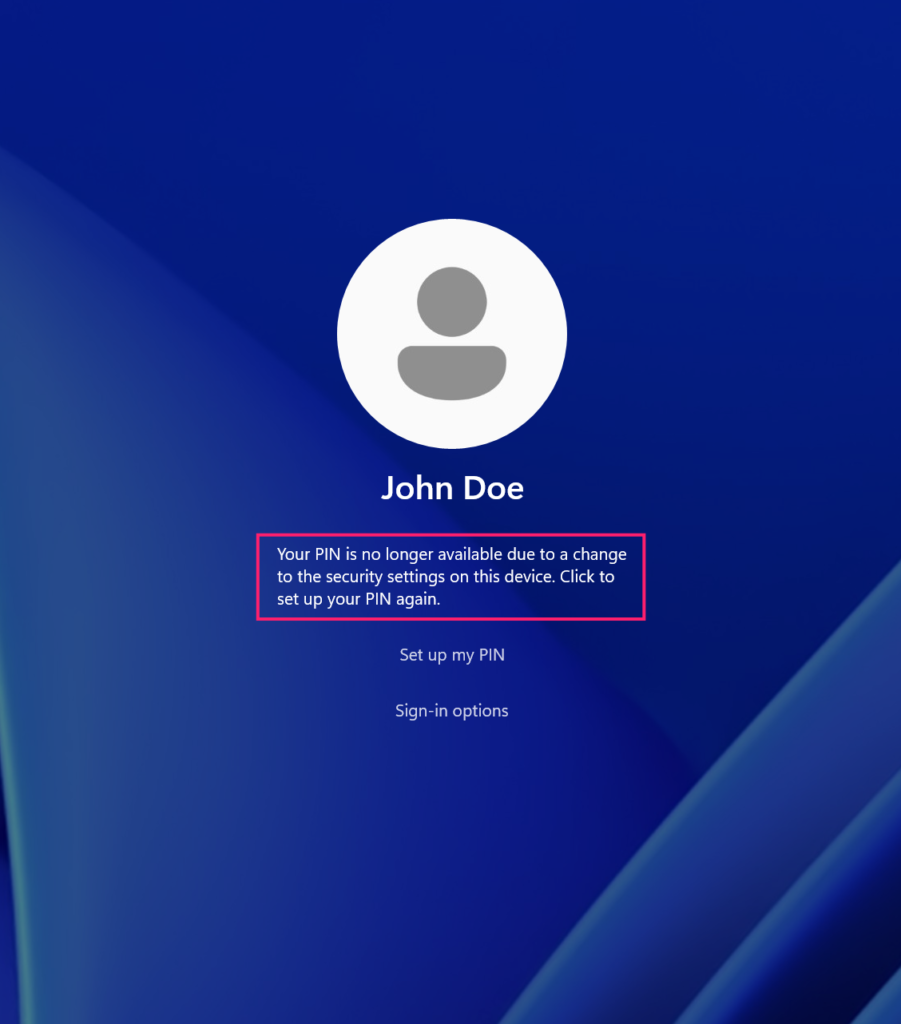
Your pin failing to let you enter your own Windows PC is extremely frustrating, especially when you know that it’s right. At its core, this error is most likely your TPM (Trusted Platform Module) losing sync with your system. When that happens, Windows can’t authenticate your PIN because PINs live in hardware.
The key difference is that a regular password gets sent to Microsoft’s servers for verification. Your PIN never leaves your device. Instead, it’s the key that unlocks a private cryptographic key stored inside your TPM. When you log in, Windows sends your PIN to the TPM, the TPM validates it, and then releases a signed confirmation that logs you in.
Because of this hardware-level setup, PIN problems are always local. If your TPM can’t verify your PIN, you’re locked out. The PIN itself is useless without that specific physical TPM. The good news is that there are a lot of methods to fix this. Here’s everything you need to know.
Why your PIN stopped working
Here are a few common reasons why your PIN might not be working:
- Software updates corrupt the NGC folder (where your PIN data lives). Your PIN data falls out of sync with your TPM.
- Credential corruption happens when cached login tokens break. This blocks PIN re-enrollment.
- System file corruption breaks the authentication chain between Windows and your TPM.
- Hardware changes like replacing your CPU or motherboard invalidate your TPM. The TPM is tied to your specific hardware, swap it and your PIN might not work.
- BIOS or firmware changes can lock you out. Changing settings like Platform mode makes your encryption keys inaccessible.
- Too many wrong PIN attempts trigger the TPM’s lockout. The TPM keeps counting failed attempts, and once it hits the limit, it locks you out permanently.
Solution 1: Use sign-in options fallback
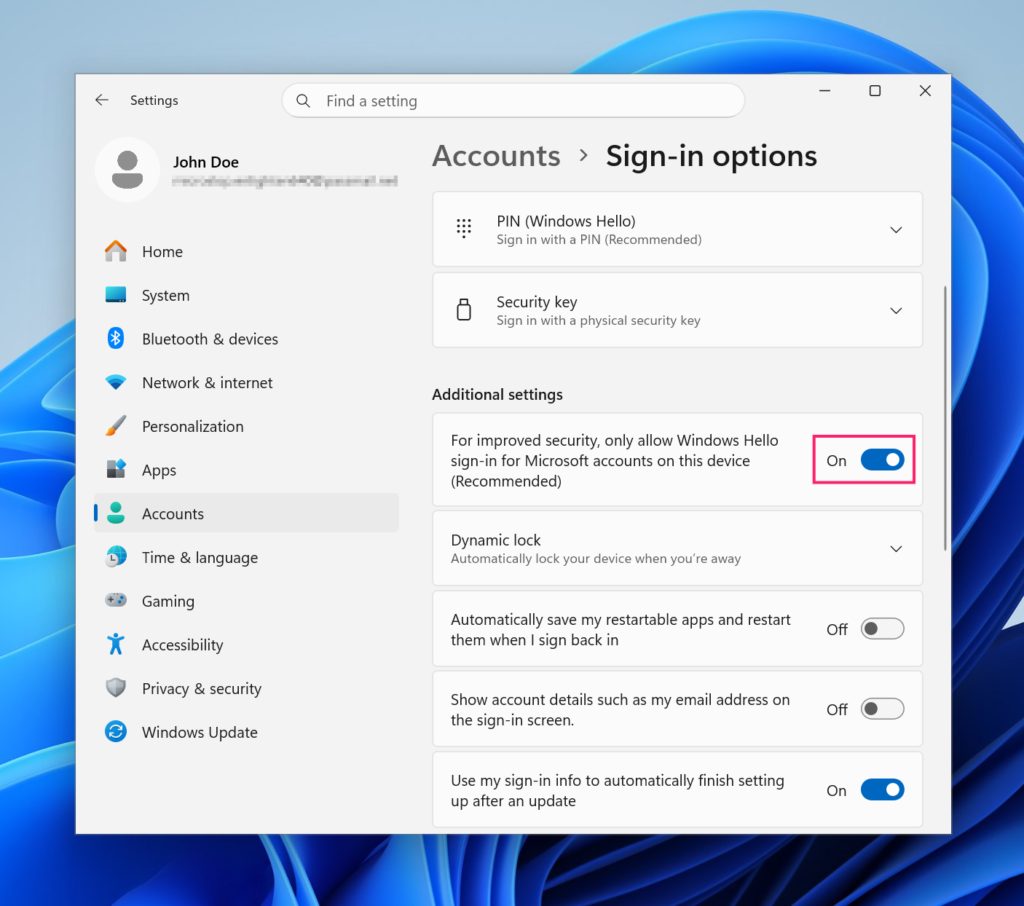
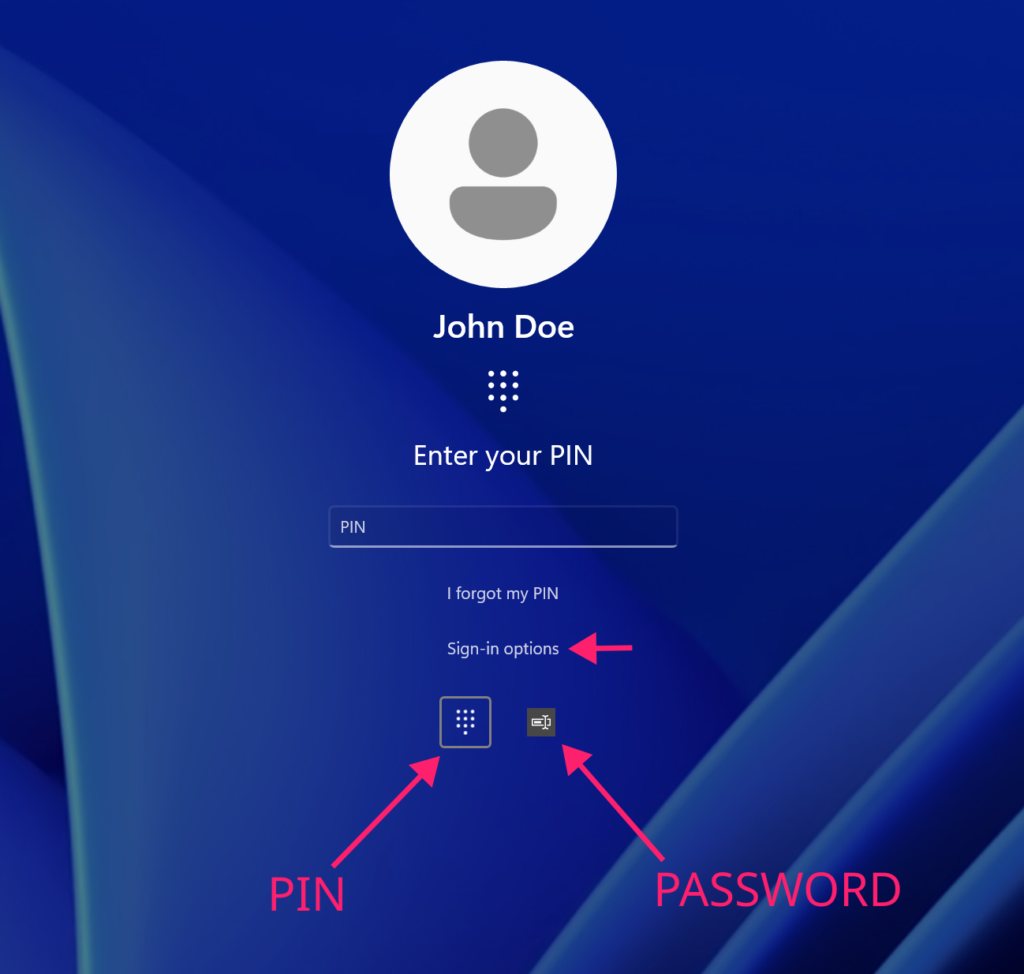
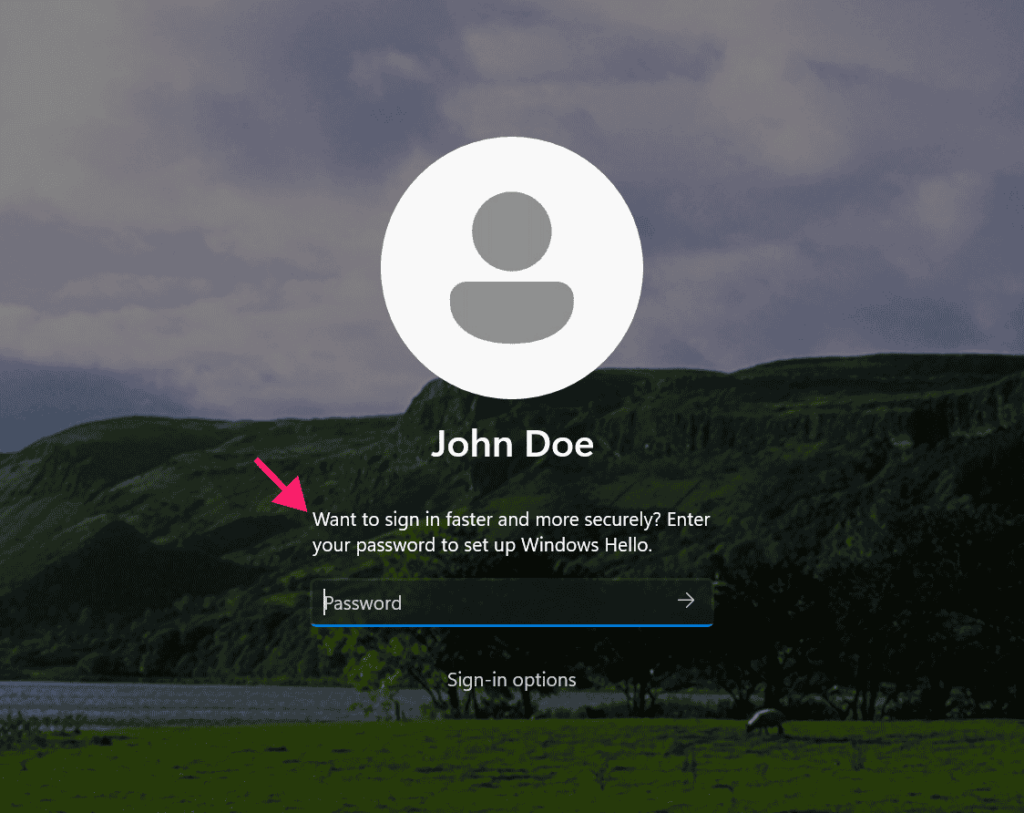
1. Sign-in options only appear on the lock screen if you’ve enabled them in Settings > Accounts > Sign-in options first. Otherwise, it will not be displayed.
2. On the lock screen, click the sign-in options button, and then click the icon for your backup method (password, Smart Card, etc.) to switch to it.
Solution 2: Reset your PIN from the lock screen
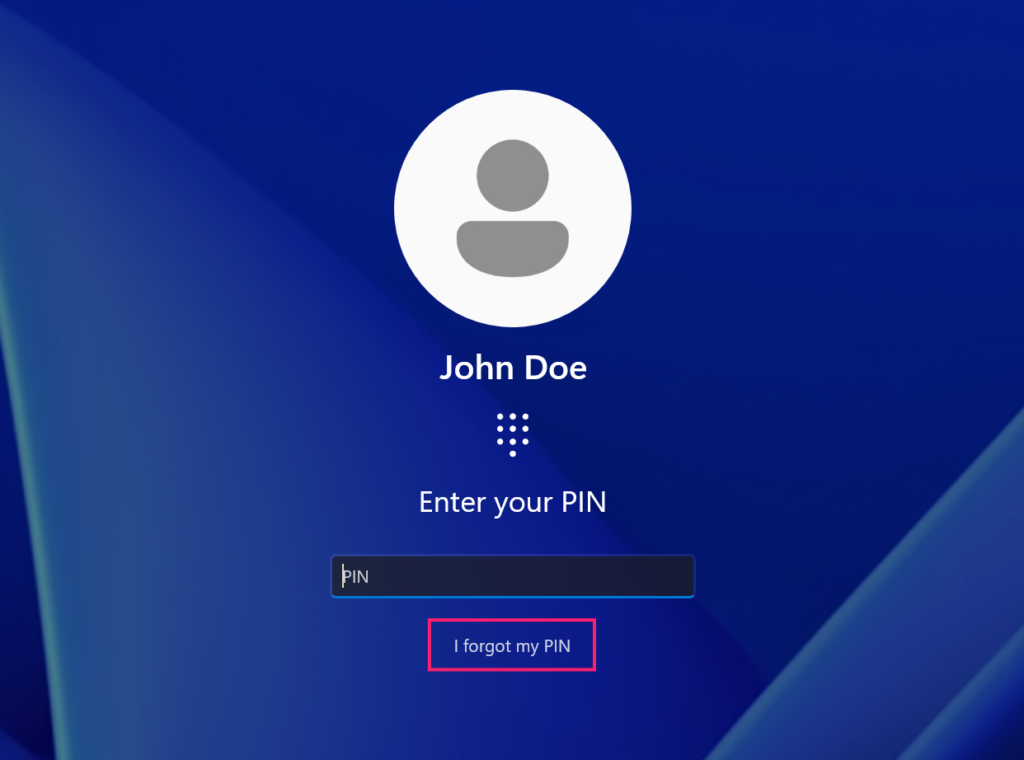
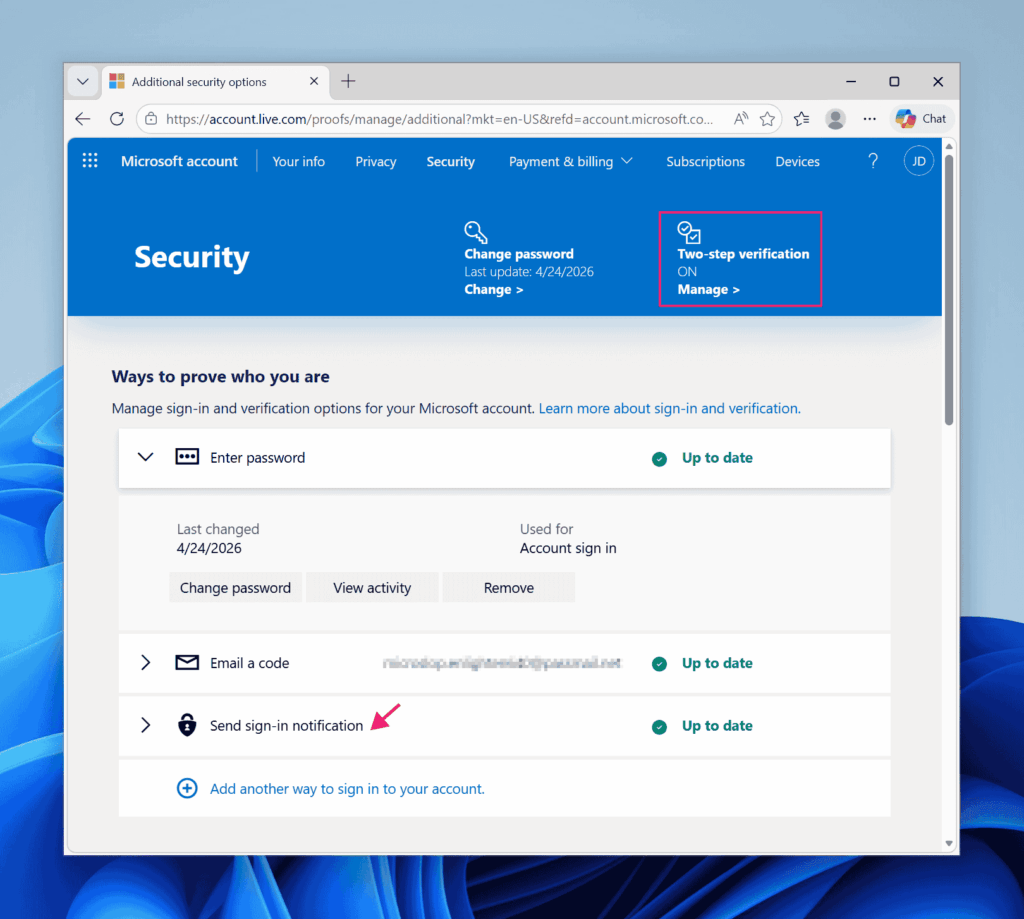
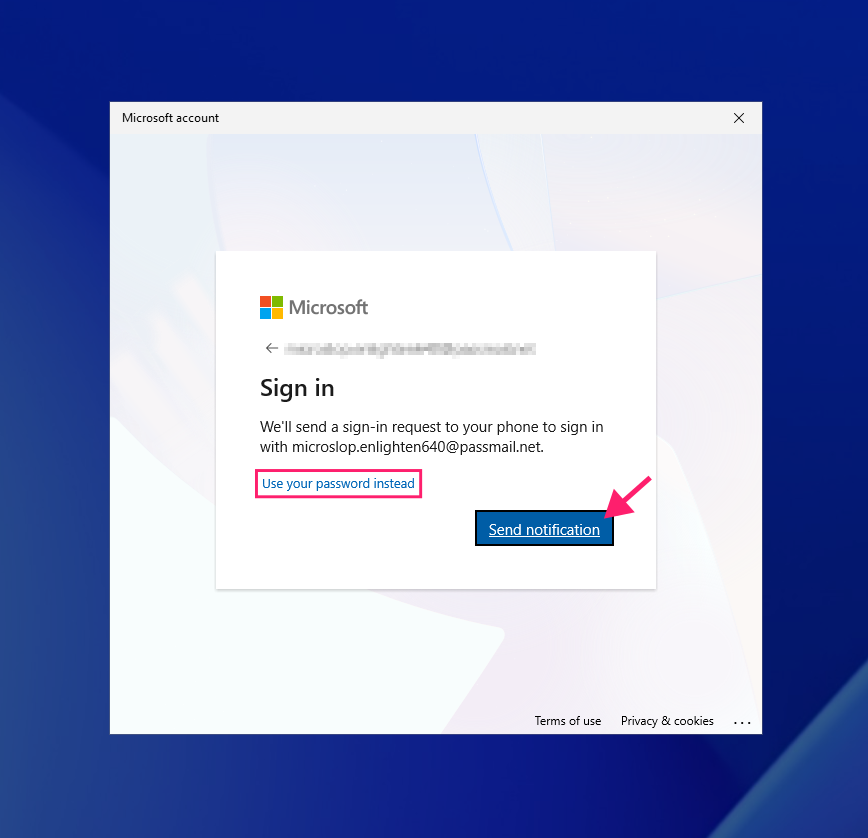
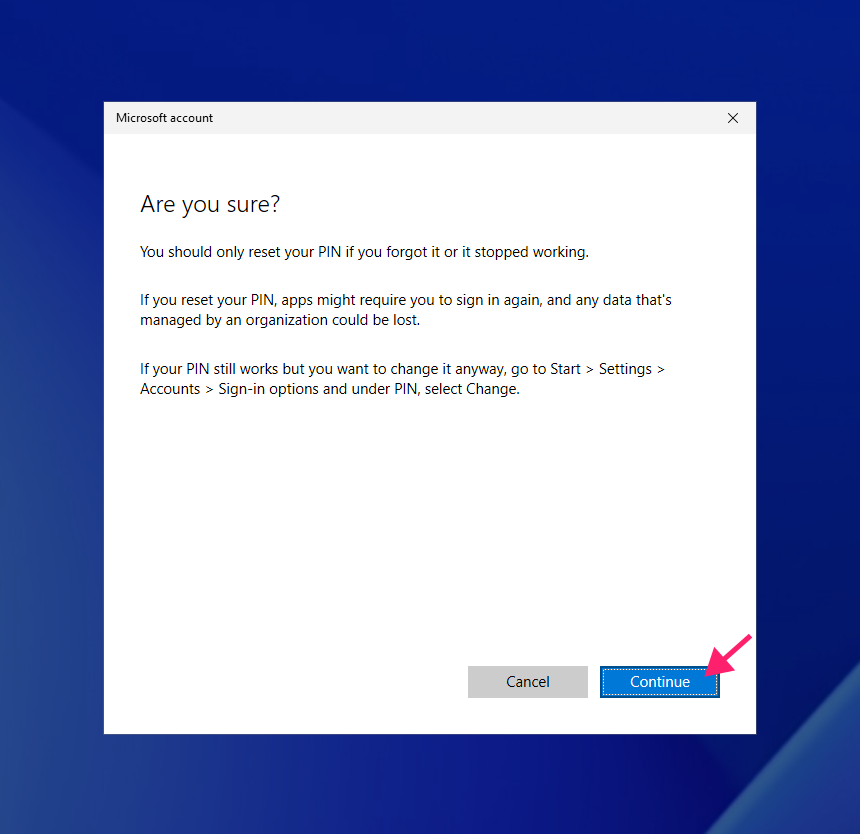
1. On the lock screen, click “I forgot my PIN.” If you’ve set up an Authenticator app, you’ll see “Send notification.” Otherwise, provide your account password.
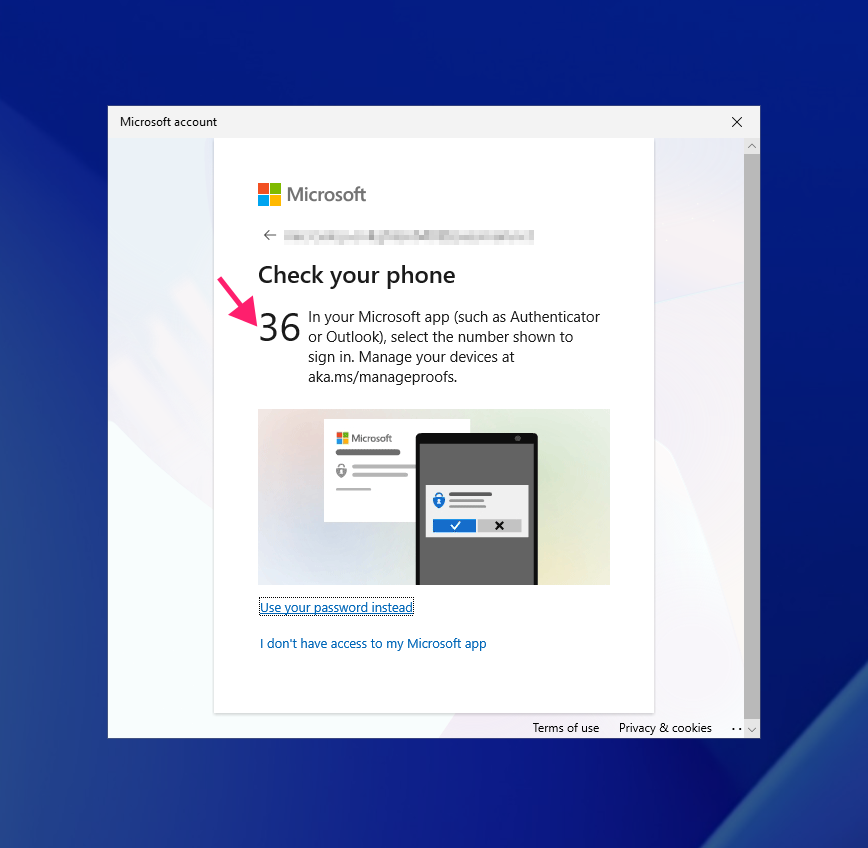
2. Open your Authenticator app and click the corresponding number for the sign-in request.
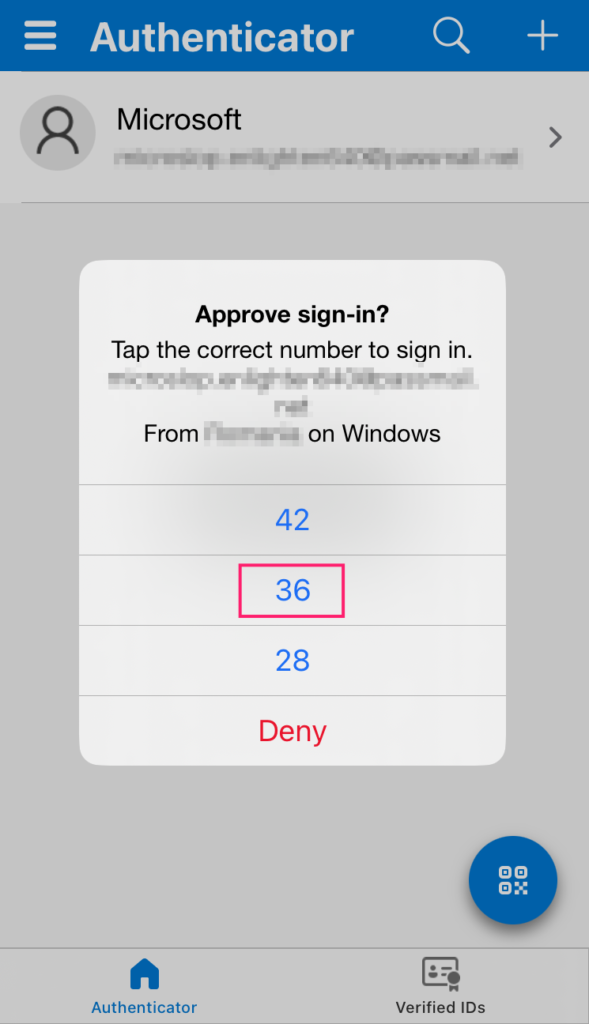
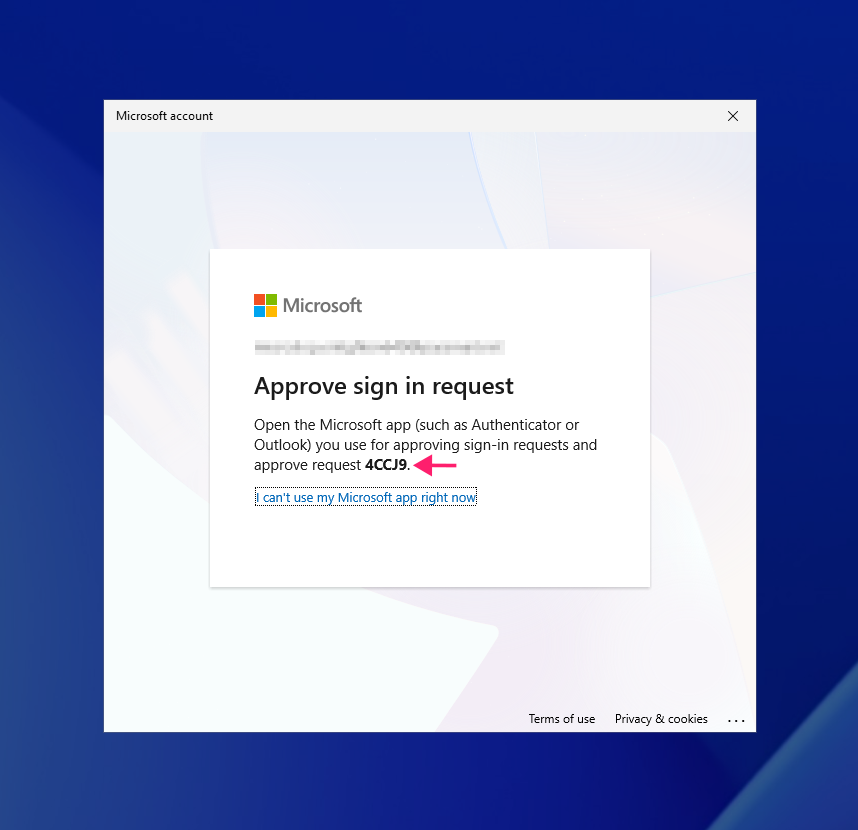
3. If two-step verification is enabled, approve the sign-in in the Authenticator app.
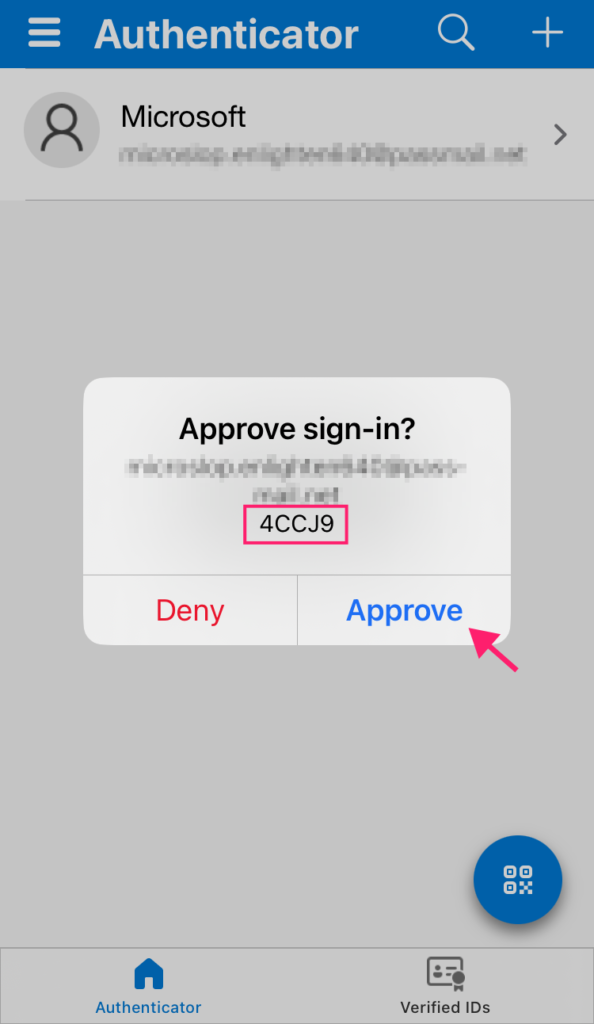
4. Confirm the PIN reset request.
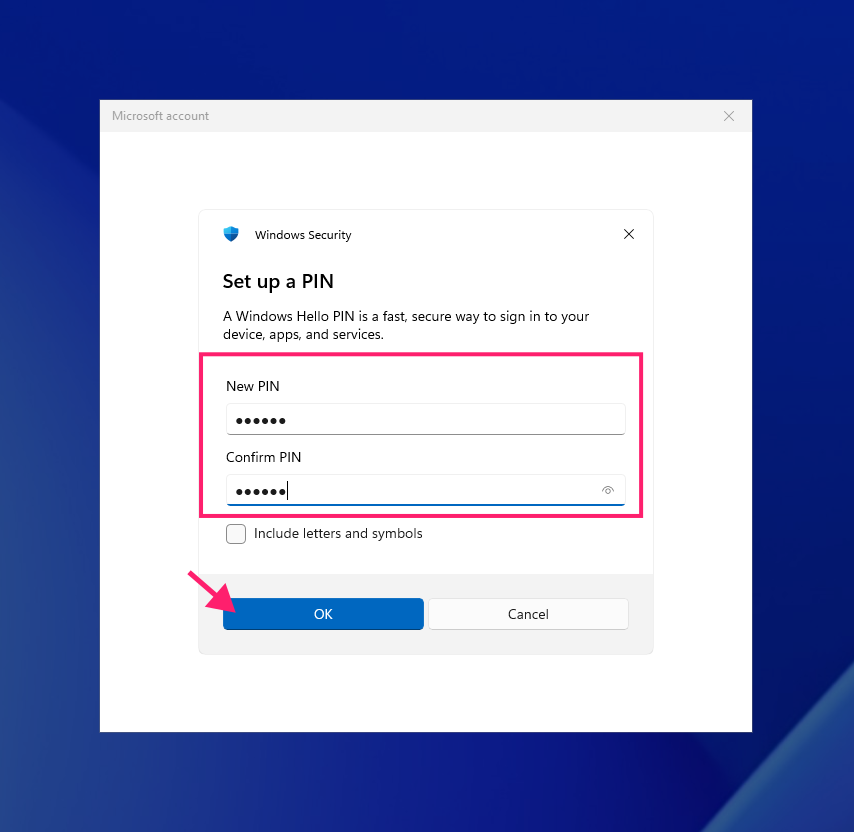
5. Enter your new PIN and click OK.
Solution 3: Boot into Safe Mode with Networking
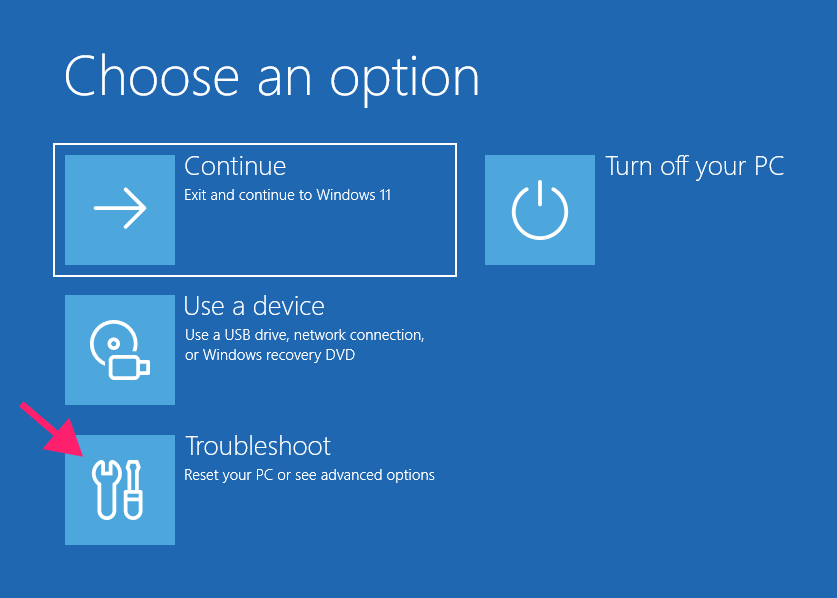
1. Click the Power button on the lock screen.
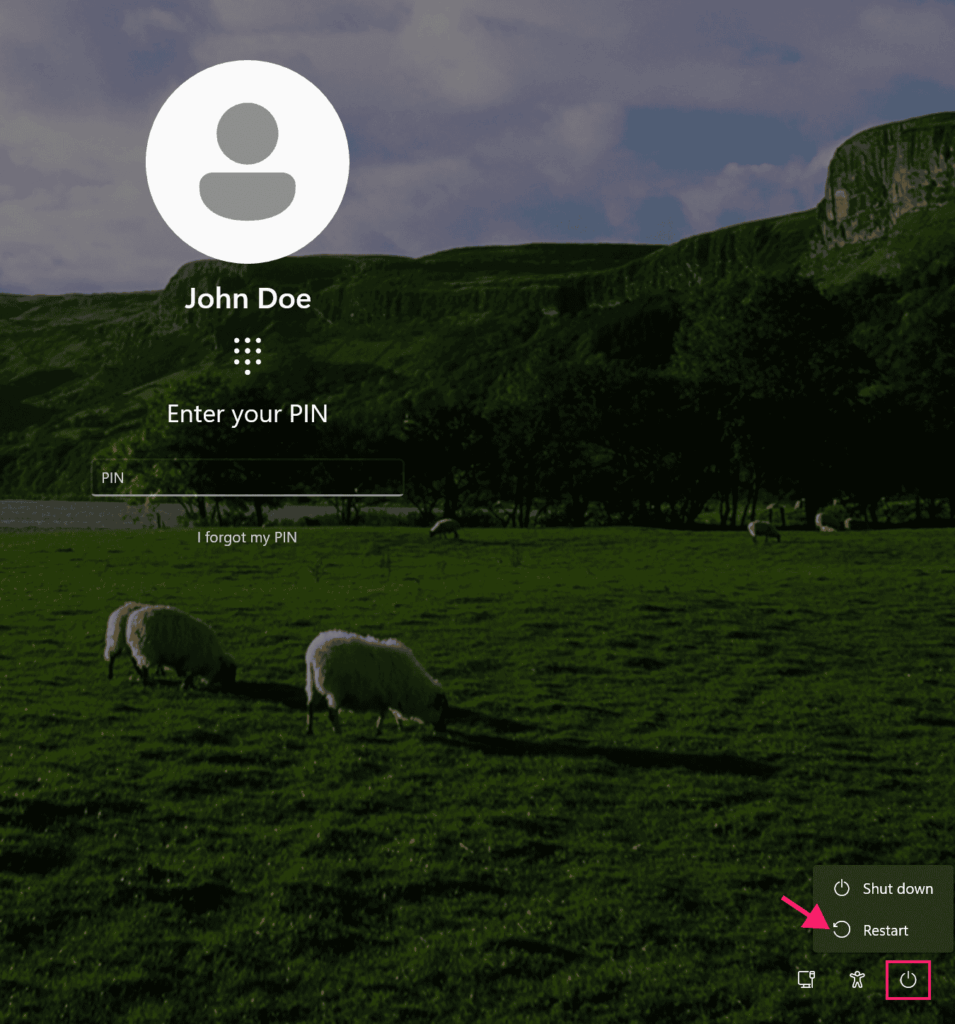
2. Press Restart while holding Shift. The system reboots into Windows Recovery Environment.
3. If locked out of the lock screen, force recovery through power on and hold the power button during the spinner animation. After 2 to 3 attempts, Windows enters recovery mode.

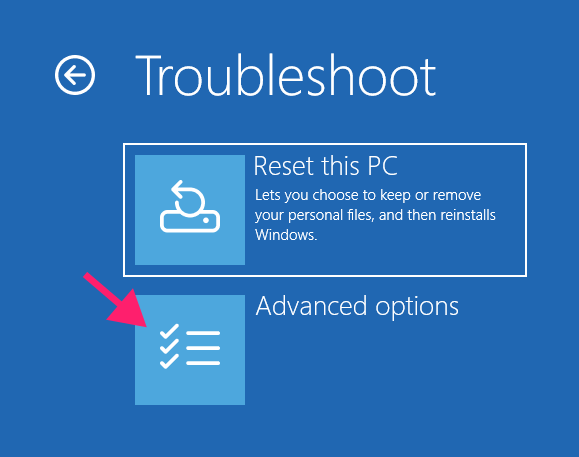
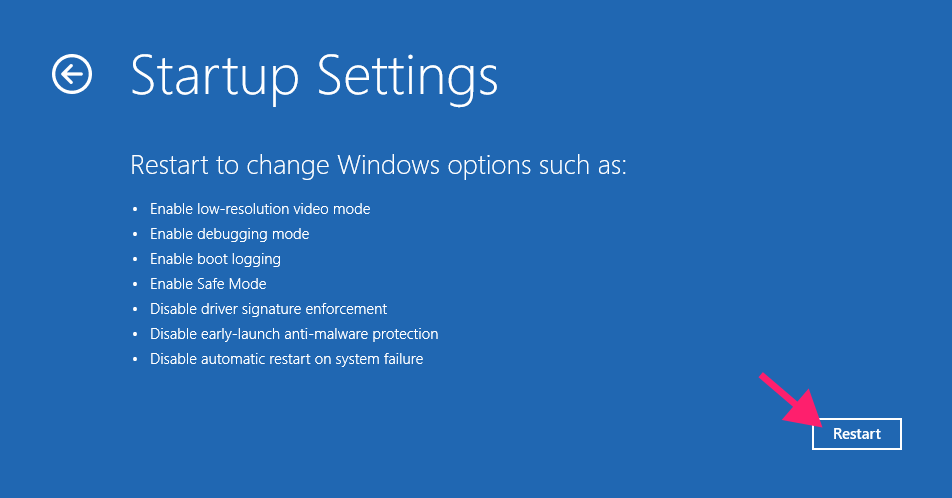
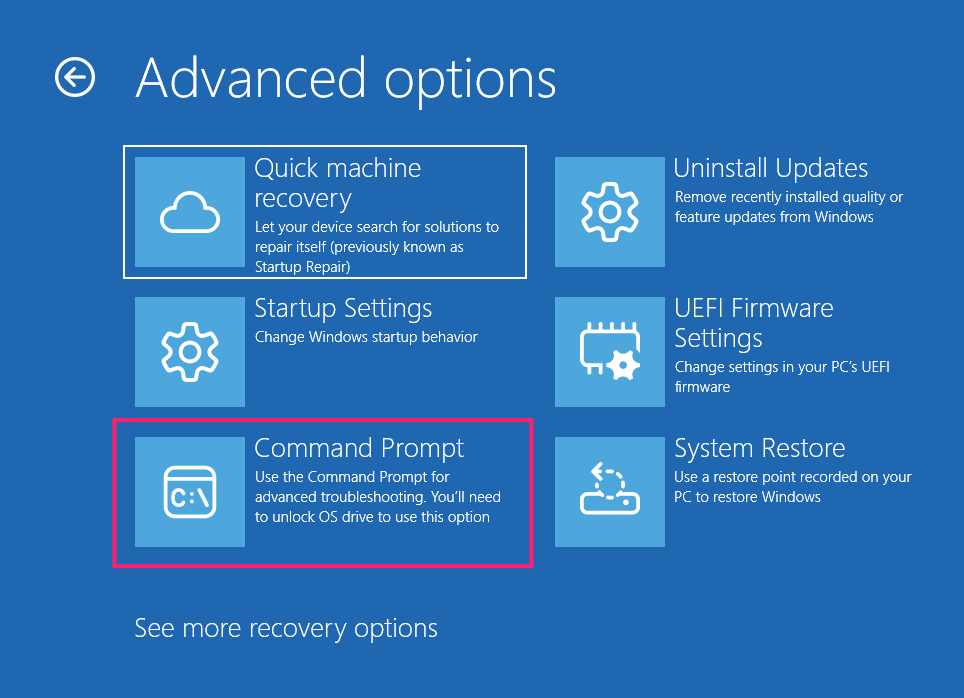
4. Select Troubleshoot > Advanced options > Startup settings
5. Select Startup settings.
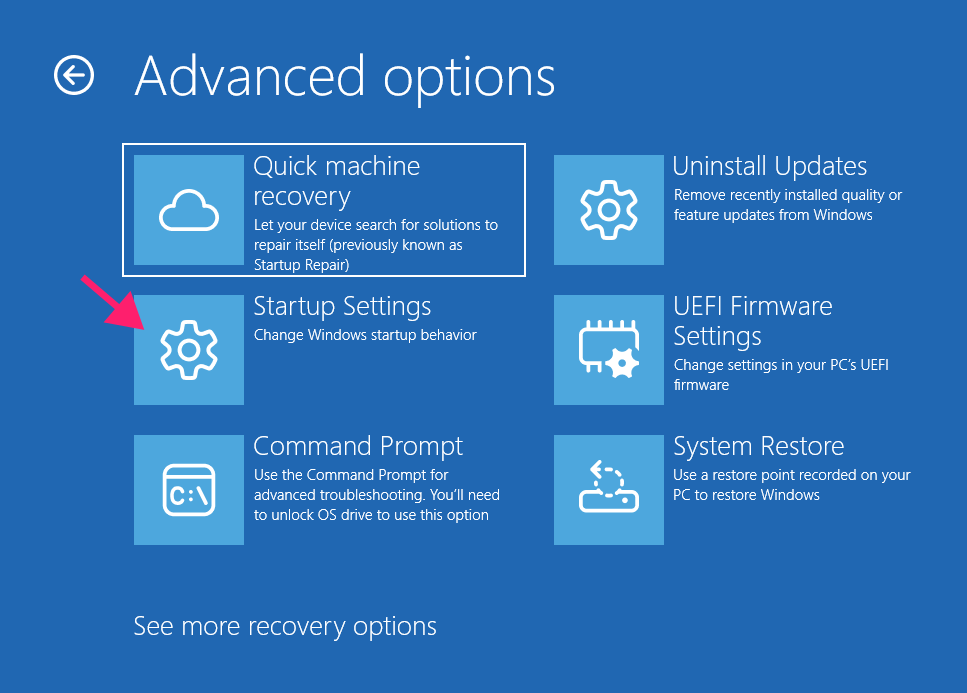
6. Click Restart.
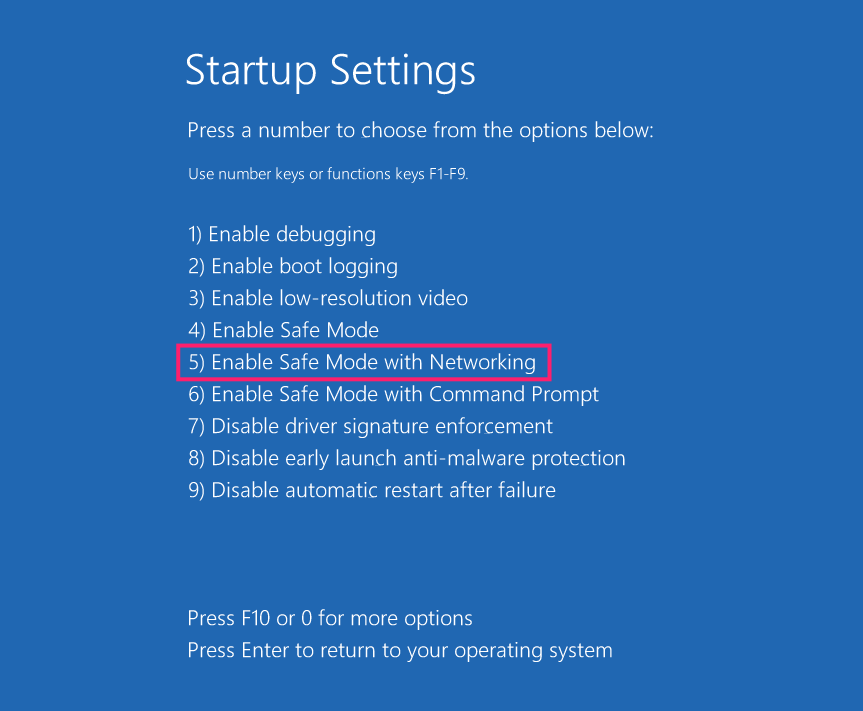
7. Press F5 to select “Enable Safe Mode with Networking” (entry 5).
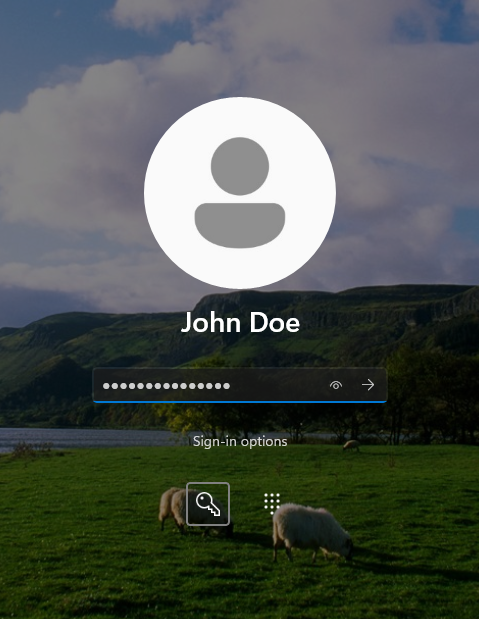
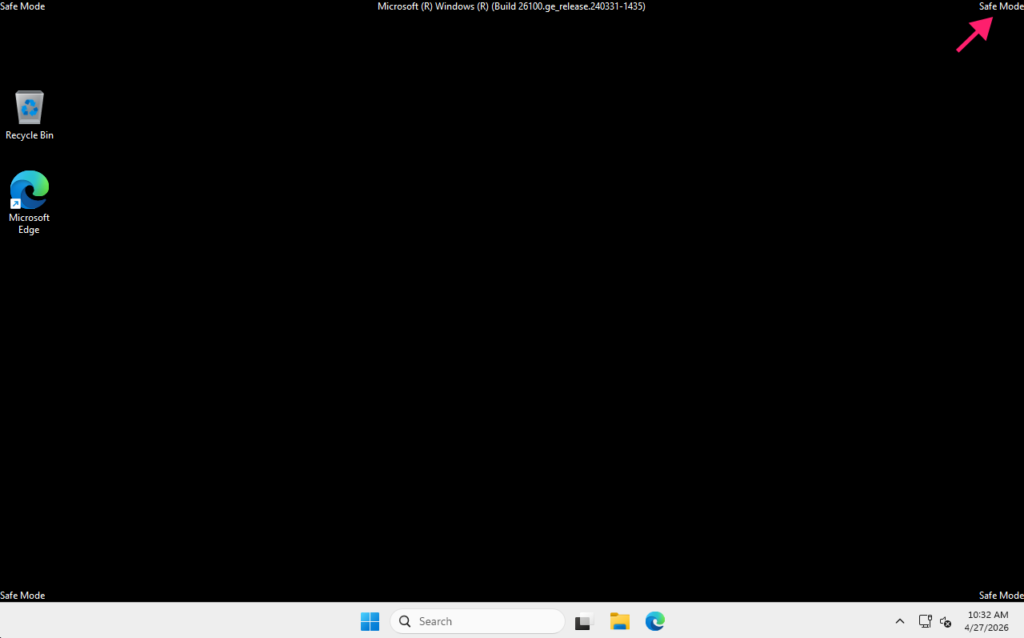
8. Windows uses locally cached credentials. Log in with your password if you previously logged in online.
Important: If you have “Only allow Windows Hello sign-in for Microsoft accounts” enabled, Safe Mode won’t work and you’ll have to try a different method.
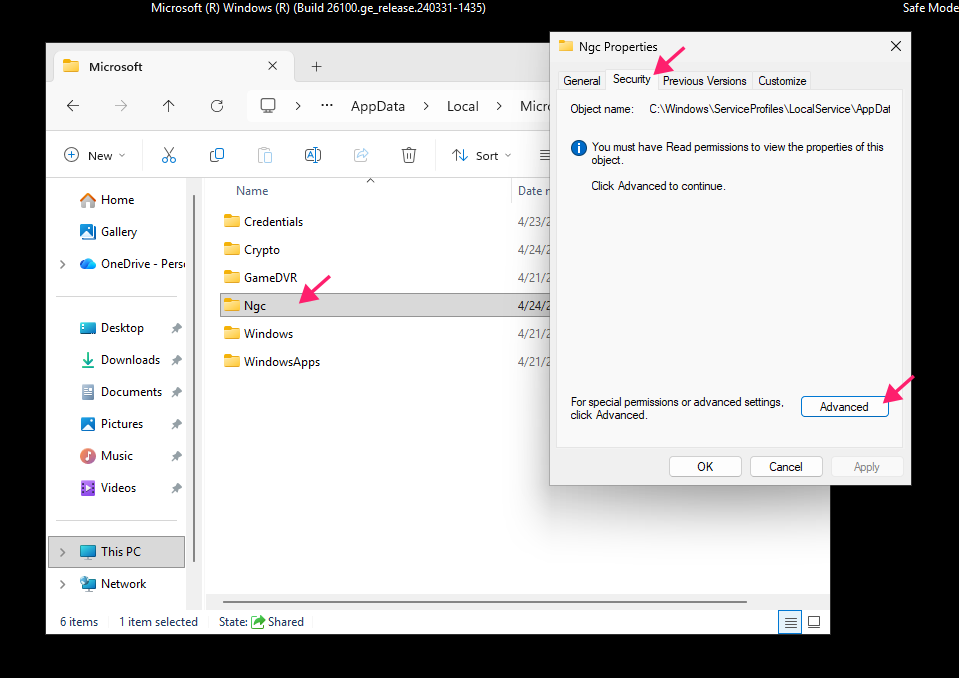
Solution 4: Delete the NGC folder
The NGC folder contains Windows Hello data, deleting it forces a new PIN setup.
File Explorer method
1. Navigate to C:\Windows\ServiceProfiles\LocalService\AppData\Local\Microsoft\ and right-click NGC > Properties >Security tab >Advanced.
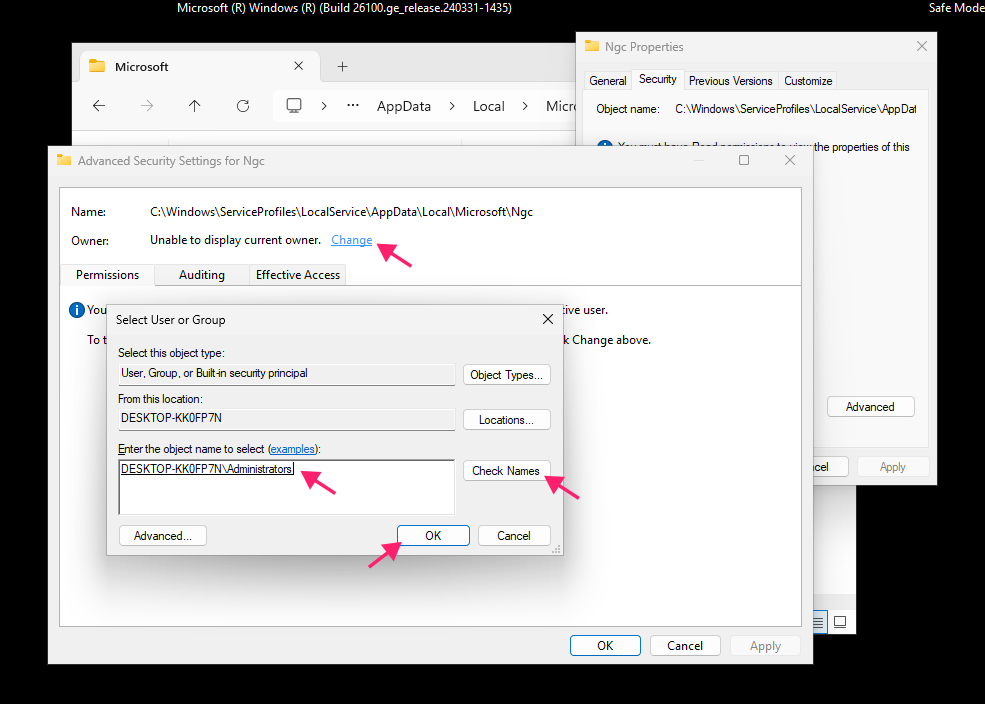
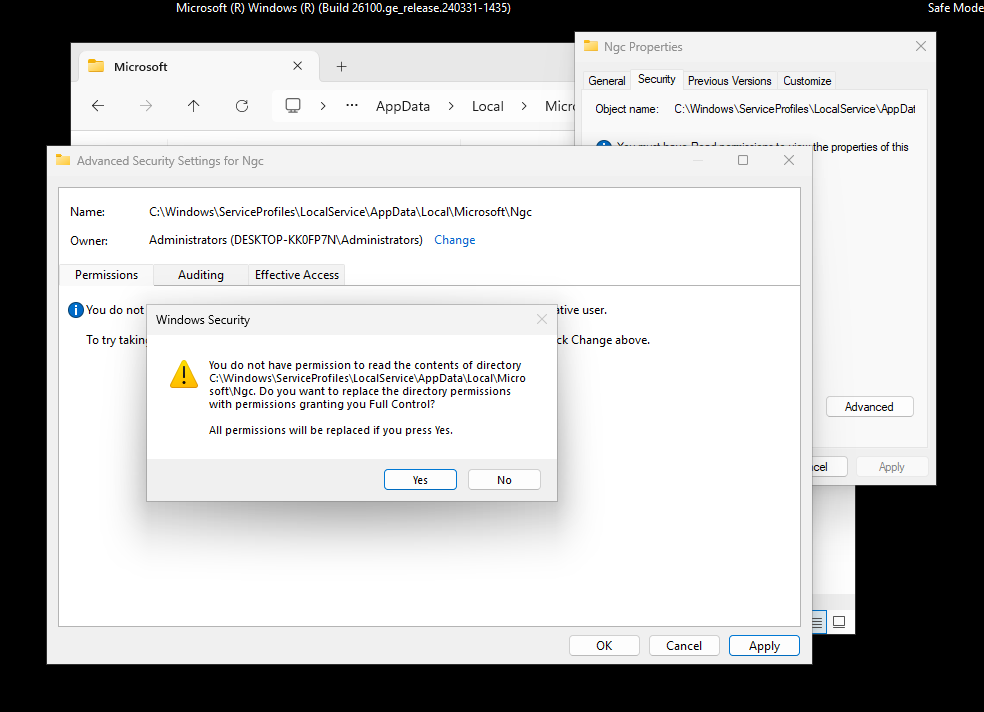
2. Click Change next to “Owner: Unable to display current owner.” Enter your Windows username or ‘Administrators’ > Check Names > OK.
3. Ensure “Replace owner on subcontainers and objects” is checked. Click Apply and Confirm the following prompts.
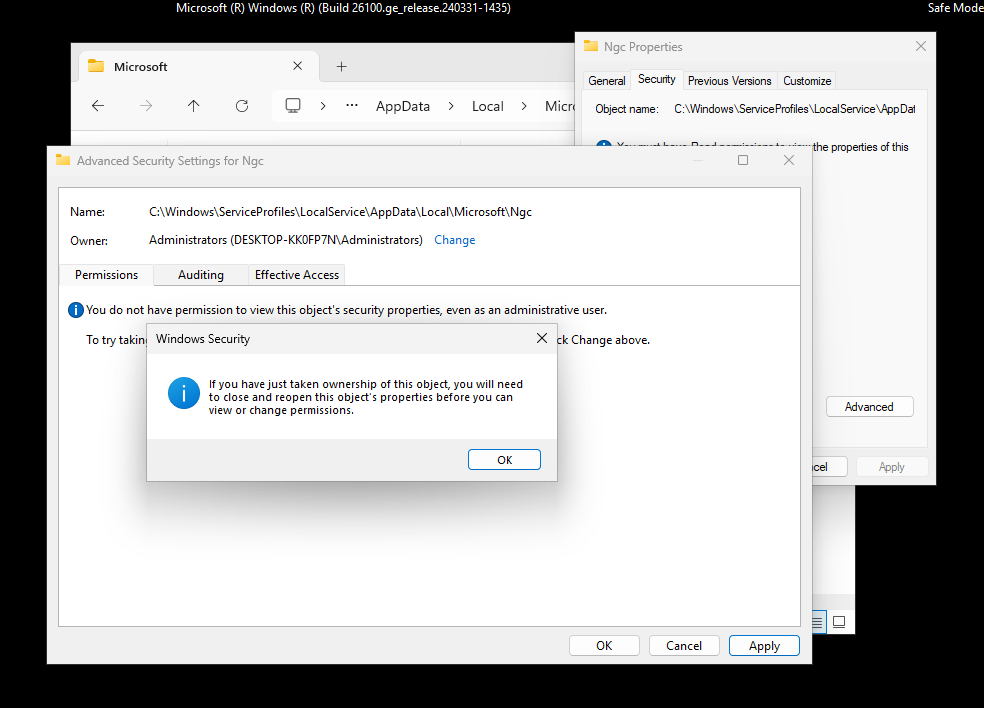
4. Ensure Full control is set. If not, click Edit and check the option.
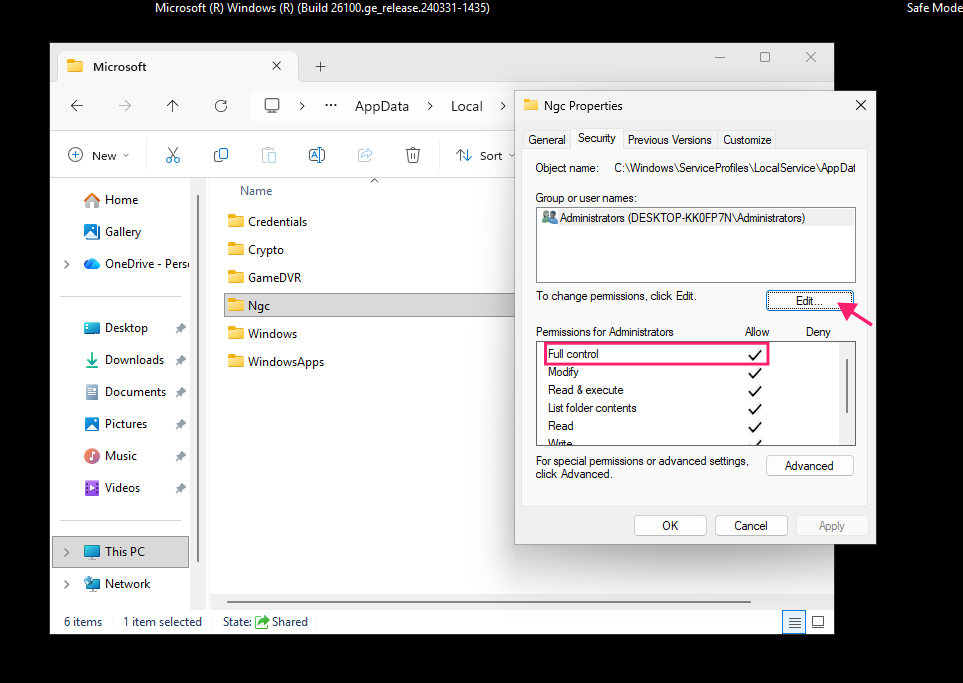
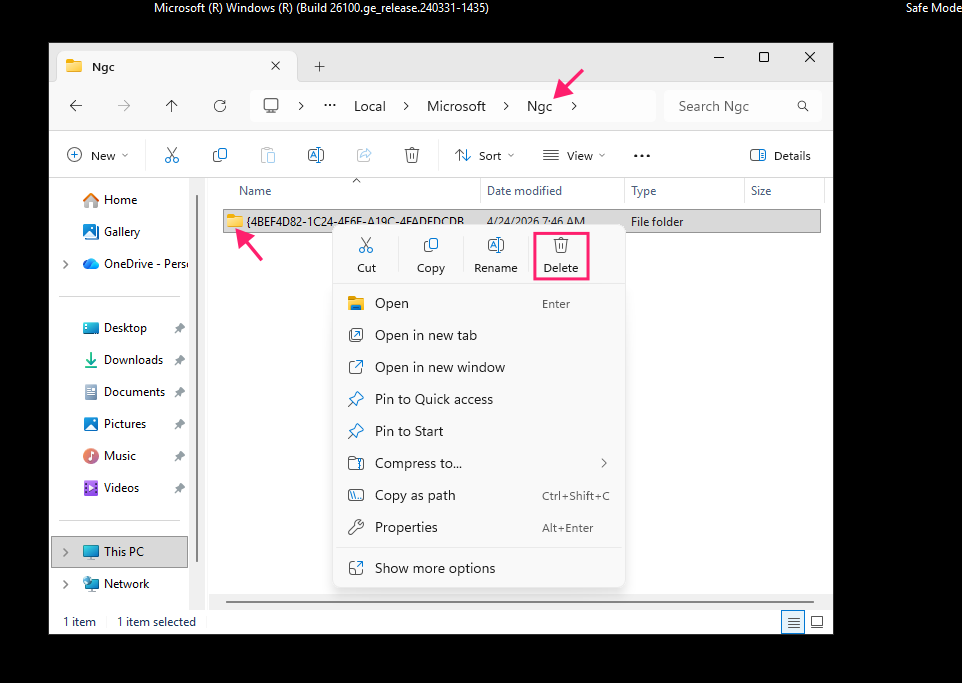
5. Open the NGC folder and delete the contents.
Command Prompt method
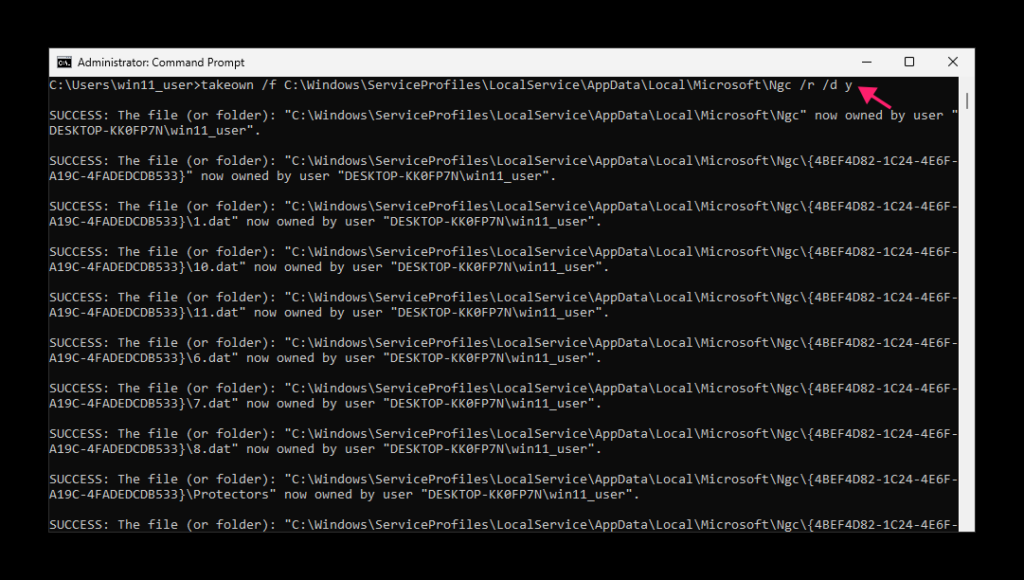
1. Open Command Prompt as administrator. Run:
takeown /f C:\Windows\ServiceProfiles\LocalService\AppData\Local\Microsoft\NGC /r /d y/fspecifies the file/folder./rapply to subdirectories recursively./d yanswer Yes at confirmation prompts.
2. Wait for the command to complete and then run: icacls C:\Windows\ServiceProfiles\LocalService\AppData\Local\Microsoft\NGC /grant administrators:F /t to grant Full control access.
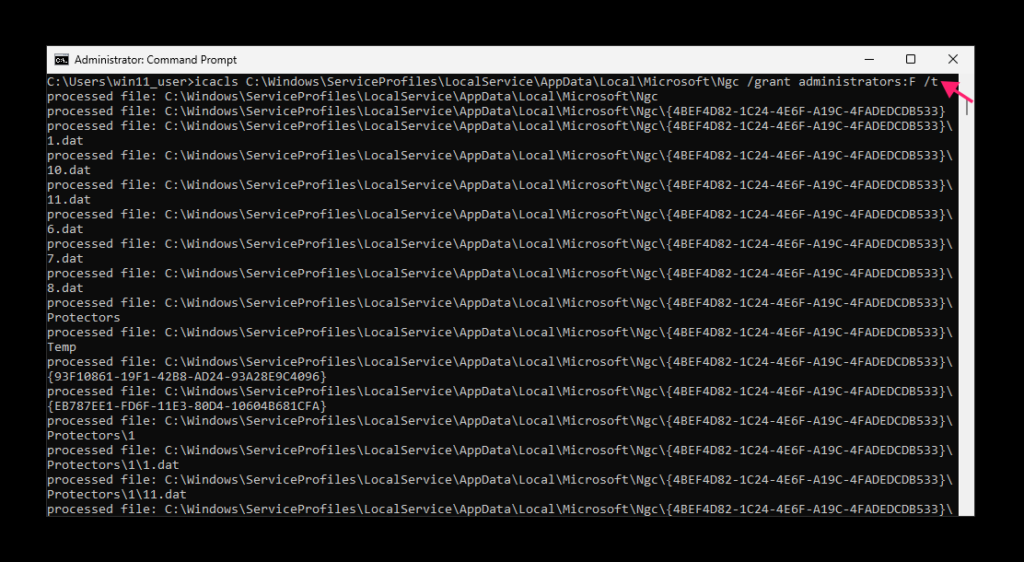
3. Next run: rd /s /q C:\Windows\ServiceProfiles\LocalService\AppData\Local\Microsoft\NGC
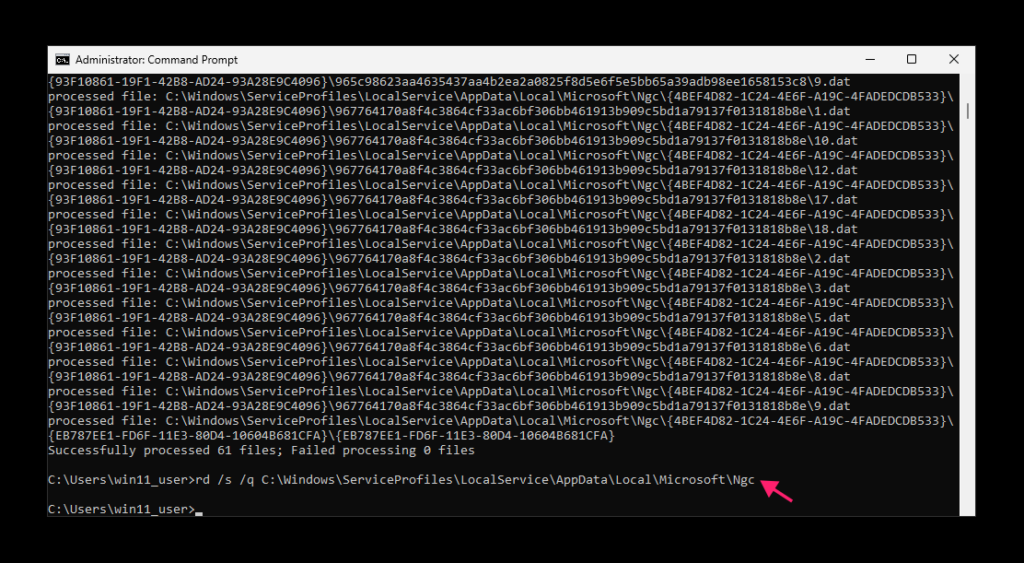
4. Restart the machine. You’ll be prompted for your password.
5. The PIN setup procedure starts automatically.
6. Enter your new PIN and click OK.
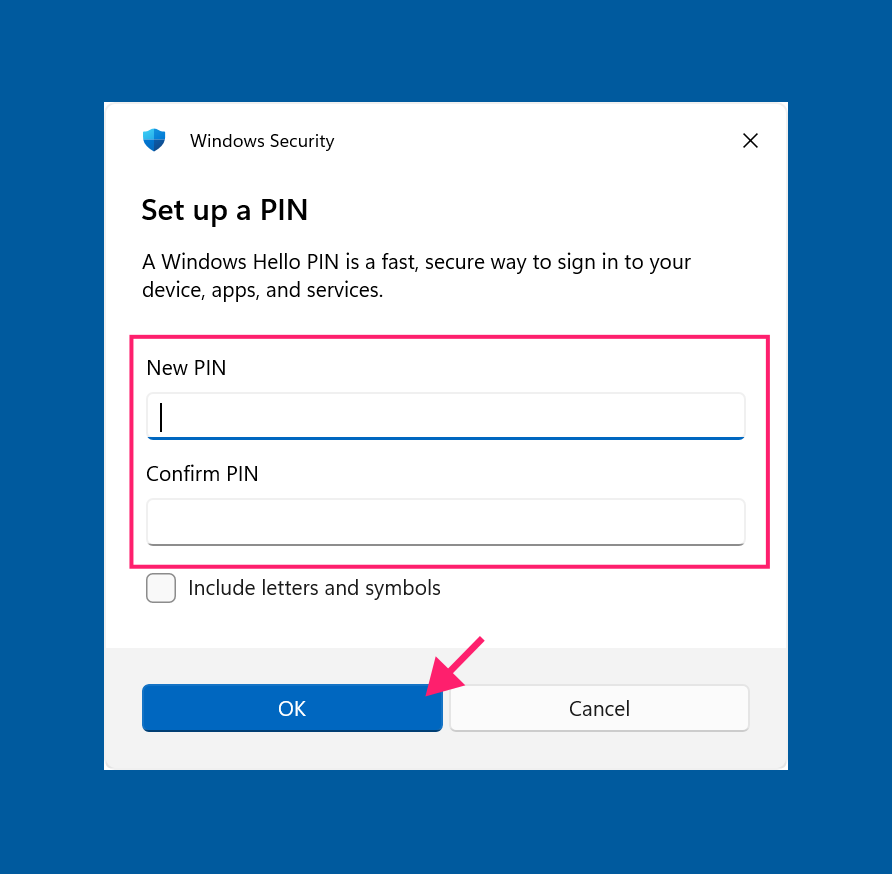
Important: If PIN setup doesn’t launch, go to Settings > Accounts > Sign-in options and create one manually.
Solution 5: Clear the TPM
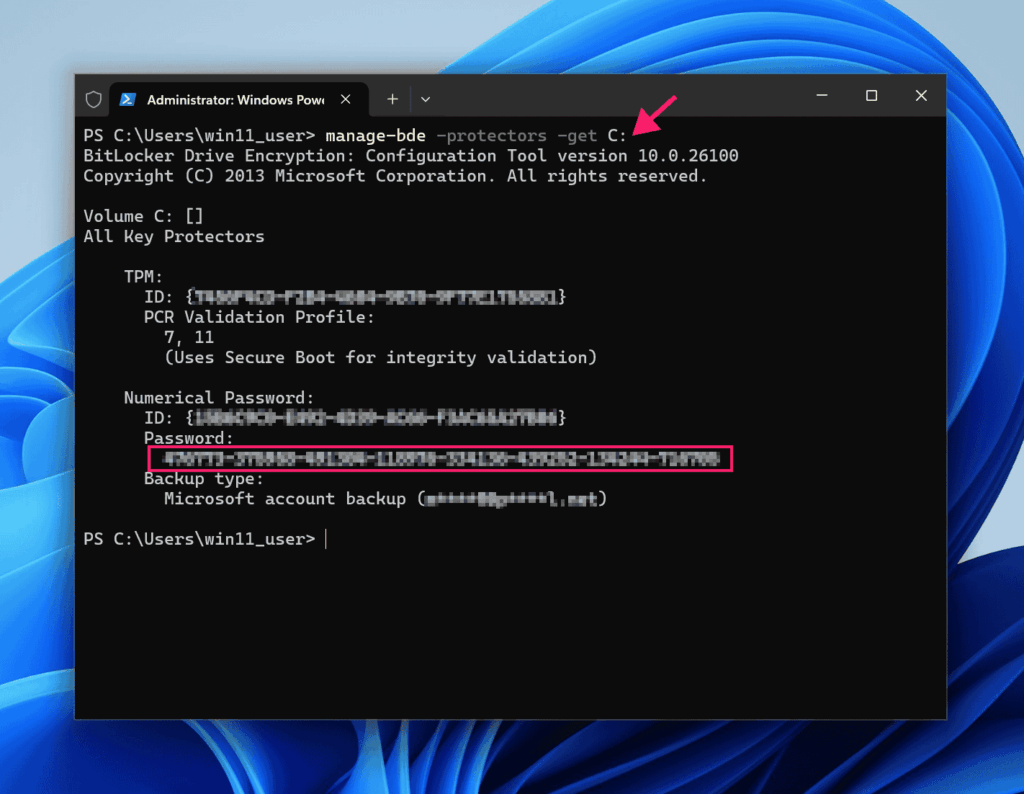
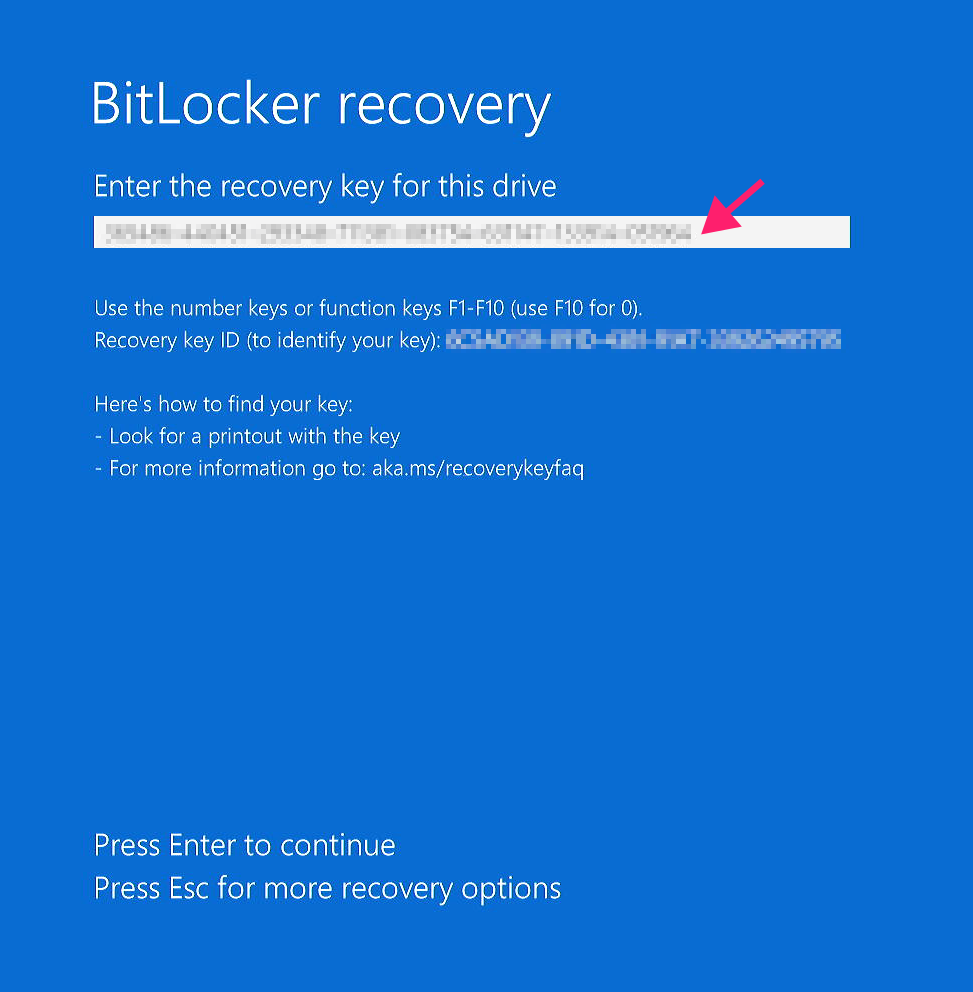
Before clearing, if BitLocker is on, get your Bitlocker recovery key or suspend BitLocker.
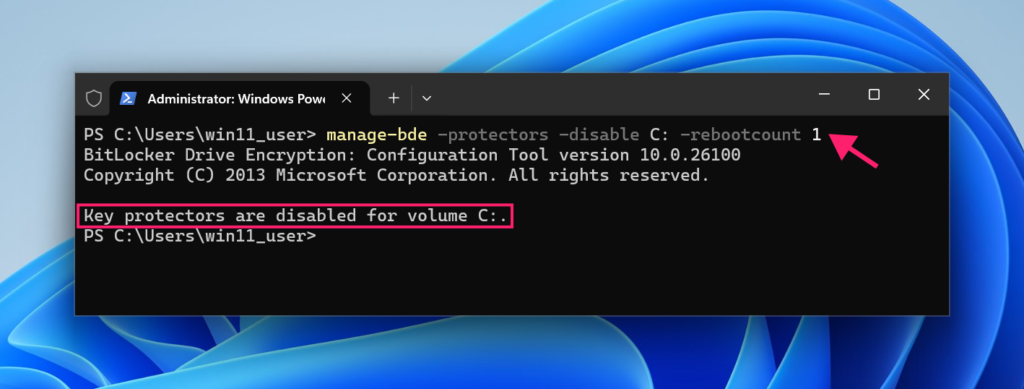
1. Run: manage-bde -protectors -get C: to check the recovery key status.
2. Then run: manage-bde -protectors -disable C: -rebootcount 1 to suspend BitLocker for one reboot.
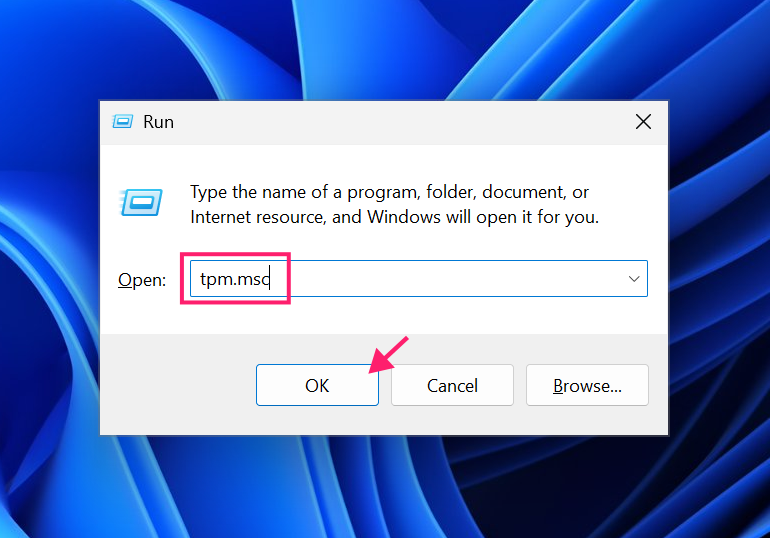
From Windows Settings
1. Press Win + R, type tpm.msc, press Enter.
2. The TPM Management Console opens. Click “Clear TPM” on the top right. Confirm by clicking Restart.
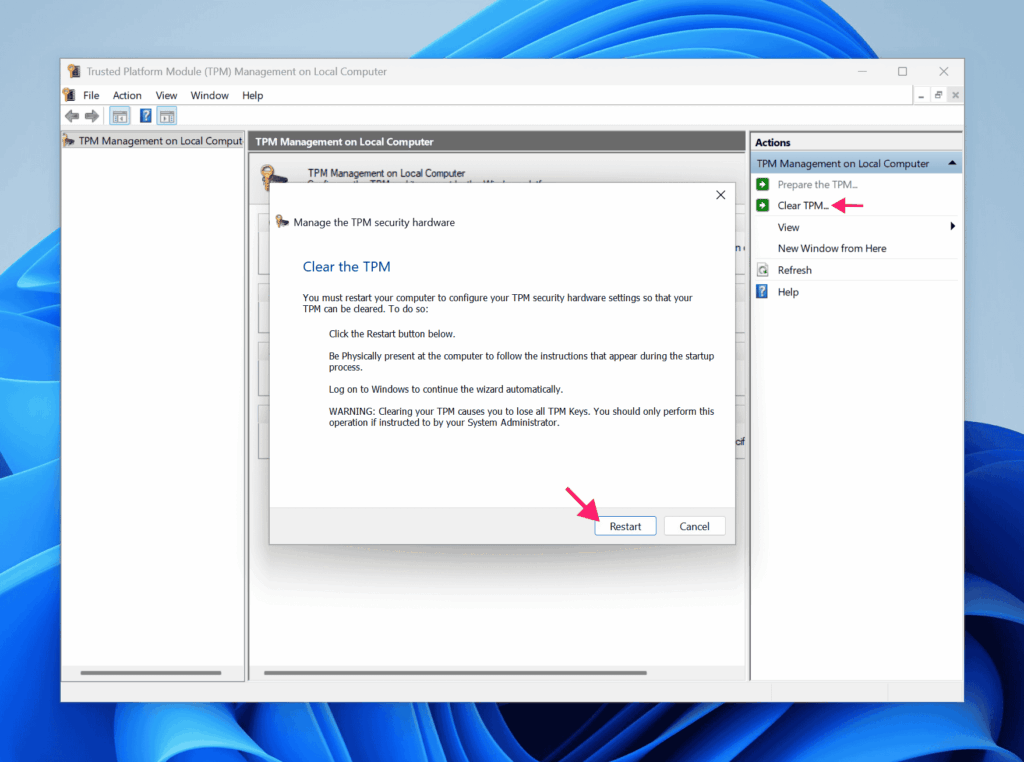
3. The system restarts. Follow any on-screen confirmation prompts.
» TPM not detected? Read our guide
From UEFI firmware
1. Press Del, F2, F10, or F12 during startup to enter UEFI.
2. Navigate to the Security section.
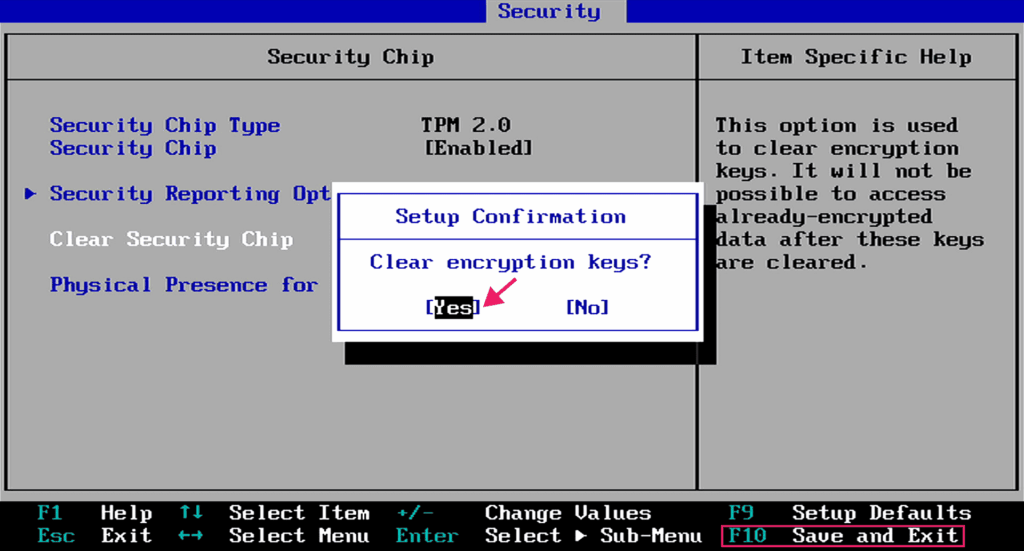
3. Find “Clear Security Chip” (name varies by manufacturer). You may see “Physical Presence for Clear” which prompts for confirmation.
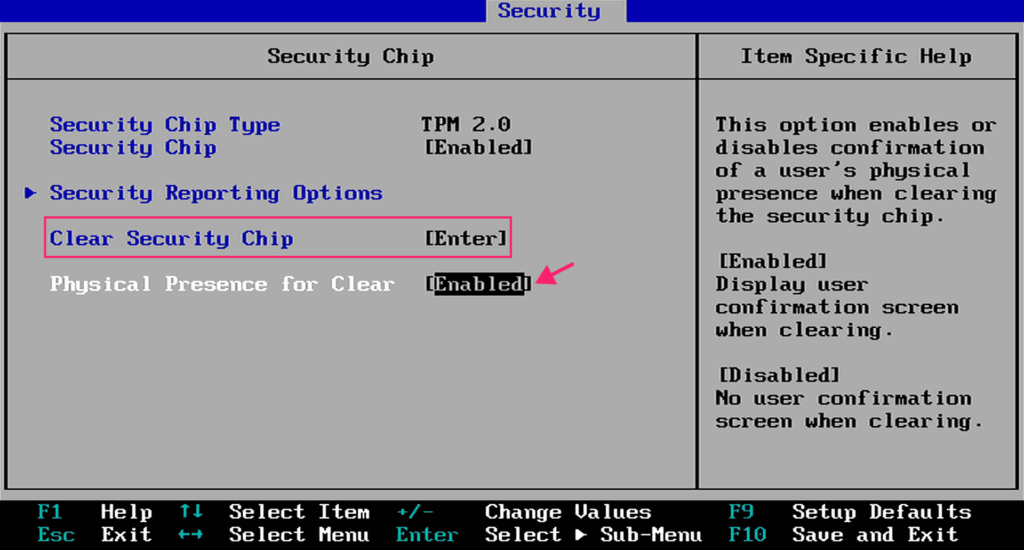
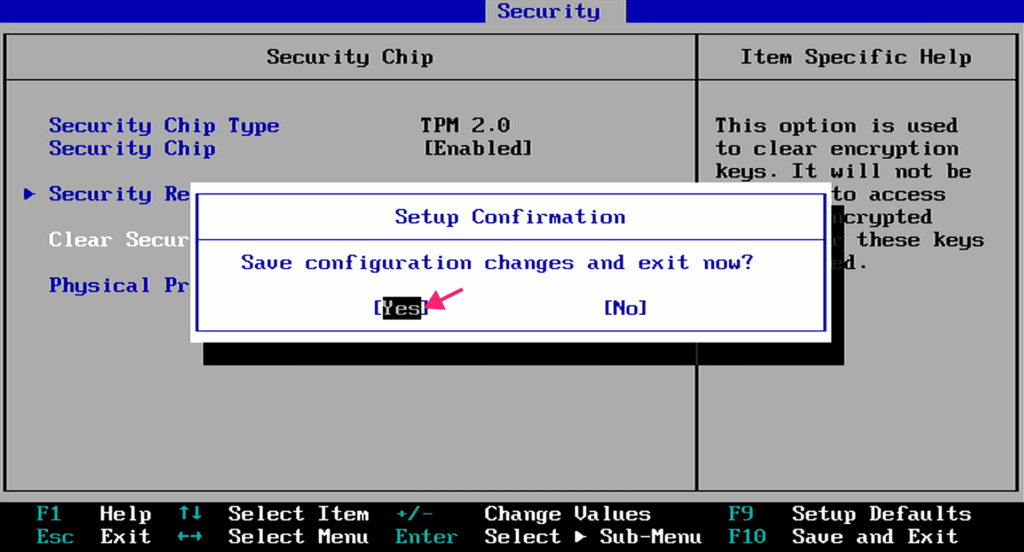
4. Confirm the clear. Select Save and Exit (F10).
5. If BitLocker was suspended before clearing TPM you will see the lock screen after the restart, otherwise you will have to enter the BitLocker key.
6. Enter your account password to set up the new PIN. If two-factor authentication is enabled on your account, approve the sign-in request in your Authenticator app.
Solution 6: Repair system files
If the above steps don’t work, corrupted Windows files might be the culprit. Use the Windows Recovery Environment to scan and repair.
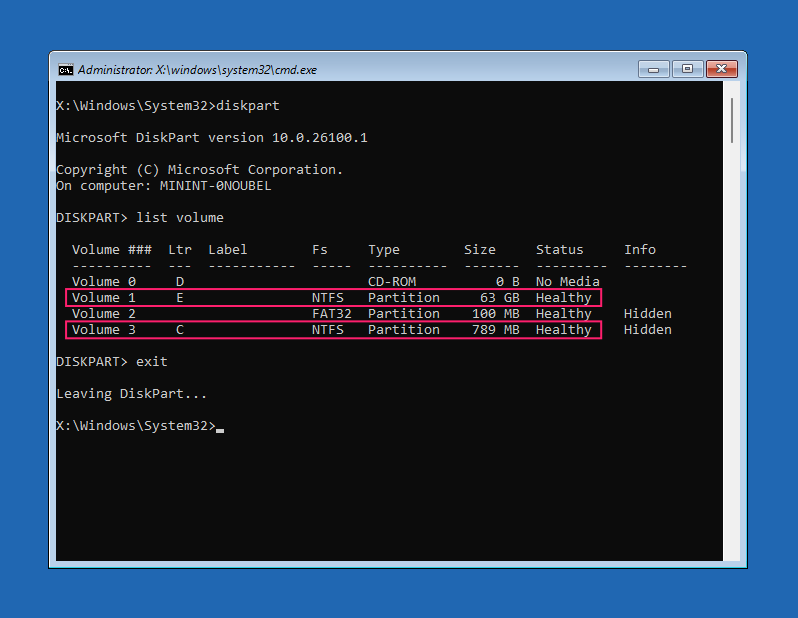
1. Boot into Windows Recovery Environment. Select Troubleshoot > Advanced options > Command Prompt.
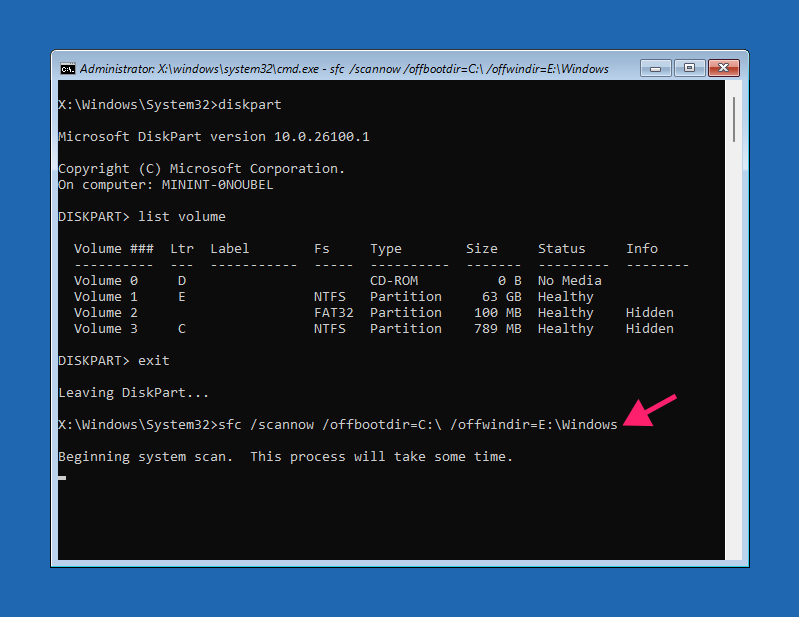
2. First, identify your Windows installation: Run diskpart and then list volume. Note which drive has Windows installed and where the bootloader is located by Size, Label, and Filesystem.
3. Type exit to leave diskpart. Run: sfc /scannow /offbootdir=C:\ /offwindir=E:\Windows
4. Replace the drive letters with your actual Windows and boot drives. This verifies protected system files and replaces any corrupted login or credential provider files.
5. Run: dism /image:E:\ /cleanup-image /restorehealth. Replace E: with your Windows drive.
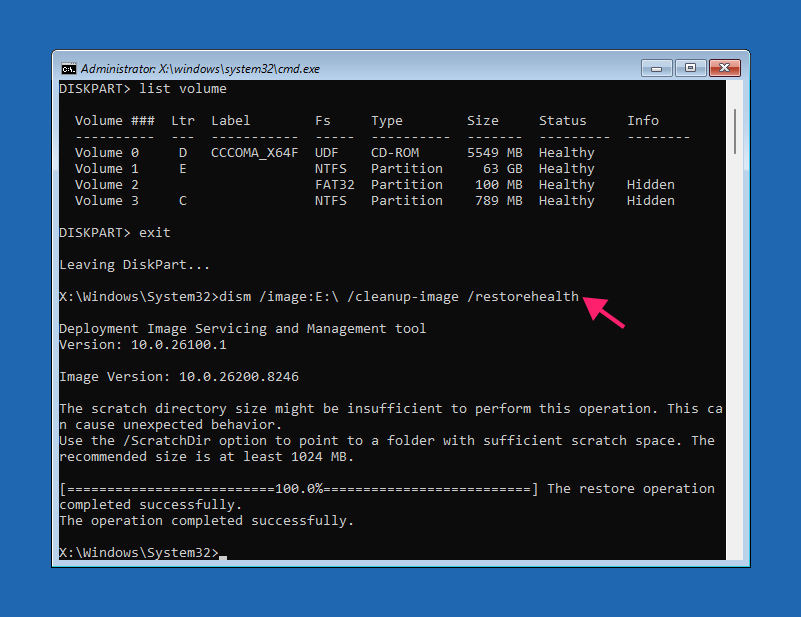
6. If the system is offline or can’t find necessary files, you may need a Windows installation USB. First, identify the index running: dism /get-wiminfo /wimfile:E:\sources\install.wim and then run: dism /image:E:\ /cleanup-image /restorehealth /source:wim:D:\sources\install.wim:6 /limitaccess . Replace the drive letters and index number (example: 6) accordingly.

7. Reboot your system. If both scans complete successfully but authentication problems persist, the issue likely isn’t corrupted system files.
» Learn more about the DISM command in Windows 11
Solution 7: Reset Windows Hello policies via Intune or Group Policy
For organizations managing multiple machines, reset Windows Hello for Business policies across your domain.
Microsoft Intune
1. Sign in to Intune admin center and go to Devices > Scripts and remediations. Create a script package (detection & remediation).
Detection template:
The Script:
Atera does not guarantee the integrity, availability, security, virus-free, safety, lawfulness, non-infringement, rights’ status, or functionality of the scripts. The use of the shared scripts is at your own risk. Scripts are provided “AS IS”. *
# current user SID
try {
    $crtUsrSid = [Security.Principal.WindowsIdentity]::GetCurrent().User.Value
} catch {
    exit 0
}
if (-not $crtUsrSid) {
    exit 0
}
# NGC path (Windows Hello container)
$ngcPath = "C:\Windows\ServiceProfiles\LocalService\AppData\Local\Microsoft\NGC\$crtUsrSid"
# check if Hello container exists and is populated
if (Test-Path $ngcPath) {
    $items = Get-ChildItem -Path $ngcPath -Recurse -ErrorAction SilentlyContinue
    if ($items.Count -gt 0) {
        Write-Output "Windows Hello container detected."
        exit 1
    }
}
exit 0Remediation template:
The Script:
Atera does not guarantee the integrity, availability, security, virus-free, safety, lawfulness, non-infringement, rights’ status, or functionality of the scripts. The use of the shared scripts is at your own risk. Scripts are provided “AS IS”. *
        try {
    # double-check presence before attempting deletion
    $crtUsrSid = [Security.Principal.WindowsIdentity]::GetCurrent().User.Value
    $ngcPath = "C:\Windows\ServiceProfiles\LocalService\AppData\Local\Microsoft\NGC\$crtUsrSid"
    if (-not (Test-Path $ngcPath)) {
        Write-Output "No Windows Hello container found. Nothing to remediate."
        exit 0
    }
    # actual reset
    $process = Start-Process -FilePath "certutil.exe" `
        -ArgumentList "-DeleteHelloContainer" `
        -Wait -PassThru -WindowStyle Hidden
    if ($process.ExitCode -eq 0) {
        Write-Output "Windows Hello container deleted successfully."
        exit 0
    } else {
        Write-Output "certutil failed with exit code $($process.ExitCode)"
        exit 1
    }
}
catch {
    Write-Output "Remediation error: $_"
    exit 1
}2. Set “Run this script using the logged on credentials” to Yes.
3. In the Assignments tab, assign this to the affected device group. At next login, old PIN data deletes and Windows Hello re-enrollment prompts.
4. Optional: Add a remediation flag to track which users already performed the reset (prevents resetting every time the script runs).
Detection:
The Script:
Atera does not guarantee the integrity, availability, security, virus-free, safety, lawfulness, non-infringement, rights’ status, or functionality of the scripts. The use of the shared scripts is at your own risk. Scripts are provided “AS IS”. *
[...]
$flagPath = "HKCU:\Software\CompanyName\WHReset"
$flagName = "ResetDone"
try {
$flag = Get-ItemProperty -Path $flagPath -Name $flagName -ErrorAction Stop
if ($flag.$flagName -eq 1) {
# reset was performed
exit 0
}
} catch {
# flag not present, continue
}Remediation:
The Script:
Atera does not guarantee the integrity, availability, security, virus-free, safety, lawfulness, non-infringement, rights’ status, or functionality of the scripts. The use of the shared scripts is at your own risk. Scripts are provided “AS IS”. *
        [...]
$flagPath = "HKCU:\Software\CompanyName\WHReset"
$flagName = "ResetDone"
if (-not (Test-Path $flagPath)) {
New-Item -Path $flagPath -Force | Out-Null
}
New-ItemProperty -Path $flagPath `
-Name $flagName `
-Value 1 `
-PropertyType DWORD `
-Force | Out-Null
Write-Output "Reset flag set."
exit 0» Compare Atera and Microsoft Intune in our detailed guide
Group Policy
The remediation script can be added as a logon script:
1. Open Group Policy Editor and go to User Configuration > Policies > Windows Settings > Scripts (Logon/Logoff) > Logon.
2. Add the remediation script as a PowerShell script (ensure the location is accessible).
3. In the same GPO, enable User Configuration > Administrative Templates > Windows Components > Windows PowerShell > Turn on Script Execution > Allow local scripts and remote signed scripts.
Note: The script runs after logon, so re-enrollment happens at next login.
» Learn more about group policy management with Atera
Solution 8: Rebuild your Windows profile (last resort)
If all other steps fail, regain access to your data by rebuilding your profile.
1. Boot into WinRE Command Prompt or use an account with administrator privileges.
2. Identify the Windows drive.
3. Back up your user profile: robocopy D:\Users\Username F:\Backup\Username /E /XD AppData\Local\Microsoft\NGC /COPYALL /XJ /R:1 /W:1 /LOG:F:\Backup\backup_log.txt. Replace drive letters accordingly. This skips the NGC folder (which cannot be restored) and preserves other data.
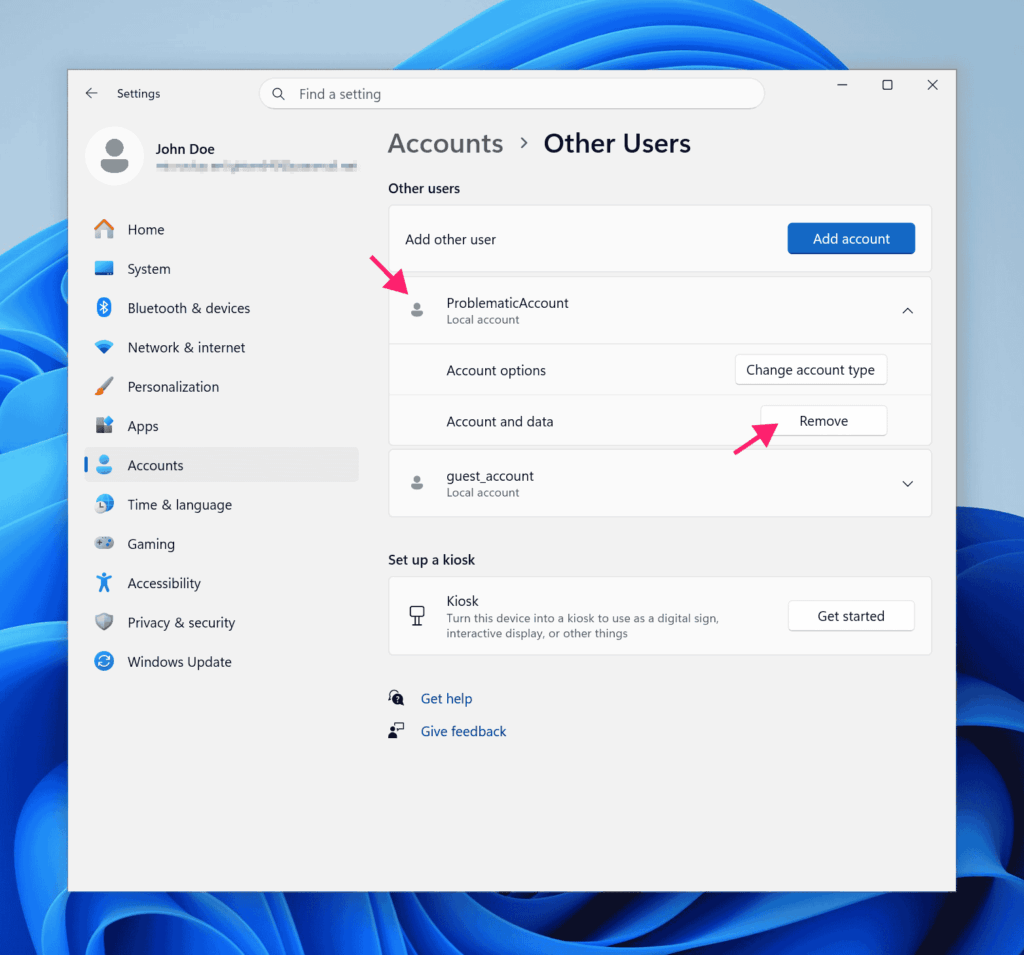
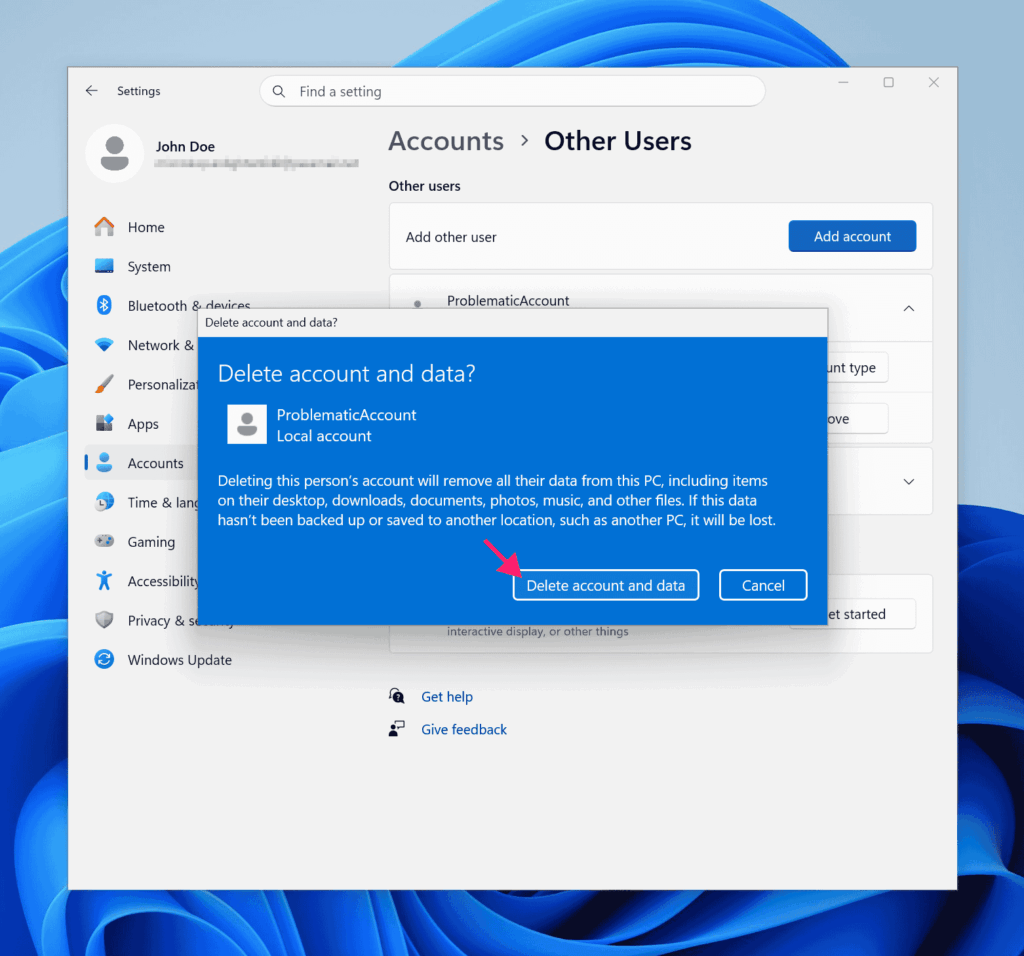
4. Go to Settings > Accounts > Other Users. Select the problematic username and click Remove, then confirm.
5. Recreate the user by clicking Add account. Alternatively, from Command Prompt run: net user username password /add
followed by: net localgroup administrators username /add (replace username and password accordingly).
6. Migrate your backup: robocopy "D:\Backup\olduser" "C:\Users\newuser" /E
Warning: Restoring the entire folder could reintroduce the original problem. Selectively copy only required configuration files and data instead.
7. Fix permissions: icacls "C:\Users\username" /setowner username /T /C. This ensures the user can control their directory.
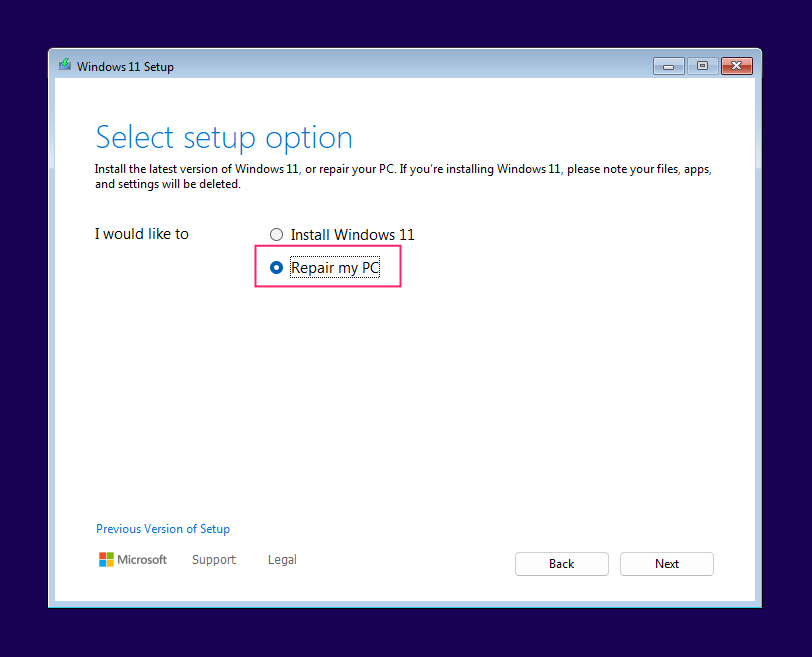
8. As a last resort, boot from an installation USB and select Repair my PC.
» Learn more about Automatic Repair in Windows 11
A smarter fix starts at the platform level
Most IT platforms can push patches and run scripts, but they still depend on your team to define every rule, write every workflow, and anticipate every failure scenario. That’s fine until your ticket queue starts filling up with the same PIN error across a dozen machines and nobody has time to chase it down.
Atera approaches this differently with Autonomous IT. Rather than relying on static rules, its AI agents learn from real interactions and improve over time. Robin by Atera handles end-user PIN issues directly, checking account status, guiding users through resets, and confirming resolution without pulling a technician in. AI Copilot gives technicians script generation, instant ticket summaries, and the context to spot whether a PIN failure is a one-off or something spreading across the environment.
Related Articles

How to fix the “Reboot and select proper boot device” error
Your machine won't boot. The screen is black, the error is cryptic, and the instinct is to start hammering repair tools. That instinct is usually what turns a fixable problem into a real one. Most boot device errors come down to a cable, a BIOS setting, or a corrupted bootloader instead of a dead drive.
Read now
How to enable or disable the Notification Center in Windows 11
275 interruptions a day. That's what Microsoft's own data says the average employee absorbs before Windows starts layering in its own alerts, banners, and badges. The Notification Center has more control options than most people use: per-app rules, Focus sessions, Do Not Disturb, Group Policy, registry edits, and PowerShell automation. Here's how to use all of them.
Read now
How to remove OneDrive from File Explorer
OneDrive is woven into Windows more deeply than it looks. Unlink it without preparation and you lose AutoSave, version history, shareable links, and any cloud-only files that never made it to local storage. Done right, removal is clean and permanent.
Read now
How to enable and disable kernel mode
Privilege escalation made up 40% of all Microsoft vulnerabilities last year. Kernel-Mode Hardware-Enforced Stack Protection exists specifically to stop it, it's already built into Windows, and most teams have never enabled it. Here's every method to turn it on, verify it's running, and handle the driver conflicts that get in the way.
Read nowEndless IT possibilities
Boost your productivity with Atera’s intuitive, centralized all-in-one platform