
Generate summary with AI

With three RDP sessions, a ticket queue, and a knowledge base article open at the same time, they probably don’t fit on one screen without constant alt-tabbing or manual resizing. Learning how to split your screen on Windows fixes that in seconds. It’s a small friction, but it adds up across a shift, and it’s exactly the kind of problem Windows already has a built-in answer for.
Snap, Snap Assist, keyboard shortcuts, and Snap Layouts are Windows’ native tools for splitting your screen, so you don’t have to drag windows into place by hand every time you switch context. Here’s how to use them easily.
» Tab switching not working? Here’s how to fix Alt+Tab not working
Getting your system ready to split screens
Before you can split your screen reliably, Snap and Snap Assist actually need to be able to work, since a disabled toggle or a specific display/app combination can make snapping seem broken when it’s really just unavailable.
First, you need to verify and configure your Multitasking settings:
- Press
Win + Ito open Settings - Navigate to System > Multitasking
- Confirm the Snap windows toggle is turned on
On Windows 11, click the v icon next to the toggle to expand the section and review the additional Snap Assist options underneath it

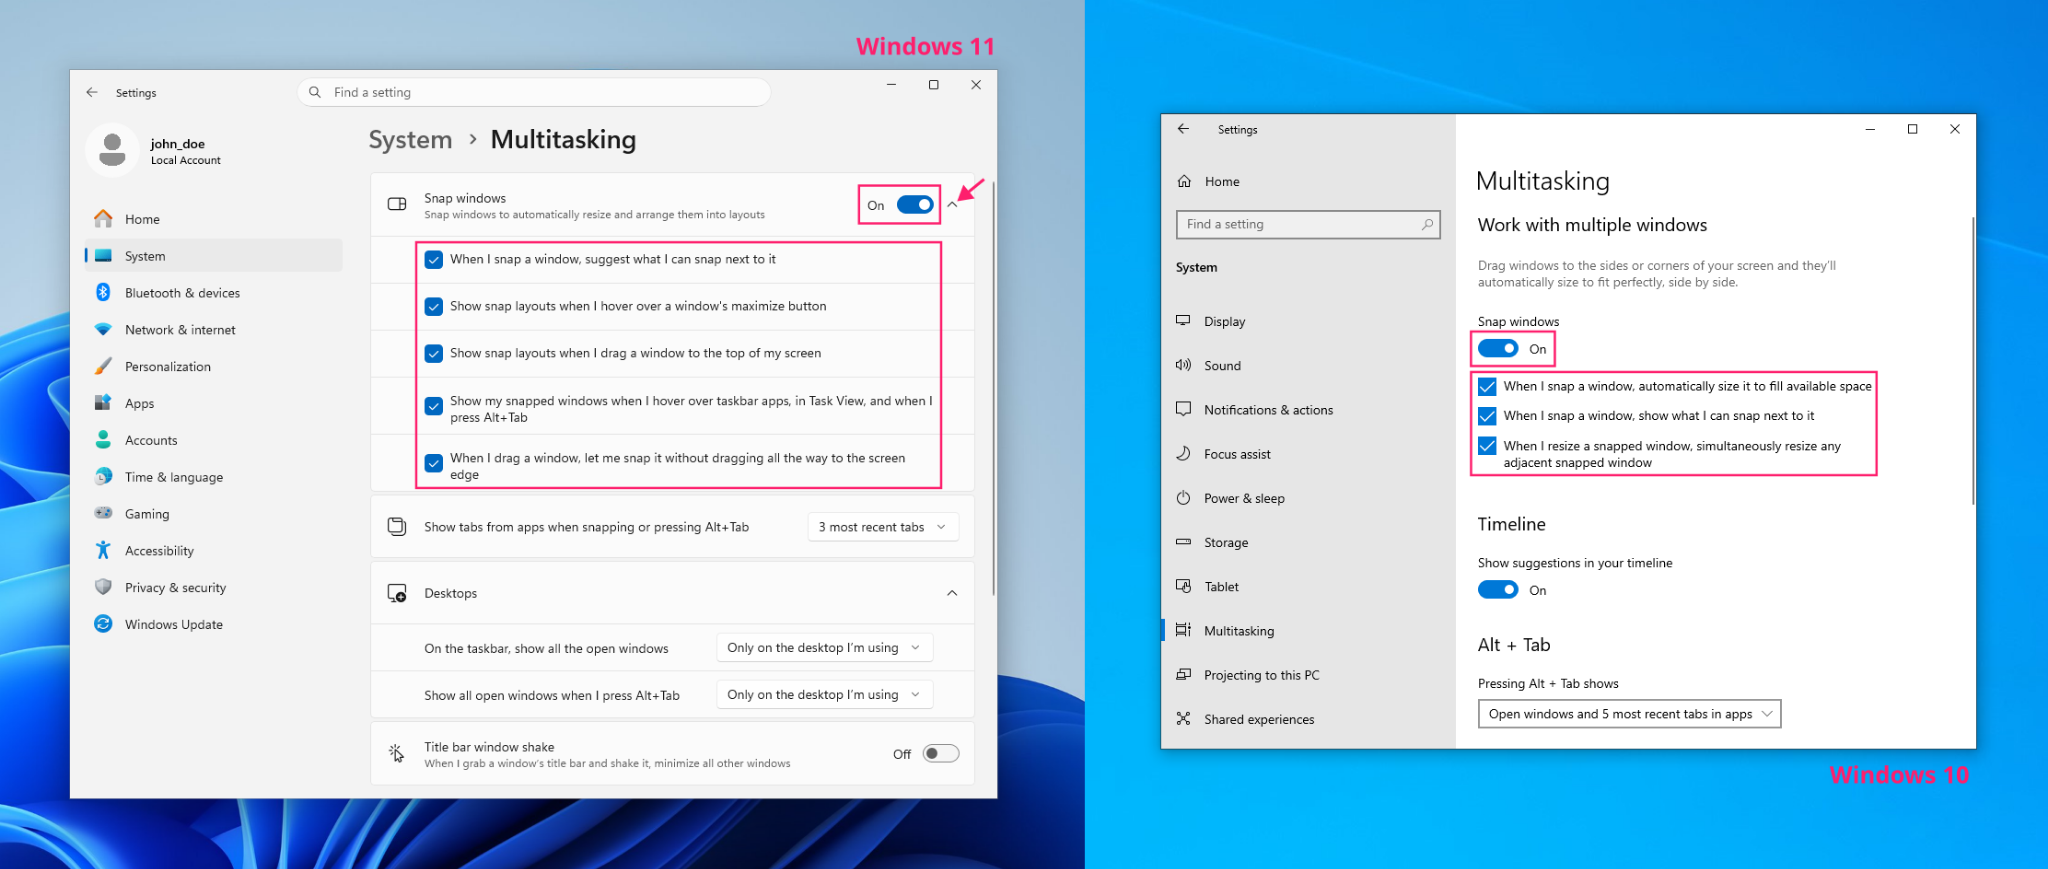
With Snap windows enabled, the settings in this expanded section control how Snap Assist behaves once you actually start snapping windows, which is covered later in this guide.
Display and app limitations
Snapping isn’t guaranteed to work on every device or with every application. Microsoft doesn’t publish specific resolution or aspect ratio thresholds for snapping itself, but there are some practical requirements:
- Windows 11 requires at least a 9-inch display at 1280×720
- Windows 10 requires 800×600
Below or near those thresholds, the number of layouts available through Snap Layouts will shrink accordingly, since there’s less room to divide.
Individual applications can also opt out of snapping regardless of display size. This typically happens when an app’s minimum window width is too large to fit inside the target snap zone, when the app uses a fixed or non-resizable window rather than standard resizable caption behavior, or when the app runs in a full-screen exclusive mode that doesn’t support windowed layouts at all. If a specific app refuses to snap, one of these three is usually the reason.
» Don’t miss our guide to checking your computer specs
Touchscreen and tablet mode behavior
Snapping mechanics shift slightly on touch-enabled devices. When tablet mode is active, the interface becomes more touch-friendly overall, with larger touch targets designed for finger input rather than precise cursor positioning.
The two OS versions handle multi-app touch snapping differently:
- Windows 10 supports up to two side-by-side apps in tablet mode, with a touch-friendly divider between them that can be dragged to resize
- Windows 11 goes further, supporting snapping of multiple apps on touchscreens either by dragging a window into a screen corner or by using the snap bar that appears at the top of the screen during a drag
Every method for splitting your screen on Windows
With Snap enabled and your device’s constraints understood, here’s every way to actually split your screen, from a simple mouse drag through fleet-wide deployment for an entire organization. Each method below solves the same problem differently, so pick the one that fits your workflow or your role.
Manual drag-and-drop
This is the most direct method and the one to reach for when you just need to snap a window quickly without memorizing anything.
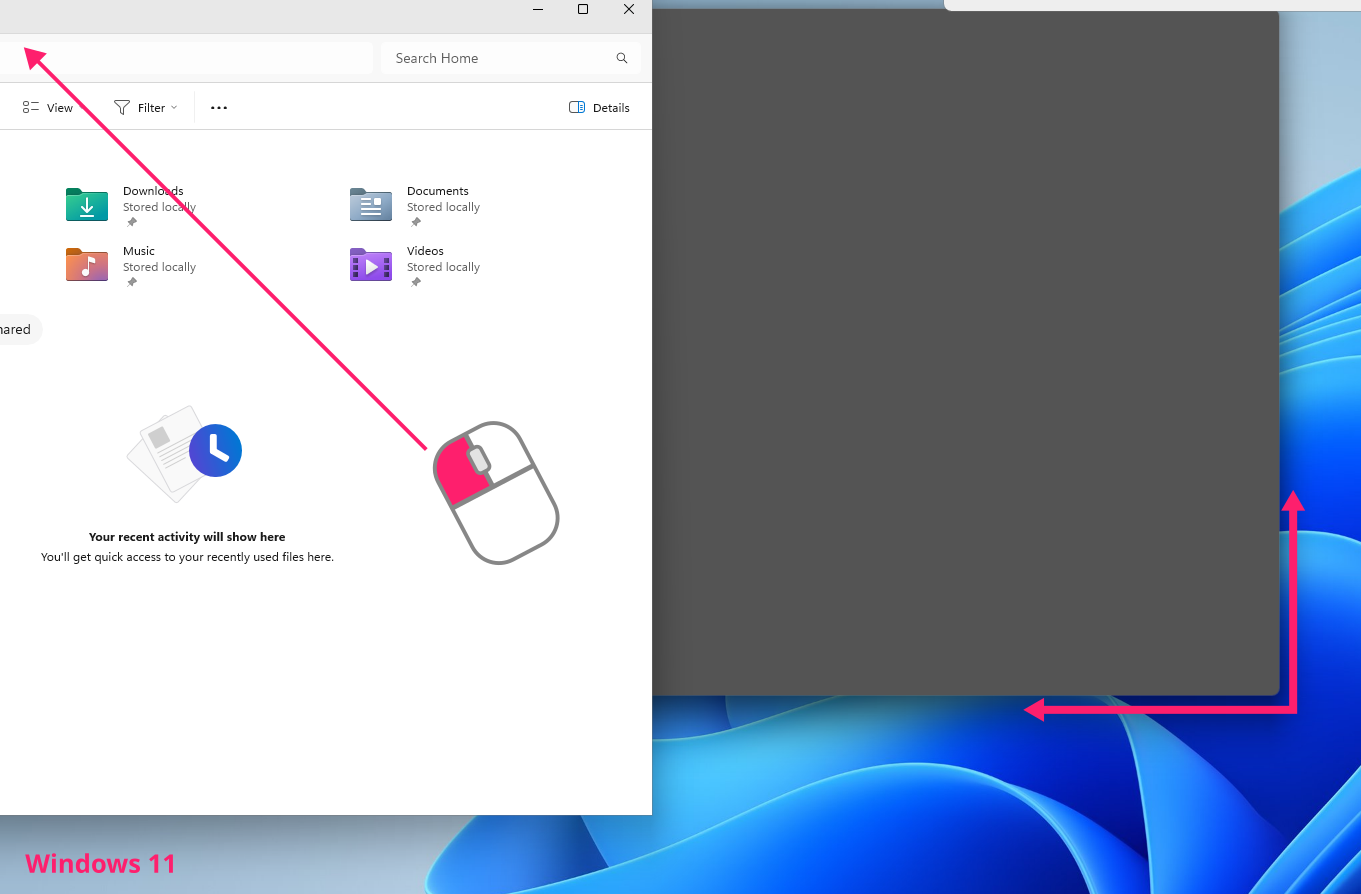
- Click and hold the title bar of the window you want to snap
Drag it to a screen edge for a two-window, half-screen split, or to a screen corner for a four-window quad split


- Release the window once the outline preview appears; it will snap into place automatically
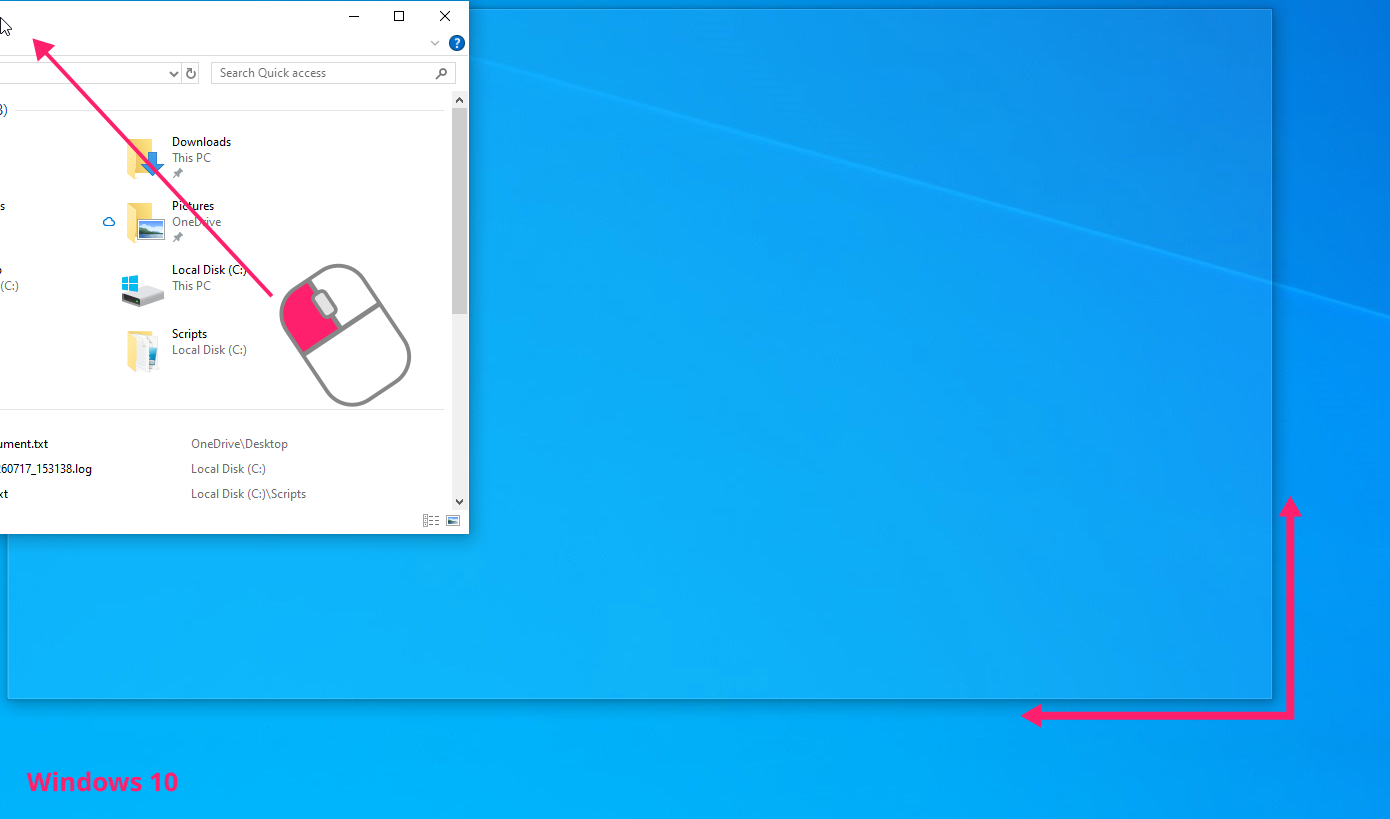
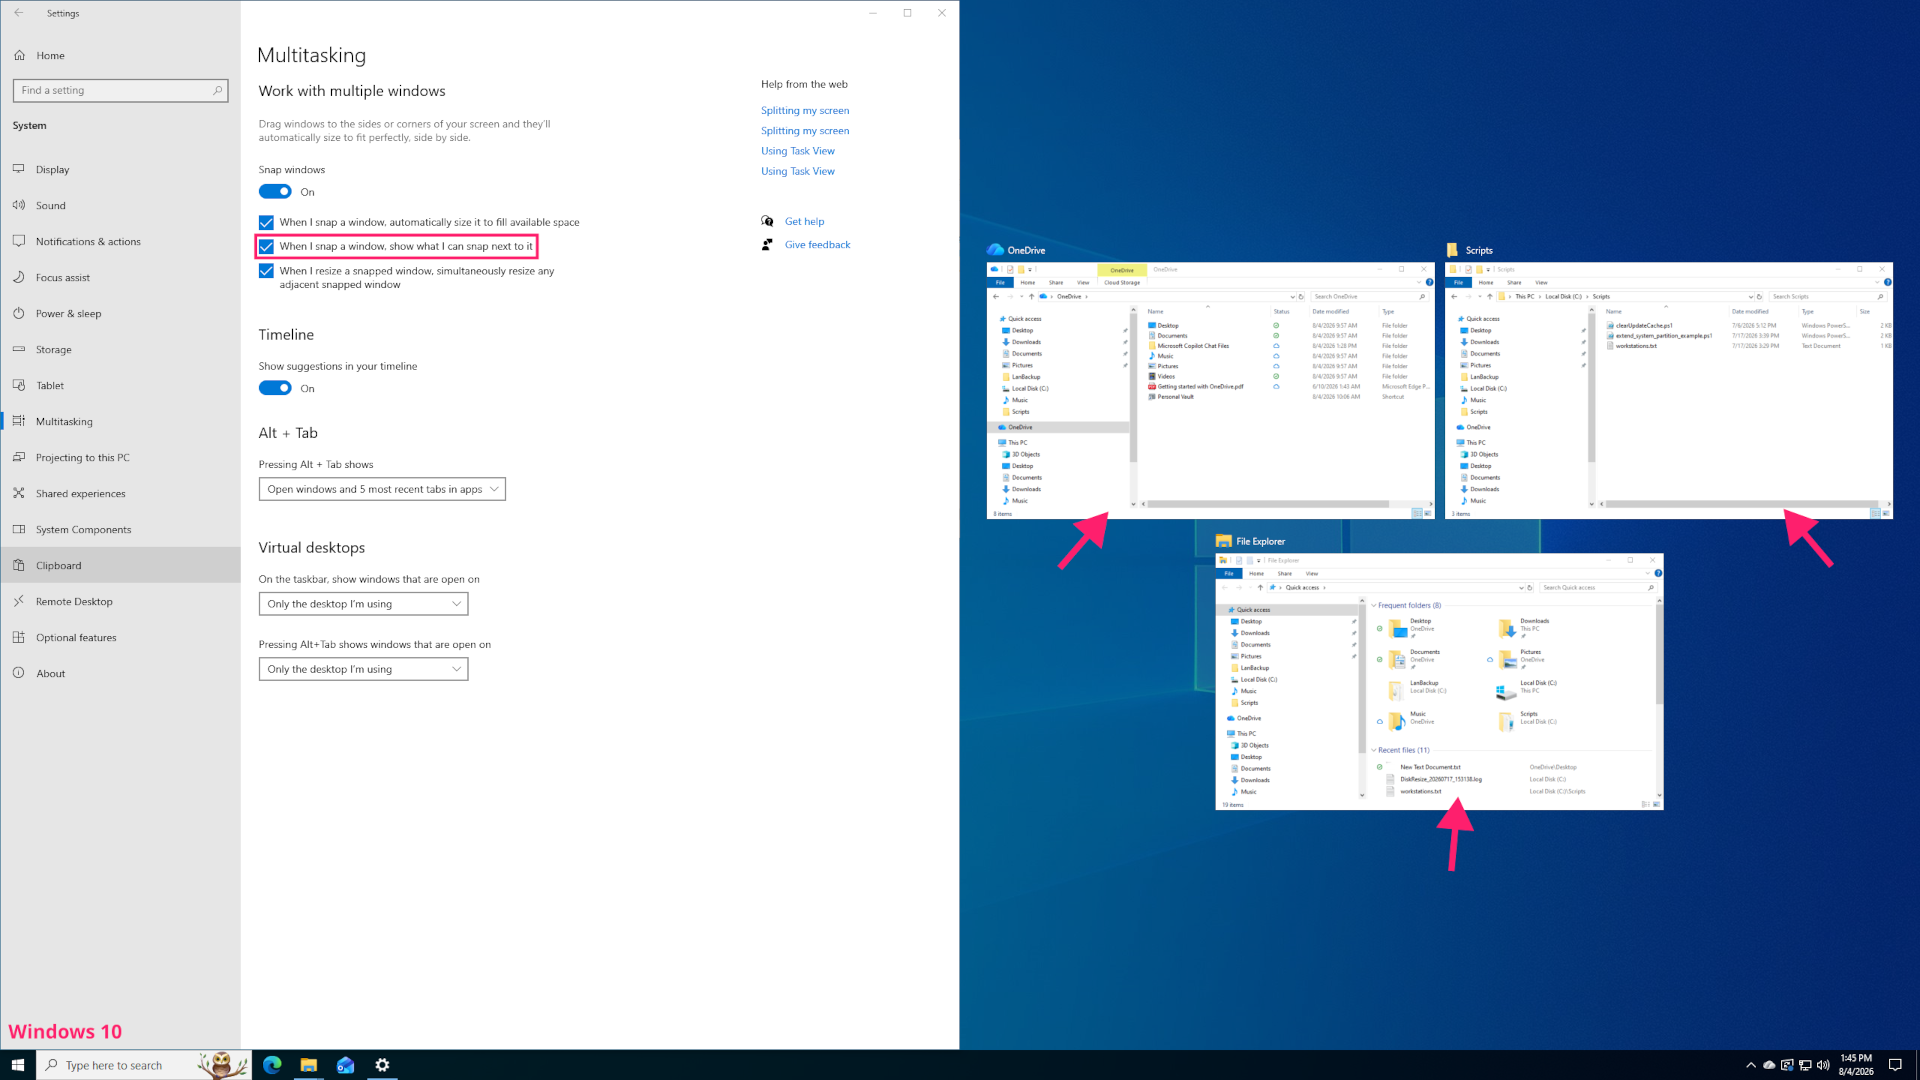
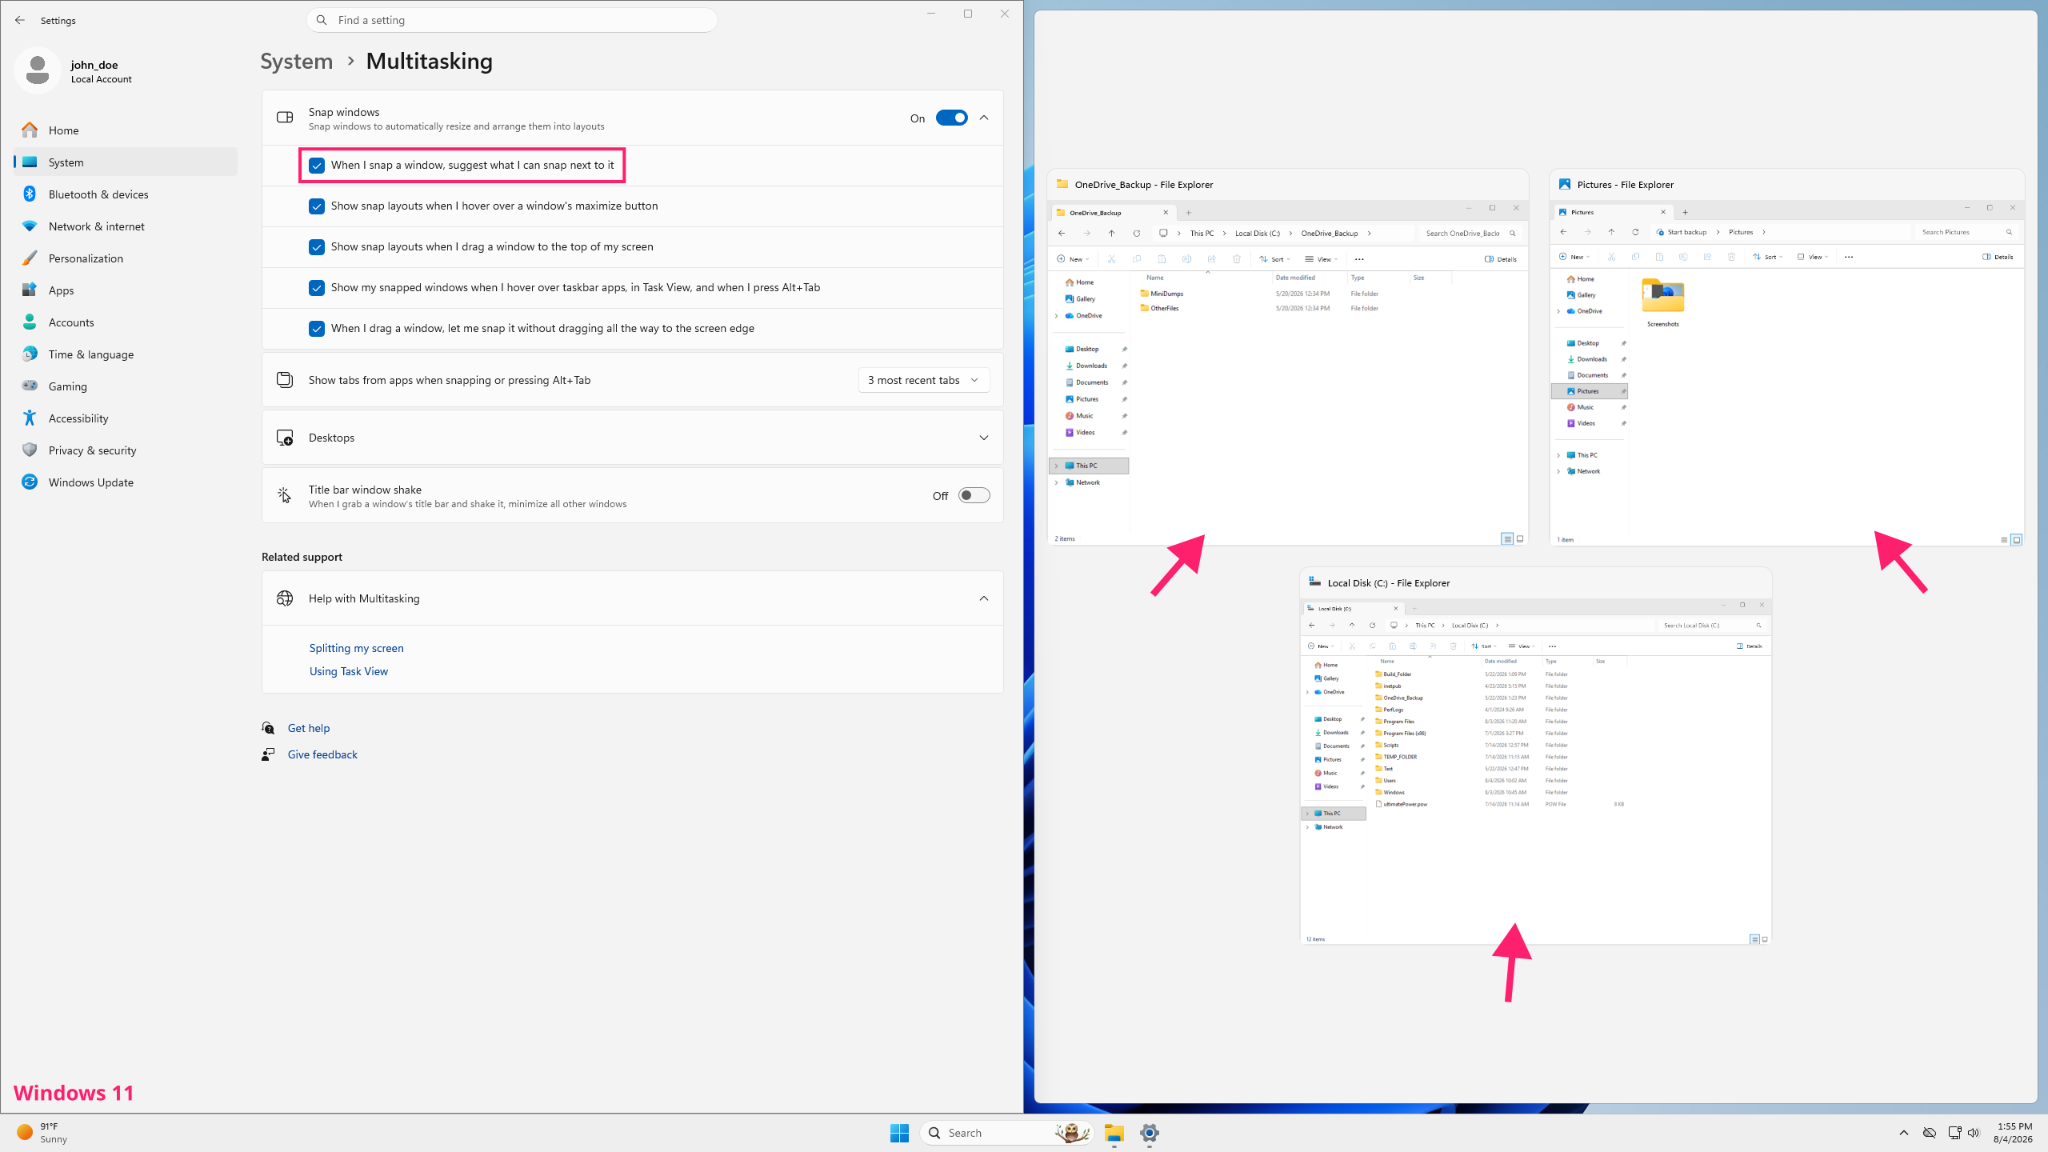
On Windows 10, enable Snap Assist it by checking When I snap a window, show what I can snap next to it in Settings. With that on, Snap Assist triggers when a window successfully snaps to an edge, showing thumbnail previews of your other open windows so you can click one to fill the remaining half; if you then drag a third window into a corner, Snap Assist re-triggers to help populate that quadrant, and you can click an empty area or press Esc to cancel.
On Windows 11, enable it by checking When I snap a window, suggest what I can snap next to it. With that on, Snap Assist triggers on every successful snap operation. When a window occupies half the screen, selecting a thumbnail fills the opposite half; when a window is snapped to a corner, thumbnail selection continues until all remaining quadrants are populated.
Keyboard shortcuts
Use this method when you want to snap, resize, or move windows without reaching for the mouse at all, particularly useful for technicians who live in keyboard-driven workflows.
- Select the window you want to snap
- Hold the Win key and press an arrow key to snap the window in that direction
- Continue pressing arrow keys while still holding
Winto cycle through positions - Release the Win key to confirm the window’s final position
If a window is already snapped to the lower-left corner, pressing the up arrow moves it to occupy half the screen; if the window is simply floating, pressing up again maximizes it. After you release Win, Snap Assist triggers the same as it would with a mouse drag, and you can select from the available thumbnails using the arrow keys and pressing Enter.
» Learn more in our guide to moving a window that’s off screen
Snap Layouts (Windows 11)
This method is the right choice on Windows 11 when you need to arrange three or four windows at once without manually positioning each one.
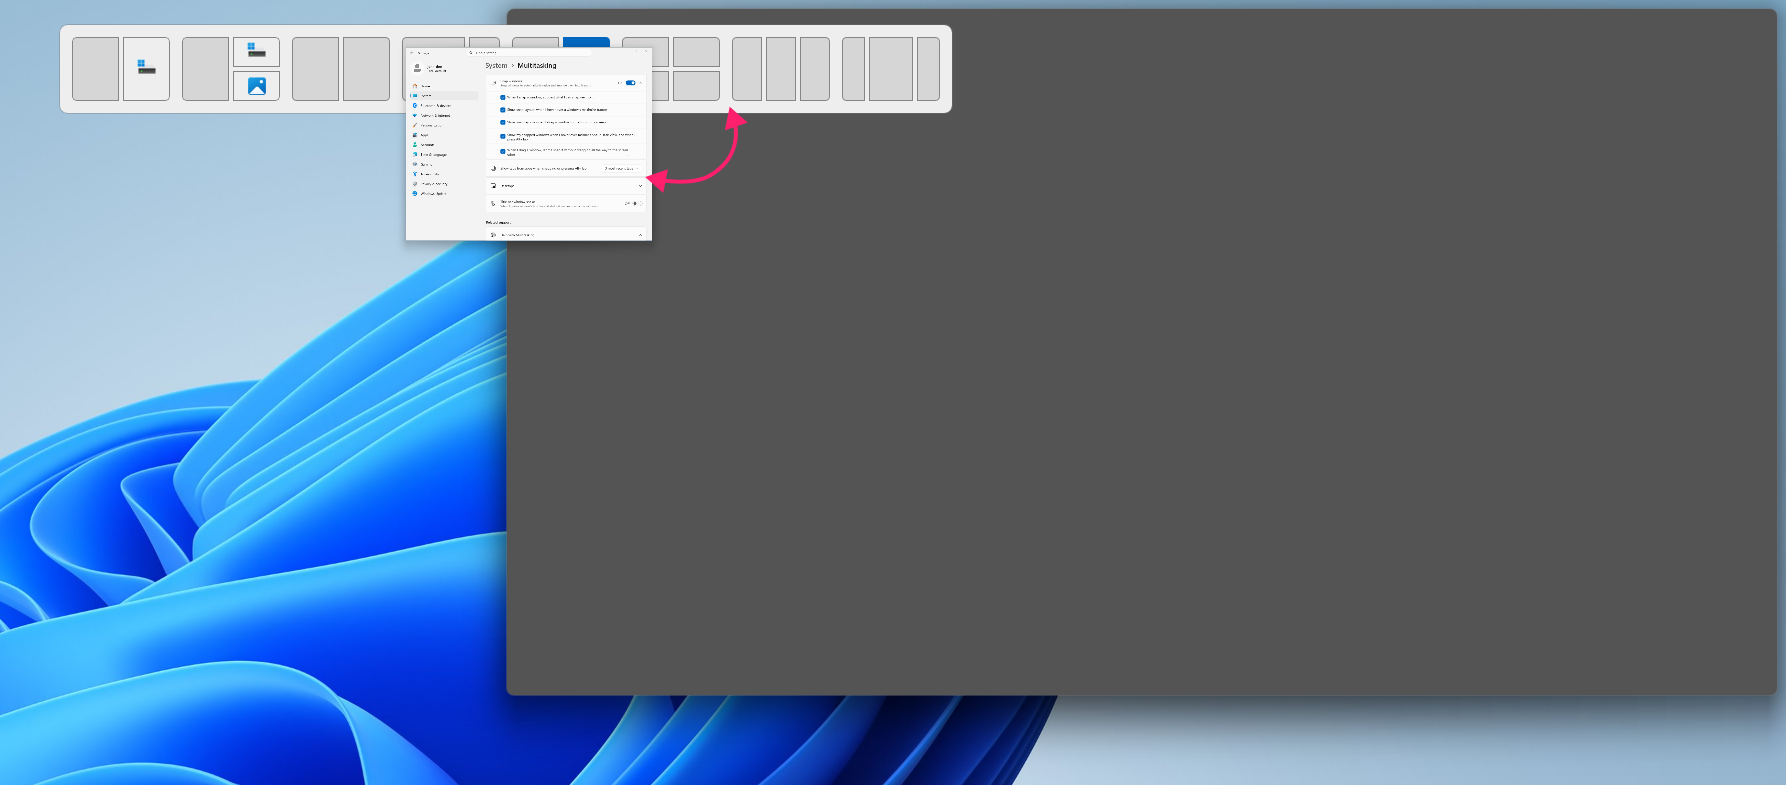
- Press Win + Z to open the Snap Layouts picker
Press the corresponding number key, or use the arrow keys, to select a layout

- Press Enter to confirm the selection
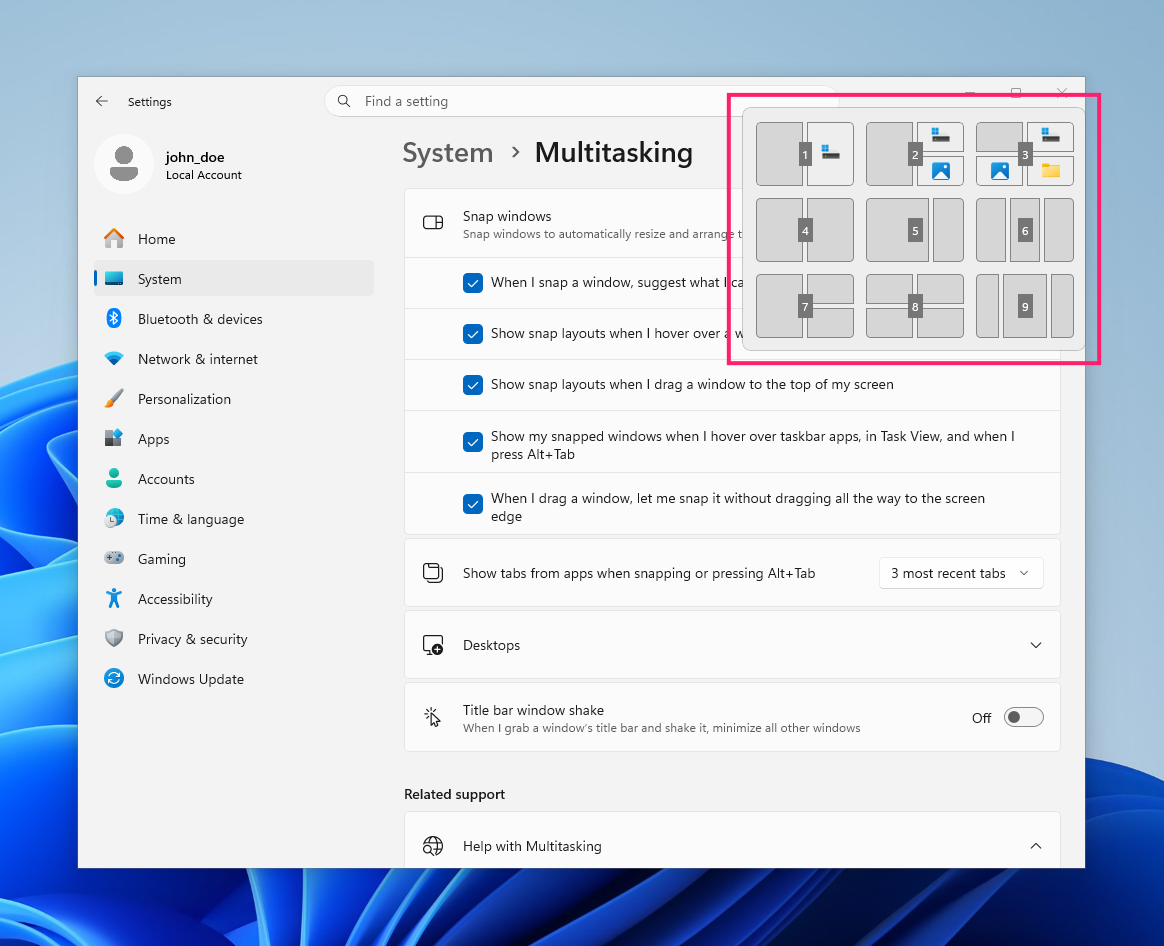
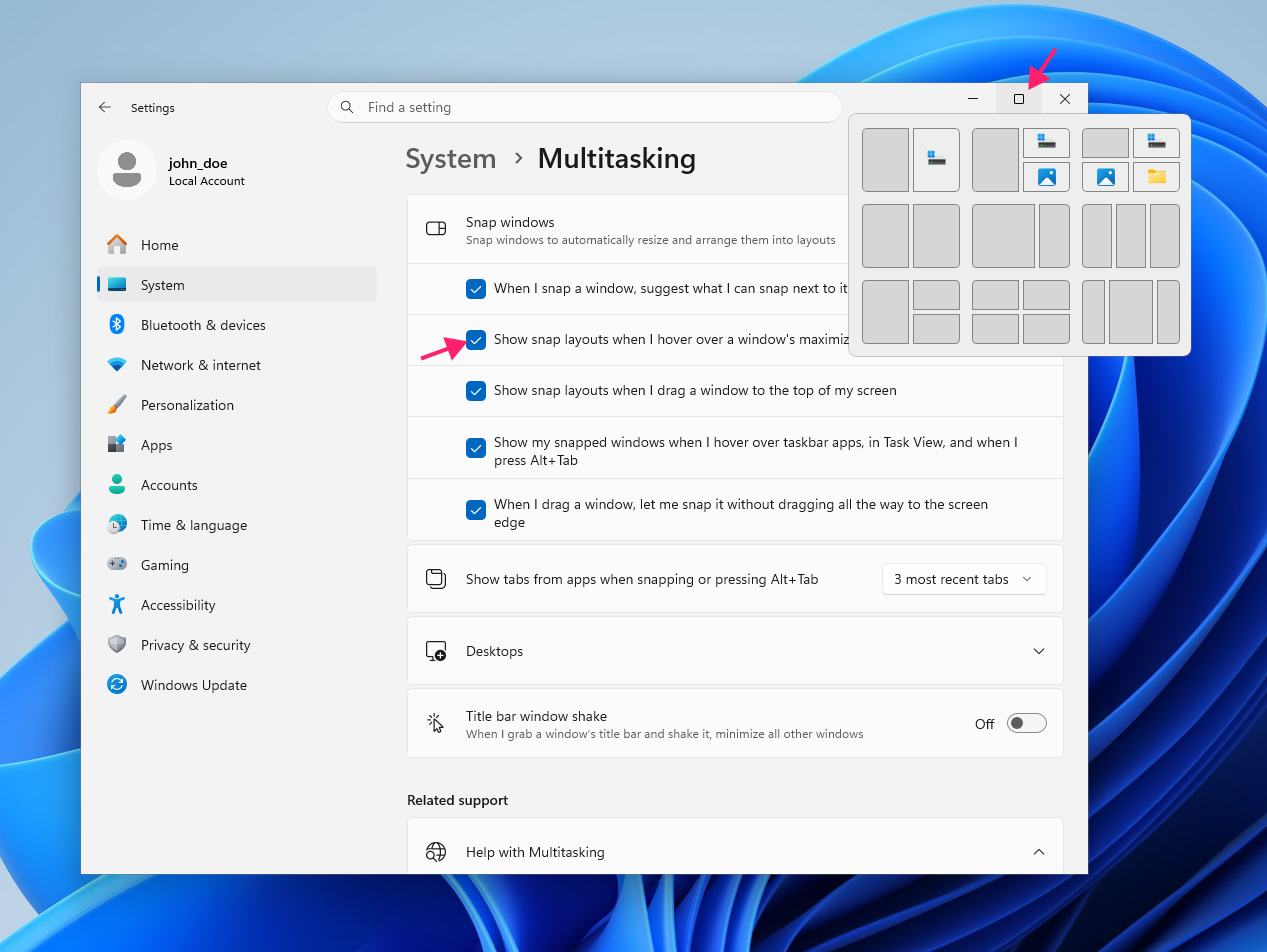
You can also trigger the picker without the shortcut. If Show snap layouts when I hover over a window’s maximize button is enabled, hovering over a window’s maximize button for a moment will display the picker.
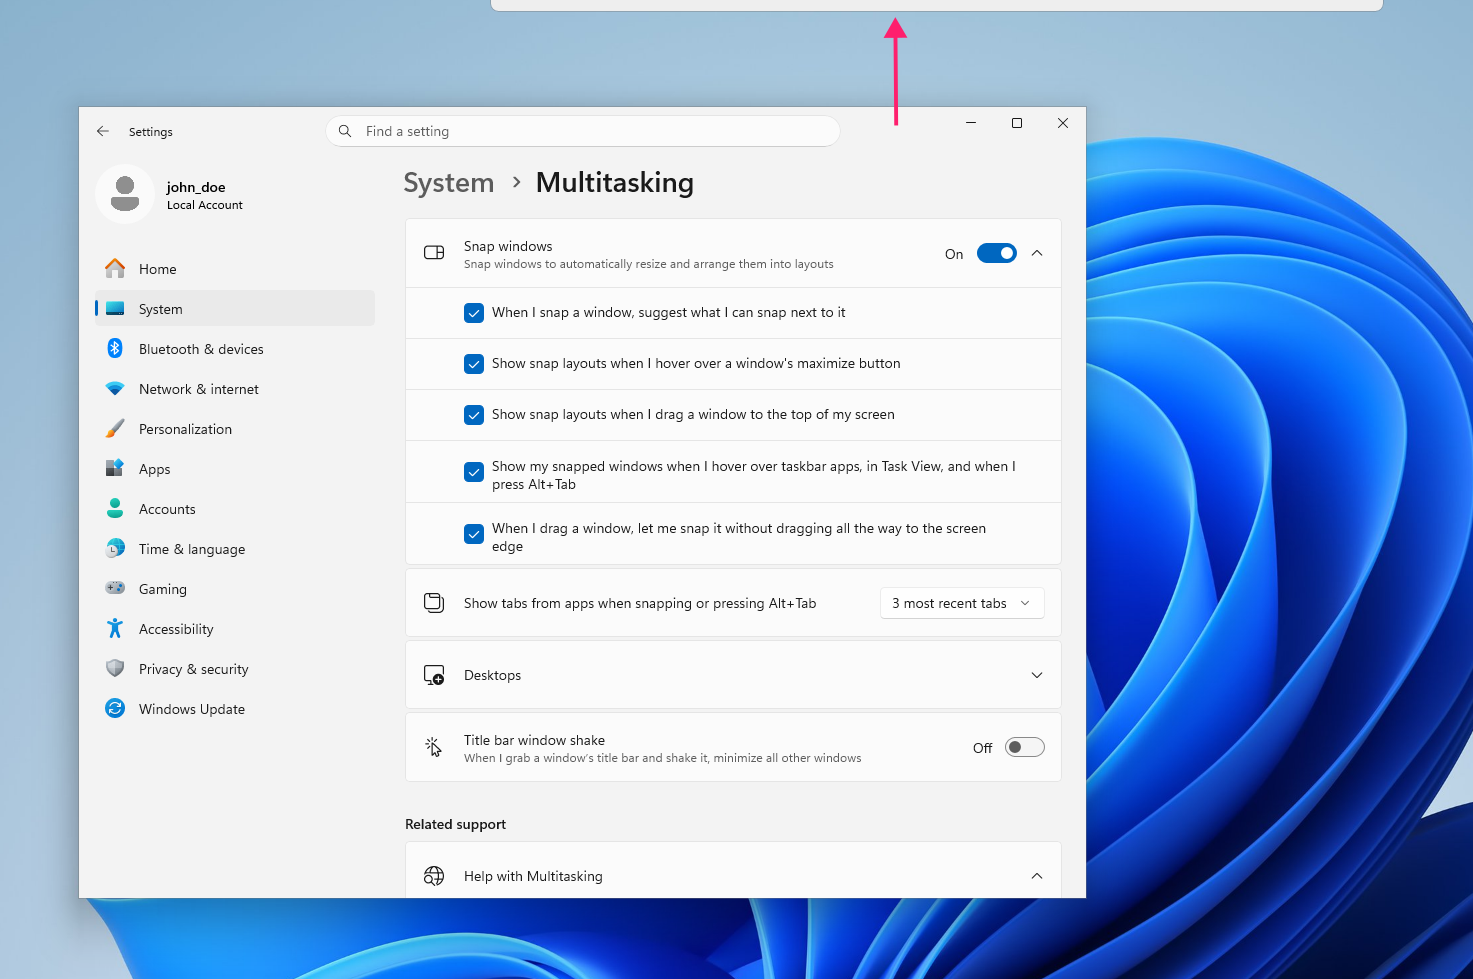
If Show snap layouts when I drag a window to the top of my screen is enabled, dragging a window toward the top of the screen reveals a snap bar you can drop the window onto to select a layout.
Managing snap across multiple monitors
Reach for this when your setup spans two or more physical displays and you need windows to snap predictably across the boundary between them.
- Drag or snap a window on either monitor; snap works independently and identically on each display
- Use Win + Shift + Left or Win + Shift + Right to move the active window to the adjacent monitor
- On Windows 11, right-click the desktop and select Display settings to enable smoother cursor movement between displays
Expand Multiple displays and check Ease cursor movement between displays

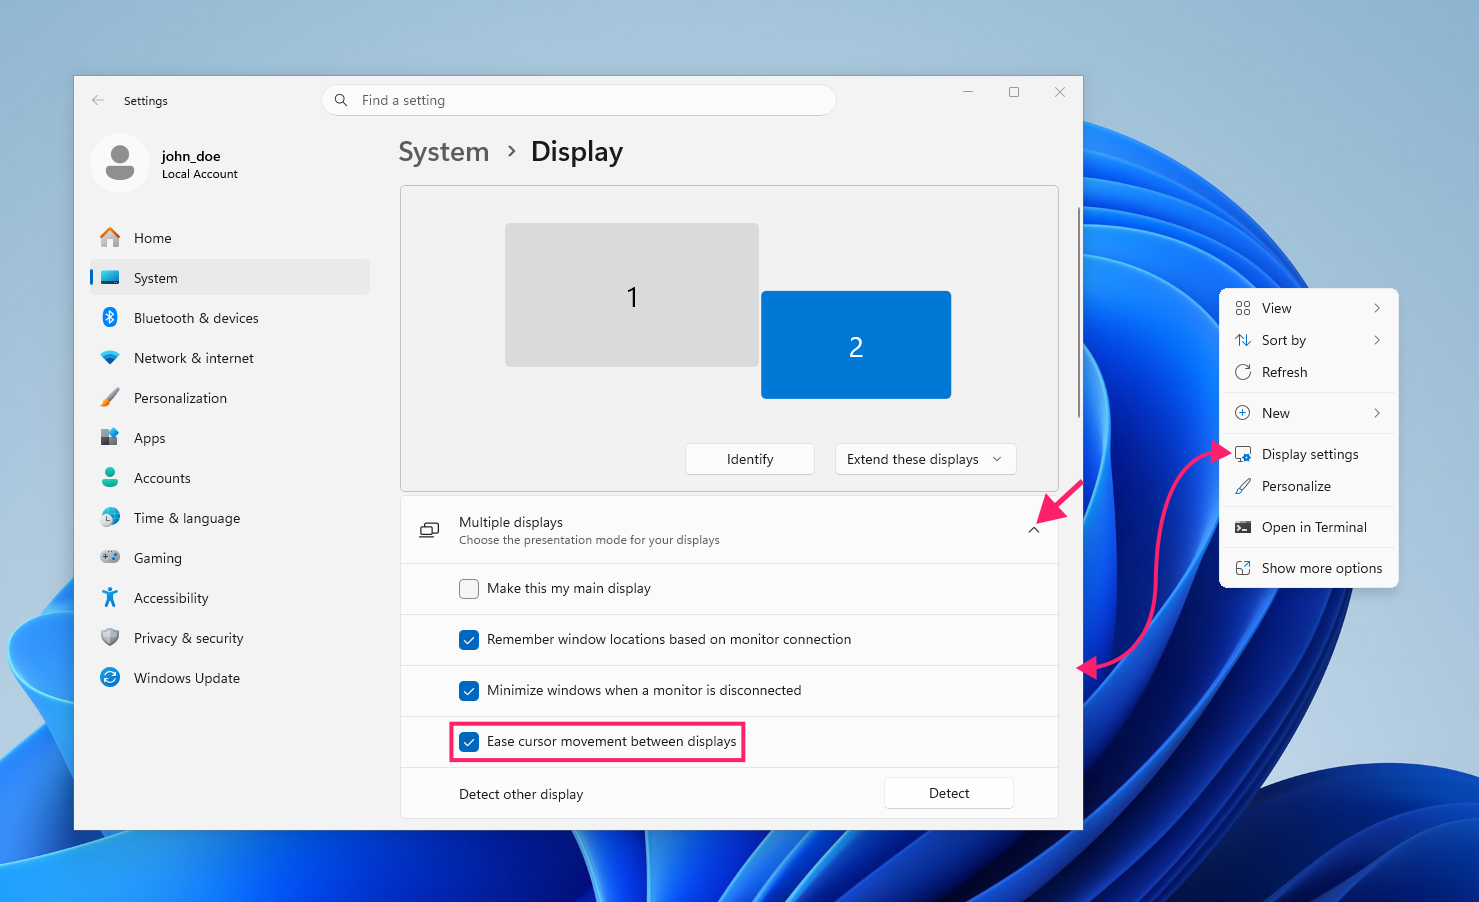
Snap Assist will show thumbnails from windows on the other monitor as well as the current one. The “sticky” boundary between displays lets you snap a window to the inner edge of a screen without accidentally dragging it onto the adjacent display.
Pausing or moving slowly against the boundary triggers the edge-snap behavior, while a fast drag will pass through without triggering it. If your monitors have mismatched resolutions or DPI scaling, that boundary can feel slightly offset from where you’d expect.
Custom persistent layouts with PowerToys FancyZones
Use FancyZones when the native snap options aren’t flexible enough and you want a persistent, custom grid tailored to your specific workflow.
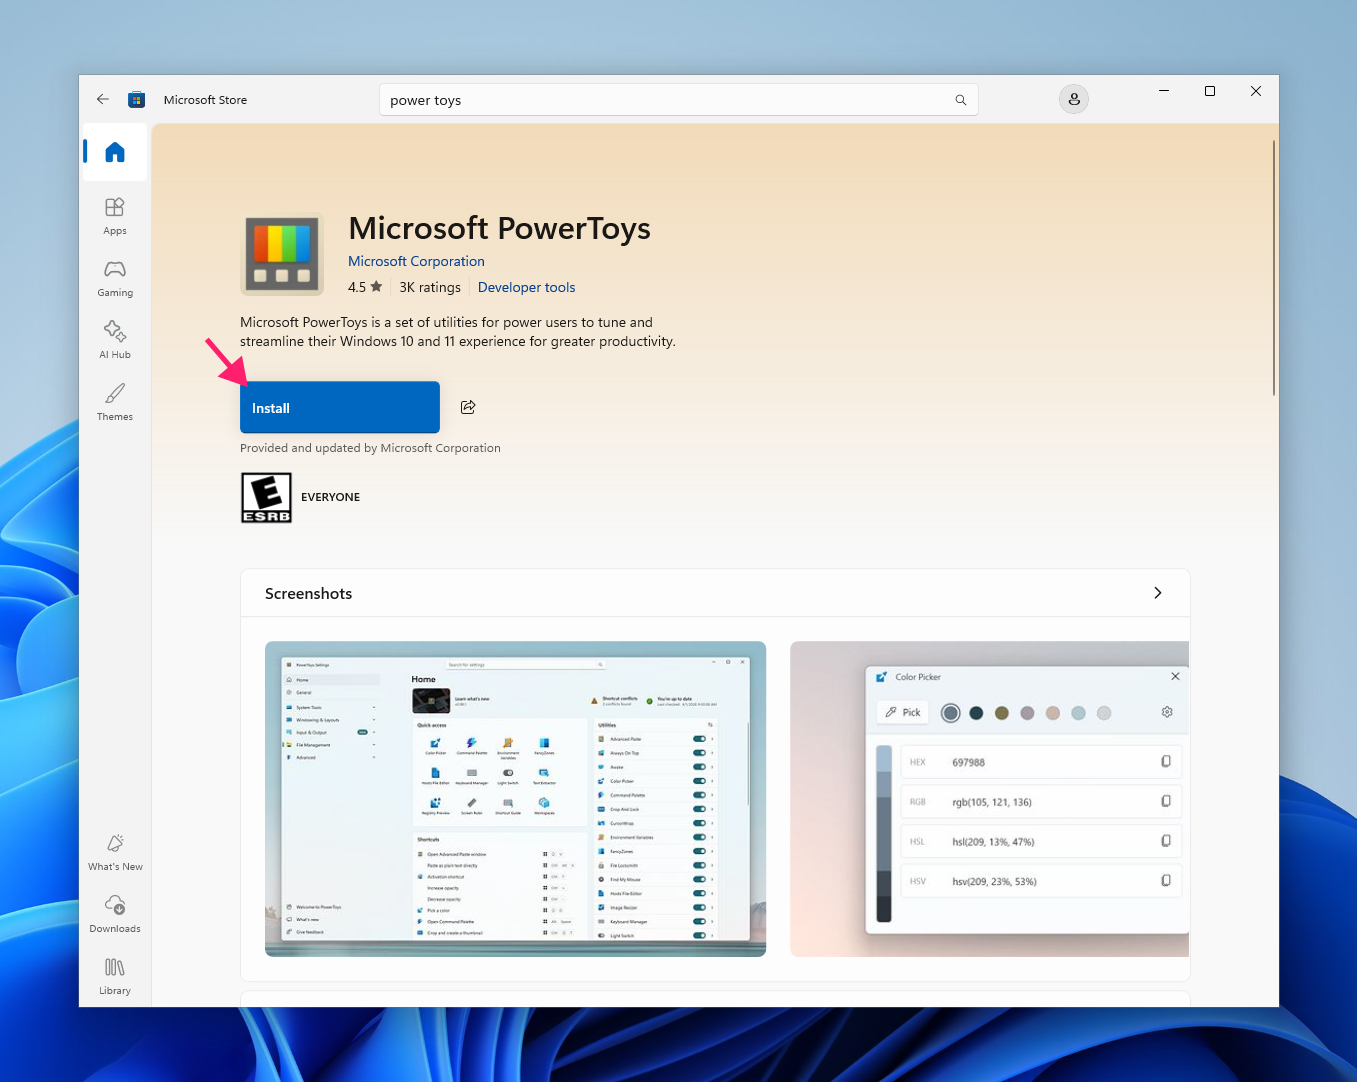
Install Microsoft PowerToys through the Microsoft Store or another official distribution method

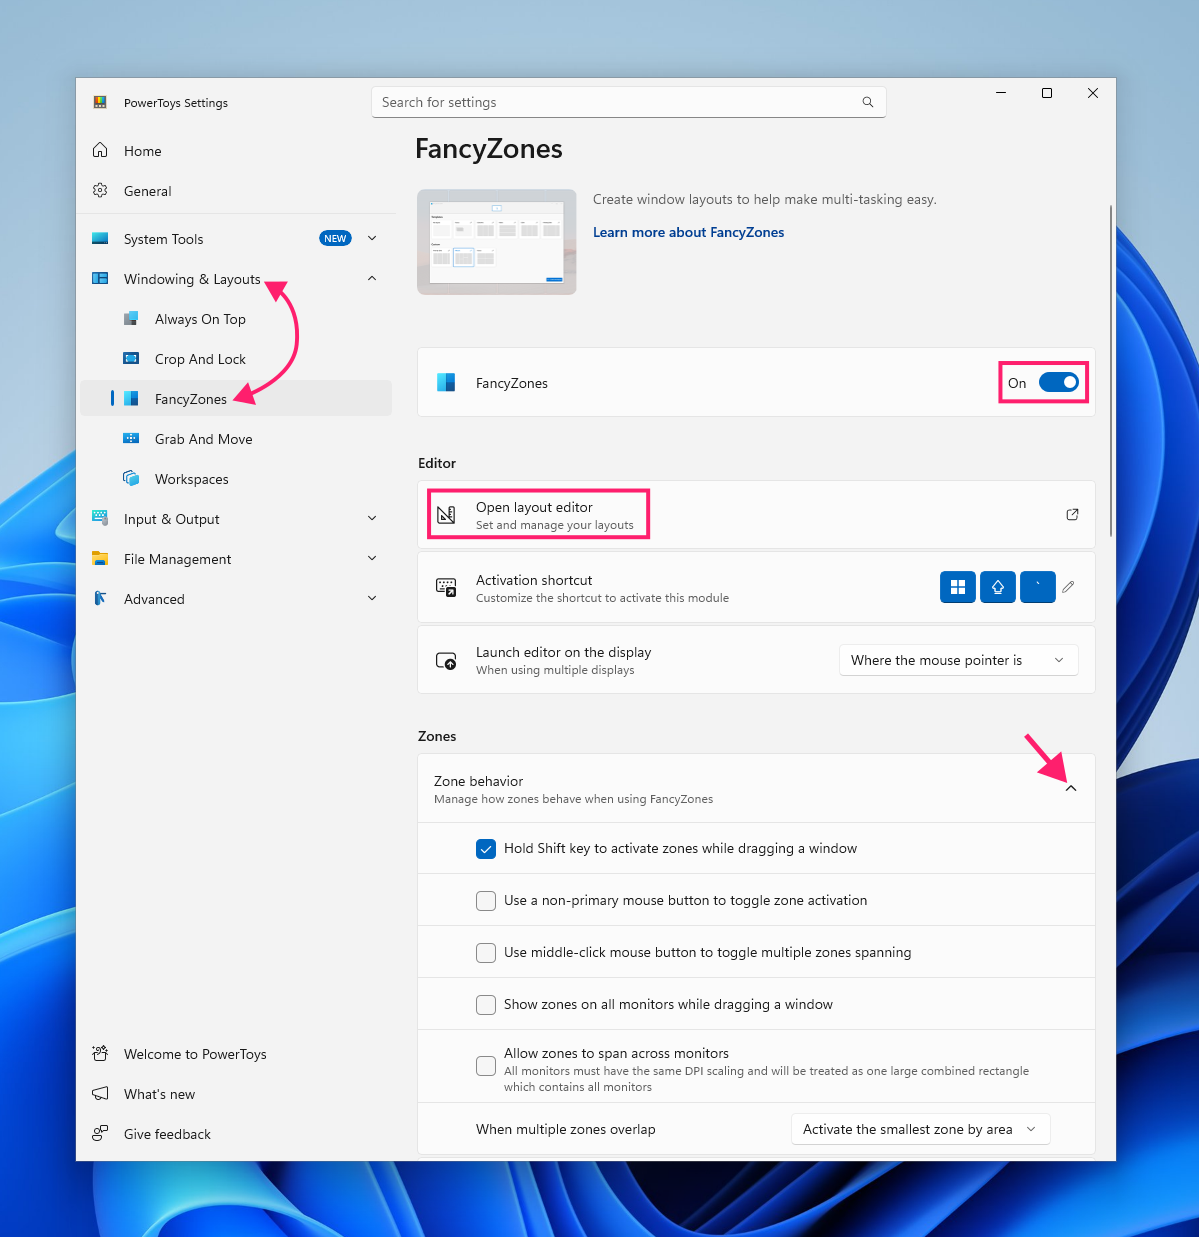
- Open PowerToys Settings, go to Windowing & Layouts > FancyZones, and toggle the feature On
Expand Zone behavior to set your activation method; Hold Shift key to activate zones while dragging a window is enabled by default

- Click Open layout editor to launch the zone editor
- Choose a template layout or build a fully custom layout
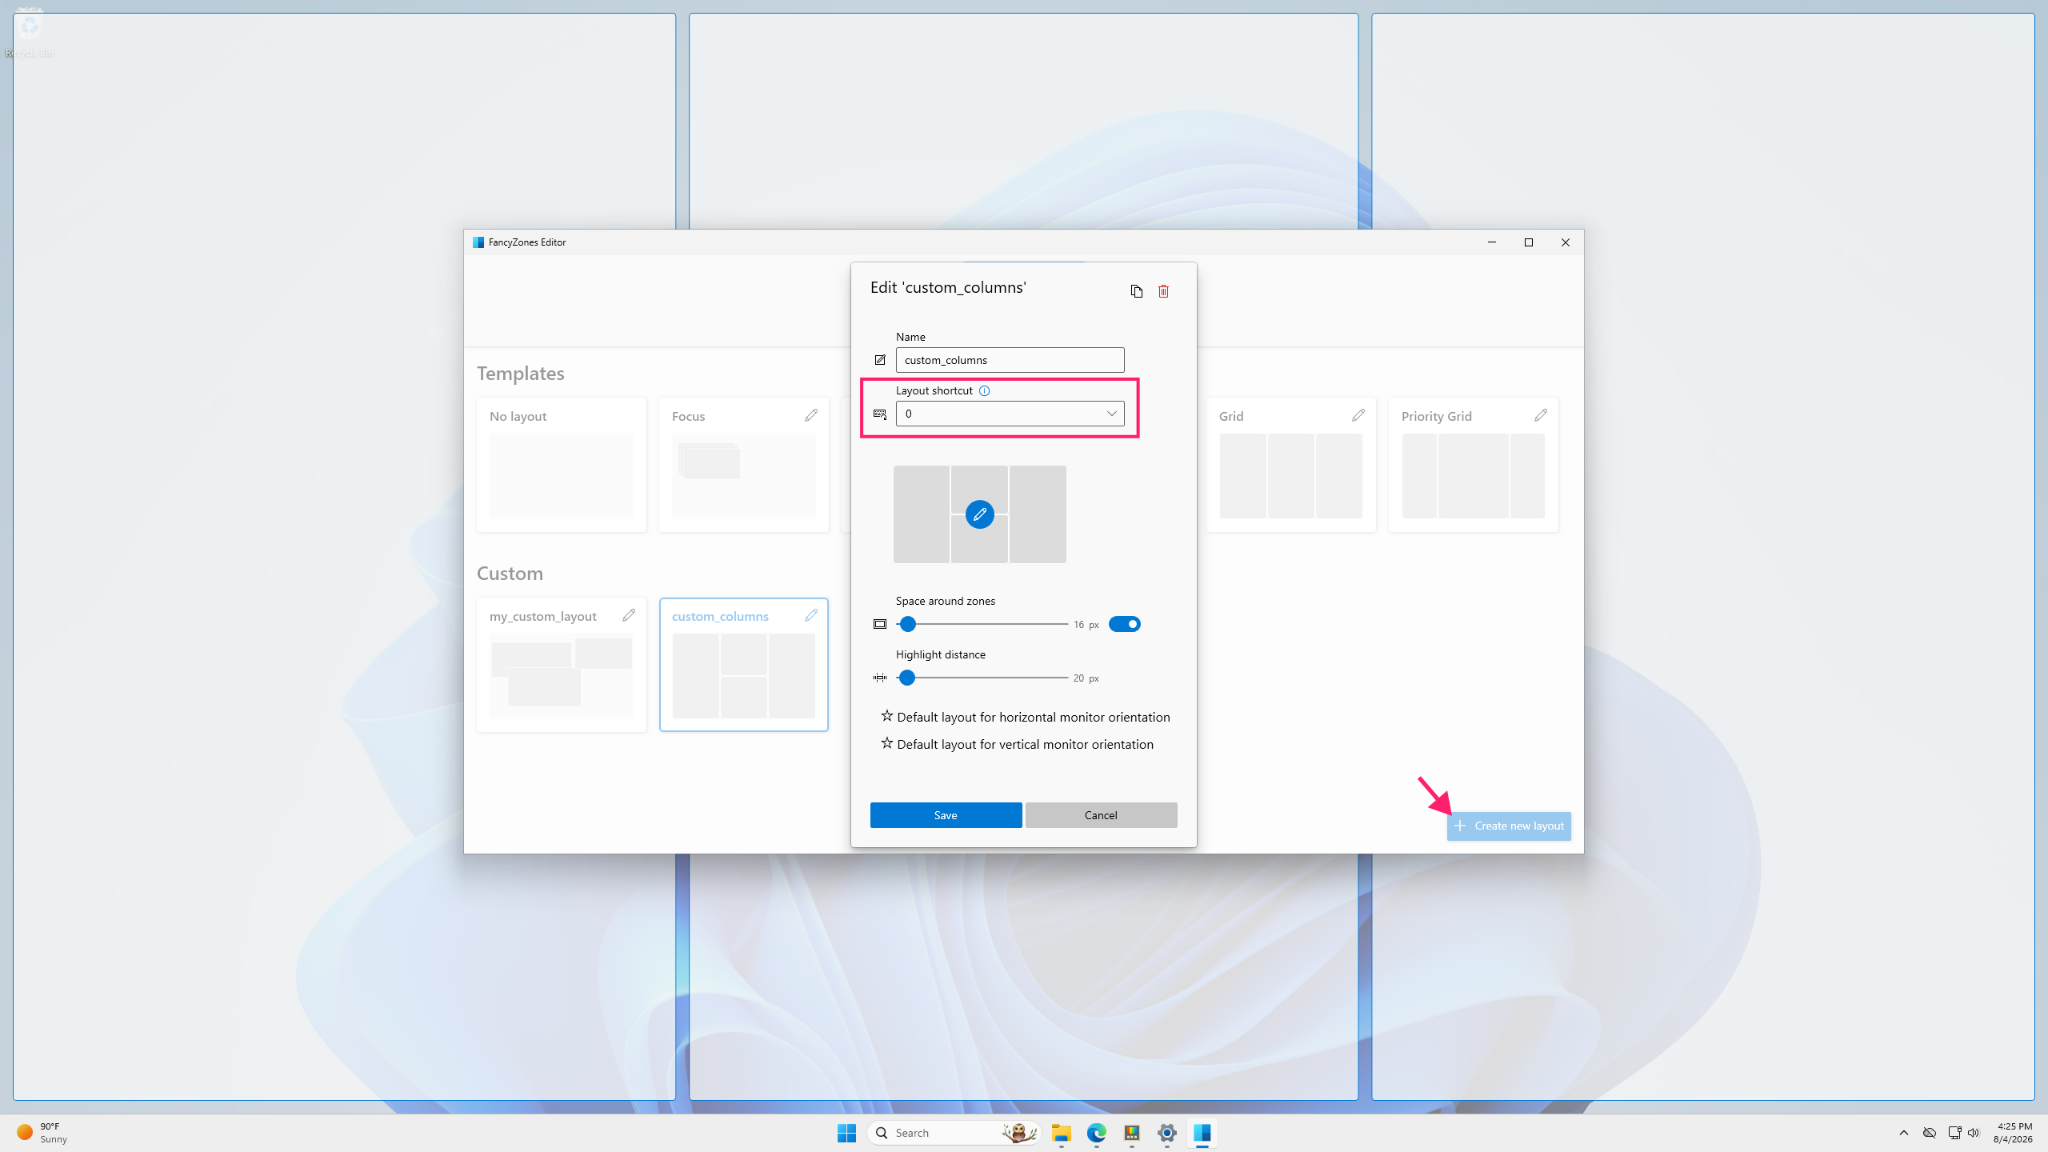
Click the edit icon on a layout to configure it and assign a number key from 0 – 9, enabling activation via Win + Ctrl + Alt + <number>

- Hold Shift (or your configured activation key) while dragging a window to display the zones, then drop the window into the zone you want
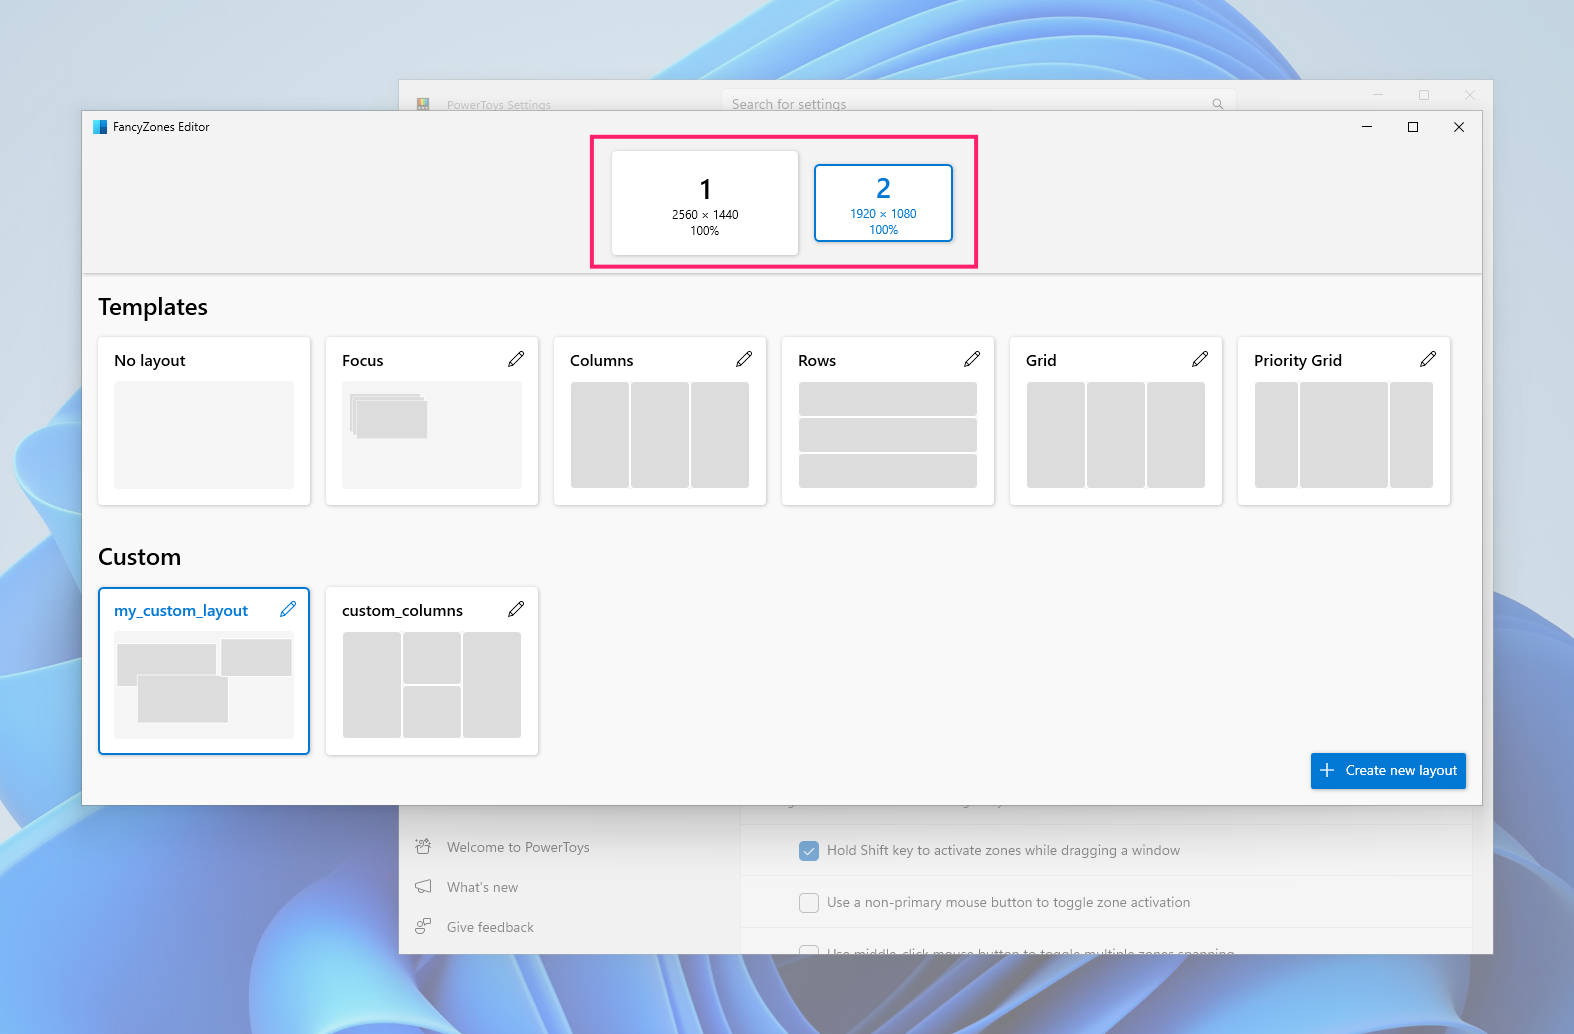
On multi-monitor systems, FancyZones lets you configure a separate zone layout for each display.

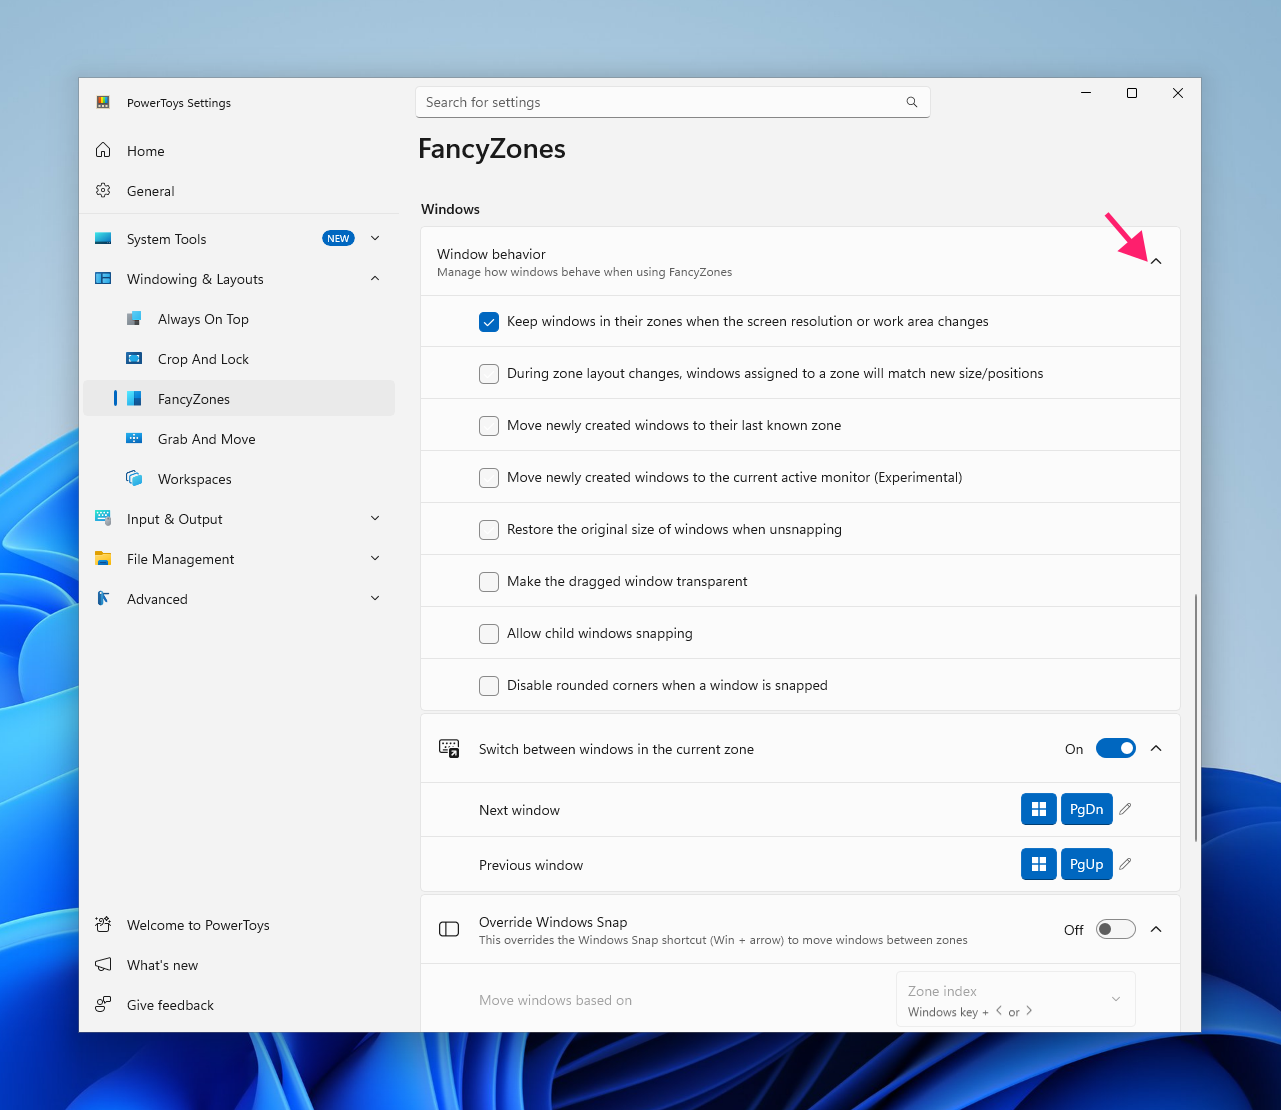
The Window behavior section under FancyZones also controls details like whether windows keep their assigned zone after a resolution change or return to their last known zone on relaunch, worth reviewing once your zones are set up.
Deploying and restricting these settings at scale
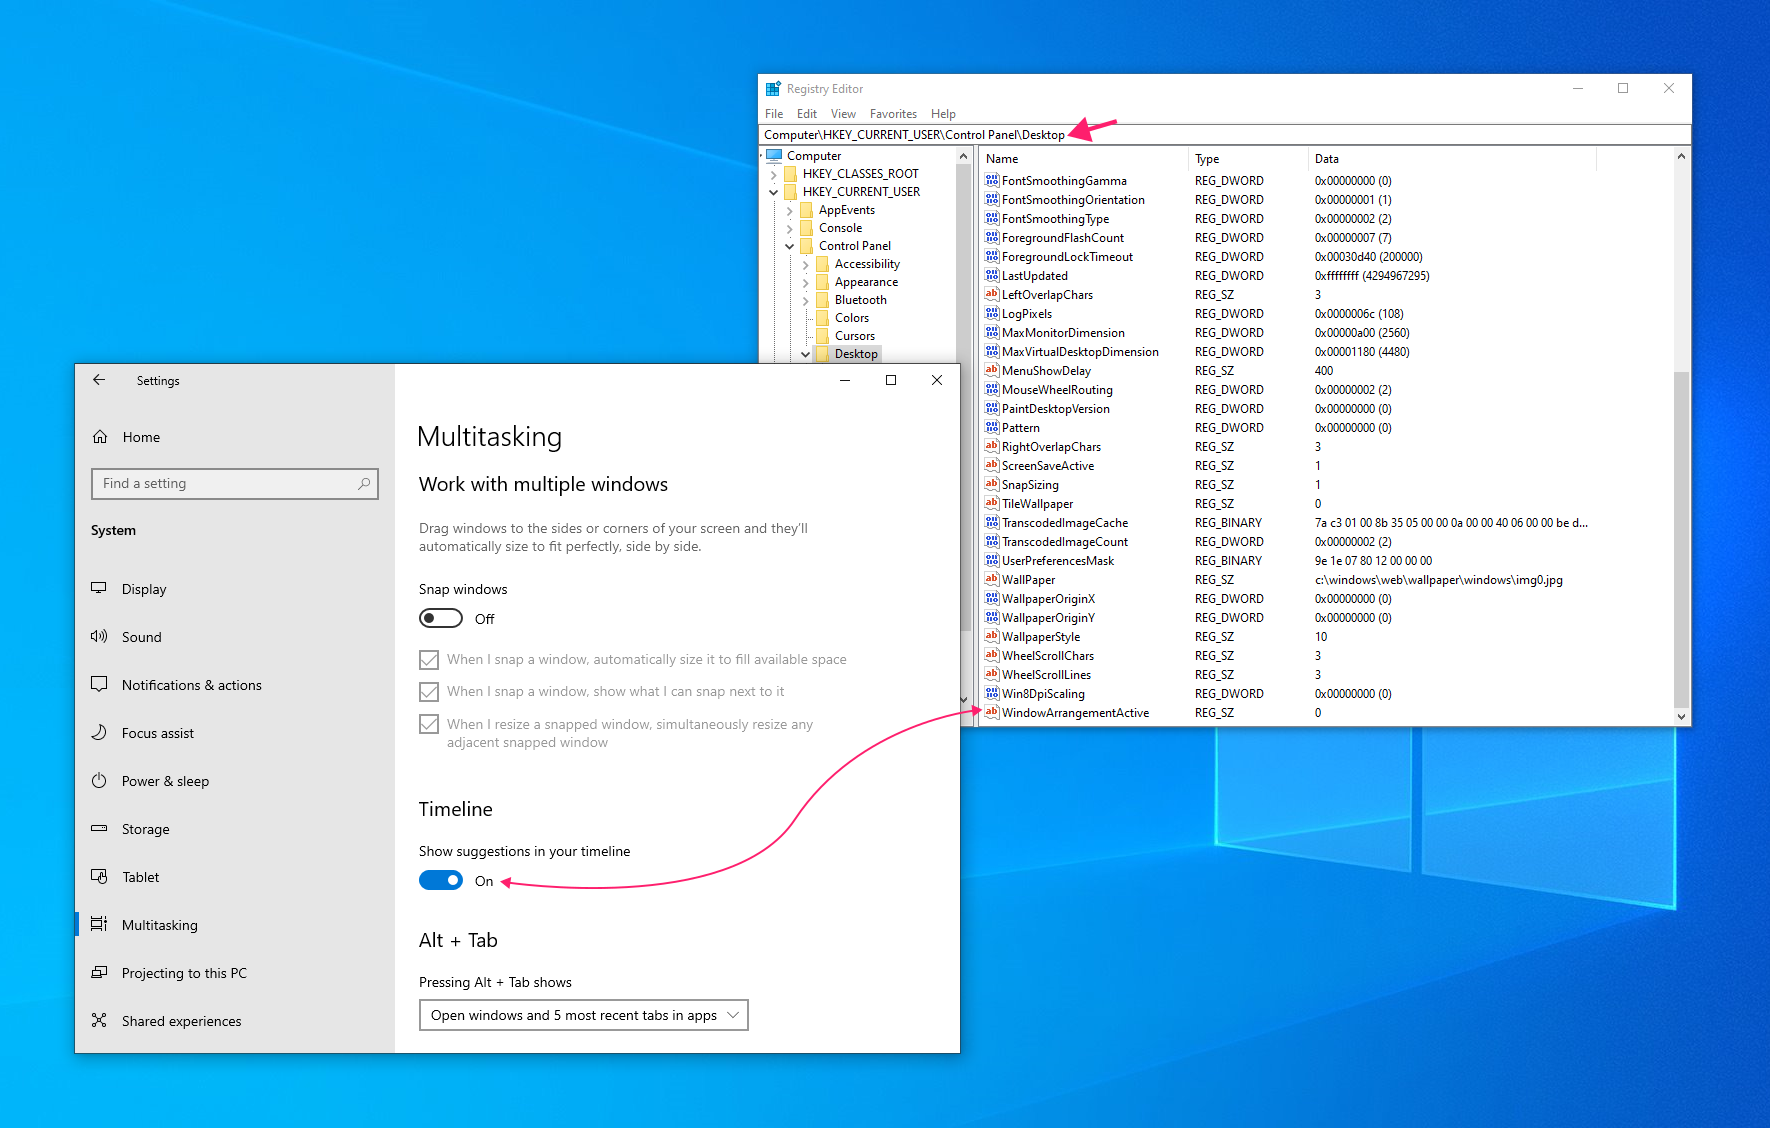
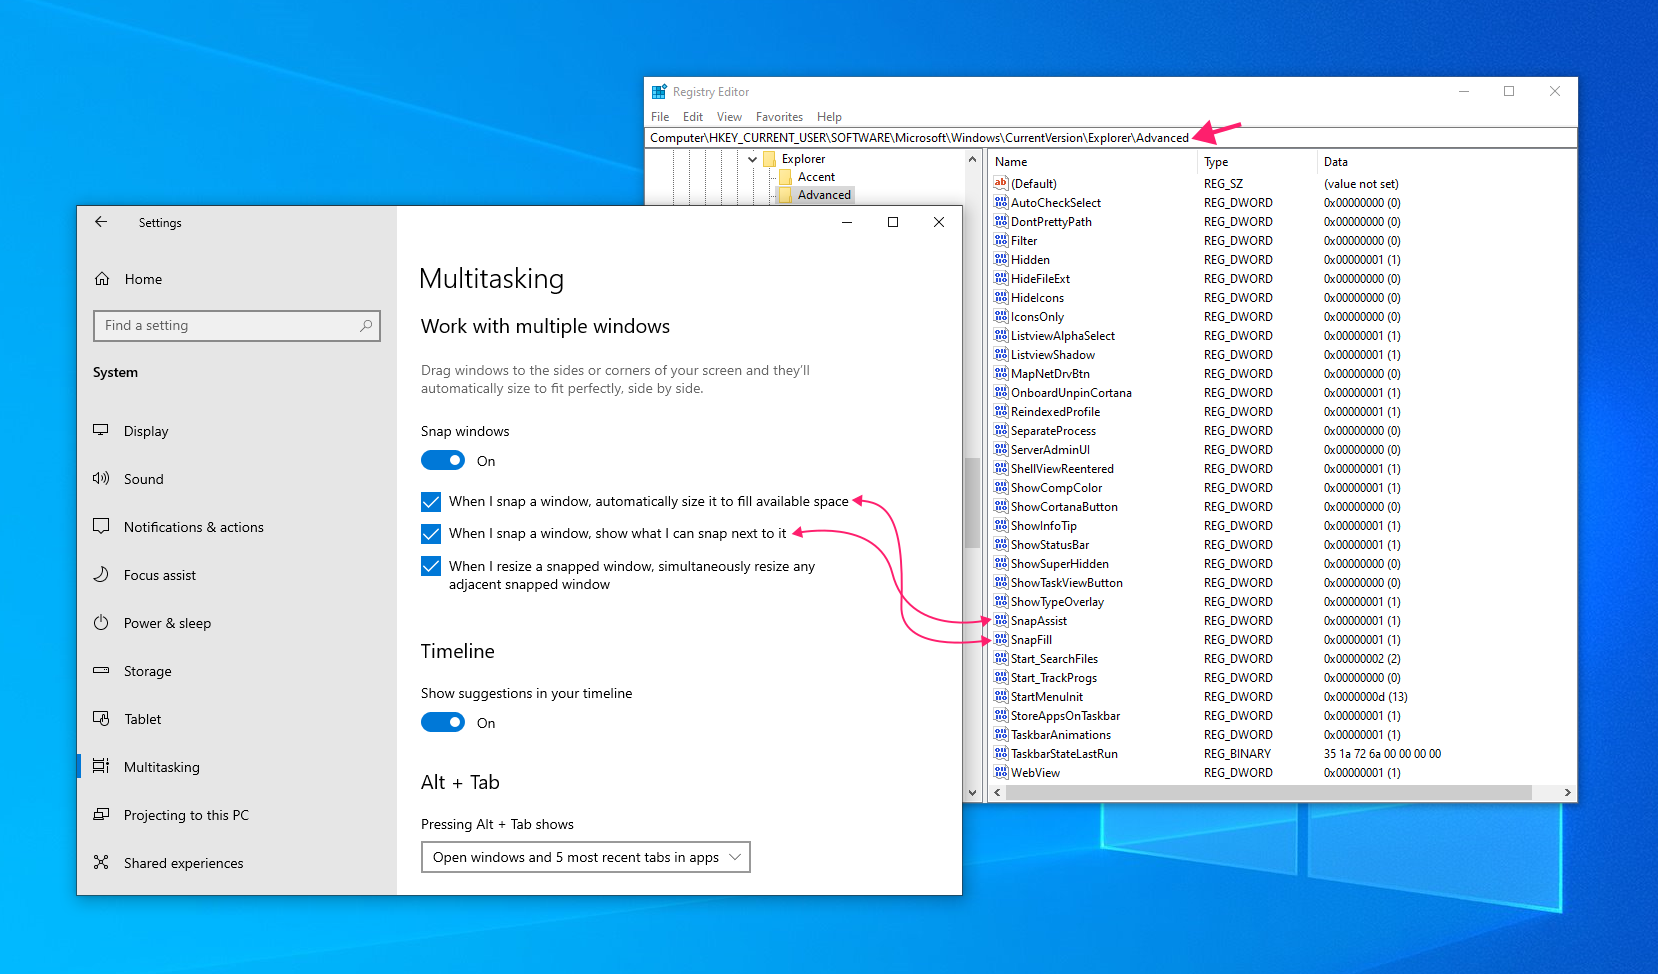
For IT admins managing more than a handful of machines, this is the method for enforcing or restricting Snap Assist and multitasking behavior fleet-wide rather than configuring each device by hand. Since these settings live in the registry, they can be pushed through GPO Registry Preferences or remote remediation scripts targeting the paths below.
Windows 10:
Setting | Value name |
Show what I can snap next to it | SnapAssist |
Automatically size a snapped window to fill available space | SnapFill |
Snap windows on/off (ComputerHKEY_CURRENT_USERControl PanelDesktop) | WindowArrangementActive |
Windows 11:
Setting | Value name |
Show snap layouts when dragging a window to the top of the screen | EnableSnapBar |
Suggest what I can snap next to it | SnapAssist |
Show snap layouts when hovering over the maximize button | EnableSnapAssistFlyout |
Snap windows on/off (ComputerHKEY_CURRENT_USERControl PanelDesktop) | WindowArrangementActive |
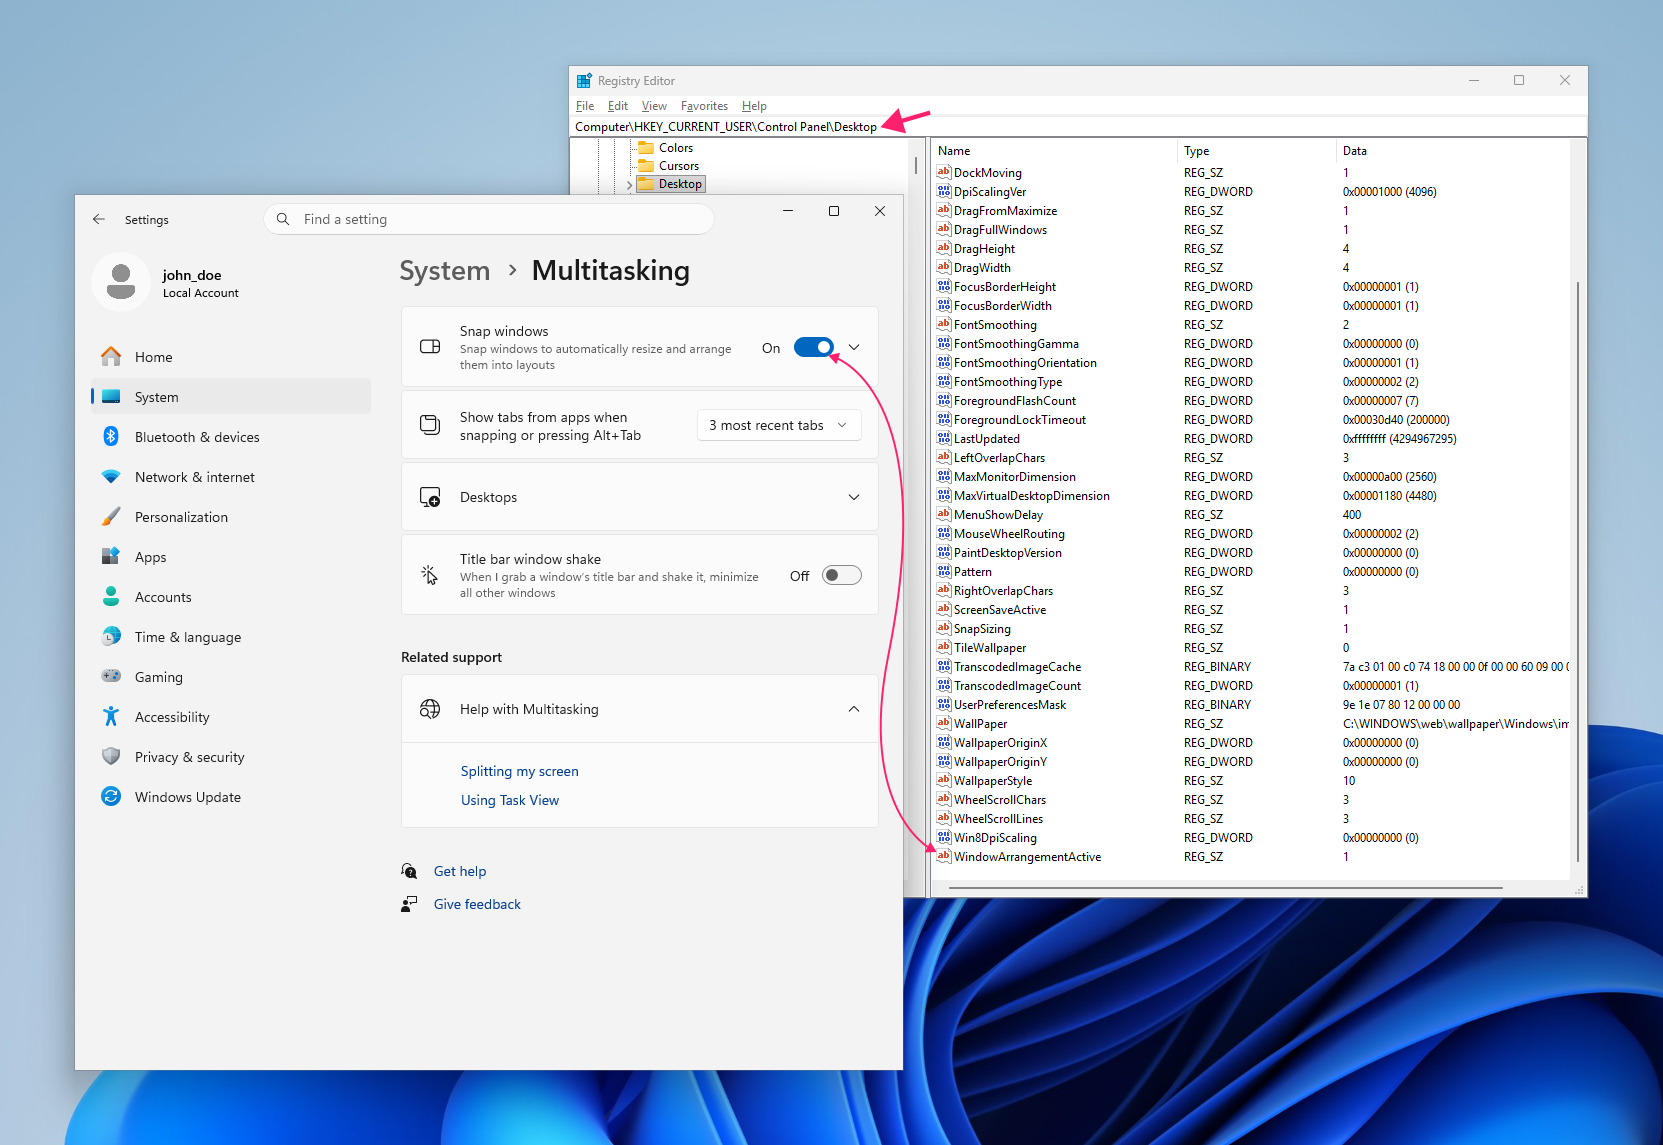
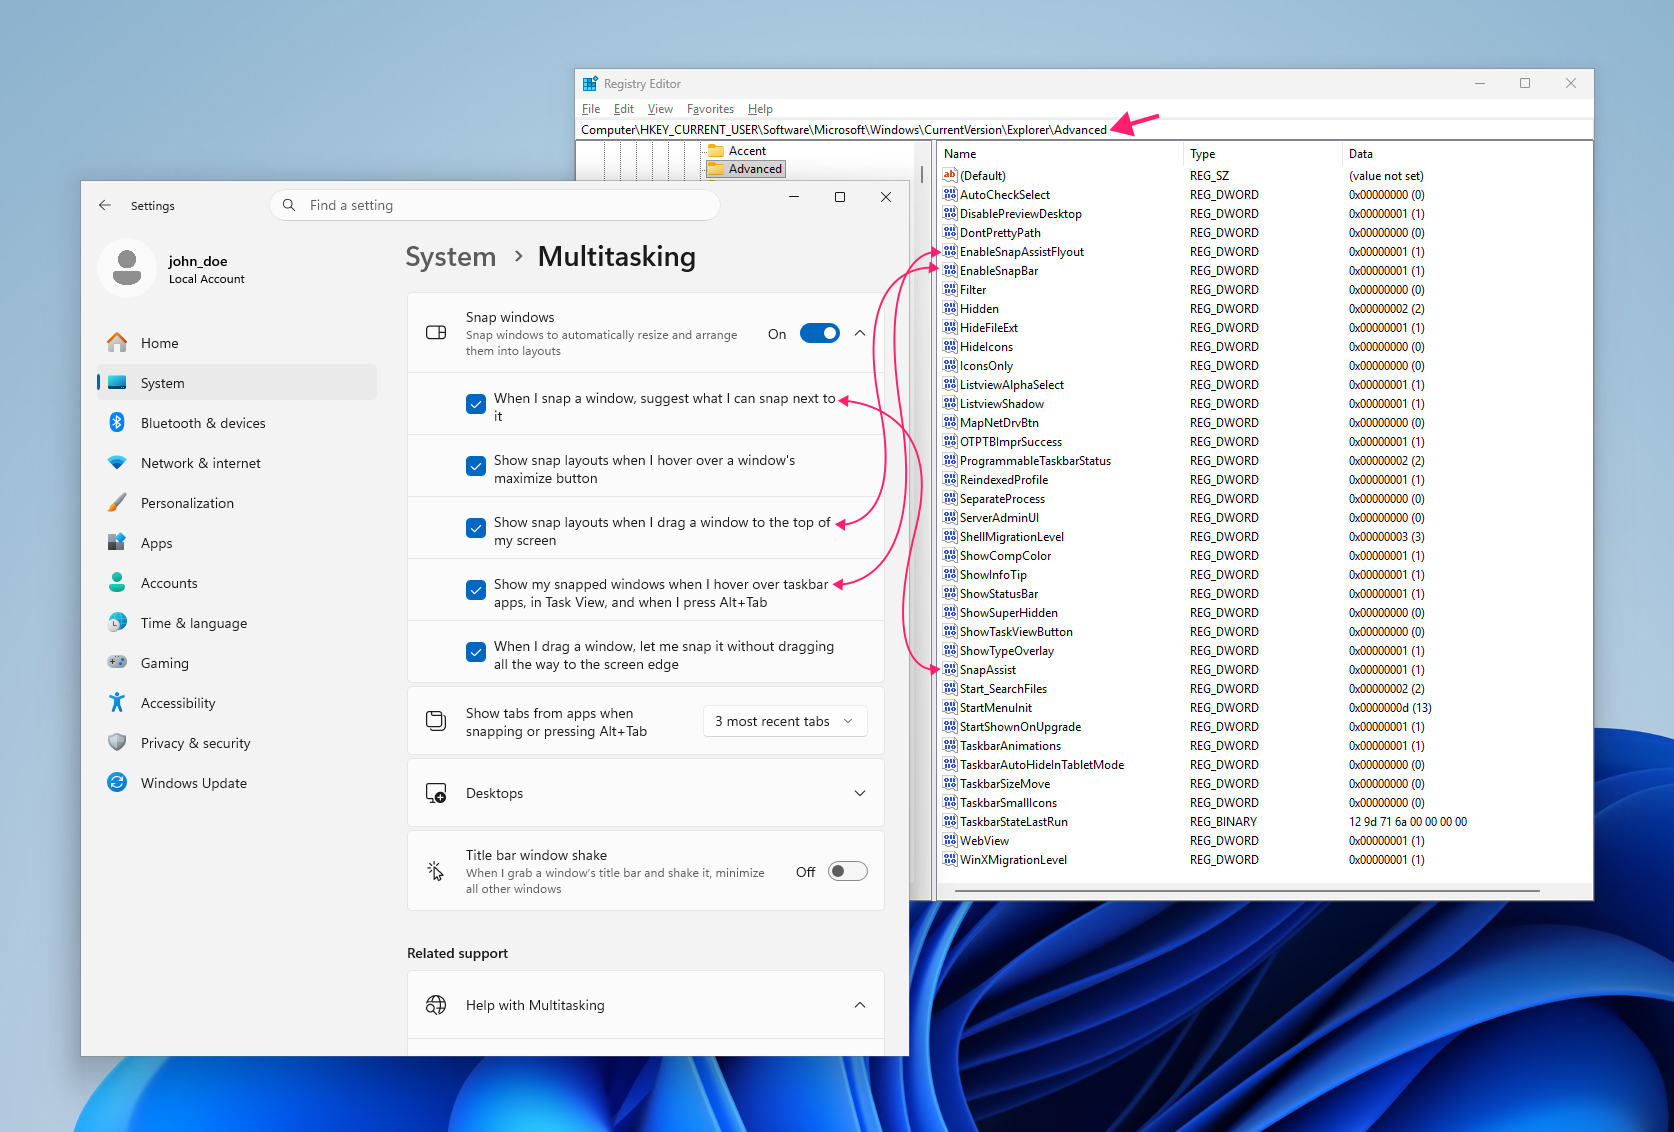
All the values above are REG_DWORD, where 1 enables the setting and 0 disables it. Here’s how to deploy it via GPO registry preferences:
- Open Group Policy Management Console and either create a new GPO or edit an existing one linked to the target OU
- Navigate to User Configuration > Preferences > Windows Settings > Registry
- Right-click Registry, select New > Registry Item
- Set Action to Update, Hive to
HKEY_CURRENT_USER, and enter the Key Path from the table above (for example,SoftwareMicrosoftWindowsCurrentVersionExplorerAdvanced) - Enter the Value name exactly as shown (for example,
SnapAssist), set Value type toREG_DWORD, and set Value data to1to enable or0to disable - Repeat steps 3 – 5 for each additional setting you want to enforce
- Link the GPO to the OU containing your target devices or users, then run
gpupdate /forceon a test machine to confirm the values apply before rolling out further
With Atera, these changes can be deployed remotely to multiple endpoints via remote PowerShell scripting. Write a PowerShell script to make the specific registry or GPO changes you need (or ask AI Copilot to write it for you), add it to your script library, and deploy it to specific devices or groups using the RMM platform.
Snap Assist and snap preview issues
If Snap Assist stops suggesting windows, panes overlap incorrectly, or the translucent snap preview outline fails to appear, work through these steps in order:
- Confirm Snap windows is enabled at Settings > System > Multitasking
- Restart Windows Explorer via Task Manager if the setting is already on but snapping still isn’t working
- Check for and install any pending graphics driver updates, since outdated drivers can break snap preview rendering
- Check your display scaling settings if you’re on a multi-monitor setup, since mismatched DPI or scaling across displays can throw off snap zone alignment
- Check whether the specific app you’re snapping has a known limitation (fixed window size, non-standard caption behavior, or full-screen exclusive mode)
» Here are our picks for the best driver updater software options
Building a screen setup that works for you
Manually resizing windows is a habit most people never unlearn, mostly because they never had a reason to. Once Snap Assist, keyboard shortcuts, and a saved FancyZones layout are doing that work for you, the time you spend wrestling windows into place drops dramatically.
For IT teams and MSPs managing this across a whole fleet rather than one machine, Atera’s remote scripting and PowerShell execution let you push the same GPO or Intune configuration out to every endpoint at once, so the whole team gets a consistent, distraction-free desktop without touching each device by hand.
Related Articles

How to reduce alert fatigue across your IT team
Your technicians aren't ignoring alerts because they're careless. They're ignoring them because most alerts have taught them to. Once the stream stops being trustworthy, real failures slip past with the noise. Fixing it means deciding what deserves an interruption, tuning out transient spikes, collapsing alert storms, and automating the fixes you've run a hundred times.
Read now
How to close the IT skills gap on your team
Course completions don't close skills gaps. Technicians finish the training, then hand the first unfamiliar failure straight back to a senior engineer. Real capability gets built on live tickets, incidents, and maintenance windows, with guidance that fades as competence grows.
Read now
How to calculate cost per ticket (and why most teams get it wrong)
Most cost-per-ticket figures are wrong before anyone reads them. Missing overhead, tickets that were opened but never closed, spam and duplicates padding the count, and one month's costs divided by another month's tickets all make support look cheaper than it is. Fix both sides of the division and the number finally shows where technician time and money actually go.
Read now
How to prepare for a software license audit
A vendor audit notice doesn't wait for you to get organized. It demands proof, right now, that every install matches every entitlement you've paid for, and most IT teams find out the hard way how much they don't actually know about their own environment. Getting audit-ready before the letter arrives is the difference between negotiating from strength and paying for months of scrambling.
Read nowEndless IT possibilities
Boost your productivity with Atera’s intuitive, centralized all-in-one platform









