
Table of contents
A low disk space alert on one laptop is a five-minute job. The same alert across dozens of endpoints is a different problem, and so is a server where IIS logs and update caches have been piling up for months. Either way, the fastest fix is usually the riskiest one. Delete the wrong folder under C:Windows and you break servicing, or shrink shadow storage without checking and you lose restore points.
A nearly full drive slows a machine down, but it can also stop it from patching and increase your organization’s attack surface. Fixing low disk space properly means finding what’s actually using the space, clearing it with supported tools, and working out why it keeps coming back.
» Manage patching better with our guide to patch management
What this takes by hand, and what Robin takes off your plate
The rest of this guide is the manual route. This is what each stage takes by hand, next to what Robin by Atera does for routine end-user cases, based on its documented disk cleanup use case.
Stage | By hand | With Robin by Atera |
Find what’s using the space | Remote in, run the baseline and location scripts, and read the results | Robin identifies what’s consuming the disk space |
Decide what’s safe to delete | Check each Disk Cleanup category and leave the risky ones unticked | Robin flags what’s safe to remove |
Tell the user | Message them and wait for a reply | Robin notifies the user |
Clean it up | Run Disk Cleanup or Storage Sense, then measure the result | Robin reclaims the storage once the user confirms |
Quick fix: run Disk Cleanup
If you need space back now, this is the fastest supported route. The sections below explain how to check first and what to leave alone.
- In an elevated PowerShell window, run cleanmgr /d C:.
- Select Clean up system files.
- Tick Windows Update Cleanup, Temporary files and Delivery Optimization Files. Leave Downloads, Recycle Bin and Previous Windows installation(s) unticked.
- Select OK, then Delete Files.
Find what’s filling the drive before deleting anything
Before you clear anything, you need to know exactly where the space has gone. On a workstation, that’s usually a mix of temporary files, update leftovers and user data. On a server, it’s just as likely to be application logs, deployment packages, and diagnostic data that pile up without anyone noticing.
These steps are all read-only. They show where the storage is going without changing anything, and they need no extra software, so you can run them in a remote support session as easily as at the console.
Get a baseline before you change anything
Start by recording total capacity, free space, and utilization. That way you can measure what each cleanup step actually recovers.
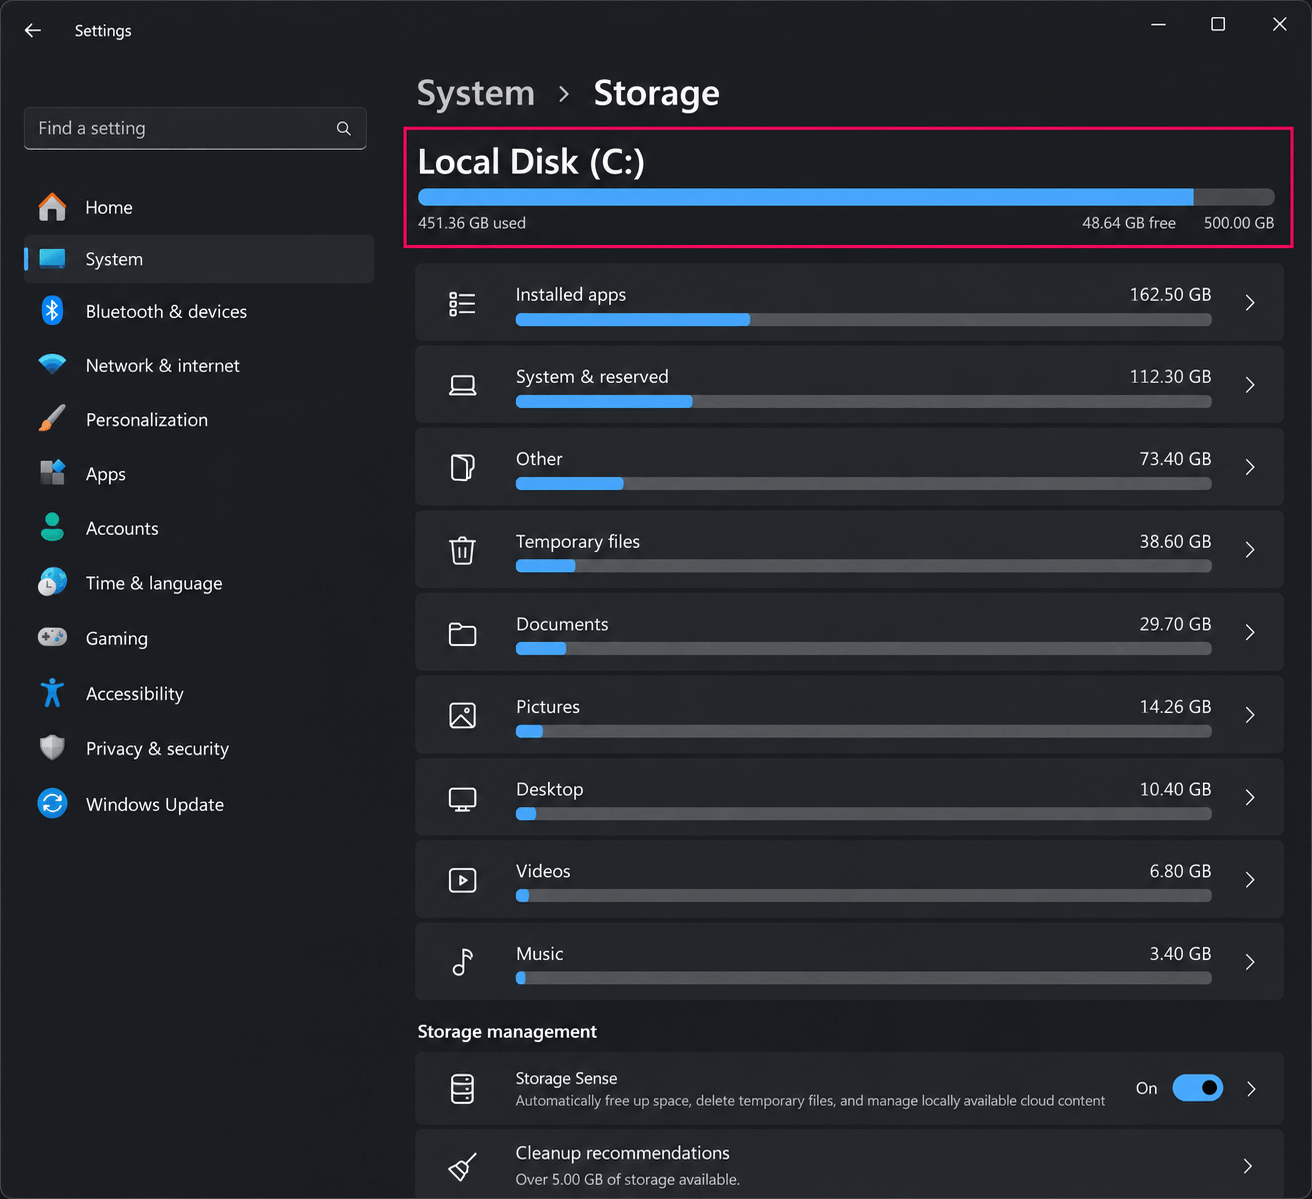
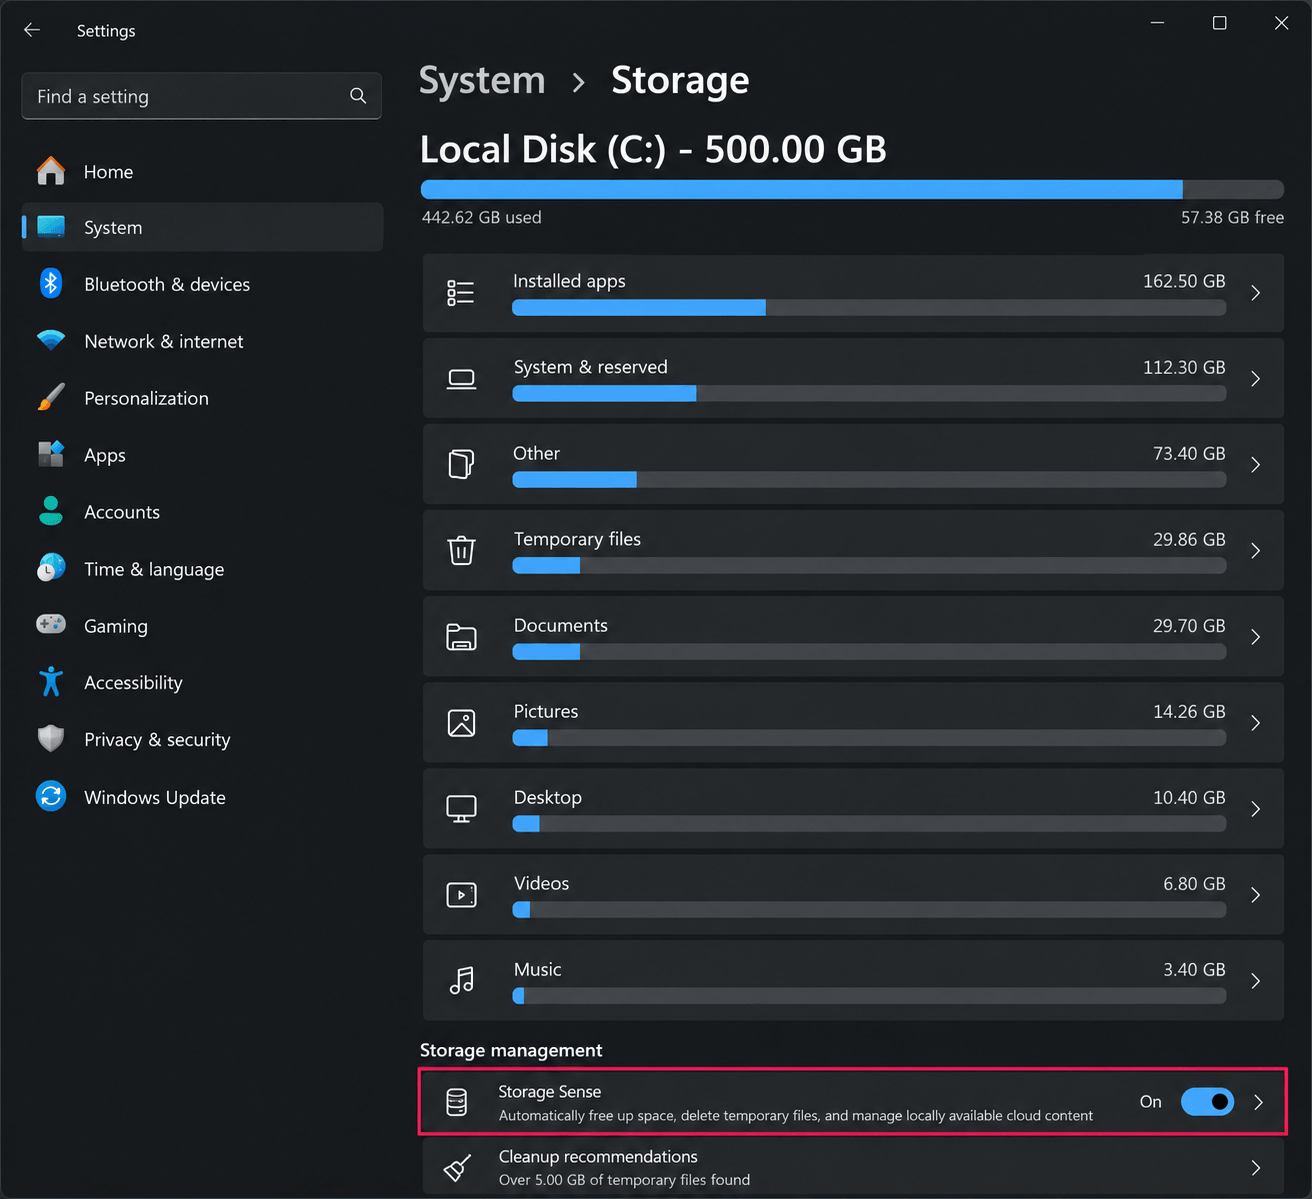
1. Open Settings > System > Storage and review the breakdown for the system drive. Windows splits usage into categories such as Installed apps, System & reserved, Temporary files and Other, and you can select Show more categories to see the rest
2. Open PowerShell as an admin and record the drive’s capacity and utilization with this command:
The Script:
Atera does not guarantee the integrity, availability, security, virus-free, safety, lawfulness, non-infringement, rights’ status, or functionality of the scripts. The use of the shared scripts is at your own risk. Scripts are provided “AS IS”. *
Get-PSDrive C | Select-Object `
  @{N='UsedGB';E={[math]::Round($_.Used/1GB,2)}},
  @{N='FreeGB';E={[math]::Round($_.Free/1GB,2)}},
  @{N='TotalGB';E={[math]::Round(($_.Used+$_.Free)/1GB,2)}},
  @{N='Used%';E={[math]::Round($_.Used/($_.Used+$_.Free)*100,1)}}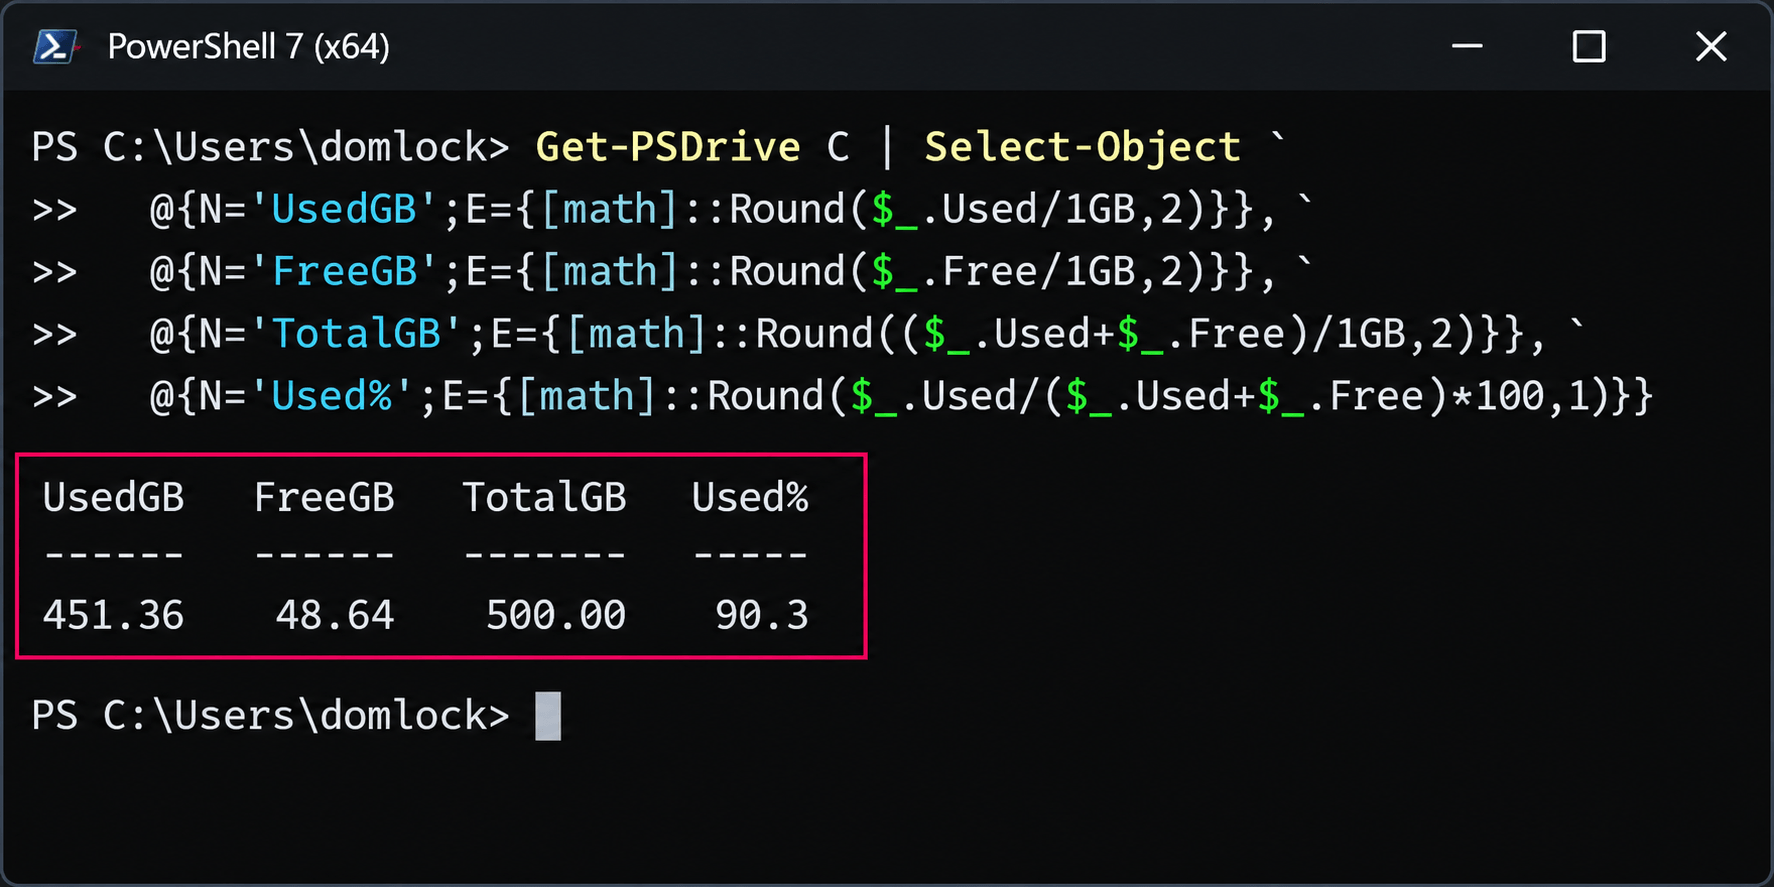
3. Keep the output, because you’ll run the same command after cleanup to measure the real improvement Also store the free space in a variable. The final measurement step in this guide compares against it, and without this line the comparison returns the wrong result: $Before = (Get-Volume -DriveLetter C).SizeRemaining
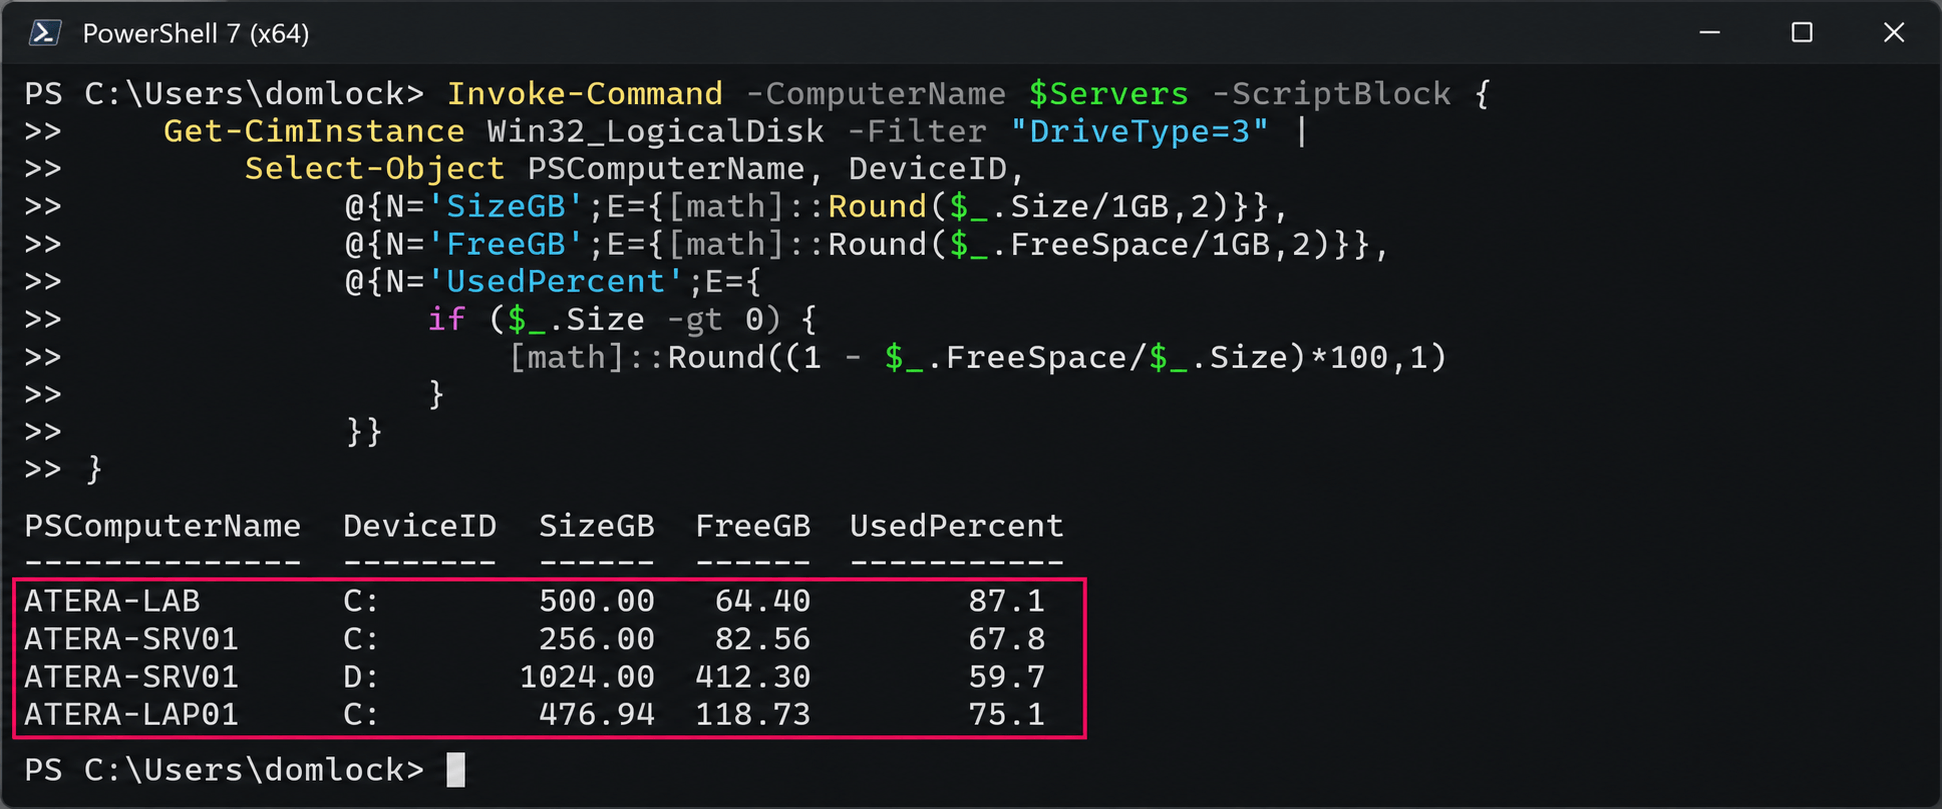
4. To take the same baseline from several Windows hosts at once, run the following read-only script with Invoke-Command. The target machines need PowerShell remoting enabled, and the account running the script needs the right permissions.
The Script:
Atera does not guarantee the integrity, availability, security, virus-free, safety, lawfulness, non-infringement, rights’ status, or functionality of the scripts. The use of the shared scripts is at your own risk. Scripts are provided “AS IS”. *
$Servers = 'SRV01', 'SRV02'
Invoke-Command -ComputerName $Servers -ScriptBlock {
  Get-CimInstance Win32_LogicalDisk -Filter "DriveType=3" |
    Select-Object PSComputerName, DeviceID,
      @{N='SizeGB';E={[math]::Round($_.Size/1GB,2)}},
      @{N='FreeGB';E={[math]::Round($_.FreeSpace/1GB,2)}},
      @{N='UsedPercent';E={
        if ($_.Size -gt 0) {
          [math]::Round((1 - $_.FreeSpace/$_.Size)*100,1)
        }
      }}
      }
If System & reserved is the largest category in Settings, don’t treat it as one problem. It’s a bundle of separate components, including:
- The component store
- Reserved storage
- The page file
- The hibernation file
- Restore points and shadow copies
- Windows.old after a feature upgrade
Measure the usual locations, then drill down
Rather than scanning the whole drive straight away, start with the locations that most often hold accumulated data. A full recursive scan of a large production volume takes time and adds disk I/O. A targeted pass usually finds the problem faster.
1. Run the following script to measure known accumulation points and sort them by size. Add or remove paths to suit the device’s role
The Script:
Atera does not guarantee the integrity, availability, security, virus-free, safety, lawfulness, non-infringement, rights’ status, or functionality of the scripts. The use of the shared scripts is at your own risk. Scripts are provided “AS IS”. *
$Paths = @(
  'C:\ProgramData',
  'C:\inetpub\logs\LogFiles',
  'C:\Windows\Temp',
  "$env:LOCALAPPDATA\Temp",
  'C:\Windows\SoftwareDistribution\Download',
  'C:\Windows\Logs\CBS',
  'C:\Windows\Logs\DISM',
  'C:\Windows\ccmcache',
  'C:\Windows\Minidump',
  'C:\ProgramData\Microsoft\Windows\WER',
  'C:\Windows\Microsoft.NET\Framework64\v4.0.30319\Temporary ASP.NET Files',
  'C:\Windows\Microsoft.NET\Framework\v4.0.30319\Temporary ASP.NET Files'
)


$Paths | ForEach-Object {
  if (Test-Path $_) {
    $Size = (Get-ChildItem $_ -Recurse -File -Force -ErrorAction SilentlyContinue |
      Measure-Object Length -Sum).Sum
    [PSCustomObject]@{
      Path   = $_
      SizeGB = [math]::Round($Size / 1GB, 2)
    }
  }
} | Sort-Object SizeGB -Descending | Format-Table -AutoSize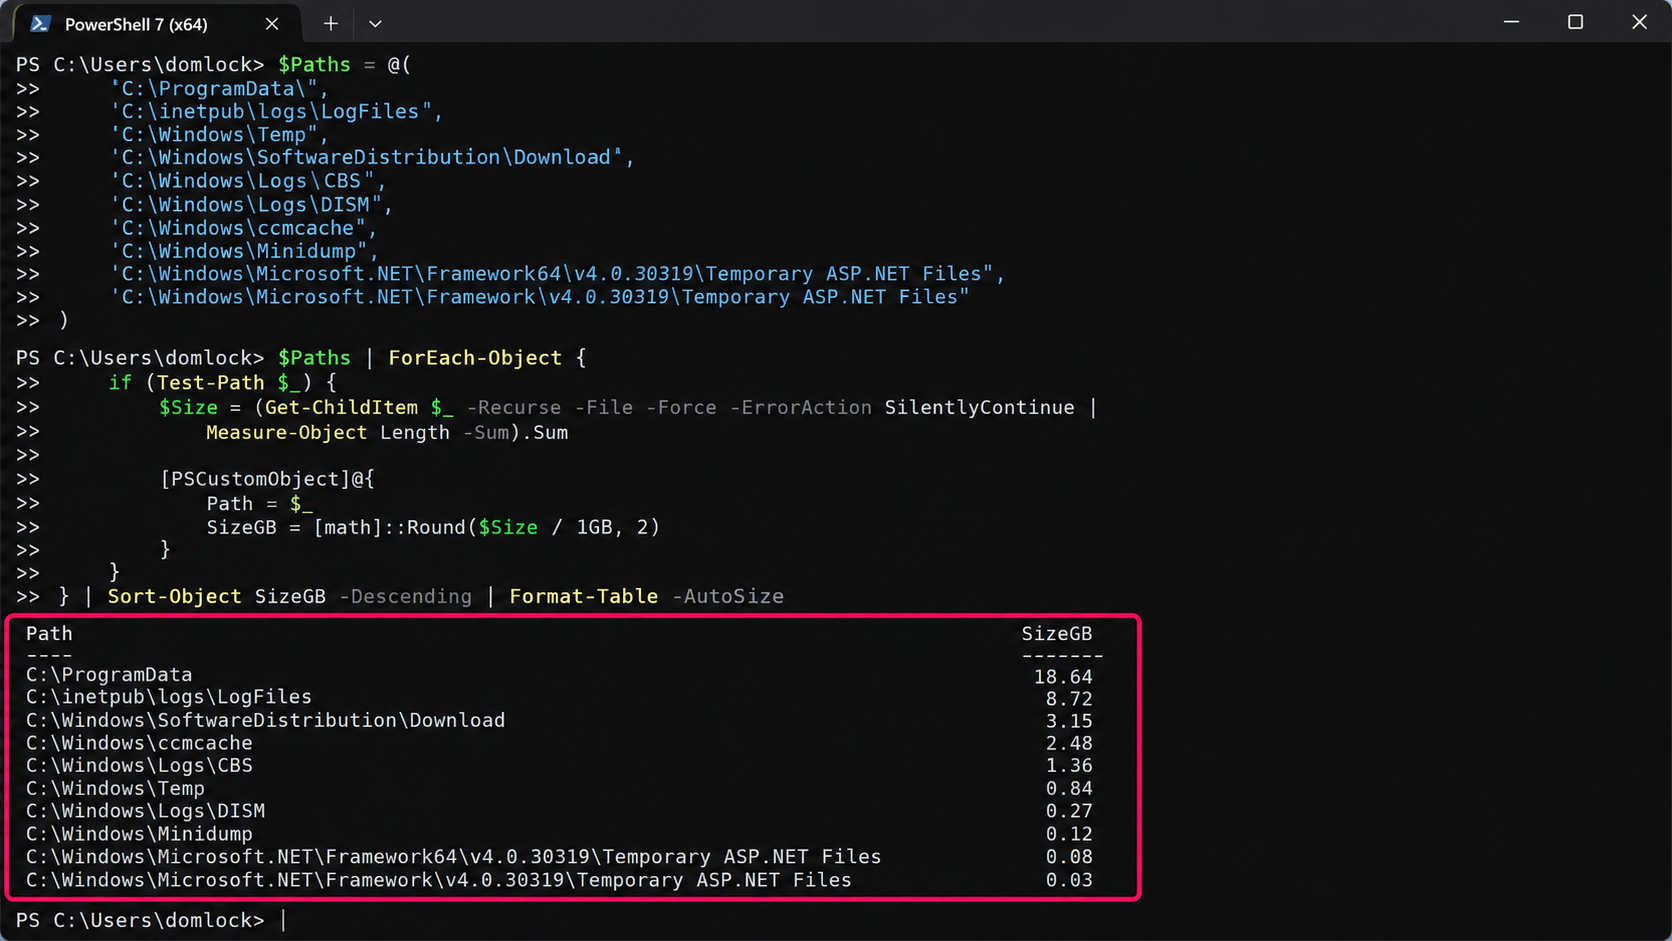
2. Take the largest directory from the results and list its 20 biggest files. Swap in whichever path stood out, whether that’s an IIS log folder, an application directory or a temp location
The Script:
Atera does not guarantee the integrity, availability, security, virus-free, safety, lawfulness, non-infringement, rights’ status, or functionality of the scripts. The use of the shared scripts is at your own risk. Scripts are provided “AS IS”. *
Get-ChildItem 'C:\ProgramData' -Recurse -File -Force -ErrorAction SilentlyContinue |
  Sort-Object Length -Descending |
  Select-Object -First 20 FullName,
    @{N='SizeGB';E={[math]::Round($_.Length/1GB,2)}}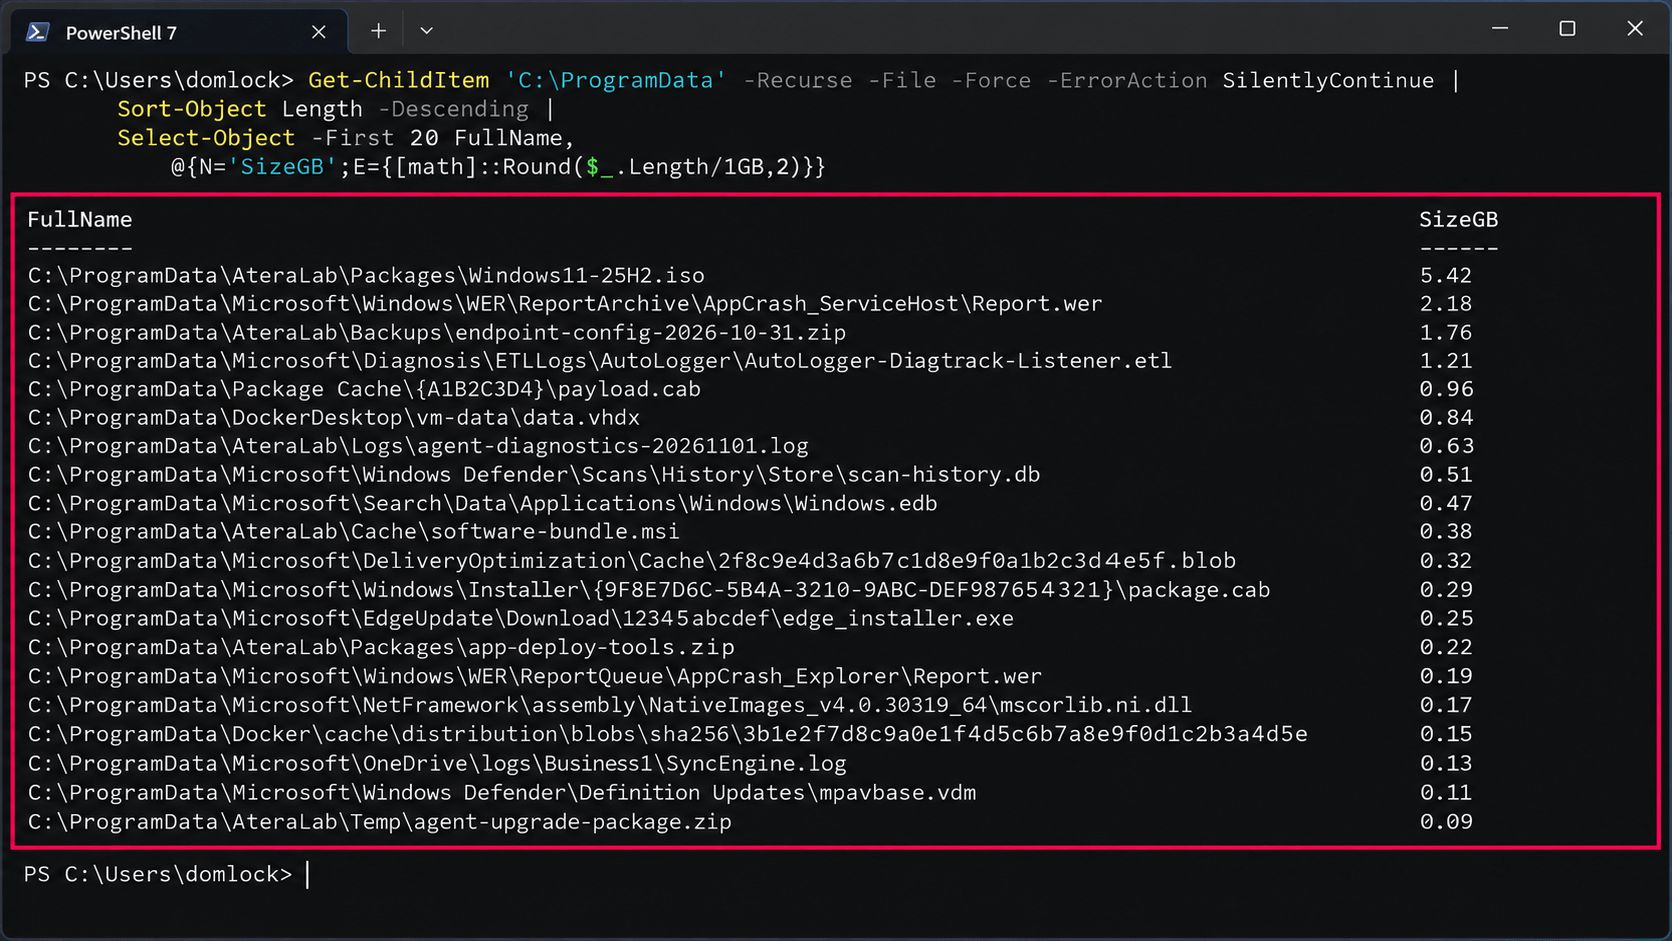
3. Treat the totals as a guide, not an exact figure. Access restrictions and files in use can both lead to under-reporting, especially when the script isn’t running elevated
4. On application servers, widen the search. IIS logs can grow considerably when retention isn’t configured, and deployment systems often keep several versions of the same application
5. To break a deployment root down by application, measure each subdirectory:
The Script:
Atera does not guarantee the integrity, availability, security, virus-free, safety, lawfulness, non-infringement, rights’ status, or functionality of the scripts. The use of the shared scripts is at your own risk. Scripts are provided “AS IS”. *
Get-ChildItem 'C:\Octopus\Applications' -Directory -ErrorAction SilentlyContinue |
  ForEach-Object {
    $Size = (Get-ChildItem $_.FullName -Recurse -File -Force -ErrorAction SilentlyContinue |
      Measure-Object Length -Sum).Sum
    [PSCustomObject]@{
      Path   = $_.FullName
      SizeGB = [math]::Round($Size / 1GB, 2)
    }
} | Sort-Object SizeGB -DescendingCheck the locations nobody looks at
When C: fills up and nothing obvious explains it, the space is usually sitting somewhere that normal file searches skip, such as runaway application logs, crash dumps, Windows Update caches, temporary installation files and Volume Shadow Copy storage.
The user’s own temp directory (%LOCALAPPDATA%Temp) is one of the most overlooked. Installers, application caches and temporary working files collect there per profile, outside the system locations most cleanup routines focus on.
On servers, also check SQL Server backup locations, application deployment directories, and retained installation packages. If the drive itself is the problem rather than what’s on it, check its health before cleaning further. See our guide to how to check hard drive health.
With Robin by Atera: Finding the space is the first job Robin takes over for routine end-user cases. When an employee reports a full drive, Robin identifies what’s consuming the disk space and flags what’s safe to remove, so your technician doesn’t need a remote session to run scripts and read the results.
Steps to free up disk space safely
Once you know where the space has gone, work through the cleanup methods from lowest to highest risk. Disk Cleanup and Storage Sense handle disposable data through supported Windows mechanisms. Command-line cleanup goes further, into system components that need a deliberate decision.
Step 1: Run Disk Cleanup for temporary files and update leftovers
Disk Cleanup is the quickest supported way to clear accumulated temporary files, Windows Update leftovers and installation artifacts. It’s also the easiest to repeat, because its settings can be saved and scripted.
- In an elevated PowerShell window, run
cleanmgr /d C:to launch Disk Cleanup for the system drive - Select Clean up system files to include the categories that need administrative privileges. Windows runs a second scan before showing the expanded list
- Select Windows Update Cleanup, which usually recovers the most space on systems that have built up superseded update components, though the amount depends on patch history and previous maintenance
- Add in Temporary files, Delivery Optimization Files, System archived Windows Error Reporting, and any temporary installation files listed. Temporary files and error reporting data grow fastest on systems with repeated application failures or installation problems
- Leave Previous Windows installation(s) unchecked unless the rollback window for the last feature upgrade has passed
- Leave memory dump and error reporting categories unchecked if you’re still troubleshooting a failure on that device, because they may hold the evidence you need
- Leave Downloads and Recycle Bin unchecked, since they may contain files users expect to keep
Select OK, then select Delete Files to confirm

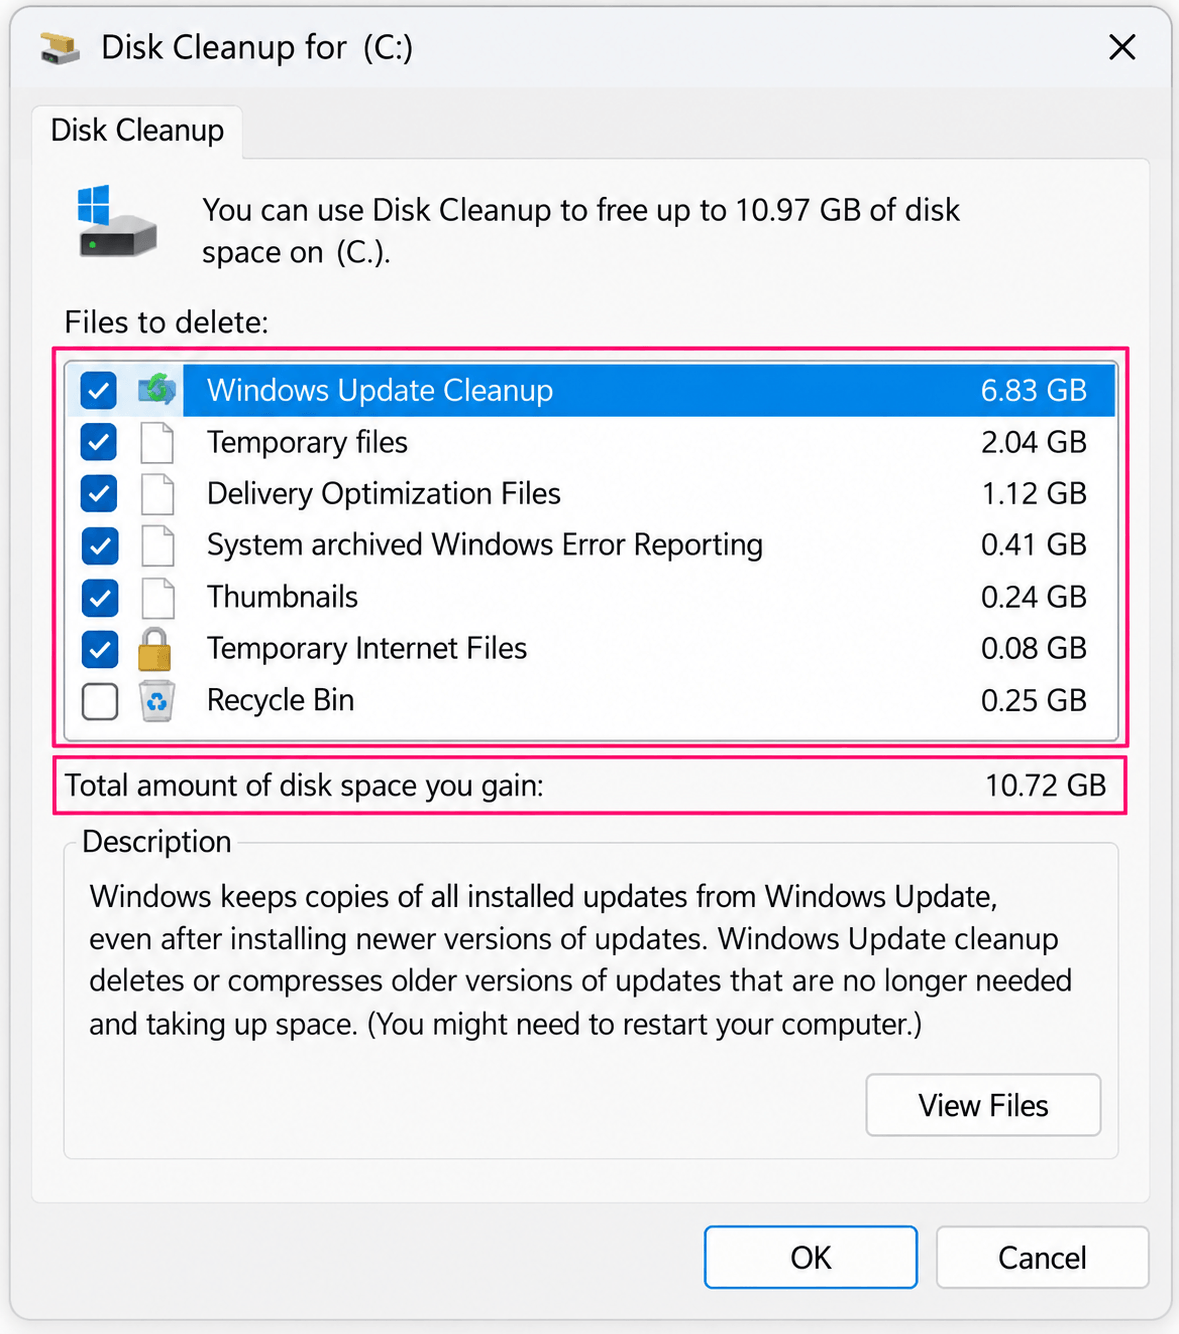
On production servers, base these choices on the system’s role and current maintenance requirements rather than a fixed checklist. To repeat the same cleanup without selecting categories every time, save a profile and run it by number:
Run
cleanmgr /sageset:100and select the categories to include. Windows stores the selection under profile 100
Run
cleanmgr /sagerun:100to execute the saved profile
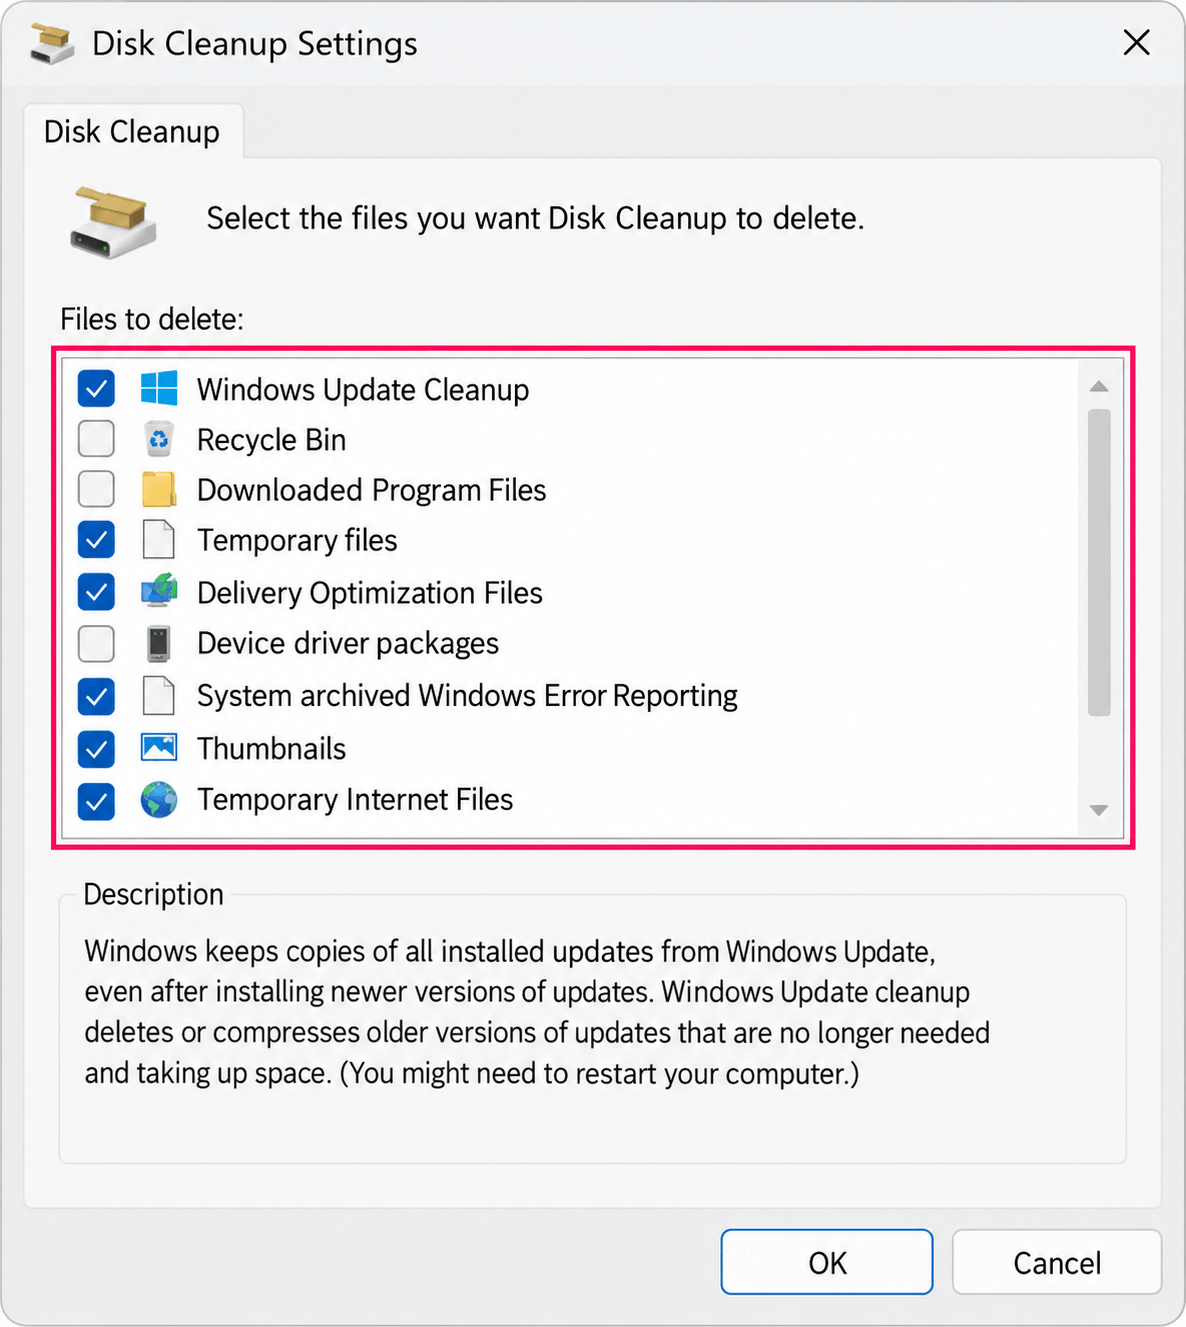
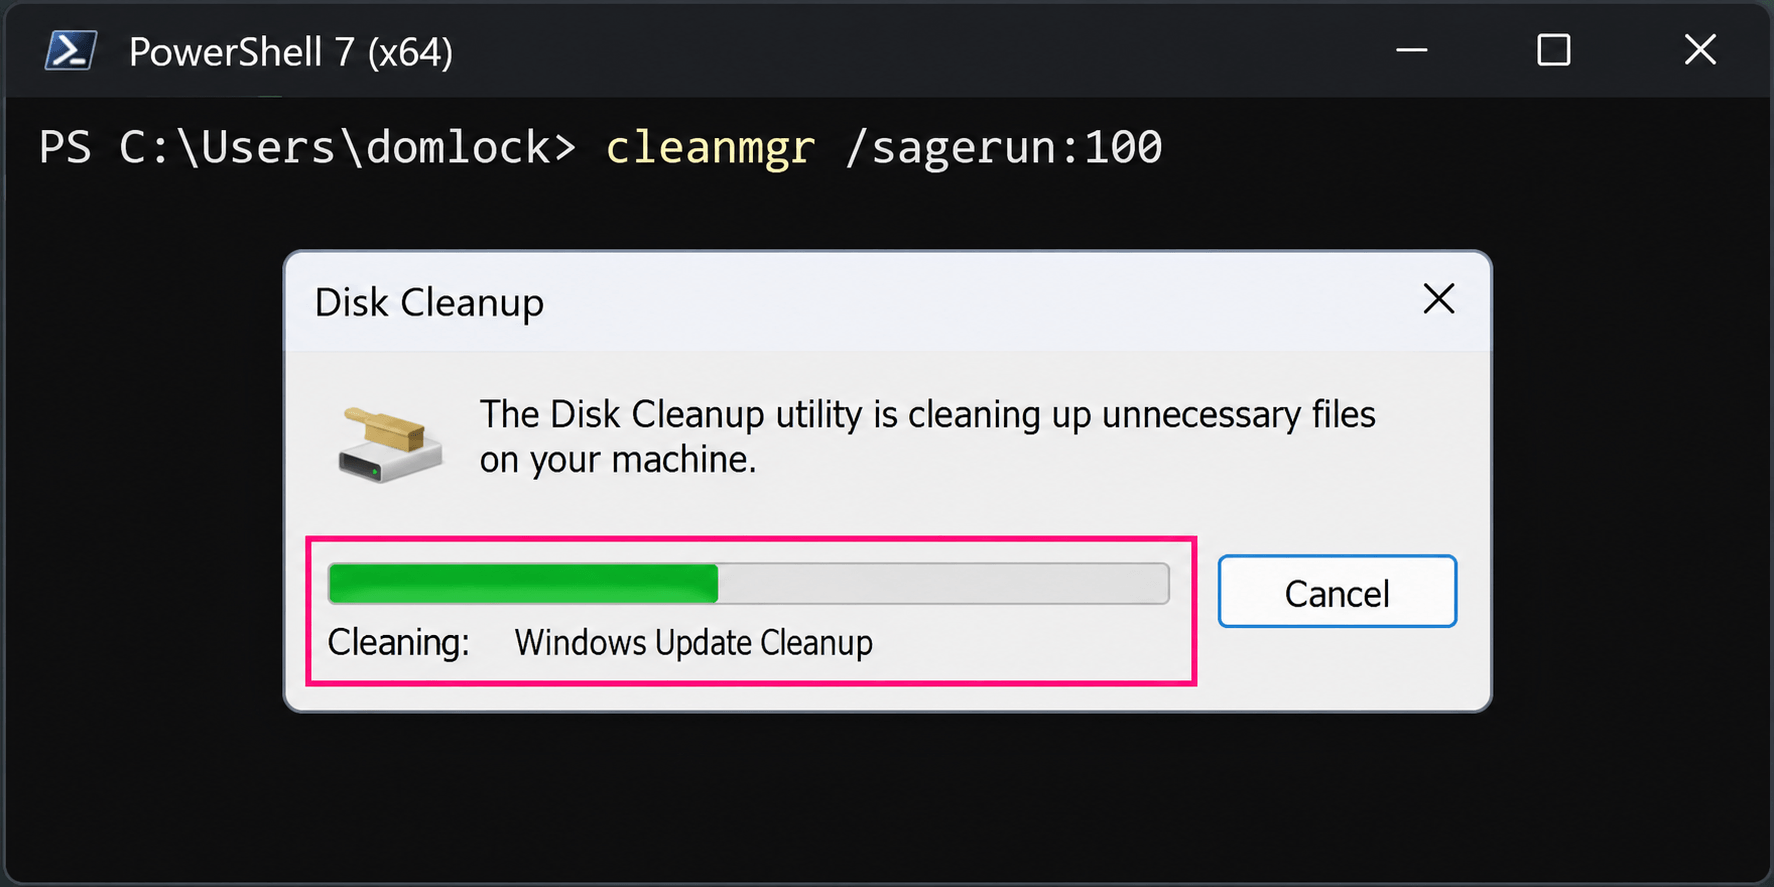
The number is just an identifier, so you can keep separate profiles for different requirements.
You can schedule a saved profile through Task Scheduler on a single machine, or across your devices with an Atera automation profile that runs the cleanup on a recurring schedule. Running it on a schedule doesn’t replace investigating unexpected growth, though.
With Robin by Atera: For a routine case, there is no checklist to work through and no profile to maintain. Robin flags what’s safe to remove, notifies the user, and reclaims the storage once they confirm, so nobody has to decide which boxes to tick or wait for a reply.
Step 2: Configure Storage Sense
Storage Sense suits Windows 10 and Windows 11 endpoints where temporary files build up over time. On business devices, change its defaults rather than leaving Windows to decide what to remove. It’s an endpoint feature, so it doesn’t replace log retention, application maintenance, or capacity monitoring on servers.
- Open Settings > System > Storage
Select Storage Sense under Storage management

- Turn on Automatic User content cleanup
- Make sure Cleanup of temporary files is turned on
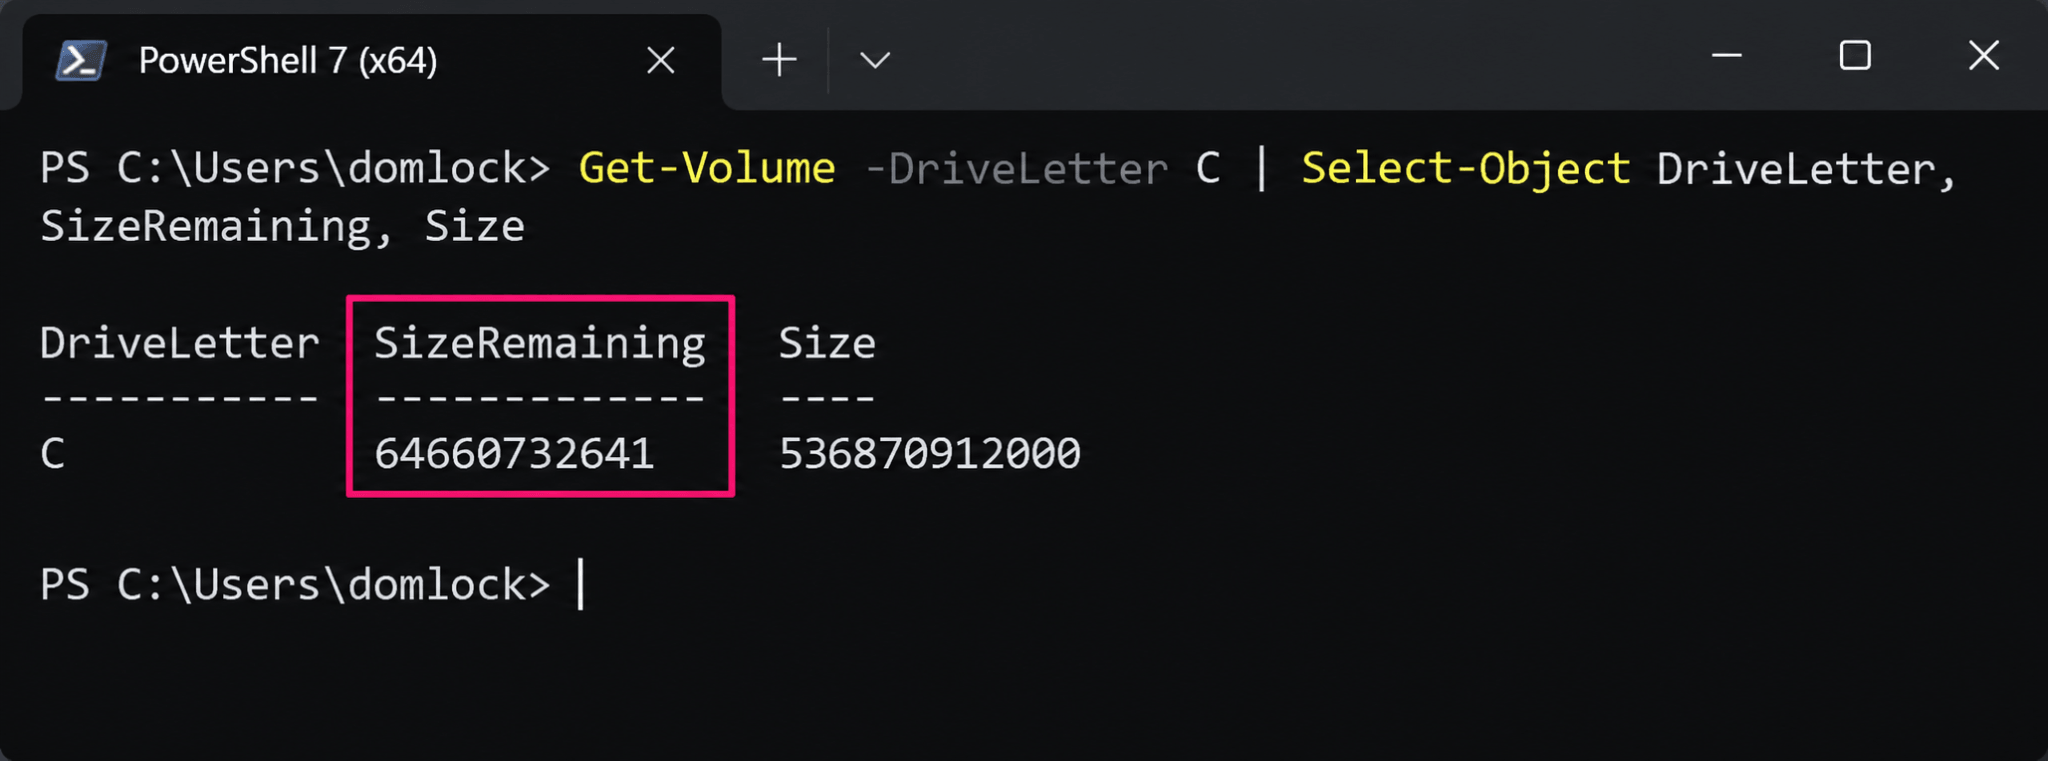
Check the drive’s remaining capacity with
Get-Volume -DriveLetter C | Select-Object DriveLetter, SizeRemaining, Sizeand compare it with your baselineNote: SizeRemaining is reported in bytes, and the amount recovered depends on which files were eligible for removal.

- Set Run Storage Sense to Every week, so cleanup runs on a regular schedule rather than waiting until space is critically low
- Set the Recycle Bin option to 30 days, provided that matches your company’s retention policy
- Set the Downloads option to Never, unless an approved organizational policy specifically permits automatic deletion. In business environments, Downloads often holds installation packages, exported reports, diagnostic files and documents users haven’t moved anywhere else yet.
Set Locally available cloud content to Never, unless you’ve reviewed your OneDrive Files On-Demand policies and offline-access requirements. Automatically making files online-only can cause problems for users who work offline or have unreliable connections

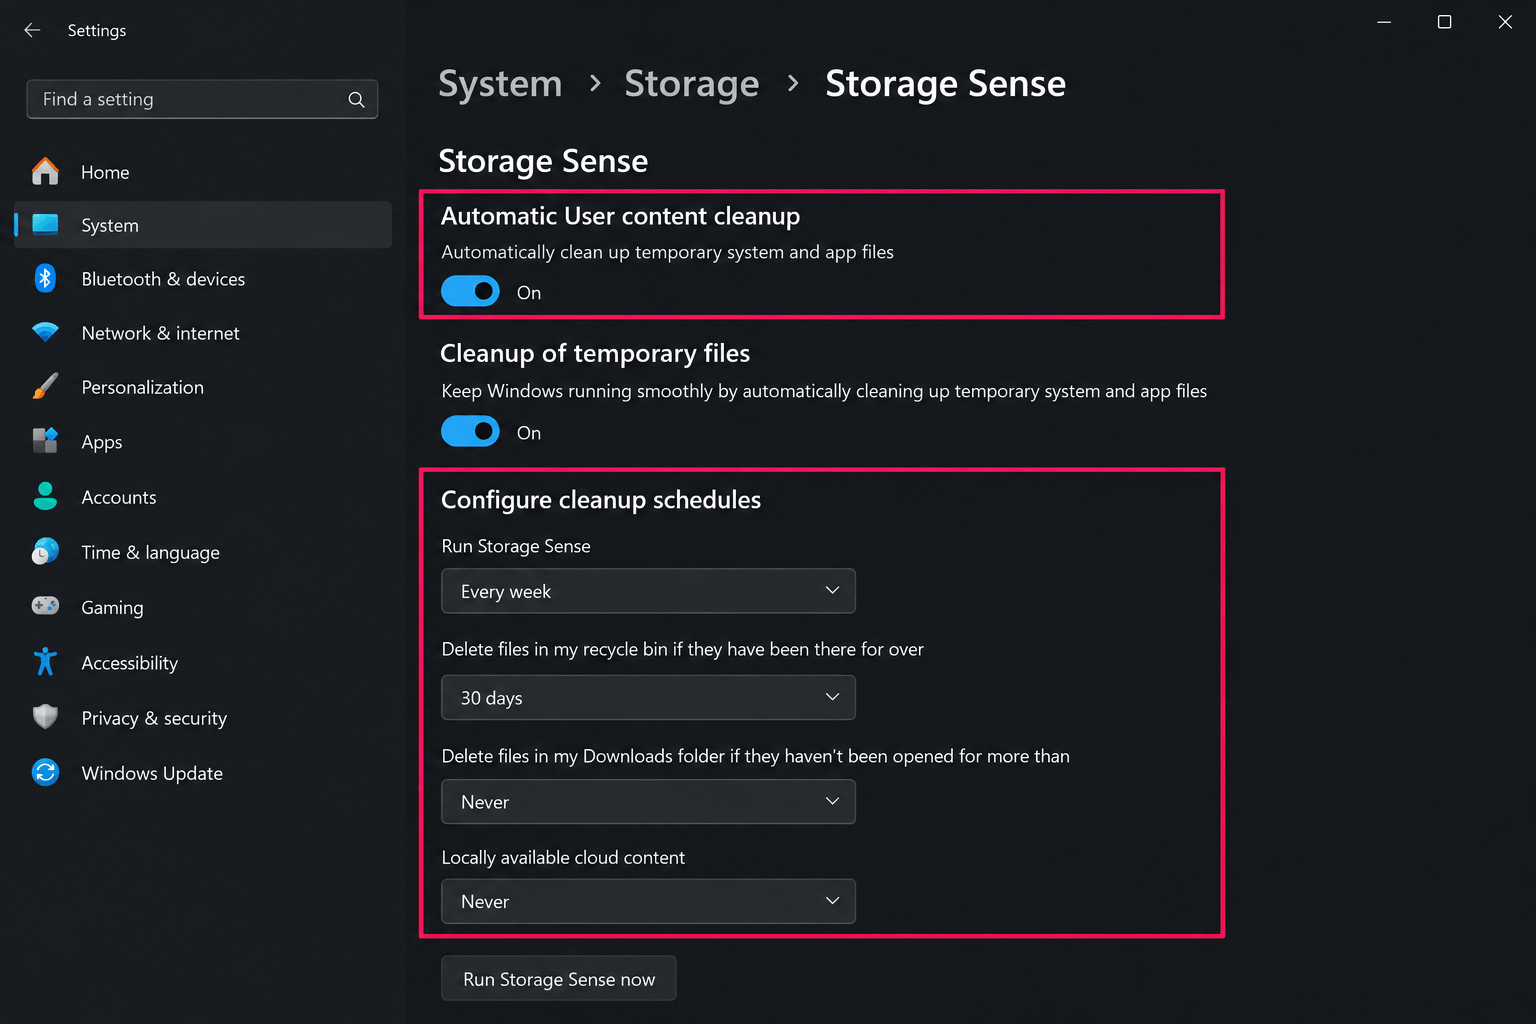
This baseline is a recommended operational setting, not a Microsoft default. It automates routine temporary file cleanup while keeping deliberate control over user documents, downloaded files, cloud content and application data.
On managed devices, push these settings through policy rather than configuring each workstation by hand, and add the related storage policies at the same time:
- Storage Sense through Intune or Group Policy: The Storage policy CSP and the matching Group Policy settings under Computer Configuration > Administrative Templates > System > Storage Sense control the same options as the Settings page.
AllowStorageSenseGlobalturns Storage Sense on, and the cadence, Recycle Bin, Downloads, and cloud content thresholds won’t apply without it.ConfigStorageSenseGlobalCadencesets the schedule (7for weekly), whileConfigStorageSenseRecycleBinCleanupThreshold,ConfigStorageSenseDownloadsCleanupThreshold, andConfigStorageSenseCloudContentDehydrationThresholdset retention in days, where0means never. - Stale user profiles: On shared devices, the Group Policy setting Delete user profiles older than a specified number of days on system restart, under Computer Configuration > Administrative Templates > System > User Profiles, removes profiles that haven’t been used within the period you set.
- OneDrive Files On-Demand: Files stay visible in File Explorer without each one being stored locally, which helps on laptops with small SSDs and users who sync large document libraries. Files marked to always stay on the device still take up space, and Files On-Demand doesn’t help with operating system or application storage.
With Robin by Atera: Storage Sense and policy settings reduce routine buildup across a fleet, but a user can still run out of space today. Robin reclaims that user’s storage once they confirm, so the case doesn’t have to wait for a scheduled cleanup or a ticket to reach a technician.
» Learn how to manage group policies easier with Atera
Step 3: Clean up system components from the command line
Command-line cleanup reaches the storage Windows hides from users, such as the component store, the update cache, and shadow copies and the hibernation file. Some of these operations are routine. Others affect updates, recovery or power management, so each step below starts with a check and only acts when the result justifies it.
Run everything from an elevated PowerShell session:
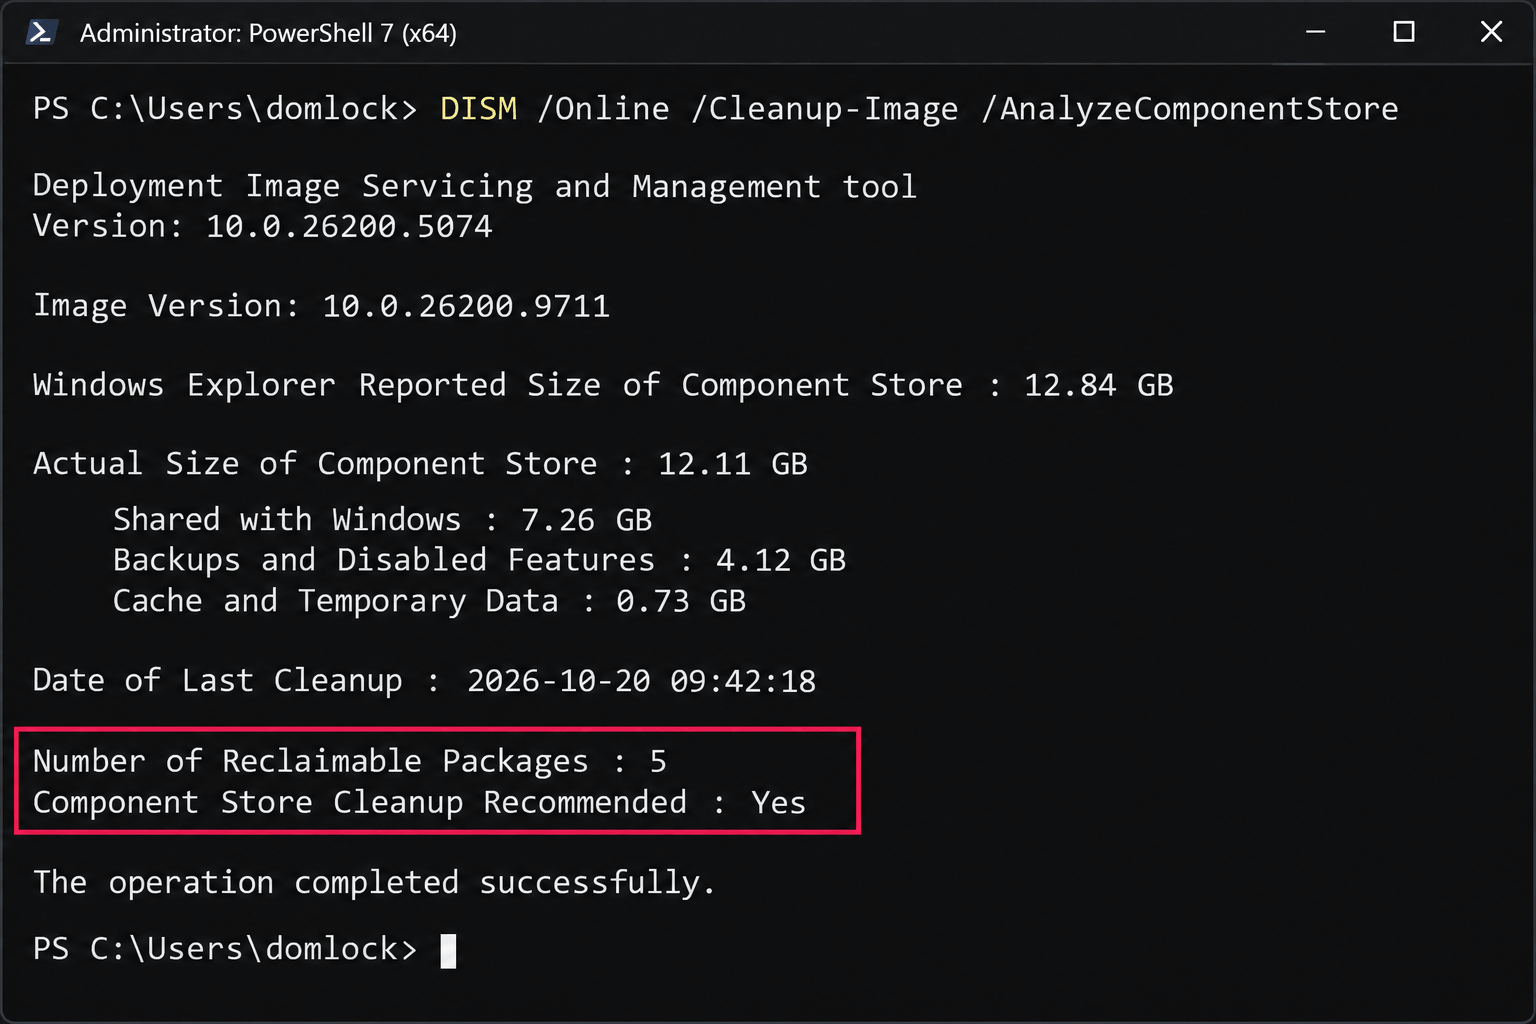
1. Analyze the component store with DISM /Online /Cleanup-Image /AnalyzeComponentStore. Check the Actual Size of Component Store, Number of Reclaimable Packages and Component Store Cleanup Recommended fields. Go by these figures rather than Explorer’s size for C:WindowsWinSxS, which counts hard-linked files more than once
2. If cleanup is recommended and no installation, update or restart is pending, run DISM /Online /Cleanup-Image /StartComponentCleanup. This removes superseded components through Windows servicing. Never delete files directly from C:WindowsWinSxS, and leave out /ResetBase in routine cleanup, because it removes the ability to uninstall updates already in the component baseline
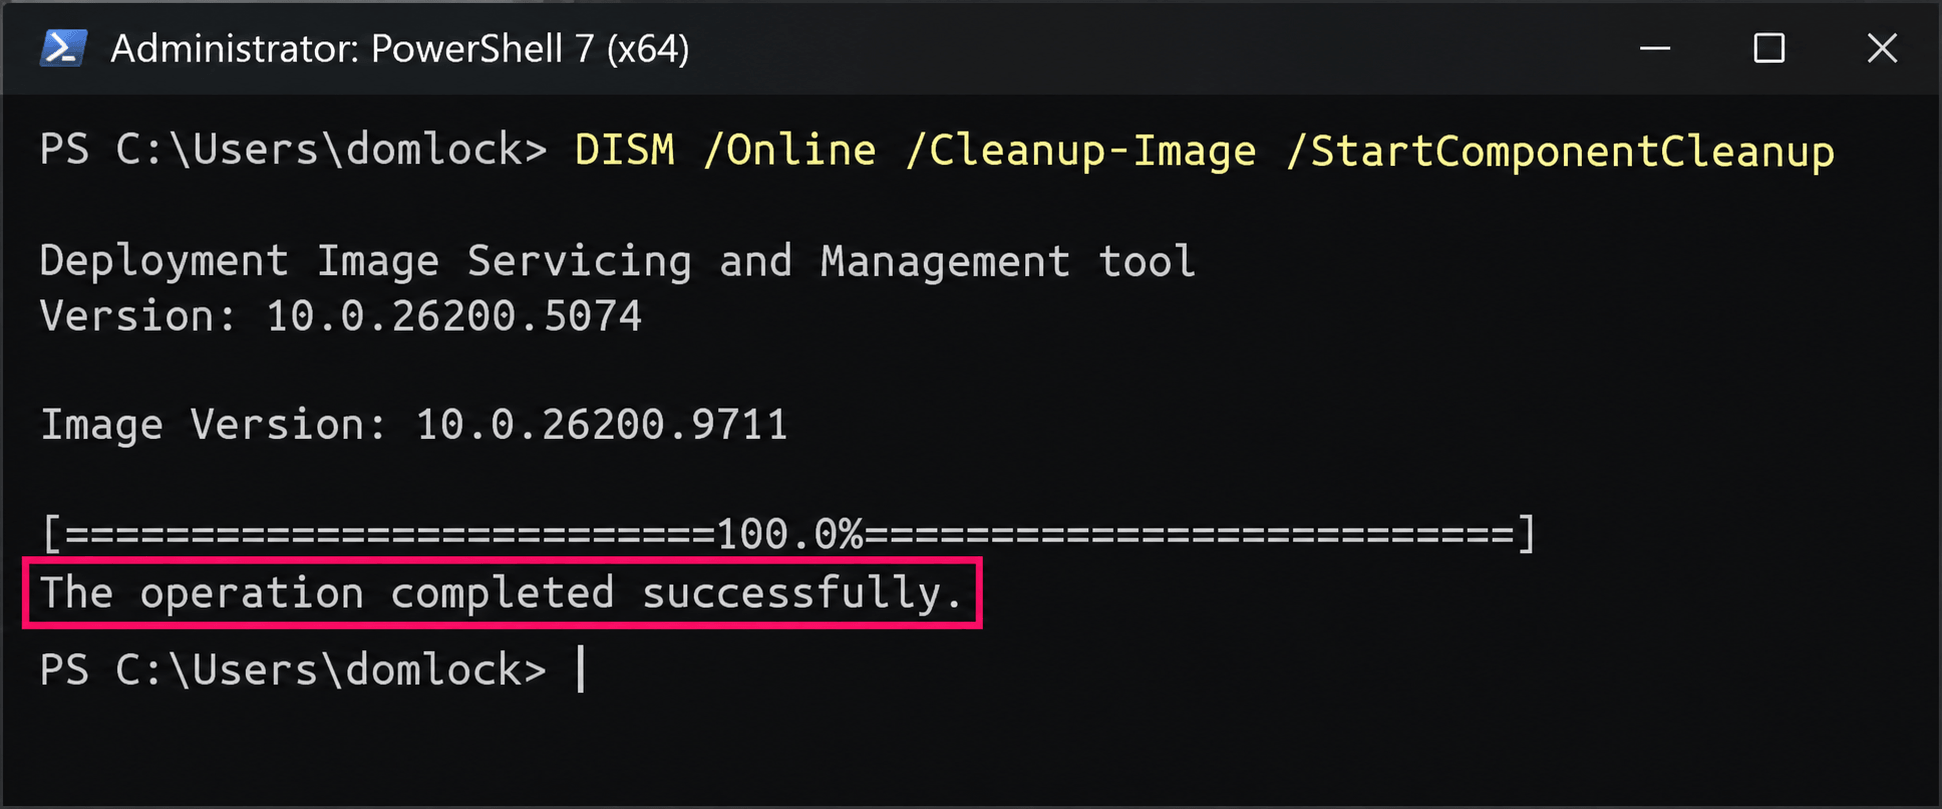
3. If your scan showed a large C:WindowsSoftwareDistributionDownload folder, confirm that Windows Update is idle, no servicing operation is running, and no restart is pending before clearing it. Clearing this cache removes downloaded packages, not installed updates, and Windows may download the content again, so treat it as conditional maintenance rather than a scheduled cleanup
4. This script clears the cache by recording the original state of the Windows Update and BITS services, verifying that both have stopped before deleting anything, and trying to restore each service to its original state even if cleanup fails, without changing service startup types:
The Script:
Atera does not guarantee the integrity, availability, security, virus-free, safety, lawfulness, non-infringement, rights’ status, or functionality of the scripts. The use of the shared scripts is at your own risk. Scripts are provided “AS IS”. *
$ServiceNames = @('wuauserv', 'BITS')
$OriginalStates = @{}
$CachePath = Join-Path $env:SystemRoot 'SoftwareDistribution\Download'


foreach ($Name in $ServiceNames) {
  $Service = Get-Service -Name $Name -ErrorAction Stop
  if ($Service.Status -notin @('Running', 'Stopped')) {
    throw "Service $Name is in a transitional state. Cleanup aborted."
  }
  $OriginalStates[$Name] = $Service.Status.ToString()
}


try {
  foreach ($Name in $ServiceNames) {
    $Service = Get-Service -Name $Name -ErrorAction Stop
    if ($Service.Status -ne 'Stopped') {
      Stop-Service -Name $Name -ErrorAction Stop
      $Service.WaitForStatus(
        [System.ServiceProcess.ServiceControllerStatus]::Stopped,
        [TimeSpan]::FromSeconds(30)
      )
    }
  }


  foreach ($Name in $ServiceNames) {
    if ((Get-Service -Name $Name -ErrorAction Stop).Status -ne 'Stopped') {
      throw "Service $Name did not stop. Cleanup aborted."
    }
  }


  if (Test-Path -LiteralPath $CachePath) {
    Get-ChildItem -LiteralPath $CachePath -Force -ErrorAction Stop |      Remove-Item -Recurse -Force -ErrorAction Stop
  }
}
finally {
  foreach ($Name in $ServiceNames) {
    try {
      $Service = Get-Service -Name $Name -ErrorAction Stop
      if ($OriginalStates[$Name] -eq 'Running') {
        if ($Service.Status -ne 'Running') {
          Start-Service -Name $Name -ErrorAction Stop
          $Service.WaitForStatus(
            [System.ServiceProcess.ServiceControllerStatus]::Running,
            [TimeSpan]::FromSeconds(30)
          )
        }
      }
      elseif ($Service.Status -ne 'Stopped') {
        Stop-Service -Name $Name -ErrorAction Stop
        $Service.WaitForStatus(
          [System.ServiceProcess.ServiceControllerStatus]::Stopped,
          [TimeSpan]::FromSeconds(30)
        )
      }
    }
    catch {
      Write-Warning "Could not restore $Name to its original state: $_"
    }
  }
}Pro tip: To clear the cache on more than one device, Atera’s RMM offers remote PowerShell execution to run the script across selected devices or device groups instead of connecting to each machine. If you need to adapt the script for your environment, AI Copilot can generate complex scripts from plain-language descriptions.
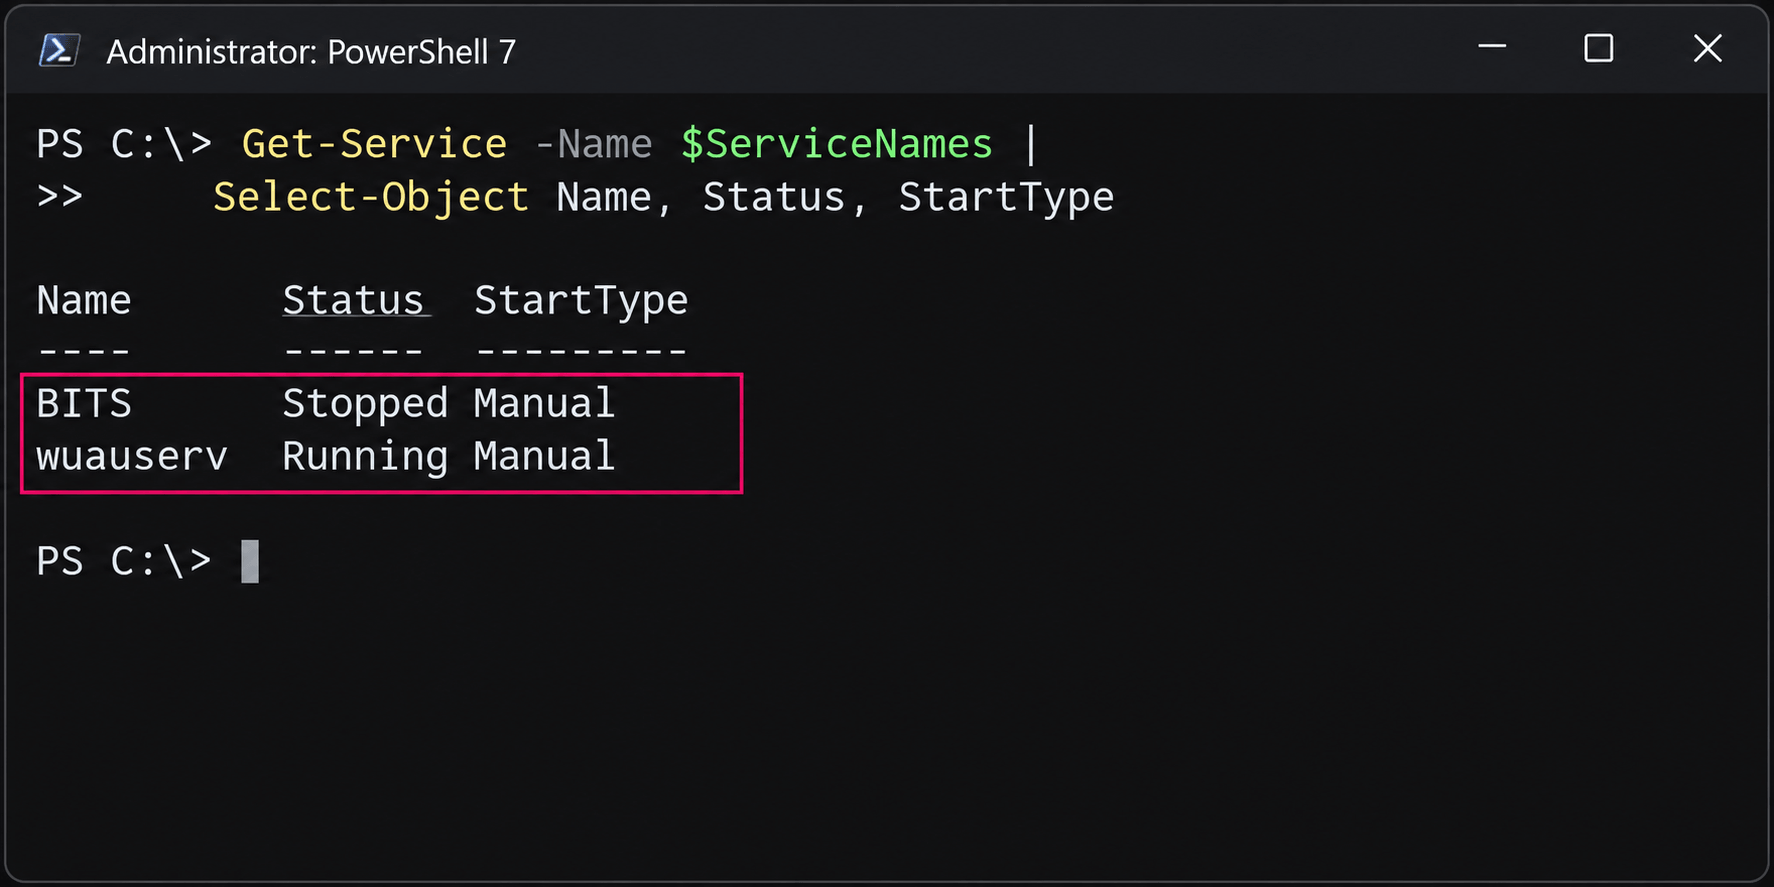
5. Verify the services’ final state with Get-Service -Name wuauserv, BITS | Select-Object Name, Status, StartType. Investigate any restore warnings
6. Check shadow copy usage with vssadmin list shadowstorage, which shows used, allocated, and maximum shadow copy storage for each volume
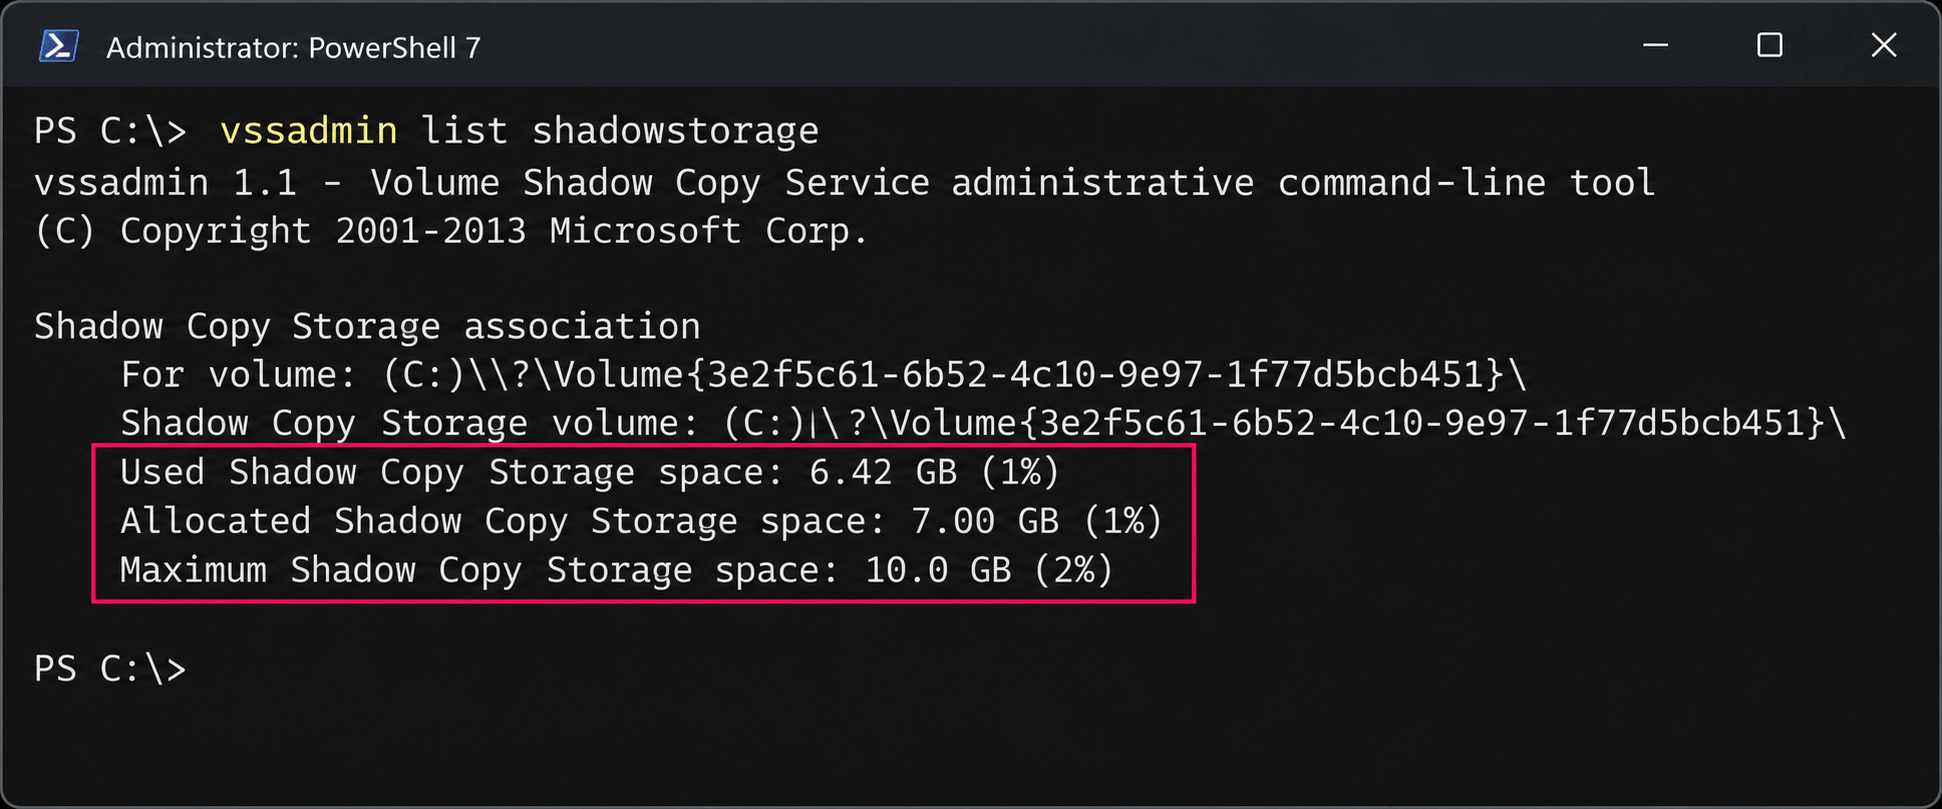
7. If your approved recovery policy allows a smaller allocation, reduce the maximum with vssadmin resize shadowstorage /For=C: /On=C: /MaxSize=<size>, setting the limit below the current maximum Be careful here. If you set the maximum below the space the shadow copies already use, Windows deletes the oldest restore points to fit the new limit, so check the used figure from the previous command first.
8. If a C:Windows.old folder is present and the rollback window for the last feature upgrade has passed, remove it through Disk Cleanup by selecting Clean up system files and then Previous Windows installation(s). Never delete it by hand. Check the hibernation file as well. Run powercfg /a to see which sleep states the device supports. On desktops and servers that never hibernate, powercfg /h off removes hiberfil.sys and frees that space, but it also turns off Fast Startup. On laptops, powercfg /h /type reduced shrinks the file while keeping Fast Startup. Leave it alone on any device where users rely on full hibernation.
9. Measure the result with this command:
The Script:
Atera does not guarantee the integrity, availability, security, virus-free, safety, lawfulness, non-infringement, rights’ status, or functionality of the scripts. The use of the shared scripts is at your own risk. Scripts are provided “AS IS”. *
$After = (Get-Volume -DriveLetter C).SizeRemaining
[PSCustomObject]@{
  BeforeFreeGB = [math]::Round($Before / 1GB, 2)
  AfterFreeGB  = [math]::Round($After / 1GB, 2)
  RecoveredGB  = [math]::Round(($After - $Before) / 1GB, 2)
}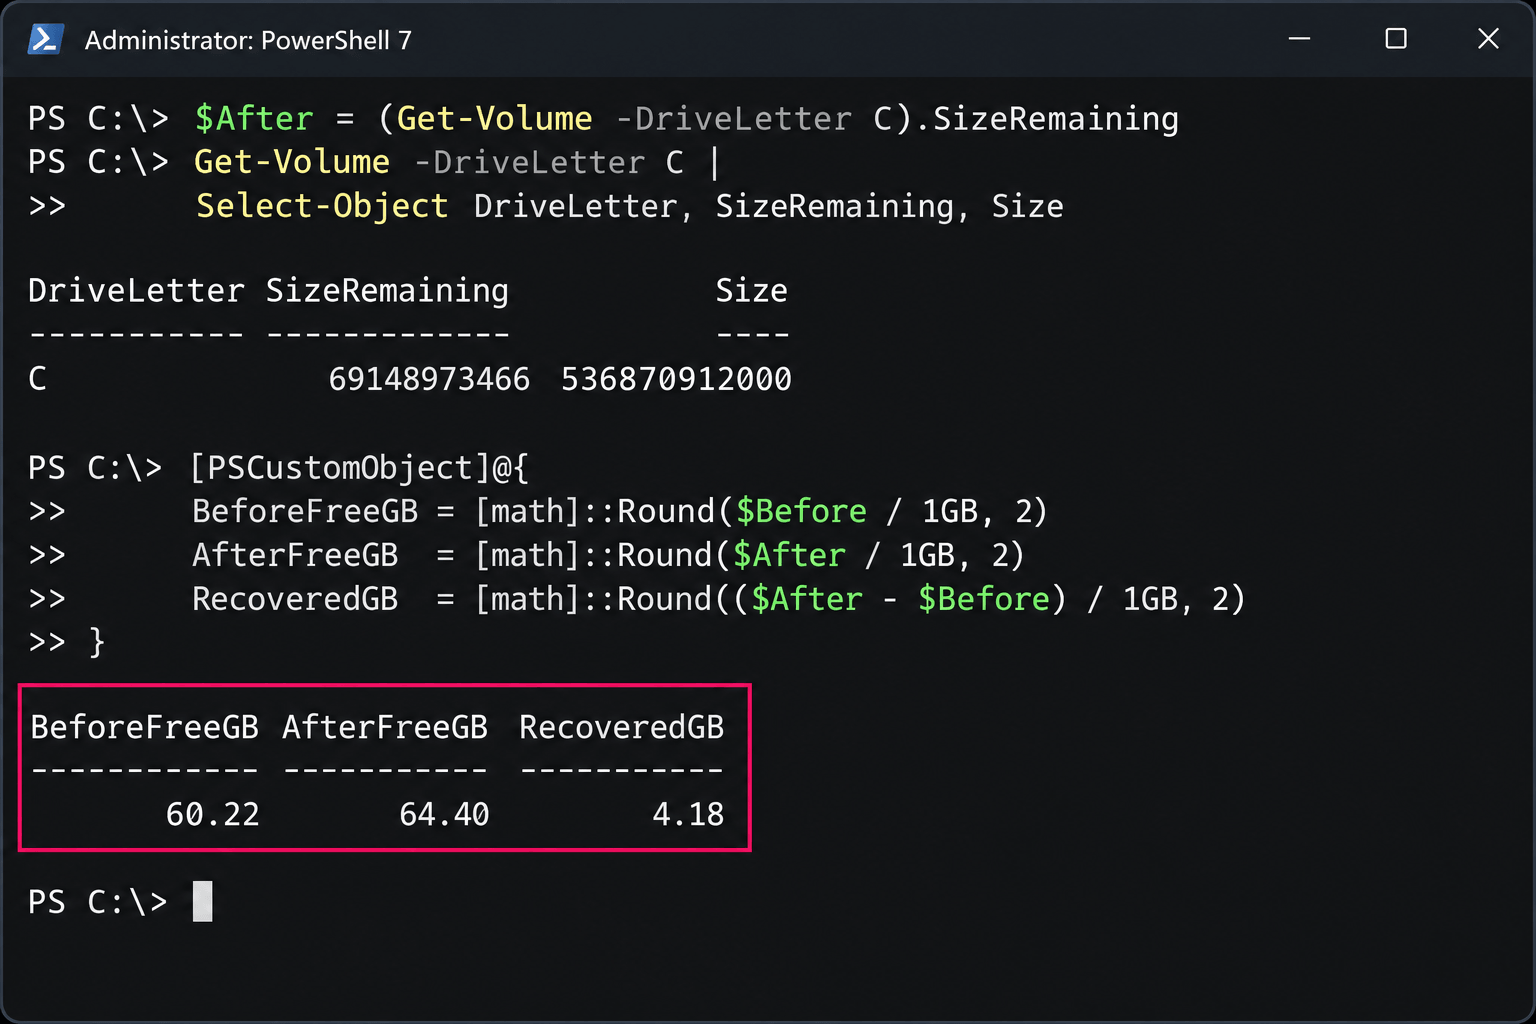
Background activity can affect the measured difference. Space recovered by clearing the update cache isn’t necessarily permanent either, since Windows may download that content again.
Warning: Some files and folders shouldn’t be deleted by hand under any circumstances: C:WindowsWinSxS, C:WindowsInstaller, pagefile.sys, and system-managed recovery data. Manage each one through its own servicing, configuration or cleanup mechanism. Recovering a few gigabytes isn’t worth breaking patching, application repair or system recovery.
» Learn more about using the DISM command correctly
Where Robin stops and your technicians start: Component store cleanup, shadow storage limits, the hibernation file and Windows.old are decisions about updates, recovery and power management, and they stay with your technicians. Robin’s disk cleanup use case covers identifying what’s consuming the space, flagging what’s safe to remove, notifying the user and reclaiming the storage after they confirm. Taking those routine cases off the queue is what gives your team the time for the decisions above.
Track down space that keeps disappearing
If a drive fills up again after cleanup, the space was taken by an ongoing process rather than a one-time event. Find that process before deleting anything else. Logs, dumps, and backups that keep reappearing often contain the evidence of what’s going wrong.
Follow these steps:
- Record free space at regular intervals to measure how quickly it’s being consumed. Schedule this through Task Scheduler (hourly for example) so you have a timeline to work from. A steady loss, such as 2 GB every hour, points to an active process. Growth that appears right after a scheduled backup or deployment points to a recurring task.
- Rerun the location scan from earlier and compare the results with your first run to find the directory that’s growing. A log directory that grows by several gigabytes overnight is a symptom to investigate, not just a folder to empty.
- List the files written to that directory in the last 24 hours. The newest large files usually point straight to the application or service writing them
- Check the Application log for recent errors from the same source with
Get-WinEvent -FilterHashtable @{LogName='Application'; Level=2; StartTime=(Get-Date).AddDays(-1)}. Correlate what you find with the application’s own logs, its scheduled tasks, and any infrastructure monitoring alerts raised over the same period. For more on reading these logs, see our guide to viewing and analyzing logs with Windows Event Viewer. - Fix the underlying error or the retention configuration responsible for the growth before setting up any automated cleanup. On production systems, first confirm whether the logs, dumps, or backups involved must be kept for troubleshooting, auditing, or recovery
Pro tip: Consider handing off some of the responsibility to Atera’s Robin. When an employee asks for help with a full drive, Robin identifies what’s consuming the disk space, flags what’s safe to remove, notifies the user, and reclaims the storage once they confirm. Routine cases, like a user Temp folder that has quietly grown to tens of gigabytes, stay out of the queue, and your team can focus on the growth that has a real cause behind it.
» Learn more about Robin’s use cases
Take routine disk cleanup off the ticket queue
Freeing up disk space is the easy part. What keeps drives healthy is knowing what’s using the space before you delete anything, sticking to supported tools for anything Windows depends on, and treating a drive that keeps refilling as a fault to fix rather than a folder to empty.
For routine end-user cases, the work described in this guide is what Robin by Atera does: it identifies what’s consuming the disk space, flags what’s safe to remove, notifies the user, and reclaims the storage once they confirm. Across Atera customers, Robin delivers up to 92% autonomous resolution of Tier-1 and complex Tier-2 technical incidents, so these tickets stop reaching your queue and your technicians keep their time for the drives that fill up for a real reason. Threshold-based disk space alerts and remote PowerShell execution in Atera cover the rest, so you can investigate and clean up across selected devices without connecting to each one. Robin is sold separately as an add-on to the Atera IT suite.
» Interested? Try Atera for free or request a Robin demo.
Frequently Asked Questions
Related Articles

How to fix a microphone not working in Windows 11
A dead mic is rarely the mic's fault. The problem usually sits somewhere upstream, and one test recording tells you where. From there, it’s a fix sequence that works on any single device, a deeper playbook for the cases where the usual steps fail, and a way to push the same checks across an entire fleet.
Read now
How to prevent AI agent sprawl before it becomes a security risk
Every AI agent is an identity with keys to something like a service account. Build them faster than you track them, and you end up with agents nobody owns, permissions nobody approved, and dormant credentials that outlive the projects that created them.
Read now
How to approach machine identity management for AI agents
Your AI agent is only as trustworthy as the identity it runs on. Plug it into a shared service account or a technician’s credentials and it inherits every permission, every stale secret, and every gap in your audit trail. Giving each agent its own scoped identity, short-lived credentials, and time-bound elevation keeps authority where it belongs.
Read now
How to address zero-day vulnerabilities
A zero-day gives you nothing to install and plenty to get wrong. Patching still matters, but it should only come after shrinking what attackers can reach, finding every vulnerable component, cutting off the exploit path with controls you’ve actually tested, and treating “remediated” as something you prove and not just what the dashboard reports.
Read nowEndless IT possibilities
Boost your productivity with Atera’s intuitive, centralized all-in-one platform