
Table of contents
Generate summary with AI

Windows updates don’t always cooperate. A driver conflict might freeze the installing phase at 40%, a feature upgrade could kick off mid-presentation, or a third-party backup tool could stop working after a blocklist change drops a vulnerable driver into the latest patch. The instinct is to pull the plug, but whether that’s safe depends entirely on where in the process Windows actually is.
Here’s everything you need to know about the different phases of the Windows update and how to stop it without breaking something.
» Tired of updates? Here’s how to disable Windows Updates and manually re-enable Windows Updates
When you SHOULDN’T interrupt an update
Not every Windows update interruption ends in disaster. It usually depends on which phase the update is in when you pull the plug. Windows Update runs in two fundamentally different stages:
- During the download phase, Windows is fetching update packages and storing them in a temporary cache. Nothing about your system is being touched. If you cut the process here, the worst outcome is that the download has to resume, and even that’s largely handled automatically, since BITS (Background Intelligent Transfer Service) picks up from the last verified chunk rather than starting from scratch.
- The installing phase is a different story entirely. At this point, Windows is actively replacing system files, drivers, registry entries, and boot components. These operations rely on atomic transactions, meaning every step in a sequence must succeed for the update to complete cleanly. When something interrupts that sequence, the components being modified are left in an inconsistent state. That inconsistency doesn’t stay contained. It cascades.
You can see this from Settings (Win + I) > Windows Update, and check the current status. If the screen shows “Installing updates” or “Undoing changes,” see “The problem with hard stopping” below. If it shows “Downloading” or the update hasn’t started yet, move onto our three methods to stop the update.
The problem with hard stopping
Holding the power button during an active install is the worst available option, not just because it’s aggressive but because of how Windows handles the update transaction.
Windows Update relies on atomic transactions. So, when updating a resource, every subsequent step in that operation must succeed for the update to be valid. If one step fails, a rollback kicks in to return the resource to its last known good state. A hard shutdown during this process bypasses the rollback entirely, leaving the resource (and anything dependent on it) in an inconsistent state that Windows has no clean path out of.
That means there are essentially three scenarios where forced interruption is genuinely dangerous.
- Feature or version upgrades: Moving from one major Windows release to another, such as 24H2, is the highest-risk category. These are closer to a Windows reinstall than a standard patch. An interruption at any point can cause data loss and leave the system in an unrecoverable state.
- The active writing phase: The stage marked by “Installing updates — XX%.” Kernel components, drivers, and registry entries are all being replaced or modified simultaneously. A hard shutdown here leaves multiple interdependent components partially written.
- Rollback in progress: The “Undoing changes…” screen carries the same risk as the active writing phase. Windows is reversing modifications, which involves the same file-level operations in reverse order. Cutting power during a rollback can leave the system in precisely the state the rollback was trying to escape.
The safer alternative, if the process has progressed far enough that system files are actively being modified, is to let the update finish. An update that completes can be uninstalled through conventional methods. A system corrupted mid-install often can’t be recovered without more invasive intervention.
If a hard shutdown becomes unavoidable, the Automatic Repair process is the recommended starting point for recovery, though even that might not be enough if the registry itself has been corrupted.
» Here’s how to enable or disable Automatic Repair
3 ways to stop or pause a Windows update
Once you’ve confirmed the update is still in the download phase (or weighed the risks and decided to intervene anyway), there are several ways to stop or pause it:
Method 1: Stop the actual update service via services.msc
This is the most direct way to halt an active update process. It stops the Windows Update service and its two dependencies (Background Intelligent Transfer Service (BITS) and Cryptographic Services) which between them handle download scheduling, package verification, and the update mechanism itself.
Stopping Windows Update alone is sometimes insufficient; all three need to be addressed.
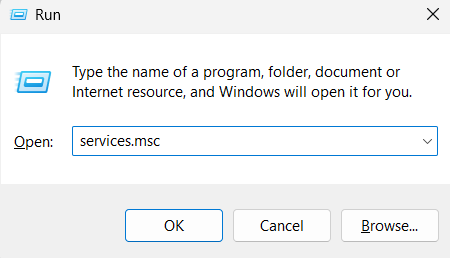
1. Press Win + R, type services.msc, and press Enter to open the Services console
2. Scroll down to locate Windows Update in the list
3. Right-click Windows Update > Stop, or select the entry and click the stop button in the menu bar
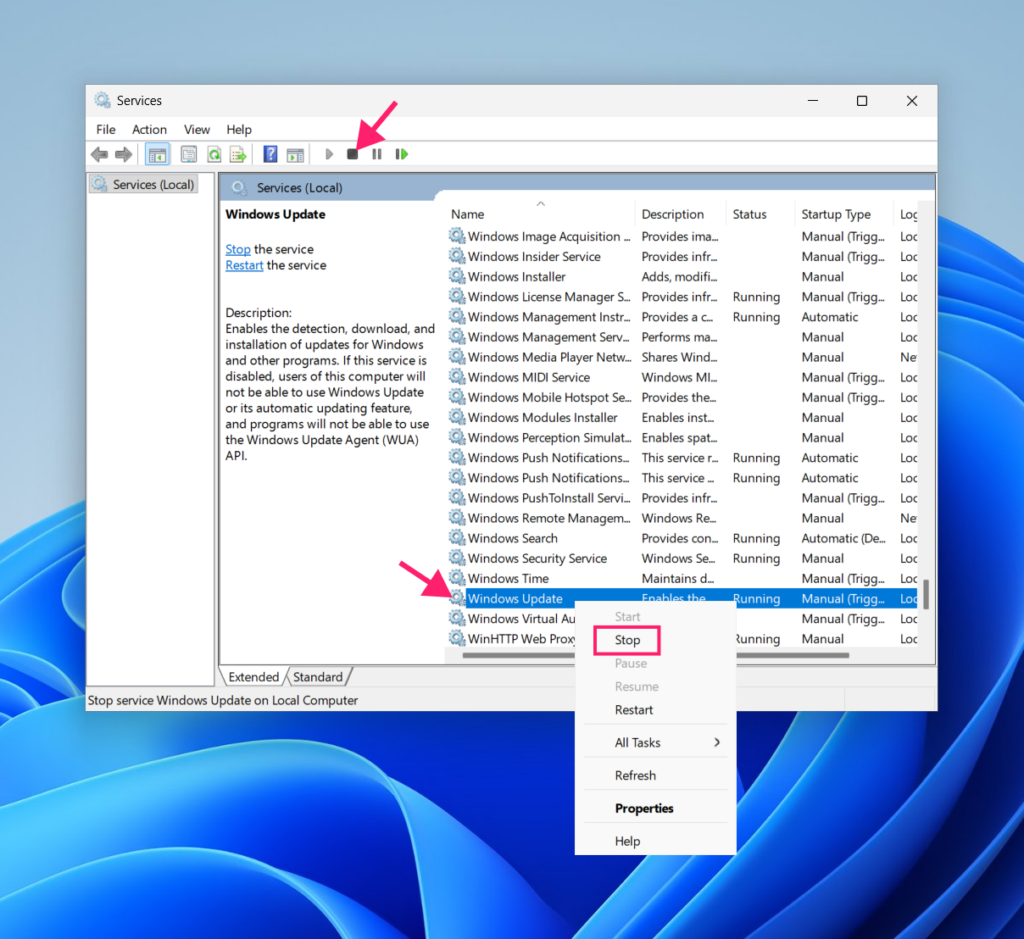
4. Repeat for Background Intelligent Transfer Service (BITS) and Cryptographic Services
To restart the services later, right-click each entry and select Start, or use the start button in the menu bar.
Method 2: Stop services via Command Prompt or PowerShell
For those who prefer the command line, the same result can be achieved faster, with the added option of stopping dependent services automatically using PowerShell’s -Force flag.
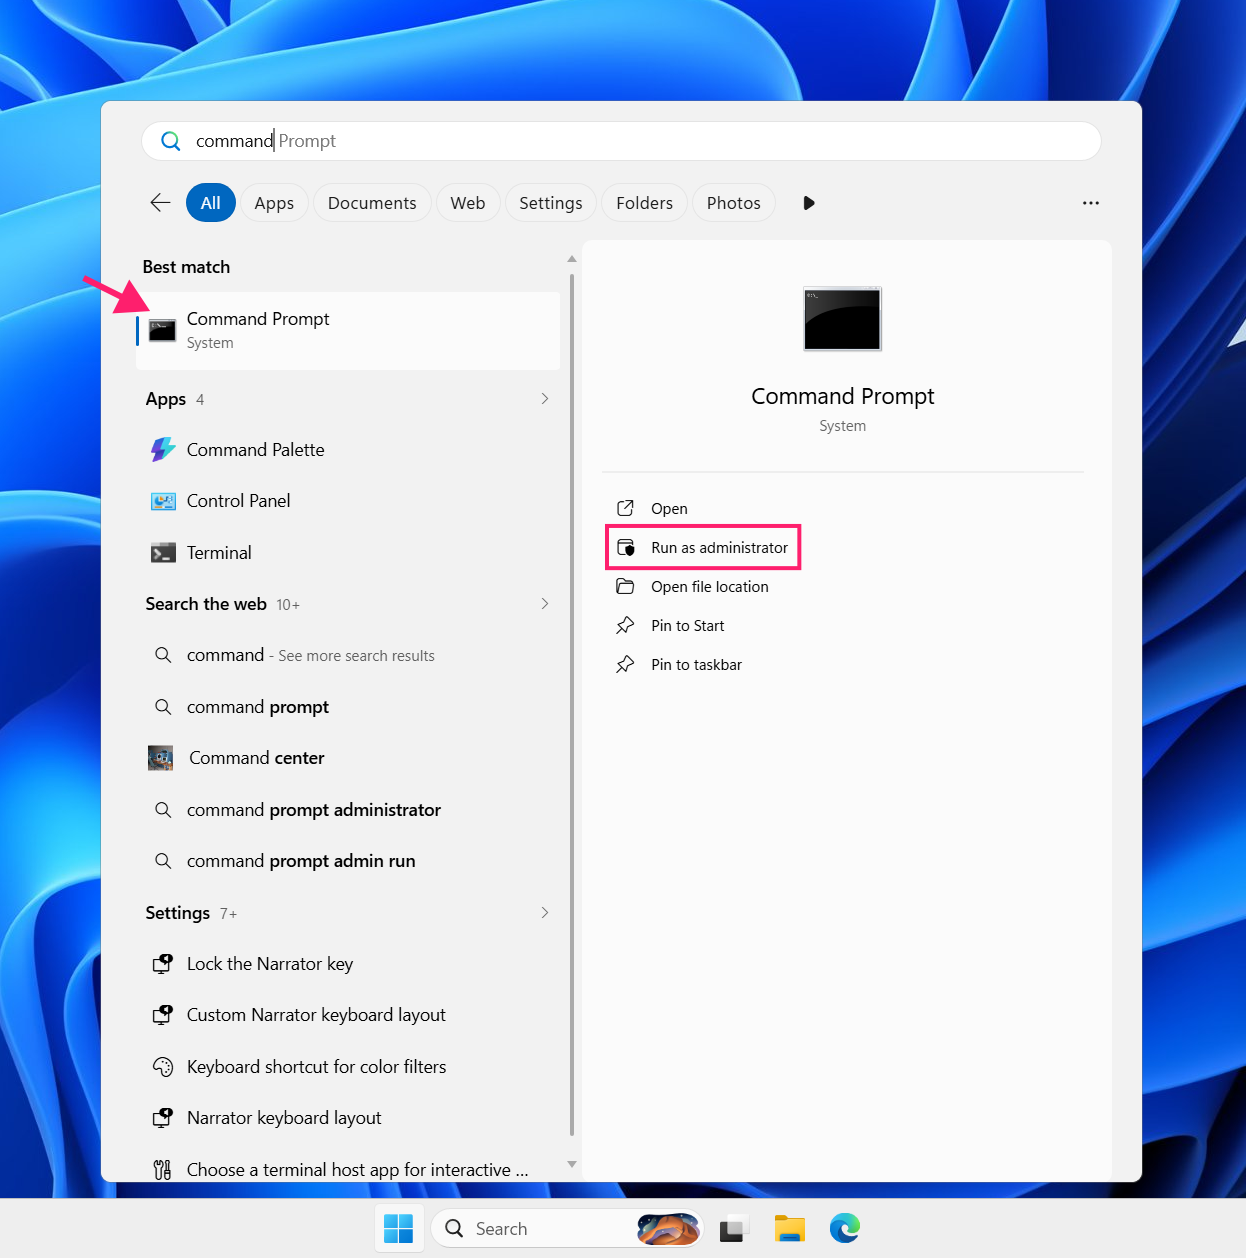
1. Open the Start menu, search for Command Prompt, right-click it, and select Run as administrator
2. Run the following commands in order:
net stop wuauservnet stop bits
net stop cryptsvc
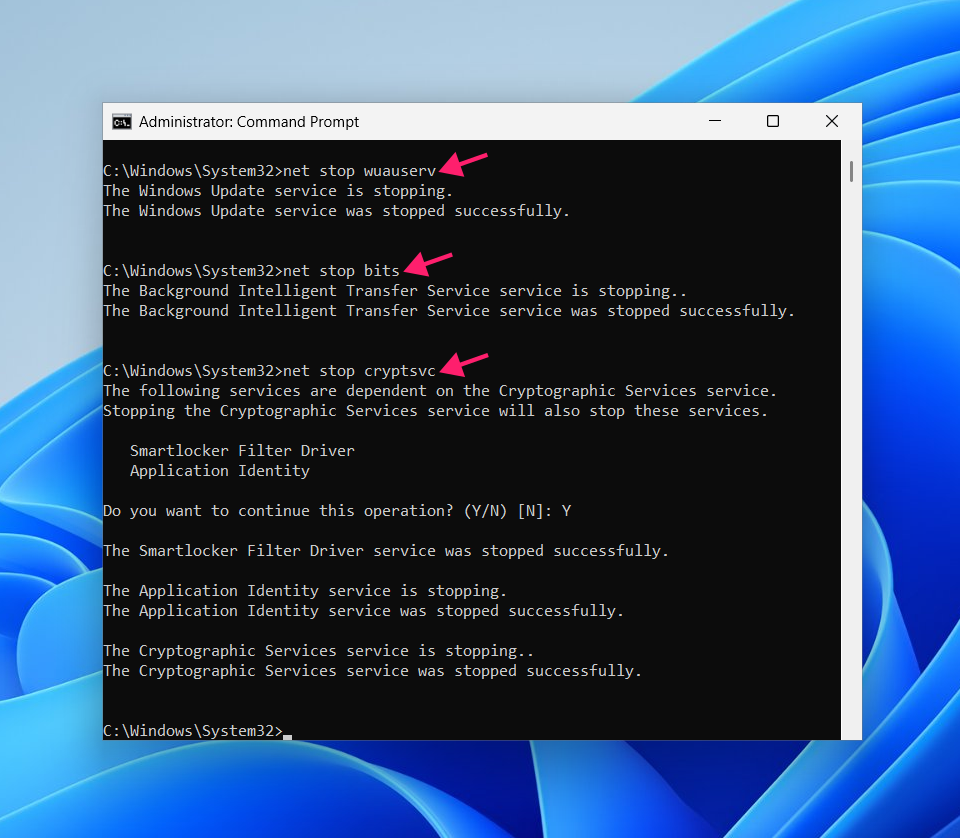
3. When stopping cryptsvc, you may be prompted to confirm that dependent services (Smartlocker Filter Driver and Application Identity) will also be stopped. Enter Y and press Enter to proceed
4. To verify each service has stopped, run:
sc query wuauservsc query bits
sc query cryptsvc
5. Each should return STATE: 1 STOPPED
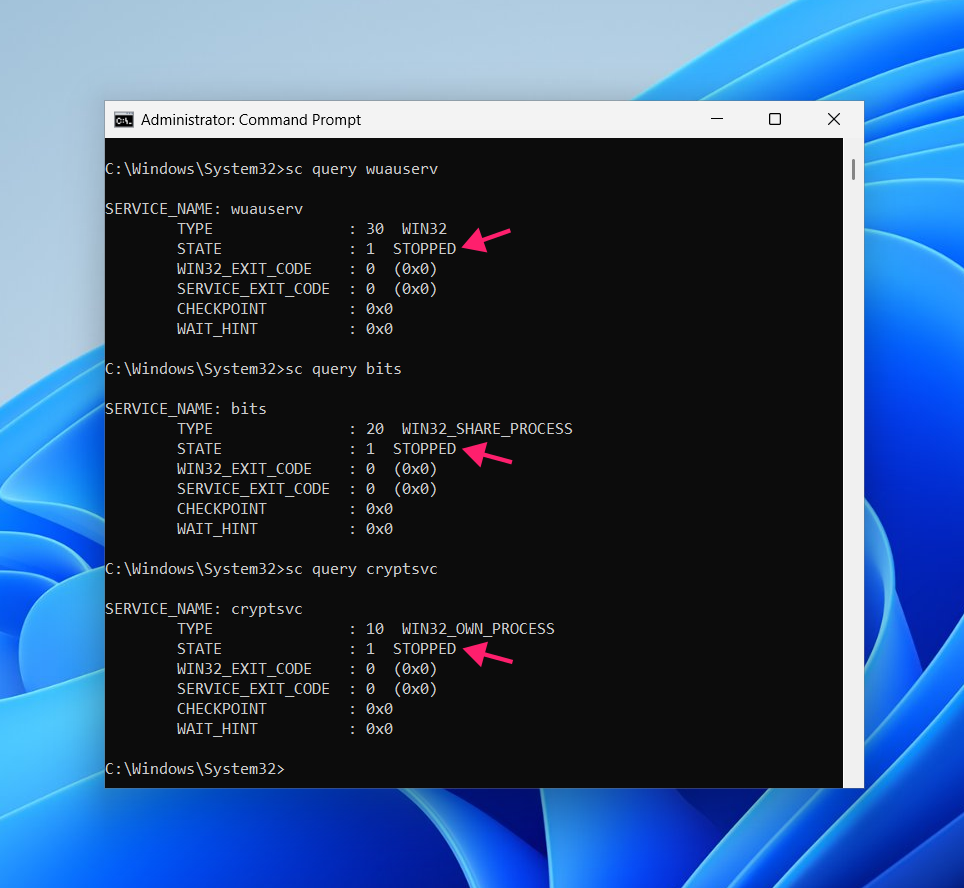
The process is largely the same for PowerShell:
1. Open the Start menu, search for Windows PowerShell, right-click it, and select Run as administrator. The -Force flag stops any dependent services automatically without prompting:
Stop-Service -Name wuauserv -ForceStop-Service -Name bits -Force
Stop-Service -Name cryptsvc -Force
2. To confirm all three are stopped in a single command: Get-Service wuauserv, bits, cryptsvc
3. All three should show Stopped in the Status column
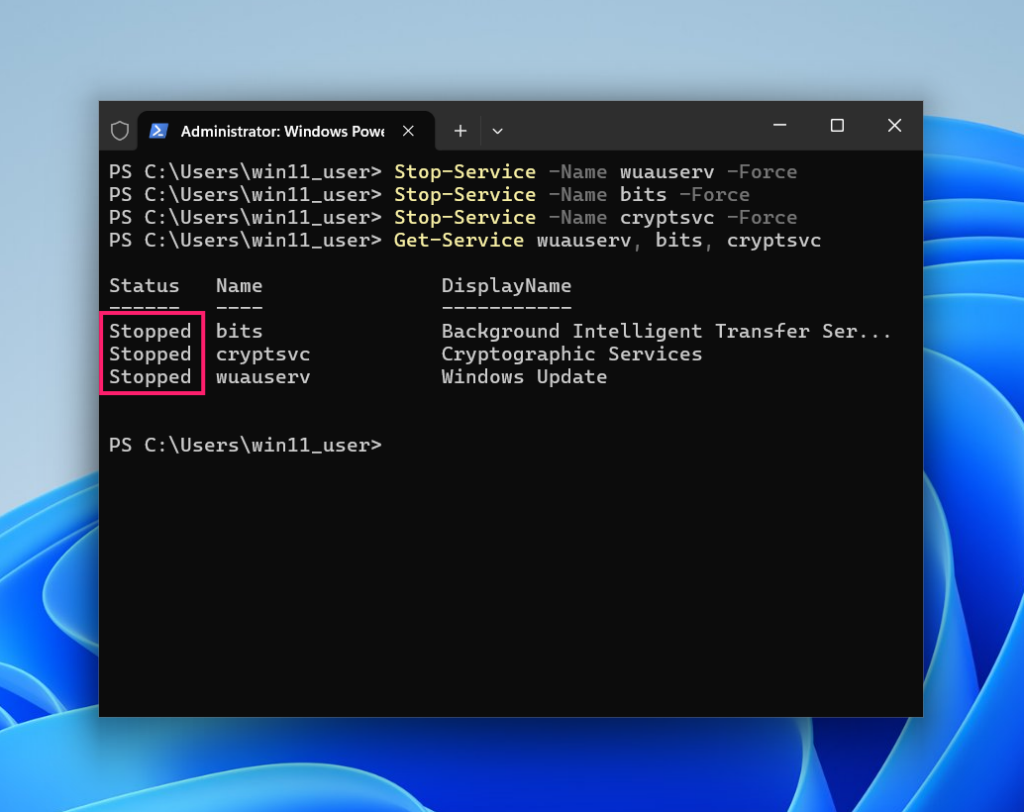
To restart services later, use net start <service> in Command Prompt or Start-Service -Name <service> in PowerShell.
Did you know? Atera’s AI copilot can help you generate these PowerShell scripts from natural language queries, and then you can deploy the scripts remotely to multiple endpoints through Atera’s RMM.
Method 3: Pause updates via Windows Settings
This method doesn’t stop an update already in progress, but it’s the cleanest way to prevent updates from installing automatically during working hours, which is useful if you want to defer patches without disabling the update mechanism entirely.
1. Press Win + I and go to Windows Update
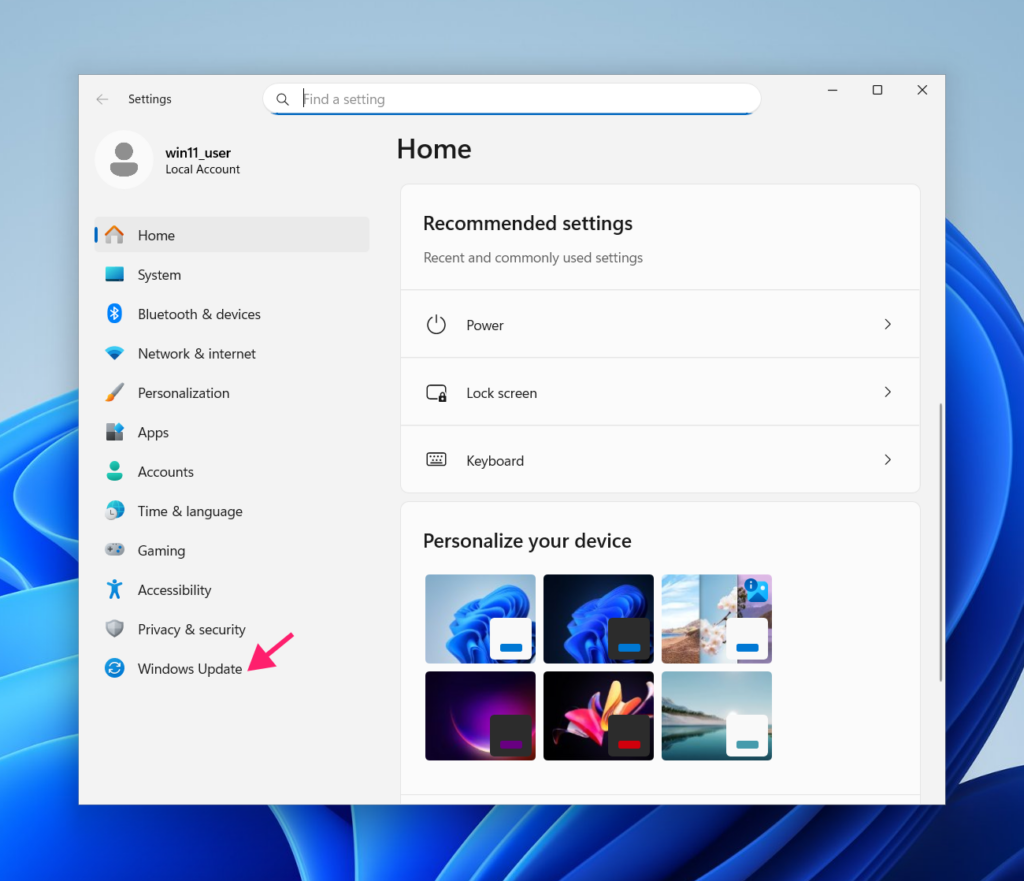
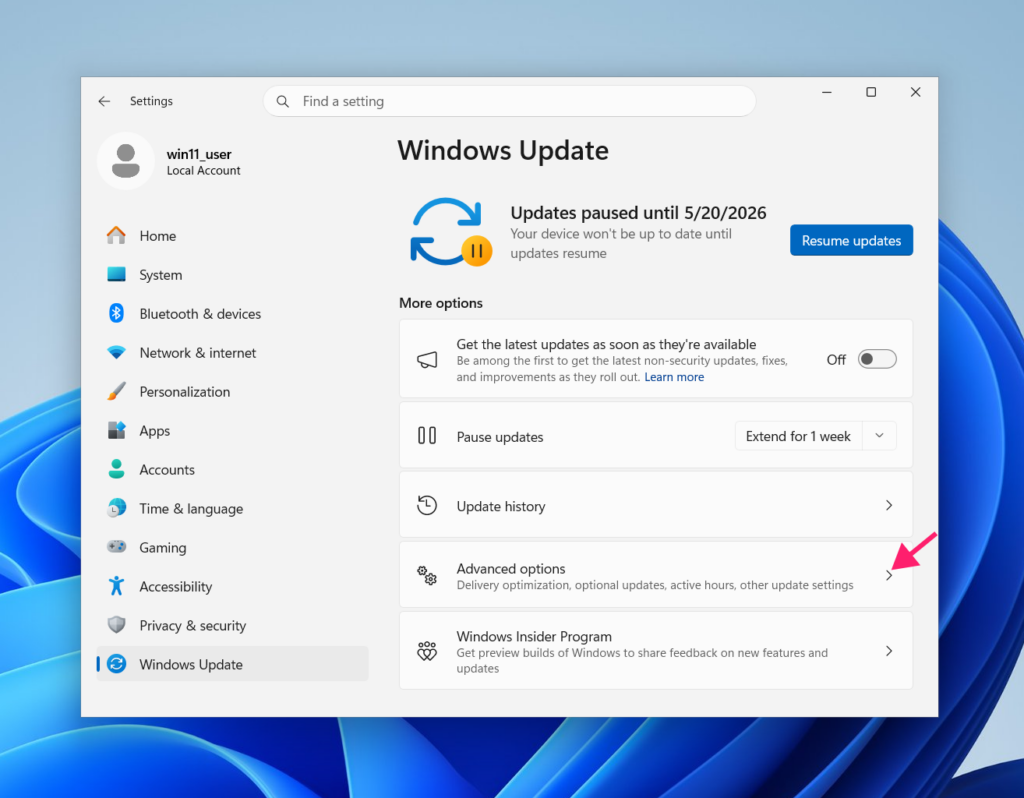
2. Locate the Pause updates section and select a pause interval from the dropdown, ranging from one to five weeks
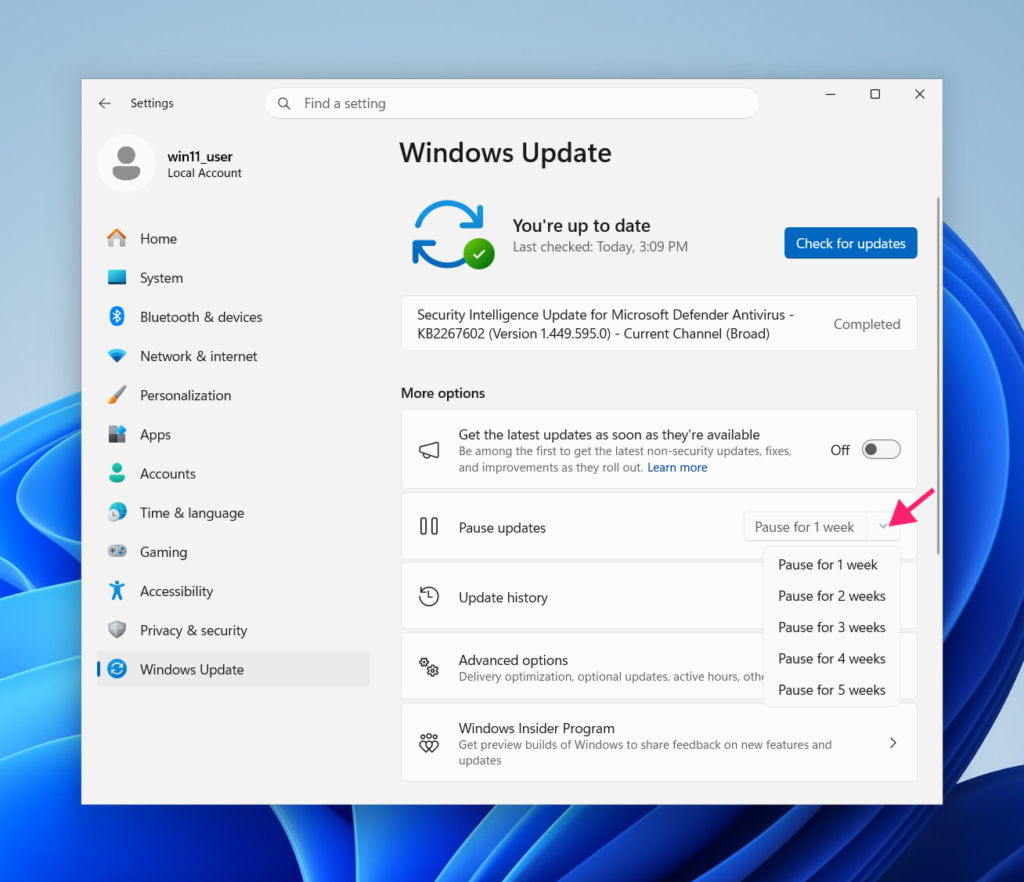
3. To prevent automatic reboots during specific hours, configure active hours by going to Windows Update > Advanced options
4. Locate the Active hours section and set Adjust active hours to Manually
5. Set your Start time and End time
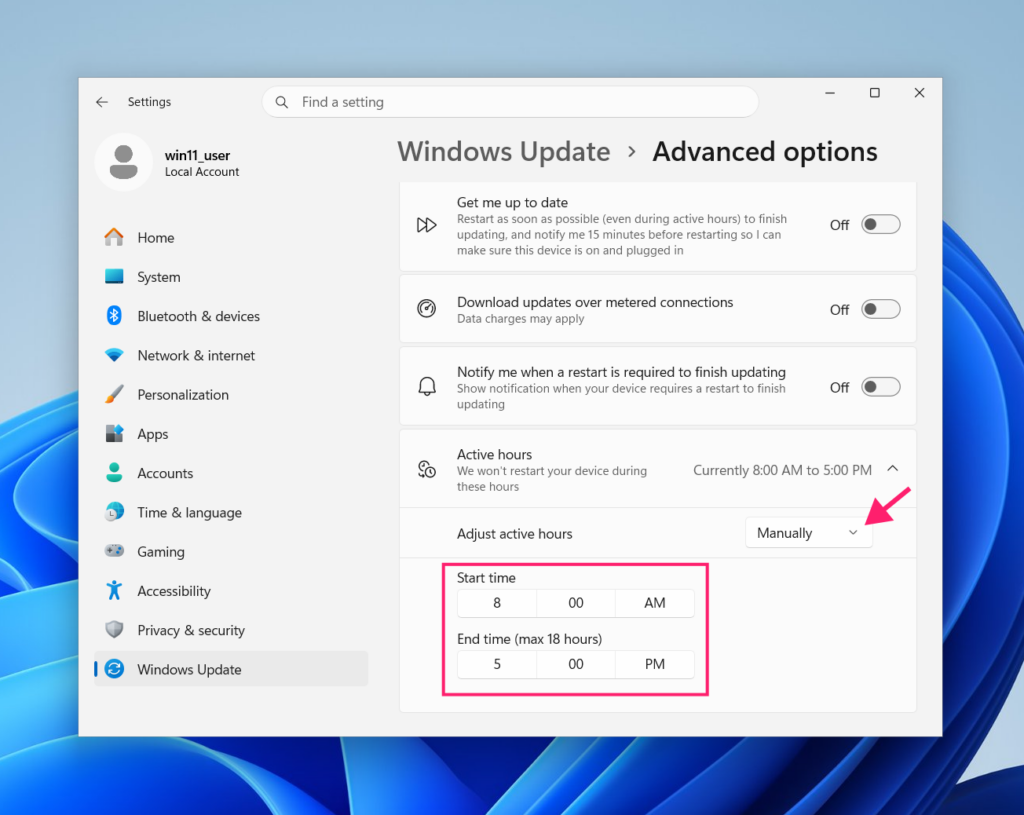
Windows will not automatically restart the device during this window. Note the maximum active hours span is 18 hours.
What to do after you stop the update
Stopping the update is the easy part. What happens next depends on how cleanly the interruption went and what state Windows is in afterward. Here are the steps you should follow.
Step 1: Clear the SoftwareDistribution folder
The SoftwareDistribution folder at C:\Windows\SoftwareDistribution is where Windows stores downloaded update packages, metadata, and the update history database. After an interrupted update, this folder can contain partial or corrupted files that cause subsequent update attempts to fail. Clearing it forces Windows to perform a fresh check and re-download what it needs.
Before touching the folder, confirm no updates are actively installing by checking Settings > Windows Update and verifying the status.
It’s safer to rename the folder than to delete it. Renaming forces Windows to recreate it fresh on next launch while preserving the original as a fallback.
1. Open PowerShell as administrator and run:
Stop-Service -Name wuauserv -ForceStop-Service -Name bits -Force
Stop-Service -Name cryptsvc -Force
ren C:\Windows\SoftwareDistribution SoftwareDistribution.old
ren C:\Windows\System32\catroot2 catroot2.old
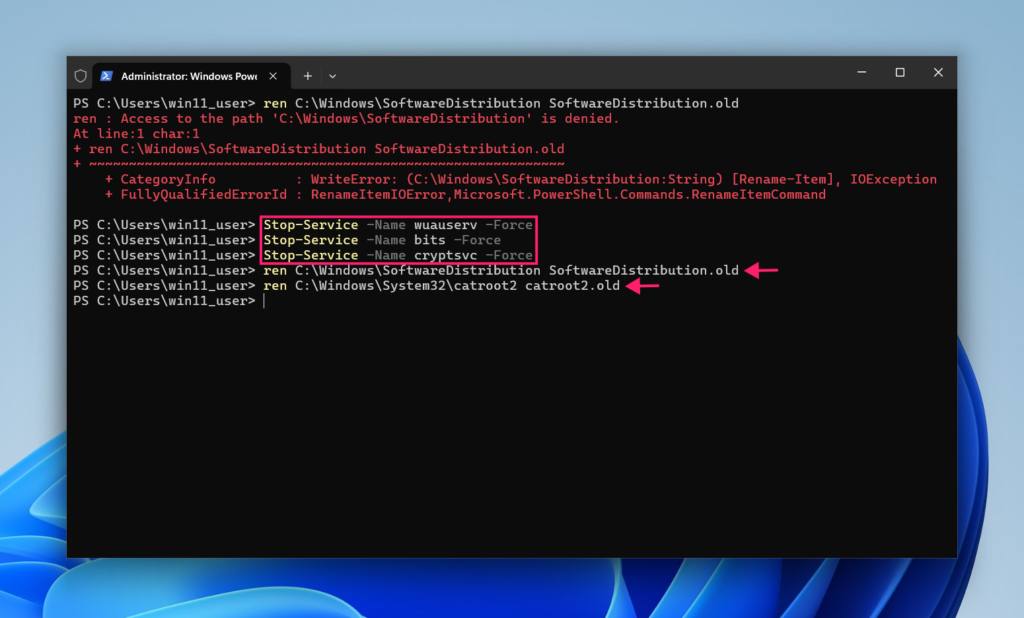
2. The catroot2 folder contains update signature validations and should be reset alongside SoftwareDistribution
3. Restart the services in reverse order to respect service dependencies:
Start-Service -Name cryptsvcStart-Service -Name bits
Start-Service -Name wuauserv
4. Verify all three are running:
Get-Service wuauserv, bits, cryptsvc
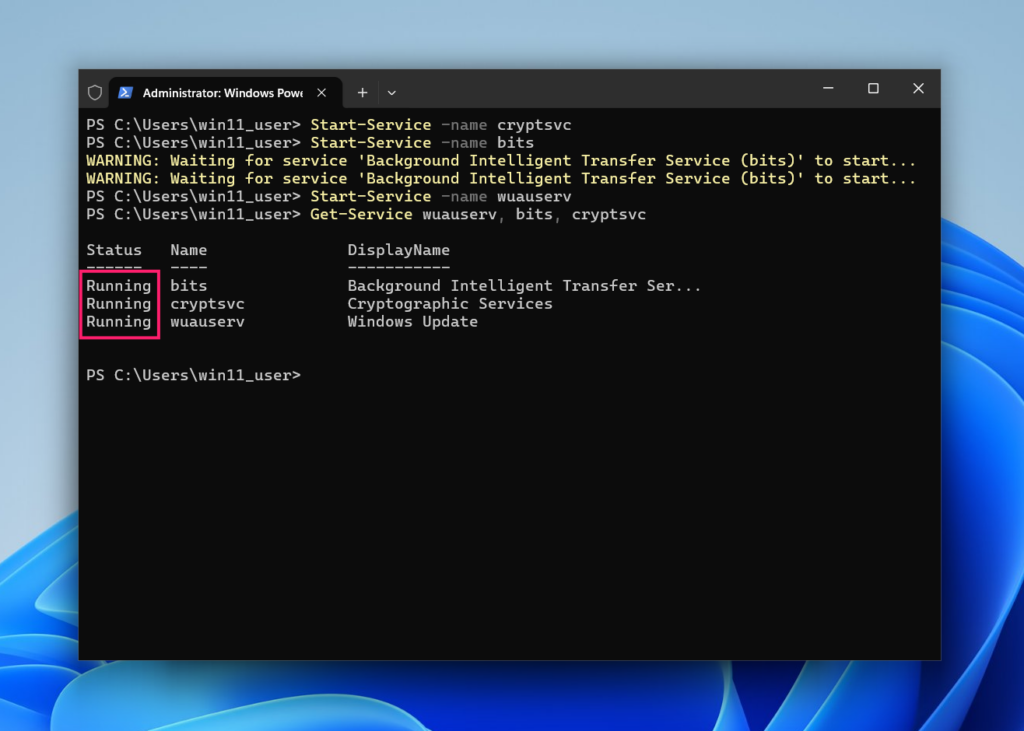
5. Then go to Settings > Windows Update and click Check for updates to trigger a fresh update scan
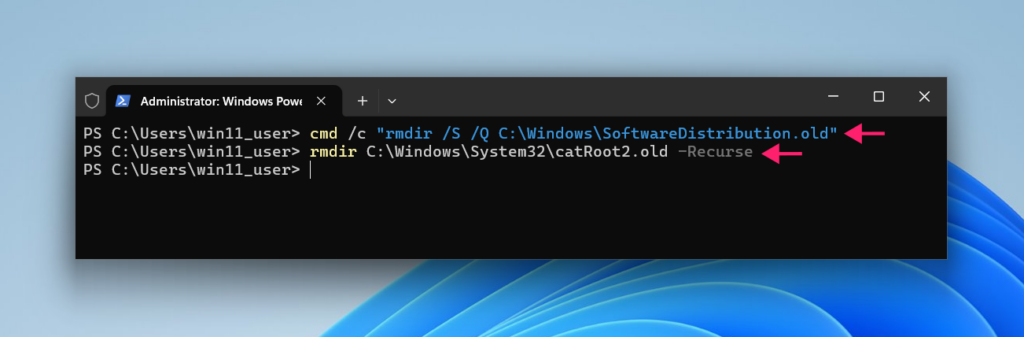
6. Once you’ve confirmed updates are working normally, the renamed .old folders can be deleted in PowerShell: cmd /c "rmdir /s /q C:\Windows\SoftwareDistribution.old"rmdir C:\Windows\System32\catroot2.old -Recurse
Step 2: Run DISM and SFC
After any interrupted install, running DISM and SFC confirms whether system file integrity has been affected. DISM checks and restores the health of the Windows component store (the image that SFC relies on to repair files) so always run DISM first.
Before running either tool, make sure there’s at least 5 GB of free space for quality updates, and at least 15 GB when dealing with feature updates.
Open Command Prompt as administrator and run:
DISM /Online /Cleanup-Image /CheckHealthDISM /Online /Cleanup-Image /ScanHealth
DISM /Online /Cleanup-Image /RestoreHealth
sfc /scannow
Run each command in sequence and allow each to complete before moving to the next. RestoreHealth in particular can take several minutes. Once SFC completes, restart the system and attempt the update again.
» Learn more about using the DISM command
Step 3: Advanced recovery (for corrupted pending.xml)
In cases where a hard shutdown occurred during the active writing phase and standard recovery steps haven’t resolved this IT issue, the problem may be deeper than partial files. An interrupted update can corrupt the pending.xml manifest stored at C:\Windows\WinSxS\.
This file is the primary transaction log for Component-Based Servicing (CBS) since it tracks staged operations that must execute during boot. When it’s corrupted, the system can enter a boot loop as the Session Manager repeatedly attempts and fails to finalize locked transactions.
The recovery path here runs through the Windows Recovery Environment (WinRE). Boot into WinRE by holding Shift while clicking Restart from the Start menu (or automatically triggered after repeated failed boots), then open Command Prompt from the advanced options and run: DISM /image:C:\ /cleanup-image /revertpendingactions
This initiates automated reversal of the pending CBS operations. If the reversal fails, the registry is likely corrupted and the system may require a repair install or a full reinstall to recover.
» Need help? Here’s how to reinstall Windows 11
Stop updates safely every time
Stopping a Windows update isn’t a single action, it’s a judgment call that changes depending on where the process is. During the download phase, the risk is low and the options are plentiful. During the install phase, the calculus shifts, so waiting it out is often safer than forcing a stop, and if you do intervene, knowing exactly which services to target and in what order is what separates a clean interruption from a corrupted system.
For IT teams and MSPs managing this across multiple endpoints, that judgment call multiplies fast. Atera’s patch management gives teams centralized control over update scheduling, automated deployment via automation profiles, and the visibility to know what’s running where, so an update firing at the wrong moment becomes something you plan around instead of react to.
» Interested? Try Atera for free
Related Articles

How to reduce alert fatigue across your IT team
Your technicians aren't ignoring alerts because they're careless. They're ignoring them because most alerts have taught them to. Once the stream stops being trustworthy, real failures slip past with the noise. Fixing it means deciding what deserves an interruption, tuning out transient spikes, collapsing alert storms, and automating the fixes you've run a hundred times.
Read now
How to close the IT skills gap on your team
Course completions don't close skills gaps. Technicians finish the training, then hand the first unfamiliar failure straight back to a senior engineer. Real capability gets built on live tickets, incidents, and maintenance windows, with guidance that fades as competence grows.
Read now
How to calculate cost per ticket (and why most teams get it wrong)
Most cost-per-ticket figures are wrong before anyone reads them. Missing overhead, tickets that were opened but never closed, spam and duplicates padding the count, and one month's costs divided by another month's tickets all make support look cheaper than it is. Fix both sides of the division and the number finally shows where technician time and money actually go.
Read now
How to prepare for a software license audit
A vendor audit notice doesn't wait for you to get organized. It demands proof, right now, that every install matches every entitlement you've paid for, and most IT teams find out the hard way how much they don't actually know about their own environment. Getting audit-ready before the letter arrives is the difference between negotiating from strength and paying for months of scrambling.
Read nowEndless IT possibilities
Boost your productivity with Atera’s intuitive, centralized all-in-one platform









