
Generate summary with AI

A clean Windows 11 installation gives you a fresh start. Whether you’re refreshing an older system, fixing persistent issues, or setting up a new machine, a clean install removes bloatware, resets your system configuration, and lets you start fresh.
But a clean install isn’t just clicking “next” a few times. You need to back up your data, verify your hardware meets Windows 11’s requirements, and handle driver and license activation correctly after the wipe.
This guide walks you through the entire process, from verification to troubleshooting.
Choosing your installation method
You have three options for creating Windows 11 installation media.
- Media Creation Tool: This Microsoft’s official method. It offers the highest reliability for standard, supported hardware. However, it has the least flexibility and it will use the latest Windows 11 version and requires an internet connection.
- Rufus: Rufus is highly customizable. It supports both MBR and UEFI, and can bypass Windows 11 requirements like TPM, RAM, and Secure Boot checks. The downside is that you need to select the right options yourself.
- PXE network boot: For large-scale deployments across multiple machines, PXE boot is the most reliable once properly configured. However, it requires correct driver injection (for storage and network devices) and a properly configured DHCP, TFTP, and WIM infrastructure.
» Learn how to use the Windows 11 creation tool
First, back up before you wipe
A clean install erases everything on your drive. Back up critical data and licenses before you proceed.
User profiles and data
Run this command in PowerShell (as administrator): robocopy C:\Users E:\Backup\UserProfiles /E /COPYALL /XJ /R:3 /W:5 /MT:16
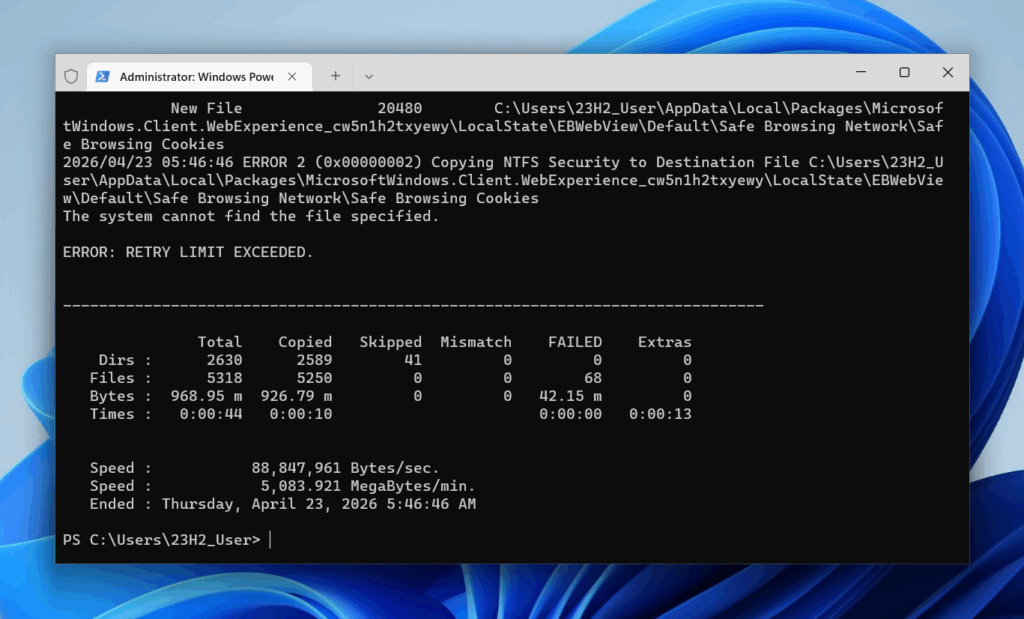
This backs up your entire Users folder to an external drive. Alternatively, use Windows User State Migration Tool (USMT, part of ADK) to capture profiles more completely than robocopy, including registry hives, associations, and settings. Use scanstate to save and loadstate to restore.

Drivers
Back up your current third-party drivers by running:
dism /online /export-driver /destination:D:\Backup\Drivers
Ideally you should run: dism /image:C:\ /export-driver /destination:D:\Backup\Drivers from a WinPE instance rather than a live session, so that you avoid skipping drivers that are locked by active drivers.
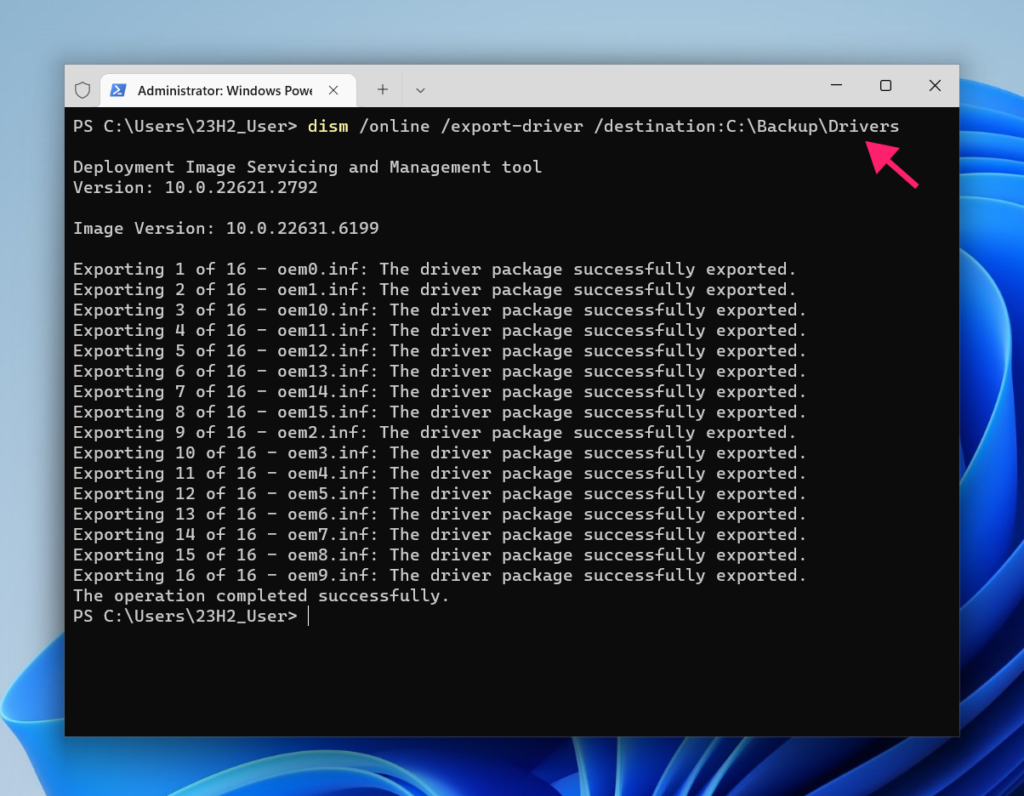
Important: Drivers installed via MSI or EXE installers (like some GPU drivers) will need to be redownloaded from the manufacturer’s website after installation.
» Need help? Here’s our guide on how to update drivers on pc
Licenses
Windows licensing generally doesn’t require manual backup. Retail licenses are tied to your physical or digital key, you’ll need to re-enter it during setup. Digital or OEM licenses are either baked into your BIOS or tied to your Microsoft account.
For third-party software, check the activation type:
- Per-device activation: Deactivate within the app before reinstalling to avoid seat conflicts.
- File-based licensing: Manually back up specific license files as directed by the vendor.
- Enterprise/server-based: No backup needed.
Important: Most organizations already protect critical data through cloud synchronization (OneDrive, Google Workspace) or centralized server backups. Check your existing backup strategy, any data not covered should be manually copied to external drives, network shares, or cloud services.
Customize your installation media (optional)
If you need to inject drivers or configure specific settings before installation, you can customize the Windows 11 ISO.
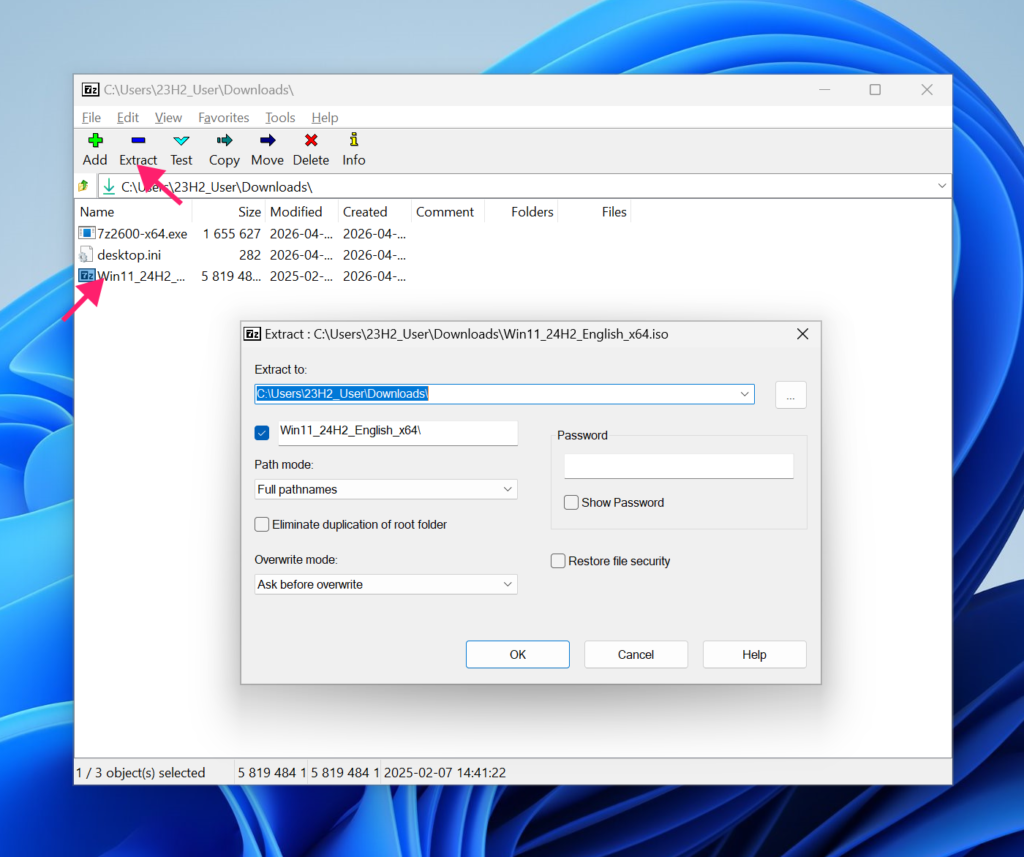
Step 1. Extract the ISO
In a Terminal, mount the ISO by running:
Mount-DiskImage -ImagePath "C:\PathTo\Win11.iso"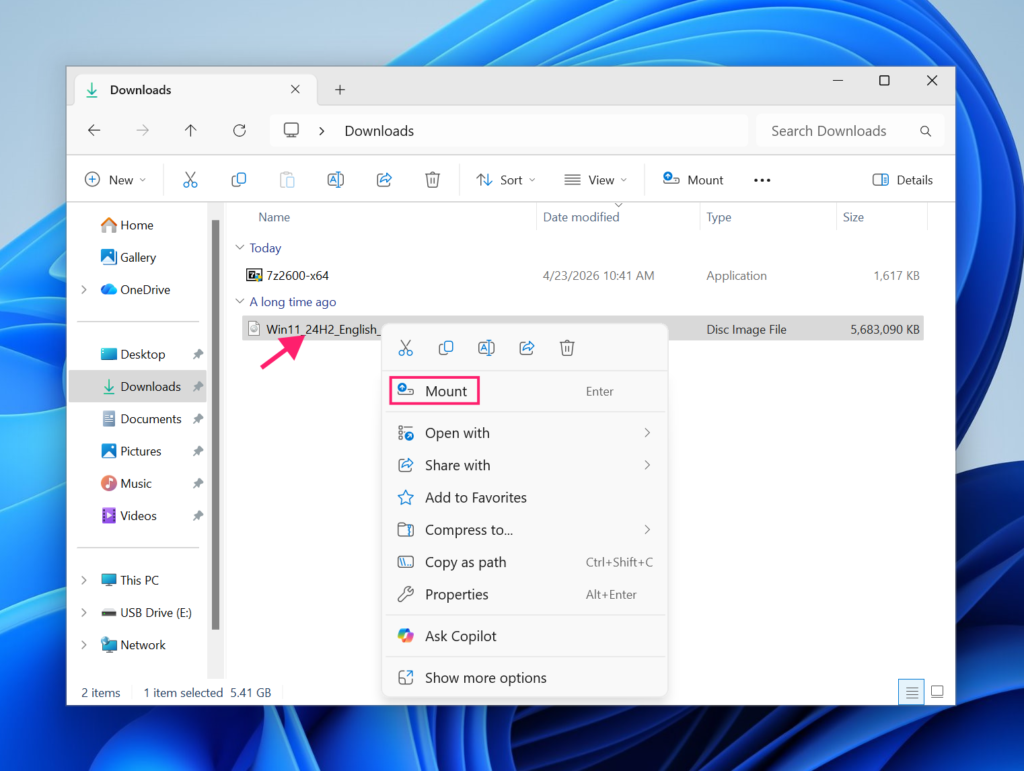
Or double-click the ISO file in Windows Explorer. Copy its contents to a temporary folder.
Step 2. Inject drivers into boot.wim
This ensures Setup can recognize your storage controllers, network cards, and other hardware during installation.
1. Open PowerShell (as administrator) and create a mount directory:
mkdir C:\Mount\Boot2. Mount the setup environment:
DISM /Mount-Image /ImageFile:"C:\Win11_custom\sources\boot.wim" /Index:2 /MountDir:"C:\Mount\Boot"3. Inject your drivers:
DISM /Image:"C:\Mount\Boot" /Add-Driver /Driver:"C:\Drivers\" /Recurse4. Run:
DISM /Unmount-Image /MountDir:"C:\Mount\Boot" /Commit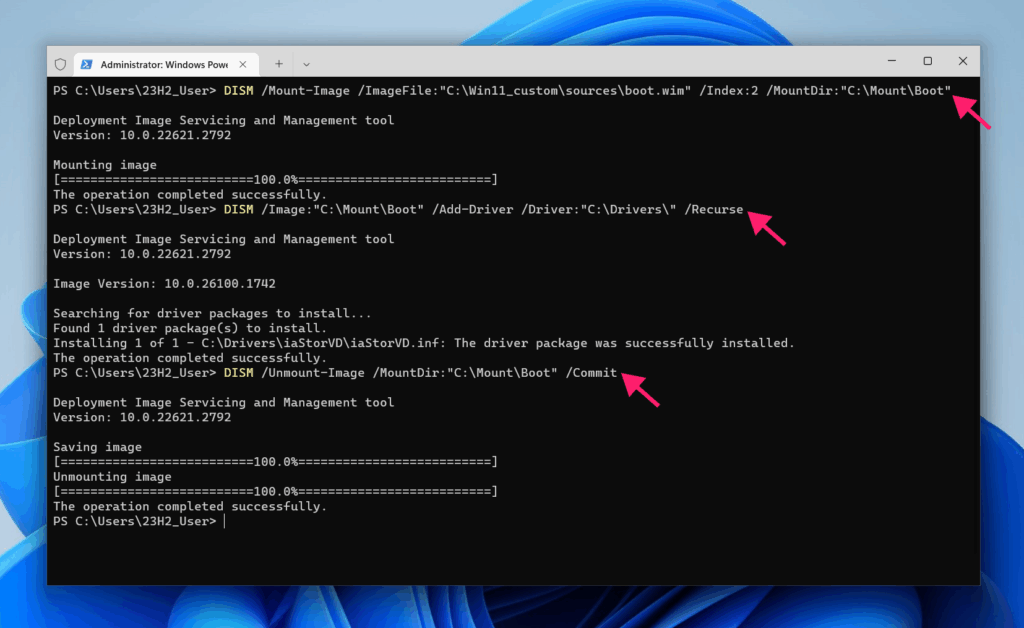
Step 3. Inject drivers into install.wim
This puts drivers into the final installed OS.
1. Check what editions are available by running the following in PowerShell (as administrator):
DISM /Get-ImageInfo /ImageFile:"C:\Win11_custom\sources\install.wim"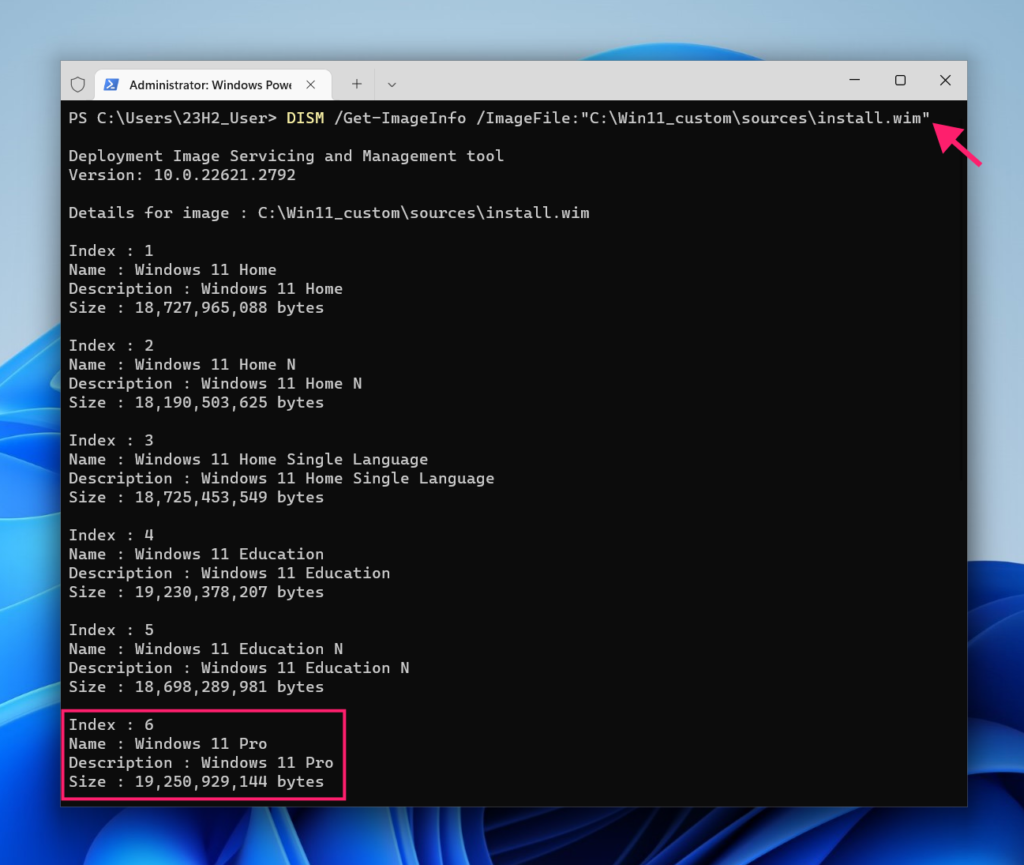
If your ISO contains install.esd instead of install.wim, convert it with:
DISM /Export-Image /SourceImageFile:"install.esd" /SourceIndex:6 /DestinationImageFile:"install.wim" /Compress:max /CheckIntegrity2. Mount the edition you need (replace Index:6 with your edition), run:
DISM /Mount-Image /ImageFile:"C:\Win11_custom\sources\install.wim" /Index:6 /MountDir:"C:\Mount\Install"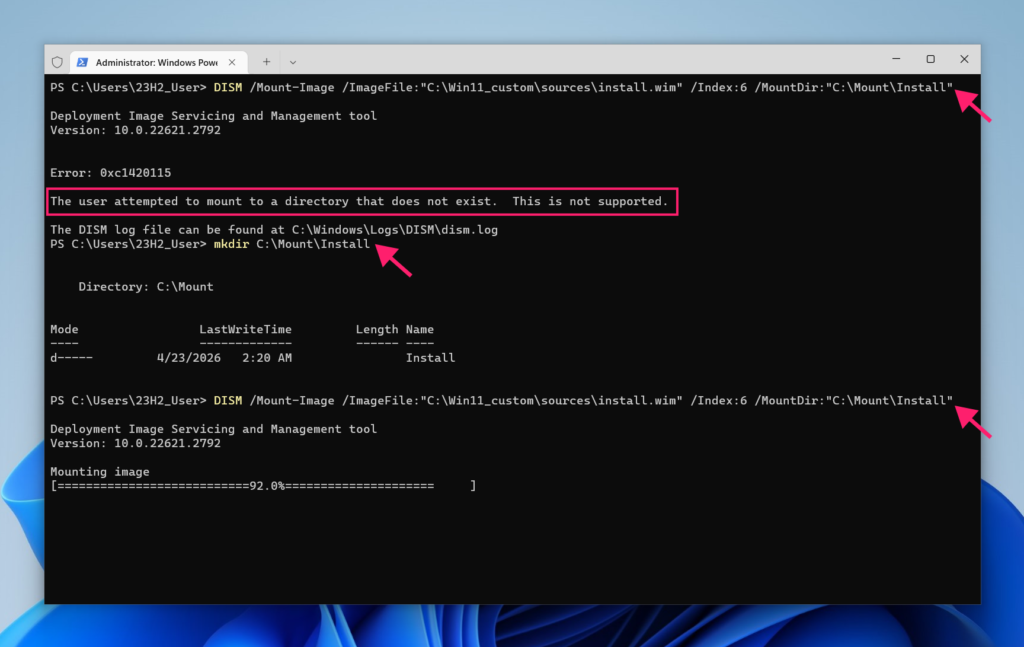
3. Inject drivers by running:
DISM /Image:"C:\Mount\Install" /Add-Driver /Driver:"C:\Drivers\" /Recurse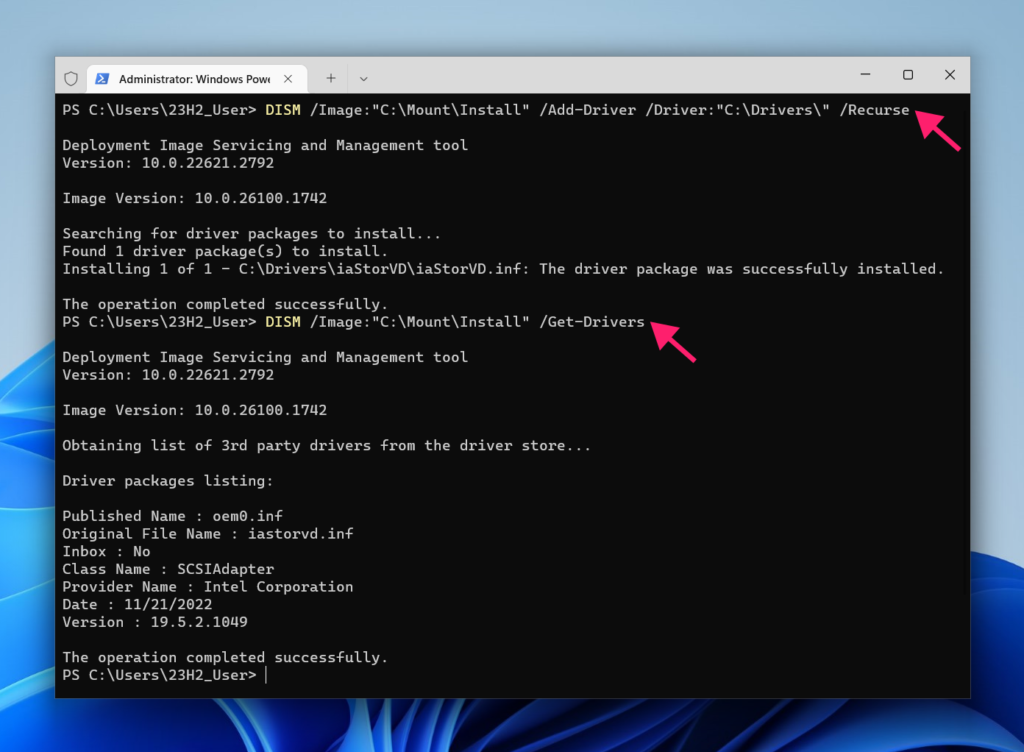
4. Unmount by running:
DISM /Unmount-Image /MountDir:"C:\Mount\Install" /Commit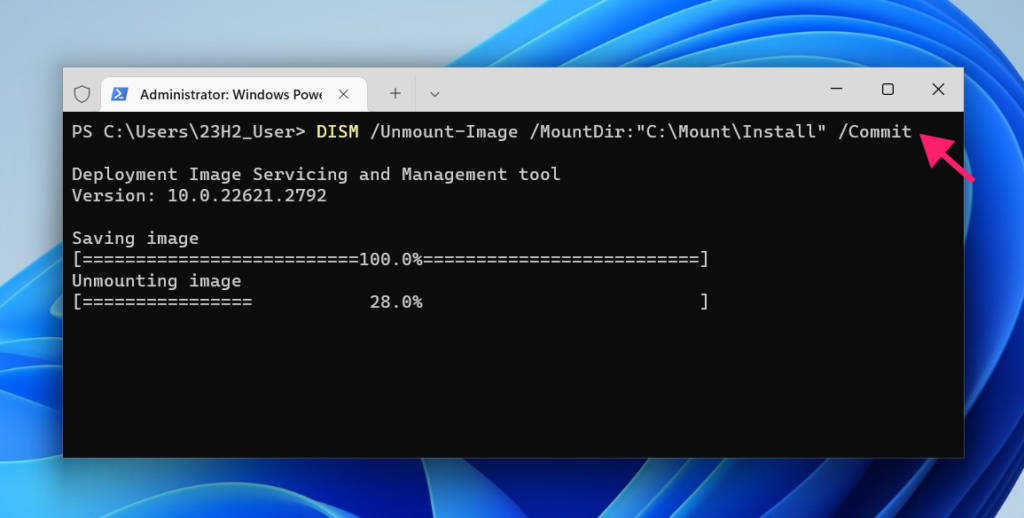
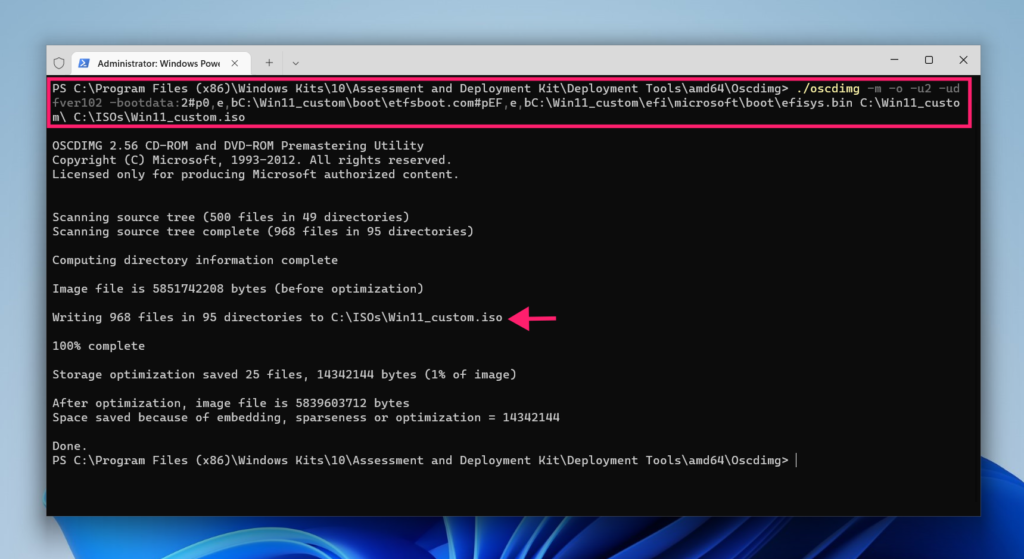
5. Repack the ISO:
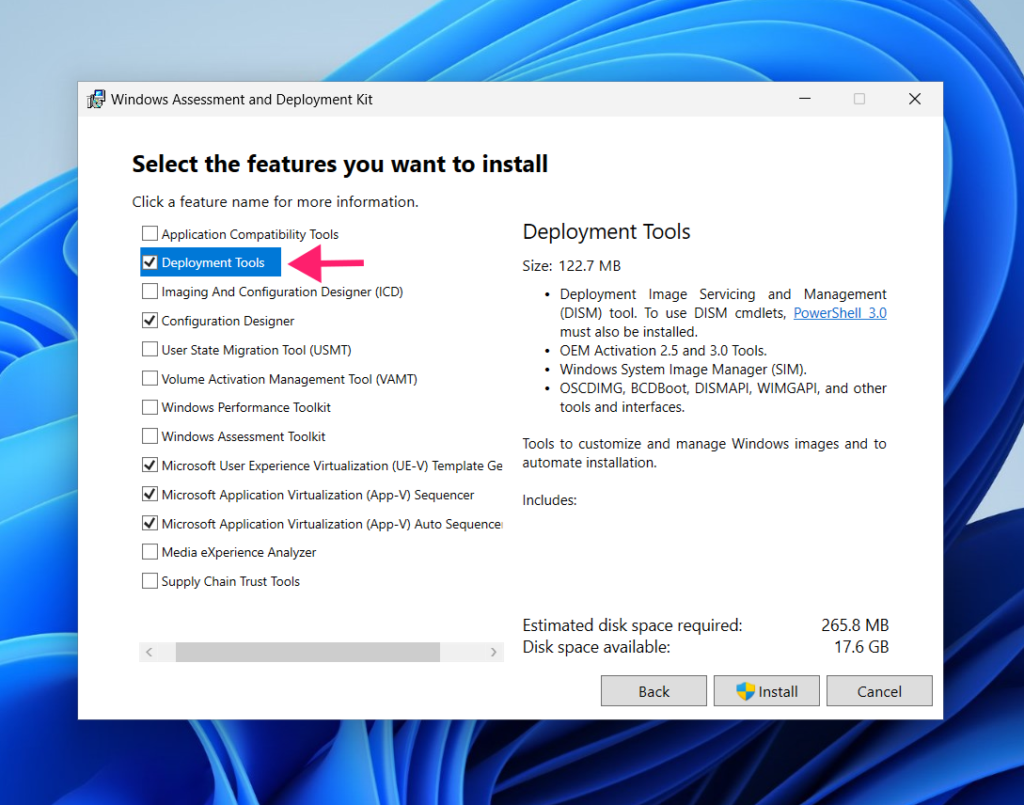
Check that you have Windows ADK installed, specifically oscdimg from Deployment Tools.
If the oscdimg binary is not set in your PATH you will have to either find its location or specify the whole path.
Run: ./oscdimg -m -o -u2 -udfver102 -bootdata:2#p0,e,bC:\Win11_custom\boot\etfsboot.com#pEF,e,bC:\Win11_custom\efi\microsoft\boot\efisys.bin C:\Win11_custom\ C:\ISOs\Win11_custom.iso
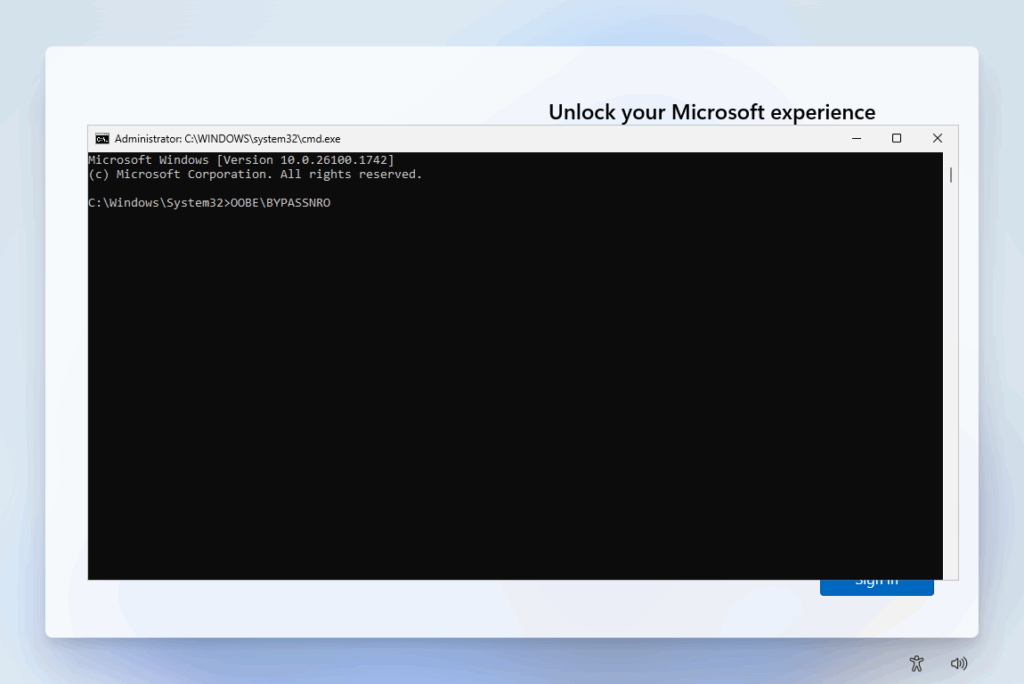
Step 4: Bypass Microsoft account requirements
Press Shift + F10 to open Command Prompt.
Type oobe\bypassnro and press Enter.
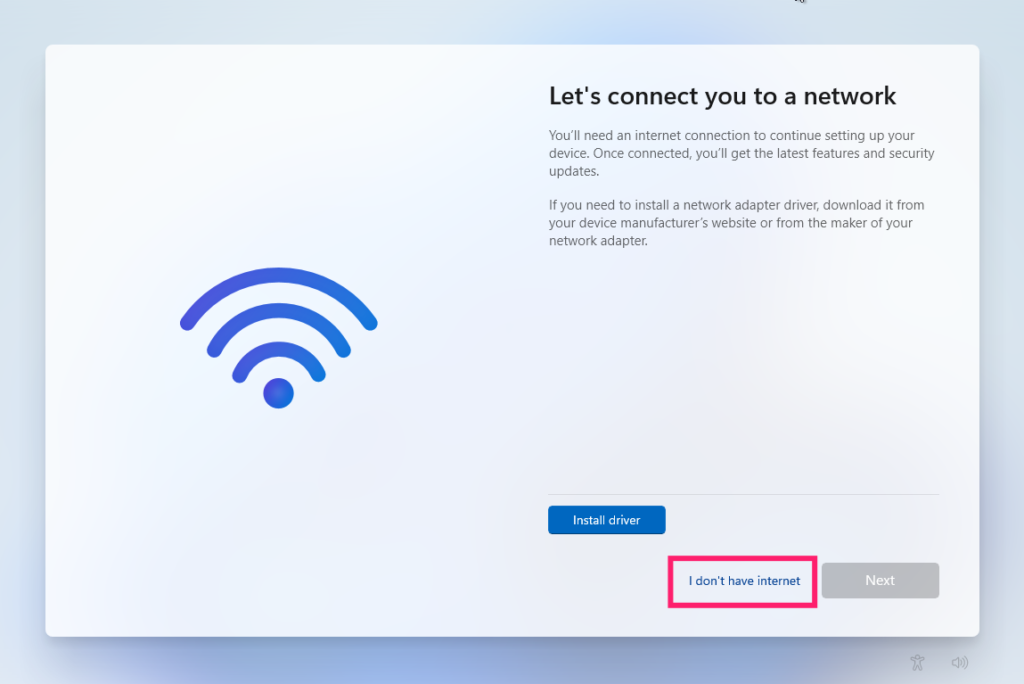
Your system will restart and you can select “I don’t have internet” and create a local account.
Important: This method has been patched after Windows 24H2.
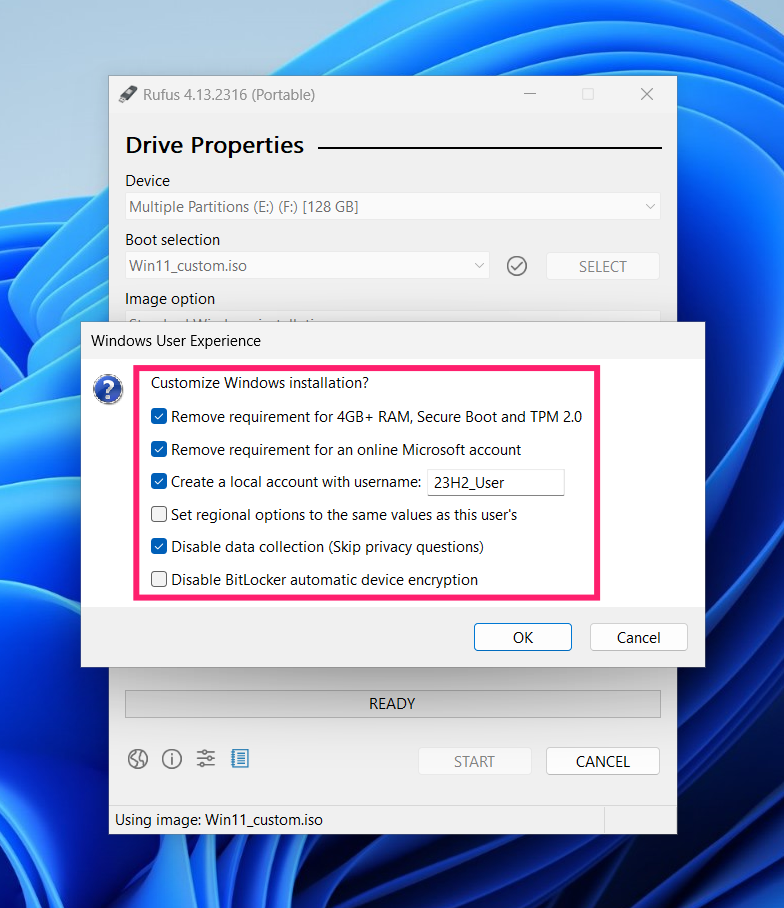
When using Rufus to create bootable media, after you press Start, a customization dialog appears. You can check the option to bypass Microsoft account requirements. This uses an autounattend.xml file placed on the USB drive.
You can also manually create/edit this file:
autounattend.xml template
<?xml version=”1.0″ encoding=”utf-8″?>
<unattend xmlns=”urn:schemas-microsoft-com:unattend”>
<settings pass=”oobeSystem”>
<component name=”Microsoft-Windows-Shell-Setup”
processorArchitecture=”amd64″
publicKeyToken=”31bf3856ad364e35″
language=”neutral”
versionScope=”nonSxS”>
<OOBE>
<HideEULAPage>true</HideEULAPage>
<HideLocalAccountScreen>false</HideLocalAccountScreen>
<HideOEMRegistrationScreen>true</HideOEMRegistrationScreen>
<HideOnlineAccountScreens>true</HideOnlineAccountScreens> <!– bypass Microsoft Account –>
<HideWirelessSetupInOOBE>true</HideWirelessSetupInOOBE>
<ProtectYourPC>3</ProtectYourPC>
<SkipMachineOOBE>false</SkipMachineOOBE>
<SkipUserOOBE>false</SkipUserOOBE>
</OOBE>
<UserAccounts>
<LocalAccounts>
<LocalAccount wcm:action=”add”>
<Password>
<Value>YourPasswordHere</Value>
<PlainText>true</PlainText>
</Password>
<Description>Local Admin Account</Description>
<DisplayName>Admin</DisplayName>
<Group>Administrators</Group>
<Name>Admin</Name>
</LocalAccount>
</LocalAccounts>
</UserAccounts>
</component>
</settings>
</unattend>
Prepare your BIOS/UEFI settings
Before you boot the installation media, verify these settings.
1. Boot mode: Set to UEFI (usually under Startup or Boot settings)

2. Secure Boot: Enable this in the Security section. Set Platform Mode to User Mode so Secure Boot can be enforced.
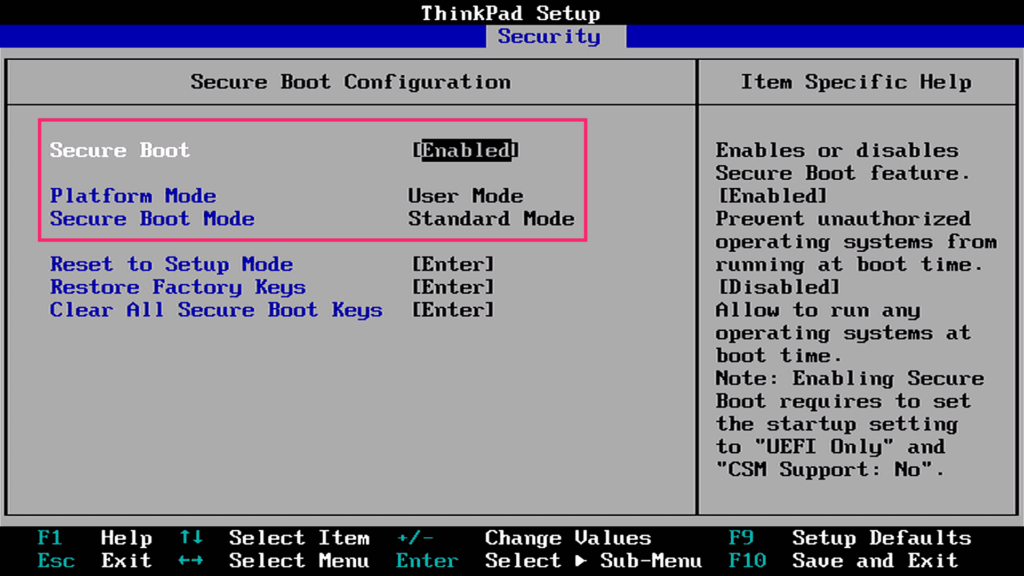
3. TPM 2.0: Confirm it’s present and enabled in the Security section.
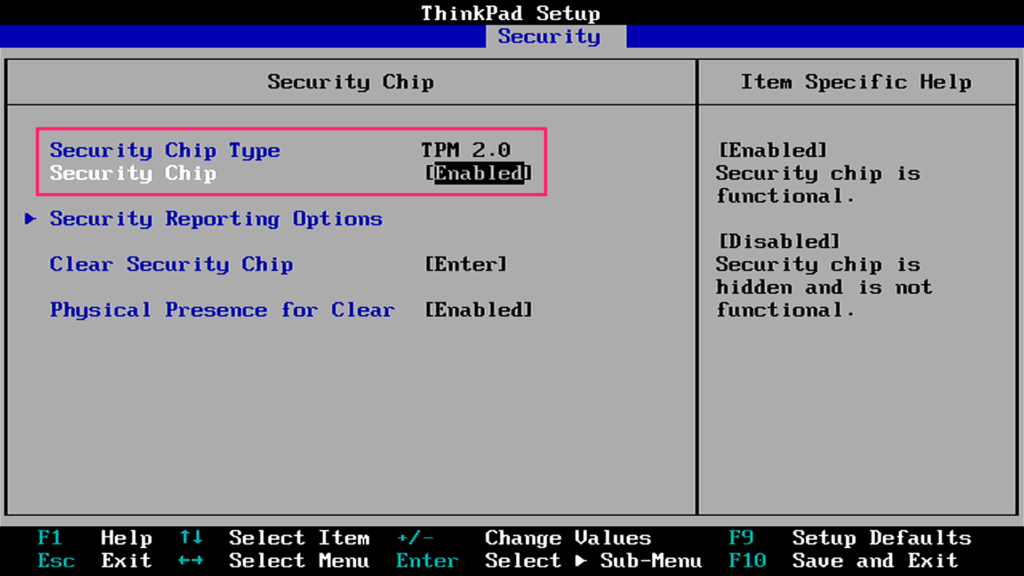
» Here’s how to fix the TPM device not detected error and enable Secure Boot
The Windows 11 clean installation process
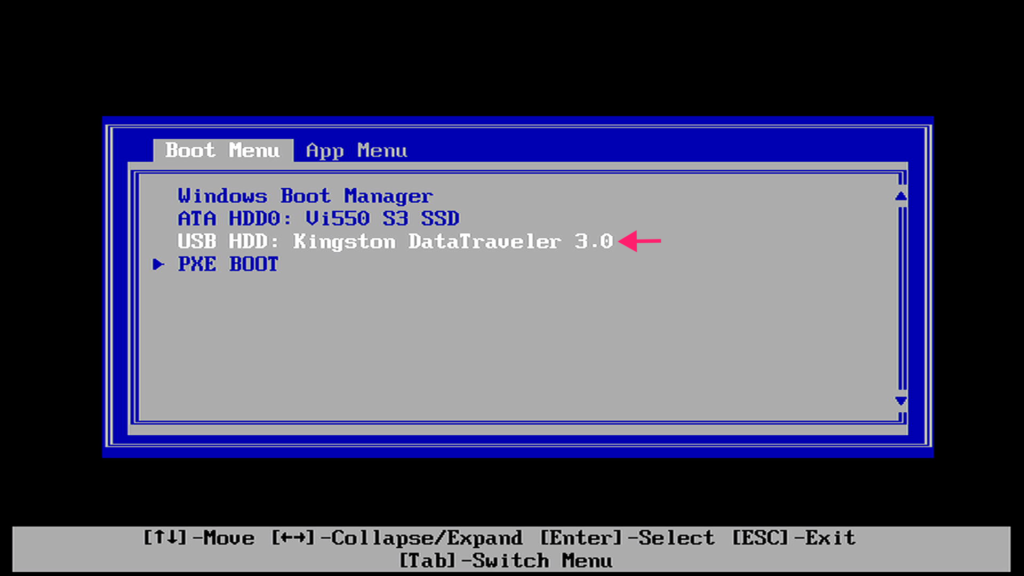
You can either change your boot order so USB takes priority, or use your device’s boot menu (the key varies by manufacturer, but it’s usually displayed during startup, something like F12, F2, or DEL).
» Here’s our guide to reinstall Windows 11
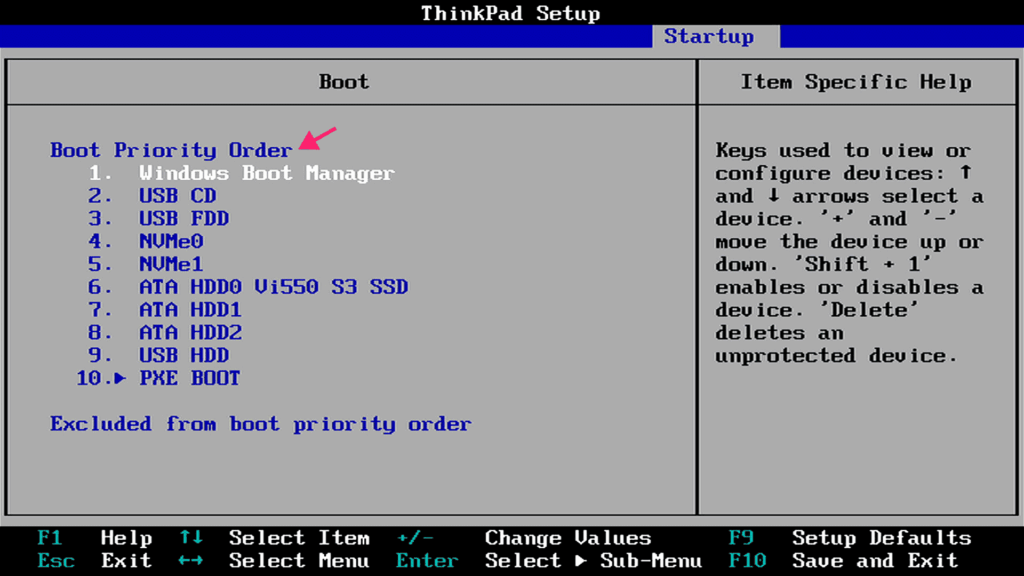
Alternatively, access your device’s boot menu. The method depends on the device manufacturer; information on how to access it is usually displayed during startup.

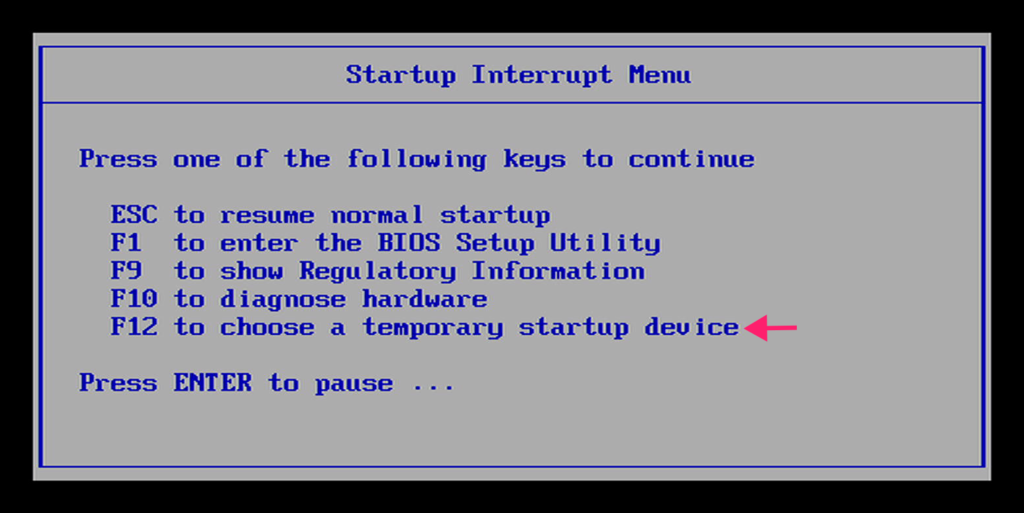
Once the boot menu is displayed, select the entry corresponding to the USB drive and press Enter to boot from it.
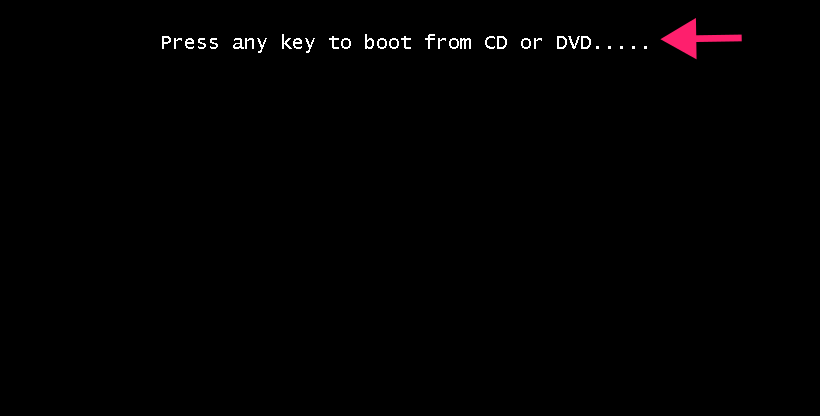
When you see the message “Press any key to boot from CD or DVD,” press a key to continue.
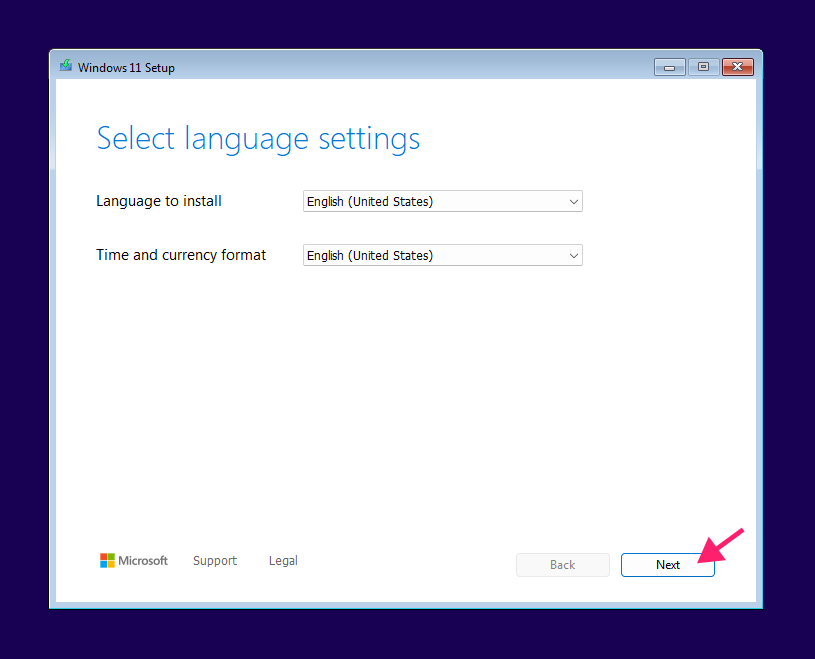
Follow the on-screen instructions to proceed. Keep in mind that the existing apps and settings will be deleted.
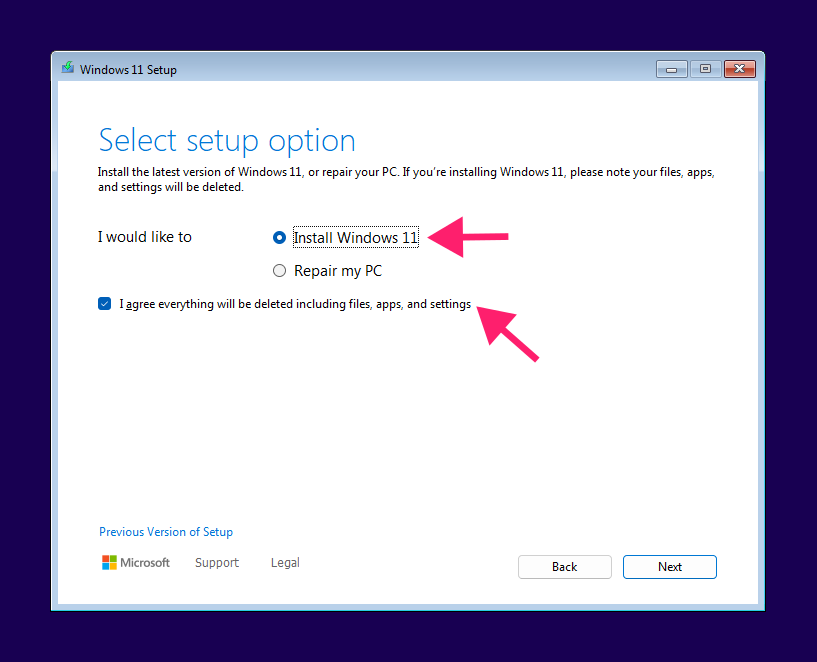
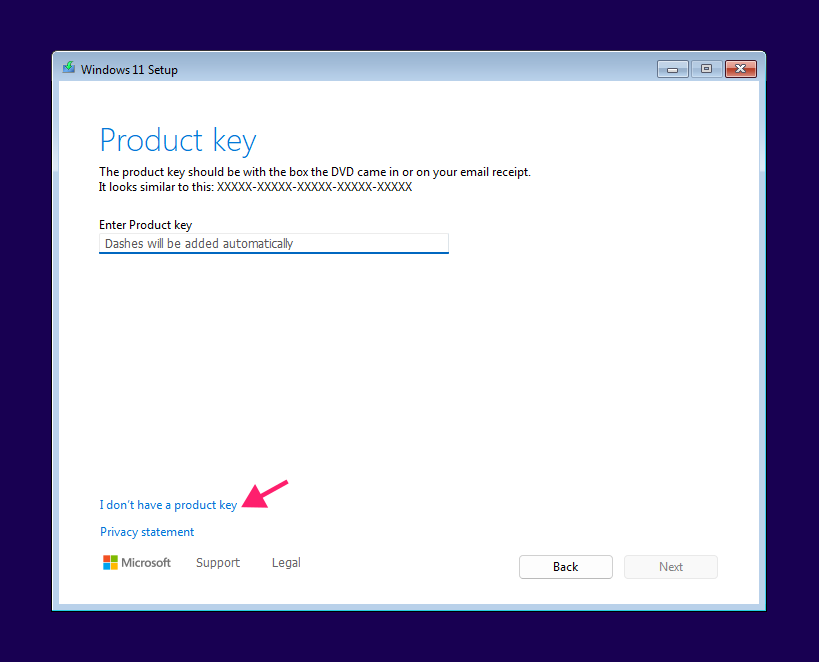
Enter your product key when prompted if you have a retail license. Otherwise, click “I don’t have a product key.” Accept the license agreement to proceed.
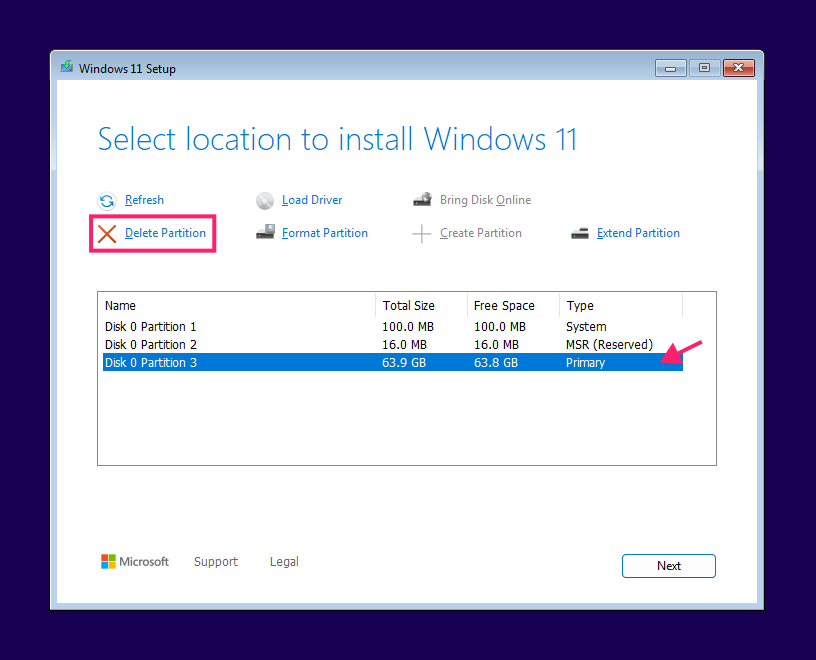
Select the partition on which you want to install your clean Windows 11 instance. Ideally, format the partition. If you don’t have any other partitions that contain data you wish to save, delete all partitions of the corresponding drive.
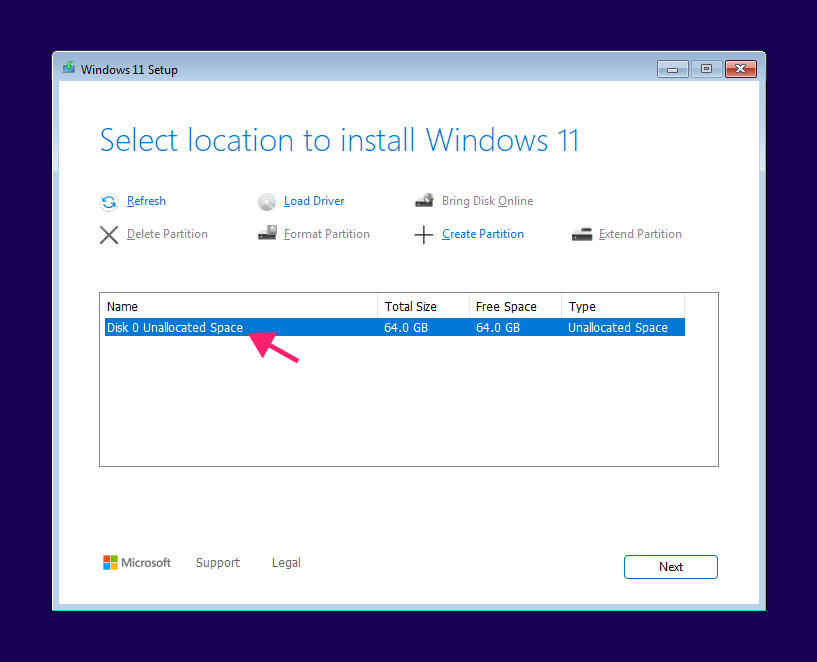
Select the unallocated space and Setup will create the necessary structure automatically. Make sure to keep track of the disk number if your system contains more than one drive, you can usually identify them by total size.
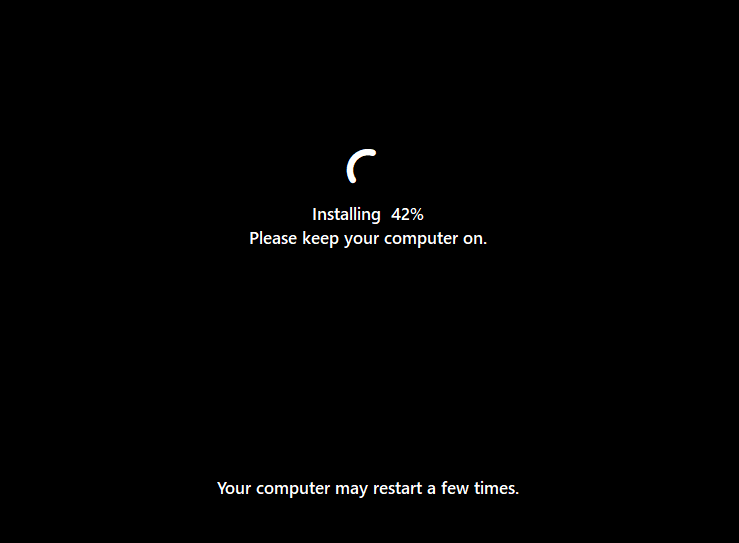
Continue following the on-screen instructions. The system will restart automatically several times.
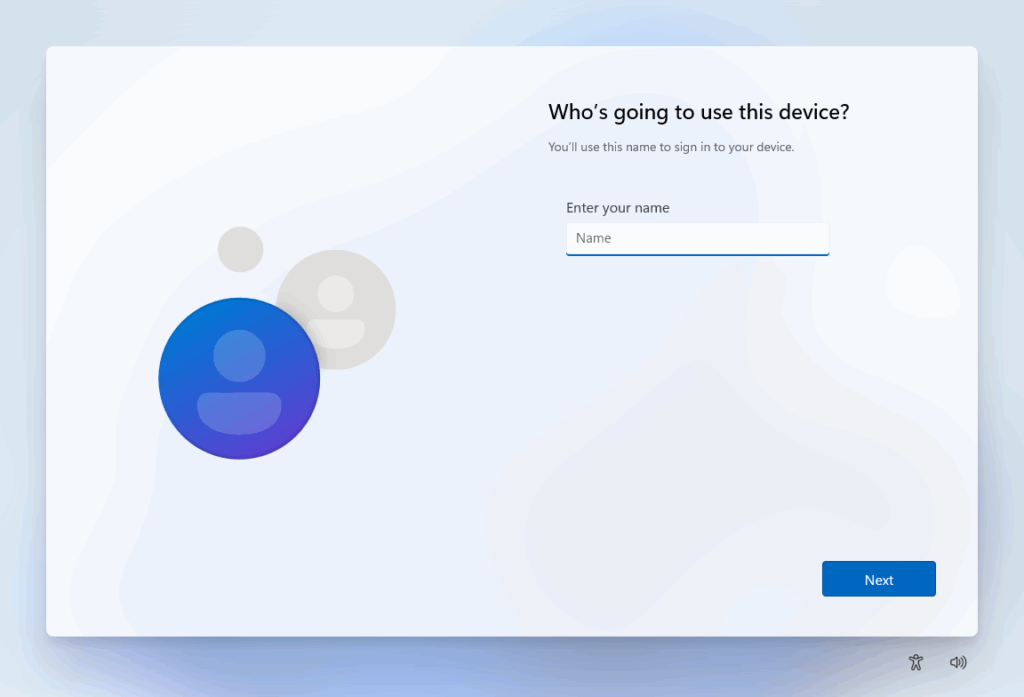
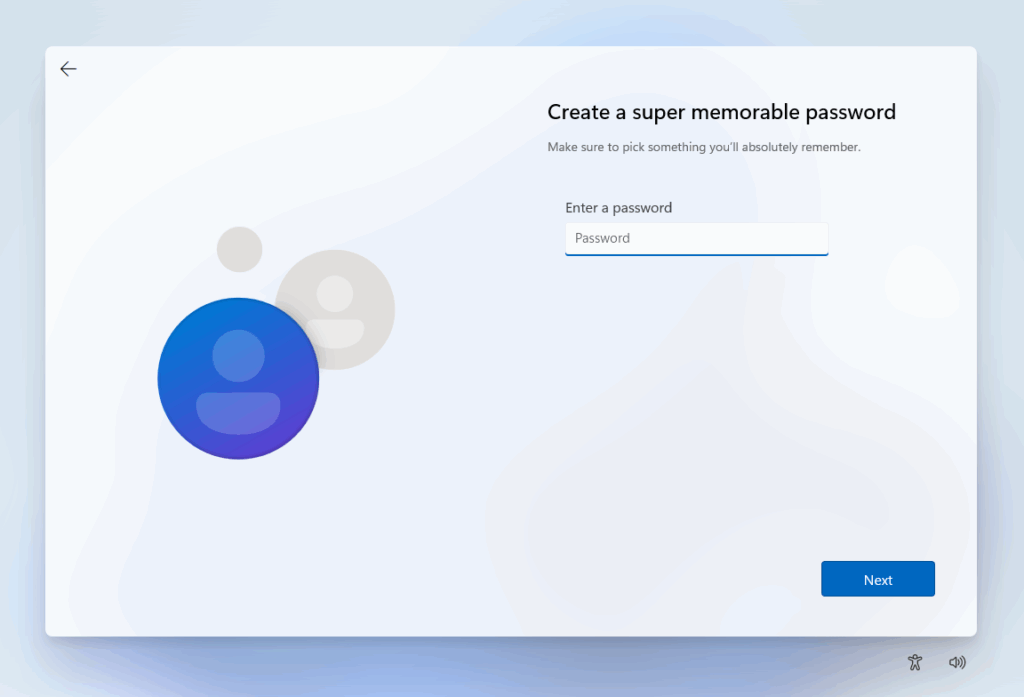
After the install process is finished, you will be prompted to enter several details regarding your system. Proceed with following the on-screen instructions.


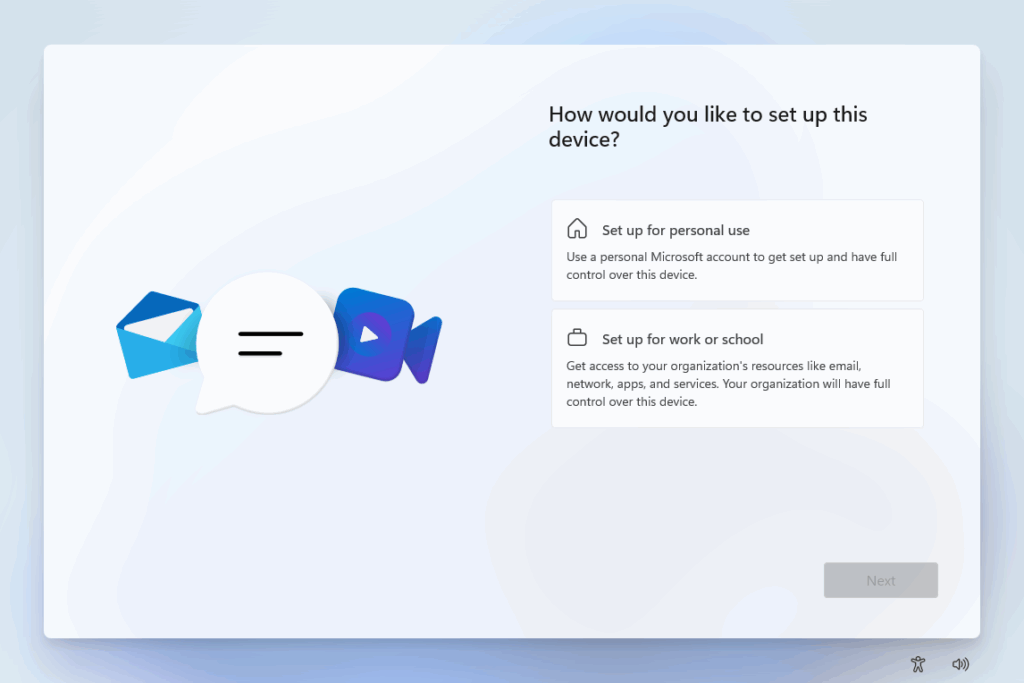
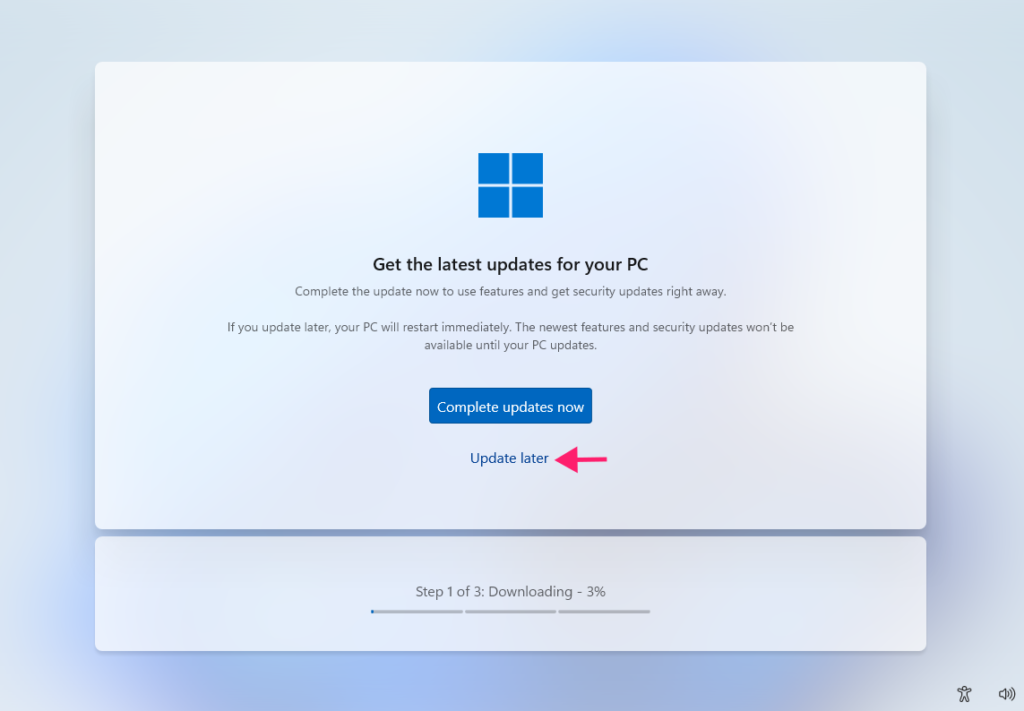
If your system is connected to the internet, Setup will try to apply updates. You can skip this by selecting “Update later.”
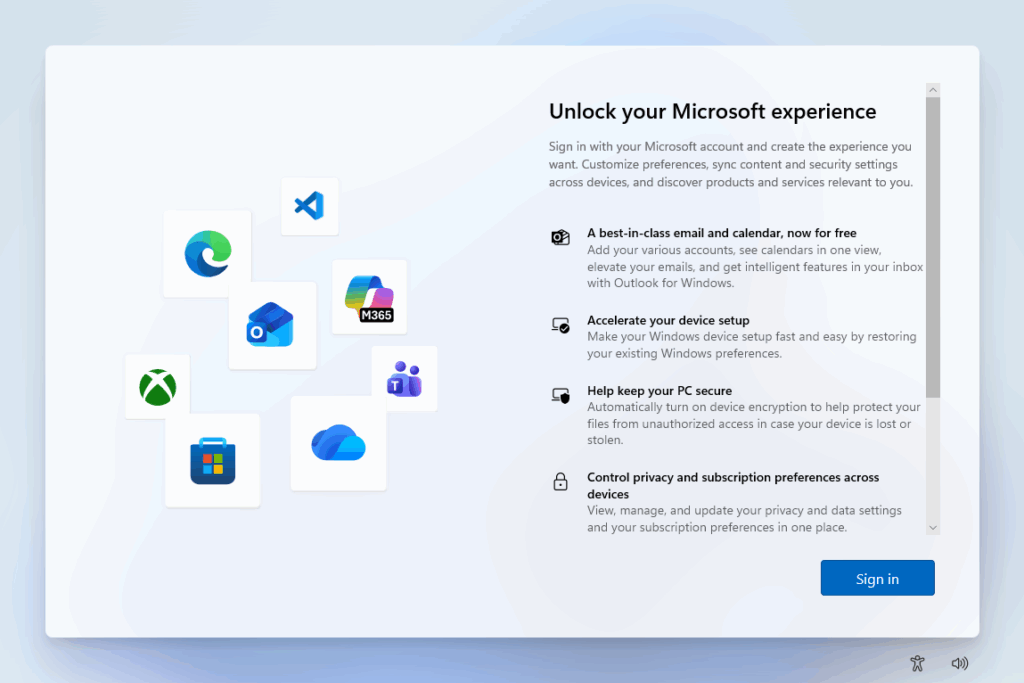
If the USB drive used for installing was set up with Rufus, you may not get the new user prompts. Otherwise, depending on the version you are installing, you may be able to skip the Microsoft account requirement using the oobe\bypassnro workaround.
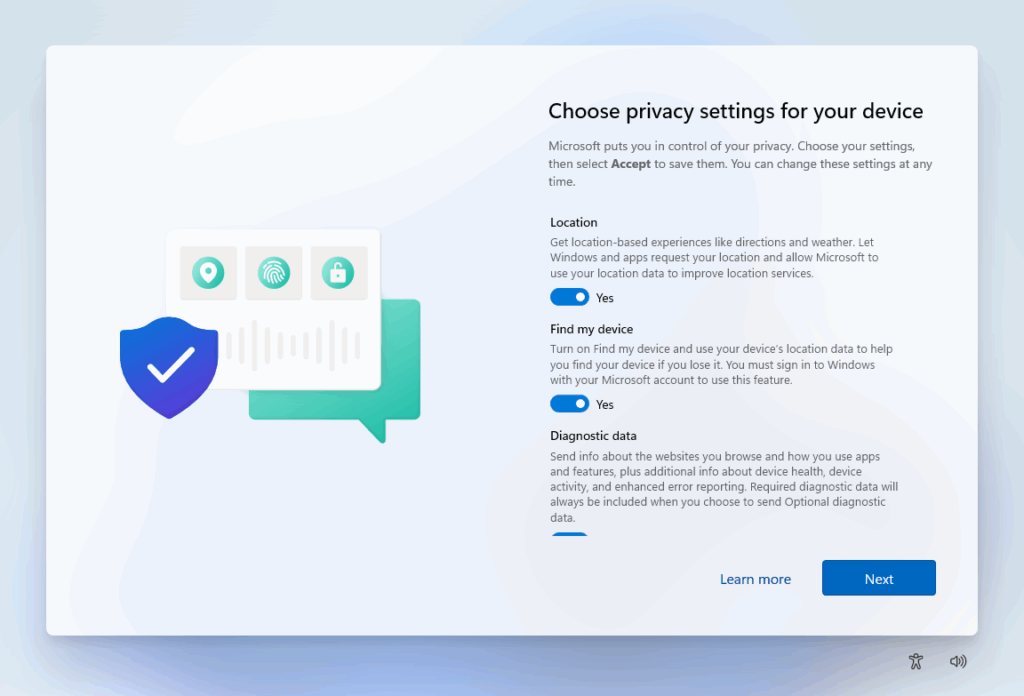
You can also review the privacy settings at this stage.
The installation process is almost done. Your system may restart again automatically.
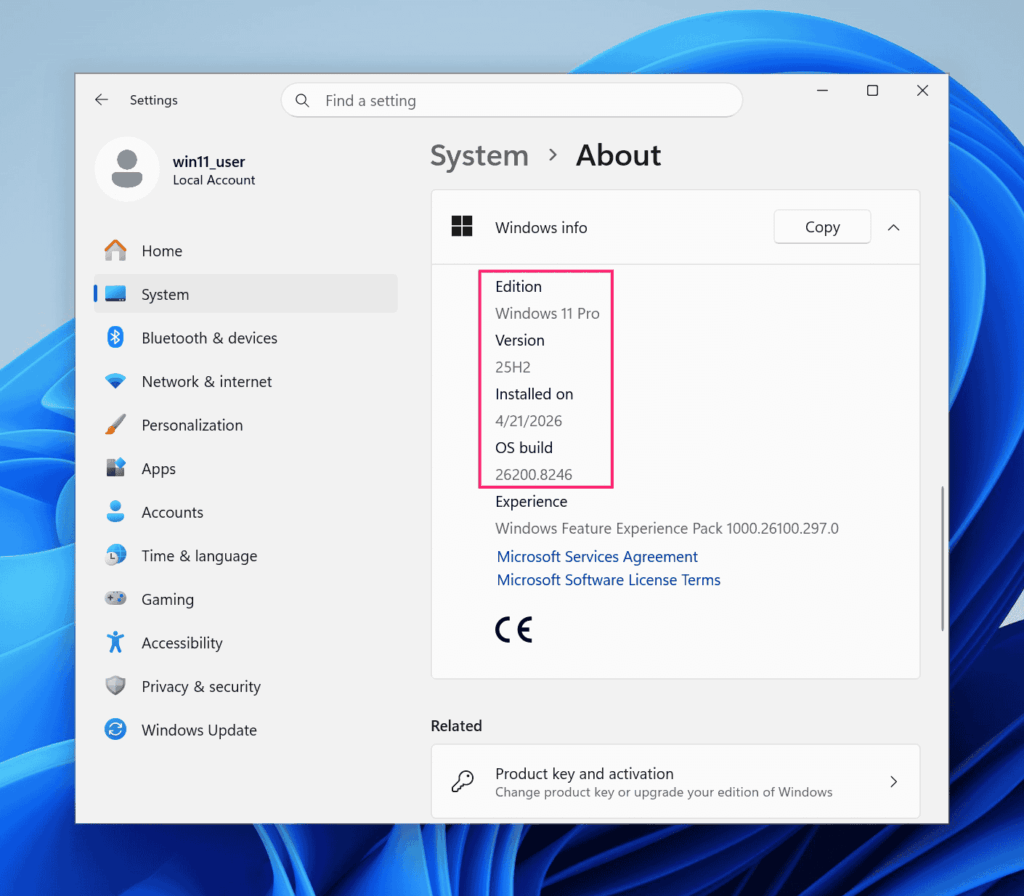
You can confirm the version of your freshly installed Windows 11 system by going to Settings > System > About. Keep in mind that you may see a different OS build than the one the ISO contained if you’ve applied updates during setup as cumulative updates can be applied.
Automate Windows 11 deployments at scale with Atera
If you’re managing multiple machines across your organization, Atera’s RMM platform turns those manual steps into automated workflows. Deploy Windows 11 at scale, execute post-installation scripts remotely, and handle driver deployment across your fleet. Add Robin, Atera’s AI agent for end-user support, and you’ve eliminated the support tickets that come with new deployments.
Ready to automate your deployment? Start your free trial
Related Articles

How to fix the “Reboot and select proper boot device” error
Your machine won't boot. The screen is black, the error is cryptic, and the instinct is to start hammering repair tools. That instinct is usually what turns a fixable problem into a real one. Most boot device errors come down to a cable, a BIOS setting, or a corrupted bootloader instead of a dead drive.
Read now
How to enable or disable the Notification Center in Windows 11
275 interruptions a day. That's what Microsoft's own data says the average employee absorbs before Windows starts layering in its own alerts, banners, and badges. The Notification Center has more control options than most people use: per-app rules, Focus sessions, Do Not Disturb, Group Policy, registry edits, and PowerShell automation. Here's how to use all of them.
Read now
How to remove OneDrive from File Explorer
OneDrive is woven into Windows more deeply than it looks. Unlink it without preparation and you lose AutoSave, version history, shareable links, and any cloud-only files that never made it to local storage. Done right, removal is clean and permanent.
Read now
How to enable and disable kernel mode
Privilege escalation made up 40% of all Microsoft vulnerabilities last year. Kernel-Mode Hardware-Enforced Stack Protection exists specifically to stop it, it's already built into Windows, and most teams have never enabled it. Here's every method to turn it on, verify it's running, and handle the driver conflicts that get in the way.
Read nowEndless IT possibilities
Boost your productivity with Atera’s intuitive, centralized all-in-one platform


