
Generate summary with AI

You double-click a zip file on a Mac and instead of a folder full of files, you get a dialog box that reads “Unable to expand [filename].zip” with an error code. Error 79, error 640, or a placeholder “0 undefined error 0” don’t tell you much, and a quick search turns up more confused forum threads than actual answers. That ambiguity is the real problem because the error doesn’t distinguish between a genuinely corrupted archive and Archive Utility simply failing to handle a file it should be able to open.
Thankfully, a handful of Terminal commands can tell you definitively what the actual problem is, and from there the resolution path is quite simple. Here’s how to diagnose it correctly the first time instead of cycling through fixes at random.
Why these zip extraction errors happen and what they mean
Before jumping to a fix, it’s worth understanding what these error codes actually mean, because “unable to expand” is at least two problems and Archive Utility’s error messages don’t tell you which one you’re facing.
Apple’s own documentation on Archive Utility error codes is thin, but here’s what each one signals:
- Error 79: “Inappropriate file type or format.” Apple documents this one, and it typically surfaces when Archive Utility encounters a
.ziparchive that’s corrupted or otherwise incompatible with what it expects. - Error 640: Not listed in Apple’s official error documentation, which stops at 102. In practice, this is an Archive Utility-specific error rather than a general macOS system error.
- Error 0 (“undefined error 0”): Apple’s own list marks code 0 as “Not used.” It’s a placeholder, not a real diagnosis, so the system is telling you it has no defined meaning for the failure you just hit.
How to verify whether the archive is corrupted or Archive Utility is the problem
The fastest way to isolate the cause is to test the archive directly in Terminal rather than relying on Archive Utility’s own error dialog.
- Open Spotlight with
Command (⌘) + Space, typeterminal, and press Return Run
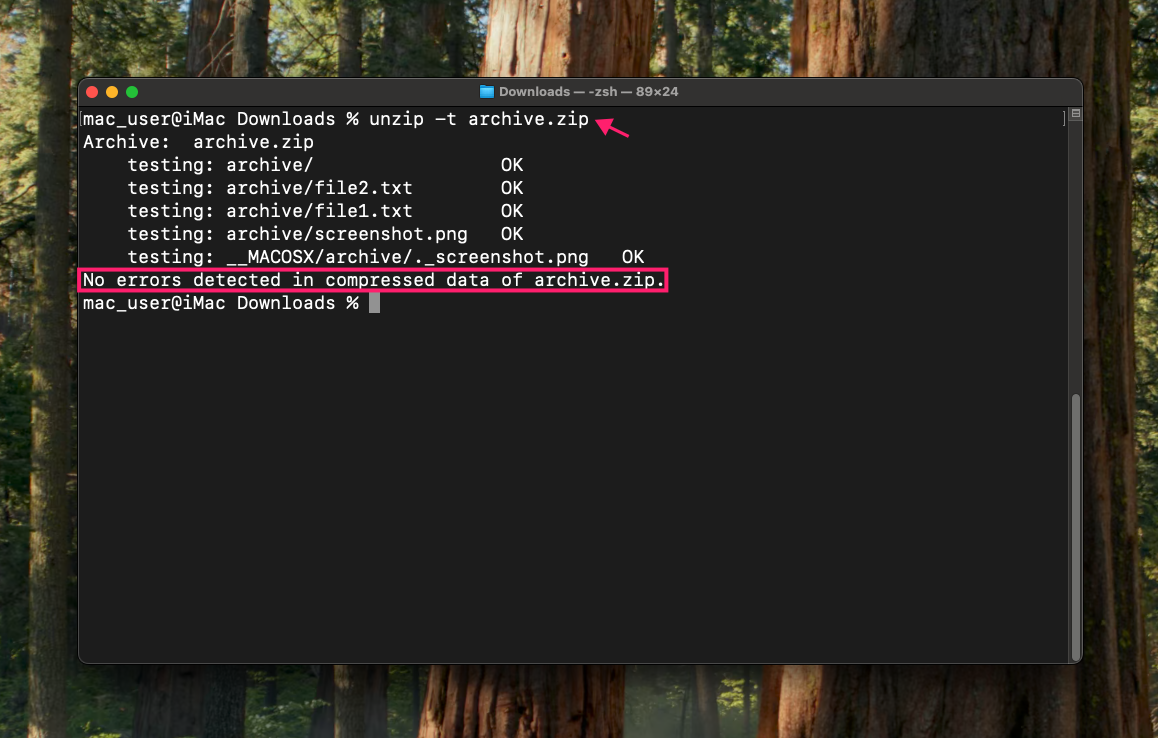
unzip -t /path/to/archive.zip, orcdinto the folder containing the archive and rununzip -t archive.zipThis checks the archive’s integrity and confirms whether it can actually be extracted. If the output reports no errors, the failure is most likely on Archive Utility’s side, not the file’s.

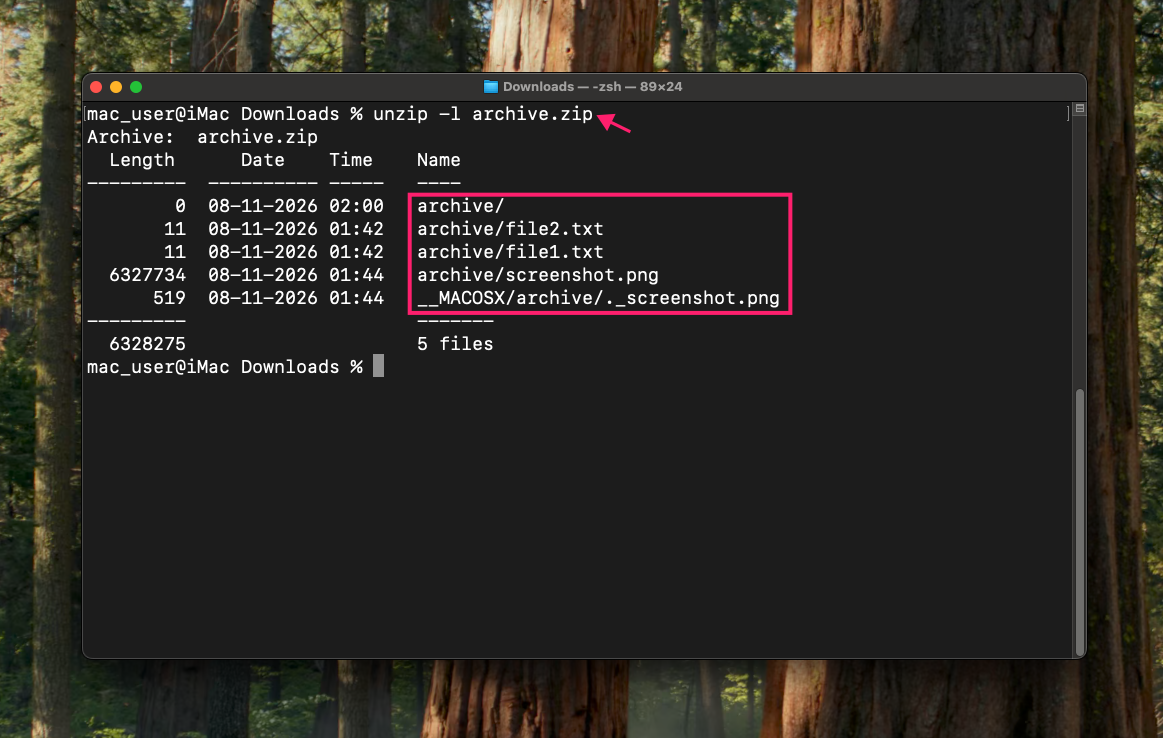
If you want a second data point, list the archive’s contents without extracting:
unzip -l /path/to/archive.zipA failure at this step is a strong signal the
.zipfile is structurally broken.
Verify the file header by running:
file /path/to/archive.zipto verify the file header
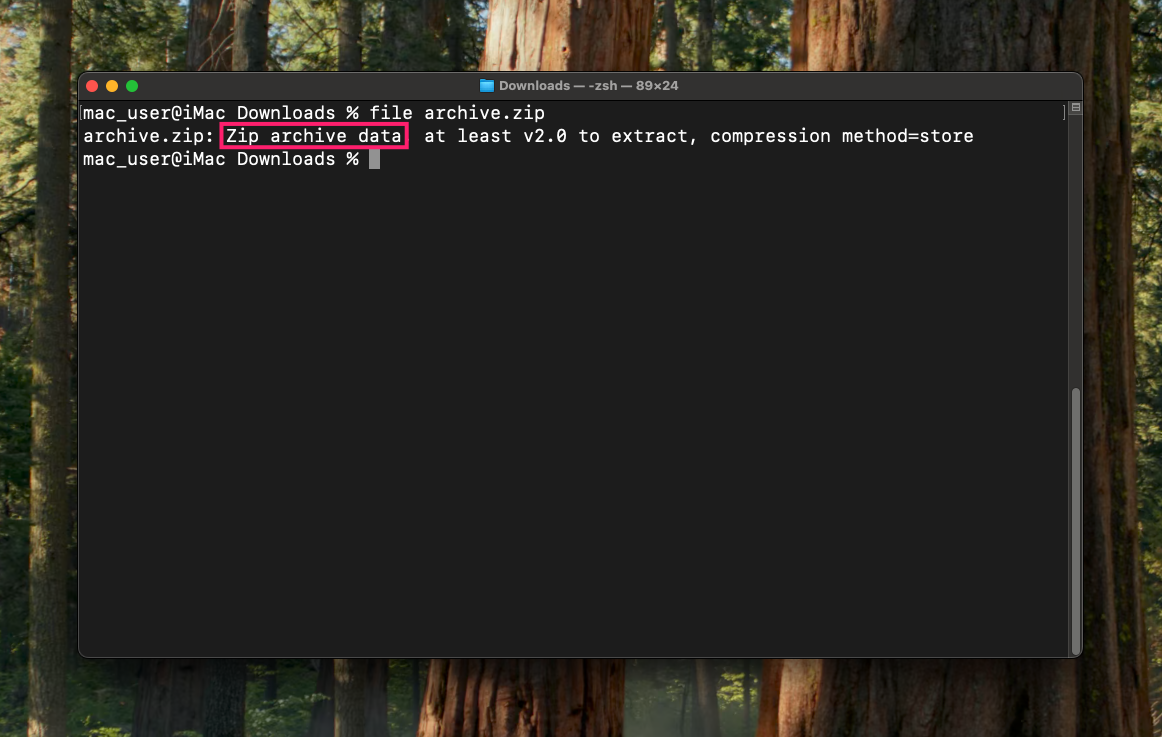
If the output reads Zip archive data, the file is being correctly identified as a zip at the format level, which further narrows the problem toward Archive Utility rather than the file itself.
What permissions and access macOS needs to extract a zip successfully
Extraction failures caused by permissions follow standard UNIX behavior, plus a couple of macOS-specific access layers worth knowing about.
Your user account needs Read access on the .zip archive itself and Write access on the destination folder where the decompressed files will land. Beyond that baseline, macOS adds two permission layers that can silently block extraction:
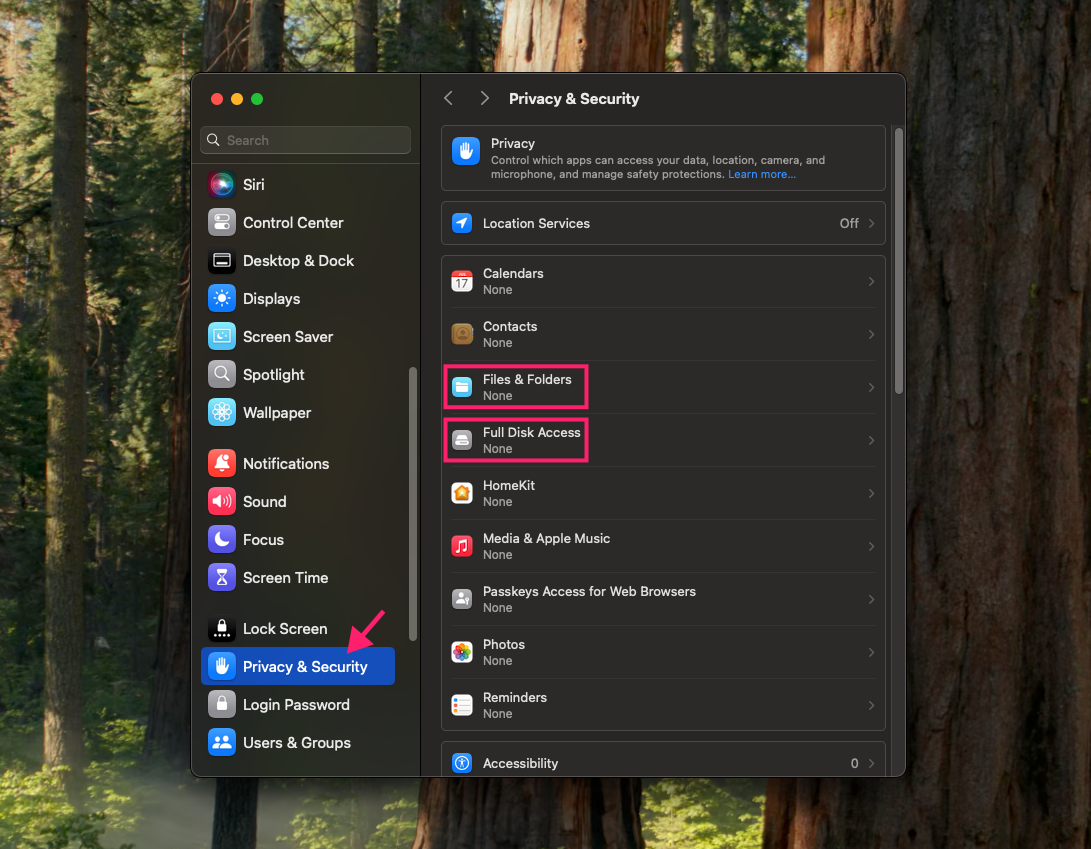
- Apps extracting to the Desktop, Downloads, or Documents folders may need explicit permission. macOS prompts for this the first time an app tries to access those locations, and you can review or revoke what’s been granted under Files & Folders in Privacy & Security settings.
- Extracting to a system-level directory or other restricted location may require Full Disk Access, which is a separate toggle under the same Privacy & Security settings.
Step-by-step resolution methods to actually fix the error
Once you know whether you’re dealing with a corrupted archive or an Archive Utility limitation, the fix is usually one of the methods below. We listed them from the simplest to most involved, but you don’t need to work through all of them since the diagnosis from the previous section should tell you which one you need.
Adjust the file extension or shorten the destination path
Use this method when a zip file has been mislabeled or when the archive contains deeply nested folders that push the destination path past macOS’s limits.
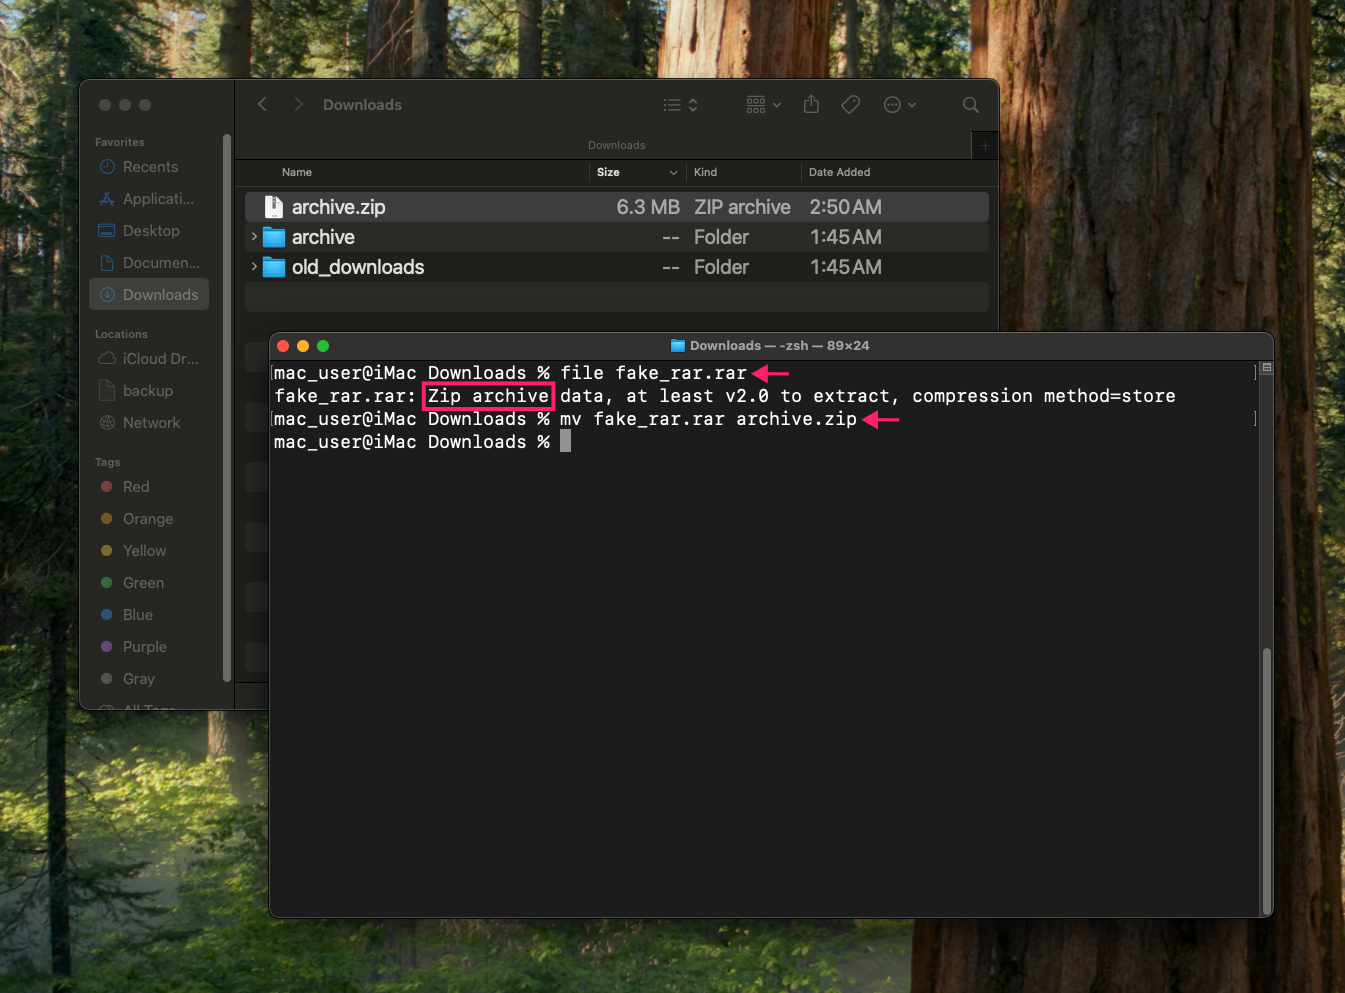
Confirm the file’s actual type by running
file /path/to/file.extin Terminal
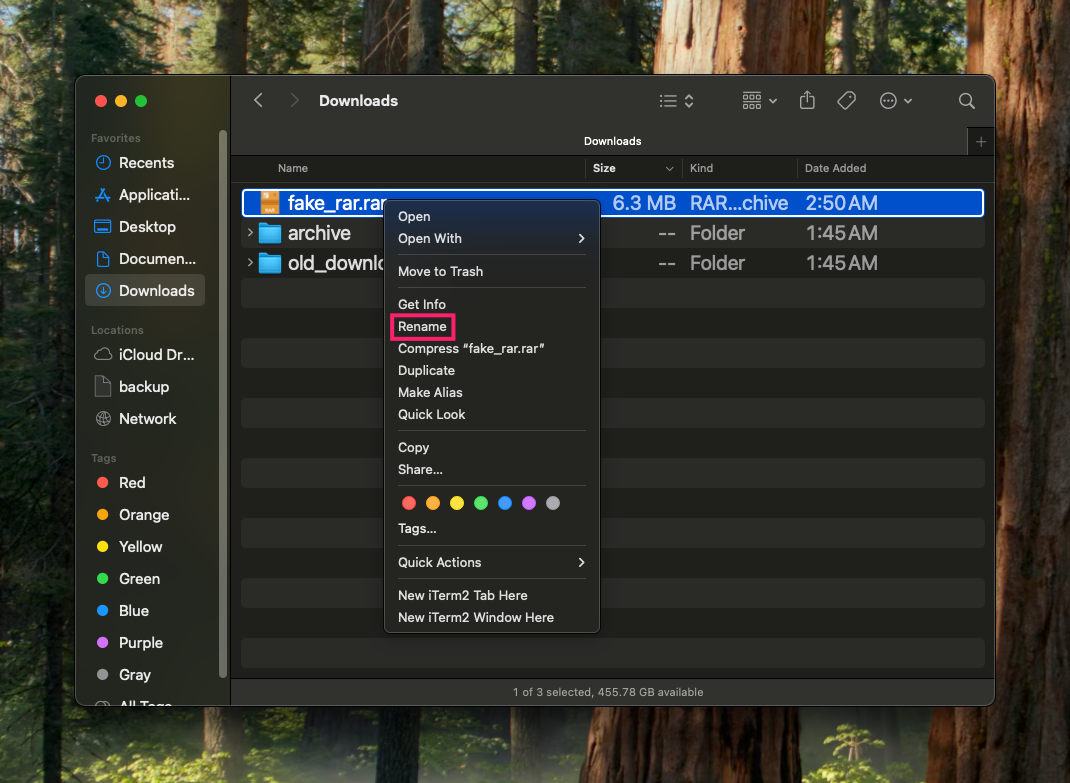
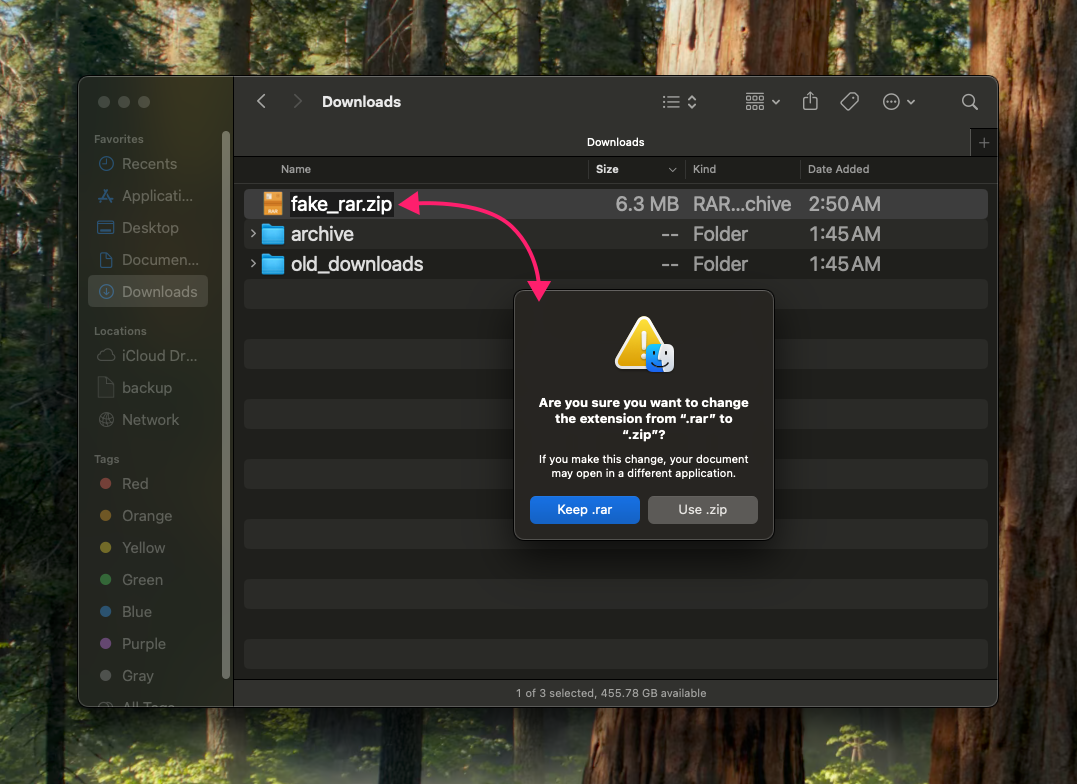
If the extension doesn’t match the actual format, rename it. In Finder, select the file, click it again (or press Return), and type the correct extension; or right-click and choose Rename

Confirm the change when prompted; macOS will warn that changing the extension changes the file’s application association

- Alternatively, rename via Terminal with
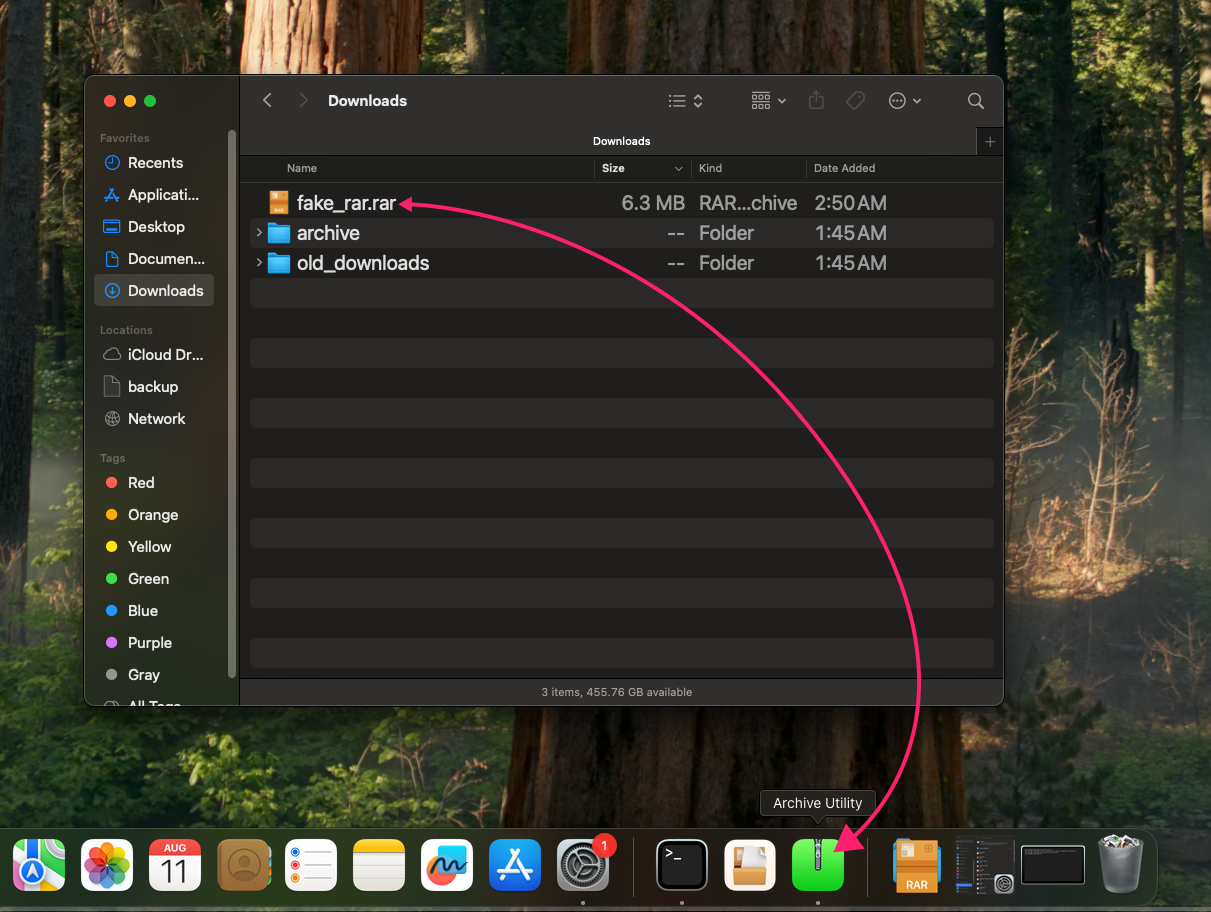
mv /path/to/file.old_ext /path/to/file.new_ext Alternatively, bypass the file association by dragging the file onto the app (Archive Utility for example)

- If renaming doesn’t resolve it, move the
.zipfile to a short, single-word name in a top-level location like~/Downloadsor~/Desktop; macOS enforces a 255-character limit on file names and a 1024-character limit on full paths, and long nested paths inside an archive can trigger extraction errors - Extract in that top-level location, then move the resulting contents to the desired directory afterward
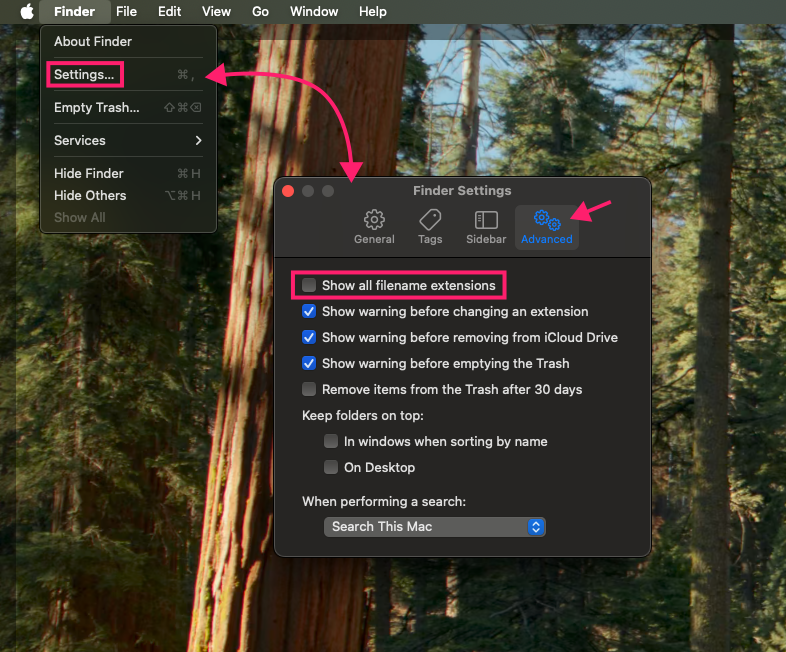
If the file extension isn’t visible in Finder to begin with, enable it under Finder > Settings > Advanced > Show all filename extensions

Fix permissions through Finder’s Get Info panel
Use this method when the diagnosis check suggests the account extracting the file lacks read access to the archive or write access to the destination.
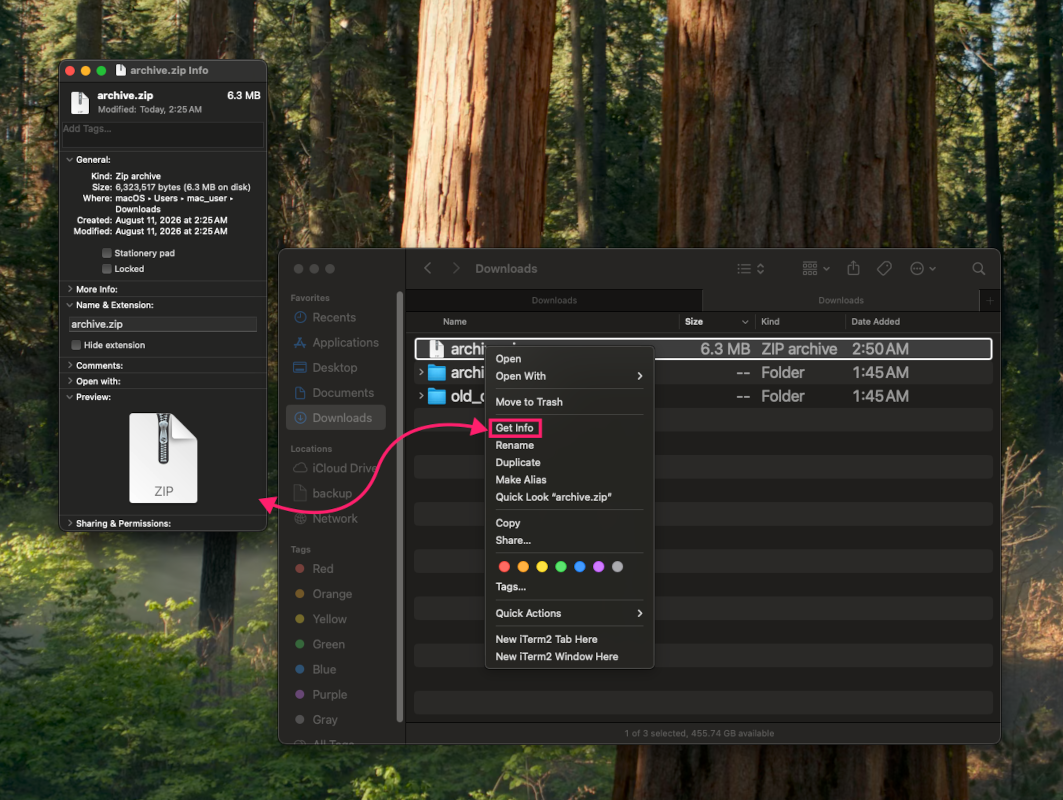
Select the file and press
Command (⌘) + i, or right-click it and choose Get Info
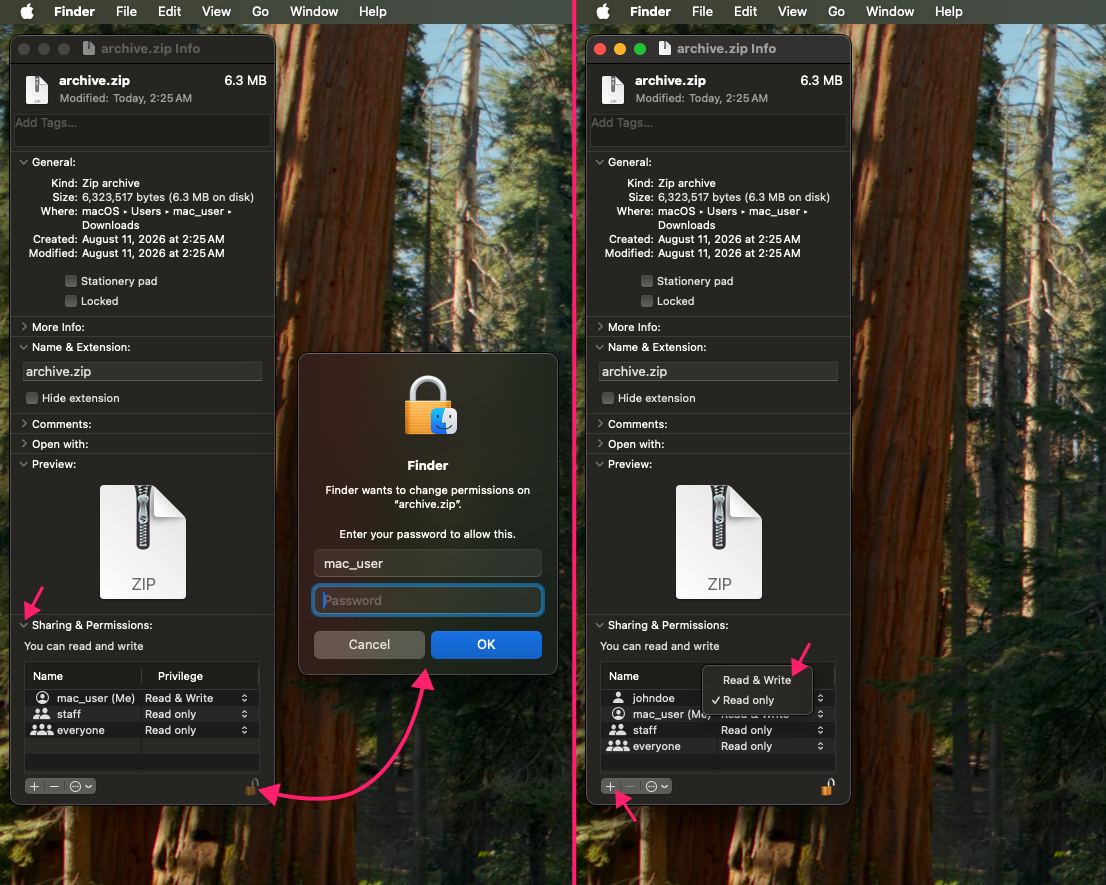
- Expand the Sharing & Permissions section
- If you don’t own the file, click the lock icon and enter credentials to unlock permission settings
Click the current entry in the Privilege column for the relevant user or group and select the correct permission level from the popup menu, or add a new entry with the + button

Extract with Terminal’s unzip command
Use this method when Archive Utility fails in the GUI but the archive itself has already tested clean.
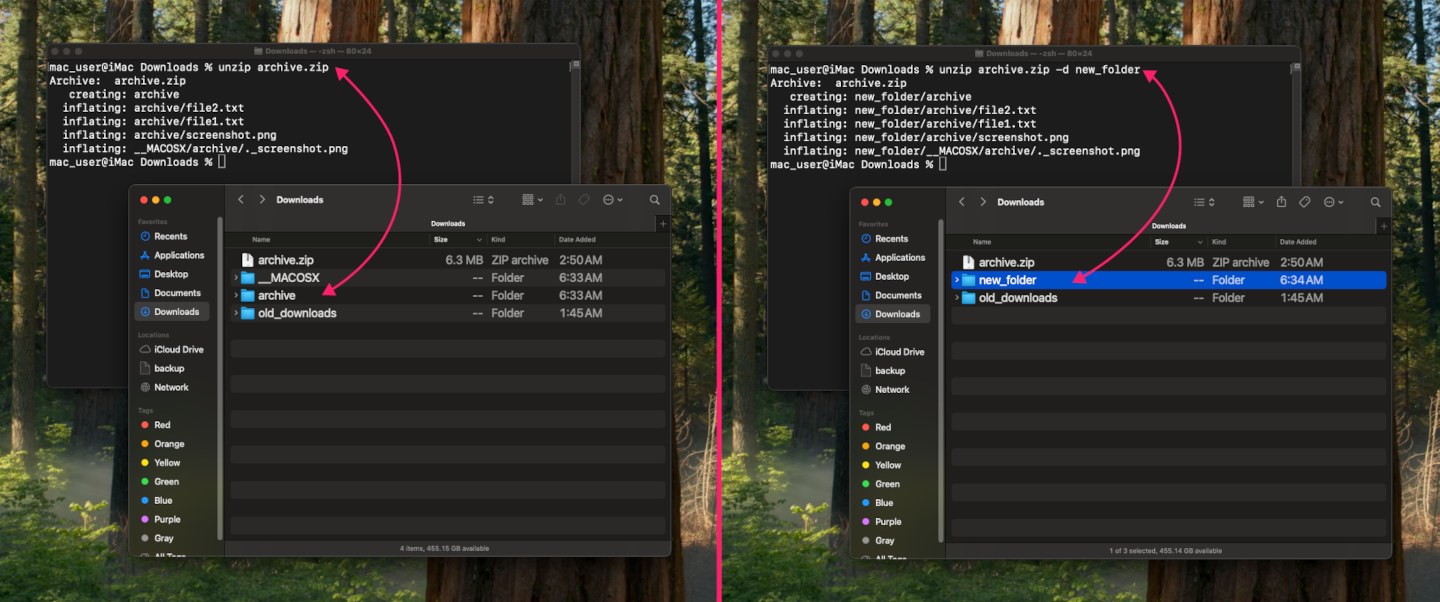
- Open Terminal and run
unzip /path/to/archive.zipto extract in place To extract to a specific folder instead, run
unzip /path/to/archive.zip -d /path/to/destination
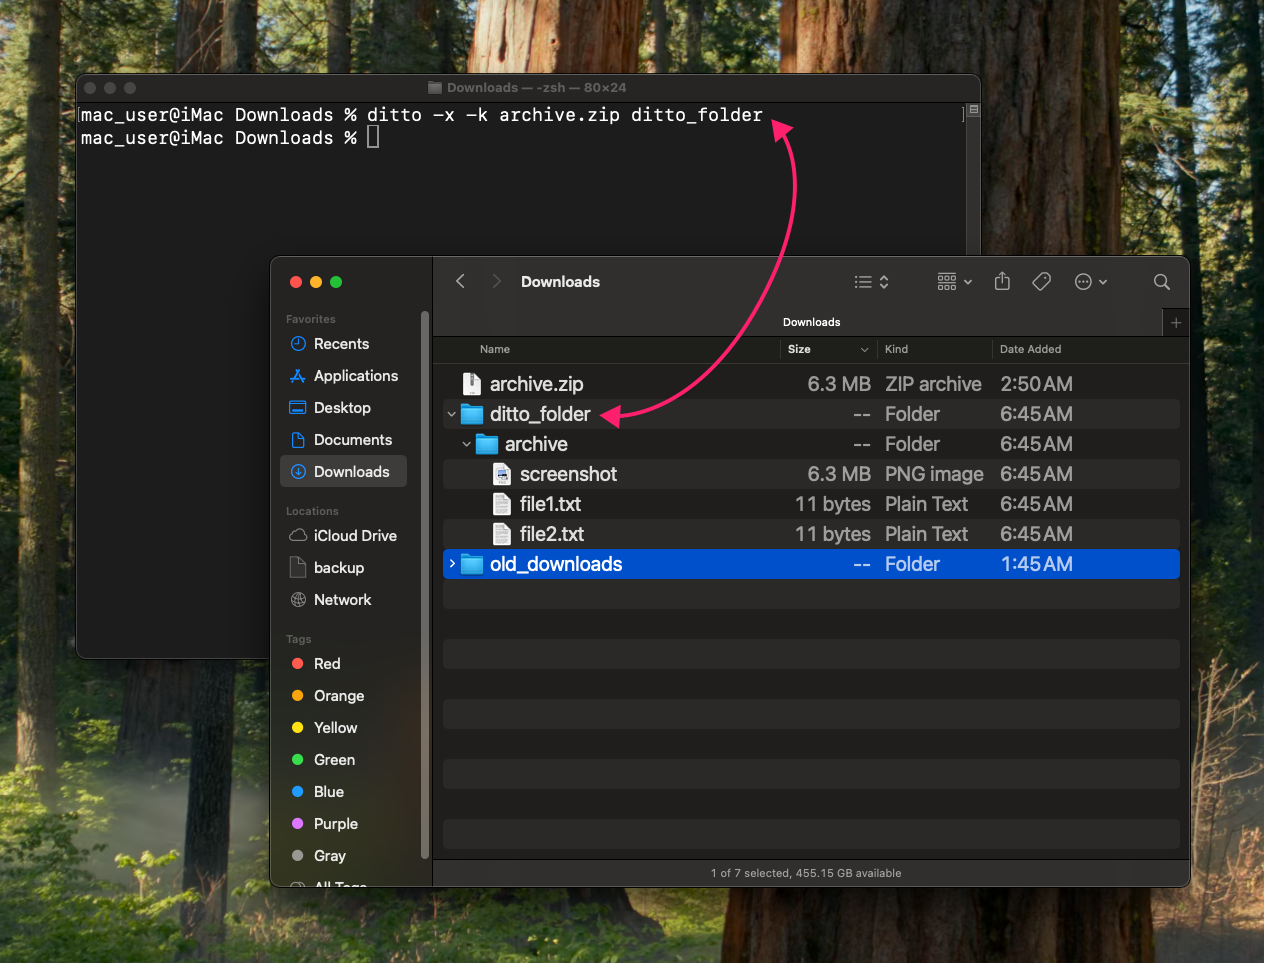
You can also force extraction when standard unzipping still returns an error using the ditto command:
- Run
ditto -x -k /path/to/archive.zip /path/to/destinationin Terminal The
-xflag tellsdittoto extract an archive rather than create one;-kspecifies that the archive format is PKZip
Clear quarantine flags with xattr
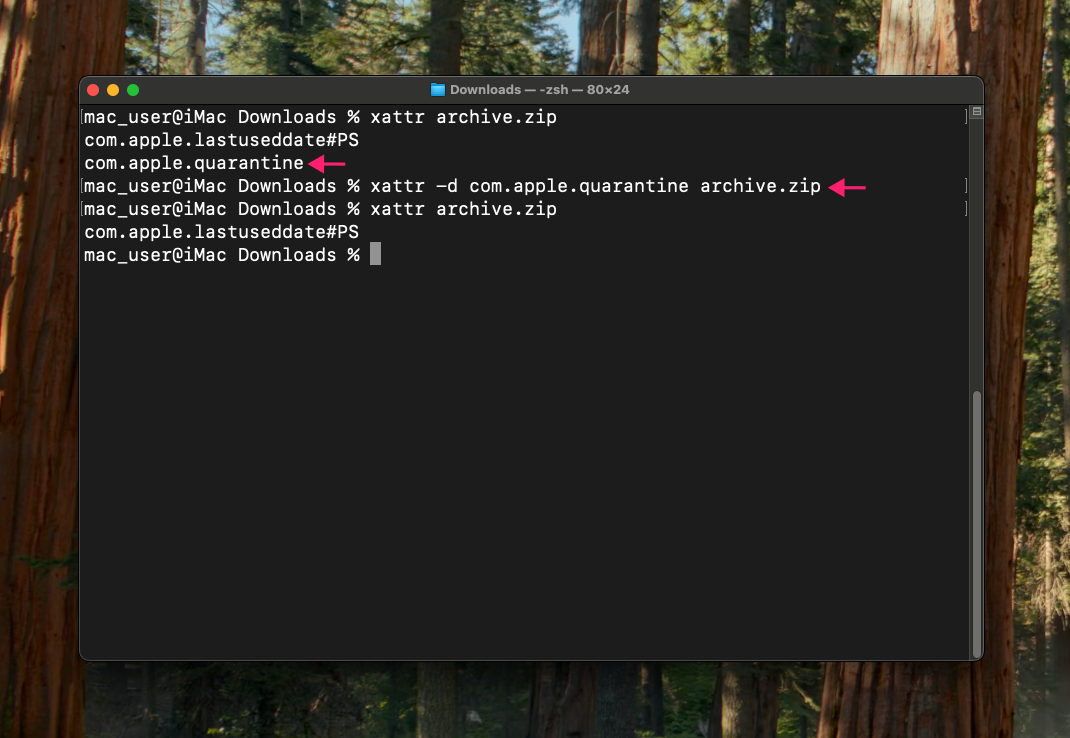
Use this method when a downloaded file is being blocked by macOS security filters rather than a genuine format or permissions issue.
- Run
xattr /path/to/archive.zipto view the file’s current extended attributes - If
com.apple.quarantineappears in the output, remove it by runningxattr -d com.apple.quarantine /path/to/archive.zip - If the archive already extracted but macOS is blocking the resulting files, remove the flag recursively with
xattr -rd com.apple.quarantine /path/to/extracted_folder Prefix the command with
sudoif you don’t own the files being modified
Force access with chmod
Use this method when read or write access is confirmed missing and you need to grant it directly from Terminal rather than through Finder.
- If you own the archive, run
chmod u+rw /path/to/archive.zipto grant yourself read and write access - If you don’t own the file, run
sudo chmod o+rw /path/to/archive.zipto grant read and write access to others - Extraction itself typically only requires read access on the archive; write access is only needed if you also need to modify the file, such as removing a quarantine flag.
To fix access on the destination folder, run
chmod -R 755 /path/to/destination
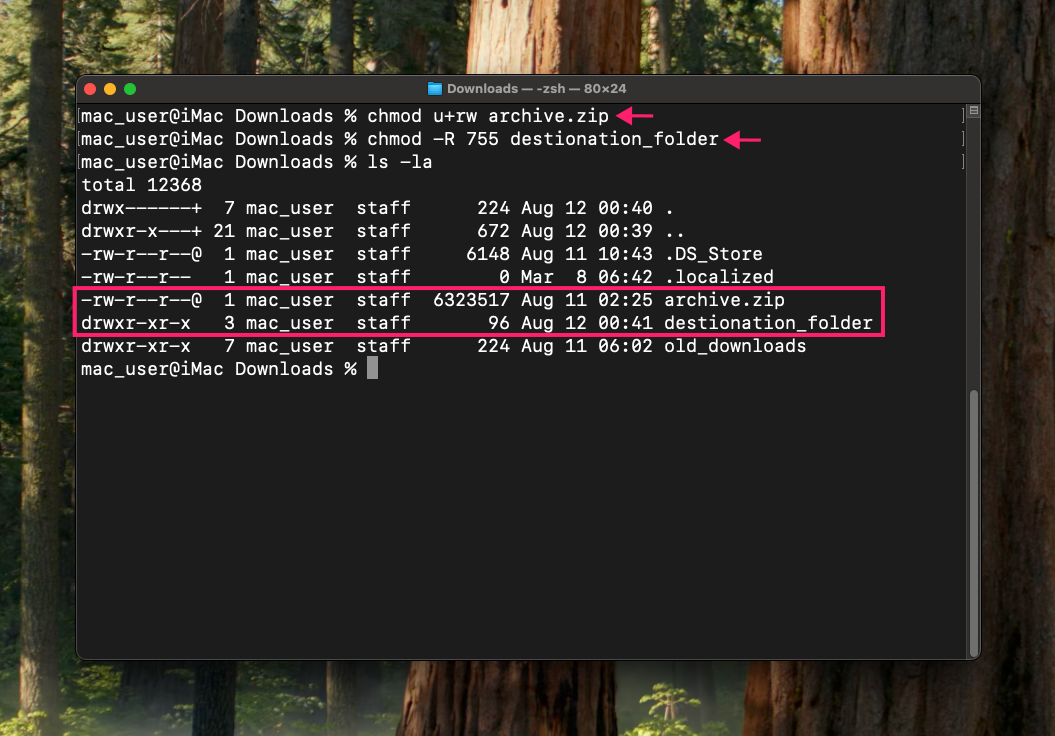
Only use the -R flag if the folder isn’t empty and its contents may need to overwrite existing items or write into existing subfolders; 755 grants the owner read, write, and execute, while group and others get read and execute. Run with sudo if you don’t own the destination folder.
» Learn more about the chmod command in our guide to changing file permissions on Linux
Scale the fix across a fleet of Macs
The methods above work fine for a single machine, but the same failure pattern (quarantine flags, permission mismatches, or both) tends to show up across many Macs at once when files are distributed through a common channel like email or a shared drive. At that point, running each fix by hand doesn’t scale, and the better move is combining the same native commands into a single script.
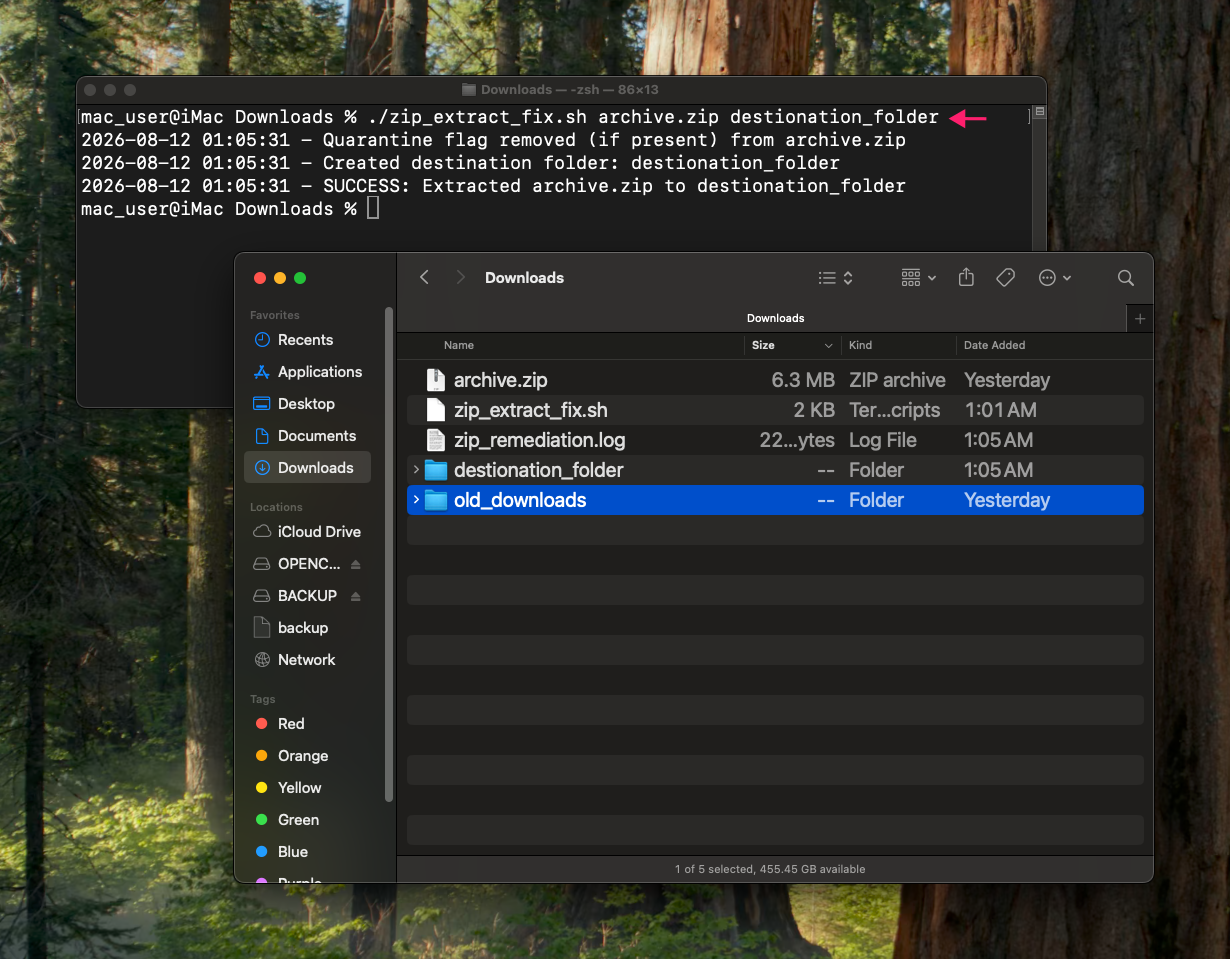
1. Write a shell script that removes the quarantine flag with xattr, sets appropriate read/write permissions with chmod, and extracts with ditto, logging each step’s outcome
Here’s an example:
The Script:
Atera does not guarantee the integrity, availability, security, virus-free, safety, lawfulness, non-infringement, rights’ status, or functionality of the scripts. The use of the shared scripts is at your own risk. Scripts are provided “AS IS”. *
#!/bin/zsh
#
# usage: ./zip_remediation.sh /path/to/archive.zip /path/to/destination
#

ZIP_PATH="$1"
DEST_DIR="$2"
LOG_FILE="/Library/Logs/zip_remediation.log"

log() {
  echo "$(date '+%Y-%m-%d %H:%M:%S') - $1" | tee -a "$LOG_FILE" 2>/dev/null
}

# validate paths
if [[ -z "$ZIP_PATH" || -z "$DEST_DIR" ]]; then
  echo "Usage: $0  "
  exit 1
fi

# check if archive exists
if [[ ! -f "$ZIP_PATH" ]]; then
  log "ERROR: $ZIP_PATH not found. Aborting."
  exit 1
fi

# remove quarantine flag
/usr/bin/xattr -d com.apple.quarantine "$ZIP_PATH" 2>/dev/null
log "Quarantine flag removed (if present) from $ZIP_PATH"

# ensure read permission on the archive
/bin/chmod 644 "$ZIP_PATH"

# create the destination folder if it does not exist
if [[ ! -d "$DEST_DIR" ]]; then
  /bin/mkdir -p "$DEST_DIR"
  if [[ $? -ne 0 ]]; then
    log "ERROR: Failed to create $DEST_DIR. Aborting."
    exit 1
  fi
  log "Created destination folder: $DEST_DIR"
else
  log "Destination folder already exists: $DEST_DIR"
fi

# take ownership in case an existing folder is owned by another user
/usr/sbin/chown -R "$(whoami)" "$DEST_DIR" 2>/dev/null
/bin/chmod -R 755 "$DEST_DIR"

# extract via ditto
/usr/bin/ditto -x -k "$ZIP_PATH" "$DEST_DIR"
DITTO_STATUS=$?

if [[ $DITTO_STATUS -eq 0 ]]; then
  log "SUCCESS: Extracted $ZIP_PATH to $DEST_DIR"
  exit 0
else
  log "ERROR: ditto failed with exit code $DITTO_STATUS"
  exit 1
fi
Pro tip: If you need to make changes to this script and need more or less specific instructions but don’t know anything about coding, Atera’s AI Copilot can vibe code it for you.
2. Validate the script manually on one machine first, confirming it exits successfully and produces the expected output folder
3. To deploy via Microsoft Intune, upload the script and configure it to run as the signed-in user or as root if the target folders require admin permissions, then assign it to the relevant macOS device groups
4. To deploy via Apple Remote Desktop, use the Copy Items command to push the script to target Macs, then select the client computers and go to Manage > Send UNIX Command to execute it
5. To deploy over SSH, loop the script across a list of hostnames or IP addresses from an administration terminal, keeping in mind that sudo -n will fail silently if passwordless sudo isn’t already configured on the target machines
For IT teams and MSPs, Atera’s RMM platform simplifies the management of Mac devices. Remote scripting capabilities let you run the same script across selected devices or device groups on demand and monitor the changes without needing separate workflows for Intune, ARD, and SSH.
» Here’s how to install Atera’s macOS Agent
Preventing extraction failures and handling edge cases
Most extraction failures trace back to the causes covered in Sections 1 and 2, but a handful of situations fall outside that pattern either because they involve an archive type Archive Utility isn’t built to handle or because the root cause is a mistake made before the file ever reached the Mac.
Here are the two most common ones and what do about them:
Scenario | What’s happening | How to resolve it |
|---|---|---|
Password-protected zip won’t open | Archive Utility can silently fail or throw an error on encryption types it doesn’t handle well | Try Terminal’s |
Split archive ( | Multi-volume archives fail if the parts aren’t all accessible together | Confirm every split file is in the same directory before attempting extraction. Missing or misplaced parts are the most common cause of failure here |
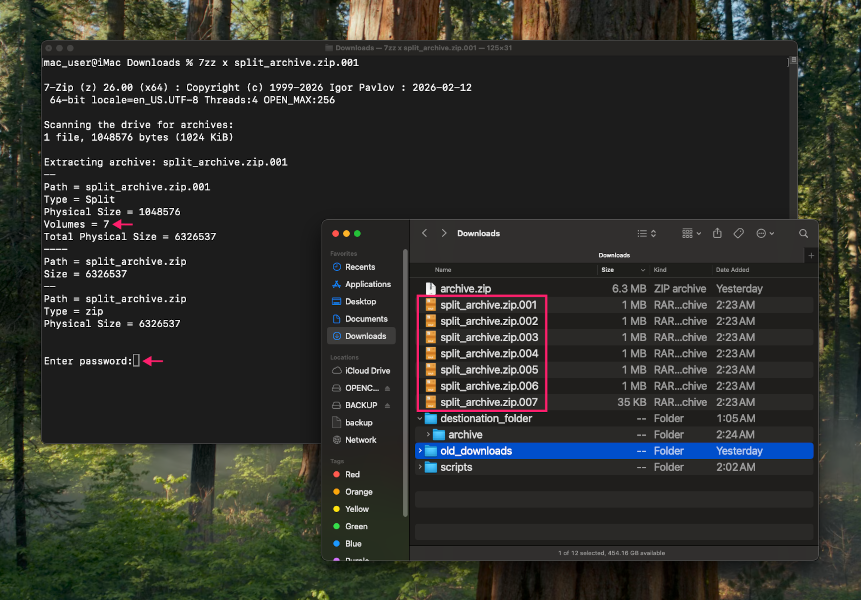
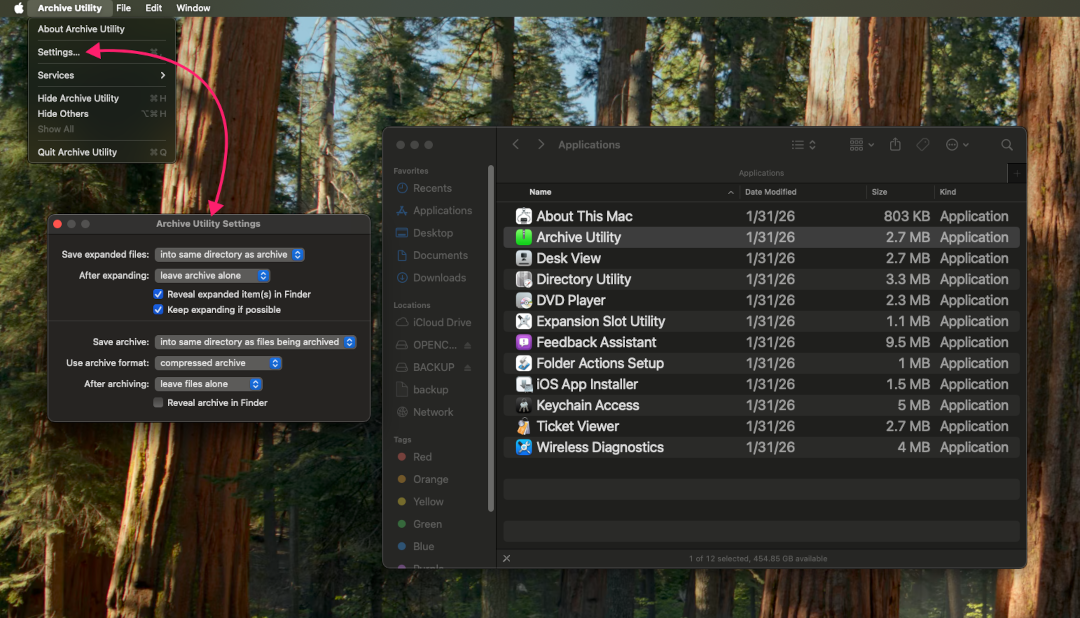
Additionally, Archive Utility has its own settings panel, separate from Finder, that controls behavior like what happens to files after expanding or archiving. Launch it directly via Command (⌘) + Space, typing archive utility, and pressing Return.
Stop guessing at zip extraction errors
Error 79, 640, and the rest aren’t a mystery once you know where to look. Checking archive integrity before touching permissions or quarantine flags saves time that would otherwise go to trial-and-error fixes that don’t address the actual failure. The same logic scales cleanly too: a script built around ditto and xattr works as well on one Mac as it does across a fleet of them.
For IT teams managing more than a handful of Macs, that consistency matters more than any single fix. Atera’s remote scripting lets you push the same remediation logic across selected devices or device groups on demand, so a fix you’ve already validated on one machine doesn’t have to be repeated by hand on the next fifty.
» Want to take control of your Mac fleet? Try Atera for free
Related Articles

How to reduce alert fatigue across your IT team
Your technicians aren't ignoring alerts because they're careless. They're ignoring them because most alerts have taught them to. Once the stream stops being trustworthy, real failures slip past with the noise. Fixing it means deciding what deserves an interruption, tuning out transient spikes, collapsing alert storms, and automating the fixes you've run a hundred times.
Read now
How to close the IT skills gap on your team
Course completions don't close skills gaps. Technicians finish the training, then hand the first unfamiliar failure straight back to a senior engineer. Real capability gets built on live tickets, incidents, and maintenance windows, with guidance that fades as competence grows.
Read now
How to calculate cost per ticket (and why most teams get it wrong)
Most cost-per-ticket figures are wrong before anyone reads them. Missing overhead, tickets that were opened but never closed, spam and duplicates padding the count, and one month's costs divided by another month's tickets all make support look cheaper than it is. Fix both sides of the division and the number finally shows where technician time and money actually go.
Read now
How to prepare for a software license audit
A vendor audit notice doesn't wait for you to get organized. It demands proof, right now, that every install matches every entitlement you've paid for, and most IT teams find out the hard way how much they don't actually know about their own environment. Getting audit-ready before the letter arrives is the difference between negotiating from strength and paying for months of scrambling.
Read nowEndless IT possibilities
Boost your productivity with Atera’s intuitive, centralized all-in-one platform









