
Table of contents
Generate summary with AI

Every file you open in Windows 11 leaves a trace. Not just a log entry buried in a system folder nobody looks at; a proper shortcut file written to a hidden directory, containing metadata that goes well beyond “this file was opened recently.” The hostname of your machine, its volume serial number, and the MAC address of its network adapter at the time of first access: all of it embedded in a .lnk file, sitting quietly in %AppData%\Microsoft\Windows\Recent, accumulating with every document you touch.
Clearing it completely can be difficult to prevent it from rebuilding itself through a cloud sync loop. So here’s how every method actually works and how you can follow each one.
What Windows 11 actually tracks (and why it matters)
Every time a user opens a file in Windows 11, the operating system writes a shortcut to a hidden folder: %AppData%\Microsoft\Windows\Recent. That shortcut (a.lnk file) isn’t just a pointer back to the original document. It’s a record of the interaction, and it persists whether or not the original file still exists.
Windows triggers a new entry whenever a file is created, opened via File Explorer or a supporting application, or modified and saved. Executables and system files are excluded to keep the list relevant to user documents, but everything else is fair game.
Quick Access vs. recent files is not the same thing
These two features live in the same place in File Explorer, which creates a lot of confusion about what’s actually being tracked and how:
- Quick Access pins are items a user has explicitly bookmarked, such as specific folders they want fast access to. They don’t change unless the user changes them.
- The Recent Files list is dynamically generated. Windows builds and updates it automatically based on what the user opens, with no manual input required.
Clearing one doesn’t touch the other. If you wipe recent file history, your pinned Quick Access folders stay exactly where they are.
How Windows 11 changed the tracking controls
Previous versions of Windows scattered the settings that governed recent file tracking across multiple menus. Windows 11 consolidated them into a single toggle: Show recommended files in Start, recent files in File Explorer, and items in Jump Lists, located under Settings > Personalization > Start.
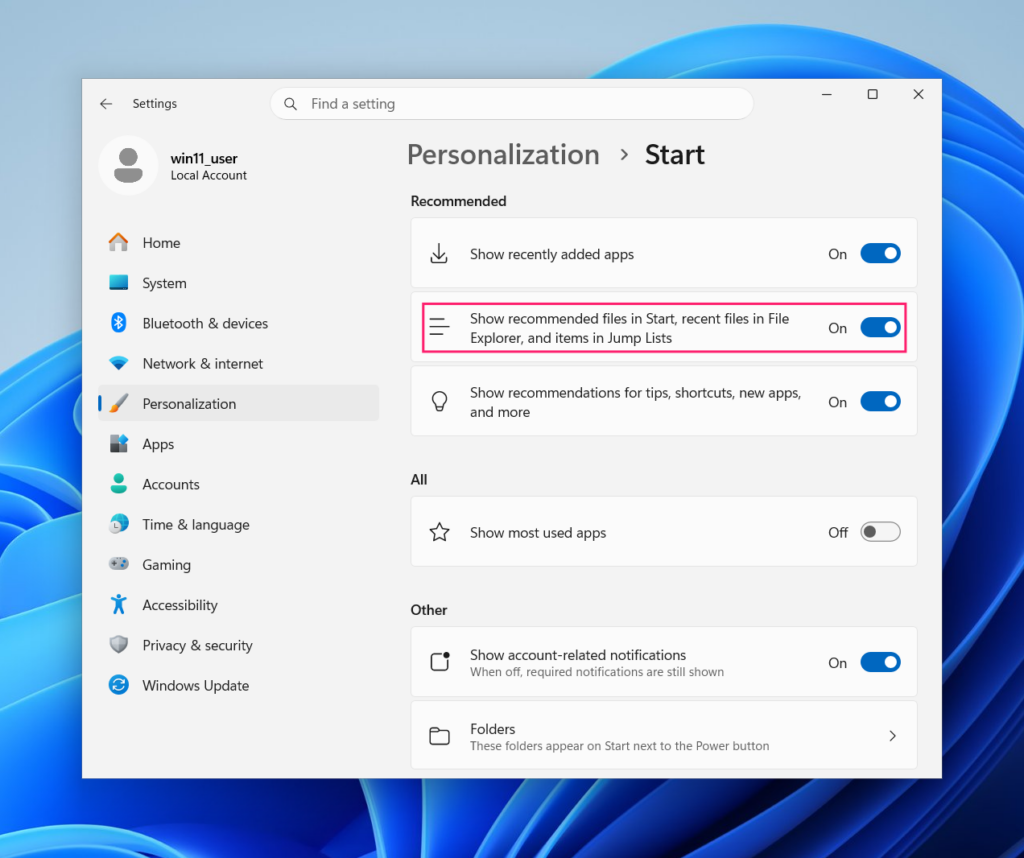
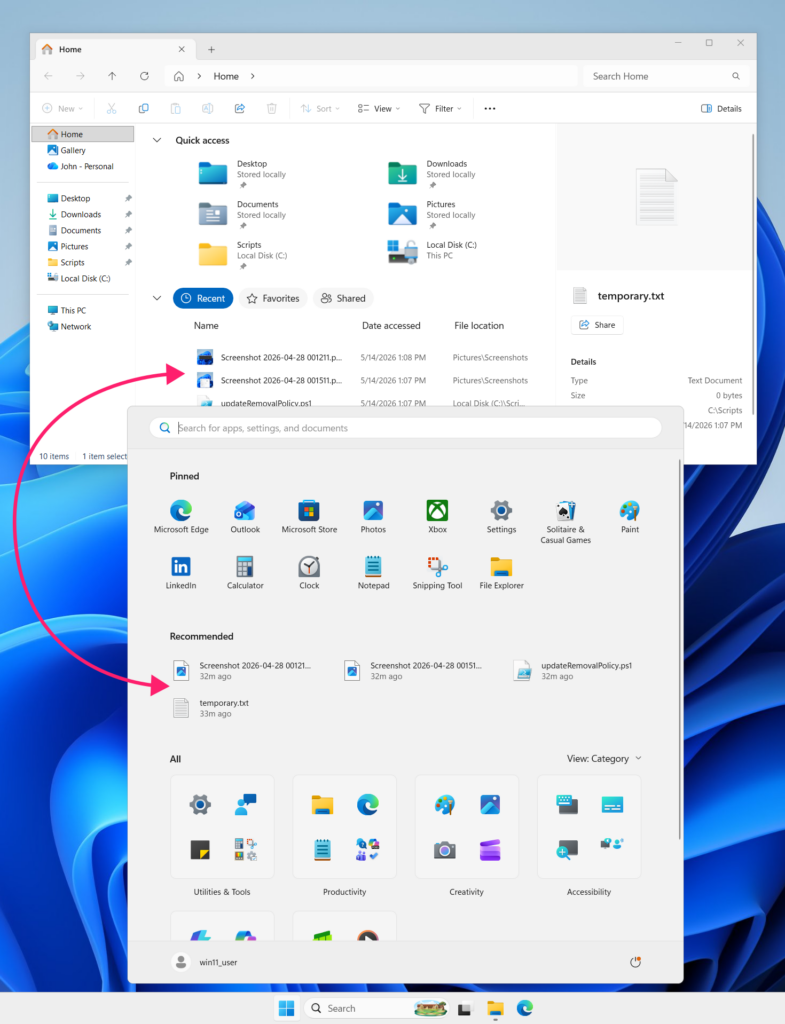
When this toggle is off, the Recent list disappears from File Explorer, the Recommended section of the Start menu stops populating, and right-clicking taskbar icons no longer shows recent documents in Jump Lists.
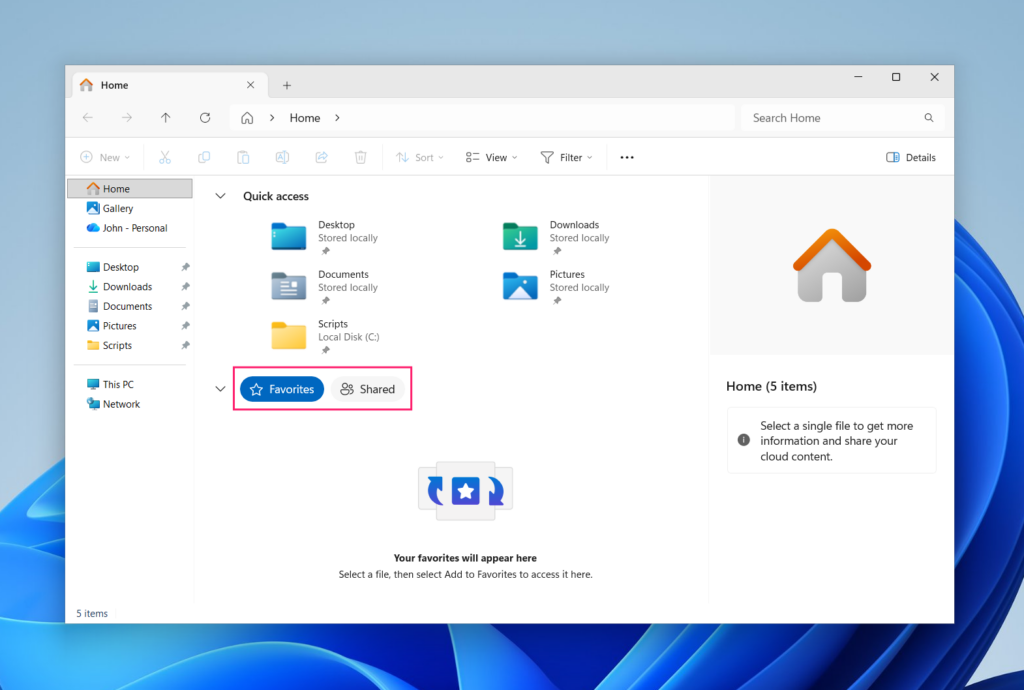
It’s a unified kill switch, but it controls visibility and future tracking, not what’s already been written to disk. The .lnk files in the Recent folder remain intact until they’re explicitly deleted.
An active OneDrive connection makes the problem worse. It expands the Recent list from a local log to a hybrid one. Entries can now be locally cached files, cloud placeholders, or documents modified on a completely different device. Open a file on your work laptop, and it can appear in the Recent list on your home machine.
This creates two complications:
- Sync conflicts on reconnection: Since OneDrive continuously syncs file state, a Recent list entry may point to a locally cached version that’s out of sync with the current cloud version. If a device was offline when changes were made elsewhere, the local entry will conflict with the cloud version once the connection is restored.
- Cross-device exposure: Settings toggled on one machine can sync via account preferences, which means sensitive file names can surface on a secondary device linked to the same account, including shared or public machines.
Clearing local recent files doesn’t touch the cloud-sourced entries. Those are fed server-side from Microsoft account activity history, and local clearing methods have no effect on them. Handling cloud entries requires a separate step that we go over tomorrow.
How to clear recent files in Windows 11
There are six methods for clearing recent files in Windows 11, each operating at a different layer of the system. Which one you use depends on what you’re trying to achieve: a quick one-time clear, surgical removal of a single entry, or enforced policy across managed devices.
Method 1: File Explorer options menu
This is the fastest way to wipe the entire recent file history in a single action.
1. In File Explorer, click the ··· menu button in the toolbar and select Options from the dropdown
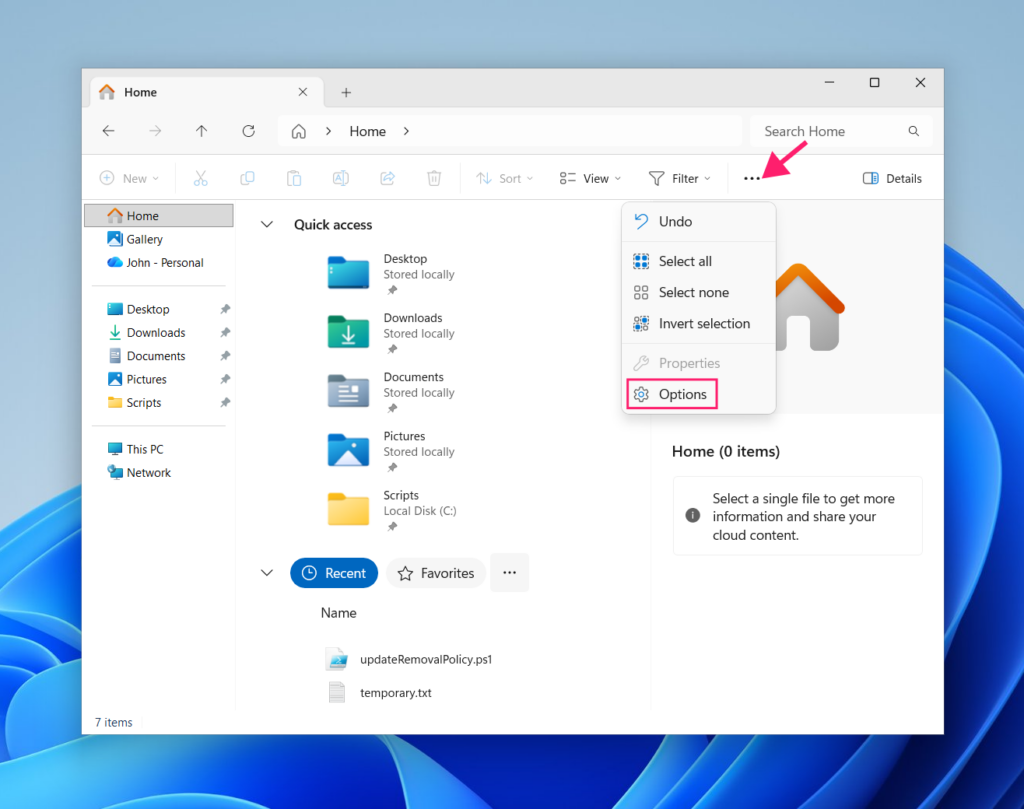
2. On the General tab, locate the Privacy section at the bottom and click Clear

3. Click OK to close the Folder Options window, then switch to the Recent tab in File Explorer and confirm the list is empty

This clears the File Explorer history in one step, but does not disable future tracking. Windows will begin populating the list again immediately after the next file is opened.
Method 2: Remove a single file from the list
Use this when you need to remove one specific entry without resetting the entire history:
1. Click Recent in the left panel of File Explorer to display recently accessed files
2. Right-click the file you want to remove > Remove from list
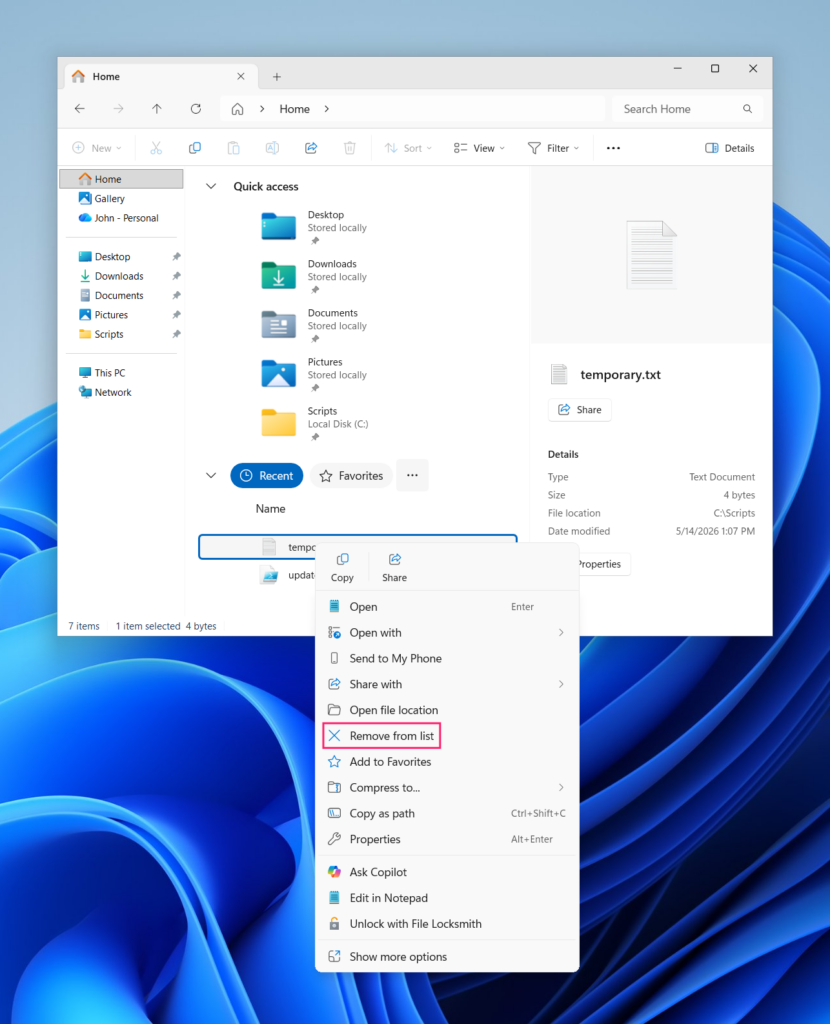
Important: This method just removes its entry from the list, so the actual file is not affected. For files sourced from OneDrive or Office.com, the entry may reappear after the next sync or if the file is reopened on another device linked to the same Microsoft account.
Method 3: Settings toggle (Personalization menu)
This method both wipes the current history and disables future tracking in a single action.
1. Press Win + I to open the Settings app
2. Navigate toPersonalization > Start
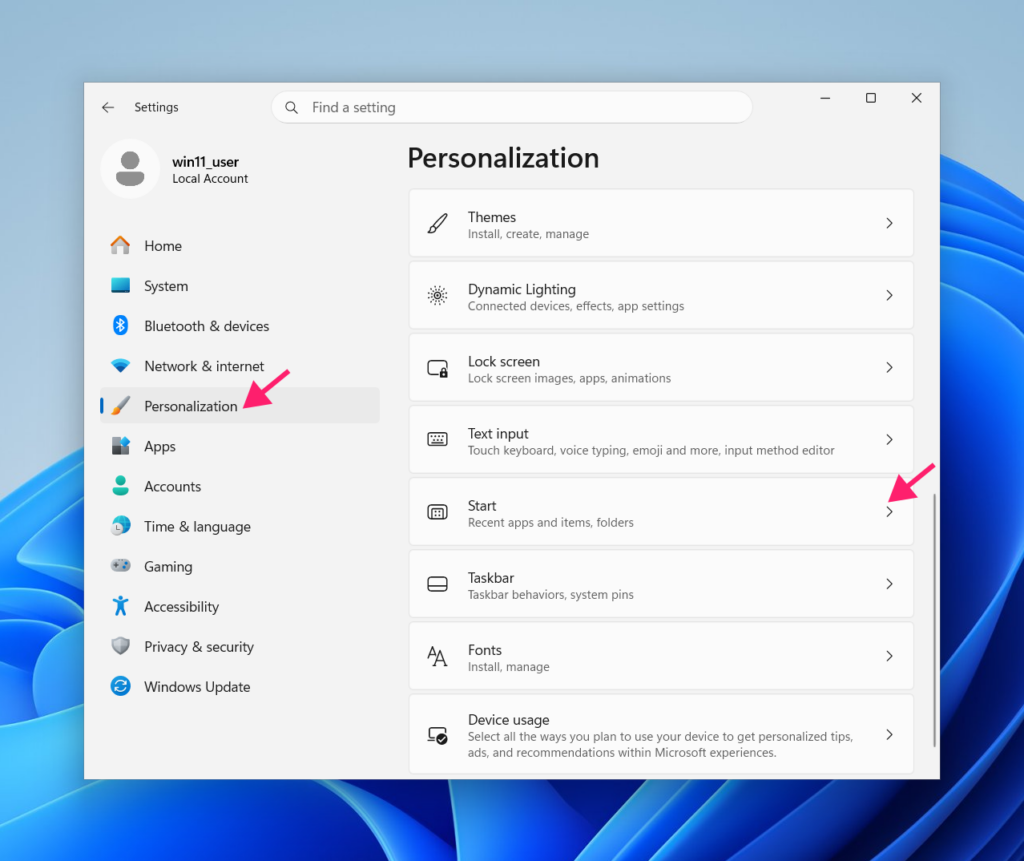
3. Toggle off the tracking setting
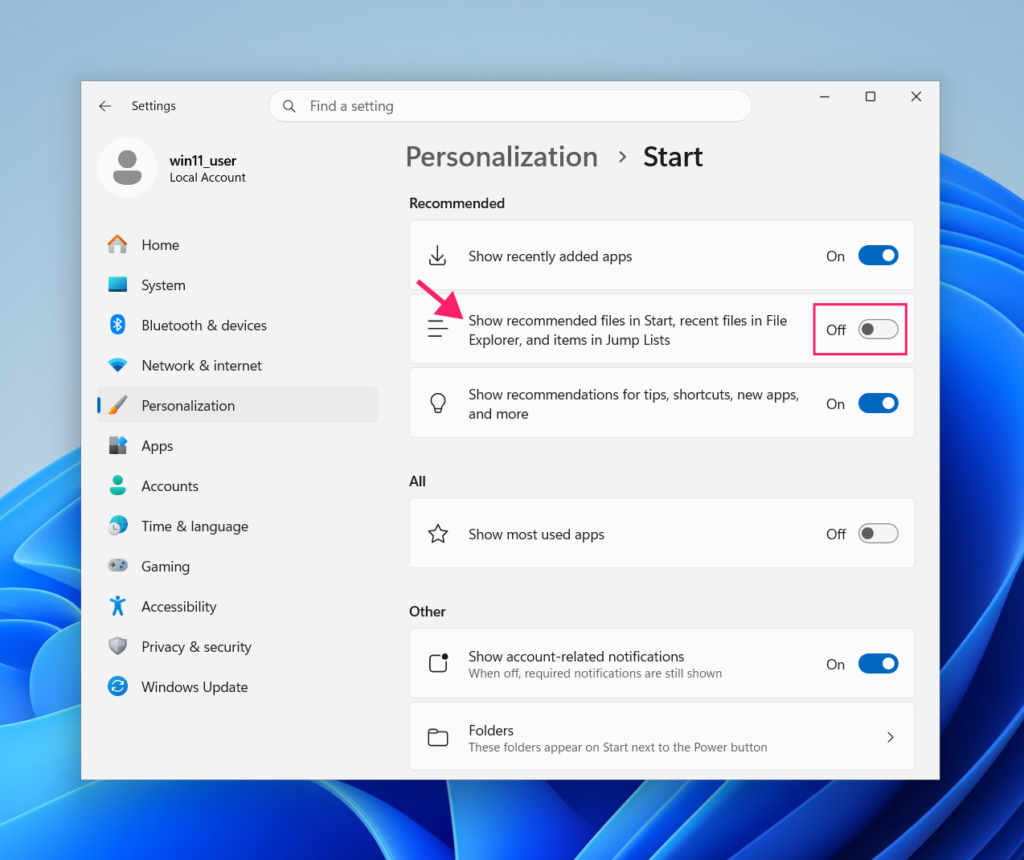
This disables tracking and clears the recent file history simultaneously. The Recent tab will no longer appear in File Explorer, the Recommended section of the Start menu will stop populating, and Jump Lists on taskbar icons will no longer show recent documents.
Re-enabling the toggle restores tracking going forward, but the previously cleared entries are permanently gone and will not be restored.
Method 4: Run dialog and shell:recent
This method opens the hidden Recent folder directly, giving you manual control over which .lnk shortcut files to delete.
1. Press Win + R to open the Run dialog
2. Type shell:recent and press Enter. This opens %AppData%\Microsoft\Windows\Recent directly in File Explorer
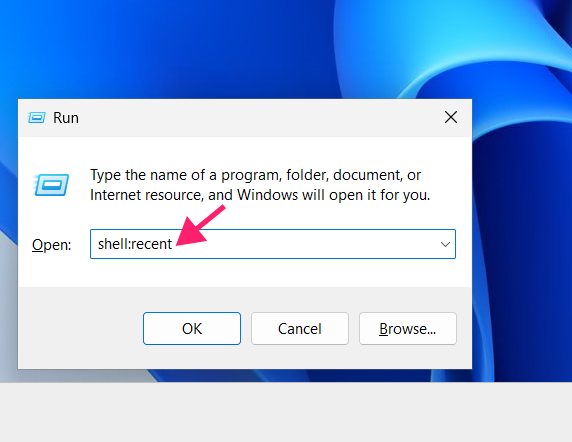
3. Select individual files or press Ctrl + A to select all, then press Delete
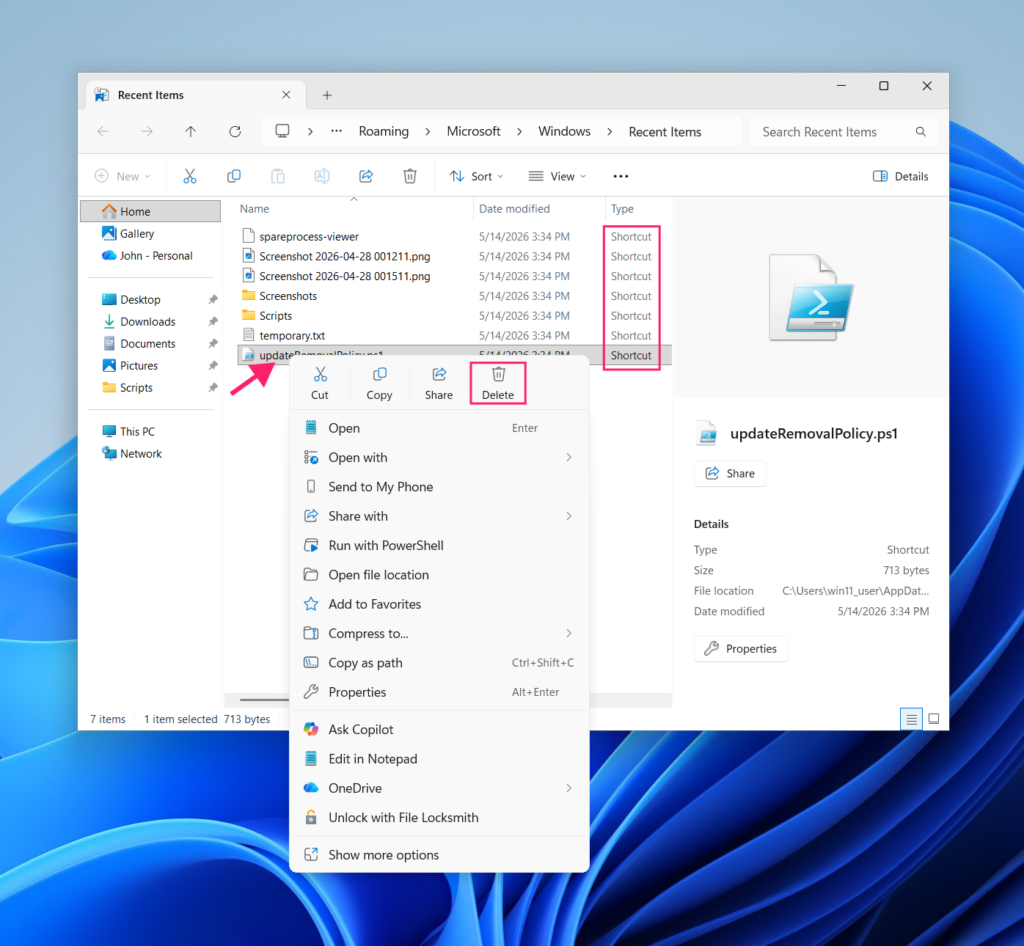
In Windows 11, deleting files from this folder does not affect the entries shown in File Explorer’s Recent section. The Recent list in Windows 11 is sourced from a different data layer. This method primarily affects legacy applications that read the shell:recent folder directly.
That means it’s most useful when you need to destroy the embedded .lnk metadata, such as the hostname, volume serial number, and MAC address.
Method 5: Registry Editor
This method replicates the behavior of the Settings toggle via the registry, making it suitable for scripted deployment across managed endpoints.
1. Press Win + R, type regedit, and press Enter
2. In the Registry Editor address bar, paste the following path and press Enter: Computer\HKEY_CURRENT_USER\Software\Microsoft\Windows\CurrentVersion\Explorer\Advanced
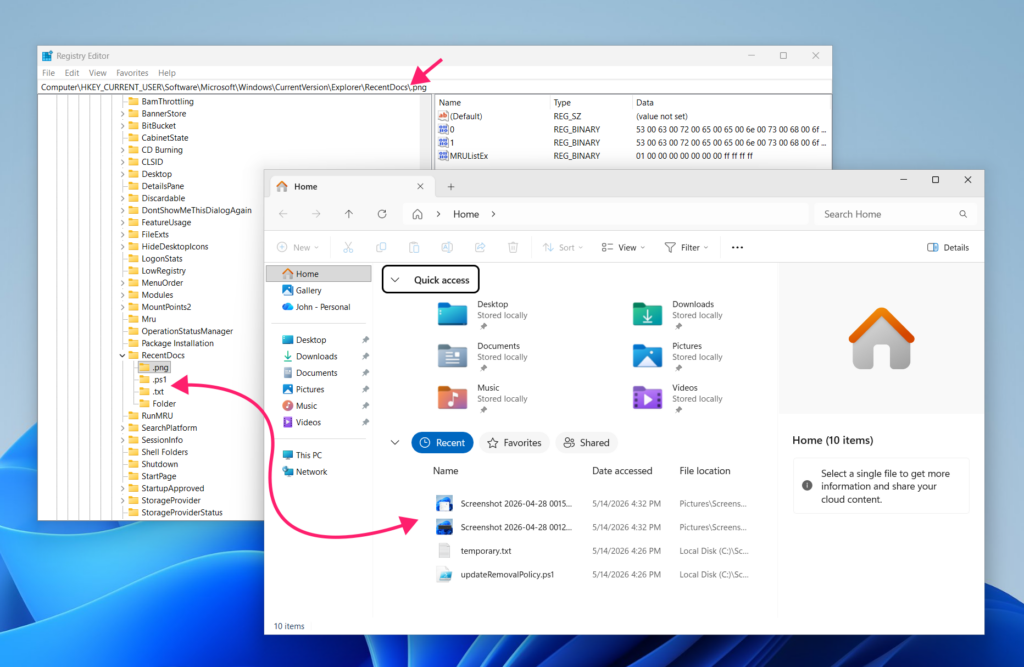
3. In the right pane, find the Start_TrackDocs entry
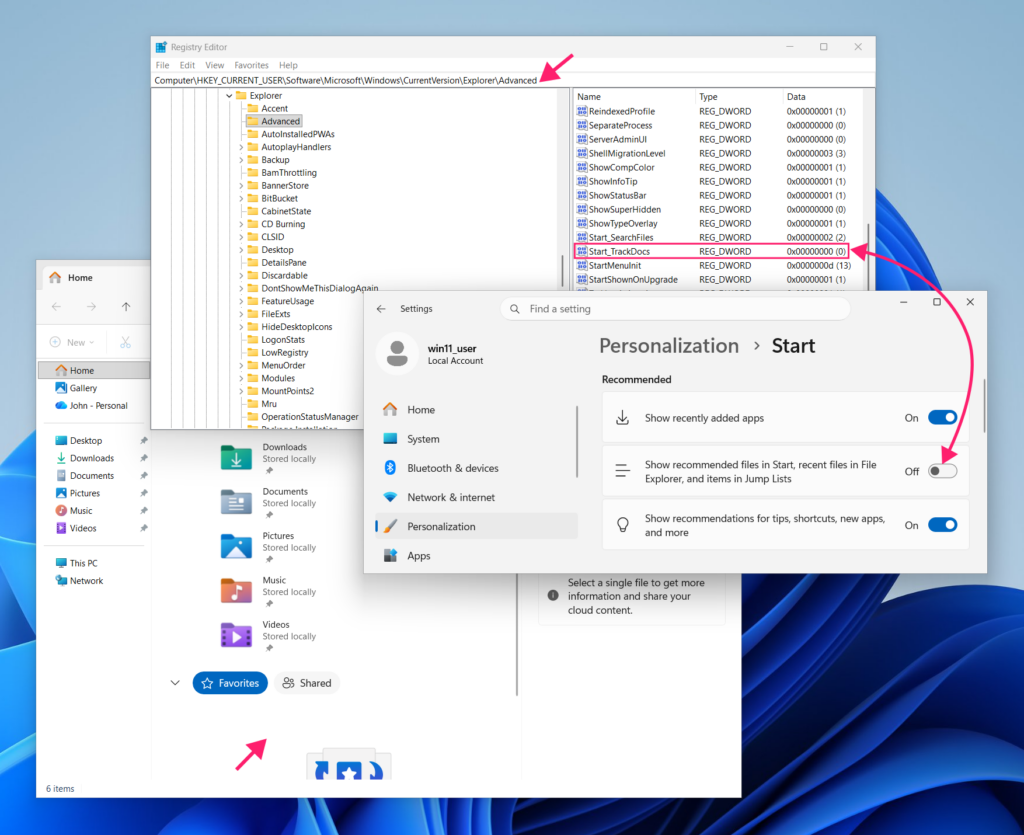
4. Double-click Start_TrackDocs and set the value data to 0, then click OK. To re-enable tracking later, set it back to 1
5. To restart Windows Explorer, open Task Manager (Ctrl + Shift + Esc), find Windows Explorer under Processes, right-click it, and select Restart
Note: the legacy RecentDocs key (Computer\HKEY_CURRENT_USER\Software\Microsoft\Windows\CurrentVersion\Explorer\RecentDocs) still exists and tracks the list internally, but deleting it does not clear the Recent list in Windows 11. Use Start_TrackDocs as described above.
» Here are the top Registry Editor challenges & simple solutions
Method 6: Local Group Policy Editor (Windows 11 Pro and Enterprise only)
Group Policy allows IT administrators to either permanently prevent recent file tracking or clear the history automatically each time a user logs off. This method is not available on Windows 11 Home.
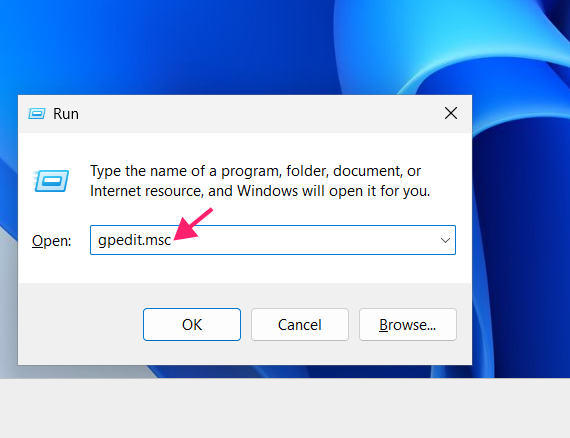
1. Press Win + R, type gpedit.msc, and press Enter to open Group Policy Editor
2. In the left panel, expand: User Configuration > Administrative Templates > Start Menu and Taskbar
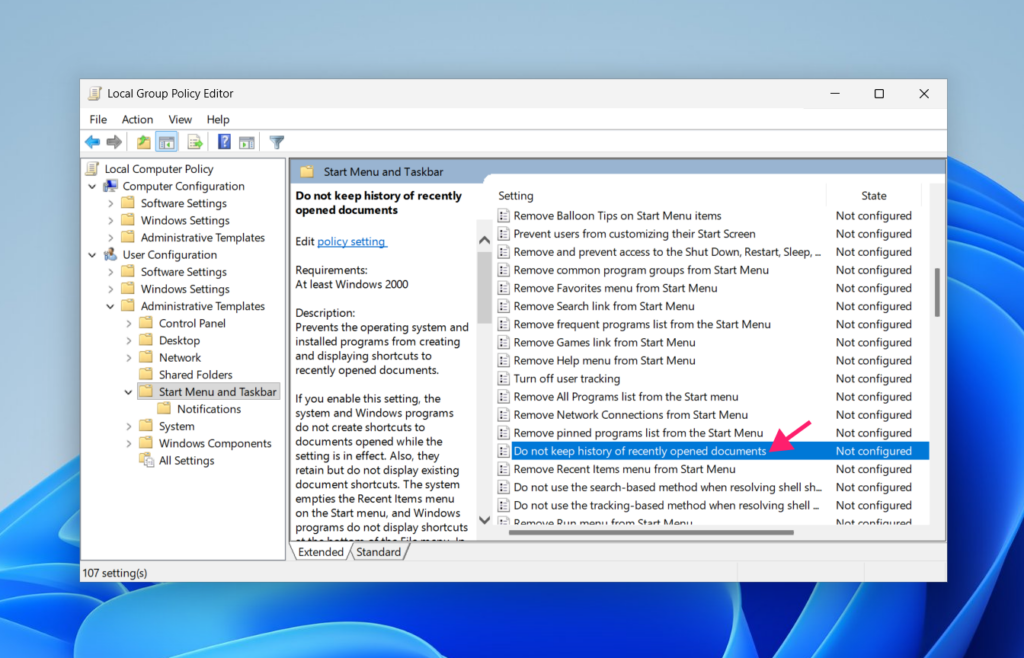
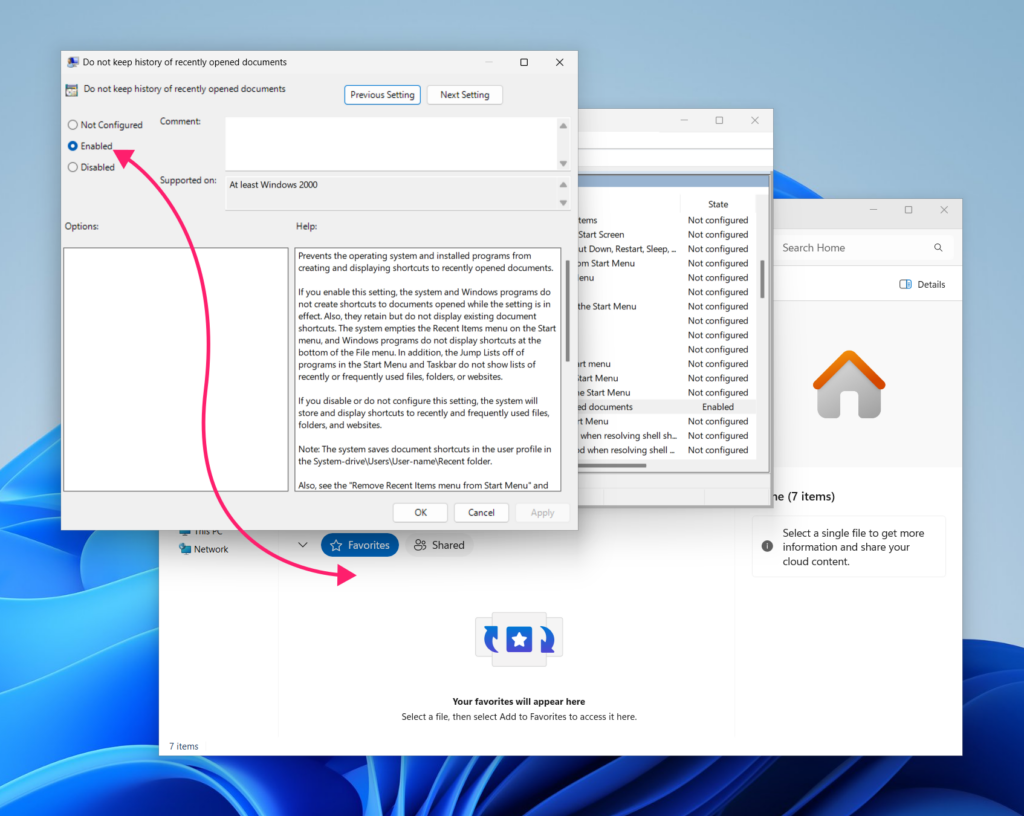
3. To stop tracking entirely, find the policy named Do not keep a history of recently opened documents and double-click it. Set it to Enabled, then click OK
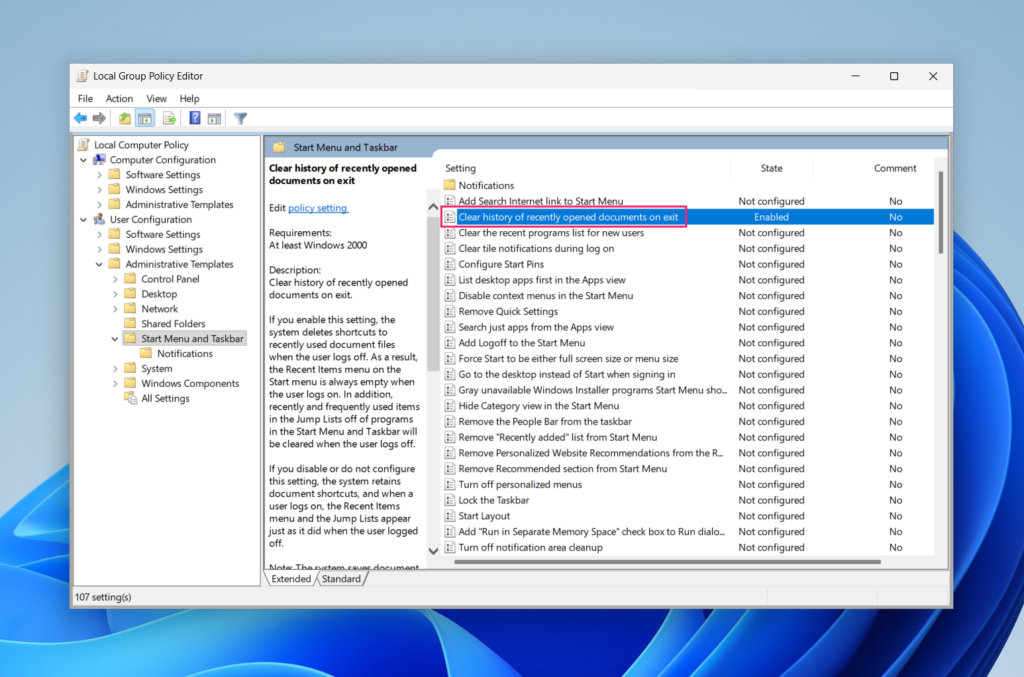
4. To clear history on logoff instead, find the policy named Clear history of recently opened documents on exit and double-click it. Set it to Enabled, then click OK
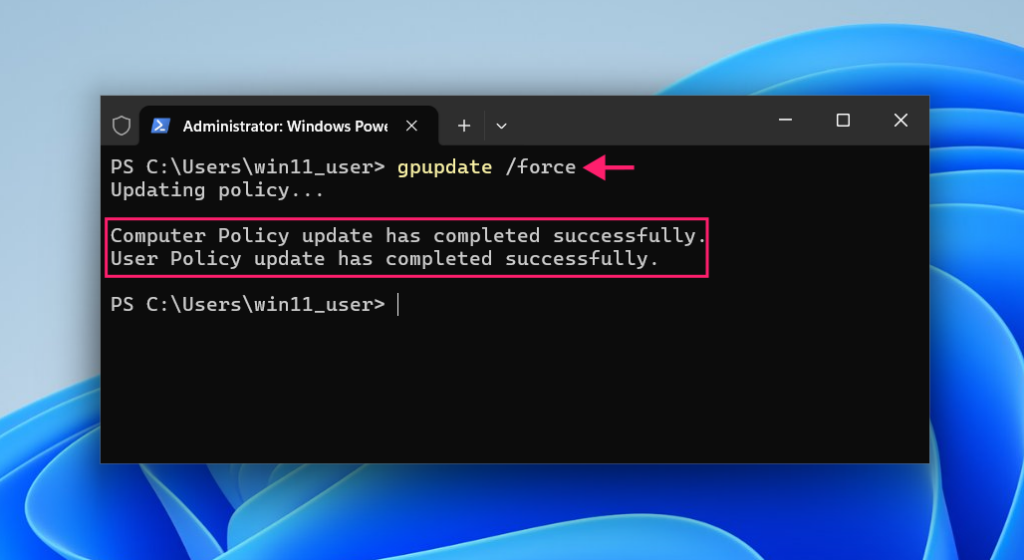
Open Command Prompt or PowerShell with elevated privileges and run: gpupdate /force
One important limitation is that neither Group Policy option affects cloud-sourced entries fed via Office.com or the MSGraph feed. To stop those from appearing, open File Explorer, go to ··· > Options > General, and uncheck Show files from Office.com in the Privacy section.
» Learn more about group policy management with Atera
Take control of what Windows tracks
Clearing recent files in Windows 11 is a three-minute task once you know which method to use. Understanding why it matters (and what you’re actually clearing when you do) is what separates a one-time fix from a managed policy.
For IT teams handling shared workstations, high-turnover environments, or any endpoint where sensitive file names shouldn’t survive a session, this isn’t a housekeeping task. It’s an endpoint hygiene decision. Atera’s RMM platform lets you deploy and enforce these configurations remotely by pushing registry settings, running cleanup scripts, deploying powershell scripts, and monitoring endpoint state across your entire fleet without touching each machine.
» Ready to take control? Try Atera for free
Related Articles

How to set up secure printing across your organization
A secure print checkbox protects exactly one moment in a document's life. Everything else, from unencrypted traffic and unhardened devices to payroll printouts forgotten in a tray, stays exposed. Real secure printing covers the whole lifecycle: release policy, authentication, encryption, hardening, and a fleet that stays monitored long after rollout.
Read now
How to reduce alert fatigue in healthcare IT
In a hospital, a dismissed alert isn't a delayed ticket. It can be a patient deteriorating while the monitor keeps sounding. Cutting alert volume won't fix that on its own, and switching alerts off can make it worse.
Read now
How to prevent configuration drift across your IT infrastructure
Configuration drift rarely breaks anything the day it happens. It hides in a hotfix, a reset default, or a vendor installer, then surfaces weeks later as a failure nobody can trace. Stopping it means defining exactly what approved looks like, closing every side door into production, giving each setting one owning tool, and checking that the baseline itself hasn't gone stale.
Read now
How to reduce alert fatigue across your IT team
Your technicians aren't ignoring alerts because they're careless. They're ignoring them because most alerts have taught them to. Once the stream stops being trustworthy, real failures slip past with the noise. Fixing it means deciding what deserves an interruption, tuning out transient spikes, collapsing alert storms, and automating the fixes you've run a hundred times.
Read nowEndless IT possibilities
Boost your productivity with Atera’s intuitive, centralized all-in-one platform









