
Table of contents
Generate summary with AI

Unexpected Adobe updates can disrupt your workflow in ways that are hard to predict. A sudden software crash or a broken integration after an unannounced update can turn a normal workday into time spent fixing IT issues instead of getting work done. Even constant update pop-ups can interfere with productivity and system stability.
In this blog, you’ll learn what happens when you disable Adobe updates, how to manage or turn them off on both Windows and Mac systems, and what steps you can take to keep your environment secure without dealing with constant interruptions.
» Here’s how to increase IT efficiency in your organization
What to know before disabling Adobe updater
Disabling the Adobe Reader Management (ARM) service stops persistent update pop-ups but removes a primary defense against critical vulnerabilities. Before modifying this service, consider the technical trade-offs and operational risks.
The level of control you have over updates is tied to the version of the software you’re running.
- Adobe Acrobat Reader (free): This version is designed with a “security-first” mentality that enforces automatic updates. Adobe often hides or completely removes the “Check for Updates” or “Disable Updates” toggles in the UI for free users. This is a deliberate choice to ensure that the massive install base of Reader users who are frequent targets for PDF-based exploits remains patched without manual intervention.
- Acrobat Pro & Creative Cloud (paid/enterprise): These versions offer granular control. Administrators can use Registry keys to disable, defer, or schedule updates. This allows IT teams to test new versions for compatibility with internal plugins or document workflows before a wide-scale rollout.
Why the difference? Adobe enforces updates on free editions to maintain a “herd immunity” against common malware. In contrast, paid enterprise versions assume the organization has an IT department capable of managing patches through centralized tools, balancing security with operational stability.
Security, compliance, and vulnerability risks
Disabling automatic updates from Adobe without a replacement strategy is a high-risk move that can lead to immediate legal and financial consequences.
- Security vulnerabilities: Adobe products are historically high-priority targets. For example, in March 2026 alone, Adobe patched over 80 vulnerabilities across its suite, several of which allowed for arbitrary code execution. Disabling the updater leaves these “doors” wide open.
- Regulatory compliance: Frameworks like HIPAA, GDPR, and PCI-DSS require organizations to maintain supported, patched software. An audit failure due to unpatched PDF software can lead to heavy fines and “non-compliant” status.
- Cyber insurance: Most modern cyber insurance policies include a “failure to patch” clause. If a breach occurs and it’s discovered that you manually disabled security updates, the insurer may deny your claim entirely, leaving your company to foot the bill for recovery.
» Learn more about cybersecurity and HIPAA compliance
When is disabling Adobe updater justified?
While “always on” is the gold standard for most, there are specific scenarios where manually stopping Adobe updates is a technical necessity:
- Controlled enterprise patching: In large environments, you don’t want 500 machines downloading 400MB updates simultaneously, killing your bandwidth. Here, IT disables the local updater and pushes patches via a RMM tool during off-hours.
- Air-gapped systems: For highly secure or industrial systems with no internet access, the background updater will constantly fail and log errors. In these cases, updates must be manually imported and validated.
- Software validation environments: In labs or “Golden Image” creation, version stability is king. Updates are only applied after formal testing to ensure they don’t break mission-critical PDF forms or digital signature workflows.
“Centralized update management should always be the goal. It provides the traceability needed for audits and ensures a uniform security baseline while giving you the power to hit “pause” if a specific update is known to cause crashes.”
Bogdan Stefan
How to disable Adobe updates on Windows
Depending on your environment, you can choose the method that fits your workflow best. Whether you’re managing a single desktop via a visual menu or using a remote terminal to command a large network, Windows provides several built-in tools to help you identify and control background update services.
Method 1: Application preferences
This method is best for individual users on Pro or Classic versions of Acrobat who want a simple, non-technical way to stop automatic installations. It’s generally not available on modern free “Continuous” builds, as Adobe enforces updates for security.
Follow these steps:
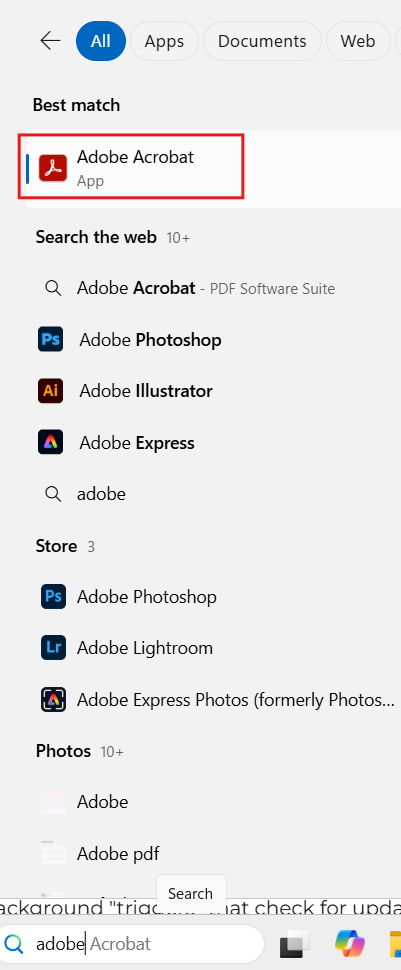
1. Search “Adobe Acrobat” in your search bar and open it
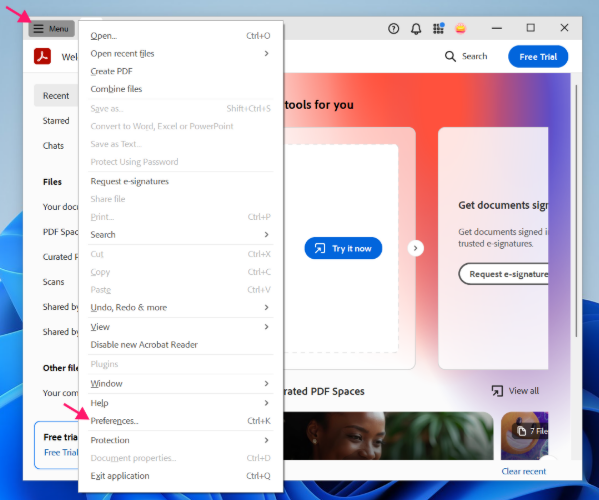
2. Click the Menu in the top-left corner and select Preferences
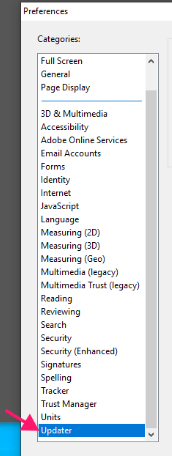
3. Select the Updater category from the left sidebar
Take note: If this category isn’t available, it means you have a modern “Continuous” version. In this case, Adobe removes the manual toggle to enforce security, and you’ll need to follow one of the other methods below (such as the Registry or Service methods).
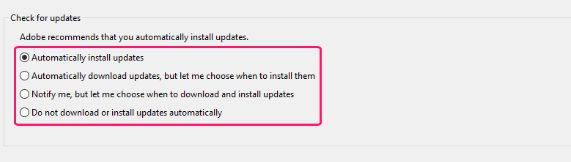
4. Uncheck the box for Automatically install updates
5. Click OK to save your changes
Method 2: Windows Task Scheduler
This approach is ideal for administrators who want to stop the recurring background “triggers” that check for updates without fully disabling the software’s ability to update manually. This helps reduce background resource usage while keeping the application functional.
Follow these steps:
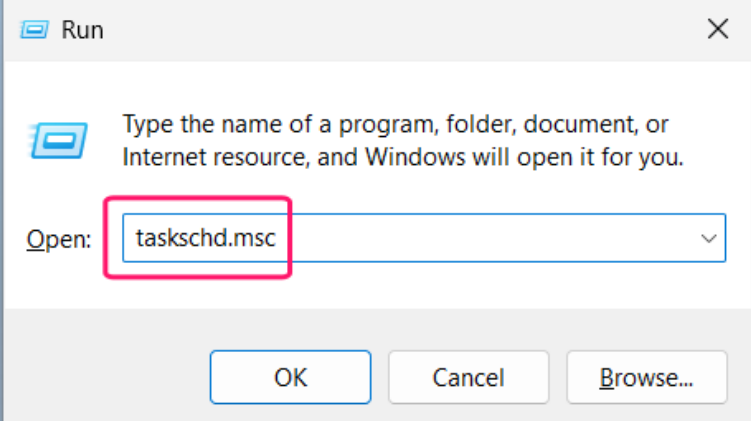
1. Press Win + R, type taskschd.msc, and hit Enter
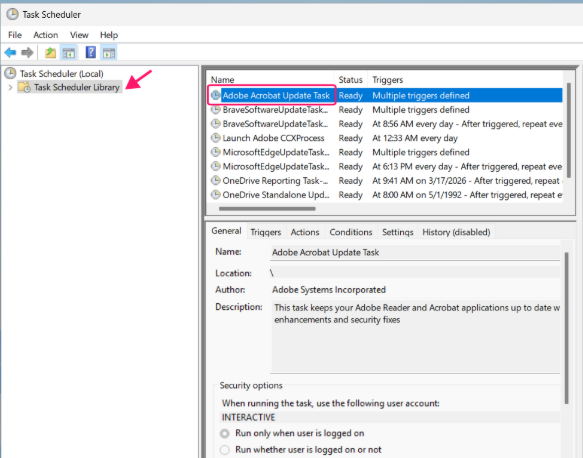
2. Click on Task Scheduler Library in the left-hand pane and locate tasks starting with Adobe Acrobat Update Task
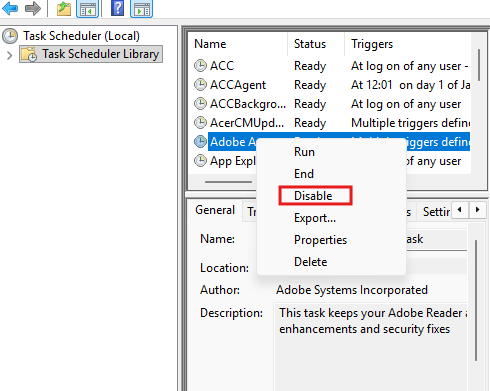
3. Right-click the task and select Disable
Method 3: Windows Services (GUI)
This method is the “gold standard” for a manual, system-level change. It’s best when you want to ensure the update engine can’t be triggered by the application or a task. It provides a clear visual confirmation of the service status.
Follow these steps:
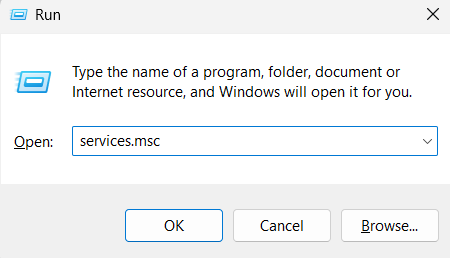
1. Press Win + R, type services.msc, and hit Enter
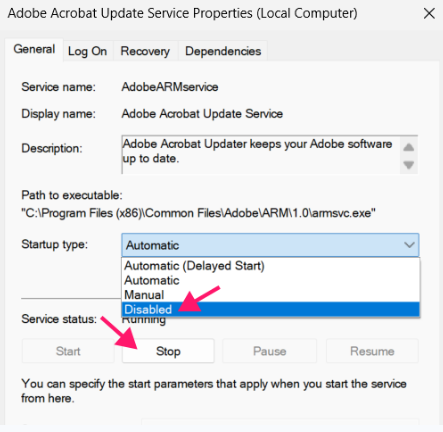
2. Find Adobe Acrobat Update Service in the list. Right-click it and select Properties
3. Click Stop, then change the Startup type to Disabled
Method 4: PowerShell
PowerShell is the fastest method for IT professionals and power users who need to apply changes quickly or include them in an automation script. This is the preferred method for remote management because it combines stopping and disabling the service into a single, reliable command string that can be deployed across multiple devices simultaneously.
Follow these steps:
1. Open PowerShell as an Administrator

2. Copy and paste the following commands in PowerShell:
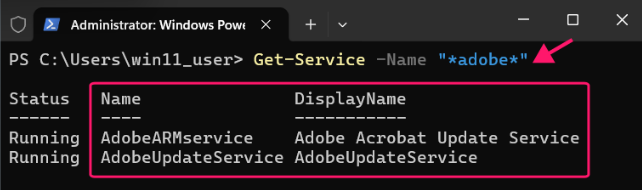
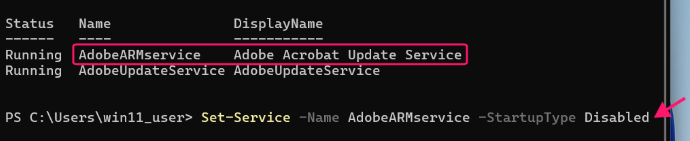
Get-Service -Name "*adobe*" – Lists all services that have “adobe” in their service name
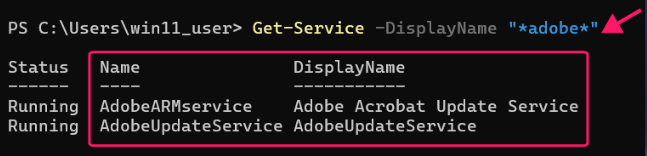
Get-Service -DisplayName "*adobe*" – Lists all services that have “adobe” in their display name
3. Locate the Adobe Acrobat Update Service and run: Set-Service -Name AdobeARMservice -StartupType Disabled (where AdobeARMservice is the name of the service) to disable it
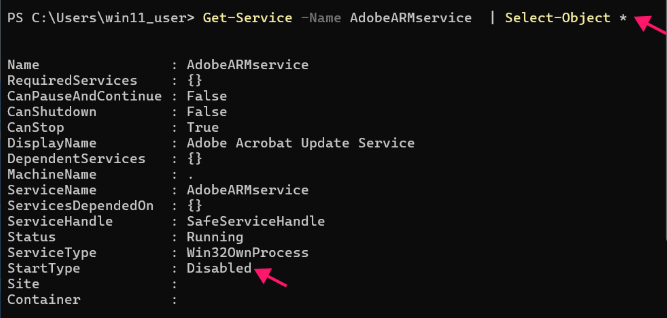
4. Confirm the status of the service with Get-Service -Name AdobeARMservice | Select-Object *
Creating custom scripts for every Adobe version or specific registry path can be a tedious and error-prone process. Atera’s AI Copilot simplifies this by generating precise PowerShell scripts that target the exact service names or registry paths you need.
This ensures your code is accurate and ready for deployment across all devices in seconds.
» Find out how to run PowerShell commands on a remote computer
Method 5: Command Prompt
The sc.exe method is a legacy approach that’s extremely reliable for scripts intended to run on older versions of Windows or environments where PowerShell might be restricted. It communicates directly with the Service Control Manager.
Follow these steps:
1. Open a Command Prompt window as Administrator

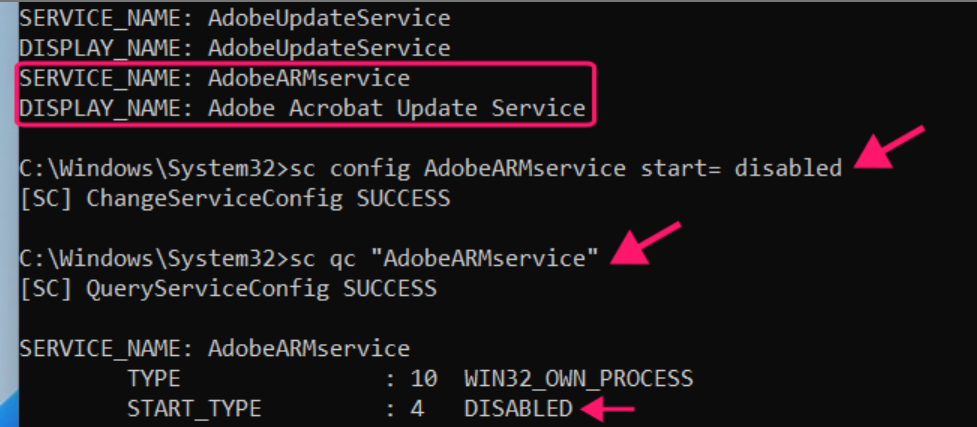
2. Run sc query state= all | findstr /i "adobe" to list services containing “adobe” in their name

3. Locate the Adobe Acrobat Update Service and run sc config AdobeARMservice start= disabled (where AdobeARMservice is the name of the service) to disable it
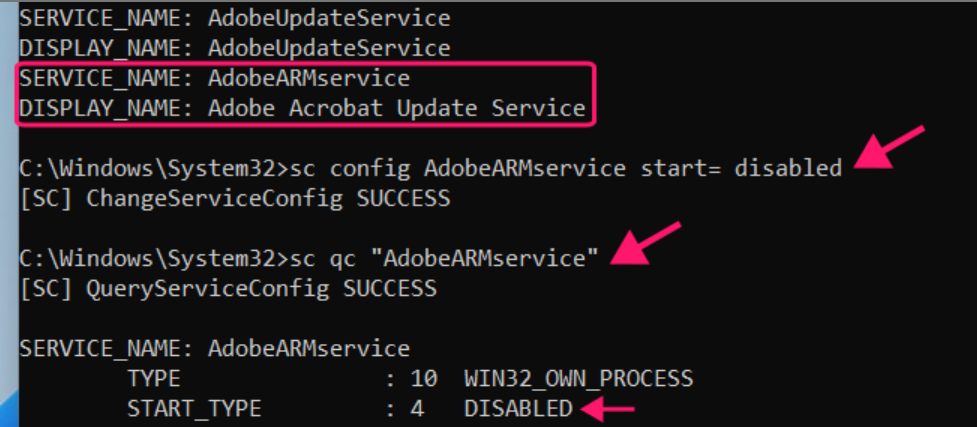
System-level changes after using this method:
- Automatic update via service layer is disabled: No background update checks will occur.
- No silent patch installation: The system won’t update itself without manual intervention.
- Task failure: Scheduled tasks that rely on the service will fail or become ineffective.
» Make sure you know the difference between PowerShell and Command Prompt
Method 6: Registry Editor
This method is used in managed environments to fully control Adobe Acrobat update behavior. It works by modifying system-level registry keys that override user settings and can lock the update option completely.
Follow these steps:
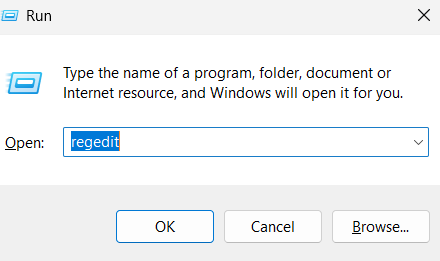
1. Press Win + R, type regedit, and press Enter
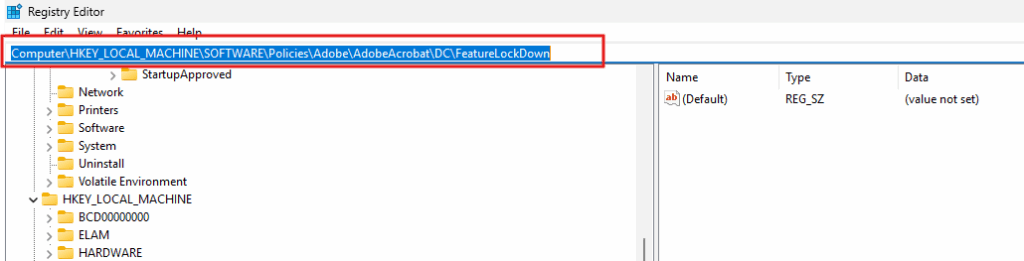
2. Navigate to the following path: HKEY_LOCAL_MACHINE\SOFTWARE\Policies\Adobe\AdobeAcrobat\DC\FeatureLockDown
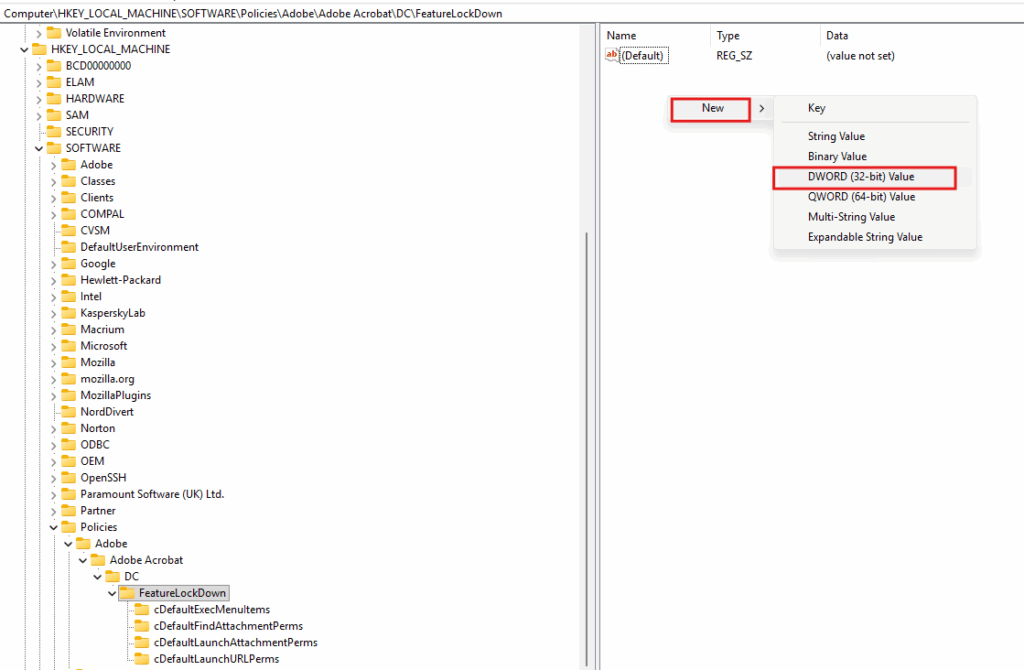
3. In the right panel, create a new value: Right-click > New > DWORD (32-bit) Value
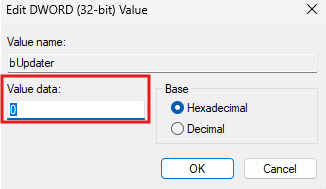
4. Name it: bUpdater and double-click it and set the value to 0
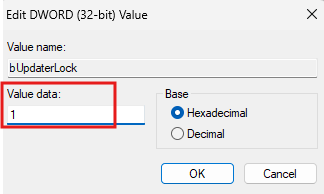
5. Create another value and name it: bUpdaterLock and set the value to 1
6. Close the Registry Editor and restart your computer
» Check out these registry editor challenges and how to overcome them
How to disable Adobe updates on macOS
Managing Adobe updates on macOS requires a different approach than Windows, as the system relies on Launch Agents and the Adobe Creative Cloud desktop framework. Whether you’re troubleshooting a single workstation or managing multiple Macs, these methods allow you to silence notifications and prevent background update checks.
Method 1: Creative Cloud Preferences
This is the standard method for users with a Creative Cloud subscription. It’s the most reliable way to stop “all-at-once” updates across the entire Adobe suite (Photoshop, Illustrator, Acrobat, etc.) without using the command line.
Follow these steps:
1. Open Adobe Acrobat
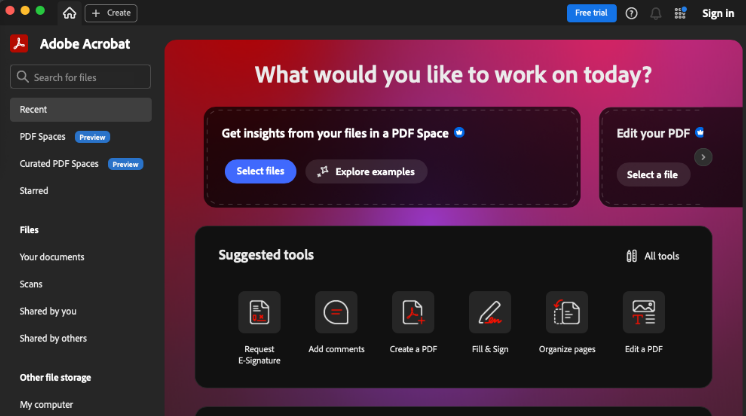
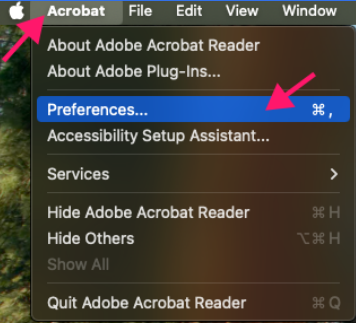
2. Click Acrobat in the top menu bar and select Preferences
Take note: If this category isn’t available, it means you have a modern “Continuous” free version. In this case, Adobe removes the manual toggle to enforce security, and you’ll need to follow the Terminal method below.
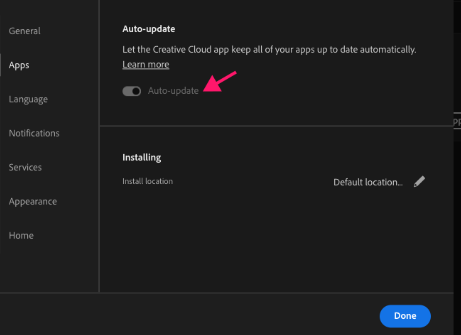
3. Uncheck “Auto-update” and click “Done” to save changes
Method 2: Adobe Launch Agents (Terminal)
macOS uses Launch Agents and Launch Daemons to trigger the Adobe ARM processes in the background. By unloading these jobs and moving the configuration files, you prevent the system from ever “waking up” the updater service.
Follow these steps:
1. Press Cmd + Space, search for Terminal, and hit Enter
2. Run launchctl list | grep -i adobe to see active Adobe processes

3. Run the following to find the corresponding .plist files:
ls /Library/LaunchAgents | grep -i adobe(System-wide agents)ls /Library/LaunchDaemons | grep -i adobe(System-wide daemons)

4. Look for com.adobe.ARMDC* entries and run:
sudo launchctl bootout system /Library/LaunchDaemons/com.adobe.ARMDC.*.plistsudo launchctl bootout gui/$(id -u)/Library/LaunchAgents/com.adobe.ARMDC*.plist

5. To make this permanent but reversible, move the files to a “disabled” folder. To do this run:
sudo mkdir -p /Library/LaunchAgents/disabledsudo mkdir -p /Library/LaunchDaemons/disabledsudo mv /Library/LaunchDaemons/com.adobe.ARMDC*.plist /Library/LaunchDaemons/disabled/sudo mv/Library/LaunchAgents/com.adobe.ARMDC*.plist /Library/LaunchAgents/disabled/

» Here are essential scripts that every IT professional needs to know
Manage Adobe updates with Atera
Disabling Adobe updates helps you avoid unexpected IT issues that could disrupt your users or break critical software integrations. However, taking this control means you’re now responsible for keeping your network patched against security threats.
By using Atera’s RMM platform, you get a clear view of all Windows and Mac devices across your systems from a single dashboard. Copilot also helps by quickly writing the scripts you need to manage these background services.
Frequently Asked Questions
Related Articles

How to decide if you need a dedicated DEX platform, or already have one
"IT feels slow" is the complaint that often sells DEX platforms. Sometimes it signals a real blind spot, but just as often already catches and fixes the problem, and a new scoring layer would only add another console. Telling the two apart takes evidence, and the real gap usually isn't visibility at all.
Read now
How to set up secure printing across your organization
A secure print checkbox protects exactly one moment in a document's life. Everything else, from unencrypted traffic and unhardened devices to payroll printouts forgotten in a tray, stays exposed. Real secure printing covers the whole lifecycle: release policy, authentication, encryption, hardening, and a fleet that stays monitored long after rollout.
Read now
How to reduce alert fatigue in healthcare IT
In a hospital, a dismissed alert isn't a delayed ticket. It can be a patient deteriorating while the monitor keeps sounding. Cutting alert volume won't fix that on its own, and switching alerts off can make it worse.
Read now
How to prevent configuration drift across your IT infrastructure
Configuration drift rarely breaks anything the day it happens. It hides in a hotfix, a reset default, or a vendor installer, then surfaces weeks later as a failure nobody can trace. Stopping it means defining exactly what approved looks like, closing every side door into production, giving each setting one owning tool, and checking that the baseline itself hasn't gone stale.
Read nowEndless IT possibilities
Boost your productivity with Atera’s intuitive, centralized all-in-one platform









