
Generate summary with AI

Privilege escalation is the most common attack class targeting Windows environments, and it has been for years running. According to BeyondTrust’s 2026 Microsoft Vulnerabilities Report, Elevation of Privilege flaws accounted for 40% of all Microsoft vulnerabilities reported in 2025, and critical vulnerabilities doubled year-over-year. Attackers don’t need to break down the front door when they can walk through it with the right privileges.
Kernel-Mode Hardware-Enforced Stack Protection is one of Windows’ most effective defenses against exactly this kind of exploit. It uses CPU-level shadow stacks to catch return address tampering before malicious code can execute. It’s already built into Windows, requires no additional licensing, and takes minutes to enable. Here’s everything you need to know.
Why kernel-mode protection matters
Windows runs everything in one of two modes:
- User mode is where your applications live. It’s a restricted environment where processes can’t directly touch hardware or arbitrary memory addresses. If something crashes in user mode, the application goes down and the rest of the system stays standing.
- Kernel mode is where the core operating system runs. With unrestricted access to hardware and system memory, a failure here doesn’t just crash an application, it crashes everything. More importantly, code executing in kernel mode can do things that user-mode code can’t, such as read and write anywhere in memory, bypass security controls, and operate with complete authority over the system.
Elevation of Privilege attacks are designed to move code from the restricted world of user mode into the unrestricted world of kernel mode. One technique that’s particularly effective is return-oriented programming (ROP), where an attacker corrupts the call stack to redirect execution to malicious code by manipulating return addresses.
The kernel can’t easily distinguish a legitimate return address from a tampered one without dedicated hardware support, which is precisely the gap that Kernel-Mode Hardware-Enforced Stack Protection is designed to close.
The protection works by maintaining a shadow stack, which is a CPU-managed, read-only duplicate of return addresses that runs in parallel with the regular call stack. Every time a function returns, the CPU compares the return address on the regular stack against the one stored in the shadow stack. If they don’t match, execution stops. An attacker can corrupt the regular stack, but they can’t touch the shadow stack without the CPU catching it immediately.
4 ways to enable and disable kernel-mode stack protection
Before configuring anything in Windows, the right hardware support needs to be in place. The feature isn’t available on every machine. Shadow stack support requires:
- The right processor; either Intel Control-flow Enforcement Technology (CET), available on Intel 11th-generation processors and later, or AMD shadow stacks, available on Zen 3 processors and later.
- Memory Integrity (HVCI) must also be enabled first, as it’s a prerequisite for kernel-mode stack protection. Without it, the option won’t appear.
- UEFI boot mode and Secure Boot must also be active, both of which are already requirements for Windows 11. Check and enable these in your BIOS or UEFI firmware before proceeding. If the hardware prerequisites aren’t met, the protection option either won’t appear or won’t function correctly.
After you’ve ensured those requirements are met, here’s how to enable and disable kernel-mode stack protection.
» Not sure? Here’s how to check HWID (Hardware ID) and update your BIOS
Method 1: Windows Security GUI
The graphical method is the most accessible and works well for individual machines:
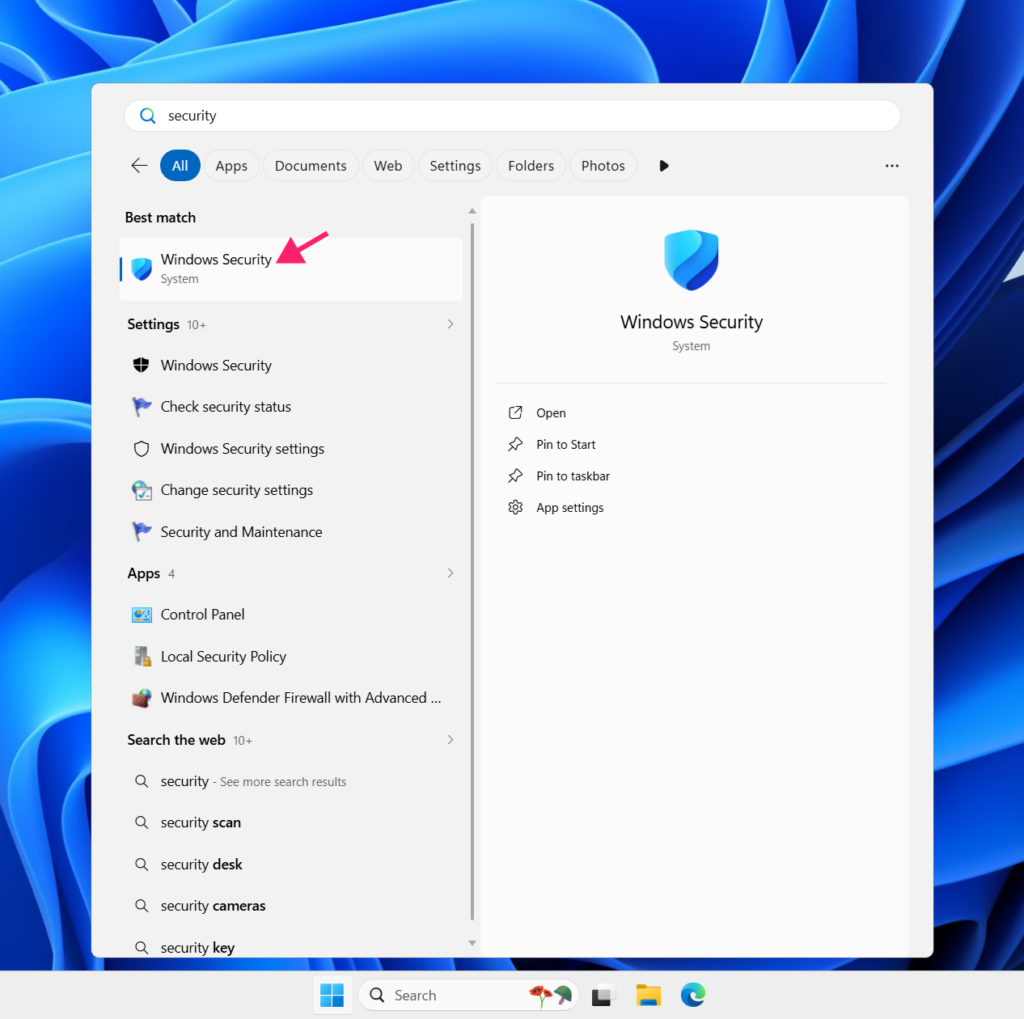
1. Open the Start menu, search for “Windows Security” and open it
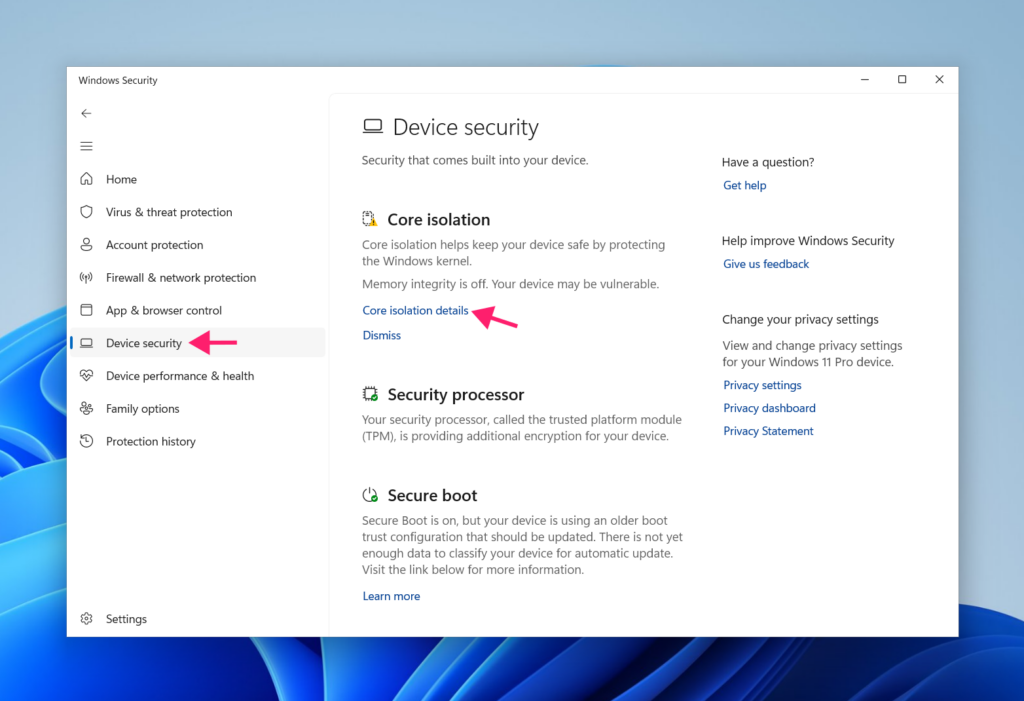
2. In the left-hand navigation, select Device Security, then click Core isolation details
3. Toggle Memory Integrity to On
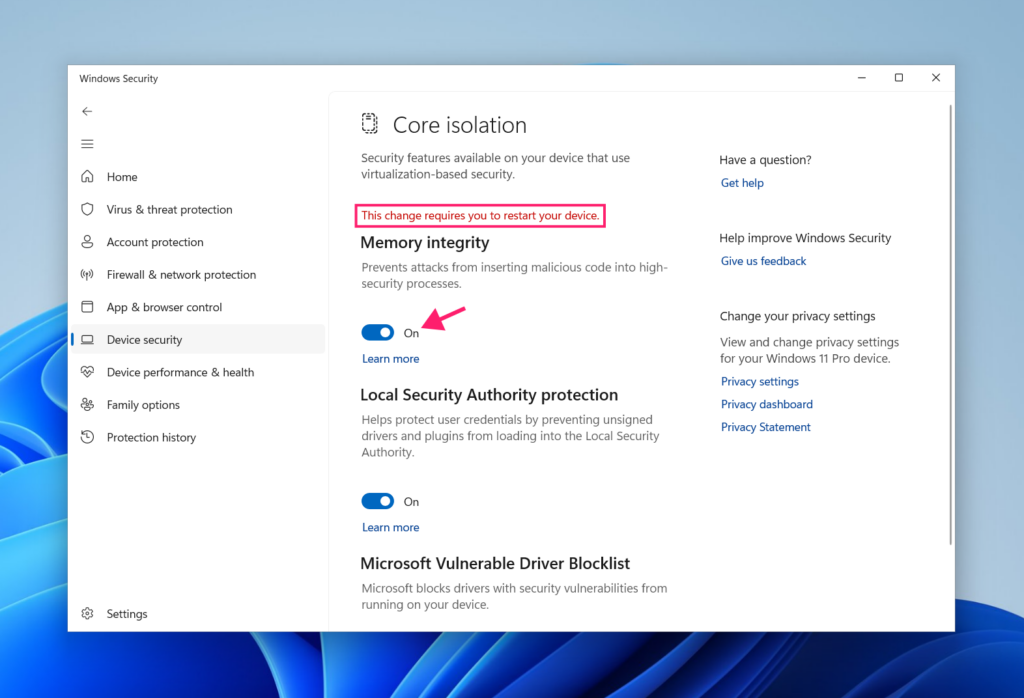
4. Windows will display a banner indicating a restart is required. Restart the machine before continuing
5. After the reboot, return to Device Security > Core isolation details
6. The Kernel-mode Hardware-enforced Stack Protection toggle will now be available. Toggle it to On
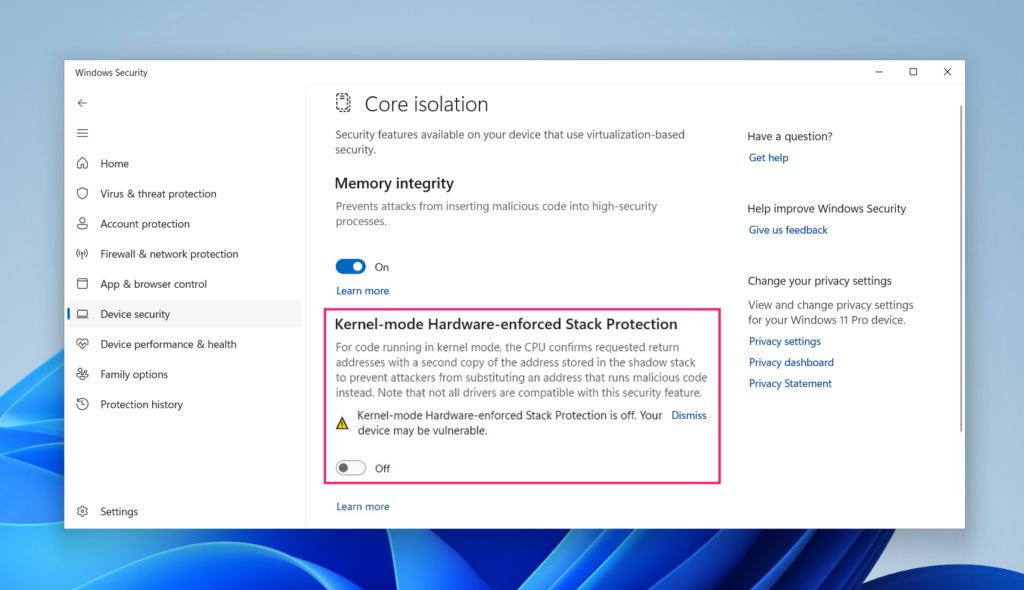
7. To disable it, just return to Device Security > Core isolation details and toggle Kernel-mode Hardware-enforced Stack Protection to Off, then restart the PC
Note: if the option doesn’t appear after enabling Memory Integrity, the system’s CPU doesn’t meet the hardware requirements (Intel CET or AMD shadow stacks), or the BIOS prerequisites haven’t been configured.
Method 2: Local Group Policy
Group Policy is the preferred approach for managing this setting on a local machine with more administrative control.
1. Press Win + R, type gpedit.msc, and press Enter to open Group Policy Editor
2. Go to Computer Configuration > Administrative Templates > System > Device Guard
3. Double-click Turn on Virtualization Based Security to open it
4. Set the policy to Enabled
5. Under Options, locate the Kernel-mode Hardware-enforced Stack Protection dropdown and set it to Enabled in enforcement mode
6. Click OK
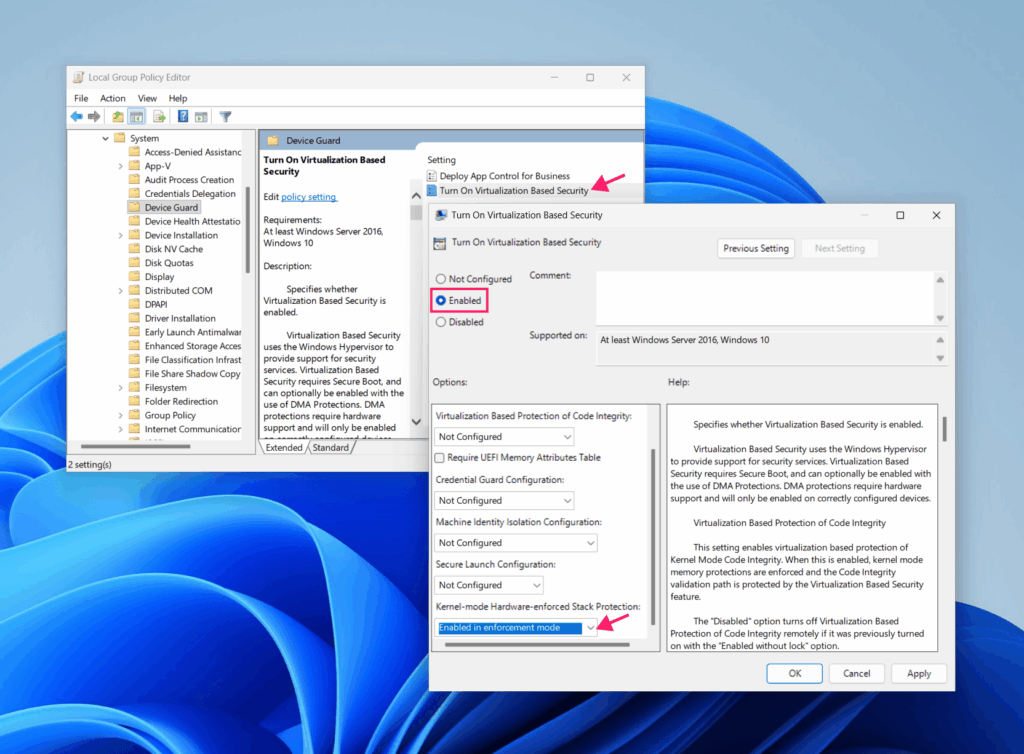
7. Restart the machine for the policy to take effect
8. To disable, return to the same policy, set the Kernel-mode Hardware-enforced Stack Protection dropdown to Disabled, and restart
Note: when this setting is managed via Group Policy, any manual registry modifications will be overwritten on the next policy refresh or system reboot. If you’re using both methods across different machines, be aware of which one takes precedence in your environment.
» Learn more about group policy management with Atera
Method 3: Registry editor
Direct registry modification gives administrators precise control, but changes are more vulnerable to being overwritten by system maintenance software or subsequent policy refreshes than Group Policy-managed settings. Use this method when Group Policy isn’t available.
The cleanest approach is to use a .reg file rather than navigating the registry manually.
1. To create the registry file, open Notepad and paste the following, then save the file as ShadowStacksEnable.reg:
The Script:
Atera does not guarantee the integrity, availability, security, virus-free, safety, lawfulness, non-infringement, rights’ status, or functionality of the scripts. The use of the shared scripts is at your own risk. Scripts are provided “AS IS”. *
Windows Registry Editor Version 5.00
[HKEY_LOCAL_MACHINE\SYSTEM\CurrentControlSet\Control\DeviceGuard]
"EnableVirtualizationBasedSecurity"=dword:00000001
"RequirePlatformSecurityFeatures"=dword:00000001
"Locked"=dword:00000000
[HKEY_LOCAL_MACHINE\SYSTEM\CurrentControlSet\Control\DeviceGuard\Scenarios\HypervisorEnforcedCodeIntegrity]
"Enabled"=dword:00000001
"Locked"=dword:00000000
[HKEY_LOCAL_MACHINE\SYSTEM\CurrentControlSet\Control\DeviceGuard\Scenarios\KernelShadowStacks]
"Enabled"=dword:00000001
"WasEnabledBy"=dword:00000002Here’s what each key does:
EnableVirtualizationBasedSecurityenables the Virtualization-Based Security frameworkRequirePlatformSecurityFeaturesrequires Secure Boot at the hardware levelLockedset to00000000configures the policy without a UEFI lock, making it easier to recover if neededHypervisorEnforcedCodeIntegrity\Enabledenables Memory Integrity, which is a prerequisiteKernelShadowStacks\Enableenables Kernel-Mode Hardware-Enforced Stack ProtectionWasEnabledByset to00000002marks the feature as user-enabled
Use 00000001 to enable any feature and 00000000 to disable it.
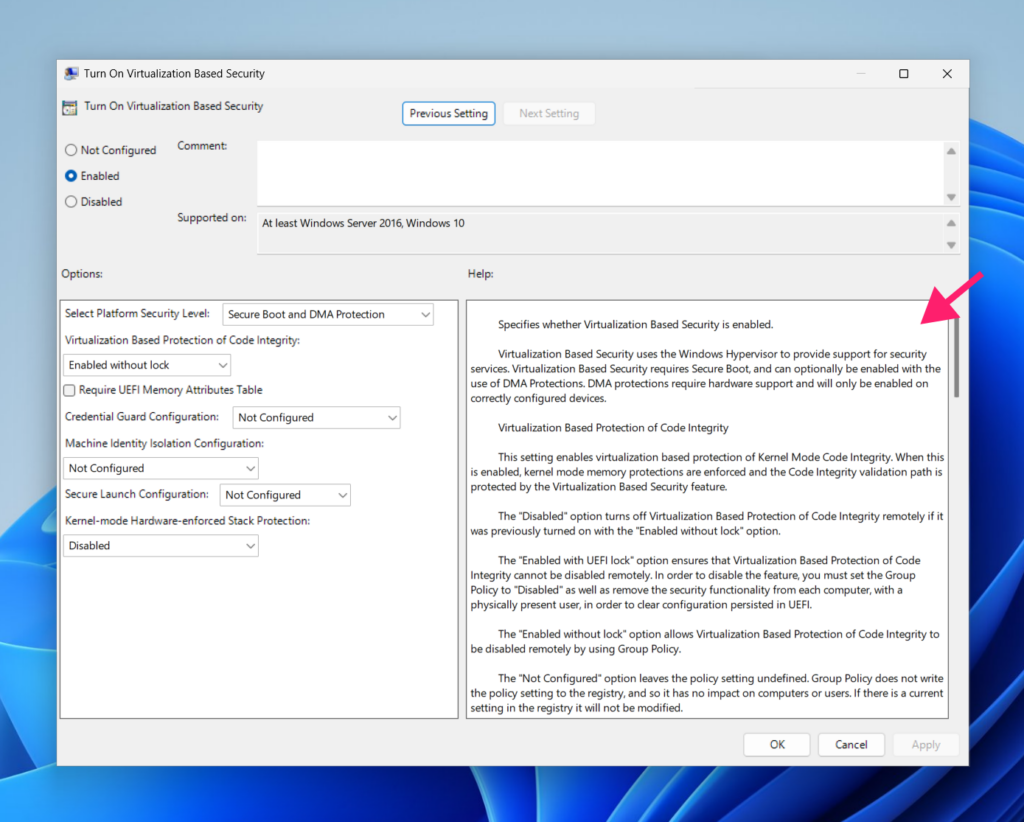
2. To apply the registry file, double-click ShadowStacksEnable.reg and confirm when prompted
3. Restart the machine
4. To disable, create a second file ShadowStacksDisable.reg with the KernelShadowStacks\Enabled value set to 00000000, apply it, and restart
» Don’t miss our top registry editor challenges and solutions
Method 4: PowerShell
PowerShell is the most practical option for scripted or remote deployment across multiple machines via Atera’s RMM or any other management platform.
1. Run the following script in an elevated PowerShell session (run PowerShell as Administrator) to enable protection:
The Script:
Atera does not guarantee the integrity, availability, security, virus-free, safety, lawfulness, non-infringement, rights’ status, or functionality of the scripts. The use of the shared scripts is at your own risk. Scripts are provided “AS IS”. *
# Target registry paths $DgPath = "HKLM:\SYSTEM\CurrentControlSet\Control\DeviceGuard" $HvciPath = "$DgPath\Scenarios\HypervisorEnforcedCodeIntegrity" $KssPath = "$DgPath\Scenarios\KernelShadowStacks"
# Verify sub-key paths exist, create if missing
if (!(Test-Path $HvciPath)) { New-Item -Path $HvciPath -Force | Out-Null }
if (!(Test-Path $KssPath)) { New-Item -Path $KssPath -Force | Out-Null }
# Enable Virtualization-Based Security
Set-ItemProperty -Path $DgPath -Name "EnableVirtualizationBasedSecurity" -Value 1 -Type DWord
Set-ItemProperty -Path $DgPath -Name "RequirePlatformSecurityFeatures" -Value 1 -Type DWord
Set-ItemProperty -Path $DgPath -Name "Locked" -Value 0 -Type DWord
# Enable Memory Integrity (prerequisite)
Set-ItemProperty -Path $HvciPath -Name "Enabled" -Value 1 -Type DWord
Set-ItemProperty -Path $HvciPath -Name "Locked" -Value 0 -Type DWord
# Enable Kernel-Mode Hardware Stack Protection
Set-ItemProperty -Path $KssPath -Name "Enabled" -Value 1 -Type DWord
Set-ItemProperty -Path $KssPath -Name "WasEnabledBy" -Value 2 -Type DWord
Write-Host "Success: Kernel-Mode Stack Protection enabled. Restart required." -ForegroundColor Green2. To disable protection, run the following in an elevated PowerShell session:
The Script:
Atera does not guarantee the integrity, availability, security, virus-free, safety, lawfulness, non-infringement, rights’ status, or functionality of the scripts. The use of the shared scripts is at your own risk. Scripts are provided “AS IS”. *
$KssPath = "HKLM:\SYSTEM\CurrentControlSet\Control\DeviceGuard\Scenarios\KernelShadowStacks"
if (Test-Path $KssPath) { Set-ItemProperty -Path $KssPath -Name "Enabled" -Value 0 -Type DWord Write-Host "Success: Kernel-Mode Stack Protection disabled. Restart required." -ForegroundColor Yellow } else { Write-Host "The targeted registry key path does not exist." -ForegroundColor Red }3. Restart the machine after running either script
Did you know? You don’t have to be a coding whizz to create comprehensive PowerShell scripts like this. If you use Atera, then AI Copilot can help you create these scripts from simple natural language queries.
How to verify protection status
After enabling via any method, confirm the feature is active before closing the loop.
Option 1: System Information tool
1. Open an elevated PowerShell or Command Prompt window and run msinfo32
2. In the System Information tool, scroll down to Virtualization-based Security Services Running
When Kernel-Mode Hardware-Enforced Stack Protection is active, it will appear here alongside Hypervisor-enforced Code Integrity (Memory Integrity).
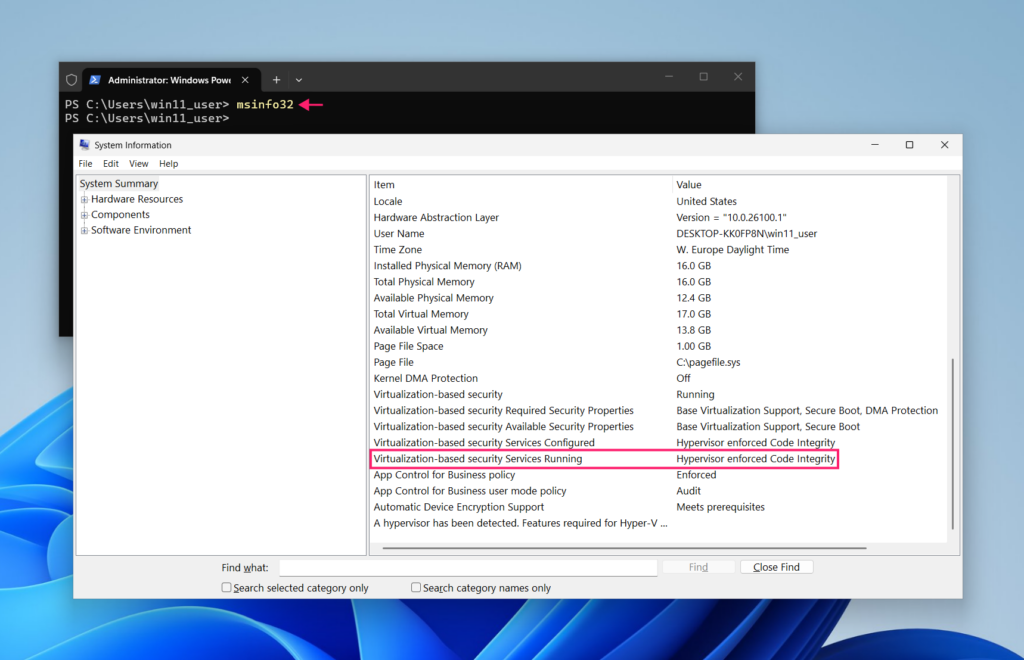
Option 2: PowerShell CIM query
Run the following in an elevated PowerShell session:
The Script:
Atera does not guarantee the integrity, availability, security, virus-free, safety, lawfulness, non-infringement, rights’ status, or functionality of the scripts. The use of the shared scripts is at your own risk. Scripts are provided “AS IS”. *
(Get-CimInstance -Namespace root\Microsoft\Windows\DeviceGuard -ClassName Win32_DeviceGuard).SecurityServicesRunningA return value of 5 confirms Kernel-Mode Hardware-Enforced Stack Protection is enabled. A value of 2 means only Memory Integrity is active and stack protection hasn’t been successfully enabled yet.
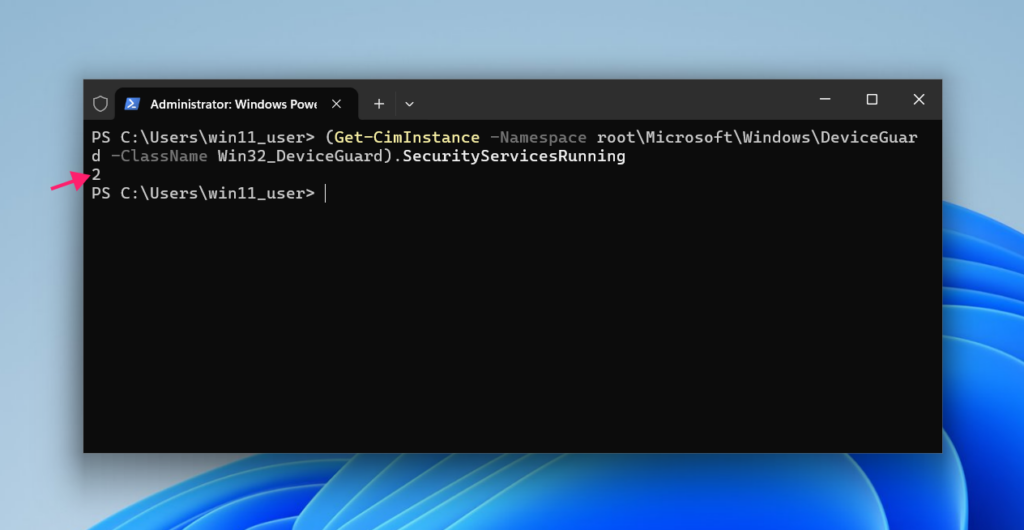
To check the raw registry state of the KernelShadowStacks keys without a restart, run:
The Script:
Atera does not guarantee the integrity, availability, security, virus-free, safety, lawfulness, non-infringement, rights’ status, or functionality of the scripts. The use of the shared scripts is at your own risk. Scripts are provided “AS IS”. *
Get-ItemProperty -Path "HKLM:\SYSTEM\CurrentControlSet\Control\DeviceGuard\Scenarios\KernelShadowSStop leaving kernel protection disabled
Kernel-Mode Hardware-Enforced Stack Protection doesn’t require a vendor, a budget line, or a deployment project. The hardware requirement is already met on any Intel 11th-gen or AMD Zen 3 system, and the feature ships with Windows. What it does require is someone actually turning it on and verifying it’s running across every managed device.
That’s where the gap usually sits. Enabling a feature locally is straightforward. Knowing whether it’s active, consistent, and correctly configured across a fleet of endpoints is a different problem entirely. Atera’s RMM gives IT teams and MSPs the visibility to deploy these settings remotely via PowerShell and verify protection status across all managed devices.
» Interested? Try Atera for free
Related Articles

How to reduce alert fatigue across your IT team
Your technicians aren't ignoring alerts because they're careless. They're ignoring them because most alerts have taught them to. Once the stream stops being trustworthy, real failures slip past with the noise. Fixing it means deciding what deserves an interruption, tuning out transient spikes, collapsing alert storms, and automating the fixes you've run a hundred times.
Read now
How to close the IT skills gap on your team
Course completions don't close skills gaps. Technicians finish the training, then hand the first unfamiliar failure straight back to a senior engineer. Real capability gets built on live tickets, incidents, and maintenance windows, with guidance that fades as competence grows.
Read now
How to calculate cost per ticket (and why most teams get it wrong)
Most cost-per-ticket figures are wrong before anyone reads them. Missing overhead, tickets that were opened but never closed, spam and duplicates padding the count, and one month's costs divided by another month's tickets all make support look cheaper than it is. Fix both sides of the division and the number finally shows where technician time and money actually go.
Read now
How to prepare for a software license audit
A vendor audit notice doesn't wait for you to get organized. It demands proof, right now, that every install matches every entitlement you've paid for, and most IT teams find out the hard way how much they don't actually know about their own environment. Getting audit-ready before the letter arrives is the difference between negotiating from strength and paying for months of scrambling.
Read nowEndless IT possibilities
Boost your productivity with Atera’s intuitive, centralized all-in-one platform









