
Generate summary with AI

Notification overload is not a minor inconvenience. According to Microsoft’s own telemetry from its 2025 Work Trend Index, employees are interrupted every two minutes during core work hours by meetings, emails, and pings. That number doesn’t account for the app banners, system alerts, and background noise firing from Windows itself.
For end users, that’s a focus problem. For IT teams managing dozens or hundreds of Windows 11 devices, it’s also a configuration problem that has more levers than most people realize. Knowing how to control, suppress, or completely remove the Notification Center puts that noise back under your team’s control. Here’s everything you need to know.
What the Windows 11 Notification Center actually is
The Notification Center is Windows 11’s central hub for system and app alerts. It collects everything from security warnings and software updates to calendar reminders and third-party app banners, storing them in one place so you can review them on your own schedule rather than reacting to each one as it fires.
To open it, click the clock in the bottom-right corner of the taskbar, or press Win + N.
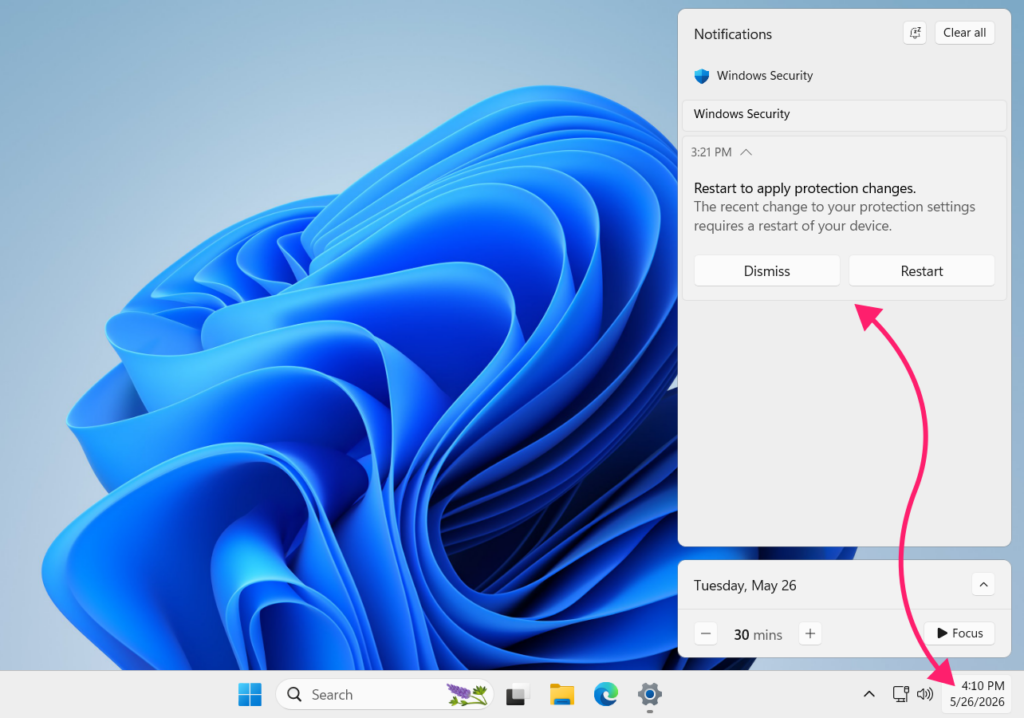
On Windows 10, a single click on the notification icon opened everything at once. In Windows 11, Microsoft split the panel into two separate sections:
- Notification Center (Win + N): Your alert history and calendar.
- Quick Settings (Win + A): Wi-Fi, Bluetooth, volume, brightness, and related toggles.
Once you’re in the Notification Center, you can navigate it entirely from the keyboard if needed:
- Tab/Shift + Tab to move forward and backward through elements
- Arrow keys to move between notifications
- Enter or Spacebar to activate a highlighted notification or button
- Delete to clear a notification
- Shift + F10 or the Menu key while a notification is focused to open its options
- Esc to close
What gets suppressed and what doesn’t
Disabling notifications in Windows 11 doesn’t mean the same thing depending on how you do it. Windows 11 has two distinct suppression states:
- Turning off notifications globally via Settings kills all pop-up banners and alerts from both the system and apps. Nothing fires, but some applications bypass the Windows notification system entirely and run their own. Those need to be disabled from within the app itself.
- Enabling Do not disturb is a softer approach. Notifications still come in and collect in the Notification Center, but banners don’t pop up on screen. Reminders and any apps you’ve designated as priority still break through. The alerts are there when you go looking; they just stop demanding your attention in real time.
One thing that stays active regardless of which suppression state you choose is critical OS alerts. Security warnings and power alerts (like a low battery notification) aren’t affected by either setting. Windows treats those as non-negotiable.
How to control notifications in Windows 11
Before reaching for Group Policy or the registry, it’s worth knowing how much control the native Settings interface actually gives you. For most environments, per-app configuration, Focus sessions, and Do Not Disturb scheduling will handle the majority of notification management without touching anything that requires elevated privileges or a rollback plan.
Per-app notification settings
The most surgical approach. Rather than silencing everything, you can configure notification behavior on an app-by-app basis, which is useful when you want to keep security alerts and monitoring tools visible while cutting out the noise from everything else.
1. Press Win + I to open Settings
2. Go to System > Notifications
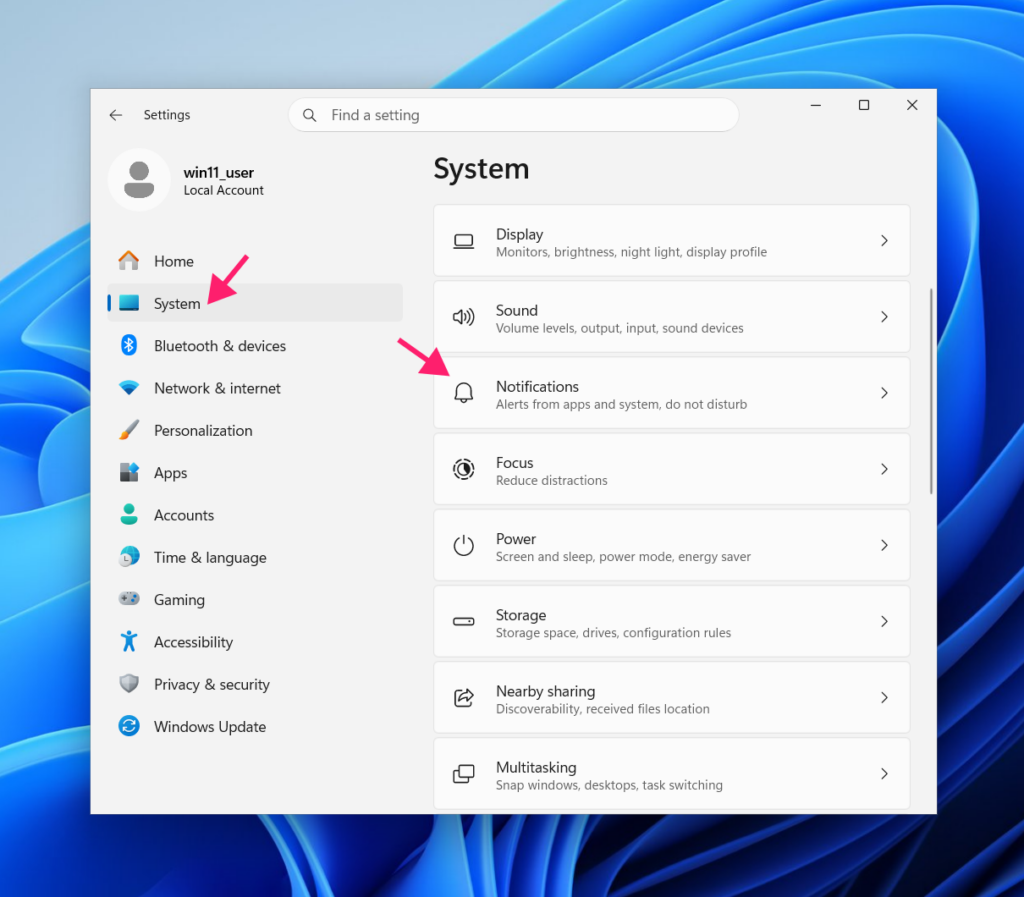
3. Scroll down to the Notifications from apps and other senders section
4. To disable an app’s notifications entirely, switch its toggle to Off
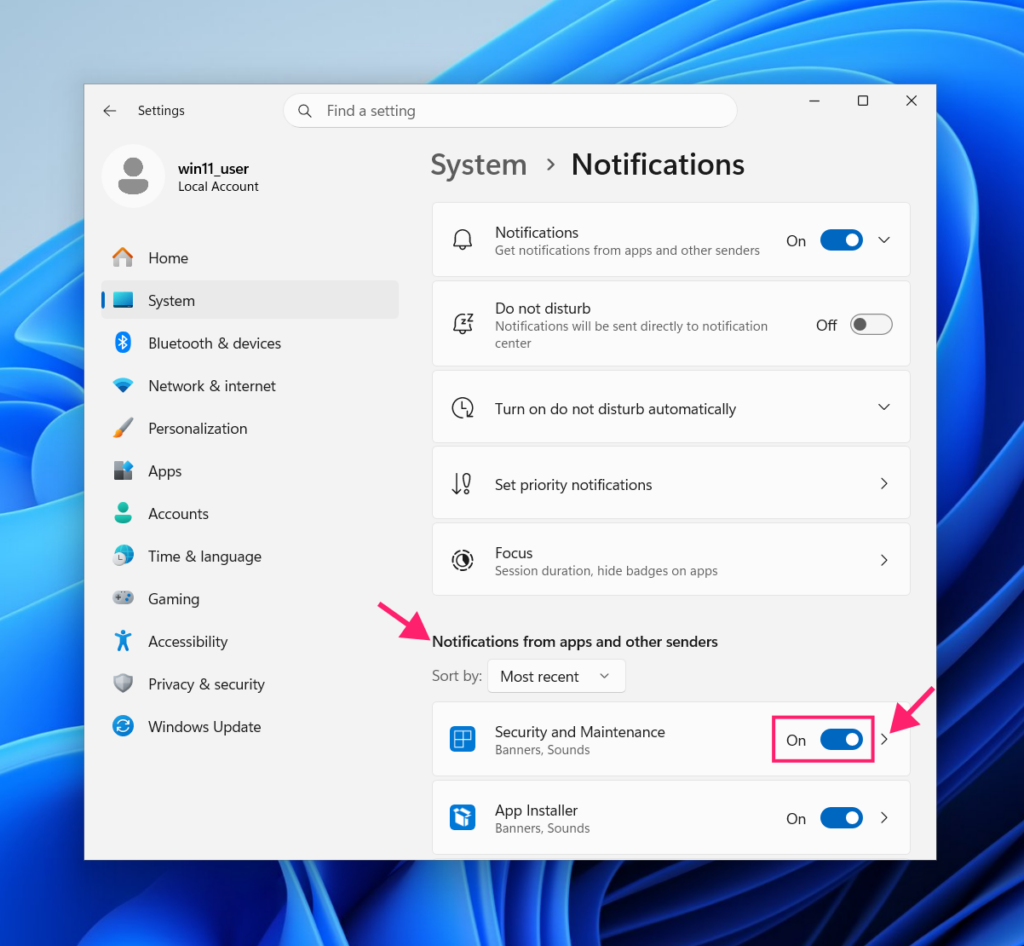
5. To customize rather than disable, click the app entry to open its individual settings, where you can control banners, sounds, and lock screen visibility independently
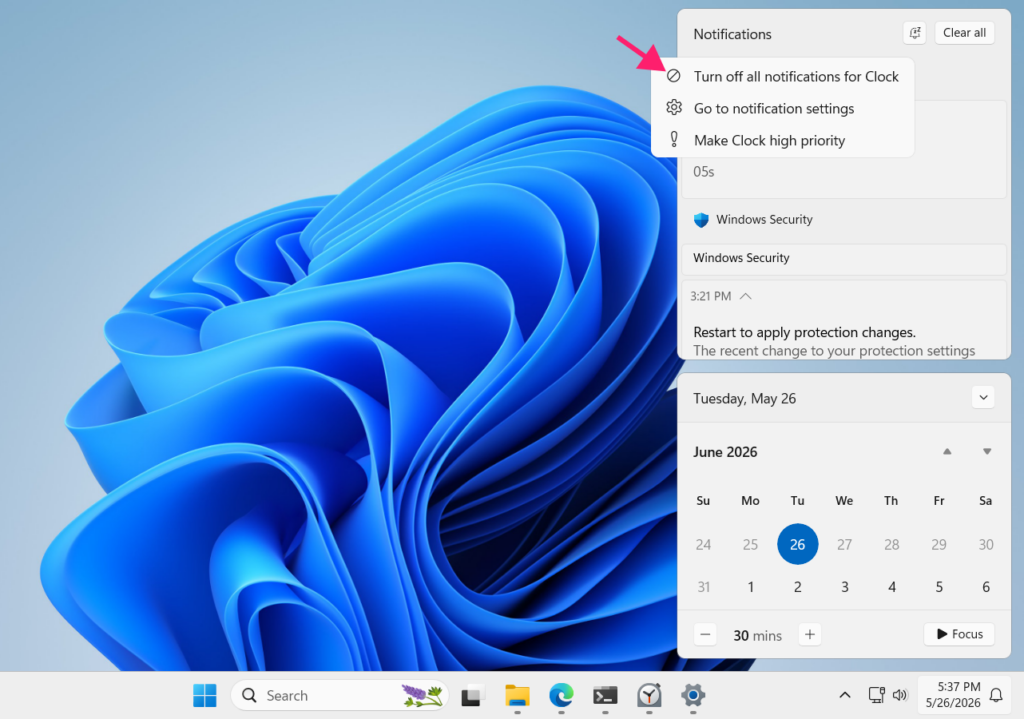
6. For a faster route, click the options button (…) next to any app and select Turn off all notifications for [App Name]
7. To revert any of these changes, return to the same screen and switch the toggle back to On, or re-enable whichever options you turned off inside the app’s individual settings
Focus sessions
Focus is Windows 11’s built-in distraction blocker. When a Focus session is active, Do Not Disturb turns on automatically, notification banners stop firing, and badges and flashing indicators on taskbar apps are temporarily hidden. Notifications still collect in the Notification Center during the session, they just don’t interrupt you.
There are three ways to start one:
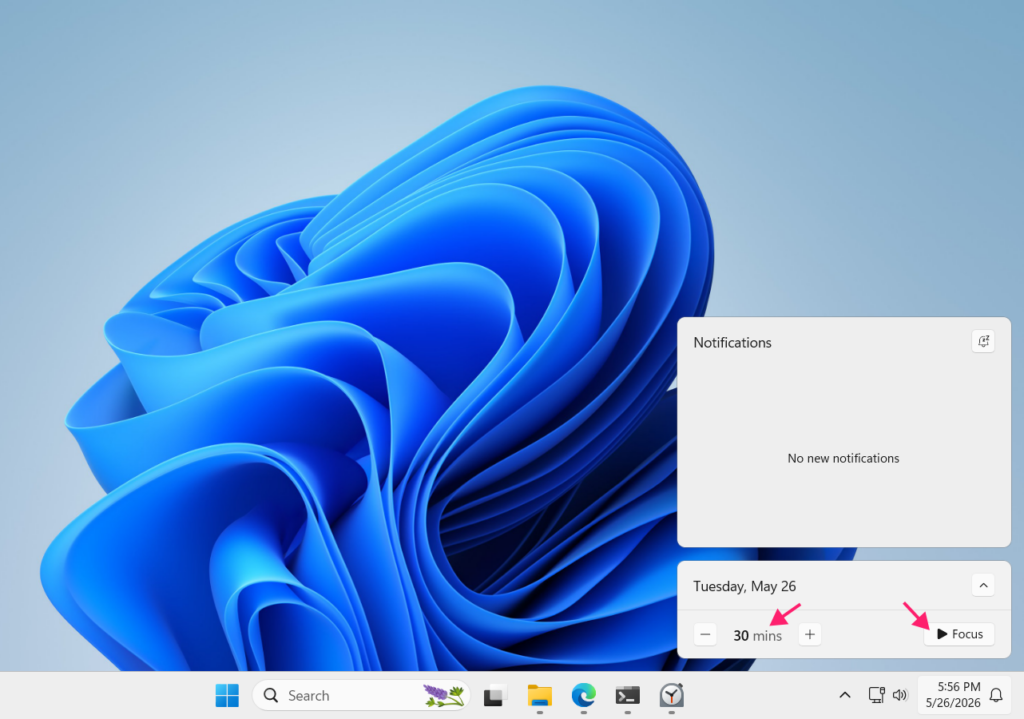
From the Notification Center
1. Press Win + N to open the Notification Center
2. Use the – and + buttons to set your desired session length
3. Click the Focus button to start
From the Clock app
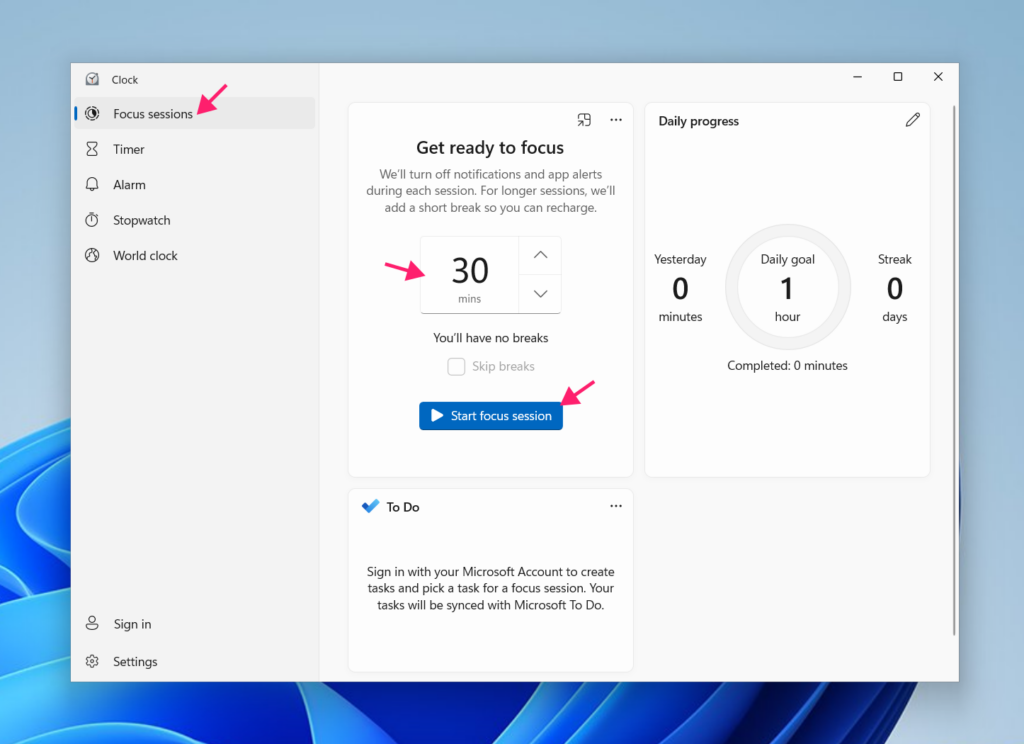
1. Open the Clock app from the Start menu
2. Go to the Focus sessions tab
3. Set your desired duration and click Start focus session
From Settings
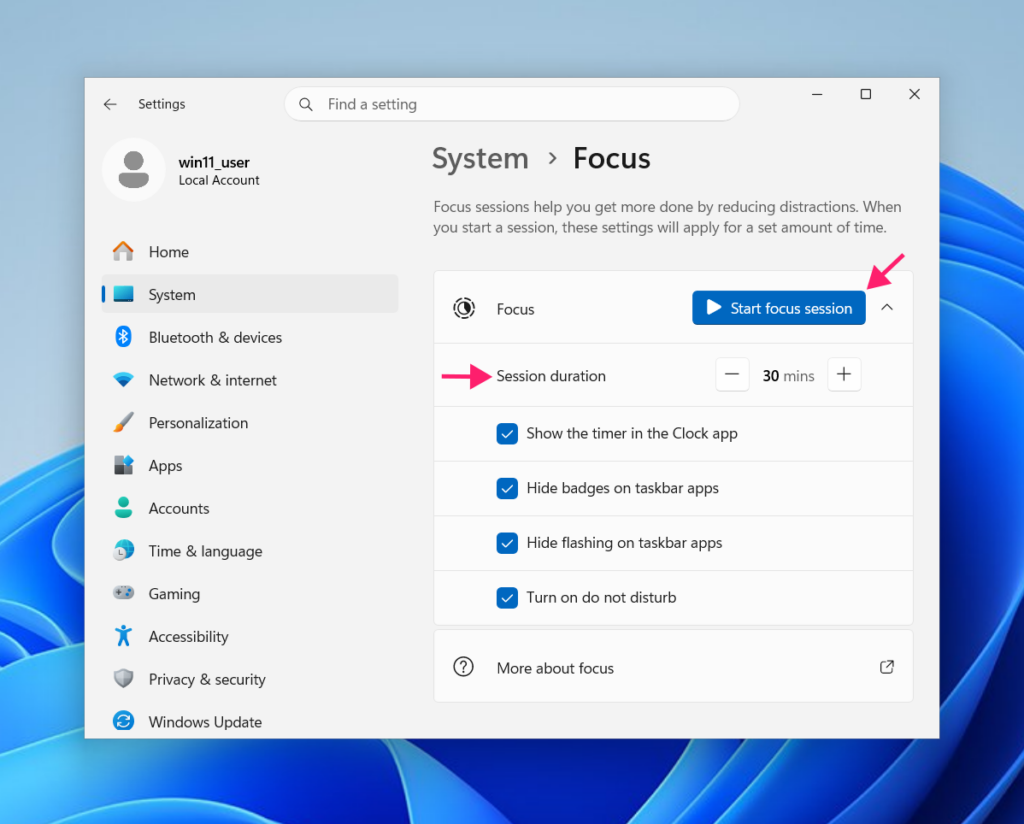
1. Press Win + I to open Settings
2. Go to System > Focus
3. Set the session duration and click Start focus session
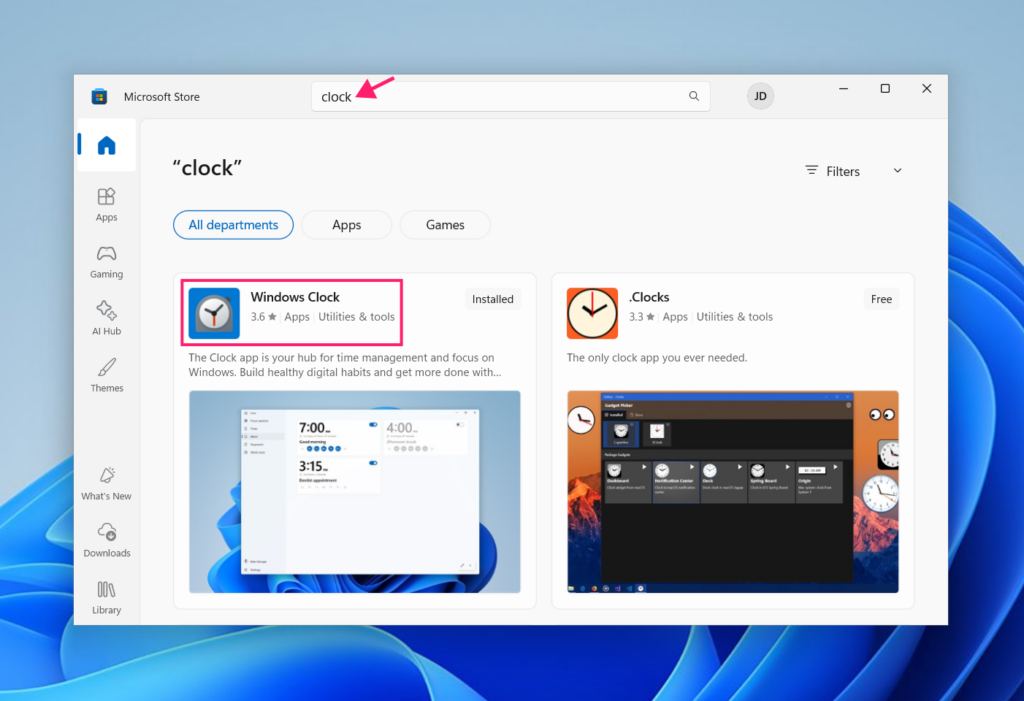
Note: Focus relies on the Clock app to function. If it’s been uninstalled, reinstall it from the Microsoft Store before attempting to start a session. Also, if Do not disturb was already enabled before the session started, it will remain on after the session ends and won’t automatically turn itself off.
Do not disturb
Do Not Disturb gives you the same banner suppression as Focus without the session timer. Notifications still arrive and sit in the Notification Center; they just don’t surface on screen until you go looking.
Unlike turning off notifications globally, this keeps everything intact. You’re not missing anything, just choosing when to look at it.
To enable or disable Do not disturb manually
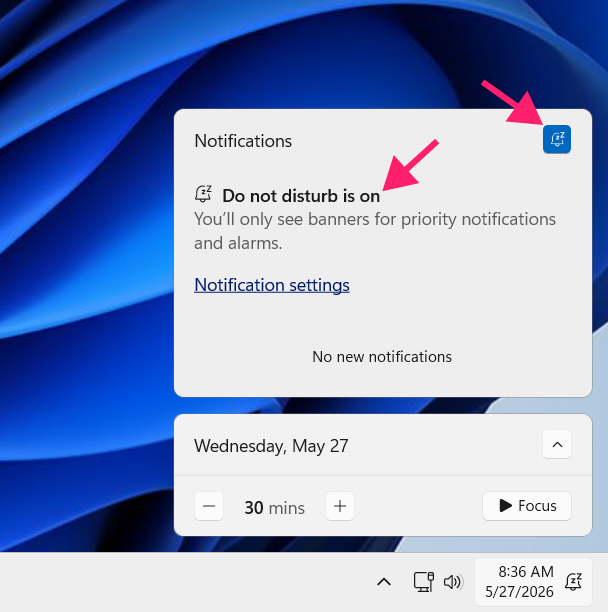
1. Press Win + N to open the Notification Center
2. Click the “zZ”icon in the top-right corner to toggle Do not disturb on or off
To schedule Do not disturb automatically
1. Press Win + I to open Settings
2. Go to System > Notifications and expand the Turn on do not disturb automatically section
3. Tick the During these times checkbox and set your desired start time, end time, and repeat schedule
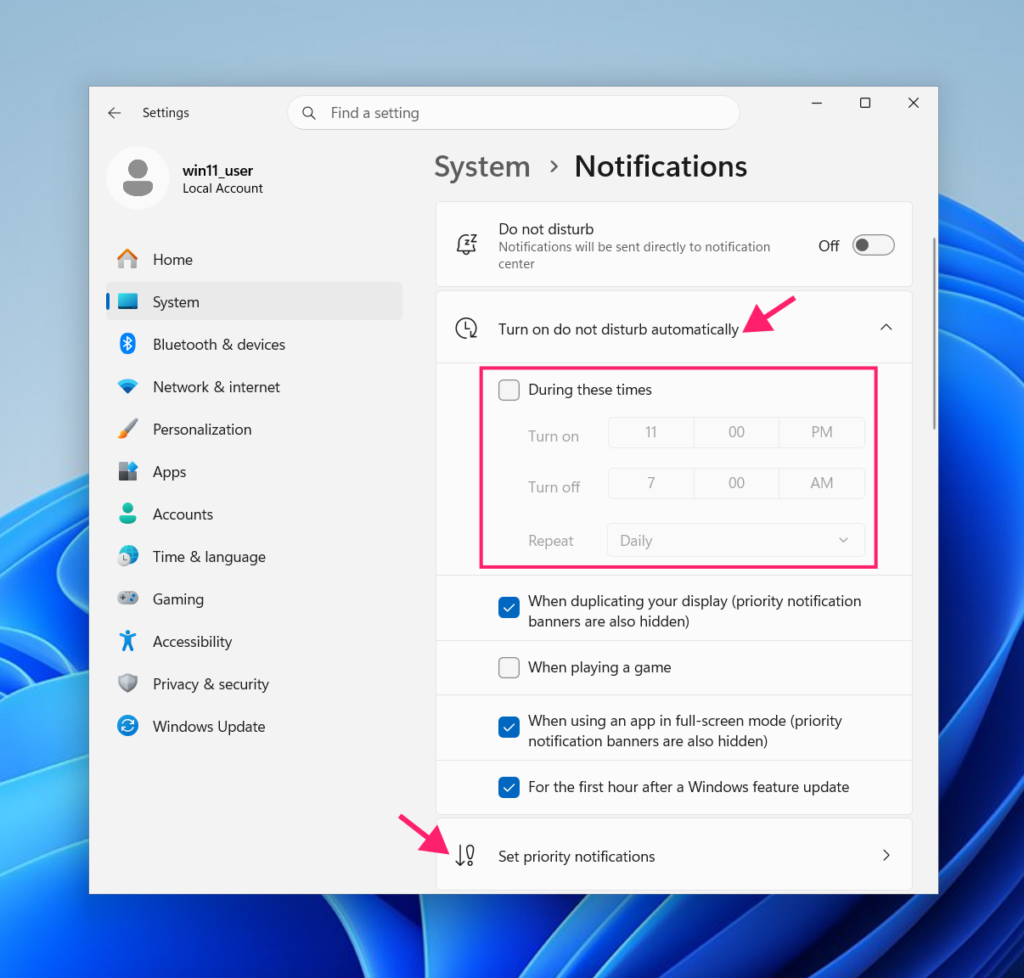
Do not disturb can also trigger automatically in other situations, such as when duplicating your display, when using an app in full-screen mode, and for the first hour after a Windows feature update.
How to disable the Notification Center entirely
The methods in Section 2 manage what notifications do. This section is about removing the Notification Center from the taskbar altogether, which means no panel, no bell icon, and no calendar popup.
There are two ways to get there: Group Policy Editor and the Registry Editor. Group Policy is the cleaner option for managed environments, but it’s not available on Windows 11 Home. The registry method works on every edition, including Home, and is also the path you’d take to deploy this change remotely at scale with PowerShell.
Method 1: Group Policy Editor
Suitable for Windows 11 Pro, Enterprise, and Education editions on domain-joined or locally managed machines.
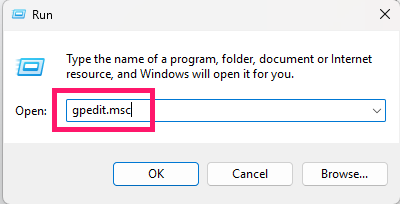
1. Press Win + R, type gpedit.msc, and press Enter to open the Local Group Policy Editor
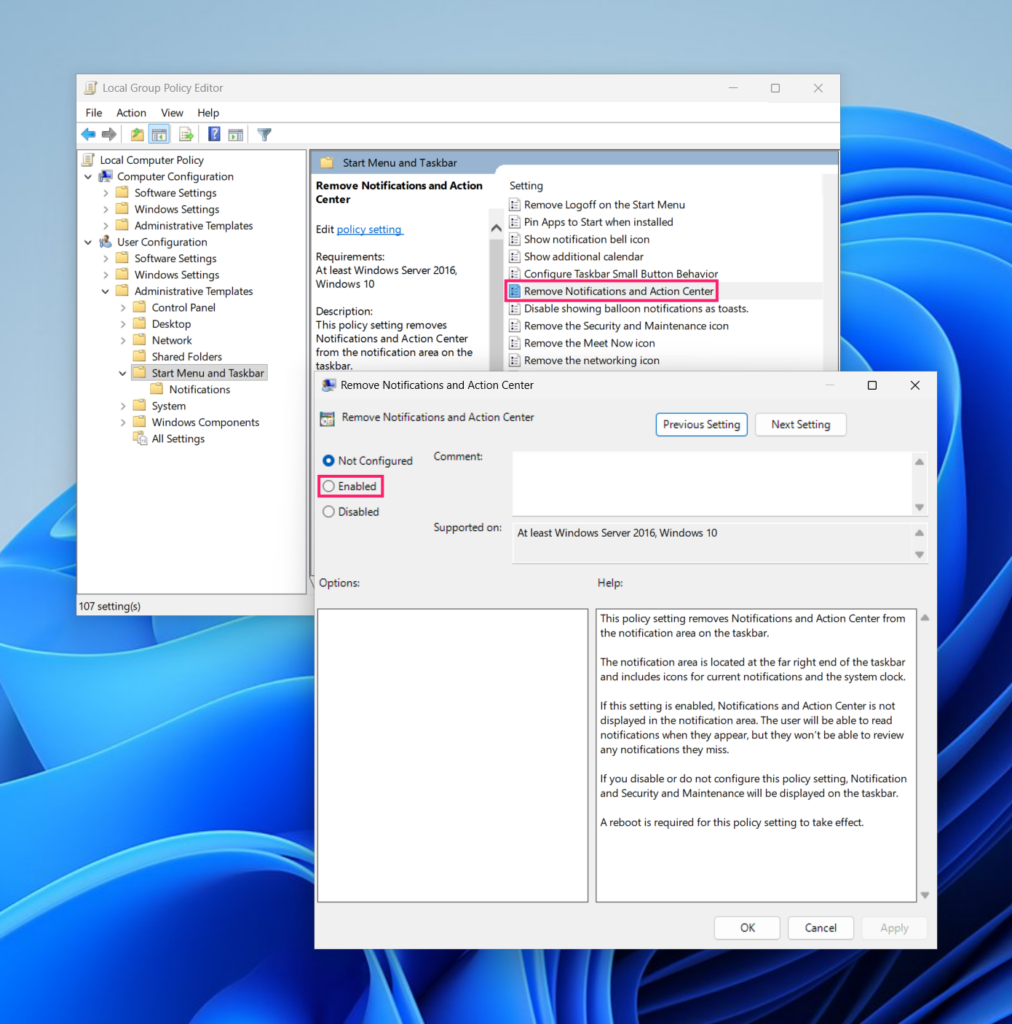
2. Navigate to User Configuration > Administrative Templates > Start Menu and Taskbar
3. Locate the Remove Notifications and Action Center policy and double-click it
4. Select Enabled and click OK
5. Open Command Prompt with elevated privileges (right-click Start, select Terminal (Admin)), then run the following command to apply the policy immediately without a reboot: gpupdate /force
The Notification Center icon will disappear from the taskbar. Note that enabling this policy also disables the calendar popup that appears when you click the clock.
Critical Windows Security alerts are not affected by this policy. If you need to review or adjust the policies governing security notifications specifically, navigate to Computer Configuration > Administrative Templates > Windows Components > Windows Security > Notifications.
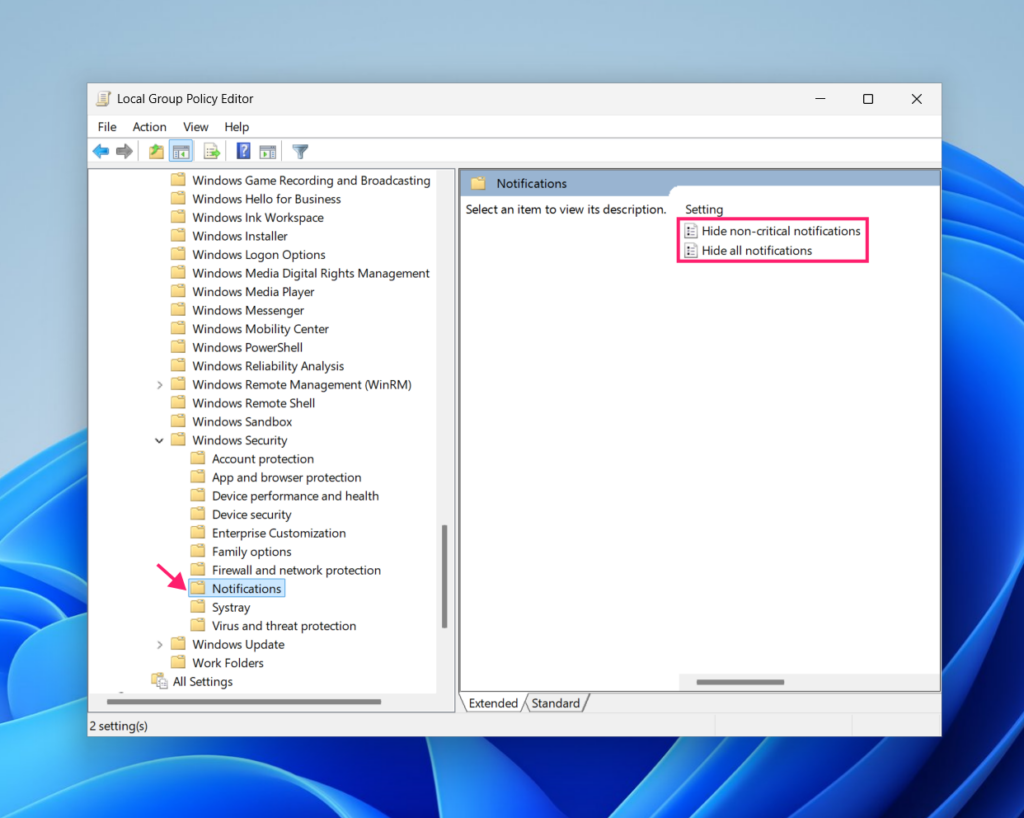
To revert, return to the same policy in Group Policy Editor, set it to Not Configured, and run gpupdate /force again.
» Learn more about group policy management with Atera
Method 2: Registry Editor
Works on all Windows 11 editions, including Home. This is also the method to use when deploying the change remotely or at scale.
1. Press Win + R, type regedit, and press Enter to open the Registry Editor
2. Navigate to the following path: HKEY_CURRENT_USER\Software\Policies\Microsoft\Windows\
3. Look for the Explorer subkey
4. If it doesn’t exist, create it by right-clicking the Windows key > New > Key, and name it Explorer
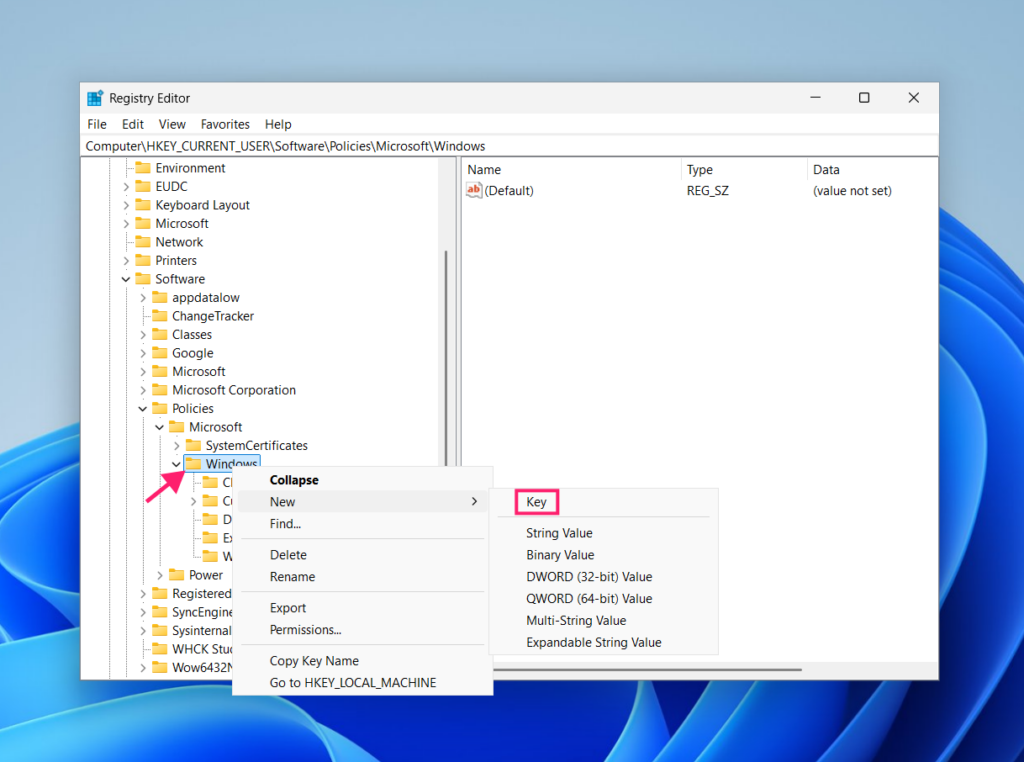
5. Inside the Explorer key, right-click in the right pane, select New > DWORD (32-bit) Value, and name it DisableNotificationCenter
6. Double-click the new value and set it to 1
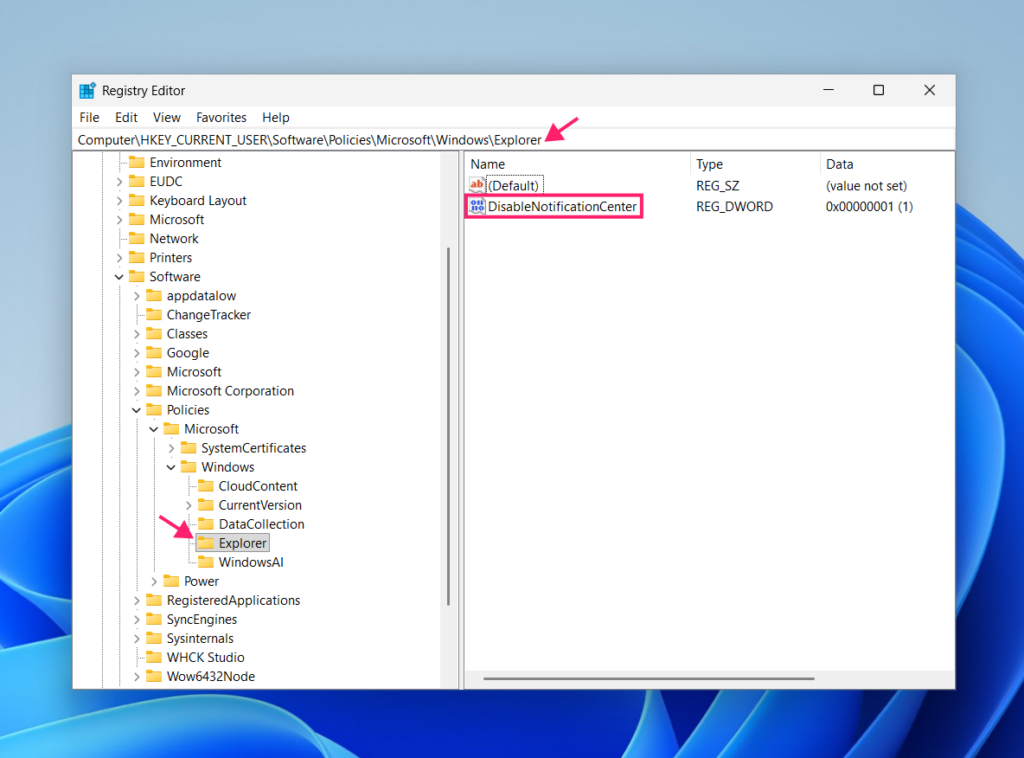
The change takes effect after signing out and back in, or after restarting Explorer. To revert, return to the same registry path and either set DisableNotificationCenter to 0, or delete the key entirely.
» Here are our top Registry Editor challenges and solutions
Method 3: PowerShell
If you’re pushing this change across multiple endpoints, the registry edit above can be scripted and deployed remotely through Atera’s RMM platform without touching individual machines.
This script handles the full operation from creating the registry key if it doesn’t exist and then setting the value:
The Script:
Atera does not guarantee the integrity, availability, security, virus-free, safety, lawfulness, non-infringement, rights’ status, or functionality of the scripts. The use of the shared scripts is at your own risk. Scripts are provided “AS IS”. *
# Create key if not present
if (-not (Test-Path "HKCU:\Software\Policies\Microsoft\Windows\Explorer")) { New-Item -Path "HKCU:\Software\Policies\Microsoft\Windows\Explorer" -Force }

# Disable (1) or enable (0) Notification Center
Set-ItemProperty -Path "HKCU:\Software\Policies\Microsoft\Windows\Explorer" ` -Name "DisableNotificationCenter" -Type DWord -Value 1To re-enable the Notification Center across your fleet, change -Value 1 to -Value 0 and redeploy. To remove the key entirely instead, replace the Set-ItemProperty line with:
The Script:
Atera does not guarantee the integrity, availability, security, virus-free, safety, lawfulness, non-infringement, rights’ status, or functionality of the scripts. The use of the shared scripts is at your own risk. Scripts are provided “AS IS”. *
Remove-ItemProperty -Path "HKCU:\Software\Policies\Microsoft\Windows\Explorer" ` -Name "DisableNotificationCenter" -ErrorAction SilentlyContinueSave the script as a .ps1 file (for example, setNotificationCenter.ps1) and deploy it through Atera’s automation profiles to push the configuration to any device or group of devices in your environment without manual intervention. And if you can’t create these scripts yourself, Atera’s AI Copilot can do it for you just with natural language queries.
Take back control of the notification layer
Controlling the Notification Center is one of those configurations that rarely makes it onto an IT priority list until it becomes a problem, such as a distracted employee, a policy audit, or a device that won’t quiet down during a client presentation. The methods covered here give you the full range, from flipping a per-app toggle to deploying a registry change across a fleet via PowerShell.
With Atera’s RMM platform, you can push scripts remotely, manage automation profiles, and maintain consistent configurations across every endpoint in your environment so that notification policies get set once and stay set. No chasing individual machines and no relying on end users to sort it themselves.
» Want to try it out? Atera offers a free trial!
Frequently Asked Questions
Related Articles

How to set up secure printing across your organization
A secure print checkbox protects exactly one moment in a document's life. Everything else, from unencrypted traffic and unhardened devices to payroll printouts forgotten in a tray, stays exposed. Real secure printing covers the whole lifecycle: release policy, authentication, encryption, hardening, and a fleet that stays monitored long after rollout.
Read now
How to reduce alert fatigue in healthcare IT
In a hospital, a dismissed alert isn't a delayed ticket. It can be a patient deteriorating while the monitor keeps sounding. Cutting alert volume won't fix that on its own, and switching alerts off can make it worse.
Read now
How to prevent configuration drift across your IT infrastructure
Configuration drift rarely breaks anything the day it happens. It hides in a hotfix, a reset default, or a vendor installer, then surfaces weeks later as a failure nobody can trace. Stopping it means defining exactly what approved looks like, closing every side door into production, giving each setting one owning tool, and checking that the baseline itself hasn't gone stale.
Read now
How to reduce alert fatigue across your IT team
Your technicians aren't ignoring alerts because they're careless. They're ignoring them because most alerts have taught them to. Once the stream stops being trustworthy, real failures slip past with the noise. Fixing it means deciding what deserves an interruption, tuning out transient spikes, collapsing alert storms, and automating the fixes you've run a hundred times.
Read nowEndless IT possibilities
Boost your productivity with Atera’s intuitive, centralized all-in-one platform









