
Generate summary with AI

Java runs quietly under the hood of a huge chunk of the world’s enterprise software. Around 30% of professional developers report using it regularly, and in finance, logistics, and large-scale backend systems, that number skews even higher. So when the Java Virtual Machine (JVM) refuses to start, the impact is rarely contained to one person’s machine.
The problem with JVM launcher errors is that the error messages themselves are nearly useless. “Could not create the Java Virtual Machine” tells you something went wrong, not where or why. The same message can stem from a misconfigured memory flag just as easily as a version mismatch. This guide walks you through how to actually diagnose what’s happening and fix it.
Why JVM launcher errors are harder to fix than they look
JVM launcher errors have a reputation for being deceptively stubborn because the same error message can have completely different root causes depending on your environment, your Java version, and even how you launched the application in the first place.
Take the two most common messages you’ll encounter:
- “Could not create the Java Virtual Machine” fails early, during the JVM initialization phase, before any application code runs. It typically points to memory allocation problems, invalid JVM arguments, or a 32-bit/64-bit architecture mismatch.
- “A Java exception has occurred” shows up slightly later, after the JVM has loaded but before the main application class executes. It usually means the runtime hit an unhandled exception, often from a misconfigured classpath, a missing library, or an initialization error.
How you launched the application also changes what you can see diagnostically:
- Running Java from the command line usually surfaces the full stack trace and JVM options, giving you something concrete to work with.
- Double-clicking a JAR file on Windows or macOS typically produces a brief popup or a console window that flashes and disappears, hiding the underlying issue almost entirely.
- IDEs like Eclipse or IntelliJ give you detailed console logs and environment details, while third-party launchers and wrappers often abstract the JVM completely, producing generic error messages with no useful diagnostic information underneath.
What’s causing them?
There are three dominant categories that could be causing these errors:
- Misconfigured JVM options, particularly invalid
-Xmxor-Xmsmemory settings, are the most frequent culprit. - Java version or architecture mismatches, such as attempting to run a 64-bit JVM on a 32-bit OS or using a Java version incompatible with the application.
- Environment variable and classpath issues, including problems with
JAVA_HOME,PATHor missing libraries, also could be causing it. - Corrupted installations or IDE wrapper conflicts make up most of the remainder.
Leaving these errors unresolved carries real consequences beyond the inconvenience of an application that won’t start. Operationally, failed JVM launches can stall batch processes, interrupt dependent services, and in development environments, block CI/CD pipelines entirely.
From a security standpoint, the underlying misconfiguration often signals something worth paying attention to, such as outdated Java versions, improper environment setups, or weak memory configurations that may expose known vulnerabilities.
What to do first
You might want to start trying fixes immediately, but that’s the wrong way to do it. Without a clear picture of your environment, you might introduce new conflicts without actually resolving the original problem.
Here’s what to check first:
1. Confirm your Java version and architecture
Follow these steps:
1. Open Command Prompt as an admin (or equivalent command-line tool on macOS or Linux)
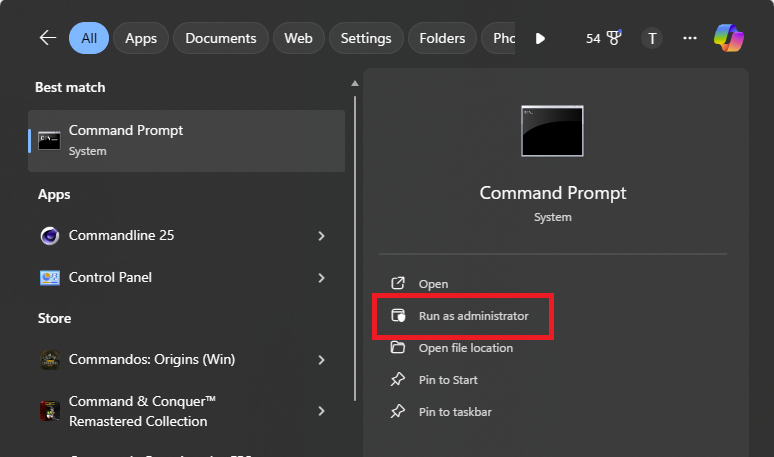
2. Run java -version

3. Check the installed version, the vendor, and whether you’re running 32-bit or 64-bit JVM
Note both, because a mismatch between JVM architecture and your operating system is one of the most common causes that’s invisible until you check explicitly.
2. Identify your launch method
How an application is launched determines what diagnostic information you have access to. Before applying any fix, confirm which of the following applies to your situation:
- Command line: Exposes full stack traces and JVM options.
- Double-clicked JAR: Typically produces a brief popup or disappearing console window that hides most diagnostic detail.
- IDE (Eclipse, IntelliJ): Surfaces detailed console logs, environment details, and plugin-specific exceptions.
- Third-party launcher or wrapper: Often abstracts the JVM entirely, producing generic error messages with no useful detail underneath.
If you’re not launching from the command line already, replicate the failure there first so you’re working with complete output.
3. Inspect your active JVM options
Run the following to surface your full set of active JVM settings, including memory allocations, system properties, and configuration flags:
1. Run java -XshowSettings:all -version
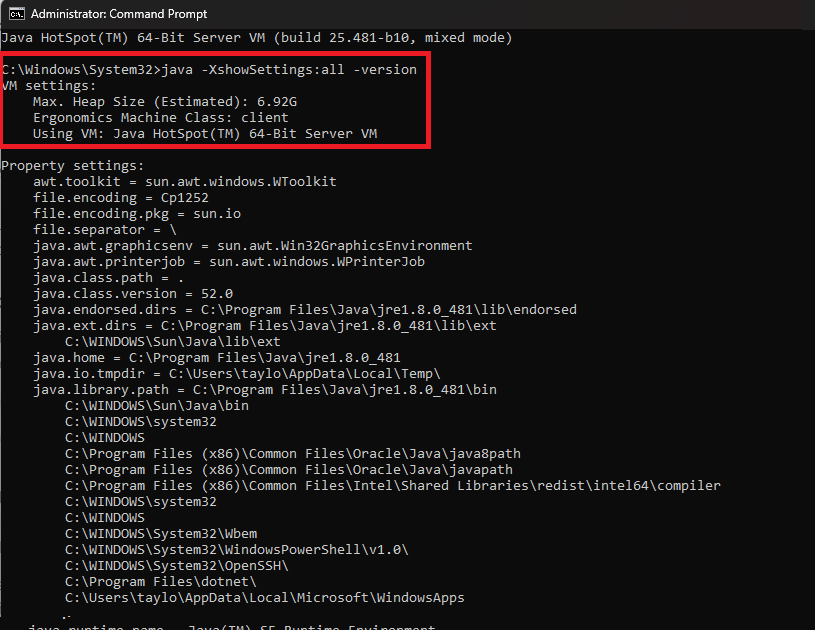
2. Review the output for memory flags, particularly -Xmx (maximum heap) and -Xms (initial heap)
3. Check whether allocated values exceed your available system RAM
Memory flags set too high for available RAM are a leading cause of initialization failures and won’t always be obvious from the error message alone.
4. Check your environment variables
Conflicting or incorrectly set environment variables are a frequent hidden cause of JVM launcher errors. Check the following:
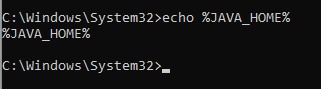
1. From an elevated command-line utility, run echo %JAVA_HOME% to verify it points to the correct JDK directory. If the output just returns %JAVA_HOME%, the variable isn’t set at all; skip to the fix methods section to address this
2. Run echo %PATH% and confirm the intended Java executable appears first in the list

3. Run set | findstr JAVA to surface any active Java-related variables, including _JAVA_OPTIONS and JAVA_TOOL_OPTIONS
4. To temporarily clear an override, run set _JAVA_OPTIONS= and set JAVA_TOOL_OPTIONS=, then retest
If clearing _JAVA_OPTIONS or JAVA_TOOL_OPTIONS resolves the error, those variables were injecting conflicting parameters. Correct them permanently via your system environment settings on Windows, or your shell profile (.bashrc,.zshrc) on Linux/macOS.
Step-by-step guide to fixing the JVM launcher errors
With your pre-flight checks complete, you have enough information to target the right fix. Work through the methods below in order since they’re arranged from most to least common cause.
1. Fix Java-level configuration issues
Misconfigured JVM options and environment variables are the most frequent cause of launcher errors. Here’s how to correct them:
Fixing memory flags:
1. Open Command Prompt (Windows) or Terminal (Linux/macOS) as an admin
2. Run java -XshowSettings:all -version and locate the heap settings in the output
3. If you’re launching Java manually, add or adjust memory flags directly in your launch command, for example: java -Xmx512m -Xms256m -jar yourapp.jar
Remember to replace “yourapp.jar” with the actual file path to the Java file you’re trying to open

4. Ensure -Xmx does not exceed your available system RAM. A safe starting point is 75% of available memory
5. Ensure -Xms is not set higher than -Xmx
6. Retest
Fixing this in Eclipse is a little different:
1. Navigate to your Eclipse installation folder and open eclipse.ini in a text editor
2. Locate the -Xmx and -Xms lines under -vmargs
3. Adjust the values to fit within your available RAM (e.g., -Xmx1024m)
4. Save the file and relaunch Eclipse
Fixing environment variables on Windows:
1. Press the Windows key, type “environment variables,” and select “Edit the system environment variables”
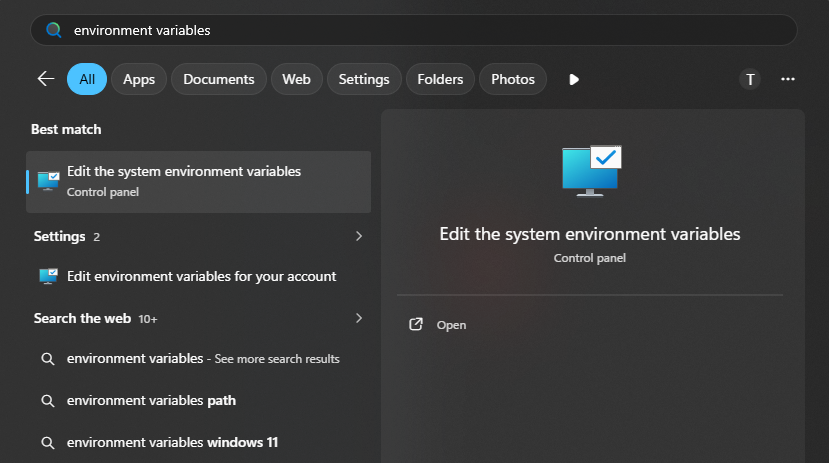
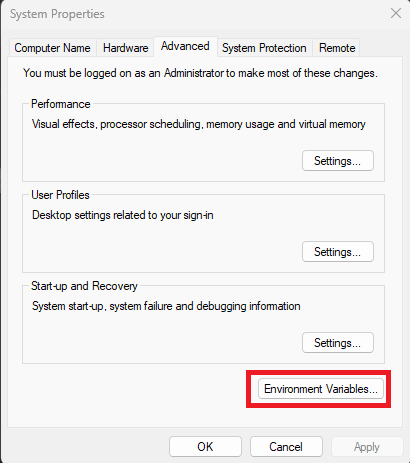
2. In the System Properties window that opens, click “Environment Variables”
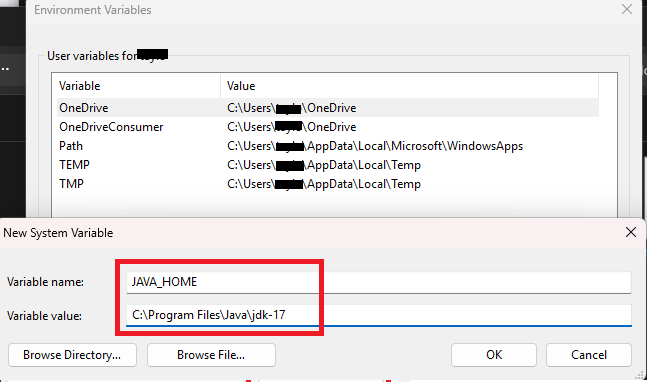
3. Under System Variables, scroll down and look for JAVA_HOME
4. If it exists, select it and click Edit. If it doesn’t exist, click New
5. Set the variable value to your JDK installation path, for example: C:\Program Files\Java\jdk-17
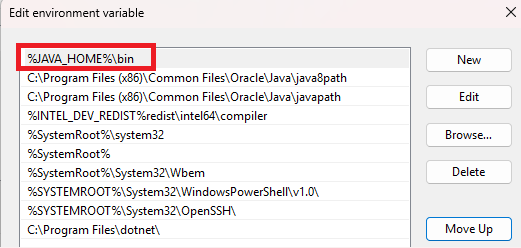
6. Next, find the PATH variable under System Variables and click Edit
7. Check whether %JAVA_HOME%\bin appears in the list. If it does, move it to the top. If it doesn’t, click New and add it
8. Click OK on all windows, restart Command Prompt, and run java -version to confirm the correct version is active
» Learn more: Viewing and managing environment variables in Windows
Fixing environment variables on Linux/macOS:
1. Open your shell profile file (.bashrc,.zshrc, or/etc/environment)
2. Set JAVA_HOME to the correct JDK path, for example: export JAVA_HOME=/usr/lib/jvm/java-17
3. Add export PATH=$JAVA_HOME/bin:$PATH to ensure the correct Java executable is used
4. Run source ~/.bashrc (or equivalent) to apply changes without restarting
5. Retest using java -version to confirm the correct version is active
2. Resolve version and architecture mismatches
If your initial diagnostic checks revealed a version or architecture mismatch, here’s how to address it:
On Windows:
1. Open Command Prompt as an admin and run where java to list every Java executable accessible on your system
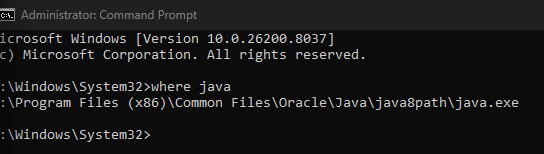
2. For each path returned, run java -version using the full path, for example: "C:\Program Files\Java\jdk-17\bin\java" -version
3. Note the version and bitness (32-bit vs 64-bit) of each
4. Follow the environment variable steps in the previous section to point JAVA_HOME and PATH to the correct installation
5. Retest by running java -version and then relaunching the application
On Linux/macOS:
1. Open Terminal and run which java to see which Java executable is currently active
2. Run java -version to confirm the version and bitness
3. On Linux, run update-alternatives --list java to see all installed versions
4. Run sudo update-alternatives --config java, which will display a numbered list of installed versions — enter the number corresponding to the correct version and press Enter
5. On macOS, run /usr/libexec/java_home -V to list all installed JDKs with their versions and paths
6. Update JAVA_HOME in your shell profile to point to the correct version as described in the previous section
7. For applications requiring a specific release, install SDKMAN! by running curl -s "https://get.sdkman.io" | bash in Terminal, then use sdk install java 17 (or your required version) and sdk use java 17 to switch
8. Retest
3. Address system-level issues
If configuration fixes haven’t resolved the error, the problem may be at the OS level.
Fixing permission issues on Windows:
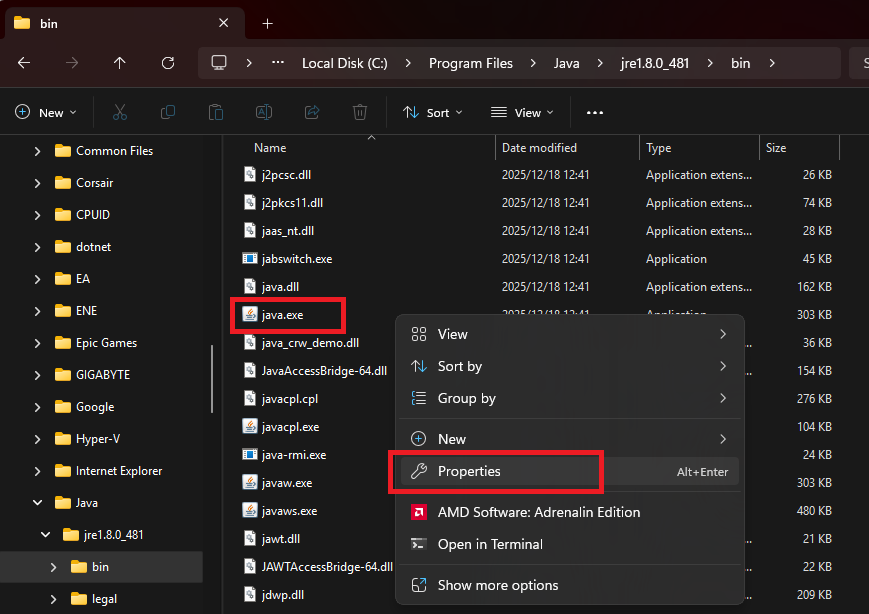
1. Open File Explorer and navigate to your Java installation directory, typically C:\Program Files\Java\jdk-17\bin
2. Right-click java.exe and select Properties
3. Go to the Security tab and check whether your user account has Read and Execute permissions

4. If not, click Edit, select your user account, check “Read & execute,” and click Apply
5. Alternatively, open Command Prompt as an administrator and run: icacls "C:\Program Files\Java\jdk-17\bin\java.exe" /grant Users:RX
6. Retest
Fixing permission issues on Linux/macOS:
1. Open Terminal and run ls -l /path/to/java to check current permissions on the Java executable
2. If the executable bit is missing (no x in the permissions), run chmod +x /path/to/java
3. Run ls -la to verify ownership. If the file is owned by a different user, run sudo chown $USER /path/to/java
4. Retest
Antivirus or EDR interference:
1. Open your antivirus or EDR console and check the event or activity log for any blocked processes around the time the JVM error occurred
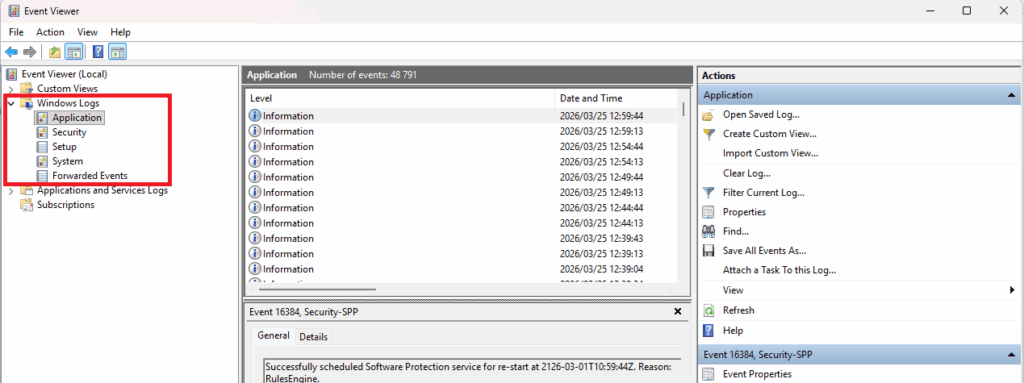
2. On Windows, also check Event Viewer: press Windows key + R, type eventvwr , and look under Windows Logs > Application for Java-related errors
3. Temporarily disable your antivirus or EDR tool and attempt to launch the application again
4. If the error resolves, re-enable the tool and add your Java runtime directory (e.g., C:\Program Files\Java\jdk-17) and application directory as permanent exclusions
5. Retest with the security tool re-enabled to confirm the fix holds
Fixing broken file associations on Windows:
1. Open Command Prompt and run java -jar yourapp.jar directly rather than double-clicking the JAR file
2. If this works, the problem is a broken .jar file association rather than a JVM issue
3. To fix the association, open Settings > Apps > Default Apps

4. Scroll down and click “Choose default apps by file type”
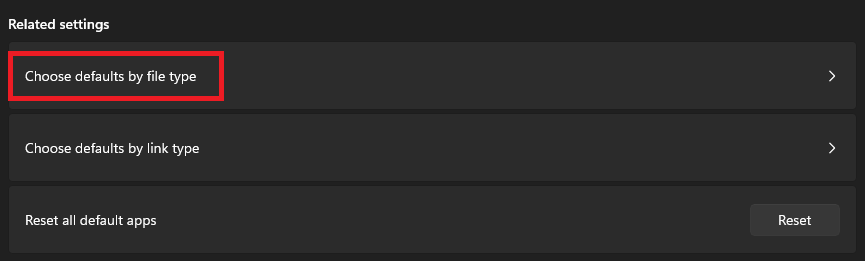
5. Find .jar in the list and reassign it to your Java runtime (e.g., javaw.exe in your JDK bin directory)
6. Retest by double-clicking the JAR
» Struggling? Learn more about changing file associations
4. Fix Eclipse-specific JVM launcher errors
Eclipse manages its own JVM configuration independently of your system Java settings, which means system-level fixes won’t always resolve Eclipse launcher errors on their own.
Here are some things you can try:
Fixing the eclipse.ini file:
1. Navigate to your Eclipse installation folder. On Windows this is typically C:\eclipse or C:\Users\YourName\eclipse. On Linux/macOS it’s typically ~/eclipse
2. Open eclipse.ini in a text editor (right-click > Open With > Notepad on Windows, or nano ~/eclipse/eclipse.ini in Terminal)
3. Look for a -vm line near the top of the file. It must appear before -vmargs because if it’s in the wrong position or missing entirely, Eclipse won’t find the JVM
4. Set -vm to the explicit path of your Java binary. It must be entered on two separate lines:
On windows:-vm
C:\Program Files\Java\jdk-17\bin\javaw.exe
On Linux/macOS:
-vm
/usr/lib/jvm/java-17/bin/java
5. Scroll down to the -vmargs section and review your -Xmx and -Xms values. Adjust them to fit within your available RAM
6. Save the file and relaunch Eclipse
Fixing workspace-level Java settings:
1. Launch Eclipse (if it opens)
2. Go to Window > Preferences > Java > Installed JREs
3. Check whether the correct JDK is listed. If it’s missing, click Add
4. Select Standard VM and click Next
5. Click Directory and navigate to your JDK installation folder (e.g., C:\Program Files\Java\jdk-17)
6. Click Finish, check the box next to the newly added JDK to set it as the default, then click Apply and Close
7. Retest
If Eclipse still won’t launch:
1. Open Command Prompt or Terminal, navigate to your Eclipse installation folder, and run eclipse -clean. This clears cached plugin data that can cause launch conflicts
2. If that doesn’t work, launch Eclipse and immediately switch to a new workspace when prompted: go to File > Switch Workspace > Other, enter a new folder path, and click Launch
If Eclipse launches successfully with a new workspace, the issue was specific to your previous workspace configuration
Keeping JVM launcher errors from coming back
JVM launcher errors look deceptively simple on the surface; one error message, one broken application. But now you know that the same message can stem from half a dozen different root causes, which is why there are so many possible ways to fix it.
Most recurring JVM issues in team environments come down to inconsistent configurations across machines. Standardizing your Java version across all devices, centralizing JAVA_HOME and PATH management, and documenting your JVM options prevents the same errors from resurfacing every time someone gets a new machine or an application updates.
For IT teams and MSPs managing these IT issues across a large number of endpoints, the manual approach doesn’t scale. Atera’s RMM platform lets you deploy and run diagnostic scripts remotely across your entire device fleet, so you can identify Java environment inconsistencies, push configuration fixes, and verify resolutions without touching each machine individually.
Related Articles

How to decide if you need a dedicated DEX platform, or already have one
"IT feels slow" is the complaint that often sells DEX platforms. Sometimes it signals a real blind spot, but just as often already catches and fixes the problem, and a new scoring layer would only add another console. Telling the two apart takes evidence, and the real gap usually isn't visibility at all.
Read now
How to set up secure printing across your organization
A secure print checkbox protects exactly one moment in a document's life. Everything else, from unencrypted traffic and unhardened devices to payroll printouts forgotten in a tray, stays exposed. Real secure printing covers the whole lifecycle: release policy, authentication, encryption, hardening, and a fleet that stays monitored long after rollout.
Read now
How to reduce alert fatigue in healthcare IT
In a hospital, a dismissed alert isn't a delayed ticket. It can be a patient deteriorating while the monitor keeps sounding. Cutting alert volume won't fix that on its own, and switching alerts off can make it worse.
Read now
How to prevent configuration drift across your IT infrastructure
Configuration drift rarely breaks anything the day it happens. It hides in a hotfix, a reset default, or a vendor installer, then surfaces weeks later as a failure nobody can trace. Stopping it means defining exactly what approved looks like, closing every side door into production, giving each setting one owning tool, and checking that the baseline itself hasn't gone stale.
Read nowEndless IT possibilities
Boost your productivity with Atera’s intuitive, centralized all-in-one platform









