
Table of contents
Generate summary with AI

Windows 10 reached end of life in October 2025, but even with a hard deadline looming, only about half of users have upgraded from Windows 10. People pushed back, IT teams braced for the help desk fallout, and a significant chunk of that resistance came from the fact that “the interface felt wrong”.
That’s a real support burden. Users who can’t find the Start button, can’t right-click the way they used to, or keep accidentally triggering Widgets are filing tickets. The good news is that most of Windows 11’s friction points are fixable, either through Settings, Group Policy, or registry edits, without touching third-party tools. This guide covers exactly what changed, what you can do about it, and how to push those changes across your fleet.
What changed, what you can fix, and what to do first
The most common friction points for users migrating from Windows 10 are the Taskbar, Start menu, File Explorer, right-click context menu, and Widgets. Some of these can be addressed natively, others require registry edits, and a few can’t be fully restored without third-party tools:
- The taskbar’s center alignment can be moved back to the left, but tile groups and tile resizing are gone.
- Icon grouping behavior can be controlled via Group Policy or registry .
- Widgets can be disabled entirely.
- The right-click context menu can be restored to its full Windows 10 form through a registry tweak, though future updates may eventually remove support for that fallback.
- Search behavior can be brought closer to Windows 10 by disabling cloud content search and switching to Classic Search mode.
- File Explorer lost its ribbon interface in Windows 11, and that can only be restored with third-party tools.
- Visual style can be brought reasonably close to Windows 10 by selecting the Windows Light or Dark theme, setting the accent color manually, disabling transparency effects, and trimming the visual effects list down to the five that Windows 10 used by default.
This is where IT teams get caught out. Cumulative updates (security patches and bug fixes) carry low UI risk, though registry tweaks that depend on updated components can occasionally be overwritten.
Feature updates are the real threat. Every feature update ships with a new set of default settings and layouts, so Group Policy configurations that aren’t stored in the updated ADMX set for that version can be overwritten and legacy features can be removed entirely. Pinned apps, taskbar grouping, and layouts are cleared unless deployed through provisioning packages, MDM, or Group Policy XML.
In practice, that means any UI standardization you push across your fleet needs to be re-validated after every feature update.
» Control this better by disabling Windows updates or manually re-enabling Windows updates
Before you deploy anything
If you’re rolling these changes on a single machine or across multiple endpoints, you should still treat it like any other configuration change. Lock down your rollback options before you touch anything by following these steps:
1. Create a rollback plan: Document step-by-step recovery or revert procedures before making any changes. This doesn’t need to be elaborate, but it does need to exist before you start, not after something breaks.
2. Test in a staged pilot group first: Pick a representative subset of machines and users before deploying organization-wide. This surfaces conflicts, unexpected behavior, and compatibility issues without putting your whole fleet at risk.
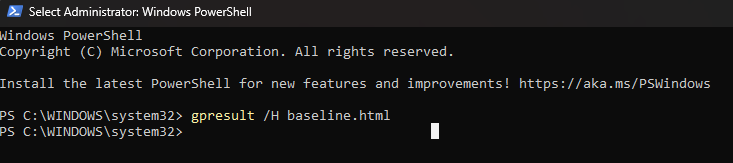
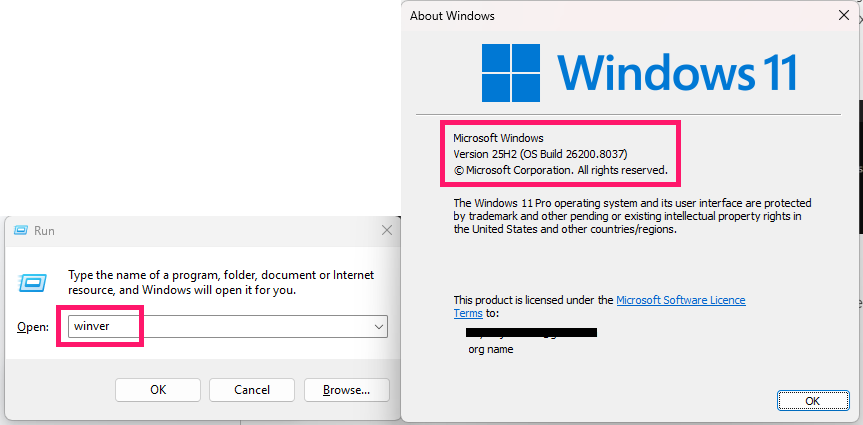
3. Capture a baseline configuration: Open PowerShell as administrator and run gpresult /H baseline.html to generate an HTML report of the current effective policy state. Run winver from the Run dialog (Win + R) to record the exact Windows build. Take screenshots of the current UI layout alongside these. You’ll want this comparison point after the next feature update cycle.
4. Create a System Restore point or VM snapshot: Search “create a restore point” in the Search box, then “Create” to set a restore point before making any changes. On a VM, take a snapshot at the same stage. Either gives you a full-state recovery option if something goes wrong during the changes themselves.
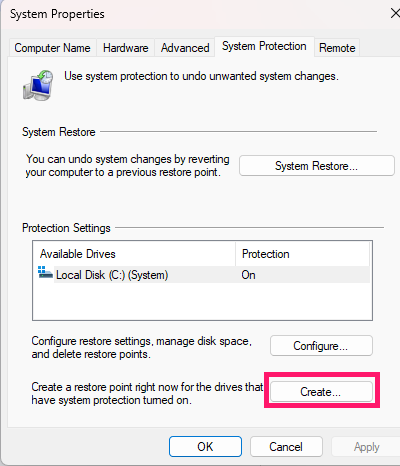
» If restore point fails and you mess up your configuration, you can always reinstall Windows 11
Step-by-step guide to making Windows 11 look like 10
Making Windows 11 look like 10 means fixing each UI element individually. For each one, the Settings method is the quickest fix for individual machines, but Group Policy and Registry options are included where available for managed deployments.
Here’s how to do that:
Taskbar
The taskbar is the most common friction point. Here’s how to move it back to where users expect it and strip out the clutter.
Method 1: Settings
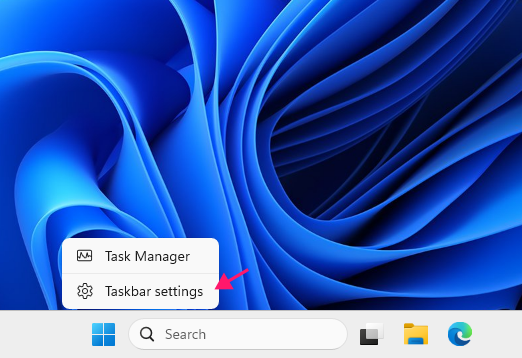
1. Right-click the taskbar and select Taskbar settings
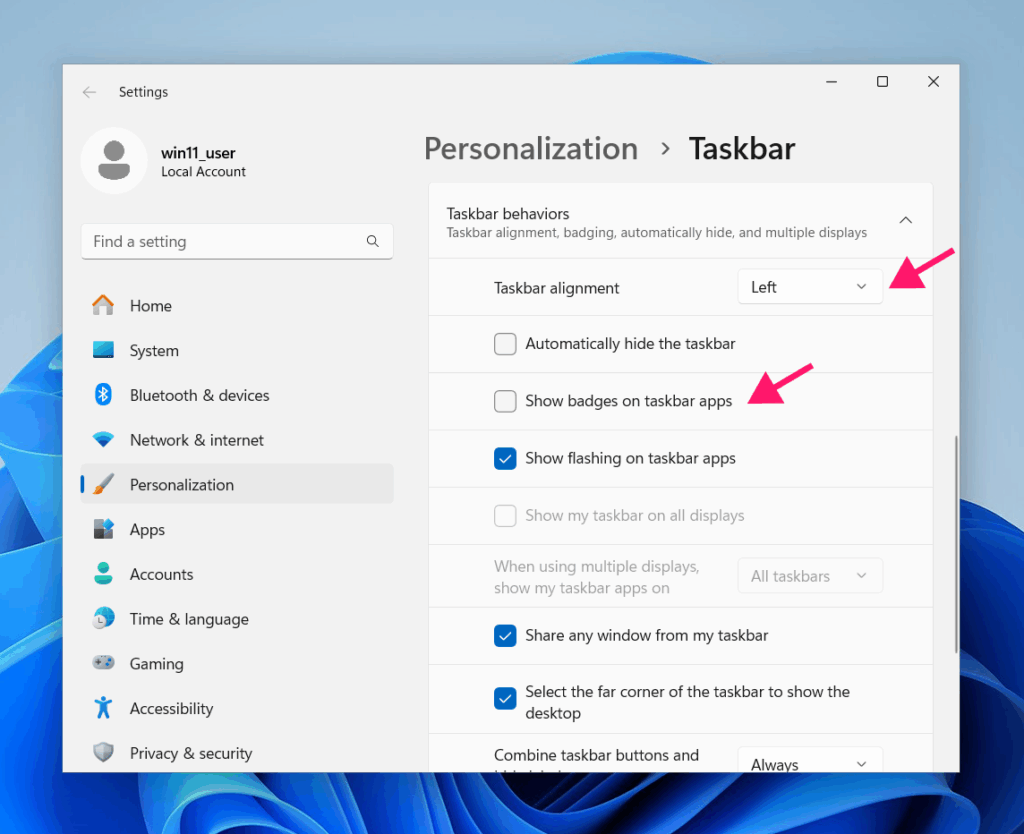
2. Scroll down to Taskbar behaviors and set Taskbar alignment to Left, then uncheck “Show badges on taskbar apps” to remove notification badges
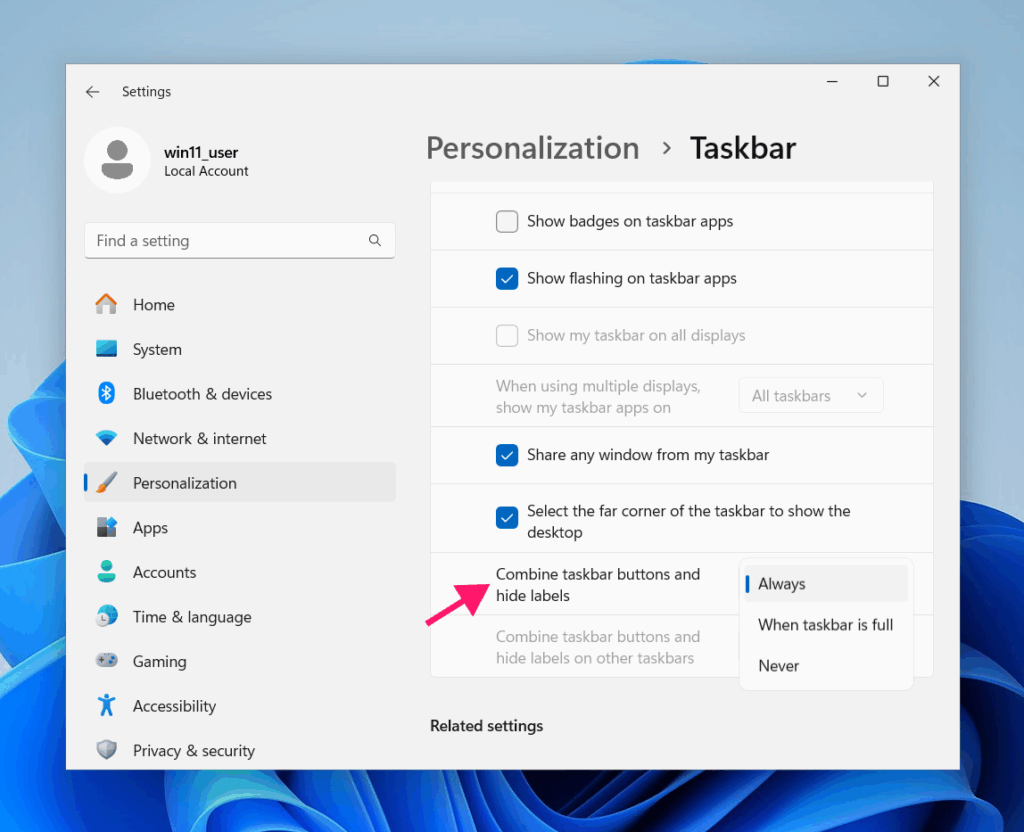
3. Set Combine taskbar buttons and hide labels to your preferred grouping behavior. The Never option most closely matches Windows 10’s default uncombined appearance
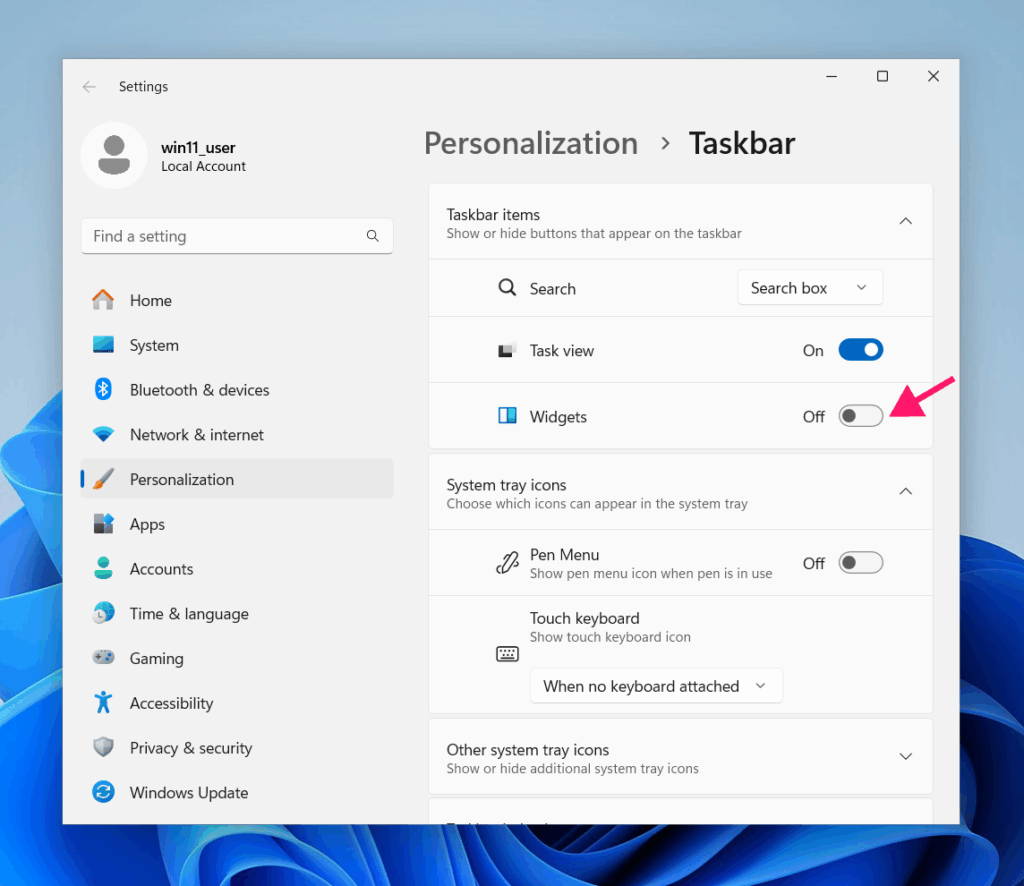
4. Scroll up to the Taskbar items section and toggle Widgets to Off
5. If the Chat toggle is visible, set it to Off
Take note: The Chat toggle was removed in Windows 11 version 23H2 and later. If you don’t see it, it’s already gone from your build.
» Don’t miss our dedicated guide to enabling or disabling Widgets
Method 2: Group Policy
Taskbar alignment can’t be controlled via Group Policy. Use Settings or the Registry method for this.
Otherwise, follow these steps:
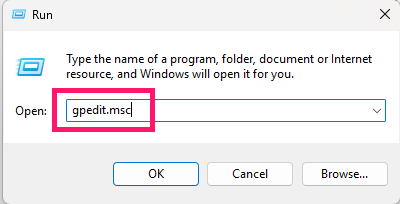
1. Open the Local Group Policy Editor by pressing Win + R, typing gpedit.msc, and pressing Enter
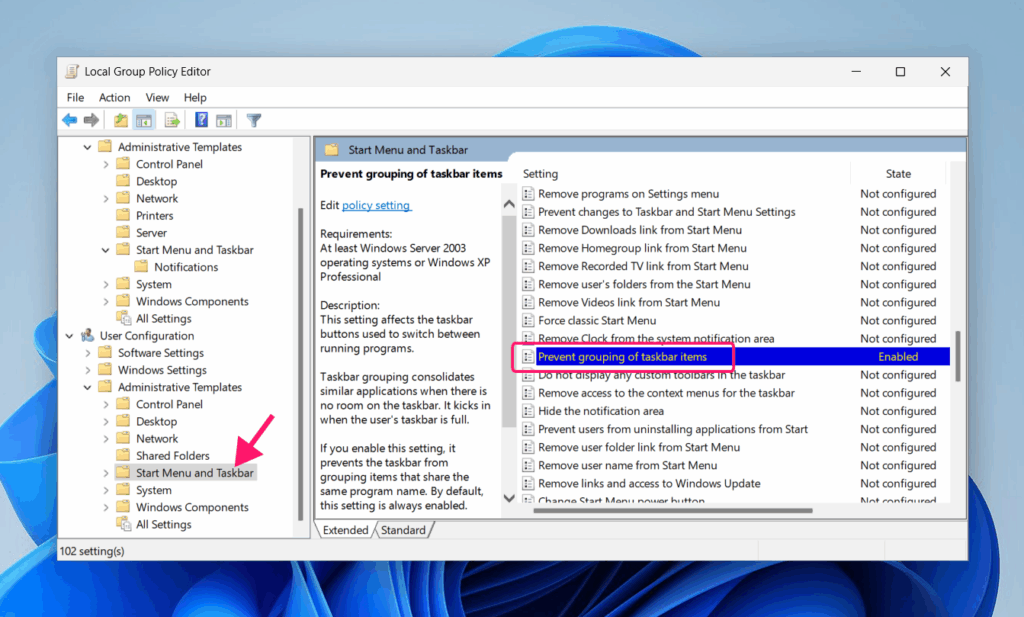
2. To disable icon grouping, navigate to User Configuration > Administrative Templates > Start Menu and Taskbar and enable Prevent grouping of taskbar items. This corresponds to Windows 10’s Combine taskbar buttons > Never behavior
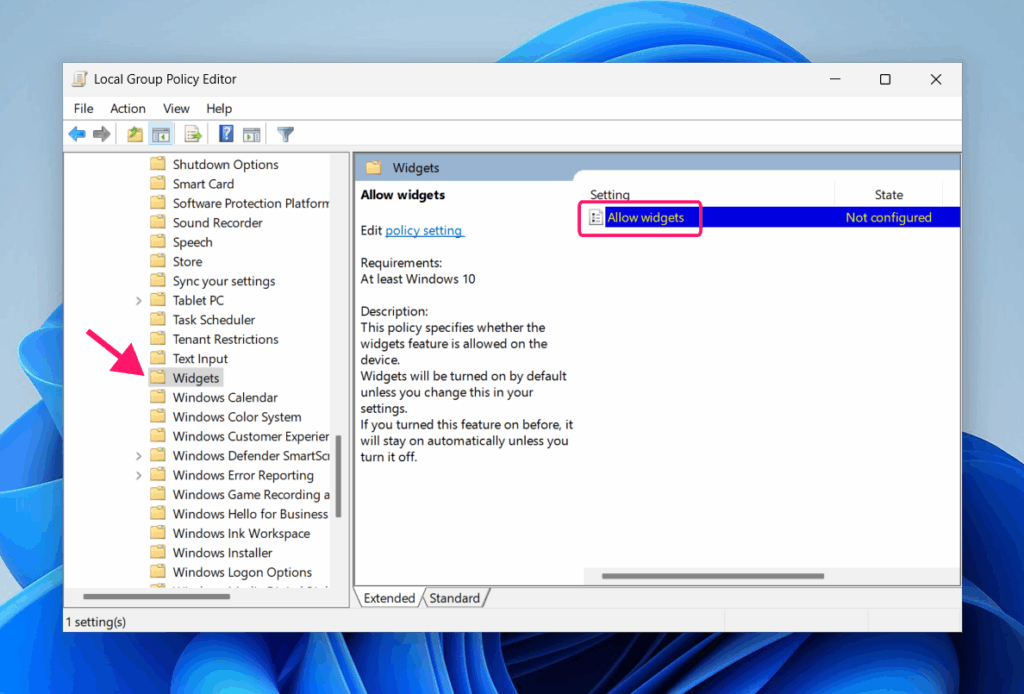
3. To disable Widgets system-wide, navigate to Computer Configuration > Administrative Templates > Windows Components > Widgets and disable Allow Widgets
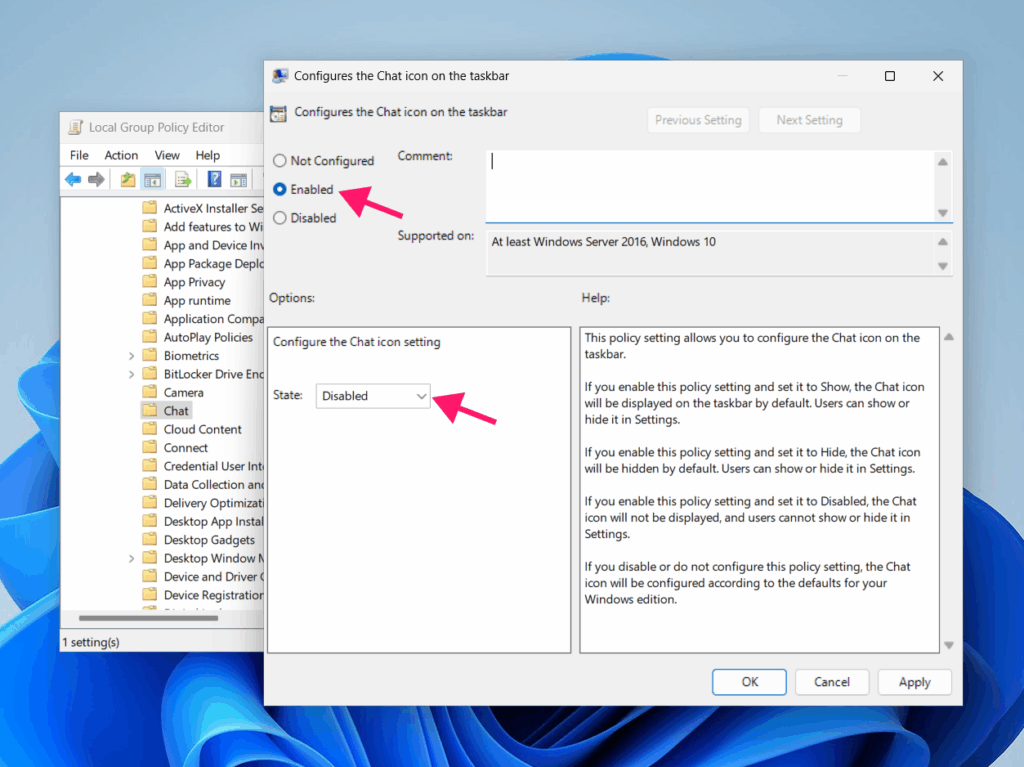
4. To disable Chat (if present in your build), navigate to Computer Configuration > Administrative Templates > Windows Components > Chat: Configures the Chat icon on the taskbar, enable the policy, and set the state to Disabled
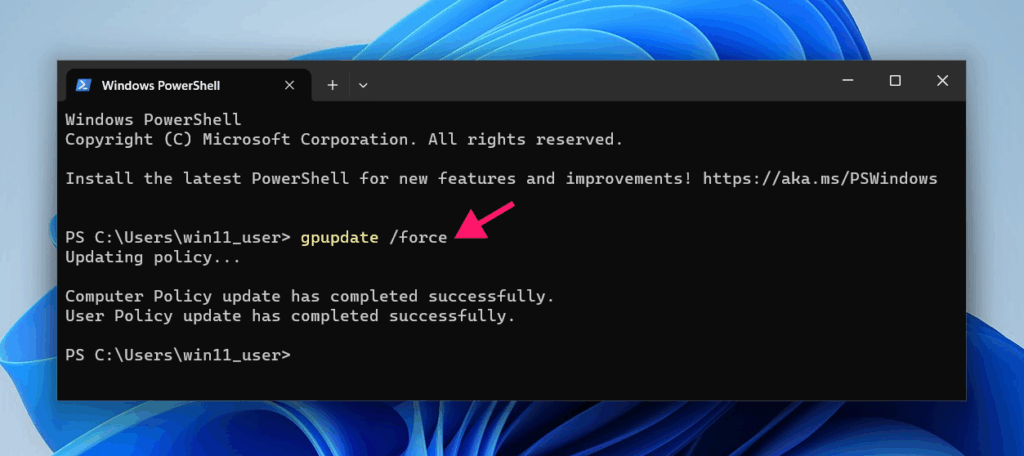
5. Run gpupdate /force in Command Prompt to apply changes immediately without waiting for the next refresh cycle
» Learn more about easy group policy management with Atera
Method 3: Registry
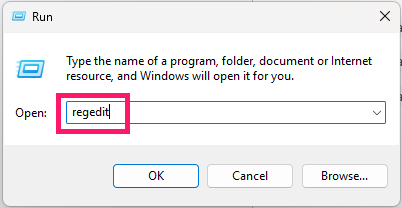
1. Open Registry Editor by pressing Win + R, typing regedit, and pressing Enter
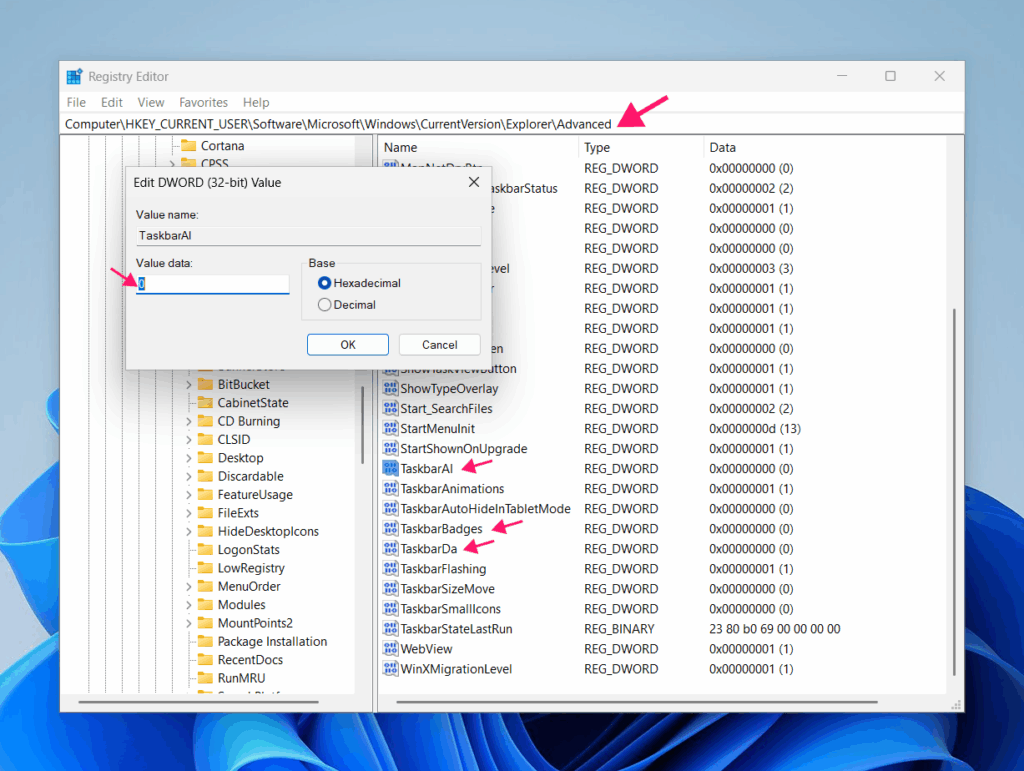
2. Navigate to: HKEY_CURRENT_USER\Software\Microsoft\Windows\CurrentVersion\Explorer\Advanced
Set the following values:
- TaskbarAl to
0for left alignment,1for center TaskbarBadgesto0to disable badges,1to enableTaskbarDato0to hide Widgets,1to show
» Here are our top registry editor challenges and solutions
Start menu
Windows 11’s Start menu doesn’t support tile groups or tile resizing. What you can do is maximize the pinned app space, hide the Recommended section, and lock down the layout for managed deployments.
Method 1: Settings
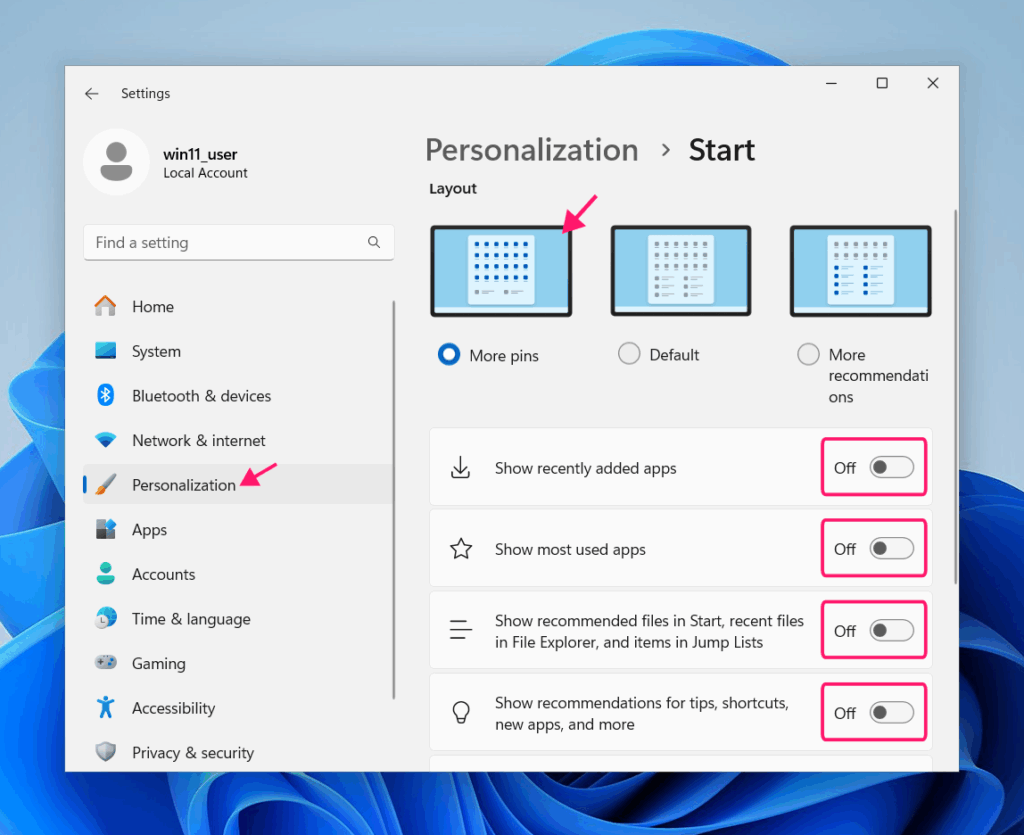
1. Open Settings > Personalization and scroll down to Start
2. Select the More pins layout to maximize pinned app space and reduce the Recommended section’s footprint
3. Turn off the following toggles:
- Show recently added apps
- Show most used apps
- Show recommended files in Start, recent files in File Explorer, and items in Jump Lists
- Show recommendations for tips, shortcuts, new apps, and more
4. To pin an app, click All apps
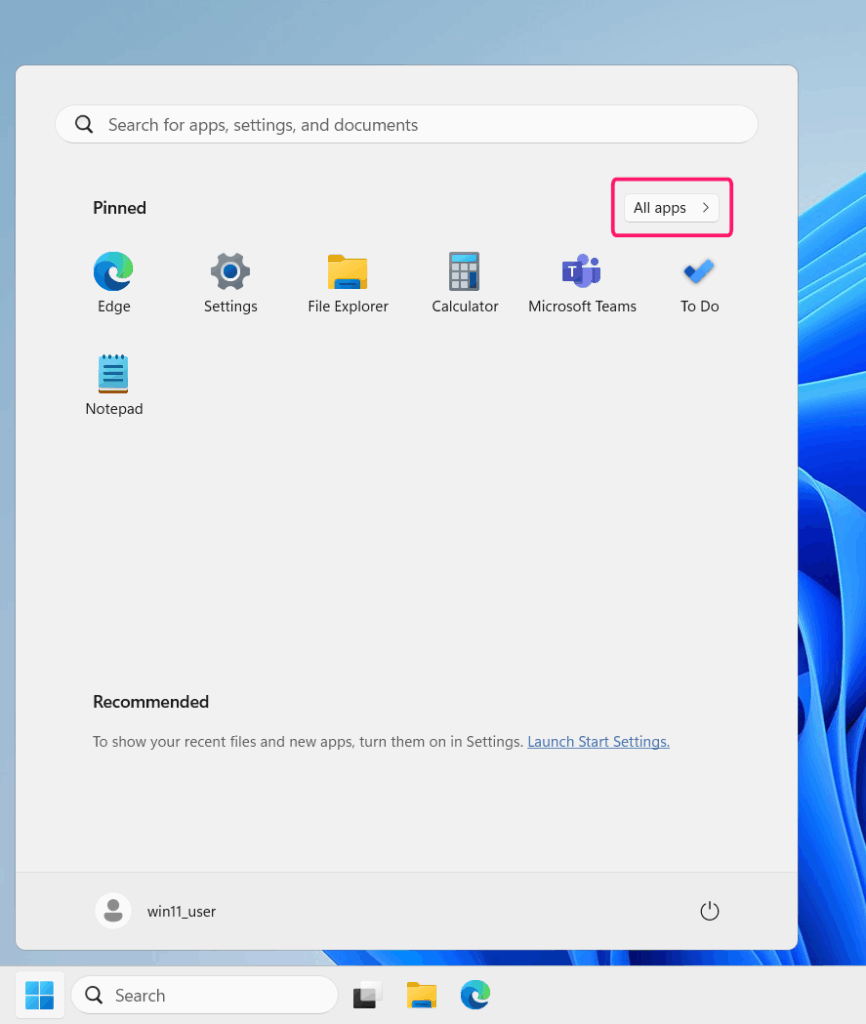
5. Find the app, right-click its icon, and select Pin to Start
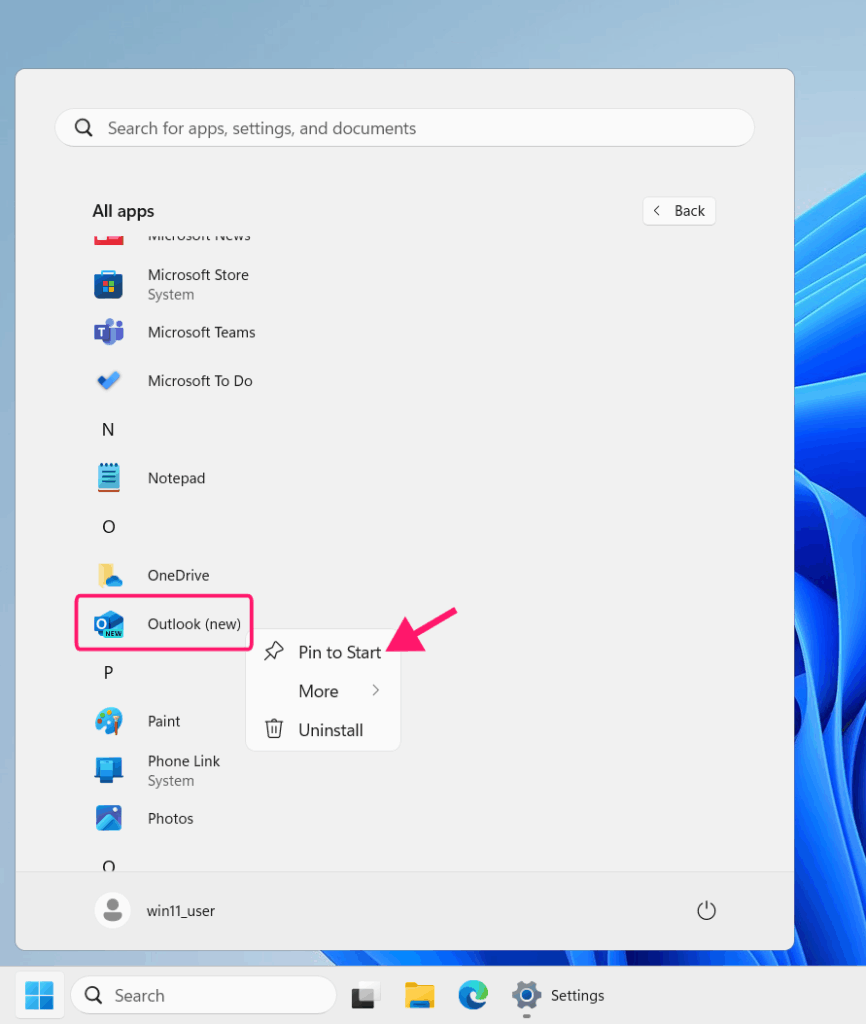
6. Rearrange pinned apps by dragging them into position.
Take note: The Recommended section cannot be completely removed through Settings. It can be hidden via Group Policy on some builds, but this may have no effect depending on your Windows version.
Method 2: Group Policy
Open the Local Group Policy Editor (Win + R > gpedit.msc).
1. To deploy a standardized pinned apps layout, first configure a device’s Start menu manually, then open PowerShell as administrator and run: Export-StartLayout -Path "C:\Layouts\StartLayout.xml"
2. Copy the generated file to a location accessible at login time
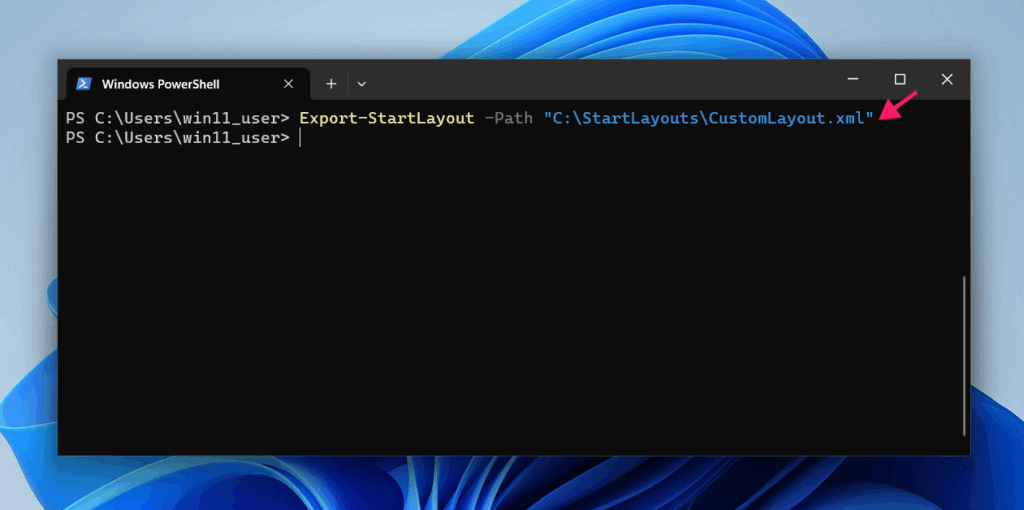
3. Navigate to Computer Configuration > Administrative Templates > Start Menu and Taskbar > Start Layout, enable the policy, and provide the path to the XML file
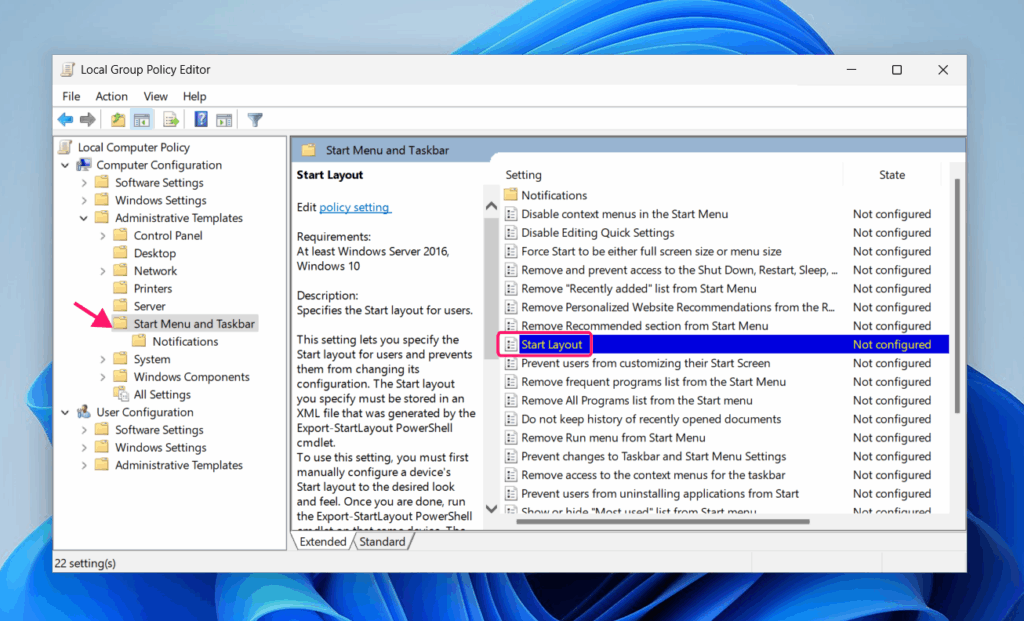
4. Enable Reapply layout at every logon to prevent users from changing it
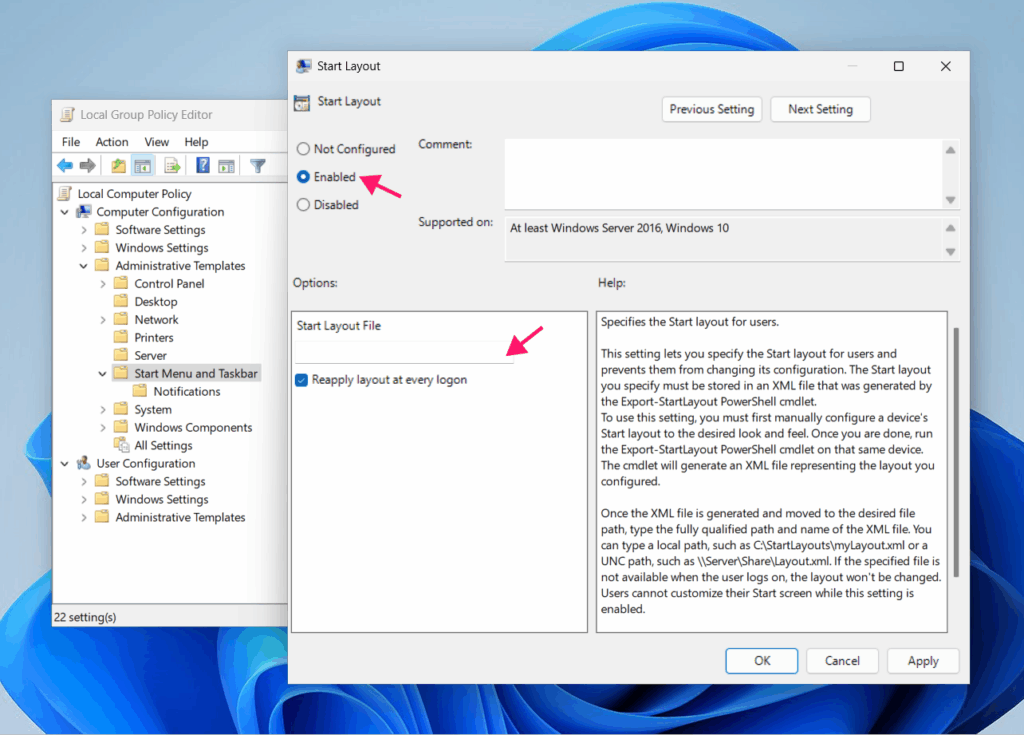
5. To hide the Recommended section, navigate to Computer Configuration > Administrative Templates > Start Menu and Taskbar and enable Remove Recommended section from Start Menu
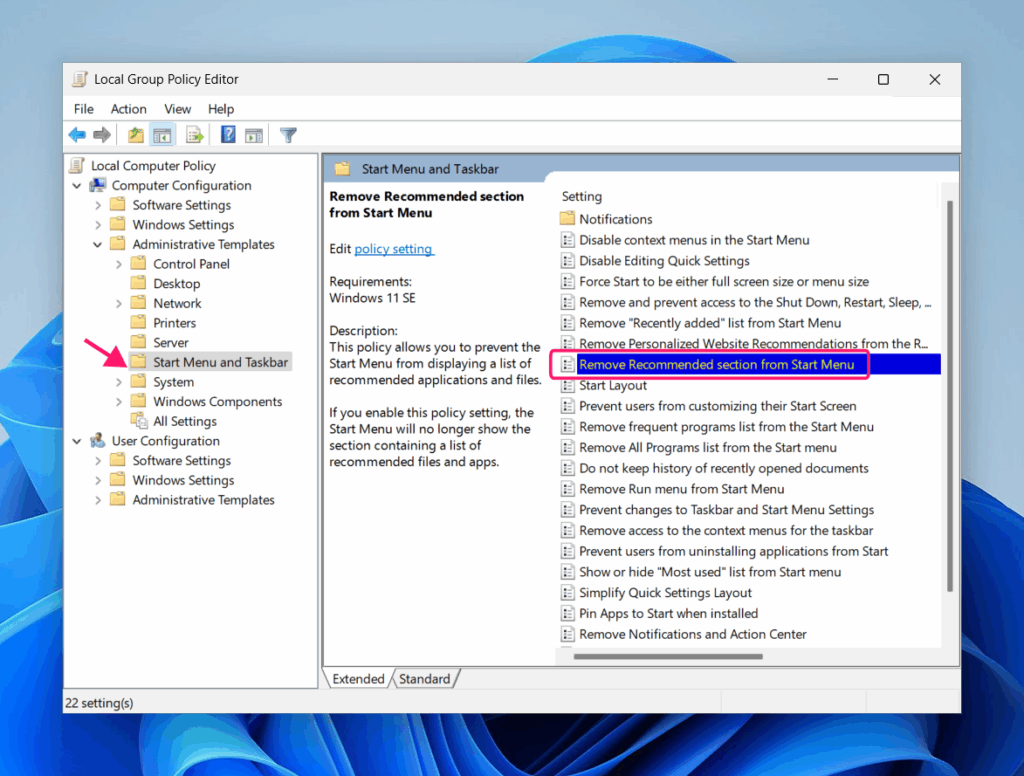
Take note: The Remove Recommended section policy may have no effect depending on the Windows build.
Start menu search behavior
1. Open Settings > Privacy & Security > Search permissions
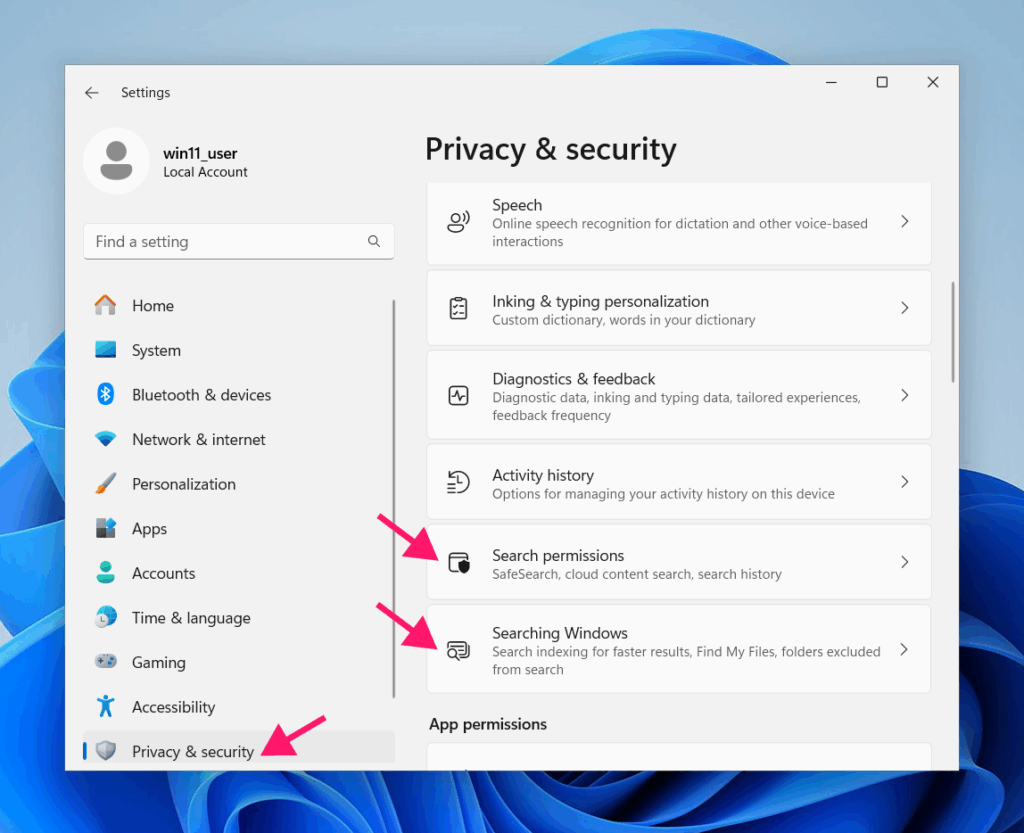
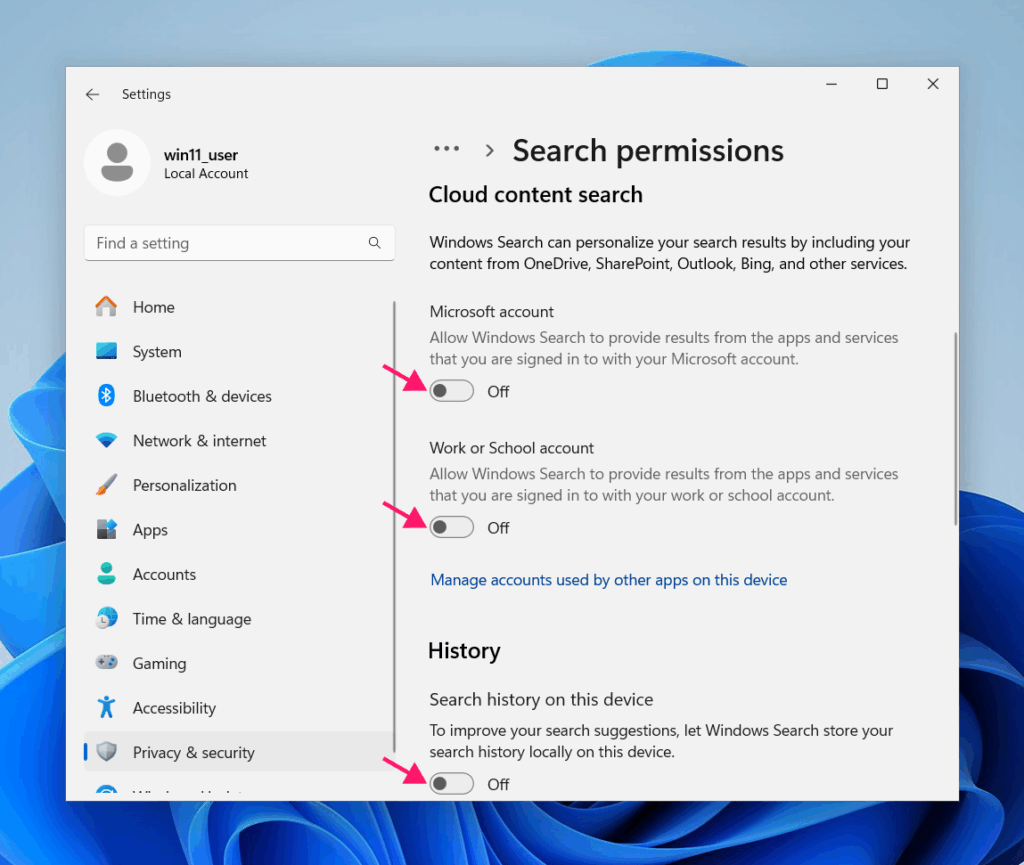
2. Under Cloud content search, disable both Microsoft account and Work or School account
3. Disable Search history on this device under the History section
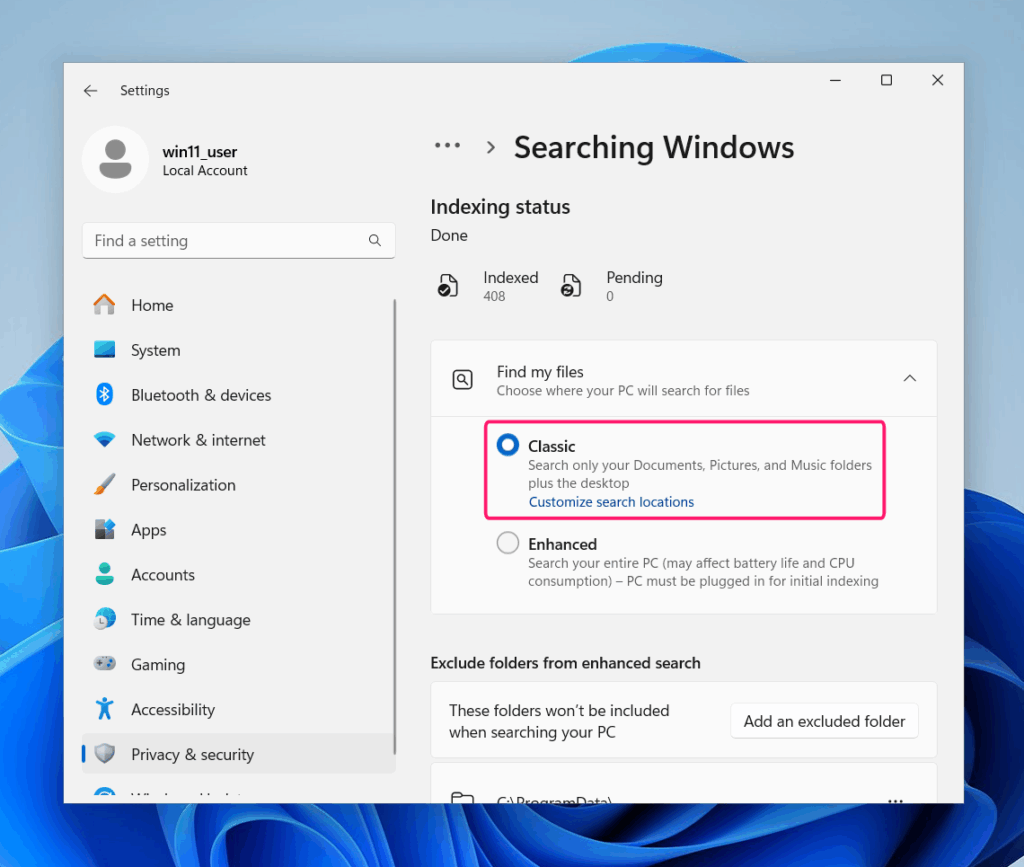
4. Go back and open Settings > Privacy & Security > Searching Windows
5. Select Classic under Find my files. This limits search indexing to Documents, Pictures, and Music folders plus the desktop, making search behavior closer to Windows 10
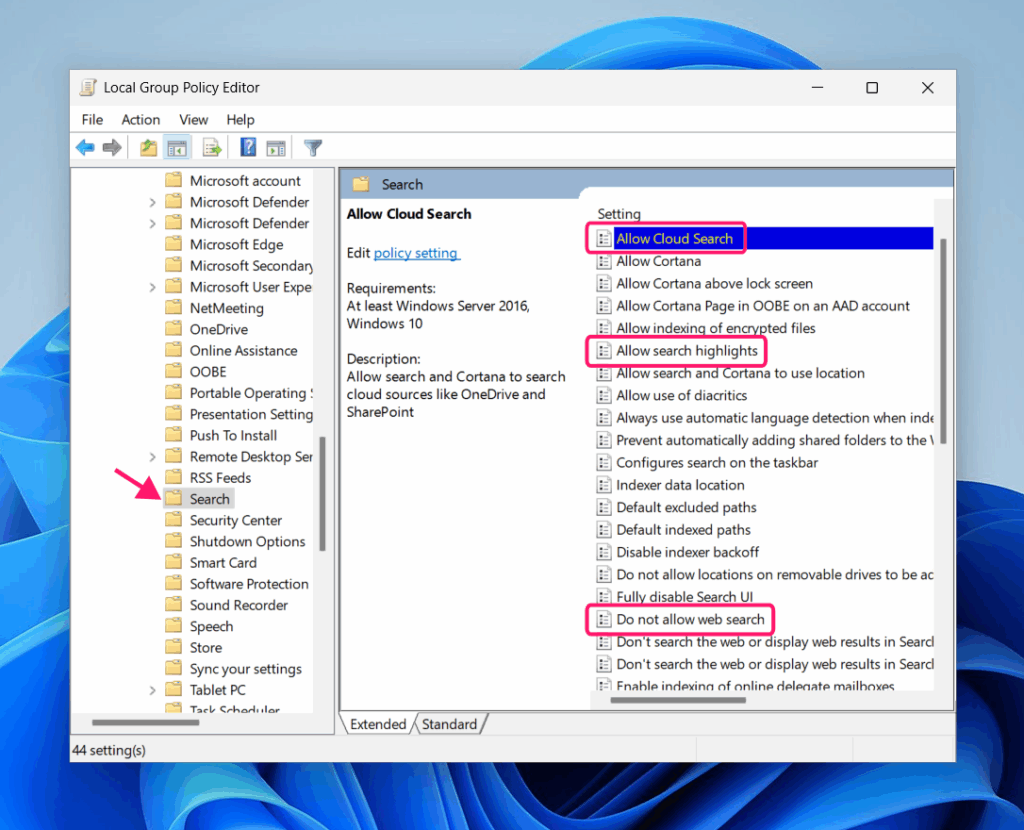
6. To control search behavior via Group Policy, navigate to Configuration > Administrative Templates > Windows Components > Search and configure the following:
- Allow Cloud Search: set to Disabled
- Allow search highlights: set to Disabled
- Do not allow web search: set to Enabled
Right-click context menu
Windows 11 simplified the context menu and added an extra click (Show more options) to reach the full list. This registry tweak restores the full Windows 10 context menu as the default.
Method 1: Registry (command line)
1. Open PowerShell or Command Prompt as administrator

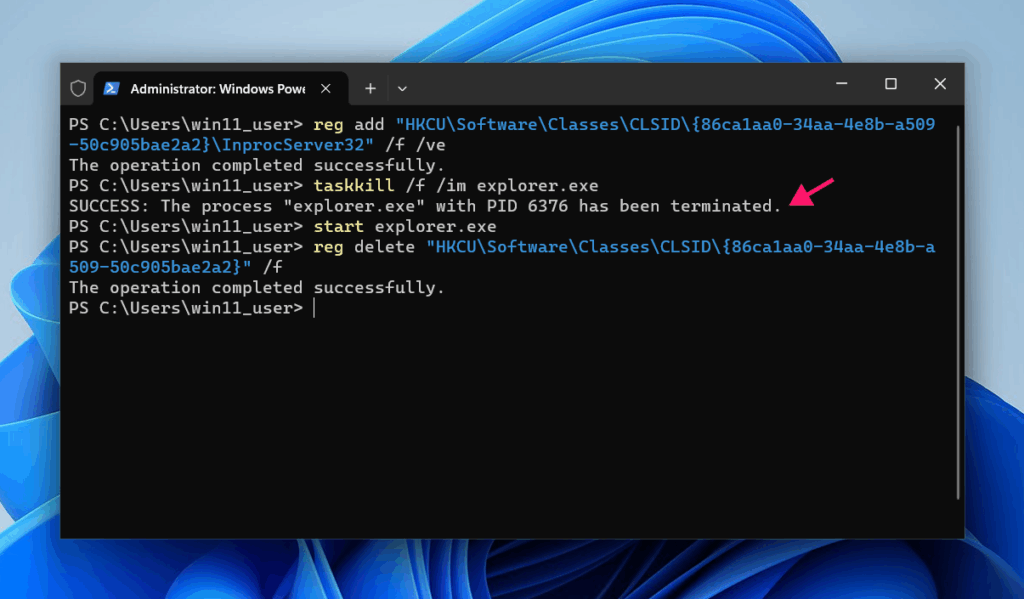
2. Run the following command: reg add "HKCU\Software\Classes\CLSID\{86ca1aa0-34aa-4e8b-a509-50c905bae2a2}\InprocServer32" /f /ve
3. Restart Explorer without rebooting by running: taskkill /f /im explorer.exe start explorer.exe
Method 2: Registry Editor
1. Open Registry Editor (Win + R > regedit)
2. Navigate to HKEY_CURRENT_USER\Software\Classes\CLSID
3. Create a new key named {86ca1aa0-34aa-4e8b-a509-50c905bae2a2}
4. Inside that key, create a subkey named InprocServer32
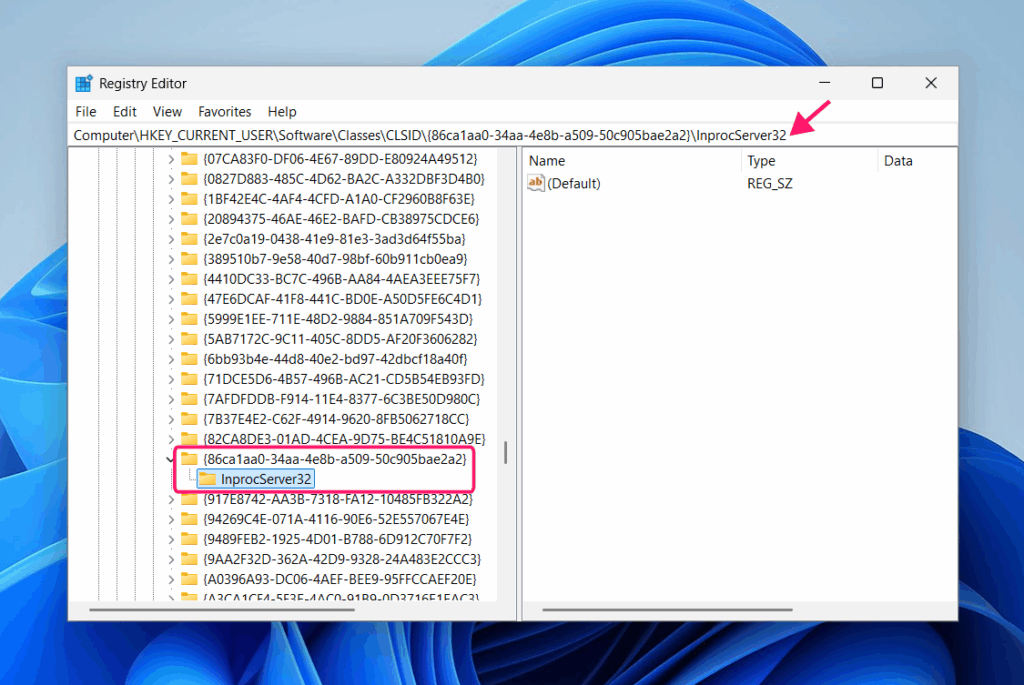
5. Leave the default value empty
6. Restart Explorer using the commands in step 3 above
7. To revert, run reg delete "HKCU\Software\Classes\CLSID\{86ca1aa0-34aa-4e8b-a509-50c905bae2a2}" /f or delete the key in Registry Editor
Take note: Future Windows updates may remove support for this legacy fallback.
File Explorer
The ribbon interface is gone in Windows 11 and can only be restored with third-party tools. However, these registry tweaks bring back several Windows 10 behaviors.
Open PowerShell or Command Prompt as administrator and run the following commands:
- Compact view (reduces space between items):
reg add HKCU\Software\Microsoft\Windows\CurrentVersion\Explorer\Advanced /v UseCompactMode /t REG_DWORD /d 1 /f - Restore Windows 10 tree expansion behavior:
reg add HKCU\Software\Microsoft\Windows\CurrentVersion\Explorer\Advanced /v NavPaneExpandToCurrentFolder /t REG_DWORD /d 1 /freg add HKCU\Software\Microsoft\Windows\CurrentVersion\Explorer\Advanced /v NavPaneShowAllFolders /t REG_DWORD /d 1 /f - Restore legacy behaviors (runs each folder in a separate process):
reg add HKCU\Software\Microsoft\Windows\CurrentVersion\Explorer\Advanced /v SeparateProcess /t REG_DWORD /d 1 /f - Set default open location to This PC instead of Quick Access:
reg add HKCU\Software\Microsoft\Windows\CurrentVersion\Explorer\Advanced /v LaunchTo /t REG_DWORD /d 1 /f - Disable the modern command bar (restores a closer-to-Windows 10 toolbar):
reg add HKCU\Software\Microsoft\Windows\CurrentVersion\Explorer\Advanced /v DisableModernCommandBar /t REG_DWORD /d 1 /f
Pro tip: The real benefit of PowerShell comes from the fact that you can deploy scripts like this remotely to multiple endpoints using tools like Atera’s RMM. The best part is that you don’t even have to be a coding genius. Atera’s AI Copilot can help you write scripts like these from natural language queries.
Visual style and themes
These settings bring the overall look of Windows 11 closer to Windows 10 without touching the shell architecture.
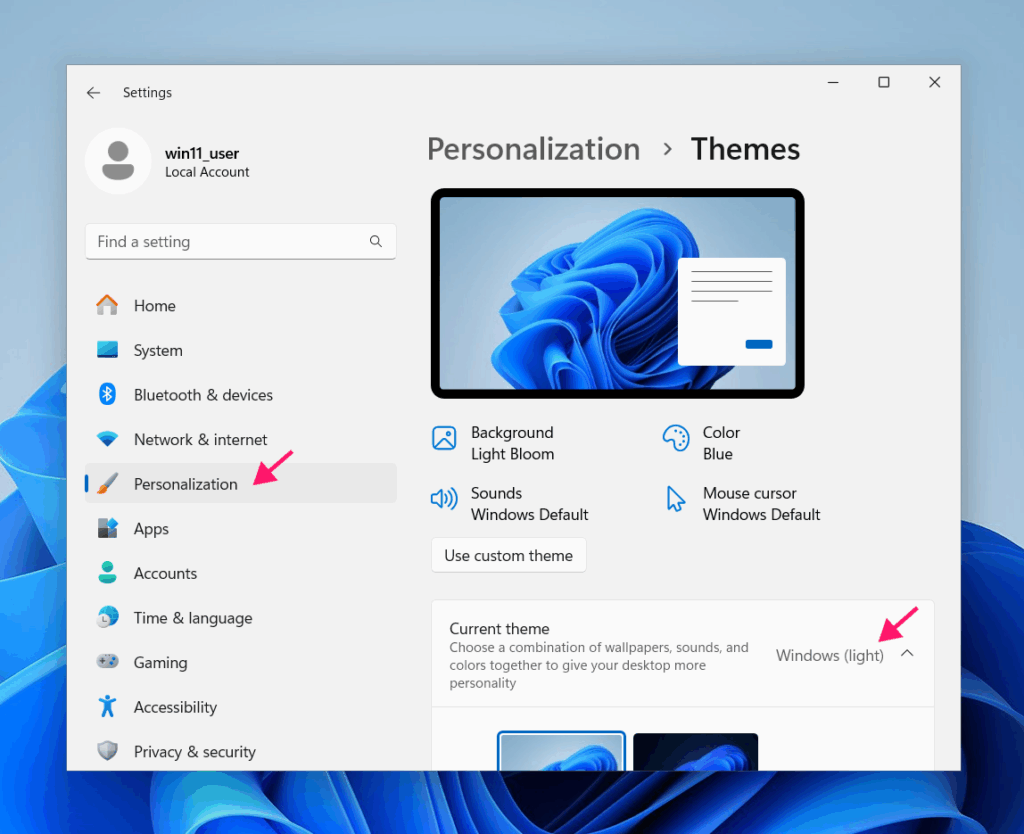
1. Open Settings > Personalization > Themes and select Windows (light) or Windows (dark) (Windows 10 defaulted to light)
2. Open Settings > Personalization > Colors
3. Set Transparency effects to Off and Accent color to Manual
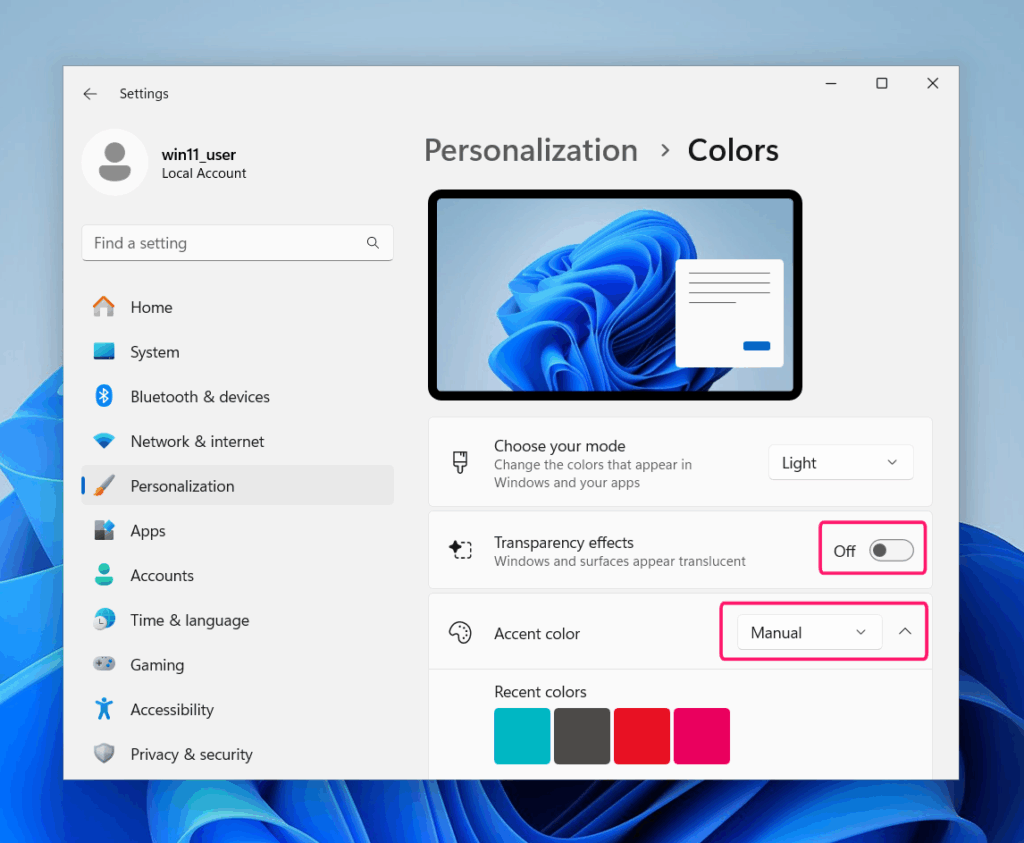
4. Scroll down to Custom colors > View colors
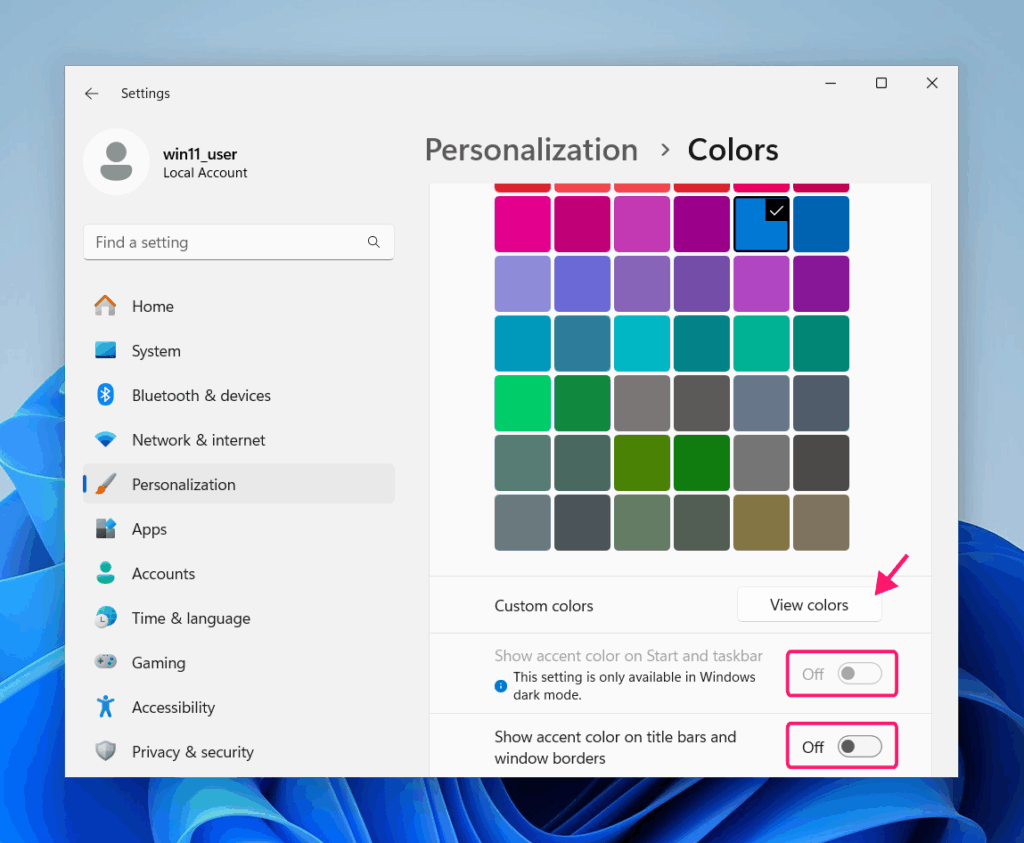
5. Click More, and enter #0078D7; this is Windows 10’s default accent color
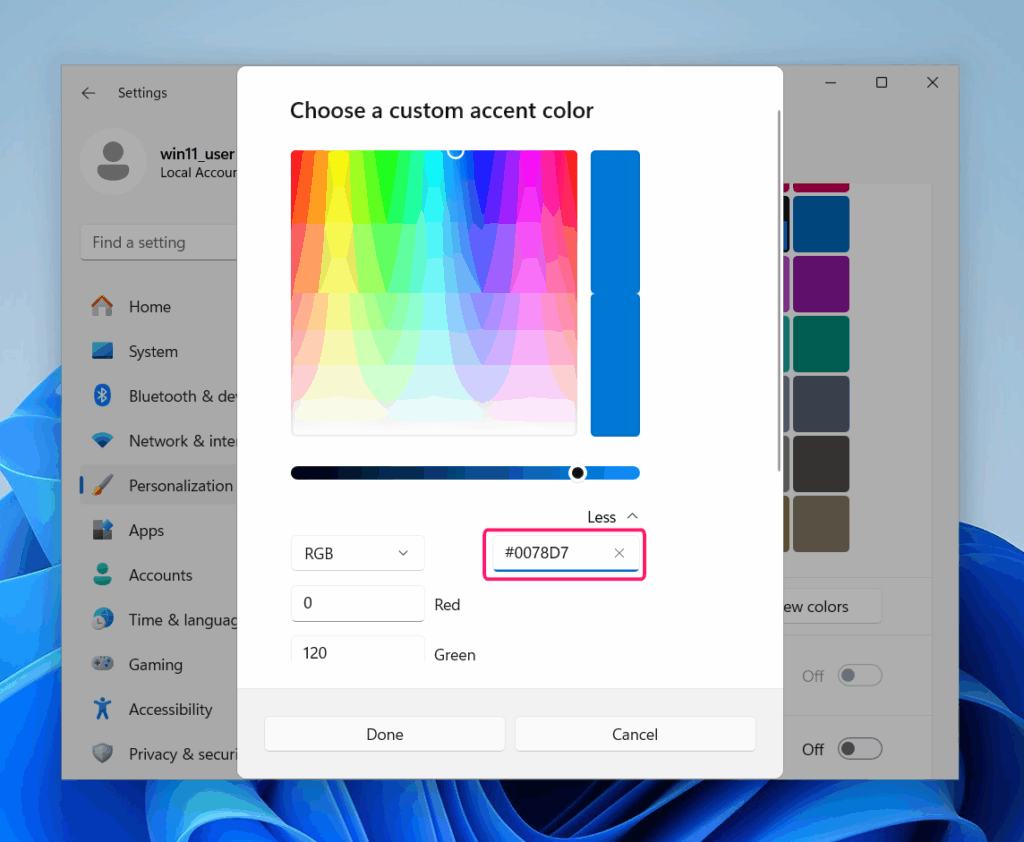
6. If using dark mode, enable Show accent color on Start and taskbar and Show accent color on title bars and window borders
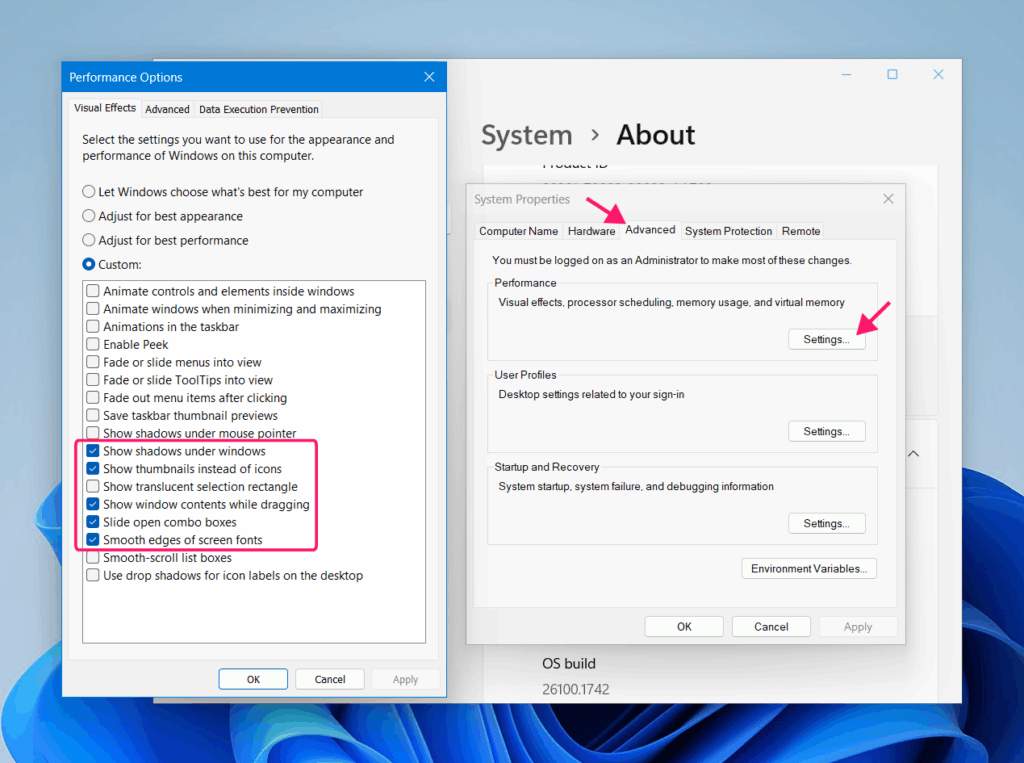
7. To minimize visual effects, go to Settings > System > About > Advanced system settings
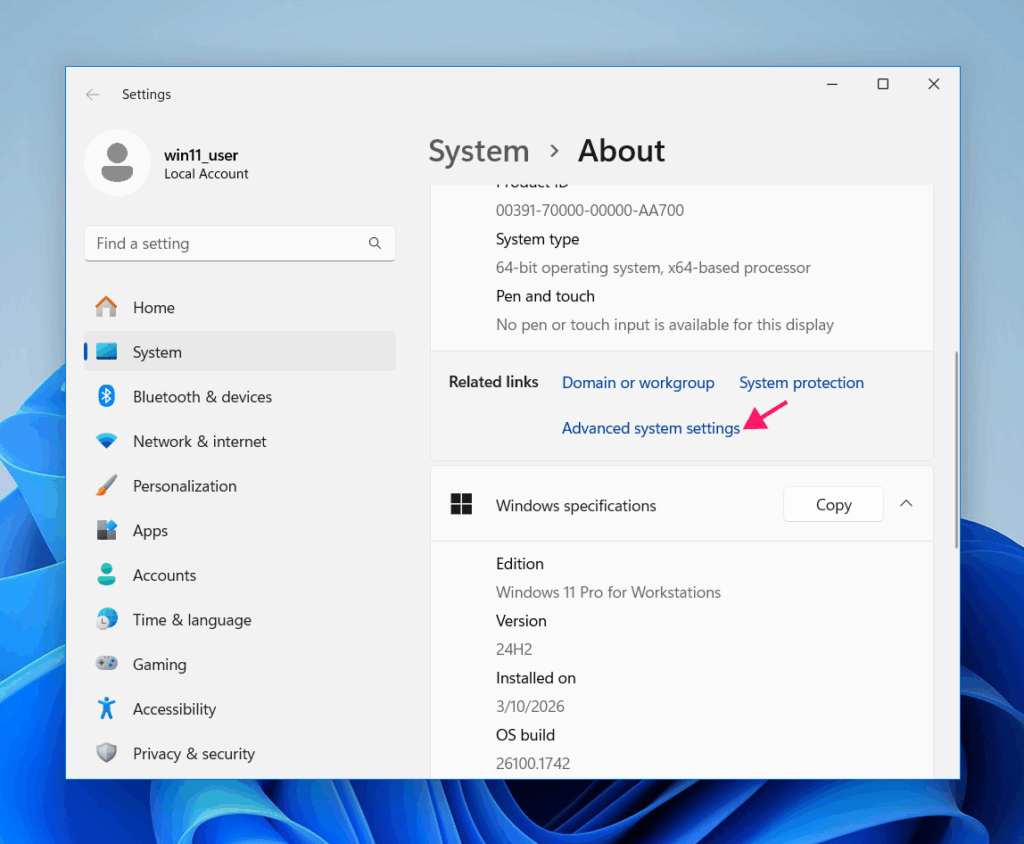
8. go to the Advanced tab, and click Settings under Performance. Select Custom and enable only the following:
- Show shadows under windows
- Show thumbnails instead of icons
- Show window contents while dragging
- Slide open combo boxes
- Smooth edges of screen fonts
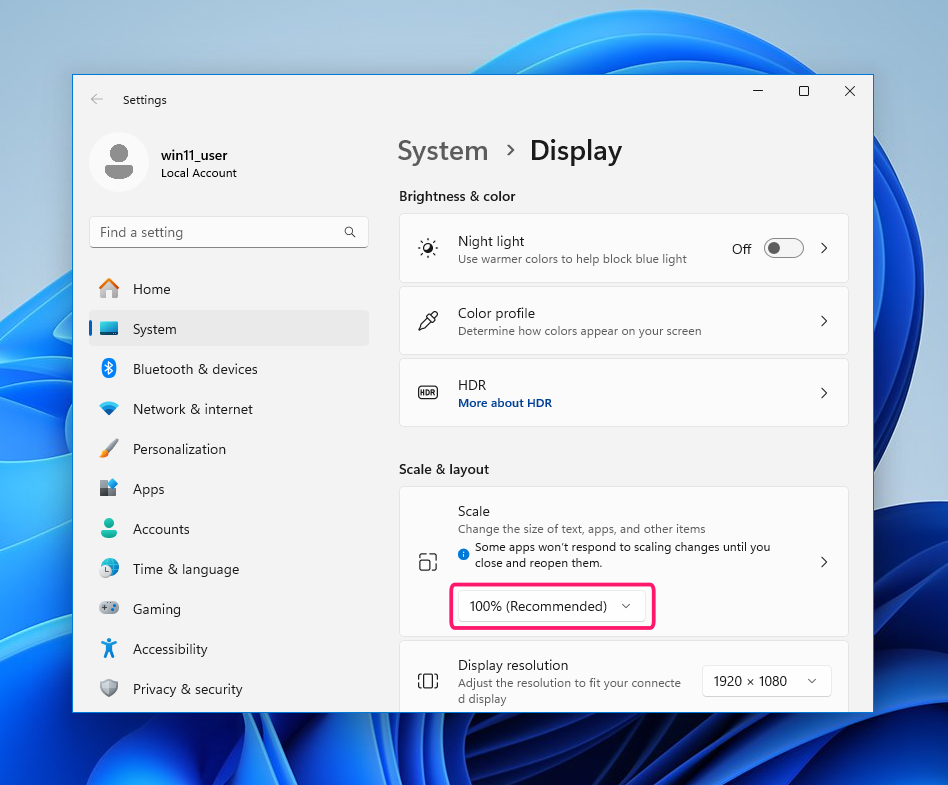
9. To restore default scaling, go to Settings > System > Display and set Scale to 100%
Windows 11-specific UI elements
These tweaks suppress rounded corners, animations, and Snap Layout prompts that don’t have equivalents in Windows 10.
Disable UI animations
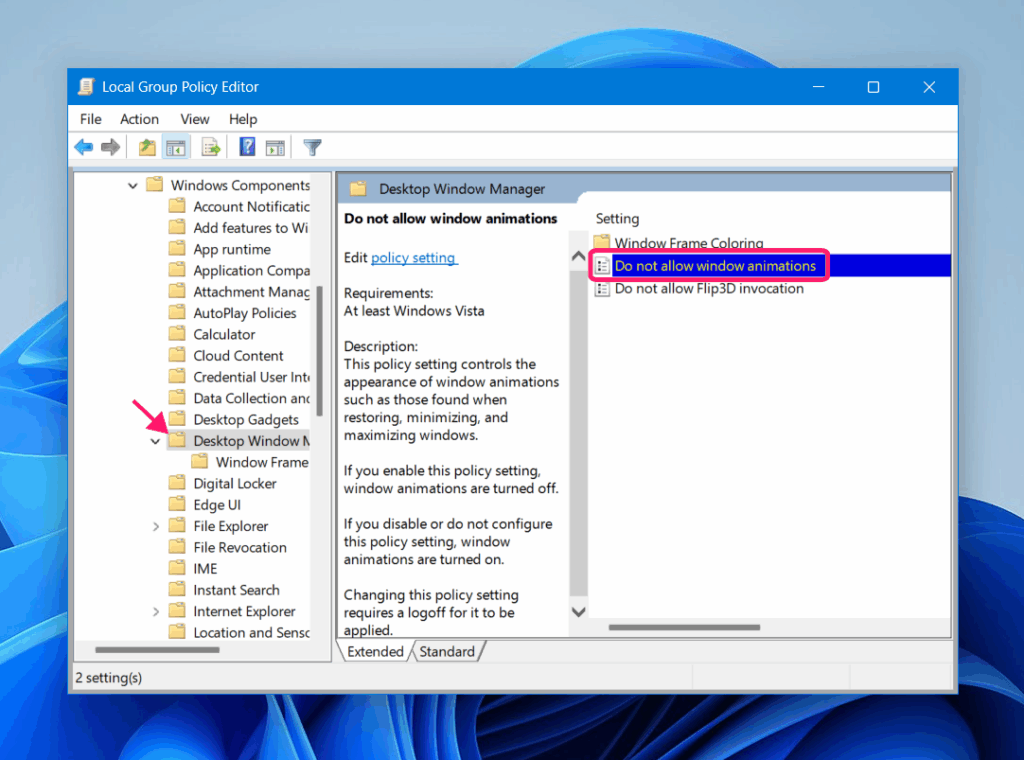
Via Group Policy: Navigate to User Configuration > Administrative Templates > Windows Components > Desktop Window Manager and enable Do not allow window animations.
Via Registry: Open Command Prompt as administrator and run:
- Disable taskbar animations:
reg add HKCU\Software\Microsoft\Windows\CurrentVersion\Explorer\Advanced /v TaskbarAnimations /t REG_DWORD /d 0 /f - Disable all UI animations:
reg add "HKCU\Control Panel\Desktop" /v UserPreferencesMask /t REG_BINARY /d 9012038010000000 /f
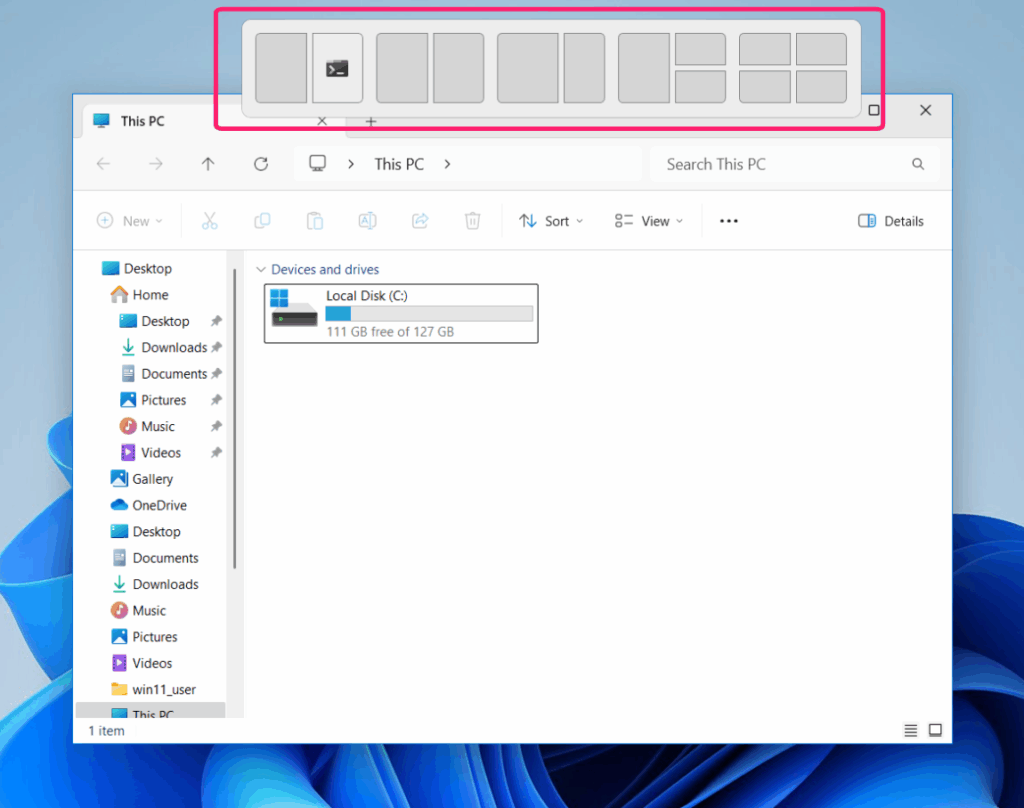
Disable Snap Layouts
Via Registry: Open Command Prompt as administrator and run:
- Disable the hover menu:
reg add HKCU\Software\Microsoft\Windows\CurrentVersion\Explorer\Advanced /v EnableSnapAssistFlyout /t REG_DWORD /d 0 /f - Disable suggestions:
reg add HKCU\Software\Microsoft\Windows\CurrentVersion\Explorer\Advanced /v EnableSnapBar /t REG_DWORD /d 0 /f
Disable transparency effects
Via Group Policy: Navigate to User Configuration > Administrative Templates > Control Panel > Personalization and enable Force a specific visual style file or force Windows Classic.
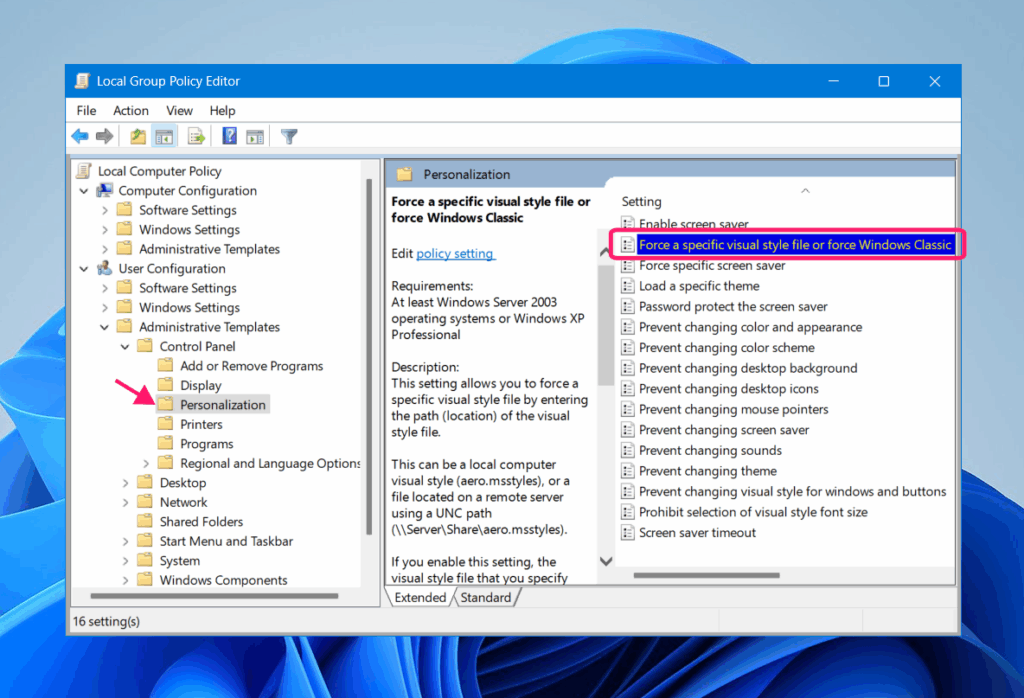
Via Registry: reg add HKCU\Software\Microsoft\Windows\CurrentVersion\Themes\Personalize /v EnableTransparency /t REG_DWORD /d 0 /f
Take note: Previous Windows 11 builds offered more granular control over legacy UI features. Many of those options are being phased out in newer builds.
When native methods aren’t enough
Some Windows 11 changes simply can’t be undone through Settings, Group Policy, or registry edits. The ribbon interface in File Explorer, full tile support in the Start menu, and rounded corners all fall into this category. Two open-source tools cover most of the remaining ground:
- ExplorerPatcher is the most comprehensive option. It can restore the Windows 10 taskbar and Start menu including tile support, bring back the File Explorer ribbon interface, remove the Recommended section from the Start menu, and disable rounded corners. It works through a combination of code injection, registry tweaks, and system file replacement.
- Open-Shell focuses primarily on the Start menu. It offers customizable Start menu styles including a Windows 7-style layout, and can revert context menus and taskbar behavior. It uses custom shell extensions, code injection, and registry tweaks rather than system file replacement, making it somewhat less invasive than ExplorerPatcher.
Warning: Both tools modify the Windows shell and carry risk with feature updates. Test on a non-production machine before deploying, and re-validate after every Windows feature update.
Making Windows 11 look like Windows 10 is ultimately a patchwork exercise. Native settings get you most of the way there, scripting and GPO get you the rest, and third-party tools pick up what neither can reach. The real challenge is keeping those changes consistent and intact across a fleet as updates roll in and new devices come online.
That’s where a platform like Atera can help. Deploying scripts remotely, monitoring endpoint configurations, and catching drift before users start filing tickets are exactly the kinds of tasks Atera’s RMM platform is built to handle at scale, without the manual overhead that makes Windows migrations such a drain on enterprise IT teams and MSPs.
Interested? Try Atera for free
Related Articles
How to set up secure printing across your organization
A secure print checkbox protects exactly one moment in a document's life. Everything else, from unencrypted traffic and unhardened devices to payroll printouts forgotten in a tray, stays exposed. Real secure printing covers the whole lifecycle: release policy, authentication, encryption, hardening, and a fleet that stays monitored long after rollout.
Read now
How to reduce alert fatigue in healthcare IT
In a hospital, a dismissed alert isn't a delayed ticket. It can be a patient deteriorating while the monitor keeps sounding. Cutting alert volume won't fix that on its own, and switching alerts off can make it worse.
Read now
How to prevent configuration drift across your IT infrastructure
Configuration drift rarely breaks anything the day it happens. It hides in a hotfix, a reset default, or a vendor installer, then surfaces weeks later as a failure nobody can trace. Stopping it means defining exactly what approved looks like, closing every side door into production, giving each setting one owning tool, and checking that the baseline itself hasn't gone stale.
Read now
How to reduce alert fatigue across your IT team
Your technicians aren't ignoring alerts because they're careless. They're ignoring them because most alerts have taught them to. Once the stream stops being trustworthy, real failures slip past with the noise. Fixing it means deciding what deserves an interruption, tuning out transient spikes, collapsing alert storms, and automating the fixes you've run a hundred times.
Read nowEndless IT possibilities
Boost your productivity with Atera’s intuitive, centralized all-in-one platform









