
Generate summary with AI

A wrong display resolution, a startup disk the Mac refuses to remember, and a system that boots straight to a question mark are the classic fingerprints of a corrupted NVRAM, not a failing drive or a botched update. Resetting the firmware-stored settings back to default usually fixes it, but the process is different depending on the specific Mac, which is a difficult thing to figure out while you’re managing a fleet of cloud-connected Macs that are all different.
Here’s everything you need to know about resetting PRAM on different Mac devices across a network.
Understanding PRAM, NVRAM, and when a reset is warranted
PRAM (Parameter RAM) and NVRAM (Non-Volatile RAM) get used interchangeably in troubleshooting conversations because they both refer to the same functional layer: a small block of memory the Mac uses to store and quickly retrieve certain system settings, regardless of which underlying storage technology is actually doing the work. For diagnostic purposes, you don’t need to distinguish between them. If you’re chasing PRAM, you’re chasing NVRAM.
It’s different on Apple Silicon (M-series) Macs. NVRAM gets tested automatically as part of the boot process, so shut the machine down, wait a few seconds, power it back on, and the system handles a reset if it’s needed without any input from you. There’s no keyboard combination to reach for here because there’s no manual path that exists on this hardware.
On Intel Macs, a manual reset is still very much a live troubleshooting step, but it’s worth being precise about when it’s actually indicated. You’re looking at firmware-level corruption, not a general OS or hardware fault, and it tends to show up as:
- Sound volume behaving incorrectly, regardless of what you set it to
- Display resolution reverting or refusing to hold your chosen setting
- Startup Disk selection issues, including a Mac that boots straight to a flashing question mark
- Time zone resetting or displaying incorrectly on its own
Outside of active troubleshooting, Apple also recommends running an NVRAM reset as a final step before selling or recycling an Intel-based Mac because it clears out firmware settings tied to the previous configuration.
» Here’s how to update your firmware
4 ways to reset PRAM/NVRAM on macOS
An NVRAM/PRAM reset restores firmware-stored settings back to their defaults. It doesn’t touch user data.
Note: This manual reset procedure only applies to Intel-based Macs. If you’re on Apple Silicon, there’s nothing to trigger here. The system already handled it automatically at boot.
Method 1: Keyboard reset
This is the original, most direct method and still the default choice on this hardware.
- Shut down the Mac completely
- Power on the Mac and immediately hold Option (⌥) + Command (⌘) + P + R for approximately 20 seconds. The Mac may appear to restart during this window, you might hear a startup sound or see the Apple logo appear and disappear
- Release the keys once the timing above has passed, and let the Mac finish starting up normally
- Check system settings like display resolution, sound volume, and time zone, and readjust anything that reverted to default
Note: On a T2 Intel Mac, the key combination is that same but the release timing differs. Release the keys after the Apple logo has appeared and disappeared a second time.
Method 2: Reset NVRAM from the desktop using Terminal
Use this when you’re already logged in and want to trigger a reset without restarting into a key-combo window. You should know that this isn’t an officially documented consumer troubleshooting step, so treat it as a power-user alternative.
- Press Command (⌘) + Space to open Spotlight, type “terminal”, and press Return
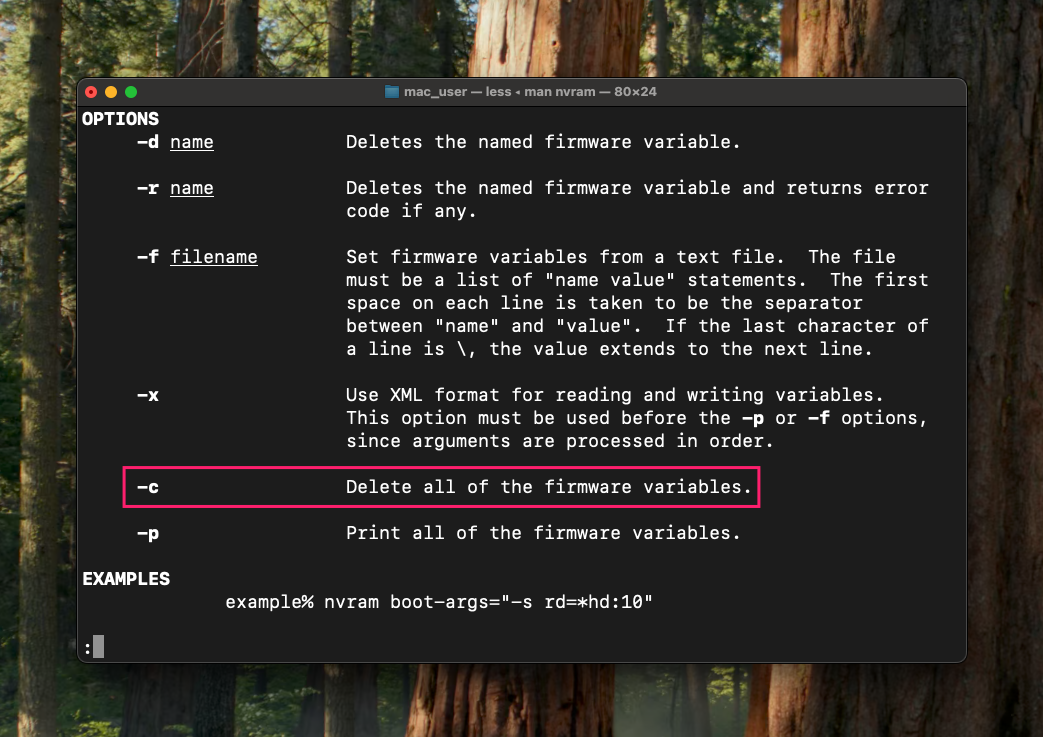
- Run
man nvramto review the manual page for thenvramcommand if you want to confirm syntax first. Run
sudo nvram -cto clear all NVRAM variables
- Restart your Mac to apply the change
Method 3: Reset NVRAM from macOS Recovery Mode
Use this when the primary OS won’t boot at all and the methods above aren’t reachable.
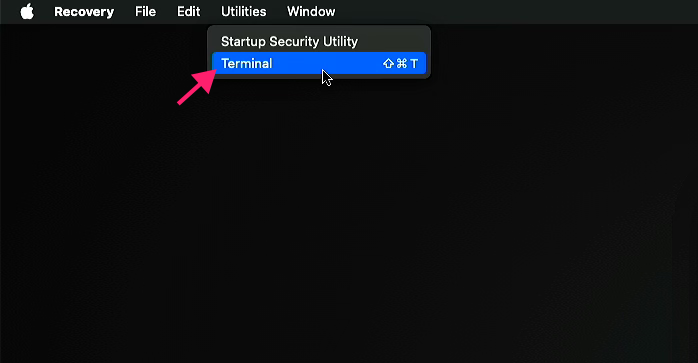
- Power on the Mac and immediately hold Command (⌘) + R to boot into macOS Recovery
From the top menu bar, go to Utilities > Terminal

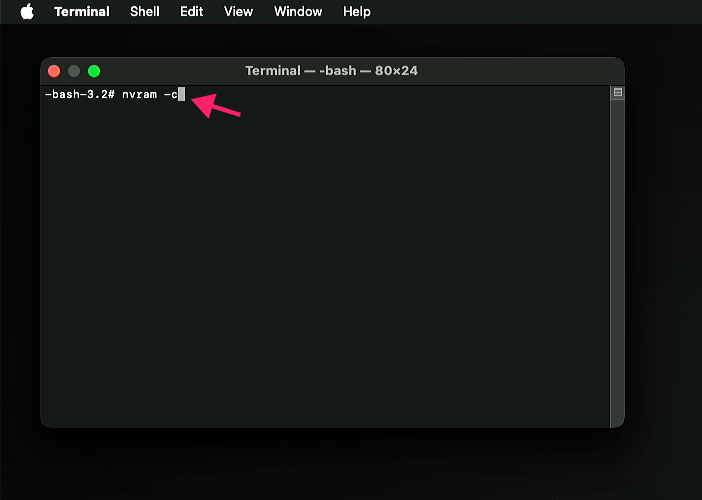
Run
nvram -cto clear all NVRAM variables
- Restart your Mac
Method 4: Resetting NVRAM at scale across a fleet
The methods above work fine for a single machine at your desk, but they don’t hold up once you’re managing NVRAM issues across a bunch of Macs you can’t physically reach. Apple’s MDM protocol doesn’t include a native “reset NVRAM” command, so this typically comes down to a custom script run through whatever remote management tooling is already in place.
Atera’s macOS agent gives you that remote reach without needing a user to hold down four keys correctly or walking to each machine in person. Once the agent is deployed to a Mac, you can push a script wrapping the nvram -c command through the RMM platform to a single device or a defined group. For a Mac that won’t boot into the primary OS at all, Remote Desktop or Remote Login (SSH) through the agent still lets you get to Recovery Mode territory without a physical trip to the machine.
» Here’s how to enable RMM on Mac
SMC resets and post-reset cleanup
The System Management Controller (SMC) is a separate chip on Intel Macs that handles low-level hardware behavior (power management, battery charging, thermal and fan control, sleep/wake, and status lighting), which is distinct from the firmware settings NVRAM stores.
An NVRAM reset and an SMC reset solve different problems, and they’re not automatically a package deal. Apple’s official documentation covers resetting the SMC specifically when a Mac won’t turn on at all (and only for Intel-based Macs) with no mention of that procedure needing to happen alongside an NVRAM reset. Treat them as two separate tools you reach for based on the symptom in front of you, not a combined troubleshooting step.
The exact SMC reset procedure depends on the hardware:
MacBooks with the T2 Security Chip
- Shut down the Mac
- Hold Control (⌃) + Option (⌥) + Shift (⇧) for 7 seconds
- Without releasing those keys, also hold the power button for 7 more seconds
- Release all keys, wait a few seconds, then press the power button to turn the Mac back on
MacBooks without the T2 Security Chip
- Shut down the Mac
- Press Control (⌃) + Option (⌥) + Shift (⇧)
- Without releasing those keys, also hold the power button, keeping all four held for 10 seconds
- Release all keys, then press the power button to turn the Mac back on
Desktop Macs
- Shut down the Mac and unplug the power cord
- Wait 15 seconds
- Plug the power cord back in
- Wait 5 seconds
- Press the power button to turn the Mac on
After an NVRAM reset: What to check
This applies to the NVRAM/PRAM reset in Methods 1-4 above, not the SMC procedure. No network settings get wiped by an NVRAM reset, so there’s no organizational network reconfiguration to plan for. The one setting worth checking is Startup Disk. If a Mac normally boots from an alternate volume, like an external disk or dedicated partition, that selection can revert to default and need to be reselected.
If the Mac won’t boot into macOS afterward:
- Shut down the Mac
- While holding the Option (⌥) key, press the power button
Select the available startup disk you want to use, then click the up-arrow icon
Scaling a fix that was built for one device
A keyboard combo works fine for one Mac at your desk, but it stops being practical the moment you’re troubleshooting the same NVRAM issue across a fleet you can’t physically reach. For IT teams and MSPs, Atera’s RMM platform simplifies the job by letting you push a NVRAM reset through remote login or script deployed remotely without walking to every machine or waiting for users to follow the troubleshooting steps themselves.
Related Articles

How to reduce alert fatigue across your IT team
Your technicians aren't ignoring alerts because they're careless. They're ignoring them because most alerts have taught them to. Once the stream stops being trustworthy, real failures slip past with the noise. Fixing it means deciding what deserves an interruption, tuning out transient spikes, collapsing alert storms, and automating the fixes you've run a hundred times.
Read now
How to close the IT skills gap on your team
Course completions don't close skills gaps. Technicians finish the training, then hand the first unfamiliar failure straight back to a senior engineer. Real capability gets built on live tickets, incidents, and maintenance windows, with guidance that fades as competence grows.
Read now
How to calculate cost per ticket (and why most teams get it wrong)
Most cost-per-ticket figures are wrong before anyone reads them. Missing overhead, tickets that were opened but never closed, spam and duplicates padding the count, and one month's costs divided by another month's tickets all make support look cheaper than it is. Fix both sides of the division and the number finally shows where technician time and money actually go.
Read now
How to prepare for a software license audit
A vendor audit notice doesn't wait for you to get organized. It demands proof, right now, that every install matches every entitlement you've paid for, and most IT teams find out the hard way how much they don't actually know about their own environment. Getting audit-ready before the letter arrives is the difference between negotiating from strength and paying for months of scrambling.
Read nowEndless IT possibilities
Boost your productivity with Atera’s intuitive, centralized all-in-one platform









