
Generate summary with AI

Most IT teams have a clear policy for patch management schedules, access controls, and backup windows. Almost none have a documented policy for how external drives get disconnected. That gap is smaller than it sounds until a user yanks a USB drive mid-transfer on a machine running Better performance mode, and now you’re looking at file system corruption on a drive that had no business being removed without ejection in the first place.
Here’s everything you need to know about changing the policy in Windows 11 for single or multiple devices.
» Trying to figure out what caused that issue? Here’s how to run a PC diagnostics report
What to know before you change removal policies
Windows 11 gives you two removal policies for external storage devices: “Quick removal”, which trades write speed for the ability to unplug at any time, and “Better performance”, which buffers writes in RAM for faster throughput but requires a proper ejection before disconnection. The right choice depends on the hardware, the workload, and who’s handling the device:
- Quick removal disables write caching on the device. Every write operation goes directly to the hardware immediately, which means the OS doesn’t need to flush anything before you disconnect. The tradeoff is performance, since applications have to wait for each write to complete before moving on. This makes Quick removal noticeably slower for sustained or large write operations like moving a folder of files or running a backup to an external drive.
- Better performance enables write caching. Write operations are buffered in RAM and flushed to the device later, so apps can proceed as if the write is already done. Transfers feel faster, progress bars fill quicker, but the drive LED may still be blinking as the cache drains. The catch is that you must use the “Safely Remove Hardware” process before disconnecting. Skip that step and you risk losing any data still sitting in the buffer. On a BitLocker-encrypted drive, an abrupt disconnection in Better performance mode can corrupt the BitLocker metadata area, potentially making the drive inaccessible even with the correct Bitlocker recovery key.
Deciding which policy works best for you generally depends on these factors:
- Frequency of removal: For devices that get plugged and unplugged constantly, like USB sticks passed between users, Quick removal is the safer default since it doesn’t rely on users remembering to eject properly.
- Device hardware: Better performance delivers the most meaningful gains on fast external SSDs with high write throughput. On a generic USB flash drive, the performance ceiling of the hardware itself limits what write caching can actually improve, so the added risk isn’t worth it.
- Workload type: For heavy or sustained writes, such as running backups or data logging to an external drive, write caching meaningfully reduces latency and improves throughput. For mostly read-only workloads, write caching is irrelevant and switching to Better performance adds risk with no practical benefit.
- Data criticality: If the device holds business-critical data, the risk of cache-related corruption from an improperly ejected drive outweighs the performance gain. Quick removal is the more defensible choice anywhere the cost of data loss is high.
How Windows stores and applies the policy
The removal policy is managed per device instance by the Windows Plug and Play (PnP) manager, not per port or per system. The setting is written to the registry under HKLM\SYSTEM\CurrentControlSet\Enum\USBSTOR\<deviceModel>\<instanceId>\Device Parameters\Classpnp as the UserRemovalPolicy value. A value of 3 corresponds to Quick removal and 2 corresponds to Better performance. If the policy has never been changed, the Classpnp key doesn’t exist yet.
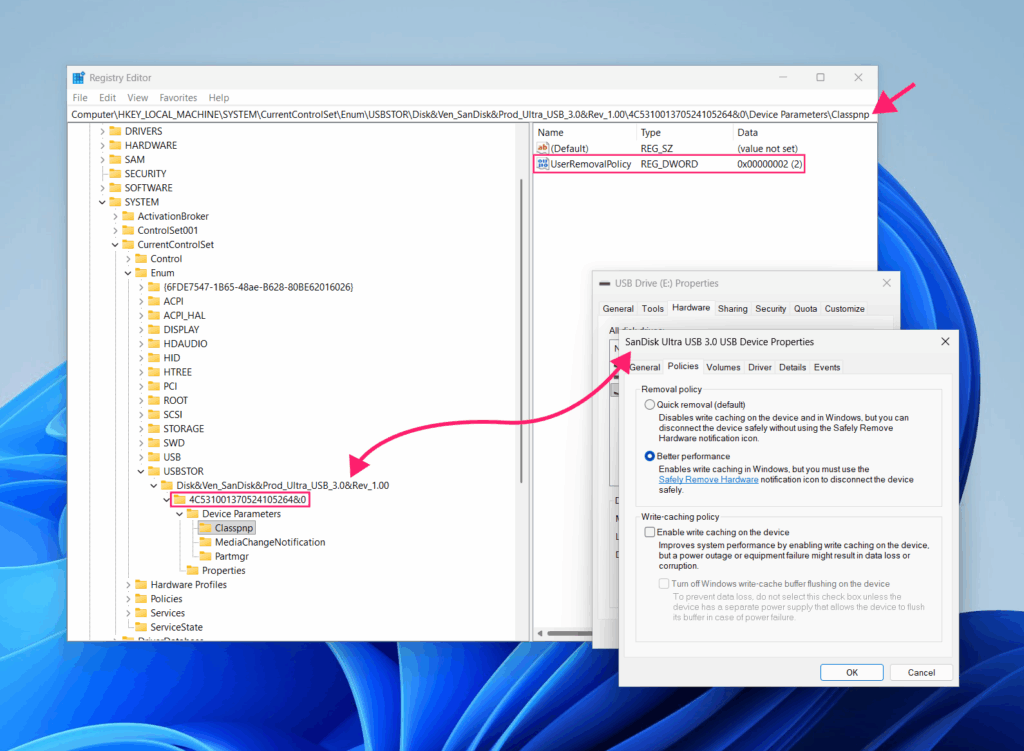
Whether the policy persists across reconnections depends on the device itself:
- If the drive has a unique serial number, Windows creates a persistent Device Instance ID that isn’t tied to a physical port. Reconnect the drive to any USB port on the same machine and Windows recognizes it and reapplies the stored policy.
- If the drive lacks a unique serial number, Windows re-enumerates it based on the parent USB hub and specific port index. In that case, the policy only persists if the device goes back into the same physical port.
Note: There is no native way to set a global policy across all devices at once. Each device must be configured individually through the GUI or in bulk via scripted registry edits deployed remotely.
Easiest methods for changing the removal policy in Windows 11
There are three ways to change the removal policy in Windows 11: Device Manager, Disk Management, and PowerShell. All three write to the same registry value under the hood, so the method you choose comes down to what information you need in front of you while you work.
Method 1: Device Manager
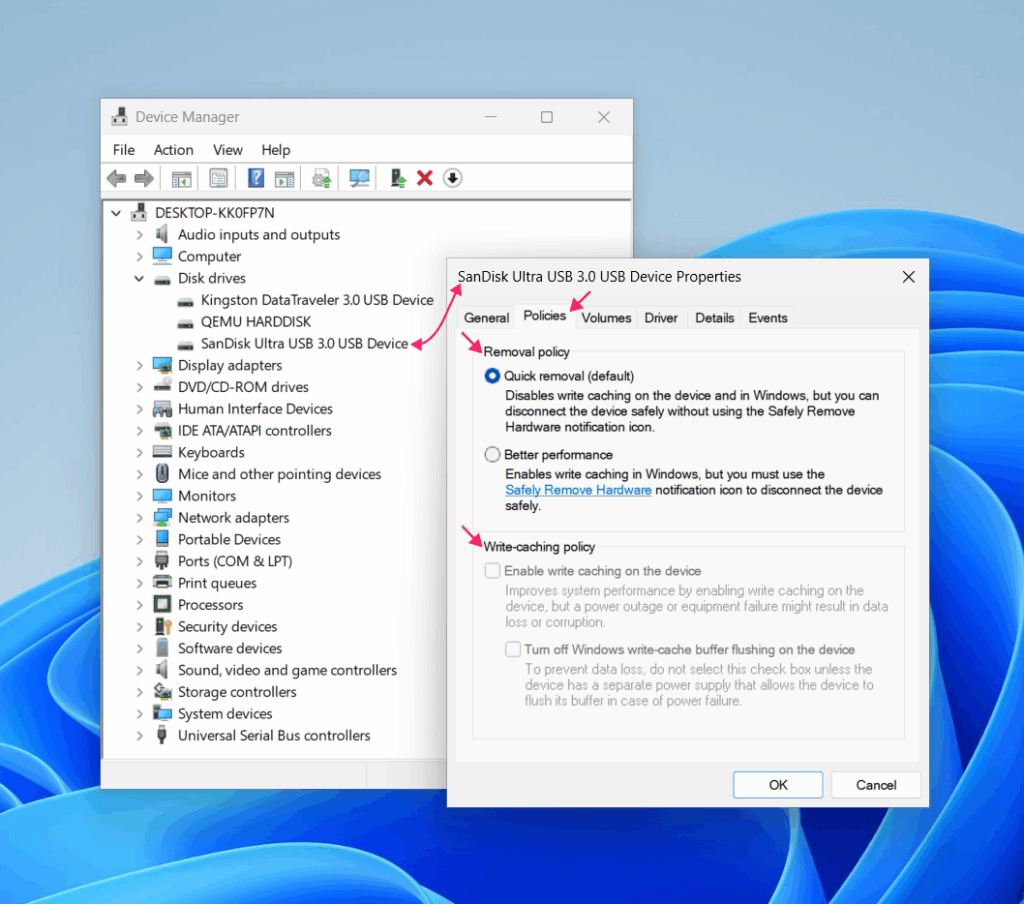
Device Manager is the most common starting point, but it doesn’t show drive letters or partition information by default. Use this method when you already know which device you’re targeting, and verify the selection before changing anything.
1. Connect the external drive to your system
2. Open Device Manager by pressing Win+X and selecting Device Manager, or right-click the Start button and select it from the menu
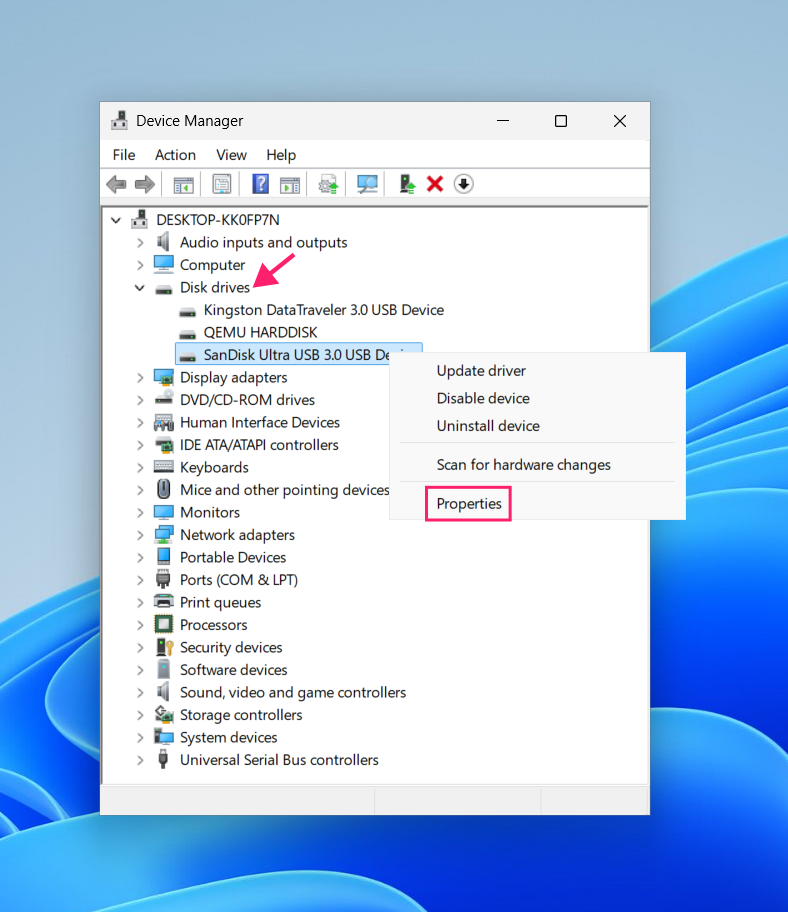
3. Expand Disk drives and locate your device in the list
4. Double-click the device entry, or right-click and select Properties
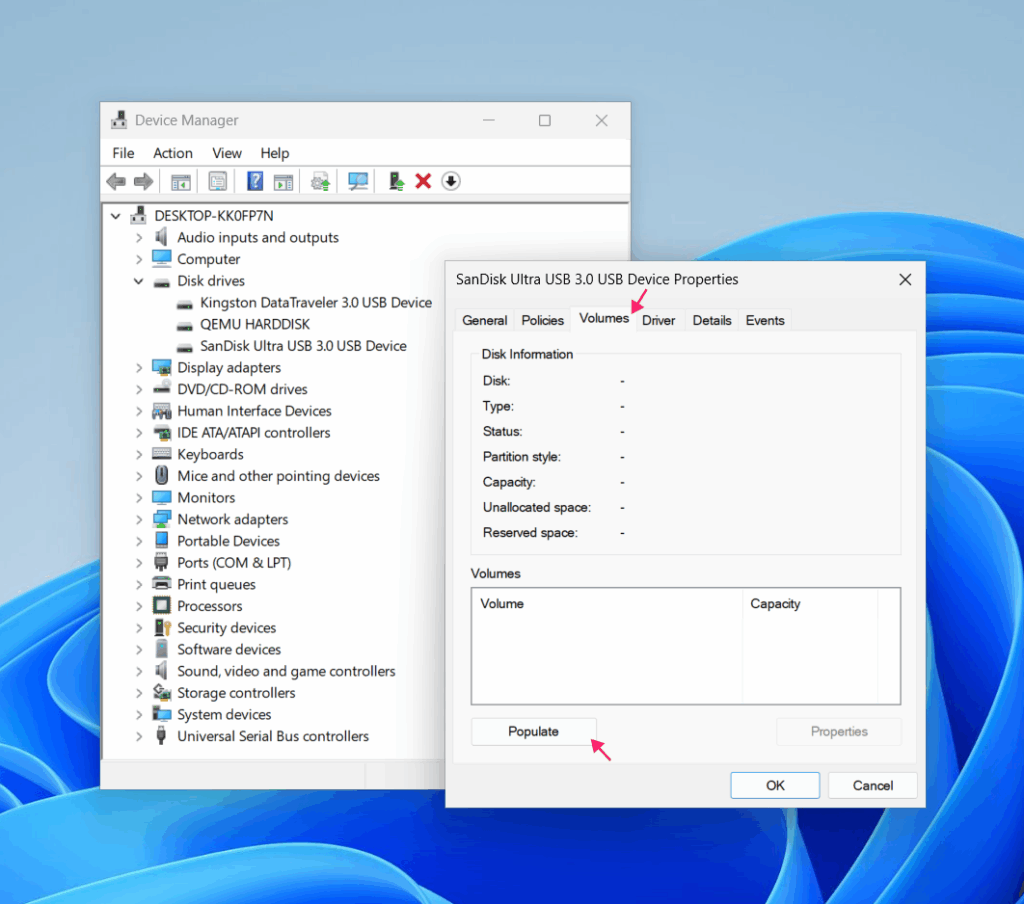
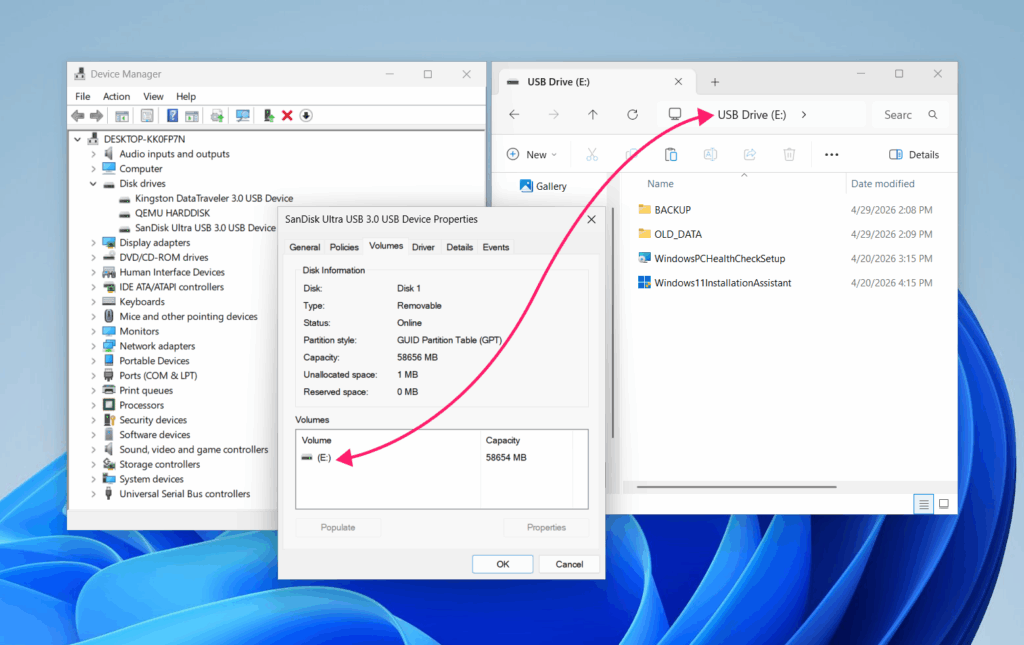
5. Switch to the Volumes tab and click Populate to confirm you have the right device. Windows will query the drive and display its associated partitions and drive letters
6. Cross-reference these against what you expect before proceeding
7. Switch to the Policies tab. If the tab is not visible, click Change settings (this requires administrator privileges)
8. Select either Quick removal or Better performance and click OK
Method 2: Disk Management
Disk Management surfaces partition information and drive letters directly in its main view, without requiring the extra Volumes tab step. Use this method when you’re working with multiple drives and want to confirm the correct disk visually before opening properties.
1. Open Disk Management by pressing Win+X and selecting Disk Management, or right-click the Start button and select it from the menu
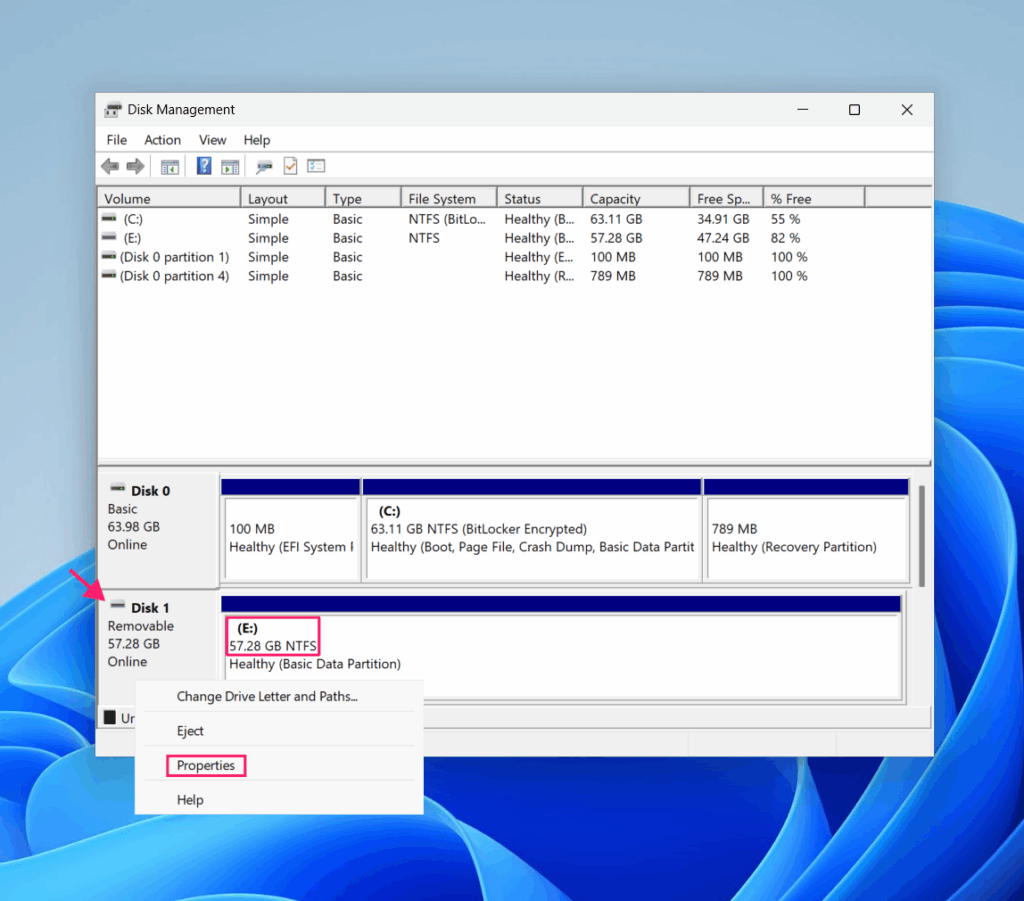
2. Locate your device in the disk list at the bottom of the window. Removable drives appear as separate disk entries with their drive letter and partition type visible
3. Right-click the disk label on the left side (not the partition) and select Properties
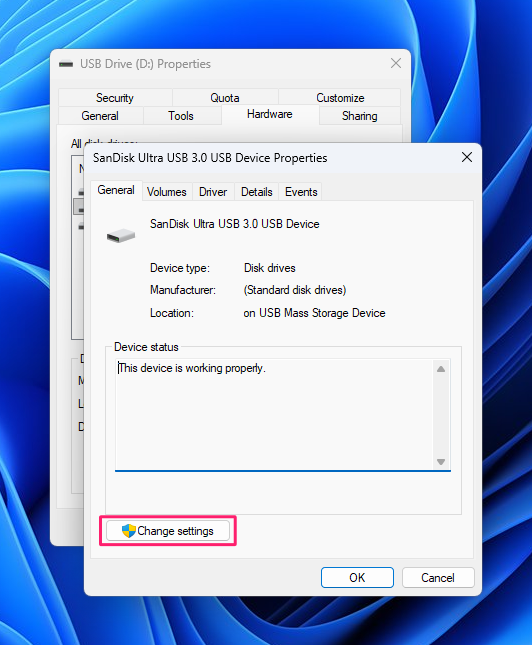
4. Switch to the Policies tab. If the tab is not visible, click Change settings (this requires administrator privileges)
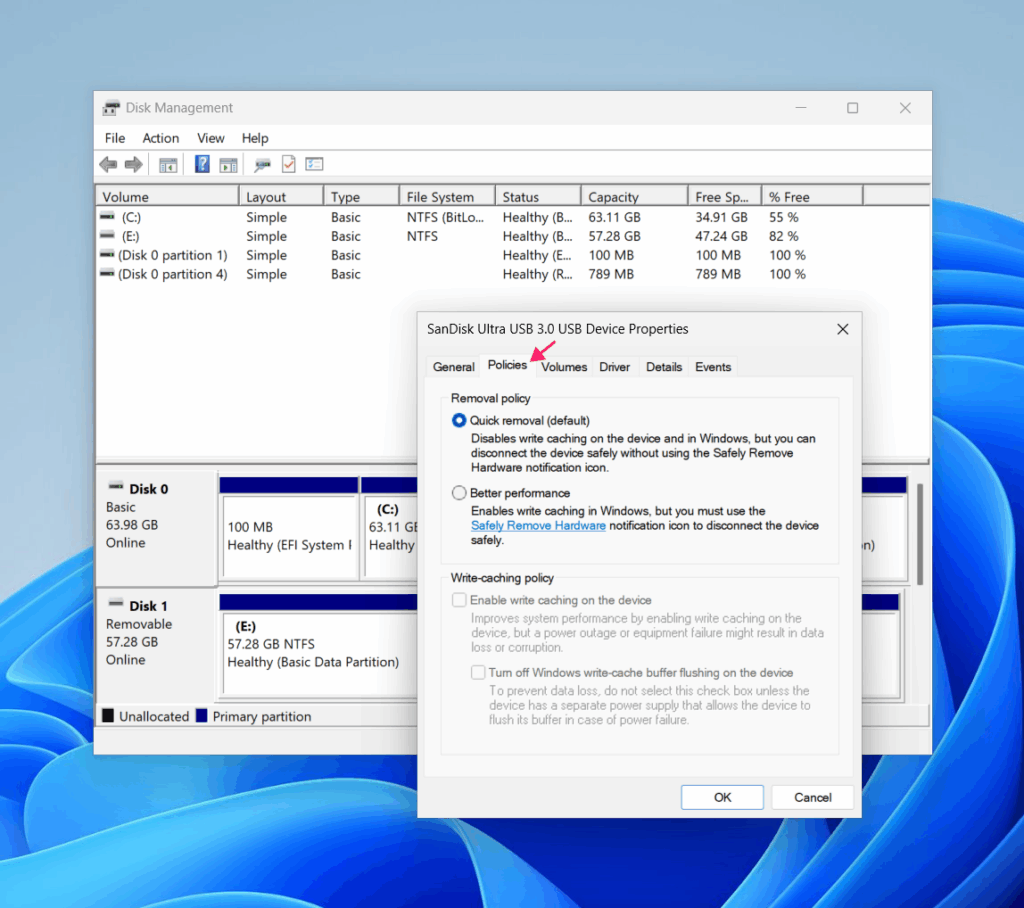
5. Select either Quick removal or Better performance and click OK
Method 3: PowerShell
There are no native command-line options for changing the removal policy directly. The setting lives in the registry under HKLM\SYSTEM\CurrentControlSet\Enum\USBSTOR, and updating it requires identifying the correct device instance ID first.
Use this method only when you need to script policy changes across multiple devices or automate enforcement.
» Here’s how to restart a remote computer using Windows
Step 1: Identify the device instance ID
1. Open a PowerShell window with elevated privileges by pressing Win+X and selecting Terminal (Admin), or right-click the Start button and select Terminal (Admin)
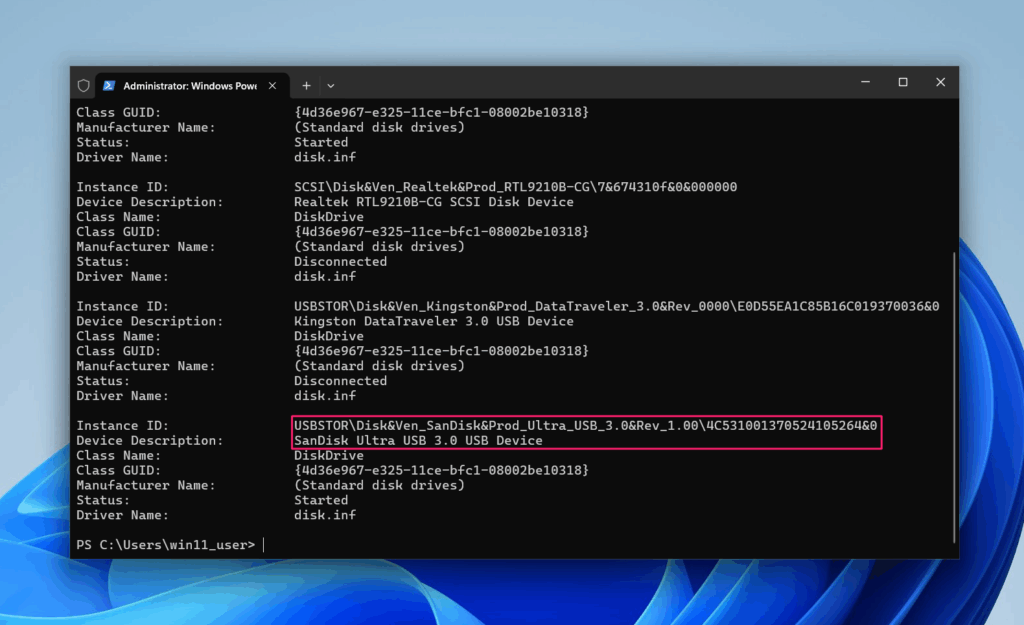
2. Run the following command to get a clean list of connected disk drives and their instance IDs: Get-PnpDevice -Class "DiskDrive" | Select-Object FriendlyName, InstanceId
3. Locate your target device in the output and copy its instance ID. The ID for a USB storage device will begin with USBSTOR\
Step 2: Check the current policy value
Run the following command, substituting the device model and instance ID from the previous step: Get-PnpDevice -Class "DiskDrive" | Select-Object FriendlyName, InstanceId
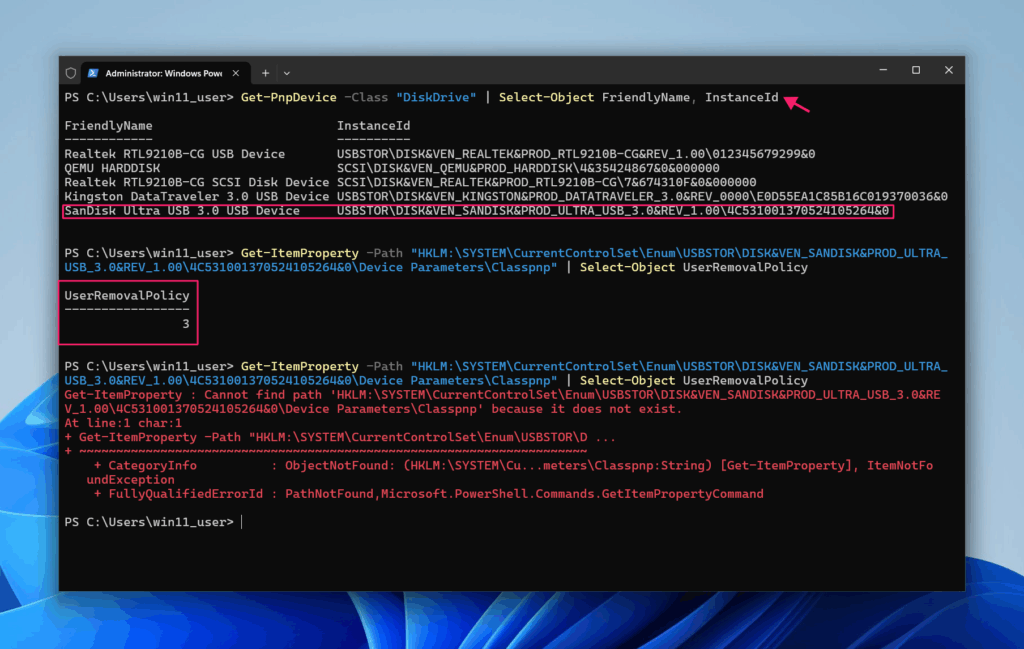
A value of 3 means Quick removal. A value of 2 means Better performance. If the Classpnp key doesn’t exist yet (because the policy has never been changed), this command will return an error rather than a blank value. That means the device is currently using the system default, which is Quick removal.
Step 3: Apply the new policy
Here’s a PowerShell script you can paste that reads the current value, writes the updated policy to the registry, and cycles the device using Disable-PnpDevice/ Enable-PnpDeviceso the change takes effect immediately without requiring a restart. Replace the $instanceID value with the ID from Step 1:
The Script:
Atera does not guarantee the integrity, availability, security, virus-free, safety, lawfulness, non-infringement, rights’ status, or functionality of the scripts. The use of the shared scripts is at your own risk. Scripts are provided “AS IS”. *
$instanceID =
"DISK&VEN_SANDISK&PROD_ULTRA_USB_3.0&REV_1.00\4C531001370524105264&0"
$path = "HKLM:\SYSTEM\CurrentControlSet\Enum\USBSTOR$instanceID\Device Parameters\Classpnp"

$existing = Get-ItemProperty -Path $path -Name "UserRemovalPolicy" -ErrorAction SilentlyContinue

if ($null -eq $existing) {
    Write-Host "UserRemovalPolicy not set (Default: Quick Removal)"
} else {
    $label = switch ($existing.UserRemovalPolicy) {
        2 { "Better Performance" }
        3 { "Quick Removal" }
        default { "Unknown ($($existing.UserRemovalPolicy))" }
    }
    Write-Host "Current policy: $label ($($existing.UserRemovalPolicy))"
}

New-Item -Path $path -Force | Out-Null
Set-ItemProperty -Path $path -Name "UserRemovalPolicy" -Value 2 -Type DWord

$pnpDevice = Get-PnpDevice | Where-Object { $_.InstanceId -like “*$instanceID*” }
if ($pnpDevice) {
    Write-Host "Cycling device to apply new policy..."
    Disable-PnpDevice -InstanceId $pnpDevice.InstanceId -Confirm:$false
    Start-Sleep -Seconds 2
    Enable-PnpDevice -InstanceId $pnpDevice.InstanceId -Confirm:$false
    Write-Host "Device re-enabled. Policy is now active."
} else {
    Write-Host "Warning: Could not find PnP device to cycle. A reconnect or restart may be required."
}Change -Value 2 to -Value 3 to set Quick removal instead. The script can also be extended to loop through all connected devices or filter by manufacturer, making it straightforward to enforce a consistent policy across an entire device fleet.
Pro tip: If this seems complicated, it doesn’t have to be. Tools like Atera’s AI Copilot can help you write PowerShell scripts using vibe coding, then you can deploy that script remotely to multiple endpoints using the RMM platform.
Getting removal policy right across your device fleet
The removal policy feels like a per-device concern until you’re managing dozens of machines across different users and workloads. At that point, manually configuring each device through Device Manager stops being an option.
Atera’s RMM platform lets IT teams deploy PowerShell scripts remotely across their entire device fleet, which means the same policy enforcement that took ten clicks per machine can run once against every endpoint you manage. For MSPs juggling multiple clients, that’s the difference between a configuration task and a managed standard.
Related Articles

How to decide if you need a dedicated DEX platform, or already have one
"IT feels slow" is the complaint that often sells DEX platforms. Sometimes it signals a real blind spot, but just as often already catches and fixes the problem, and a new scoring layer would only add another console. Telling the two apart takes evidence, and the real gap usually isn't visibility at all.
Read now
How to set up secure printing across your organization
A secure print checkbox protects exactly one moment in a document's life. Everything else, from unencrypted traffic and unhardened devices to payroll printouts forgotten in a tray, stays exposed. Real secure printing covers the whole lifecycle: release policy, authentication, encryption, hardening, and a fleet that stays monitored long after rollout.
Read now
How to reduce alert fatigue in healthcare IT
In a hospital, a dismissed alert isn't a delayed ticket. It can be a patient deteriorating while the monitor keeps sounding. Cutting alert volume won't fix that on its own, and switching alerts off can make it worse.
Read now
How to prevent configuration drift across your IT infrastructure
Configuration drift rarely breaks anything the day it happens. It hides in a hotfix, a reset default, or a vendor installer, then surfaces weeks later as a failure nobody can trace. Stopping it means defining exactly what approved looks like, closing every side door into production, giving each setting one owning tool, and checking that the baseline itself hasn't gone stale.
Read nowEndless IT possibilities
Boost your productivity with Atera’s intuitive, centralized all-in-one platform









