
Table of contents
Generate summary with AI

One of the most common issues you might face in a Linux environment is a “package not found” error or a broken dependency. This usually happens when you follow a guide for one release while your system is running another. Whether you’re troubleshooting a server, running a quick PC diagnostic, or installing a new desktop app, knowing your version is the first step to avoiding these headaches.
In this blog, we’ll explore the various methods to identify your Ubuntu release, why the versioning scheme matters, and how to scale these checks across a large network of systems.
» New to Linux? Learn which Linux command sends messages to network interface
The Ubuntu versioning scheme
Before you start running commands to identify your OS, you should understand what those numbers and names mean. Ubuntu versions follow a YY.MM format. This refers to the Year and Month the version was initially released.
- Long Term Support (LTS): These are the major releases. They come out every two years and are supported for five years (or more with extended maintenance).
- Point releases: You might see a version like 22.04.3. The “.3” is a maintenance update, similar to a service pack, which rolls up security fixes and hardware support.
- Codenames: Every release has a two-word “alliterative animal” nickname (like Jammy Jellyfish or Noble Numbat). Administrators use the codename to pin services and automation scripts to ensure the correct software updates are applied.
Permission levels: Do you need sudo?
Checking the Ubuntu version doesn’t require elevated or “root” permissions. Basic system metadata is intentionally exposed so that any regular user can verify compatibility for troubleshooting. You only need sudo if you’re performing an action that changes the system, such as installing a new package or running an update.
» Find out how to check Linux version
Different methods for checking your Ubuntu version
Depending on your current environment, you can choose the method that fits your workflow best. Whether you have a full desktop interface or are working from a remote terminal, Ubuntu provides several built-in tools to help you identify the specific release and system version currently in use.
Method 1: Graphical User Interface (GUI)
This is the most straightforward method for desktop users. It provides a clean, visual overview of your OS and hardware without needing to type any commands.
Follow these steps:
1. Press the Super (Windows) key to bring up the Activities overview
2. Type About and click on the corresponding entry

3. You can also access the About section by opening the Settings application, scrolling down to System and clicking on the About section
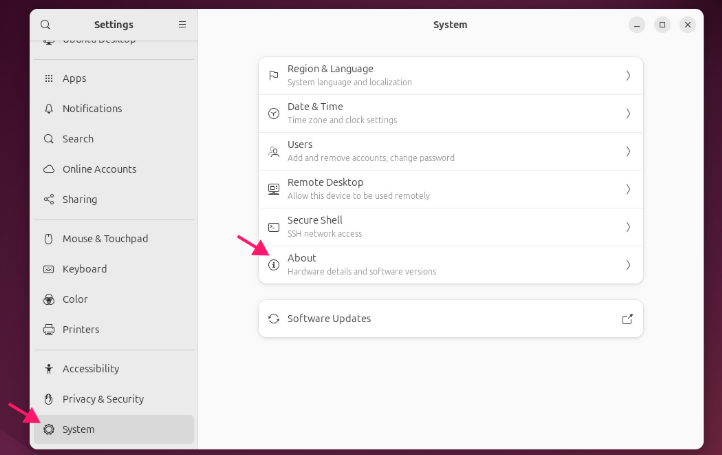
4. You’ll see the one of the following:
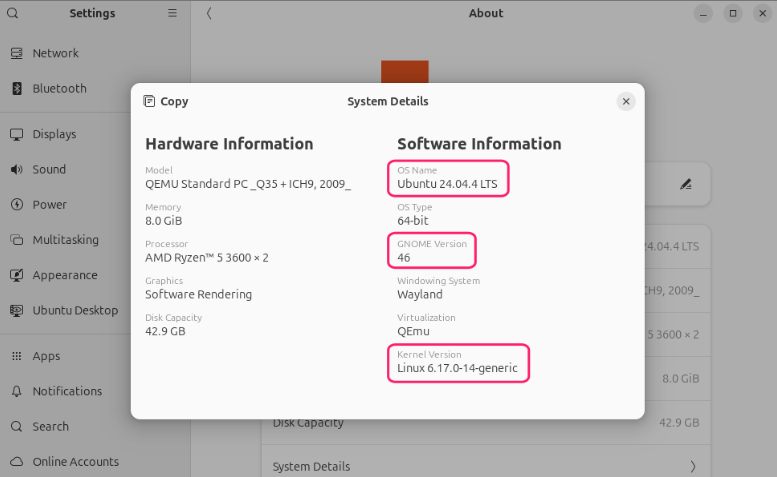
In earlier GNOME versions the About section is simplified, showing just a few details beyond the Ubuntu version

In later versions (> GNOME 41) more detailed system information is given under system details
Method 2: The lsb_release command
This is the gold standard for terminal users. It follows the Linux Standard Base (LSB) specification, meaning the output is consistent and reliable across almost all Debian-based systems.
Follow these steps:
1. Open a terminal window (default shortcut is Ctrl + Alt + T)
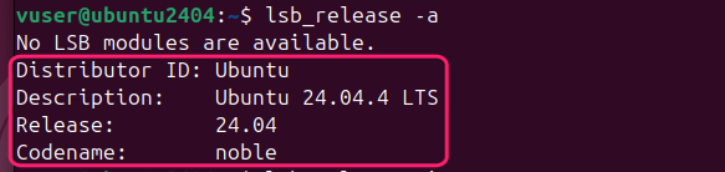
2. Run lsb_release -a (using -a will output all fields)

3. Examine the output:
- Distributor ID: Represents the Linux distribution
- Description: Full description of the distribution, including extended support tag and point release
- Release: Version number in YY.MM format
- Codename: Release codename for simplified identification
Method 3: Inspect the /etc/os-release file
This method is ideal for developers and sysadmins who need to pull version data into a script. It reads directly from a standard configuration file used by modern Linux distributions.
Follow these steps:
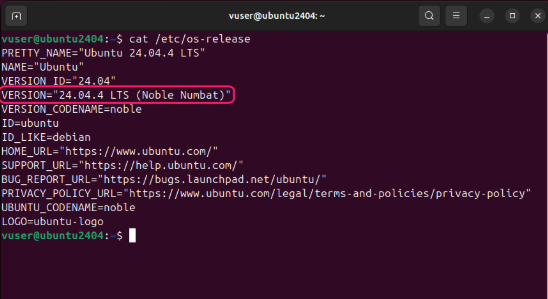
1. Open a terminal window and run cat /etc/os-release

2. Examine the output:
- VERSION: Full description of the distribution, including extended support tag, point release and codename
- VERSION_ID: Version number in YY.MM format
- NAME, ID: Represents the Linux distribution
Method 4: Use hostnamectl
While primarily used to manage the system hostname, hostnamectl can also retrieve Ubuntu version information. It’s a modern, all-in-one command for identifying systems on distributions that use systemd.
Follow these steps:
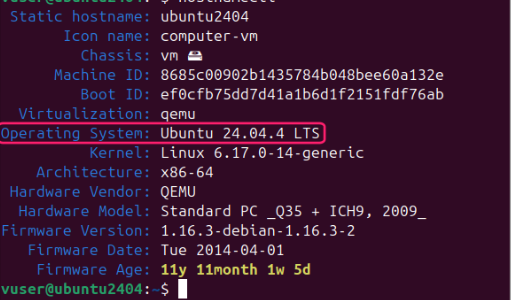
1. Inside a terminal run hostnamectl

2. Examine the Operating System field to see the Ubuntu version
Method 5: Use cat /etc/issue
This is a quick way to check the version via a plain text file often used for the login prompt. It’s fast, but it shouldn’t be considered authoritative as it can be manually edited by users with sudo privileges.
Follow these steps:
1. Run cat /etc/issue in a terminal window and examine the output
Take note: Using cat will also list the \n and \l escape sequences (new line and terminal line) used for formatting the login screen

2. /etc/issue.net is the network equivalent used by SSH and typically omits these escape sequences

» Here are essential scripts that every IT professional needs to know
Method 6: Remote version checks via SSH
This approach allows IT administrators to check versions across multiple systems without physically visiting each computer. It ensures consistent results across the network by using secure, password-less access.
Follow these steps:
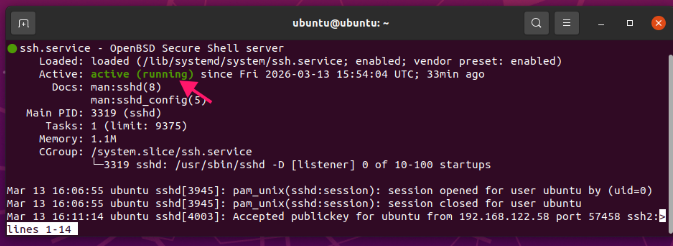
1. Run sudo apt install openssh-server to install the server (on the targeted computers). Make sure the server is running: systemctl status sshd
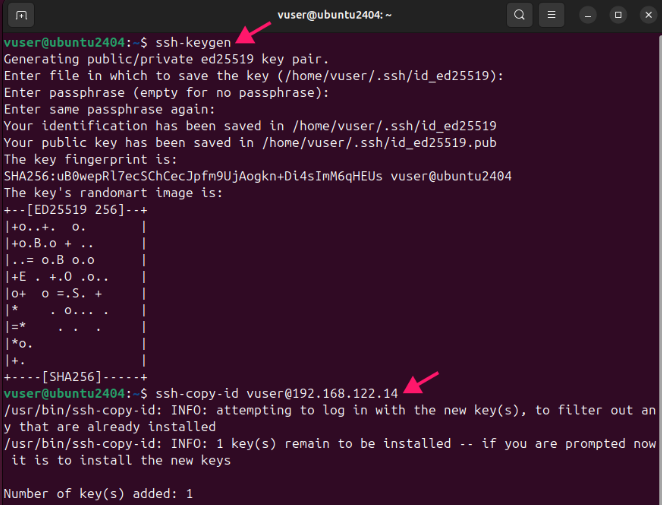
2. On the computer that will run the script run: ssh-keygen to generate a ssh key pair and copy the public key to the remote hosts by running ssh-copy-id <user>@<host>
3. To check a single host run: ssh <user>@<host> "source /etc/os-release && echo \$PRETTY_NAME"

4. For multiple hosts, use this bash script:
The Script:
Atera does not guarantee the integrity, availability, security, virus-free, safety, lawfulness, non-infringement, rights’ status, or functionality of the scripts. The use of the shared scripts is at your own risk. Scripts are provided “AS IS”. *
#!/bin/bash

set -e  # exit if a command fails

source /etc/os-release

echo "Host version: $PRETTY_NAME"
echo "Checking remote machines..."
for host in $(cat hosts.txt); do
  echo "=== $host ==="
  ssh "$host" 'source /etc/os-release && echo $PRETTY_NAME'
done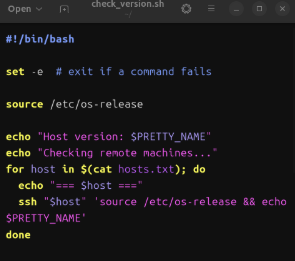
5. Save your hosts information in a text file, for example hosts.txt.and execute the script by running ./your_script.sh
» Find out about Atera’s Linux RMM for better visibility
Manage Ubuntu versions with Atera
Managing individual SSH keys and custom scripts for a growing network of servers can quickly become unmanageable. Atera’s RMM platform simplifies this by pulling version info and patch status for every Ubuntu machine into one central dashboard automatically.
Instead of manually maintaining hosts.txt files or troubleshooting remote connections, you can use Atera’s AI Copilot to handle the tedious work for you. You can ask Copilot to generate specialized scripts for your Ubuntu systems and deploy them across your entire network in seconds. This removes the manual repetitive work and keeps your infrastructure standardized and secure.
Frequently Asked Questions
Related Articles

How to decide if you need a dedicated DEX platform, or already have one
"IT feels slow" is the complaint that often sells DEX platforms. Sometimes it signals a real blind spot, but just as often already catches and fixes the problem, and a new scoring layer would only add another console. Telling the two apart takes evidence, and the real gap usually isn't visibility at all.
Read now
How to set up secure printing across your organization
A secure print checkbox protects exactly one moment in a document's life. Everything else, from unencrypted traffic and unhardened devices to payroll printouts forgotten in a tray, stays exposed. Real secure printing covers the whole lifecycle: release policy, authentication, encryption, hardening, and a fleet that stays monitored long after rollout.
Read now
How to reduce alert fatigue in healthcare IT
In a hospital, a dismissed alert isn't a delayed ticket. It can be a patient deteriorating while the monitor keeps sounding. Cutting alert volume won't fix that on its own, and switching alerts off can make it worse.
Read now
How to prevent configuration drift across your IT infrastructure
Configuration drift rarely breaks anything the day it happens. It hides in a hotfix, a reset default, or a vendor installer, then surfaces weeks later as a failure nobody can trace. Stopping it means defining exactly what approved looks like, closing every side door into production, giving each setting one owning tool, and checking that the baseline itself hasn't gone stale.
Read nowEndless IT possibilities
Boost your productivity with Atera’s intuitive, centralized all-in-one platform









