
Table of contents
Generate summary with AI

Linux is having a moment. Global desktop market share has climbed to 4.7% in 2025, a 70% jump from 2.76% in 2022 and the momentum shows no sign of slowing. It’s probably because Windows 11’s hardware requirements are locking out capable machines, Microsoft is pushing ads and AI into corners of the OS users never asked for, and Linux distributions are becoming genuinely polished and user-friendly.
For IT pros curious about Linux but not ready to abandon Windows entirely, dual booting is the practical middle ground because it gives you two operating systems in one machine with full control over which one you use and when.
That said, getting a dual boot setup right requires more than just clicking through an installer. Between UEFI configuration, partition management, and bootloader quirks, there are enough moving parts to trip up even experienced technicians. This guide walks you through the entire process, from pre-installation checks to switching between operating systems, so you can set it up once and have it work reliably.
What to do first
Before touching a partition or downloading an ISO, there are a few things worth checking and setting up on the Windows side so you don’t end up with a broken boot or a corrupted filesystem.
Check hardware and compatibility
Not every machine is a good dual boot candidate. Here are the constraints to evaluate before committing:
- Secure Boot: Some Linux distributions don’t support Secure Boot. You can either disable Secure Boot in BIOS or choose a distribution that supports it, like Ubuntu or Fedora.
- Disk space: Linux needs room to live. If your Windows drive is nearly full, you’ll need to free up space or add a dedicated drive.
- BitLocker encryption: An encrypted drive may not be accessible from Linux. Disable or suspend BitLocker before resizing any partitions, and save your BitLocker recovery key to an external device or your Microsoft account.
- OEM restrictions: Some manufacturers lock down their machines, making it difficult or impossible to install a second operating system. Double check that your machine can even handle it.
- Driver support: Not all hardware manufacturers provide Linux drivers. Most concentrate on Windows, so check whether your hardware has Linux support before choosing a distribution.
On the compatibility side, a few additional factors are worth checking:
- Architecture: If you’re running Windows on ARM, confirm that your chosen Linux distribution supports ARM. Most mainstream distributions target x86_64, though ARM support is improving.
- Windows edition: Pro and Enterprise versions include Hyper-V, Microsoft’s built-in hypervisor. If Hyper-V is enabled, it can conflict with some Linux distributions, so disable it before proceeding.
» Don’t miss our guide to updating drivers on PC
Prepare Windows 11 for dual boot
Once you’ve confirmed your hardware is a good fit, work through the following steps in Windows before doing anything else.
1. Back up your system
A full system backup is non-negotiable before repartitioning a drive. Follow these steps:
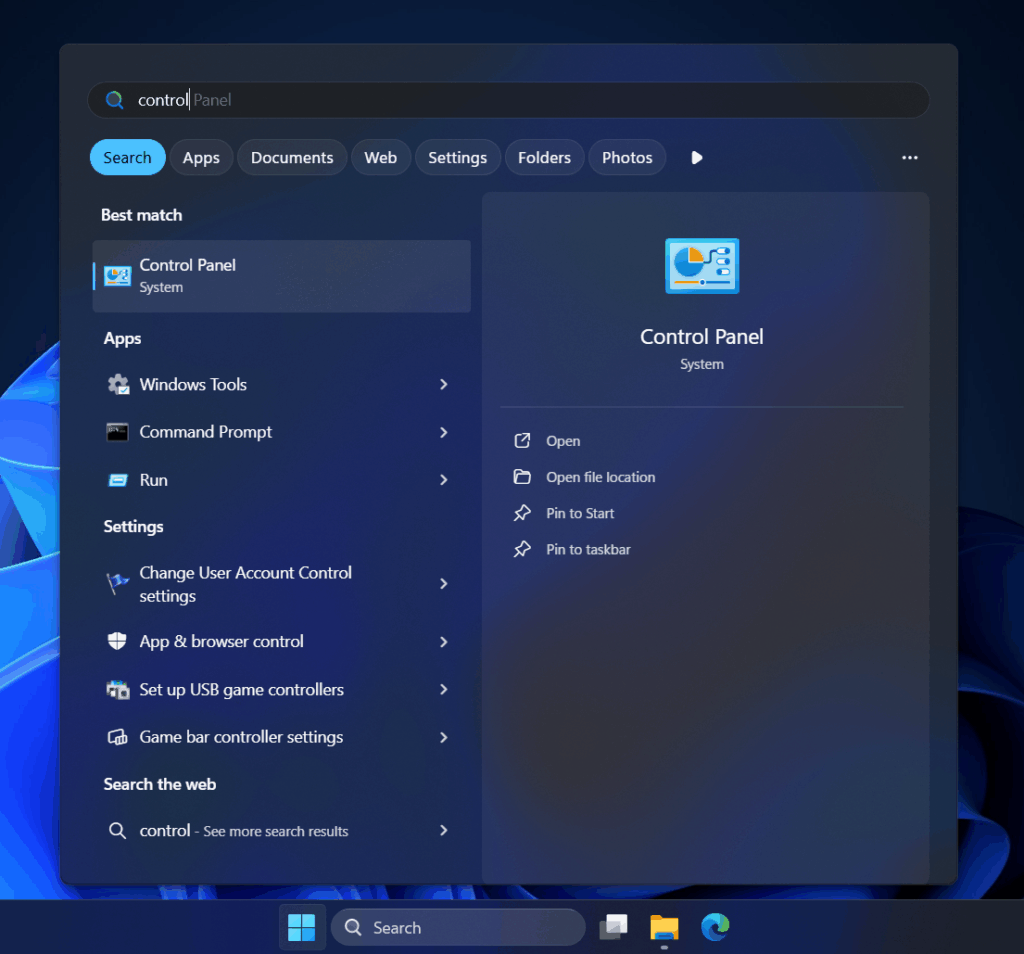
1. Open Control Panel.
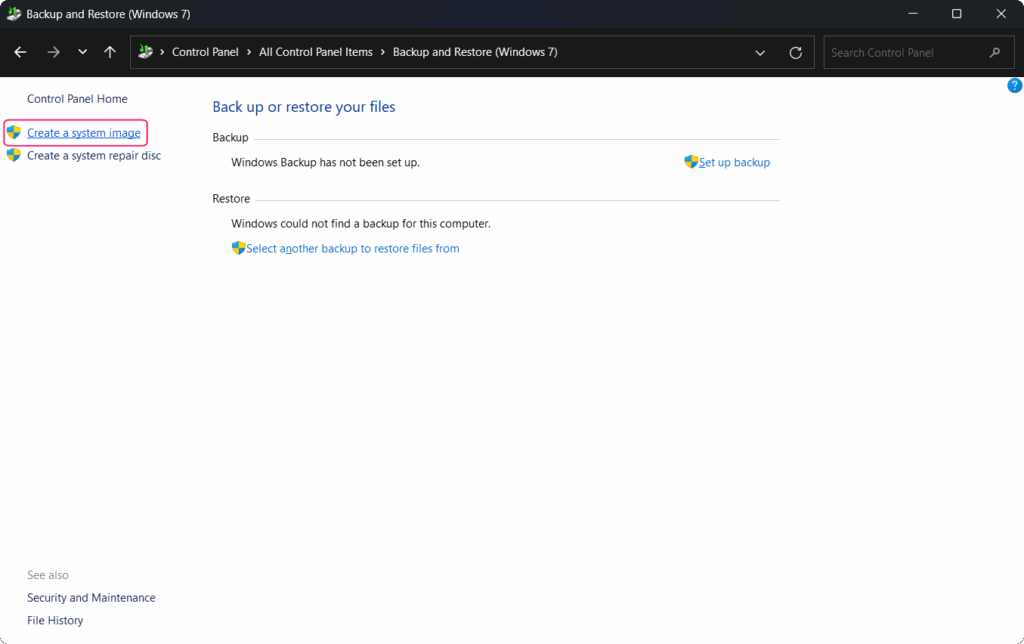
2. Navigate to Back up or restore your files and click Create a system image Backup and Restore (Windows 7) and create a system image.
Third-party backup tools work too, but make sure the backup is complete and verified before continuing.
2. Disable BitLocker
Resizing a partition on an encrypted drive without disabling BitLocker first risks data loss. Follow these steps:
1. Open Control Panel.
2. Navigate to BitLocker Drive Encryption.
3. Confirm BitLocker is off or suspended before proceeding.
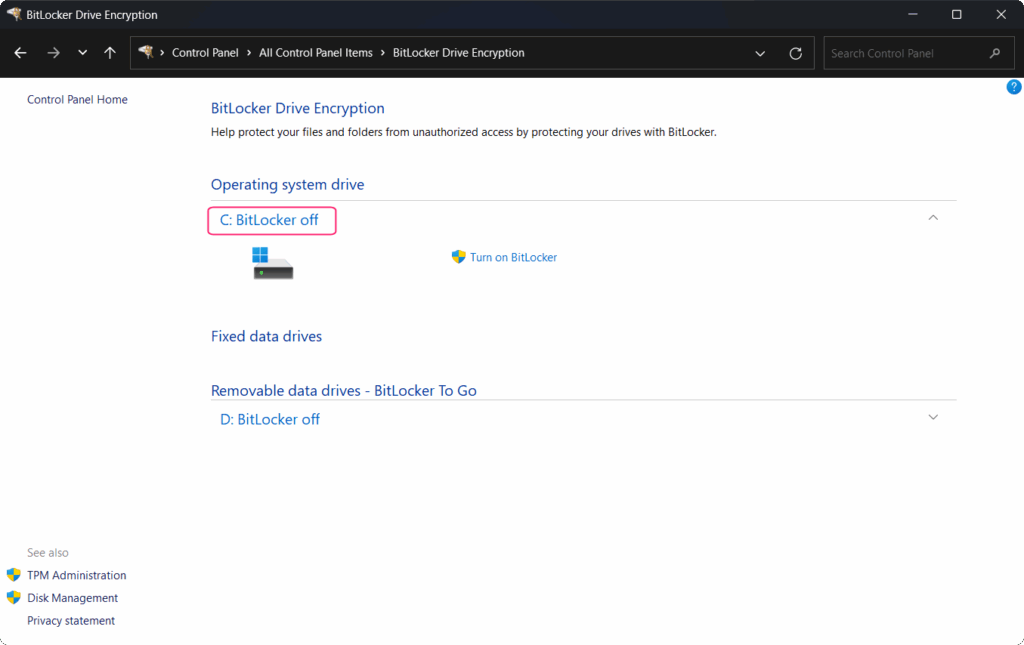
4. If needed, disable it (it may take a while to finish).
5. Save your BitLocker recovery key to an external device or your Microsoft account before making any changes.
» Need more help? Here’s our guide to using BitLocker correctly
3. Disable Fast Startup
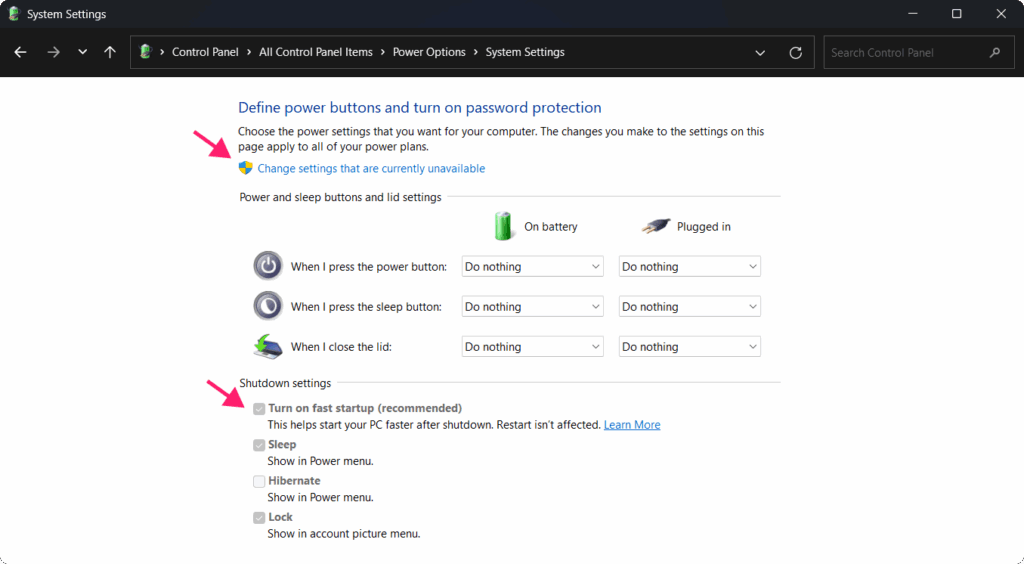
Fast Startup lets Windows partially hibernate instead of fully shutting down, which can cause filesystem issues when Linux tries to access NTFS partitions. Follow these steps:
1. Open Control Panel.
2. Navigate to Power Options > Choose what the power buttons do.
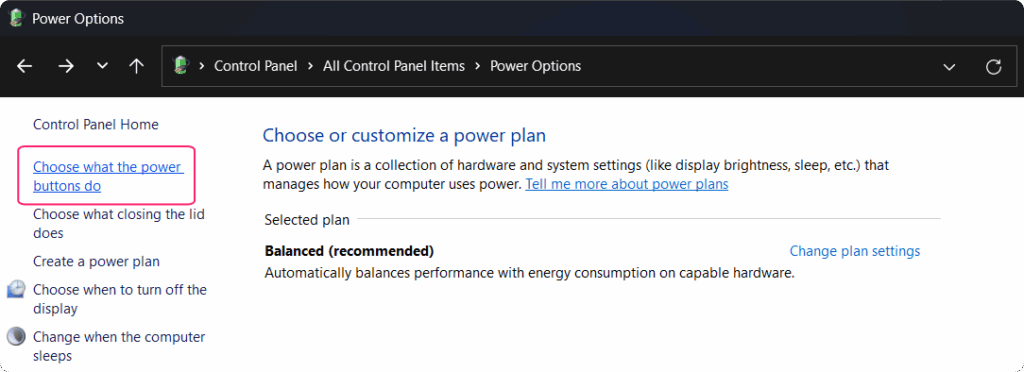
3. If the Fast Startup checkbox is greyed out, click Change settings that are currently unavailable to unlock it.
4. Uncheck Turn on fast startup and save your changes.
4. Disable hibernation
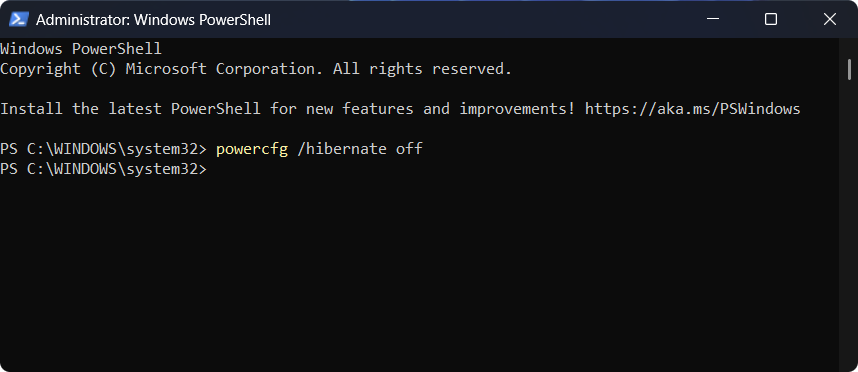
Even with Fast Startup off, full hibernation can still cause filesystem conflicts. Follow these steps:
1. Open Command Prompt or PowerShell as an administrator.

2. Run the following command: powercfg /hibernate off
» Did you know you can run PowerShell commands on a remote computer?
5. Shrink your Windows partition
Linux needs unallocated space to install into. Follow these steps:
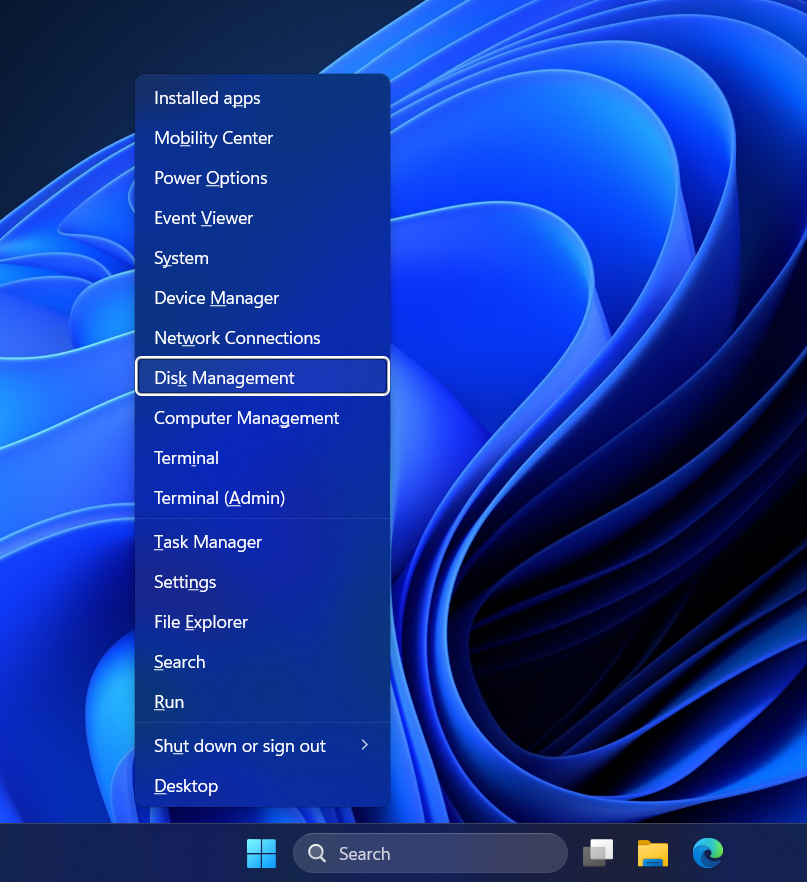
1. Press Win + X and open Disk Management.
2. Right-click your C: drive and select Shrink Volume.
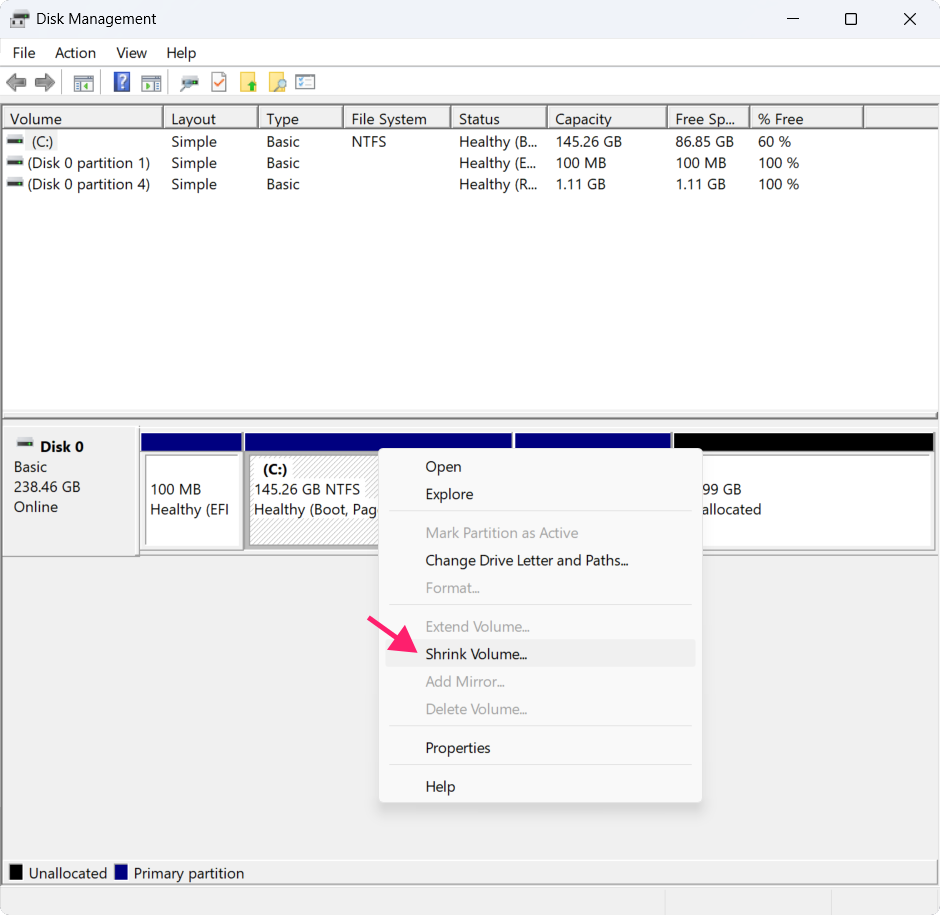
3. Enter the amount of space to free up and confirm.
4. Leave the freed space unallocated since the Linux installer will handle it from there.
» SSD causing issues? Here’s how to check your SSD health
6. Run Windows Update
Pending updates that modify boot files after Linux is installed can disrupt the bootloader, so clear them out first. Follow these steps:
1. Open Settings > Windows Update.
2. Download and install all pending updates.
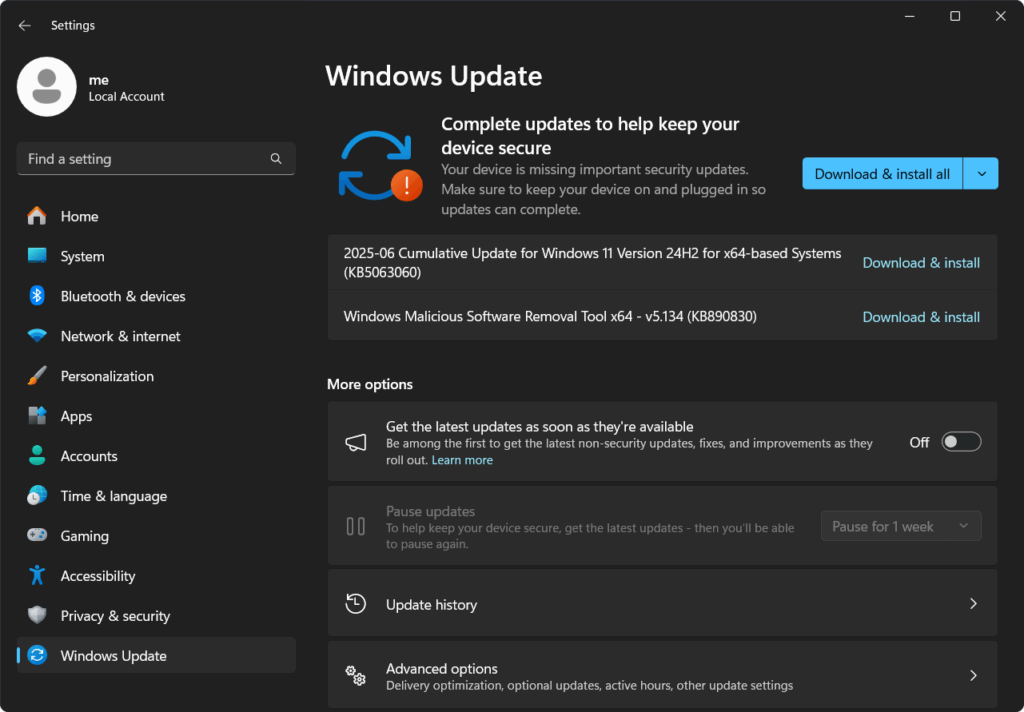
3. Reboot before starting the Linux installation.
» Here’s how to disable Windows updates and manually re-enable Windows updates
Step-by-step guide to dual booting Windows 11 and Linux
With your Windows 11 environment prepped and your partitions ready, it’s time to set up the dual boot. The process breaks down into three steps: creating your installation media, installing the dual boot setup, and configuring the bootloader so you can switch between operating systems reliably.
Step 1: Create your installation media
You’ll need a bootable USB drive loaded with your chosen Linux distribution. The process differs slightly depending on whether you’re working from Windows or Linux.
From Windows using Rufus
Rufus is the most reliable tool for creating UEFI-compatible Linux installation media on Windows. Follow these steps:
1. Go to the official website of your chosen Linux distribution and download the .iso file. For Ubuntu, that’s ubuntu.com/download. Make sure the distribution you choose supports UEFI; most modern distributions like Ubuntu, Debian, and Fedora do.
2. Download Rufus from rufus.ie and insert a USB flash drive large enough to hold the .iso file.
3. Launch Rufus as Administrator. In the Device section, select your USB drive.
4. Under Boot selection, select Disk or ISO image and click Select to choose the .iso file you downloaded.
5. Check that the Partition scheme is set to GPT, but Rufus should detect this automatically for most distributions.
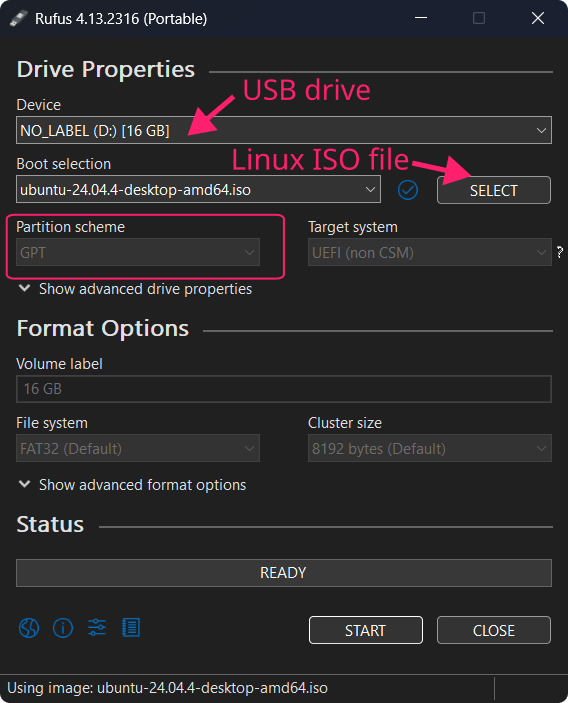
6. Click START. Rufus will warn you that all data on the USB drive will be erased. Make sure you’ve backed up anything important from the drive before confirming.
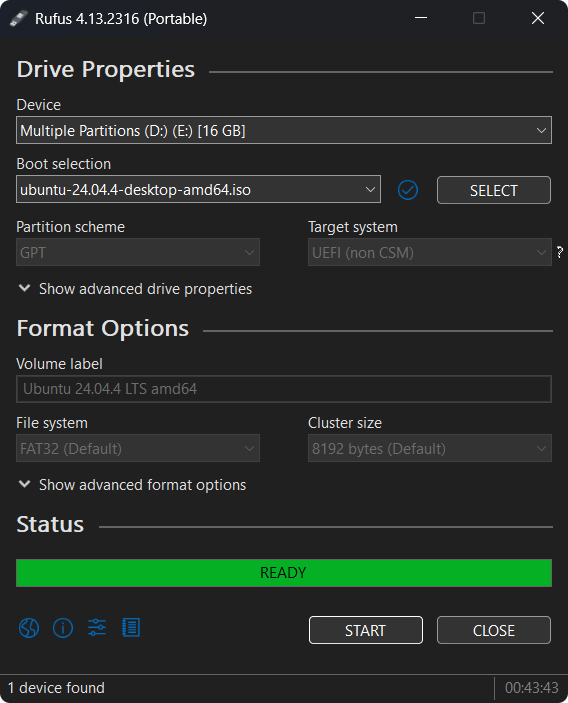
Once complete, your USB drive is ready with a UEFI-compatible Linux installer.
» Struggling? Check out our guides to reinstalling Windows 11 and using the Windows 11 creation tool
From Linux using dd
If you’re starting from a Linux machine and need to create Windows 11 installation media, use the dd command. Follow these steps:
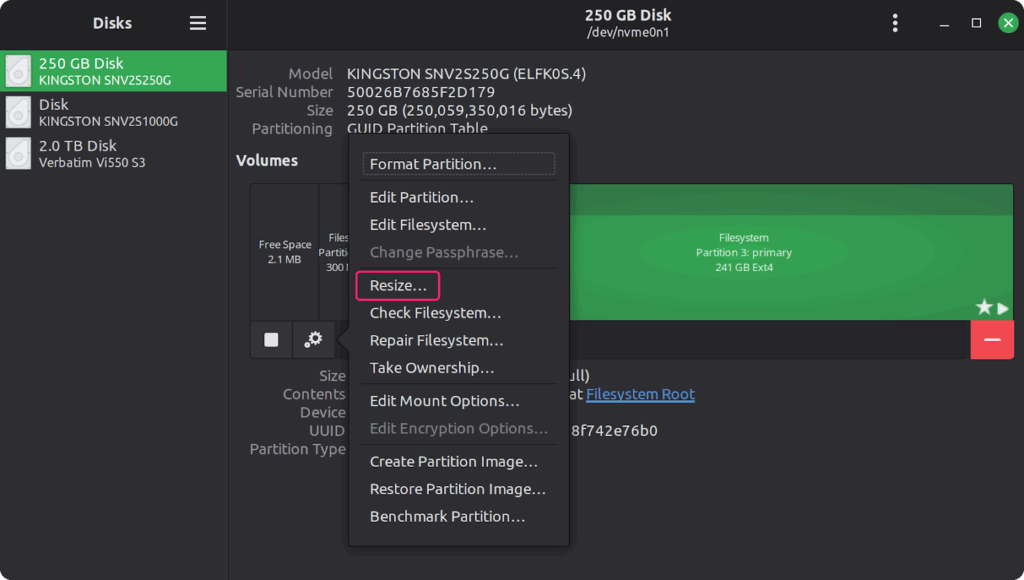
1. Resize your Linux partition to free up space for Windows, at least 64GB (but more is recommended for optimum performance). You can do this using tools like gparted or the system Disks utility.
2. Head to the Windows 11 .iso file download page and navigate to the Download Windows 11 Disk Image section.
3. Insert your USB drive and identify it using lsblk or fdisk in the terminal. You can usually identify the correct drive by its size.
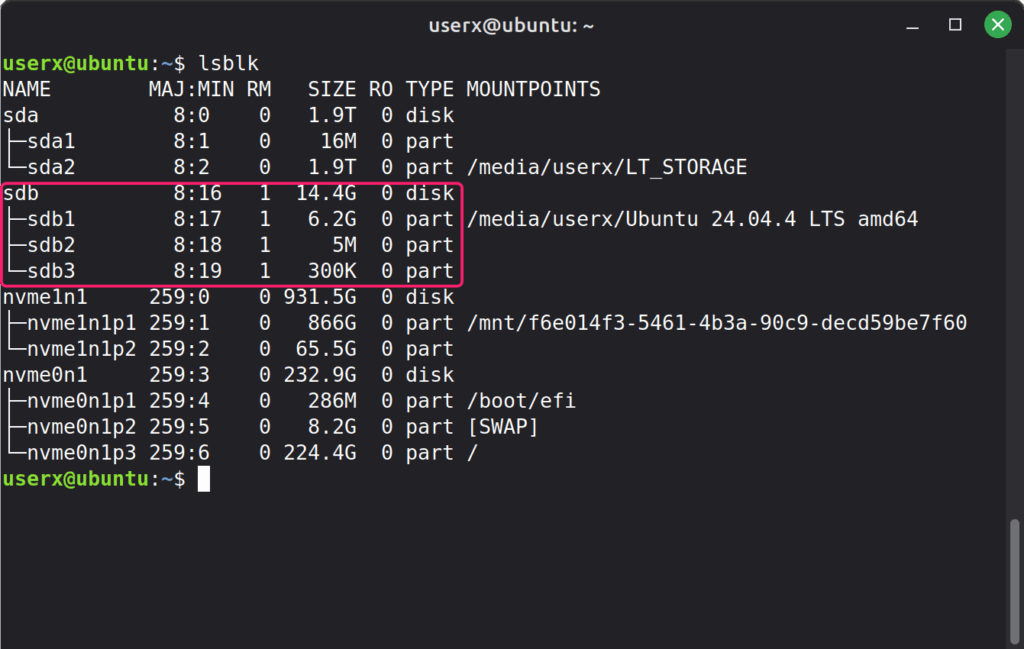
4. Run the following command in the terminal, replacing the path and device identifier with your own: sudo dd if=/path/to/windows11.iso of=/dev/sdX bs=4M status=progress oflag=sync
If you’re running the command from the same folder as the .iso file, you can specify just the filename for the if argument. Otherwise, include the full path. For example, ~/Downloads/Win11_25H2_EnglishInternational_x64.iso.
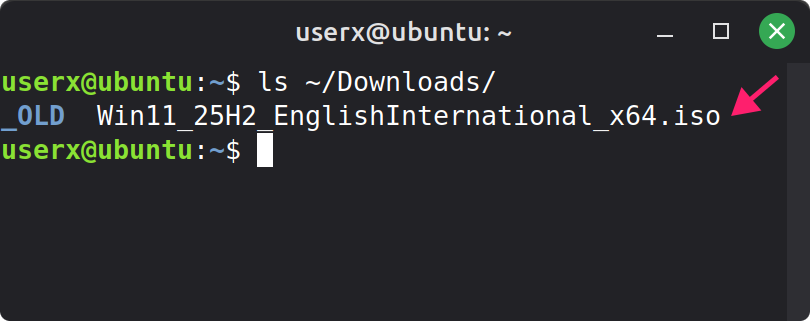
Important: dd will overwrite whatever drive you point it at without any further warning. Double-check your device identifier before running the command.
Step 2: Install the dual boot setup
There are two installation paths depending on whether you’re putting both operating systems on the same drive or on separate physical drives.
Option A: Single drive installation
This is the most common setup. The Linux installer will use the unallocated space you freed up during the preparation step. Follow these steps:
1. Insert your bootable USB drive and restart the machine.
2. Access the boot menu by pressing the appropriate key for your manufacturer (usually F2, F10, or F12. Desktop machines often use DEL).
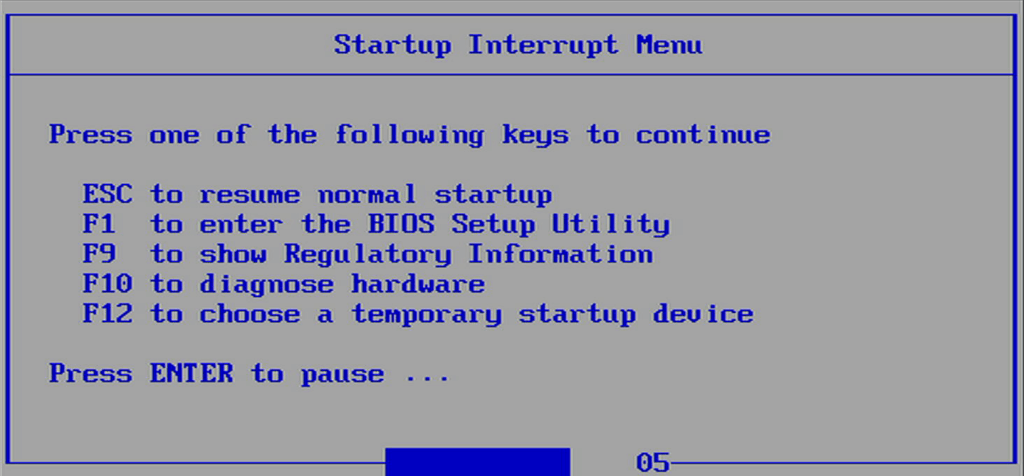
3. If you can’t find the right key, hold Shift while clicking Restart in Windows to access the advanced startup menu, then Troubleshoot > Advanced options > UEFI Firmware Settings.
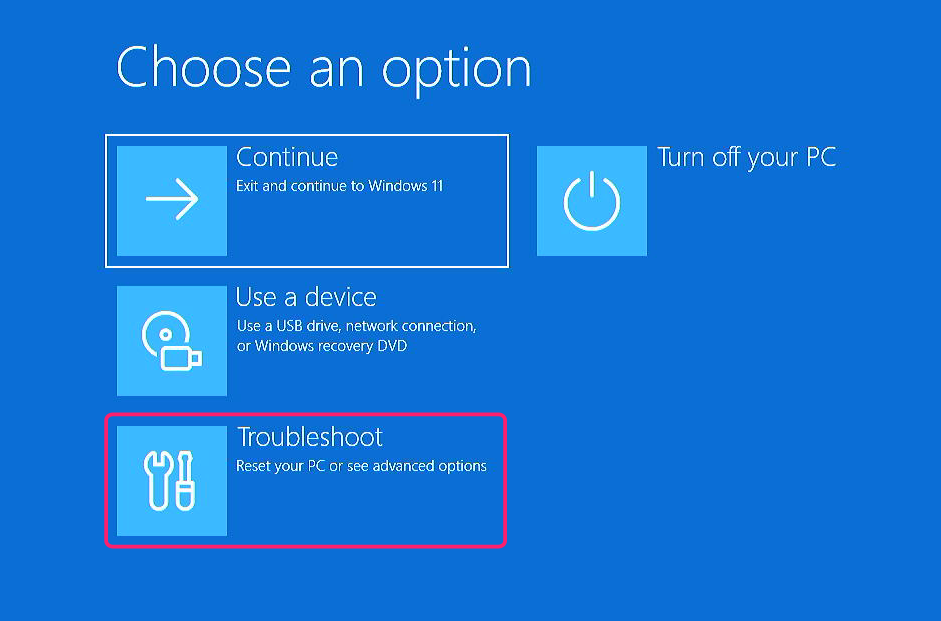
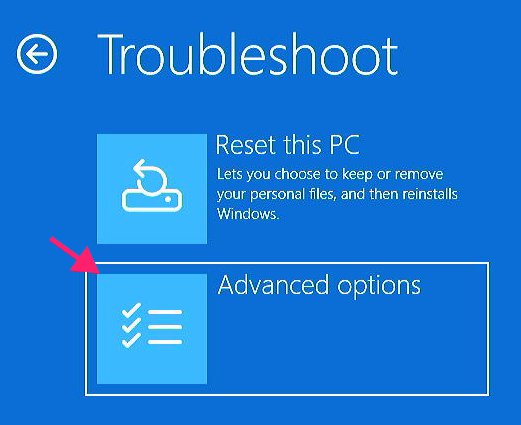
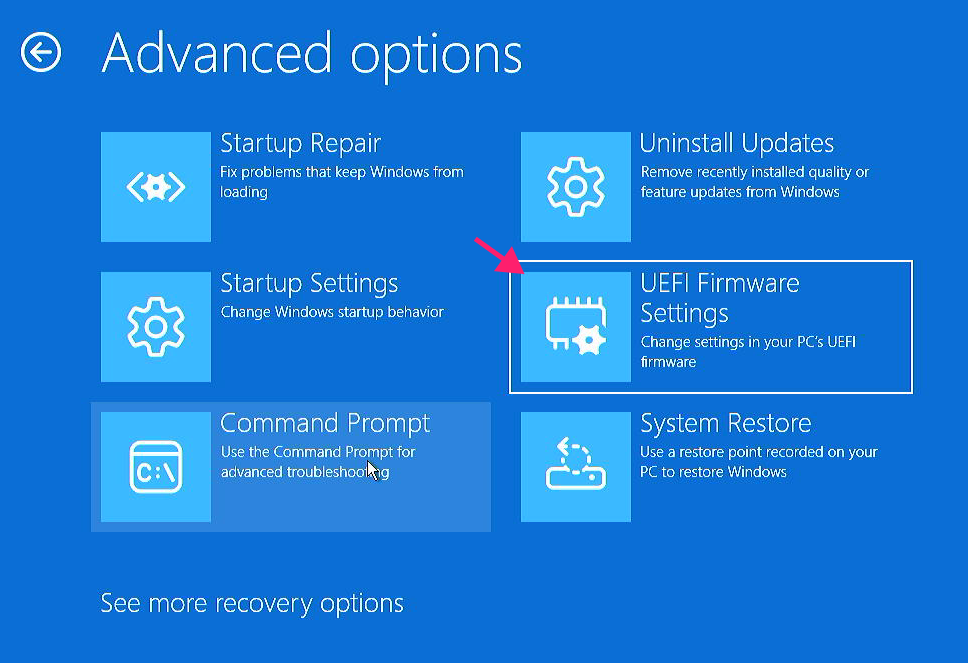
Once inside the BIOS settings, most machines have a boot override option where you can choose which drive to boot from. If that’s not available, temporarily modify the boot order to give priority to the USB drive.
» Outdated BIOS? Here’s how to update BIOS
4. Navigate to the Boot Order section and move the USB drive to the top of the list, then reboot. The system will boot from the USB drive.
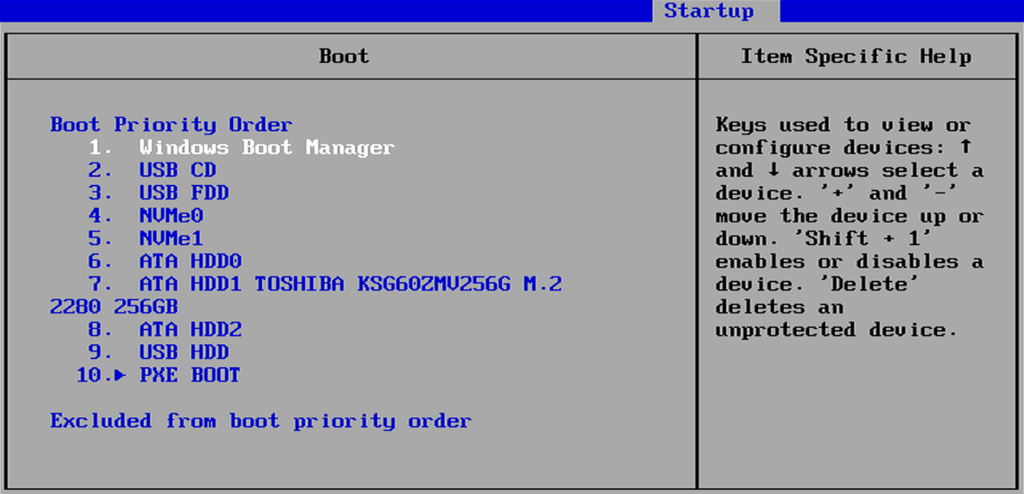
5. If you were able to access the boot menu directly, select the corresponding USB drive to start the installation.
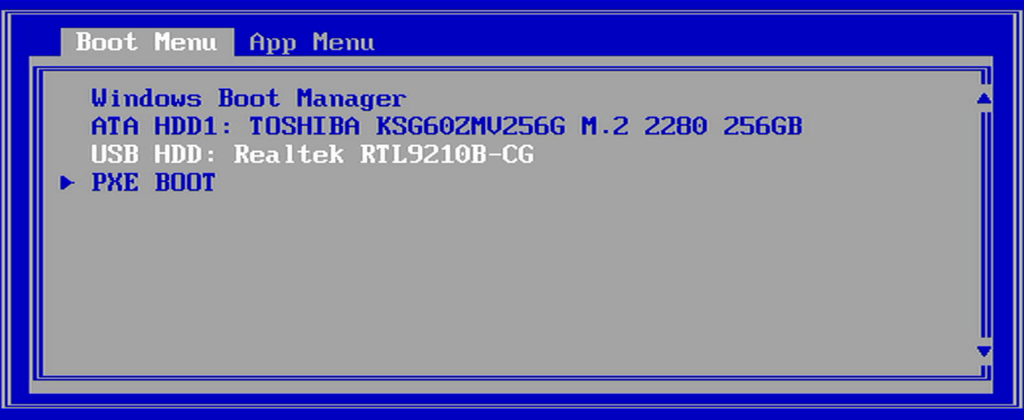
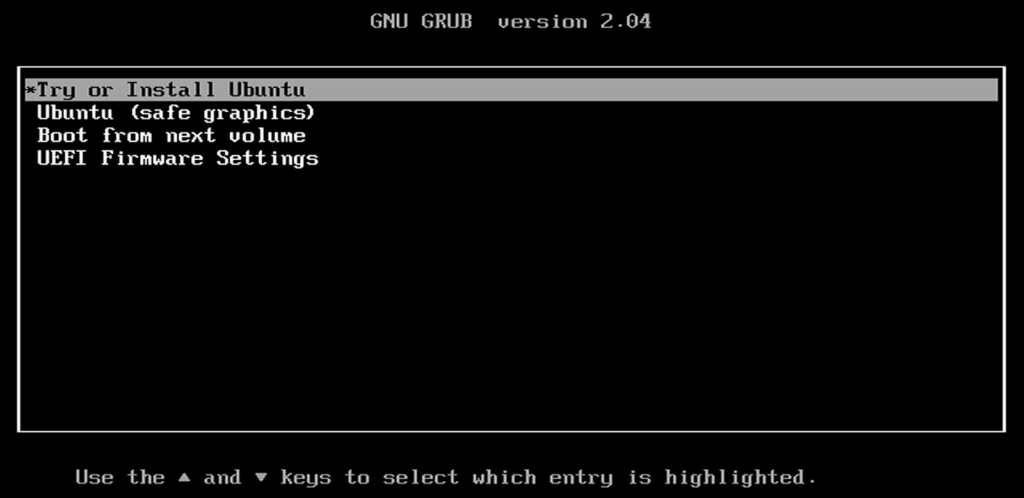
6. You will be prompted with another boot menu, now specific to your chosen Linux distribution. For Ubuntu, select Try or Install Ubuntu.
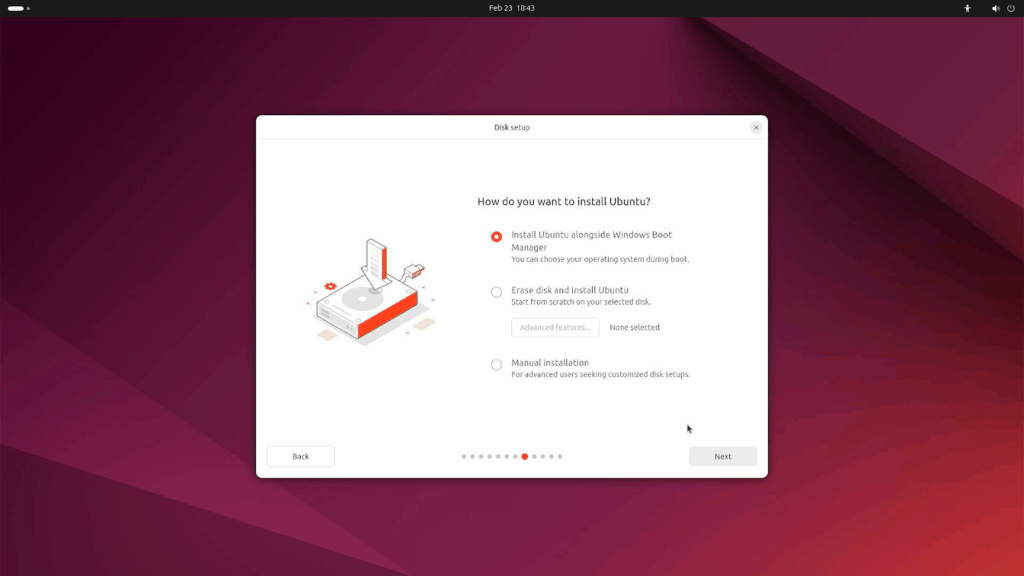
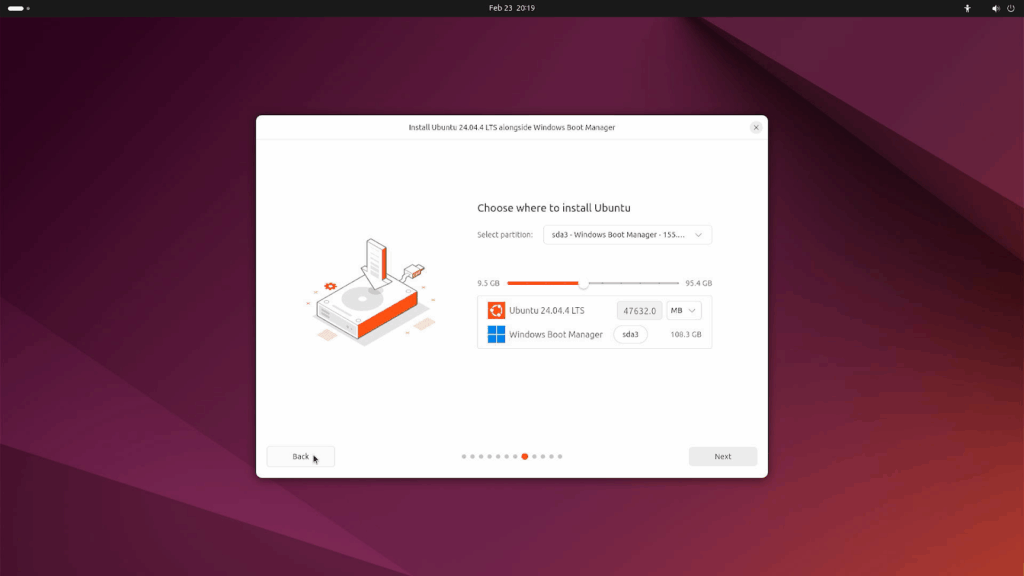
7. Most modern Linux distributions will detect your existing Windows 11 installation and allow you to select how much space to allocate from the space freed up in Windows.
8. Follow the on-screen installation prompts, allocate space for Linux using the slider provided, and proceed with the installation.
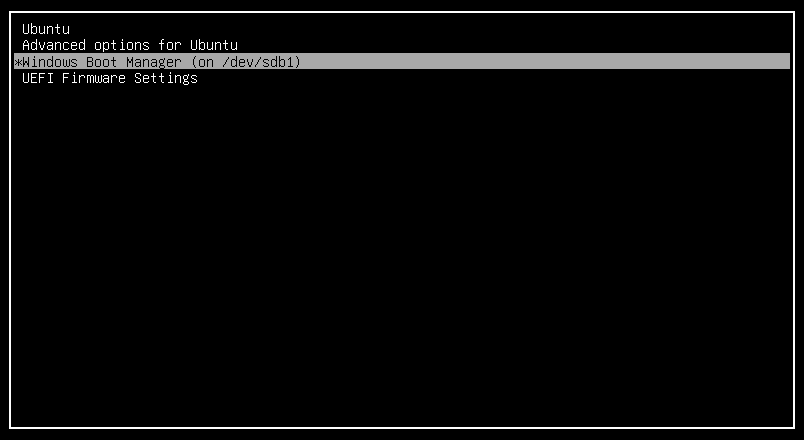
9. Once installation is complete, reboot when prompted. A new boot menu (GRUB) will appear allowing you to select which operating system to load.
Note: If you’re installing Windows 11 onto a machine that already has Linux, Windows will overwrite the GRUB bootloader with its own. To restore GRUB, boot from a live Linux USB, open a terminal, and run:
sudo mount /dev/sdXn /mnt
sudo mount --bind /dev /mnt/dev
sudo mount --bind /proc /mnt/proc
sudo mount --bind /sys /mnt/sys
sudo chroot /mnt
grub-install /dev/sdX
update-grub
If the Windows bootloader was corrupted, boot from the Windows installation USB, click Repair my PC, and from the Advanced options screen either run Startup Repair or manually fix the bootloader from Command Prompt by running:
bootrec /fixboot
bootrec /rebuildbcd
Option B: Separate drive installation
Installing each OS on its own physical drive is the cleaner option since the two systems are fully isolated, and removing one drive won’t affect the integrity of the other. The process is almost identical to Option A, with one key difference.
Follow these steps:
1. Follow steps 1 through 4 from Option A to boot from your USB drive.
2. When the installer asks where to install Linux, select the separate drive rather than the unallocated space on the Windows drive. You can distinguish between drives by capacity and manufacturer name.
3. You can use the entire separate drive for Linux with no manual partitioning needed.
4. Complete the installation and reboot when prompted.
The OS that boots by default is determined by the boot order set in your BIOS firmware. To boot a specific OS, use your machine’s boot menu at startup and select the corresponding drive. Boot order can also be adjusted permanently in your BIOS firmware settings.
Step 3: Configure the bootloader and switch between operating systems
Once both operating systems are installed, switching between them is straightforward. At startup, the GRUB boot menu will appear and let you select which OS to load. If you want to change the default OS or adjust timing, you can configure GRUB from a Linux terminal. Follow these steps:
1. Open a terminal in Linux.
2. Run sudo update-grub to scan for all installed operating systems and update the GRUB configuration. If Windows 11 is detected, it will be added to the boot menu automatically.
3. To set a default OS, run sudo nano /etc/default/grub to open the GRUB configuration file.
4. Find the line containing GRUB_DEFAULT=0. The number corresponds to the boot menu entry position, counting from 0. Change it to match the entry for your preferred default OS, such as GRUB_DEFAULT=2 if Windows is the third entry.
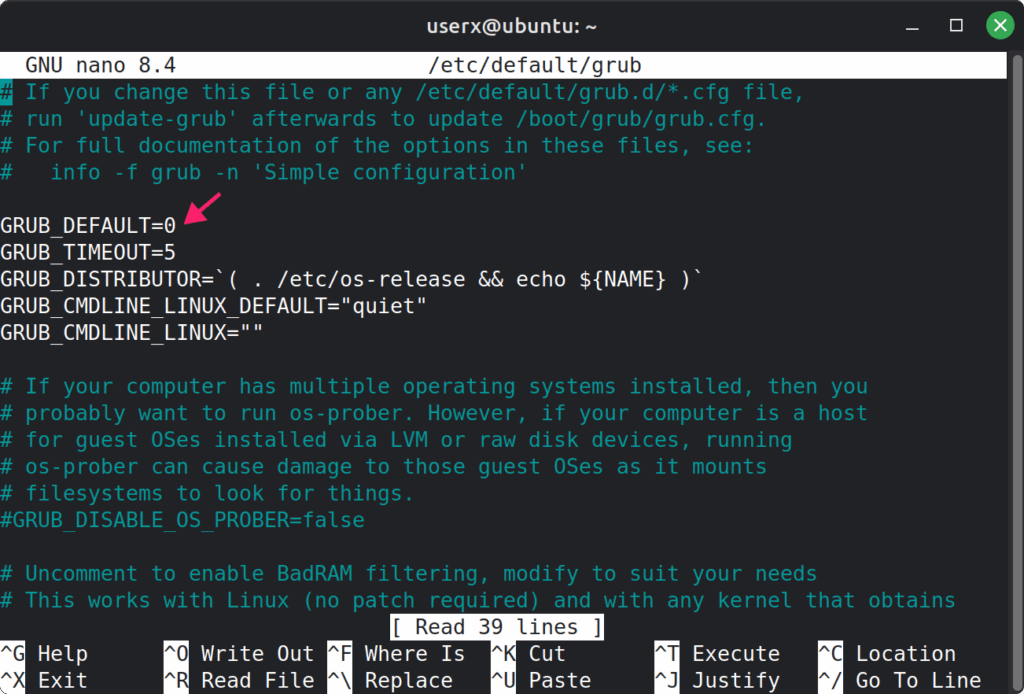
5. Press Ctrl + O to save, then Y to confirm, then Ctrl + X to exit.
6. Run sudo update-grub again to apply the changes.
For setups where each OS is on a separate drive, use your machine’s boot menu at startup to select the drive you want to boot from. Boot order can also be adjusted permanently in your BIOS firmware settings.
Control your IT environment better with Atera
Dual booting Windows 11 and Linux gives IT pros the flexibility to work across both environments without committing to one or the other. Done right, with proper preparation, clean partitioning, and a correctly configured bootloader, it’s a stable and reliable setup. Done wrong, it’s a recovery USB and a few tense terminal commands away from a bad afternoon.
Managing dual boot machines across a team adds another layer of complexity with tracking configurations, keeping both operating systems patched, and maintaining visibility across mixed OS environments. Atera’s all-in-one RMM platform covers Windows, Mac, and Linux from a single dashboard, with automated patch management and scripting running in the background so routine maintenance doesn’t fall through the cracks.
» Interested? Try Atera for free
Frequently Asked Questions
Related Articles
How to decide if you need a dedicated DEX platform, or already have one
"IT feels slow" is the complaint that often sells DEX platforms. Sometimes it signals a real blind spot, but just as often already catches and fixes the problem, and a new scoring layer would only add another console. Telling the two apart takes evidence, and the real gap usually isn't visibility at all.
Read now
How to set up secure printing across your organization
A secure print checkbox protects exactly one moment in a document's life. Everything else, from unencrypted traffic and unhardened devices to payroll printouts forgotten in a tray, stays exposed. Real secure printing covers the whole lifecycle: release policy, authentication, encryption, hardening, and a fleet that stays monitored long after rollout.
Read now
How to reduce alert fatigue in healthcare IT
In a hospital, a dismissed alert isn't a delayed ticket. It can be a patient deteriorating while the monitor keeps sounding. Cutting alert volume won't fix that on its own, and switching alerts off can make it worse.
Read now
How to prevent configuration drift across your IT infrastructure
Configuration drift rarely breaks anything the day it happens. It hides in a hotfix, a reset default, or a vendor installer, then surfaces weeks later as a failure nobody can trace. Stopping it means defining exactly what approved looks like, closing every side door into production, giving each setting one owning tool, and checking that the baseline itself hasn't gone stale.
Read nowEndless IT possibilities
Boost your productivity with Atera’s intuitive, centralized all-in-one platform









