
Generate summary with AI

A user in your organization unlinks OneDrive from their device or it gets removed during system cleanup. Within minutes, files that were previously visible in File Explorer start disappearing or show as unavailable. Shared folders stop syncing, and Office files lose AutoSave functionality.
What initially looks like a simple sync change quickly turns into missing files and disrupted workflows if the system wasn’t prepared correctly.
In this guide, you’ll learn how to safely handle OneDrive removal, ensure all cloud files are stored locally, and prevent data loss or access issues during the transition.
» Here’s how to increase IT efficiency in your organization
Pre-removal impact on OneDrive features, Microsoft Office, and file sharing
Decoupling OneDrive impacts default Windows features that users rely on for daily collaboration and data safety.
- Microsoft Office AutoSave: AutoSave only works for files stored in OneDrive or SharePoint. Once decoupled, the old AutoRecovery behavior will still be available to periodically save copies of changed files, but Version History will no longer work for locally stored files.
- File sharing changes: The Share functionality in OneDrive can generate shareable links with granular permission controls to manage who can access the files. Decoupling OneDrive removes this feature from the right-click context menu in File Explorer. Users will have to rely on classic share mechanisms like Bluetooth, Wi-Fi, or email, or configure file sharing over the network.
How users must handle Files On-Demand
OneDrive Files On-Demand (enabled by default starting with build 23.066) allows cloud file access without having to download them and use storage space on your system. The icon next to the file specifies the sync state:
- Online-only files: Blue cloud icon.
- Online-only files that have been opened: Green tick mark with white background. When Storage Sense is turned on these files will become online-only after a set period of time.
- Always keep on device marked files: Solid green circle with white tick mark. These files take up space and are always available.
Keep in mind that any online-only files will become unavailable when you sever the sync connection
How to ensure files are safely downloaded
For individual files and folders, use the context menu option Always keep on device to make sure you retain access.
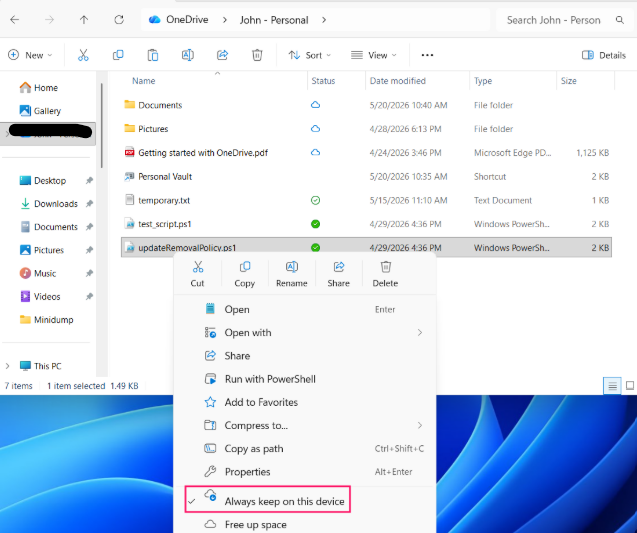
Alternatively you can download everything by using the Download all files option:
1. Right-click the OneDrive icon in File Explorer and go to OneDrive > Settings
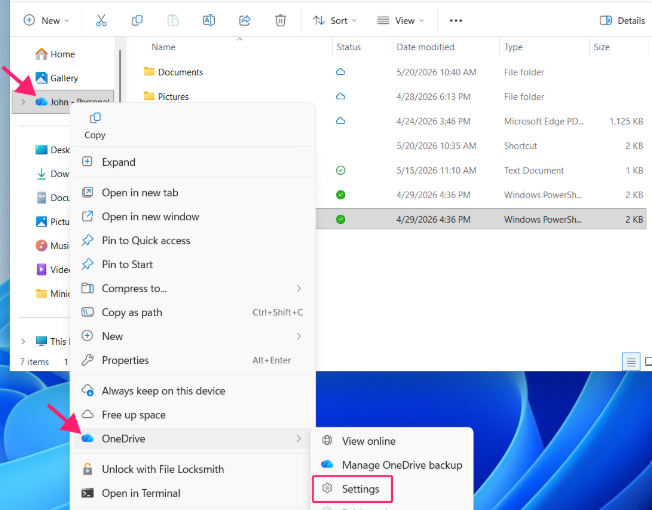
2. Click Sync and backup > Advanced settings > Download all files
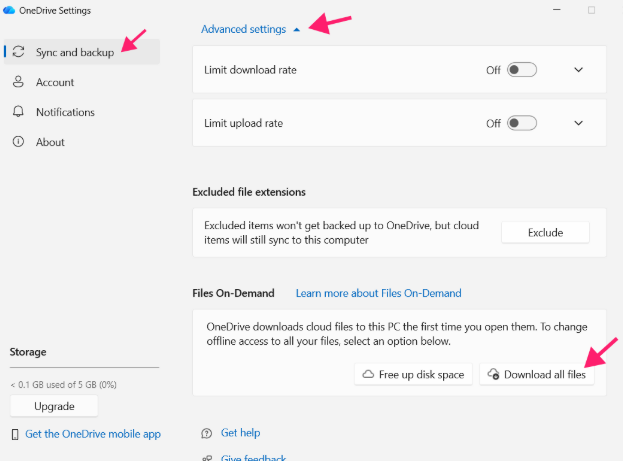
Take note: This is the bulk equivalent of marking all files as Always keep on device
Backup steps to prevent OneDrive data loss
To guarantee zero data loss when transitioning files out of the default OneDrive directory, use these preparation steps:
Stop folder backup before unlinking
1. Open OneDrive Settings and go to Sync and Backup > Manage backup
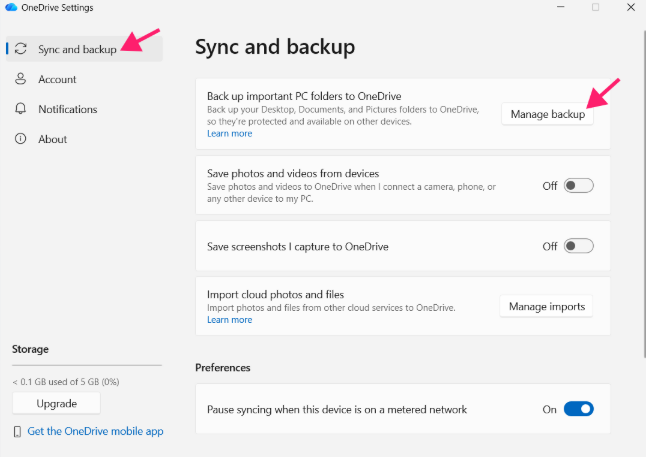
2. Disable backup for each individual folder
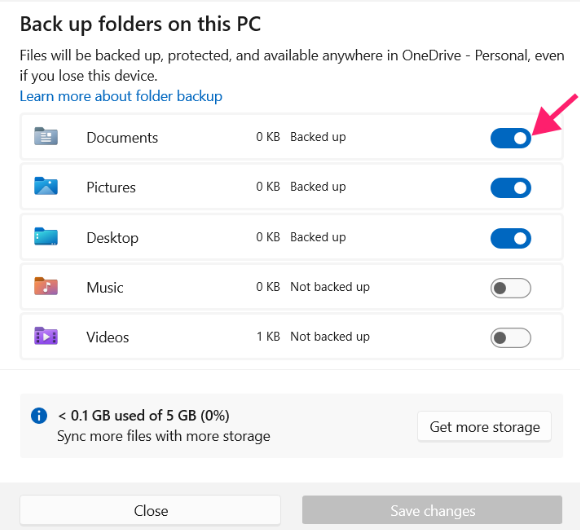
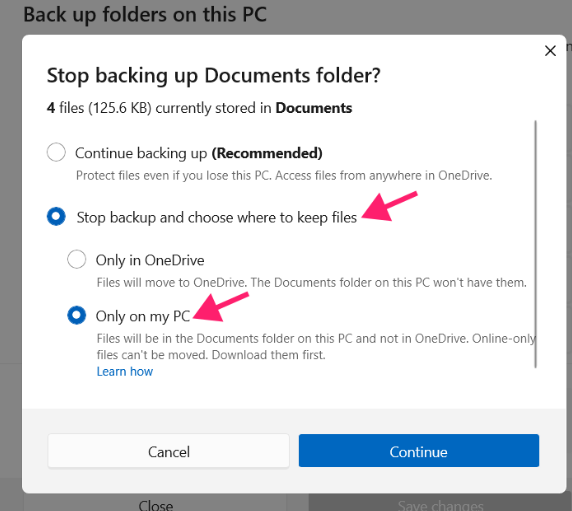
3. You’ll be prompted to decide what to do with the files; choose to save them to your PC
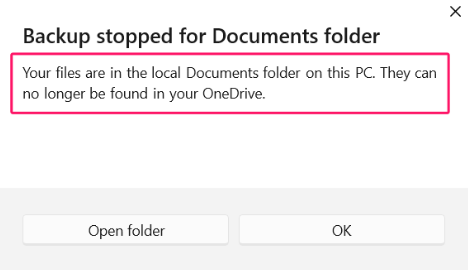
4. Wait for the confirmation screen
Ensure no cloud-only placeholders remain
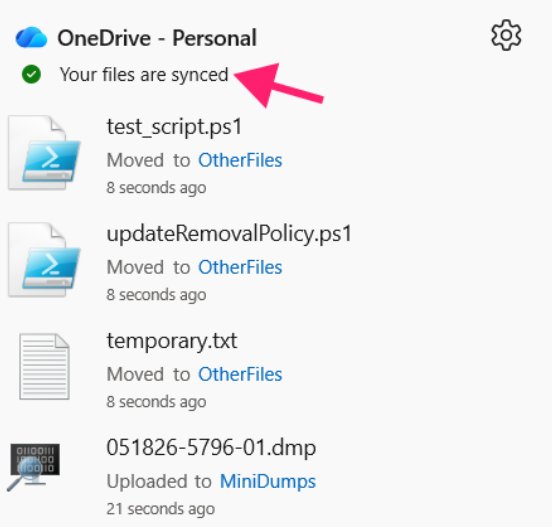
1. Confirm sync is complete. If OneDrive is still uploading when you begin transitioning, files can be lost mid-transfer
Relocate your data
1. Press Win + E to open File Explorer and navigate to your main OneDrive folder
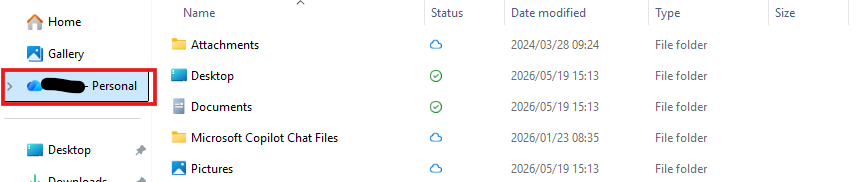
2. Press Ctrl + A to select all files and folders
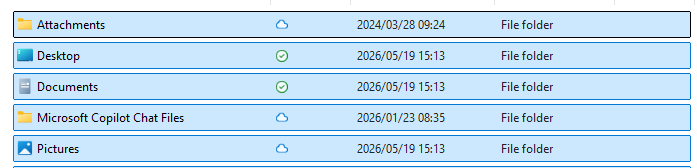
3. Press Ctrl + X to cut the files, or press Ctrl + C to copy them
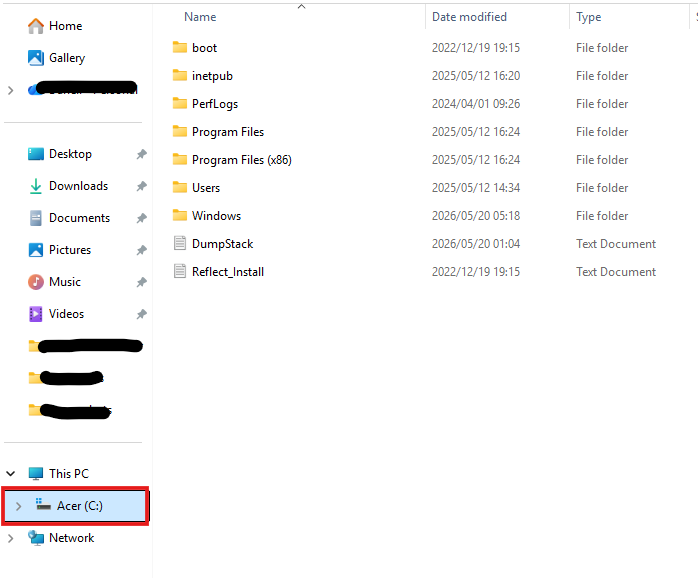
4. Navigate to a safe local path outside of the OneDrive folder structure, such as a new folder created directly on your C:\ drive and press Ctrl + V to paste the files into the new local directory
Keep in mind that deleted items can still be restored from the OneDrive recycle bin within a certain time frame depending on the account type
6 ways to disable and remove OneDrive from File Explorer
To completely decouple your system from cloud synchronization, you can use these native Windows methods to unlink, disable, or entirely remove the application.
Method 1: Unlink your account
This method stops all active synchronization and safely disconnects your Windows PC from your Microsoft account.
Follow these steps:
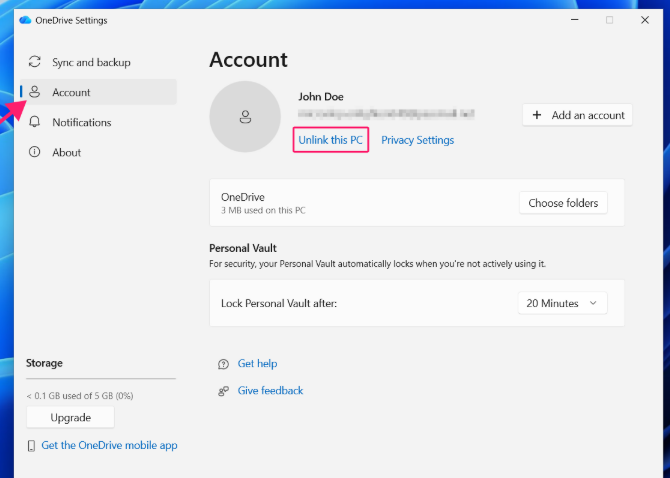
1. Open OneDrive Settings and go to the Account section. Look for the Unlink this PC button/link and press it
2. You’ll be prompted to confirm the action
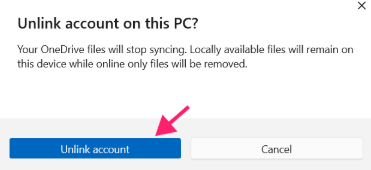
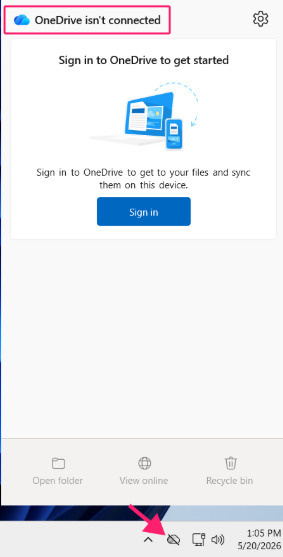
3. To confirm that you have successfully unlinked the account, check the OneDrive icon and status. The icon should be crossed and you should see a OneDrive isn’t connected message
» Make sure you know how to remove a Microsoft account from Windows 11
Method 2: Disable OneDrive from Windows Startup processes
This method permanently prevents OneDrive from running in the background and starting automatically when your computer boots.
Follow these steps:
1. Press Ctrl + Shift + Esc or right-click the taskbar and select Task Manager
2. Go to the Startup Apps section and look for the OneDrive entry. Either right-click the entry and select Disable or use the Disable button from the menu bar
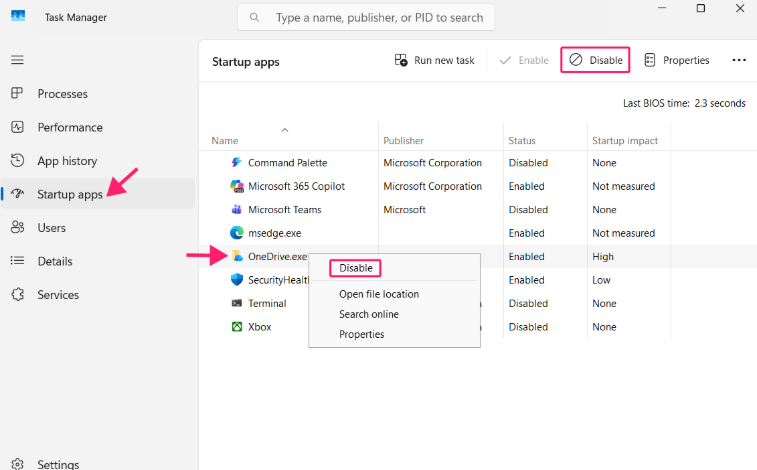
After the next system reboot, OneDrive will not start automatically and you shouldn’t see the OneDrive icon present in the taskbar
Method 3: Uninstall the OneDrive application
This method completely removes the OneDrive application from your system using the native Windows Settings menu.
Follow these steps:
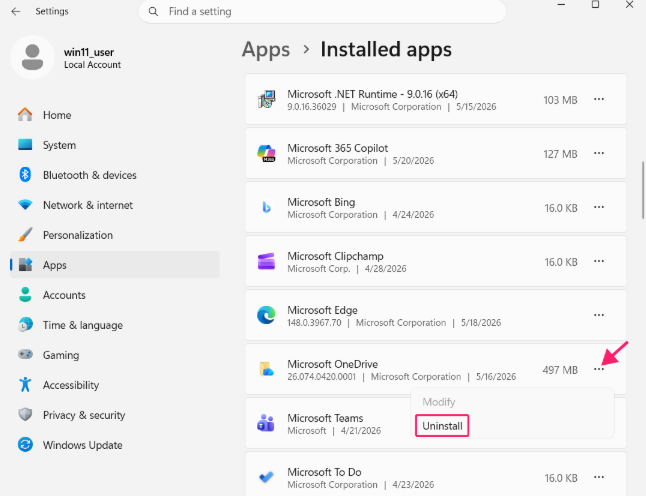
1. Press Win + I to open Settings
2. Go to Apps > Installed apps
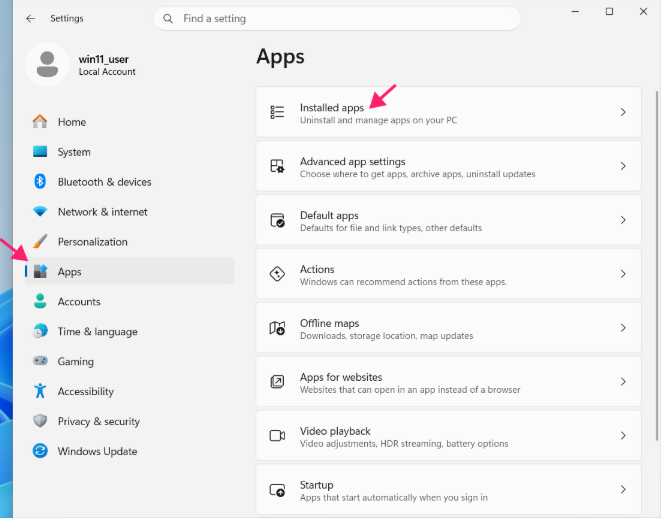
Search for OneDrive, press the options button (…) and select Uninstall
Method 4: Modify Registry Editor values
This method hides the persistent OneDrive folder icon from the File Explorer navigation pane and file dialogs.
Follow these steps:
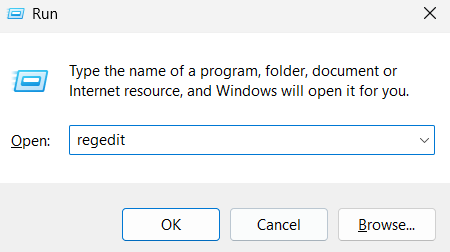
1. Open Registry Editor (Win + R, type regedit, press Enter)
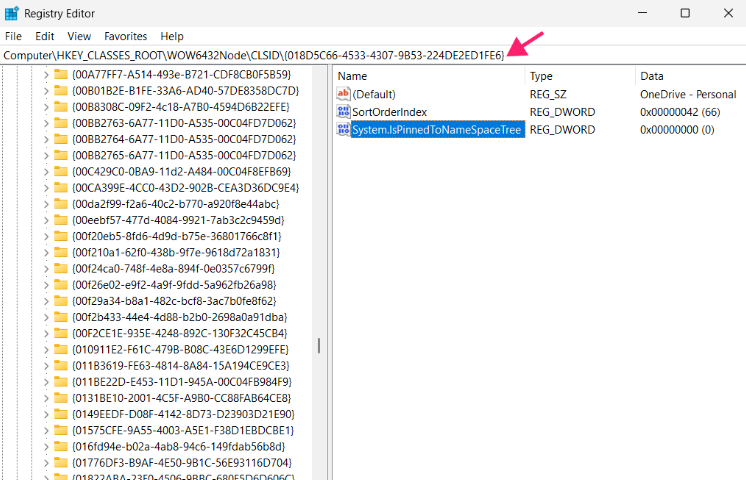
2. Navigate to: HKEY_CLASSES_ROOT\CLSID\{018D5C66-4533-4307-9B53-224DE2ED1FE6} and look for the System.IsPinnedToNameSpaceTree key. Update it to 0

Delete the {018D5C66-4533-4307-9B53-224DE2ED1FE6} subkey at HKEY_LOCAL_MACHINE\SOFTWARE\Microsoft\Windows\CurrentVersion\Explorer\Desktop\NameSpace\ to clear the Global Desktop Namespace Reference.
To set this only for the current user:
- Update the
System.IsPinnedToNameSpaceTreekey to 0 at:HKEY_CURRENT_USER\Software\Classes\CLSID\{018D5C66-4533-4307-9B53-224DE2ED1FE6} - Delete the subkey
{018D5C66-4533-4307-9B53-224DE2ED1FE6}at:HKEY_CURRENT_USER\Software\Microsoft\Windows\CurrentVersion\Explorer\Desktop\NameSpace\
For 64-bit systems:
Update the System.IsPinnedToNameSpaceTree key to 0 at: HKEY_CLASSES_ROOT\Wow6432Node\CLSID\{018D5C66-4533-4307-9B53-224DE2ED1FE6}
This prevents 32-bit apps from showing the entry in Save As dialogs
» Check out these registry editor challenges and how to overcome them
Method 5: Leverage Group Policy Editor
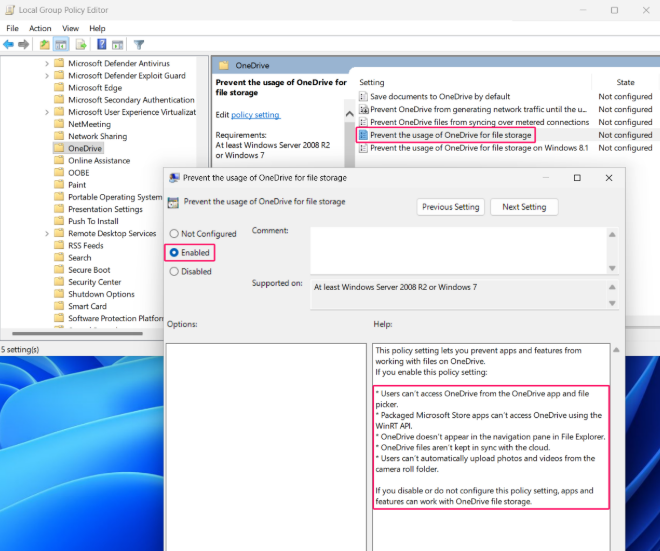
This method allows IT administrators to open Group Policy Editor and universally block OneDrive usage for file storage machine-wide across the local system.
Take note: Ensure all required files have been downloaded locally before enabling this machine-wide block.
Follow these steps:
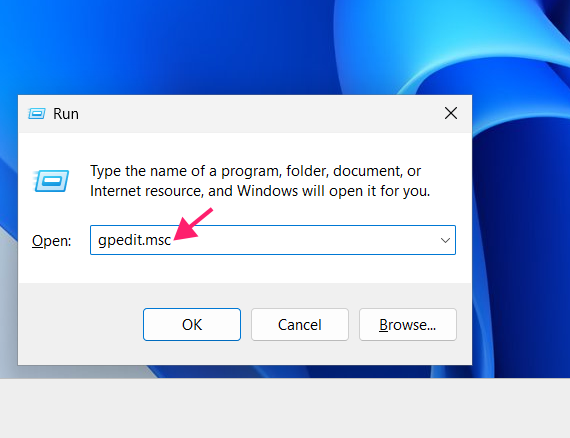
1. Press Win + R, type gpedit.msc and press Enter
2. Go to Computer Configuration > Administrative Templates > Windows Components > OneDrive.
3. Enable the Prevent the usage of OneDrive for file storage policy
» Here’s everything you need to know about group policy management with Atera
Method 6: Forced Command-Line termination and uninstallation
This method uses administrative commands to force-close OneDrive and silently remove the application when standard settings menus fail to respond.
Follow these steps:
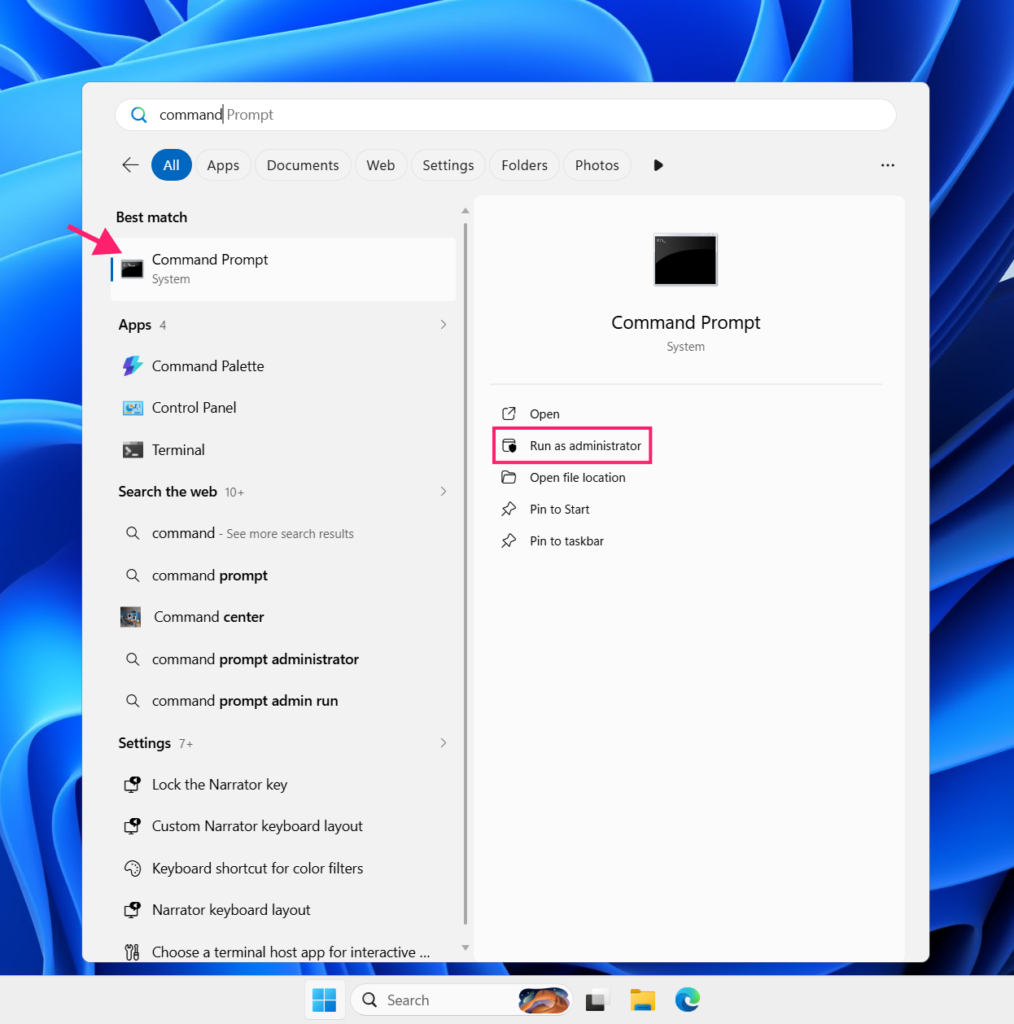
1. Open a Command Prompt window with elevated privileges
2. Force termination by running the command: taskkill /f /im OneDrive.exe
Note: If you get a “The process ‘OneDrive.exe’ not found” error, it means OneDrive was already stopped

3. Execute the silent uninstall by running the command: %SystemRoot%\System32\OneDriveSetup.exe /uninstall
Note: The /uninstall switch will run silently; if there is no output or error messages, the uninstall was successful

» Here are essential scripts that every IT professional needs to know
How Atera can help
Managing cloud storage removal, local file states, and registry configurations across multiple workstations takes up valuable technical resources. Atera’s RMM platform simplifies this process by combining endpoint diagnostics and machine management into one central console.
Using Atera’s AI Copilot, you can instantly generate and deploy scripts remotely to adjust startup settings, push registry tweaks, or run silent uninstalls without interrupting users. Copilot helps you quickly customize commands for specific tasks, like hiding folder entries from File Explorer. Combined with real-time monitoring and alerts, you gain full visibility over system changes to prevent file sync issues and keep your infrastructure stable.
» Try Atera for free to see how it can streamline your operations
Frequently Asked Questions
Related Articles

How to reduce alert fatigue across your IT team
Your technicians aren't ignoring alerts because they're careless. They're ignoring them because most alerts have taught them to. Once the stream stops being trustworthy, real failures slip past with the noise. Fixing it means deciding what deserves an interruption, tuning out transient spikes, collapsing alert storms, and automating the fixes you've run a hundred times.
Read now
How to close the IT skills gap on your team
Course completions don't close skills gaps. Technicians finish the training, then hand the first unfamiliar failure straight back to a senior engineer. Real capability gets built on live tickets, incidents, and maintenance windows, with guidance that fades as competence grows.
Read now
How to calculate cost per ticket (and why most teams get it wrong)
Most cost-per-ticket figures are wrong before anyone reads them. Missing overhead, tickets that were opened but never closed, spam and duplicates padding the count, and one month's costs divided by another month's tickets all make support look cheaper than it is. Fix both sides of the division and the number finally shows where technician time and money actually go.
Read now
How to prepare for a software license audit
A vendor audit notice doesn't wait for you to get organized. It demands proof, right now, that every install matches every entitlement you've paid for, and most IT teams find out the hard way how much they don't actually know about their own environment. Getting audit-ready before the letter arrives is the difference between negotiating from strength and paying for months of scrambling.
Read nowEndless IT possibilities
Boost your productivity with Atera’s intuitive, centralized all-in-one platform









