
Table of contents
Table of contents
- What you need to know before removing a Microsoft account from Windows 11
- Methods for removing or disconnecting a Microsoft account in Windows 11
- How to remove a Microsoft account using computer management or command-line tools
- How to remove a Microsoft account when the password is unknown
- Proactive Management with Atera
Generate summary with AI

Managing user identities in a Windows 11 environment is a bit like handling a high-stakes puzzle. Because the operating system is built to be multi-tenant, it allows local accounts, Microsoft accounts, and work profiles to live on the same hardware. However, these accounts aren’t just separate folders; they’re tethered to cloud services, encryption keys, and licensing.
If you pull an account without understanding where those threads lead, you might find yourself dealing with locked drives or lost sync data. This guide breaks down the technical boundaries of these accounts and the right way to disconnect them without causing a headache.
» Here’s how to increase IT efficiency in your organization
What you need to know before removing a Microsoft account from Windows 11
Windows 11 is designed to be multi-tenant, allowing various account types to coexist on a single piece of hardware. While it feels like there are no boundaries, specific technical limits exist depending on the “role” of the account.
- Local and Microsoft accounts: There is no official hard limit on the number of accounts you can add to a single machine. Your practical limit is defined by local resources, specifically available disk space for user profiles.
- Microsoft Store accounts: You can attach a single Microsoft account to up to 10 different devices for downloading Store apps and managing content licenses.
- Work or school accounts: While there is no official limit per machine, organizational policies usually dictate how many devices a single user can enroll. Notably, Windows 14 limits active sessions to 3 work/school accounts at one time.
- Secondary accounts: There’s no official system limit, though individual applications (like Outlook or Teams) may have their own internal caps on how many identities they can manage simultaneously.
What happens when you remove an account?
Removing a Microsoft account isn’t just deleting a username; it’s severing a connection to a suite of integrated services. Most of these components rely on the Web Account Manager (WAM) for identity. When that identity is pulled, the local user profile usually stays, but the “pipes” to the cloud are cut.
- OneDrive: You are signed out immediately and synchronization stops. Crucially, locally stored files are not deleted, but they will no longer update to the cloud.
- Microsoft Store: You lose the ability to install or update any apps previously purchased with that specific account.
- BitLocker: Removing the account stops the automatic backup of the recovery key to the cloud. It doesn’t decrypt the drive, which is a major risk. You should ensure the key is backed up manually or disable BitLocker before removal.
- Activation: Local activation remains intact for the current hardware. However, you lose the “Digital Link” that allows you to transfer that license if you change the motherboard or move to a new device.
» Make sure you know how to find your Bitlocker recovery key
Primary vs. secondary account removal
In business or shared environments, the implications of removal depend heavily on the account’s rank.
- Removing a secondary account: It only affects the specific services (like a specific mailbox or a specific app) that were using that identity. It’s a common practice in shared environments to limit access to specific organizational services without nuking the entire user environment.
- Removing a primary account: This is a foundation-level change. In managed enterprise IT environments, pulling the primary account often requires the device to be completely re-enrolled into organizational services (like Microsoft Intune) before any company policies can take effect again.
» Find out how to delete user profiles in Windows
Methods for removing or disconnecting a Microsoft account in Windows 11
There are different ways to remove or disconnect a Microsoft account depending on what you’re trying to do; whether that’s changing how you sign in, removing an account from apps, or deleting a user completely. Here are the main scenarios and how to handle each one.
Switch to a local account via Settings
This option is used when you no longer want to sign into Windows with a Microsoft account but still want to keep everything on your device exactly as it is, including your files, apps, and user profile. It simply changes how authentication works on the device.
Follow these steps:
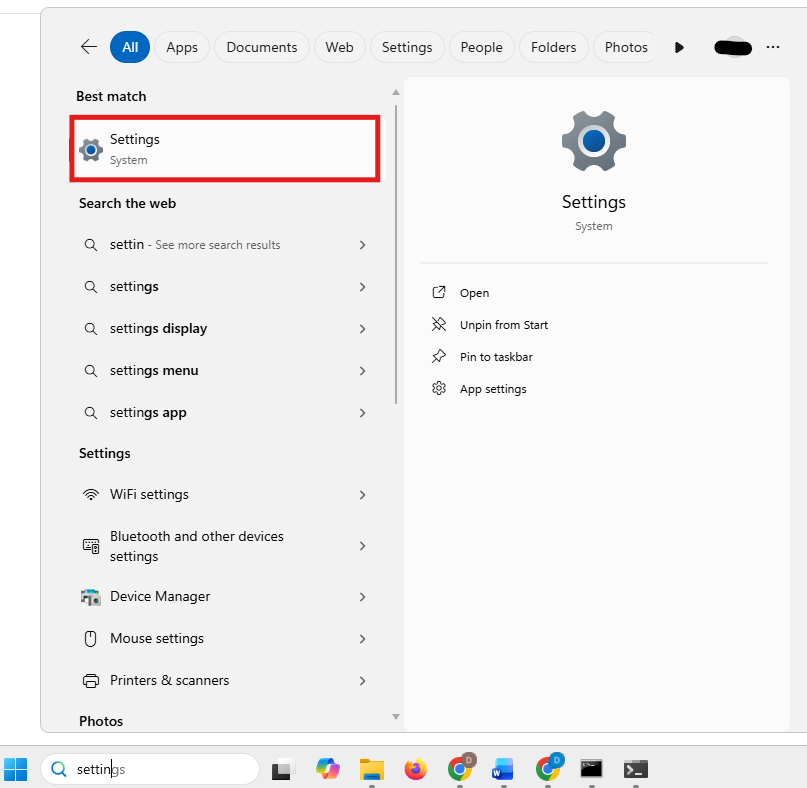
1. Search “Settings” in your search bar and open it
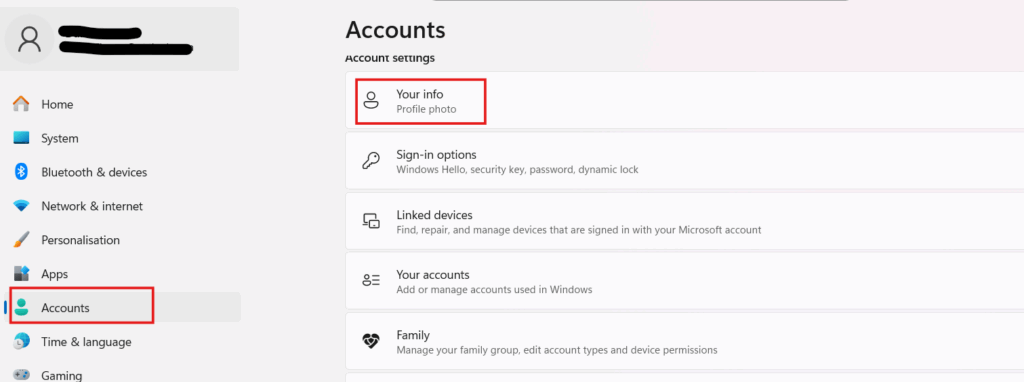
2. Go to Accounts > Your info
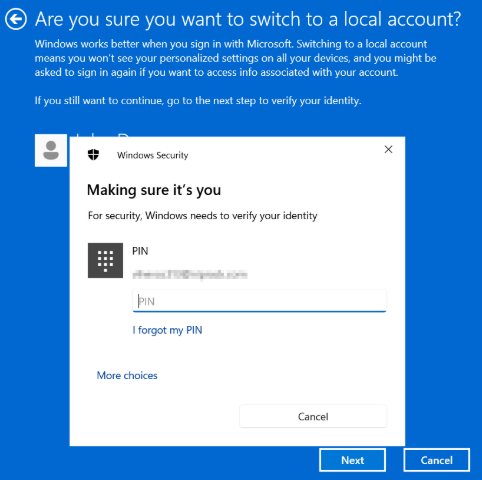
3. Click “Sign in with a local account instead”

4. Enter your current PIN or password
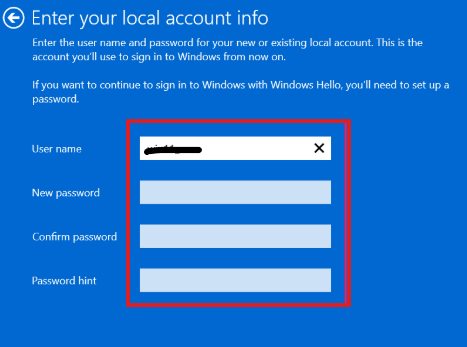
5. Choose a local username and password
6. Click Sign out and finish
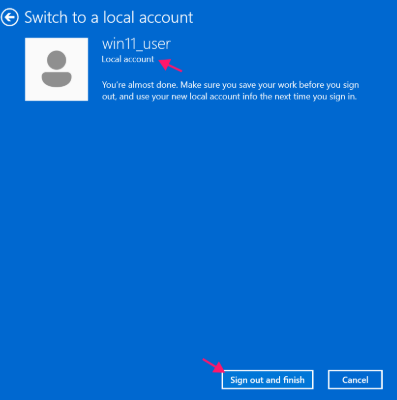
7. Sign back in with your new local account
Remember: You’ll now be signed out of Microsoft services like OneDrive and the Microsoft Store, and syncing across devices will stop.
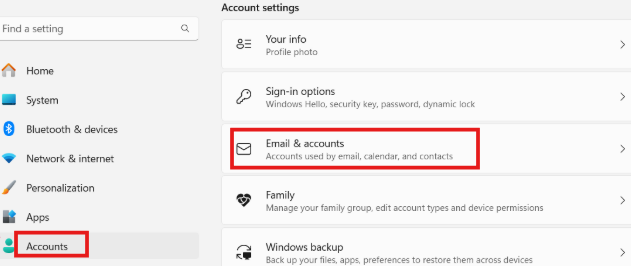
Remove Microsoft account from email & accounts
This method is used when the Microsoft account is only connected to apps and services (like email, OneDrive, or the Store) but is not your main Windows sign-in account. It removes access for those apps without changing how you log into the device.
Follow these steps:
1. Open Settings
2. Go to Accounts > Email & accounts
3. Under Accounts used by other apps, select the account and click Remove to confirm
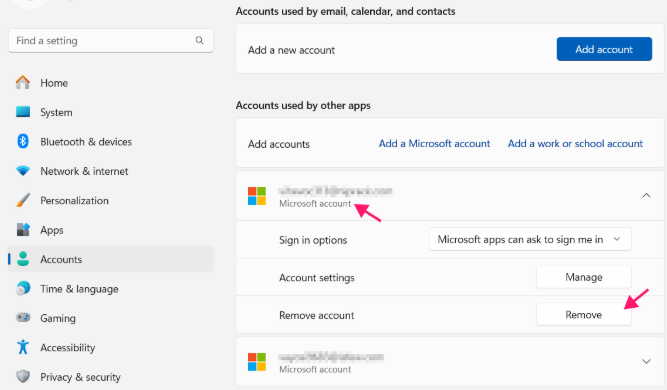
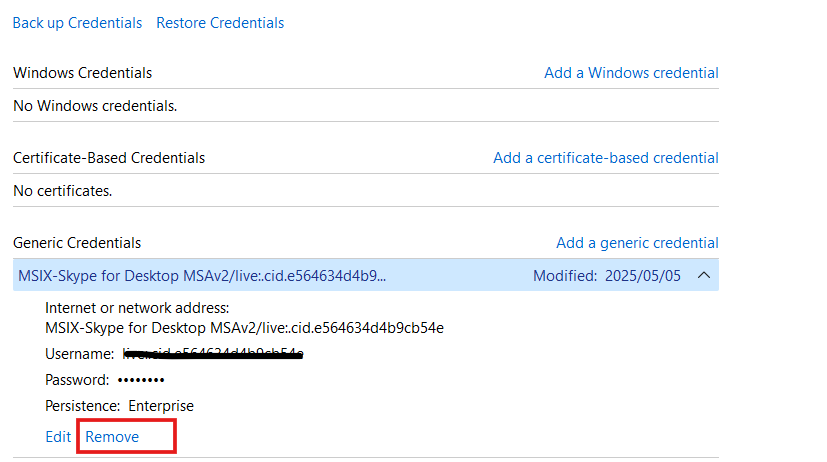
Take note: When removing a Microsoft account from Email & accounts, it’s important to clear any saved credentials because Windows often stores login details in the background to keep apps signed in automatically. If these credentials are not removed, the account may still appear in apps, continue syncing data, or silently reauthenticate without you realizing it.
Follow these cleanup steps:
1. Search “Control Panel” in your search bar and click “open”

2. Click Credential Manager
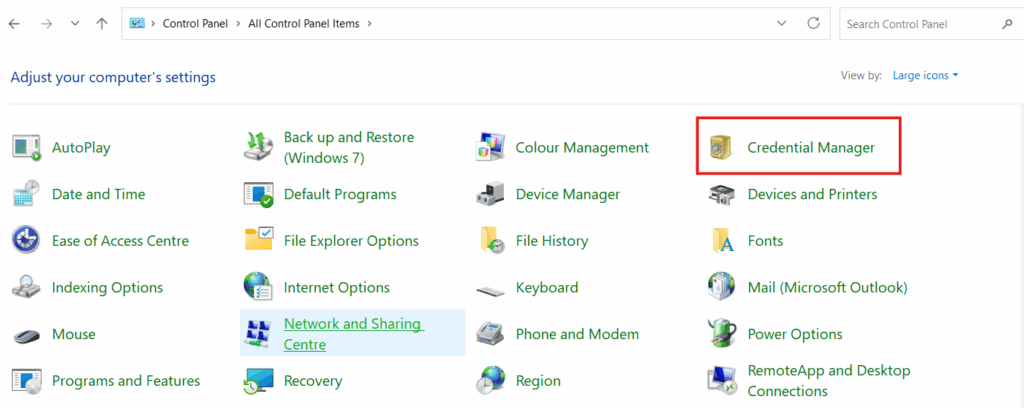
3. Select Windows Credentials
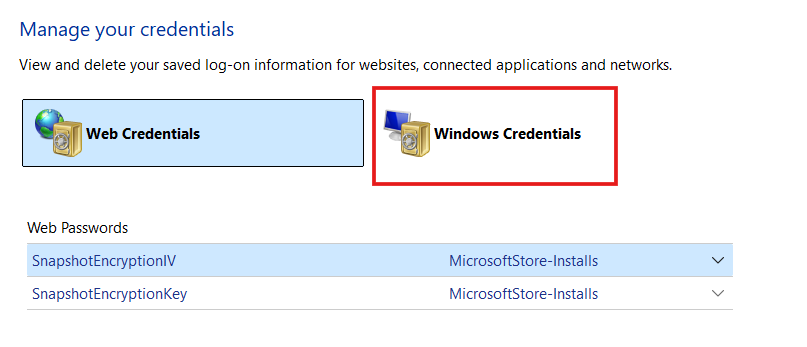
4. Remove any entries linked to the Microsoft account
Remove Microsoft account from family & other users
This is used when you want to completely remove another user from the device, including their account, files, and personal settings stored on the system.
Take note: Family & other users have been split into two separate sections in Windows 11.
Follow these steps:
1. Open Settings

2. Go to Accounts > Family
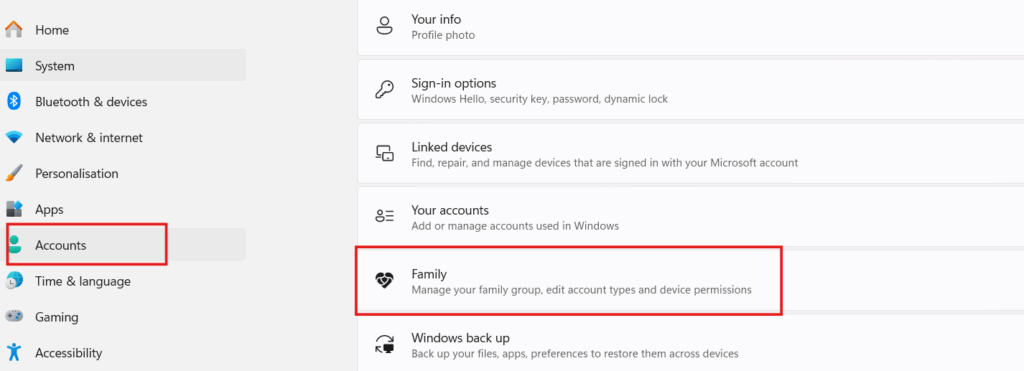
3. In the Family section you can manage members you have added to your family group

4. Go back to Accounts and select Others
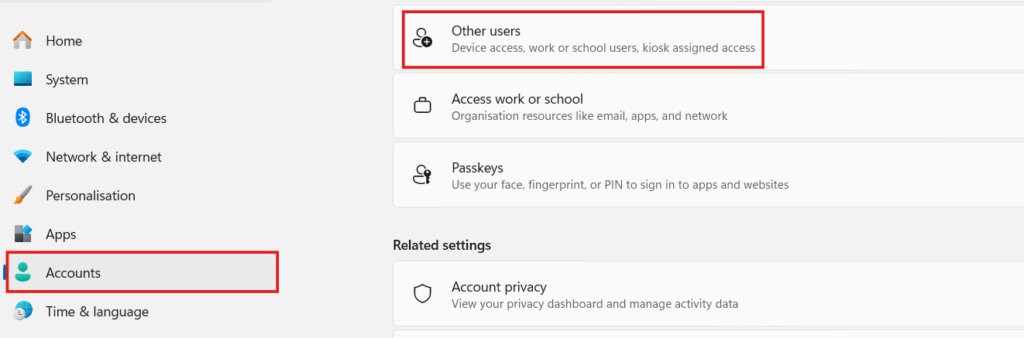
5. The Other users section can be used to add or delete accounts

How to remove a Microsoft account using computer management or command-line tools
This approach is used in more technical scenarios where the account can’t be removed through Settings, such as when profiles are hidden, the interface is not working, or administrative tasks need to be automated.
It directly interacts with local system accounts stored in Windows, which means changes happen at system level rather than through the normal user interface.
Computer management
This method is useful when you prefer a visual interface but the Settings app doesn’t show the account.
Follow these steps:
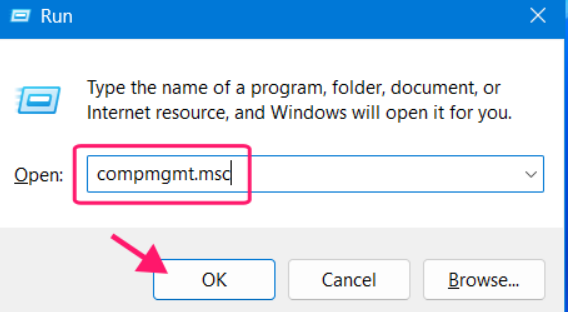
1. Press Win + R and type compmgmt.msc and press Enter
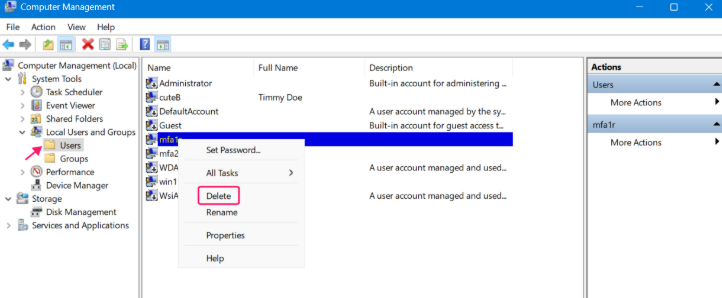
2. Go to Local Users and Groups > Users. Right-click the account you want to remove and click Delete
PowerShell
PowerShell is a built-in Windows tool that lets you manage your system using commands. It’s often used for admin tasks like creating or removing user accounts.
Follow these steps:
1. Search “PowerShell” in your search bar and click “Run as administrator”

2. Copy and paste this command in PowerShell: Get-LocalUser – This will show a list of all user accounts on the device. Look through the list and note the exact username you want to remove

3. Copy and paste this command: Remove-LocalUser -Name "username" – Replace “username” with the actual account name

While these commands work well for one computer, manually typing them out for every computer in a company is a massive drain on time. Atera’s RMM platform allows you to push these scripts to your entire fleet at once.
If you’re dealing with a complex cleanup, Atera’s AI Copilot can generate the exact PowerShell code you need to not only remove the account but also verify that the user profile folders and registry entries are cleared out. It turns a manual chore into a quick, automated task.
» Find out how to paste in PowerShell
Command Prompt
This is an older but still effective method, often used in recovery environments or basic scripting.
Follow these steps:
1. Search “Command Prompt” in your search bar and click “Run as Administrator”

2. To view all user accounts, copy and paste this command: net user – Look through the list and note the exact username you want to remove

3. Run this command to delete the user account: net user "username" /delete – Replace “username” with the actual account name

» Here are essential scripts that every IT professional needs to know
How to remove a Microsoft account when the password is unknown
This situation usually comes up when you can’t sign into an account but still need to remove it while keeping access to the device and avoiding data loss.
Use another administrator account
If another administrator account is available, you can still access the device, back up the user’s data, and then remove the account safely without needing the password.
Follow these steps:
1. Sign in with an administrator account
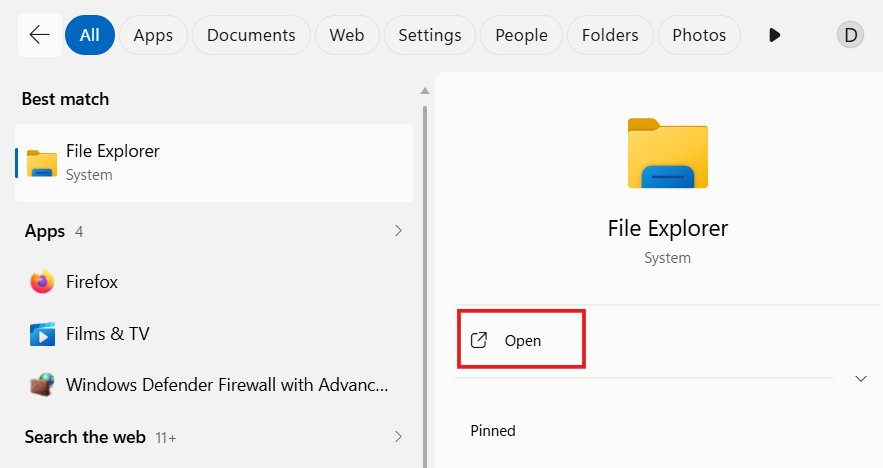
2. Search “File Explorer” in your search bar and click “Open”
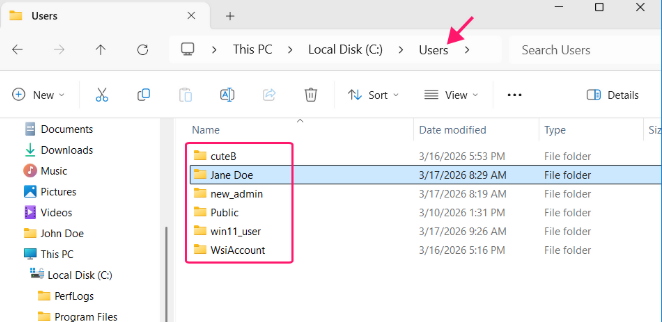
3. Go to C:\Users\ and locate the user folder of the account
4. Copy and back up all important files (Documents, Desktop, Pictures, etc.)
5. Remove the account using Settings, Computer Management, or Command-line tools
» Make sure you know the difference between PowerShell and Command Prompt
Use Microsoft account recovery
If no other admin account is available but the account is still needed, the official recovery process is the safest way to regain access without removing the account.
Follow these steps:
- Go to the Microsoft account recovery page
- Enter the account email address
- Follow the verification and reset steps
Resetting the device (last resort)
If you have no administrator access and can’t recover the account, resetting the device may be the only remaining option.
WARNING: This can result in partial or complete data loss, so it should only be used when no other option is available.
Follow these steps:
1. Go to Settings > System > Recovery
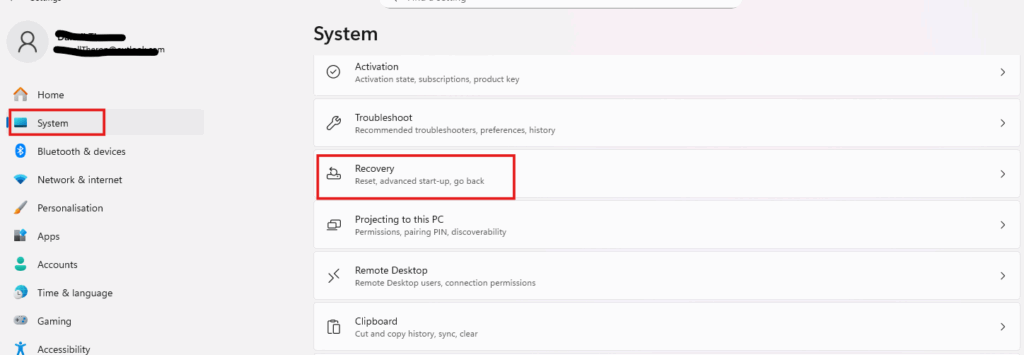
2. Choose Reset this PC

» Don’t miss these essential tools for a centralized internal IT department
Proactive Management with Atera
Keeping track of Microsoft accounts across a whole network is a core part of keeping things stable, but doing it manually on every single laptop is a massive waste of time. This is where Atera’s RMM platform makes life easier by giving you an overview of every account on every device from one screen.
Instead of manually checking user profiles or reviewing BitLocker status one by one, you can use Copilot to handle the repetitive work by generating PowerShell scripts to audit local versus cloud accounts and remove outdated profiles.
Frequently Asked Questions
Related Articles

How to fix the “Reboot and select proper boot device” error
Your machine won't boot. The screen is black, the error is cryptic, and the instinct is to start hammering repair tools. That instinct is usually what turns a fixable problem into a real one. Most boot device errors come down to a cable, a BIOS setting, or a corrupted bootloader instead of a dead drive.
Read now
How to enable or disable the Notification Center in Windows 11
275 interruptions a day. That's what Microsoft's own data says the average employee absorbs before Windows starts layering in its own alerts, banners, and badges. The Notification Center has more control options than most people use: per-app rules, Focus sessions, Do Not Disturb, Group Policy, registry edits, and PowerShell automation. Here's how to use all of them.
Read now
How to remove OneDrive from File Explorer
OneDrive is woven into Windows more deeply than it looks. Unlink it without preparation and you lose AutoSave, version history, shareable links, and any cloud-only files that never made it to local storage. Done right, removal is clean and permanent.
Read now
How to enable and disable kernel mode
Privilege escalation made up 40% of all Microsoft vulnerabilities last year. Kernel-Mode Hardware-Enforced Stack Protection exists specifically to stop it, it's already built into Windows, and most teams have never enabled it. Here's every method to turn it on, verify it's running, and handle the driver conflicts that get in the way.
Read nowEndless IT possibilities
Boost your productivity with Atera’s intuitive, centralized all-in-one platform


