
Table of contents
Generate summary with AI

When your PC or laptop starts crawling, you might be lacking some RAM. Especially with how demanding modern workflows can be (looking at Chrome), the 8GB of RAM that used to be more than enough just won’t cut it if you’re running video calls and downloads as well. The hardware isn’t broken, it’s just out of headroom. If your system actually needs it and memory is your main constraint, going from 8GB to 16GB can make it almost 3X faster.
But doing it right across a fleet is another matter. Before you order a single stick, you need to know whether the machine can even be upgraded, what it can support, and what compatibility rules will make or break the install. And that’s assuming you can even get reasonably priced RAM with the current state of the PC market.
This guide walks you through the full process from pre-upgrade assessment to post-installation validation.
» Make sure RAM is the upgrade you need by running a PC diagnostics report
What to check before looking for RAM
Not every performance complaint is a RAM problem, and not every RAM problem is solvable with an upgrade. Before you pull a single screw, you need three things confirmed:
What the machine currently has
What it can theoretically support
Whether the hardware physically allows an upgrade at all
Skipping any of these steps is how you end up ordering the wrong modules or creating other IT issues.
1. What RAM does this machine actually have?
The first step is getting an accurate picture of the current memory configuration, including capacity, type, speed, and how many slots are in use. Each operating system gives you a different path to this information.
On Windows, Task Manager is your quickest option. Follow these steps:
1. Open Task Manager by pressing Ctrl + Shift + Escape
2. Navigate to Performance > Memory
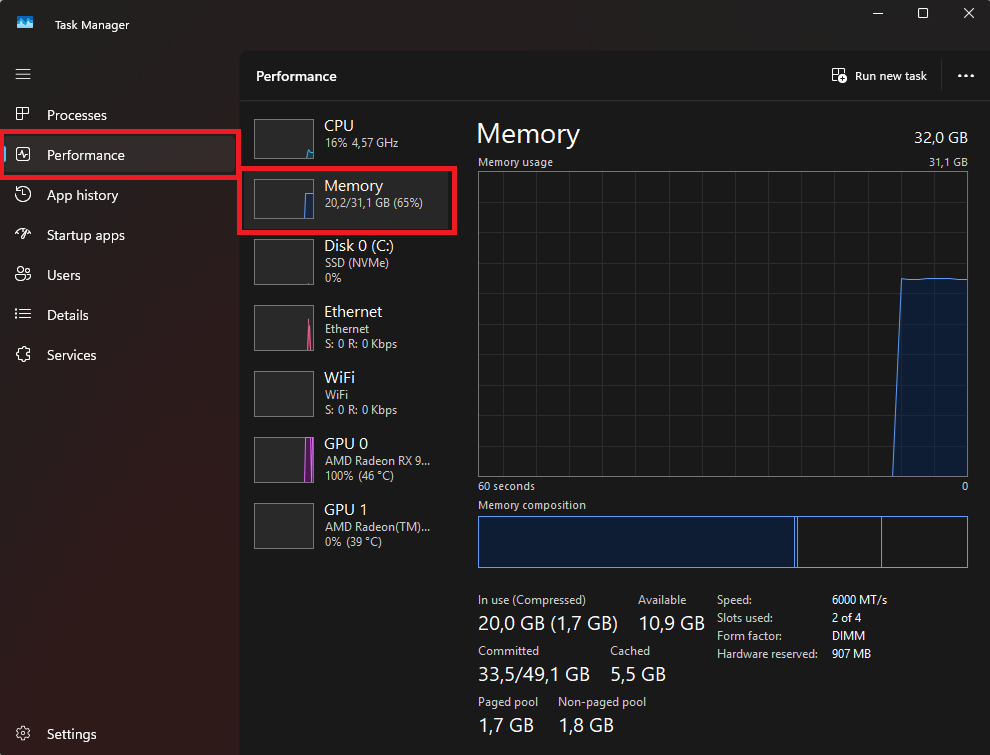
3. Here you’ll see total installed RAM, current speed, and slots used at a glance.
4. For more granular detail (including the exact memory type and part numbers), open PowerShell as an admin

5. Run this command: Get-CimInstance -ClassName Win32_PhysicalMemory | Select-Object DeviceLocator, Capacity, Speed, MemoryType
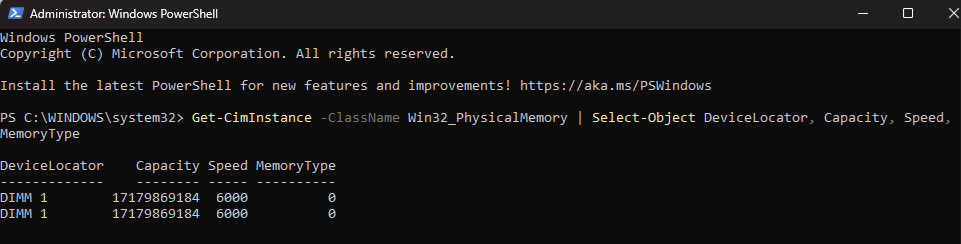
On macOS, navigate to Apple menu > About This Mac > More Info > System Report > Memory. This gives you a full breakdown of each slot, including module size, type, and speed. Note that on Apple Silicon Macs (M1 and later), this view will show unified memory rather than discrete slots.
On Linux, the sudo dmidecode -t 17 command pulls detailed memory information directly from the system’s SMBIOS data, including size, type, speed, and slot location.
» Did you know that you can paste in PowerShell and deploy PowerShell scripts remotely?
2. How much RAM can this machine actually support?
Knowing what’s installed is only half the picture. You also need to know the ceiling, which is where things get complicated:
- The CPU architecture defines the theoretical maximum. For example, Intel’s technical specifications tie memory support directly to the memory controller within the processor, which in modern consumer chips can often handle 128GB or more.
- The motherboard chipset and physical slot layout frequently set a lower practical limit. A board with two RAM slots and a maximum of 32GB per slot caps you at 64GB regardless of what the CPU could theoretically address.
- BIOS/UEFI firmware can impose its own restrictions, and manufacturer thermal or electrical design constraints may lower the ceiling further still.
On Windows, you can query the chipset’s maximum addressable memory by running (Get-CimInstance -ClassName Win32_PhysicalMemoryArray).MaxCapacity in PowerShell. The result is returned in kilobytes; divide by 1,048,576 to convert to gigabytes. In our example below, the max supported memory would be 128GB (134217728 ÷ 1048576).

On macOS, The system_profiler command gives you the memory controller’s maximum supported capacity: system_profiler SPMemoryDataType. This returns full memory slot information including current configuration. However, for the maximum supported ceiling specifically, the most reliable method is checking Apple’s official tech specs page for the exact model since Apple Silicon machines usually set a “maximum” of whatever was configured at purchase, and no upgrade path exists regardless of what the controller reports.
On Linux, the sudo dmidecode -t 16 command queries the Physical Memory Array entry in the system’s SMBIOS data, which includes a “Maximum Capacity” field that reflects the hardware ceiling. This is distinct from dmidecode -t 17 (which we already reference in the section for slot-level detail). The -t 16 flag is the right call specifically for max capacity.
When these sources conflict, follow this hierarchy:
Priority | Source | Why |
1 (Highest) | Manufacturer’s official technical manual | Accounts for physical and electrical design limits |
2 | CPU/chipset specifications | Defines theoretical maximum capability |
3 | Software commands | Estimates based on OS reporting |
4 (Lowest) | Retail listings | Often generic or contain errors |
3. Can this machine be upgraded at all?
This is the question that trips up even experienced admins. The trend toward thinner, lighter hardware has brought with it a significant shift away from modular, upgradeable RAM toward soldered memory that’s permanently attached to the motherboard and physically can’t be upgraded unless you’ve got a soldering kit, a full afternoon to spare, and the confidence to risk breaking the system beyond repair.
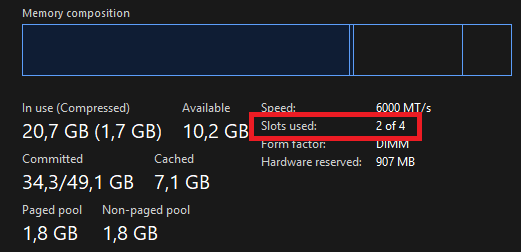
The fastest pre-disassembly check on Windows is Task Manager. Navigate to Performance > Memory and look at the “Slots used” field. If it shows “0 of 0” or omits slot information entirely, the memory is almost certainly soldered.
On Linux, sudo dmidecode -t 17 will return a “No Module Installed” entry for empty physical slots, or show no slot entries at all if memory is integrated.
Certain device families have moved almost entirely to non-upgradable designs:
- Apple Silicon MacBooks (M1, M2, M3, and later): RAM is physically integrated into the System on a Chip (SoC) package and cannot be upgraded under any circumstances
- Ultra-thin ultrabooks: Most laptops under approximately 15mm thickness use LPDDR memory soldered directly to the logic board
- Fanless 2-in-1 convertibles: Prioritize thermal management and space over modularity
- Entry-level Chromebooks: Commonly use soldered RAM alongside eMMC storage to reduce cost
If you’re managing a fleet and need to assess upgradeability at scale, Atera’s RMM platform with infrastructure monitoring can pull hardware asset data remotely (including motherboard model and memory configuration) across all your managed devices. That means you can identify which machines in your inventory have available slots and which are locked before anyone touches a screwdriver.
Choosing the right RAM
Once you’ve confirmed an upgrade is viable, the next question is what to actually buy. RAM compatibility is a mix of hard rules and softer guidelines, since some specifications are physically non-negotiable while others have enough flexibility that minor mismatches won’t cause problems.
Speed (MHz) and CAS latency are flexible. If you install a 3600MHz module alongside a 3200MHz module, the system will automatically downclock the faster stick to match the slower one. This won’t damage anything, but it does mean you’re paying for speed you won’t get.
For this reason, matching speeds when adding to an existing configuration is strongly advisable even if it isn’t strictly required. This usually isn’t a problem today though, since manufacturers and suppliers often sell dual channel RAM as a two-stick bundle.
What must match exactly
Three specifications are non-negotiable:
- DDR generation
- Voltage
- Form factor
Get any of these wrong and you’re either looking at a system that won’t boot or physically can’t be done.
“I once worked with a client who tried to force a DDR5 module into a DDR4 slot. Because the ‘notch’ is in a different position, they nearly cracked the motherboard.”
Ruben Castellano Gonzalez
DDR generation (DDR4 vs. DDR5) determines the physical key position on the module. The slots are intentionally incompatible, you cannot install the wrong generation without applying force that risks permanent damage to the slot or the board.
Voltage is equally critical. Modern systems are sensitive to power fluctuations, and pairing high-voltage RAM with a low-voltage motherboard (like 1.35V modules in a 1.2V system) can cause immediate instability or long-term electrical degradation.
Form factor (DIMM for desktops, SO-DIMM for laptops) is a physical size difference that makes cross-installation impossible, but it’s worth confirming before ordering, particularly when sourcing modules remotely for a user’s machine.
Modern thin-and-light laptops add another layer of strictness. These machines use SPD (Serial Presence Detect) profiles to communicate directly between the memory module and the BIOS/UEFI. Modules that don’t conform to the expected JEDEC standards or use high-density chips the firmware doesn’t recognize may cause the system to fail to POST, or produce random Blue Screen of Death errors under load.
Single channel vs. dual channel
Memory channel configuration determines the bandwidth available between your RAM and the CPU. A single module running in single-channel mode uses a 64-bit data path, which creates a bottleneck in memory-intensive tasks. Two modules running in dual-channel mode double that to a 128-bit path, significantly improving throughput for gaming, rendering, and heavy multitasking.
The real-world impact is substantial. Adding a second matching module to a single-channel configuration can and can make heavy multitasking and app switching feel noticeably smoother on systems that were previously memory‑bandwidth‑bound.
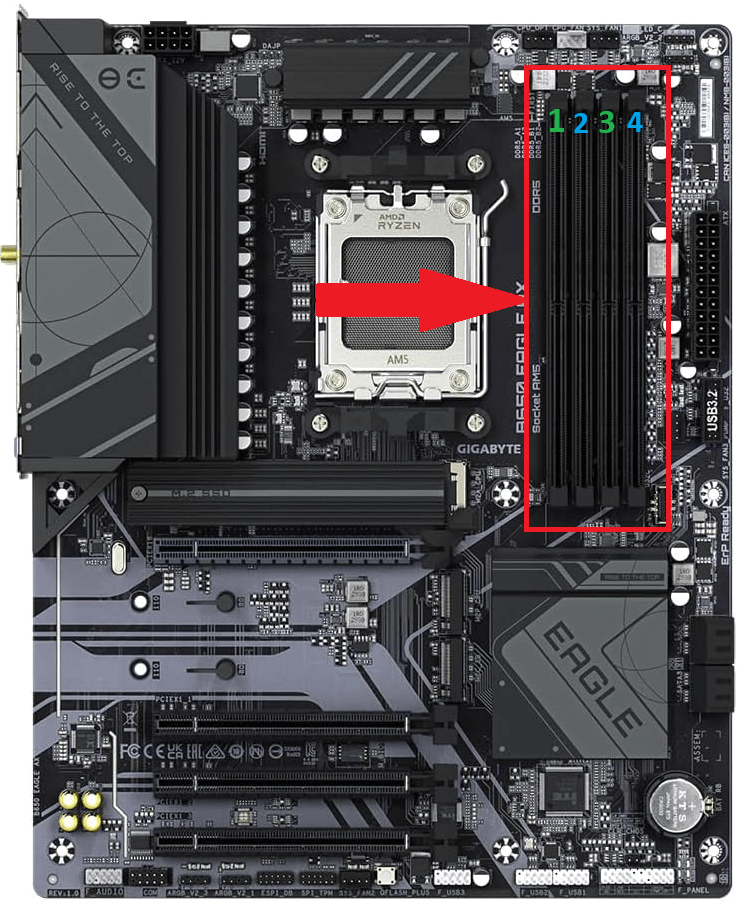
Activating dual-channel mode requires correct slot population. On most four-slot motherboards, you need to place modules in slots 2 and 4 (often labeled A2 and B2) rather than side-by-side in slots 1 and 2. Using adjacent slots typically forces the system into single-channel mode regardless of how many modules are installed.
Should you add to what’s there or replace everything?
If the machine has an open slot and the existing module is relatively modern, adding a matching module is the straightforward path since you get the dual-channel performance benefit without discarding working hardware. Replacing everything makes more sense when you’re moving to a significantly higher frequency, ensuring perfect specification symmetry, or when the existing modules are old enough that matching replacements are harder to source than a fresh matched kit.
Warning: Mixed configurations (pairing an old 4GB stick with a new 16GB one, for example) introduce real risk. Even when speeds nominally match, differing CAS latencies can cause memory controller errors. Mismatched capacities create what’s called asynchronous dual-channel mode, which provides only partial bandwidth benefits. And if voltages differ, you may face a system that simply won’t POST.
Installing and validating your upgrade
You’ve confirmed the machine can be upgraded, chosen compatible modules, and have everything in hand. The physical installation is straightforward, but you still need to take care not to damage the components.
Here are the steps you need to follow:
1. Power down and unplug everything
Electrostatic discharge (ESD) is invisible, instantaneous, and can permanently damage a memory module or motherboard without leaving any visible sign. Before opening any machine, power it down completely, unplug it from the wall, and ground yourself.
An anti-static wrist strap connected to a grounded surface can give you confidence that nothing will happen, but it’s honestly not needed in most scenarios. So long as the computer is powered down and unplugged, just give it a few minutes or power cycle it (hold the power button for a few seconds while it’s unplugged). Additionally, frequently touching an unplugged metal chassis serves as a practical alternative.
For laptops, disconnect the internal battery before proceeding. On most modern laptops this requires removing the back panel, but skipping this step risks an accidental short while you’re working inside the machine.
2. Install the modules
RAM modules are keyed, meaning the notch on the module aligns with a corresponding break in the slot, and there is only one correct orientation. Never apply force. If the module doesn’t seat easily in the direction you’re inserting it, stop and recheck the orientation before continuing. As we covered in the previous section, forcing a module that doesn’t fit is how motherboards get cracked.
The seating technique differs slightly between desktops and laptops:
Desktop (DIMM):
1. Unclip the RAM connectors on the motherboard and remove the old RAM (if you’re doing a full replacement)
2. Leave the clips open
3. Align the module with the slot, ensuring the notch matches
4. Remember that if your motherboard has 4 RAM slots, DON’T put the RAM sticks next to each other. 2 and 4 is the correct configuration, while 1 and 3 can be used if you have 4 RAM sticks
5. Apply firm, even downward pressure along the full length of the module until both side clips snap into place simultaneously (most DDR5 motherboards only have one clip)
6. If both clips aren’t in, the RAM isn’t seated quickly
Laptop (SO-DIMM):
1. Insert the module at a 30–45 degree angle, sliding it into the slot until it’s fully inserted horizontally
2. Press the module downward toward the board until the metal retention arms on either side click into place
3. The module should lie flat when correctly seated
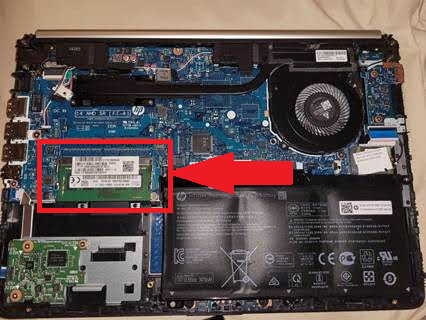
After seating, give each module a gentle lateral check. It shouldn’t move. Any play in the slot means it isn’t seated properly, which will either prevent the system from booting or cause intermittent errors under load.
3. Validate the upgrade
A successful physical installation means nothing until the system confirms it. Validation should happen in two stages: firmware first, then the operating system. If the firmware doesn’t see the memory, the OS won’t either, so starting at the BIOS/UEFI level tells you immediately whether the installation was successful before you’ve even booted into Windows.
Step 1: Check the BIOS/UEFI
1. Restart the machine and enter the BIOS/UEFI (typically by pressing F2, F10, Delete, or the manufacturer-specific key during POST)
2. Navigate to the memory or system information section and confirm two things
- The total capacity matches what you installed
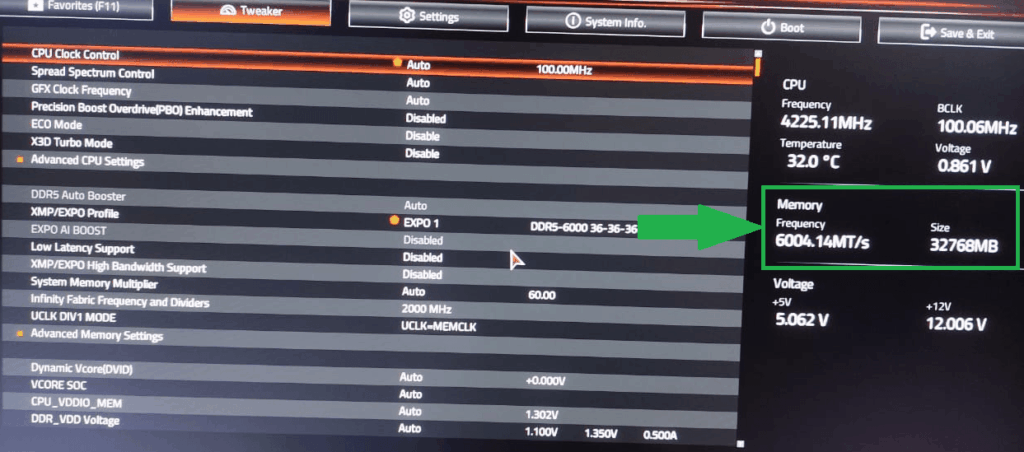
- The XMP (Intel) or EXPO (AMD) profile is active
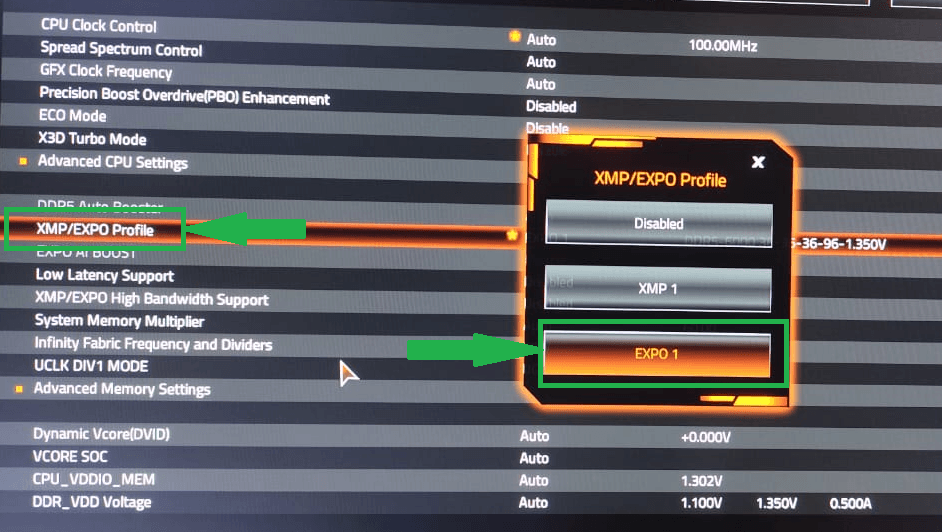
Without enabling XMP or EXPO, the system will run the new modules at a conservative default speed, often significantly slower than their rated frequency
This is one of the most common post-upgrade oversights and the usual explanation when a user reports their new RAM doesn’t feel any faster.
Step 2: Verify in the operating system
Once you’ve confirmed the BIOS sees the correct capacity and speed, boot into the OS and run a second check:
On Windows, open Task Manager and navigate to Performance > Memory. This gives you a quick view of total capacity, current speed in MHz, and slots used.
On macOS, navigate to Apple menu > About This Mac > More Info > System Report > Memory to confirm capacity and slot population.
On Linux, run sudo dmidecode -t 17 to verify each module is recognized, or use free -h for a quick total capacity check.
Scaling RAM upgrades across your environment
A RAM upgrade on a single device is a straightforward procedure once you know the rules. The real challenge for enterprise IT teams and MSPs is making that process repeatable and reliable across an entire device fleet, identifying which machines need attention, which can be upgraded, and which are locked by design without touching each one individually. That requires visibility into your hardware estate before the work begins, not after.
That’s where Atera’s RMM platform earns its place. With remote hardware asset scanning across all managed endpoints, you can identify memory configurations, slot availability, and device specifications fleet-wide from a single console. When the upgrades are done, the same platform confirms the new configurations have registered correctly across every machine, without anyone needing to be on-site.
Frequently Asked Questions
Related Articles

How to reduce alert fatigue across your IT team
Your technicians aren't ignoring alerts because they're careless. They're ignoring them because most alerts have taught them to. Once the stream stops being trustworthy, real failures slip past with the noise. Fixing it means deciding what deserves an interruption, tuning out transient spikes, collapsing alert storms, and automating the fixes you've run a hundred times.
Read now
How to close the IT skills gap on your team
Course completions don't close skills gaps. Technicians finish the training, then hand the first unfamiliar failure straight back to a senior engineer. Real capability gets built on live tickets, incidents, and maintenance windows, with guidance that fades as competence grows.
Read now
How to calculate cost per ticket (and why most teams get it wrong)
Most cost-per-ticket figures are wrong before anyone reads them. Missing overhead, tickets that were opened but never closed, spam and duplicates padding the count, and one month's costs divided by another month's tickets all make support look cheaper than it is. Fix both sides of the division and the number finally shows where technician time and money actually go.
Read now
How to prepare for a software license audit
A vendor audit notice doesn't wait for you to get organized. It demands proof, right now, that every install matches every entitlement you've paid for, and most IT teams find out the hard way how much they don't actually know about their own environment. Getting audit-ready before the letter arrives is the difference between negotiating from strength and paying for months of scrambling.
Read nowEndless IT possibilities
Boost your productivity with Atera’s intuitive, centralized all-in-one platform









