Table of contents
Generate summary with AI

Before the widespread use of remote access software, MSPs and IT departments or professionals would need to be on-site with each of their clients to troubleshoot, diagnose issues, or make changes to a workstation or machine.
Before the widespread use of remote access software, MSPs and IT departments or professionals would need to be on-site with each of their clients to troubleshoot, diagnose issues, or make changes to a workstation or machine.
The only way that they could get the work done from a distance was to talk the customer through the task and hope that they were tech-savvy enough to understand the job at hand. Worse yet, the only way they could know whether the problem had been resolved was through the word of their client, who may or may not know if the issue was fixed. Thank goodness we have remote access technology, eh?
But during the times of audibly walking your client through what needs to happen being the only form of remote support, the last worry on peoples’ minds was “but how can I form a remote desktop connection using multiple monitors?”
Well, today that’s changed. Many IT technicians today use 2 (or even more!) monitors, and there are times when having access to these monitors during a remote session can be very handy. Here’s what you need to know about using remote desktop with 2 monitors, or more.
Using remote desktop to view multiple monitors on Windows
Luckily, if your target computer is using multiple monitors, they don’t need to do anything special on their end in order for you to access their computer. However, if you’re looking to establish a remote connection using more than 1 monitor, then you’ll need to adjust a few settings in the Remote Desktop Connection app.
Just go to the search bar, and type in “remote desktop”, where you should be able to find and click on Remote Desktop Connection.
Here’s where you would normally enter the relevant authentication credentials so that you can gain remote access to a target device. However, as is, that won’t allow you to start a remote desktop dual monitor session.In order to change that, you’ll just need to click on Show Options.
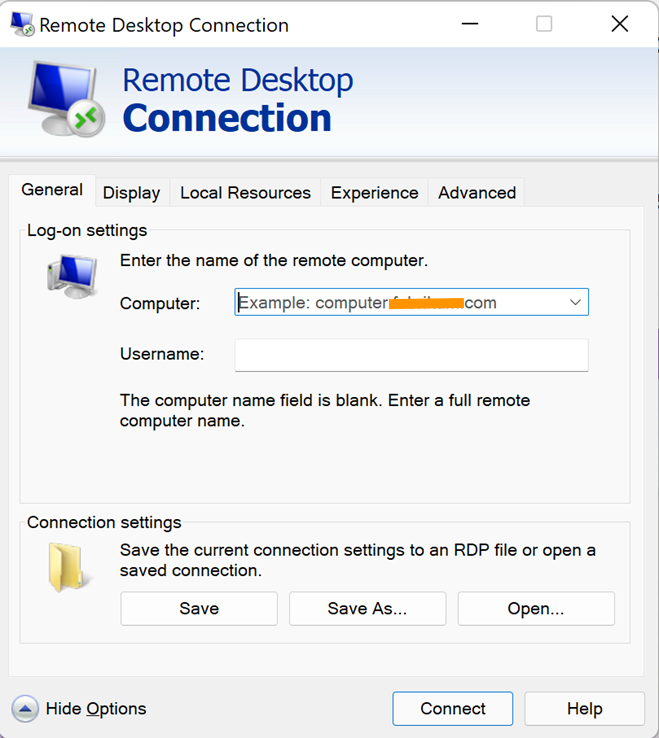
Then, under the Display tab, you should see a box that says “Use all my monitors for the remote session”. If you want to use multiple monitors on your end of the remote connection, you’ll need to check this box.

If you’re an MSP that frequently needs to establish a remote connection with a multiple monitor setup, it could be a good idea to save these settings as your default connection settings. To do that, just head back to the General tab and click on the Save option. This will automatically overwrite your RDC default settings with the settings that are currently checked.

Make sure that you actually have Use all my monitors for the remote session checked.
Now that you’ve saved these RDP settings as default, you won’t need to keep toggling on this setting every time you go to establish a connection. You should be able to extend your remote desktop connection to your second monitor without adjusting the settings everytime.Now, you’ll be able to establish the remote connection like normal, and still view the remote desktop across all of your monitors. Just enter the target computer’s name under Computer, (which they can find under Settings > System > Remote Desktop > PC name).
Running remote desktop for multiple monitors as a command
If you’re having trouble accessing the Remote Desktop Connection app via the Search bar, or are having trouble finding the box to use all of the monitors, there’s another way. You can use a command to both open the RDC app, as well as toggle the “use all monitors” setting to on. First, press the Windows button + R on your keyboard. You should now see the Run window. Next, you’ll need to type in “mstsc.exe /multimon”, which will also pull up the Remote Desktop Connection app.
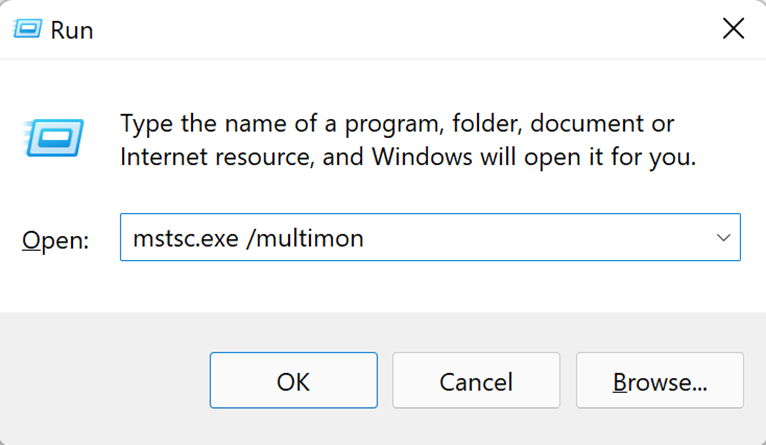
If you want, you can double-check that the checkbox that shows that all of your monitors are available for the remote session is automatically toggled on. However, this will only apply for one session. The connection rules are not saved automatically on the machine, and neither are your credentials for signing in, so this is a better option for a one-off connection request.
Manually changing the RDP file
There’s a third option that we’ll go over, but it’s a bit more technical in nature. So if you’re not working in an IT department, or are not very technically inclined, we recommend sticking with using the remote desktop connection app.
Save a custom .rdp file from the Remote Desktop Connection app using Save As, then open it in Notepad to make manual changes. By adding the line “Use Multimon:i:1”, you’ll be overwriting your settings to allow for multiple monitor connections via remote desktop.
And if you want to use only specific monitors to establish the remote connection, you can add the line selectedmonitors:s:x,y,z to your file to specify which of your local monitors to use in your multi-monitor setup. Just replace our example numbers with the numbers of the monitors that you want to use to establish remote connections. The first number will be your primary monitor.
For example, if you have 3 monitors but only want to use remote desktop with 2 monitors, you can specify selectedmonitors:s:0,1.
If you aren’t sure which monitors are which, you can run the following command in your Command Prompt in order to see a list:
mstsc.exe /1

Are there any downsides of using remote desktop?
While Windows RDP is a free tool for remote access, as with any free tool – it comes with a few limitations.
One of the downfalls of using Windows RDP for remote access is that you can’t make changes to connection properties while you have an open session. That means that you’ll need to close all sessions and connections for any changes to take effect.
For example, if you initiate a connection to a computer without specifying that you want to make the connection with all your monitors, you’ll need to end your session and start a new one.
It can also be more complicated to link computers that have different OS versions or when you’re using different kinds of systems or machines. For example, on Windows 7, multi-monitor mode is only available on Enterprise or Ultimate builds, and so the other Windows machine will need to be on Enterprise or Ultimate build, in order to support a multiple monitor connection.
For some MSPs and IT professionals, using Windows RDP can be slow and delayed. As we know, in the IT business, time = money and customer satisfaction is everything. So, freezing screens or large amounts of latency might not be worth the free price tag. If that’s the case, there are a lot of great remote access options for techs with multiple monitors in the form of remote access software.
Alternatives to using remote desktop
As we said, if using Remote Desktop Connection isn’t checking all the boxes for you, there are third-party software solutions that can quickly and easily allow you to gain remote access, even if the remote or local computer has multiple monitors. Atera integrates with both AnyDesk and Splashtop, so here’s how it works for both of these choices.
If you work in an IT department or run an MSP, you may be in charge of a bunch of networks, where manually performing remote connections can quickly become complicated and time-consuming. And that’s where we come in, using Atera and our remote desktop integrations, you can remotely monitor and manage each of the devices inside of your managed networks, and even connect to them, whether the end-user is at the computer or not.
AnyDesk
On AnyDesk, the toolbar will show you each remote display numbered with its own rectangle. By clicking on the relevant rectangle, you will be switched to the respective monitor on the device with which you’re making a connection. You can even show more than one monitor at the same time by establishing a concurrent session with the same device from different windows. By toggling between the windows, you’ll be able to see the monitor you’re looking for.
Splashtop
Splashtop is another industry-leading remote connection software that offers seamless integration within our RMM (remote monitoring and management) software. And similar to AnyDesk, Splashtop allows users to connect to devices with multiple monitors. To learn more about how you can use Splashtop combined with our industry-leading IT software, check out our Splashtop integration page.
Transform the way you remote access with Atera
With remote work becoming more and more commonplace in an office environment, remote access is more important than ever. To support employees and clients who work remotely, hybrid work environments, multi-site clients, and even users on business trips, remote access is a truly powerful item in your technology toolbelt.
And with the onset of Autonomous AI, remote connections will never be the same. Gone are the days of lengthy ticket creation following remote connections. With Atera’s AI Copilot, you’ll have a summary of the remote connection, including any key points or actions you performed on the device within seconds.
So if you’d like to use remote access like you never have before, along with world-class RMM features like network discovery, automated patch management, and many other features, sign up for our 30-day free trial to take our software for a spin.
Related Articles

Remote Asset Monitoring for Smarter IT Management
Discover how remote asset monitoring can improve IT asset performance and reduce downtime for businesses of all sizes.
Read now
How to Force a Group Policy Update Remotely (GPUpdate)
Learn in two effective ways how to remotely force a GPUpdate (Group Policy) for a seamless security and network management.
Read now
Can RMM be the game-changer you need to boost employee productivity?
Apart from the clear benefits of RMM, this tool can also help a business save costs, collect essential data, and create detailed analytical reports.
Read now
Tech Trends Transforming the Workplace
The integration of technology into the workplace is a trend accelerated, in many ways, by changes that required adaptation in the year 2020.
Read nowEndless IT possibilities
Boost your productivity with Atera’s intuitive, centralized all-in-one platform