
Generate summary with AI

You’re staring at a black screen with a message that shouldn’t exist. The machine was fine yesterday, but now it won’t boot. According to Backblaze’s Q2 2025 Drive Stats report, the quarterly failure rate for hard drives rose to 1.42% in the first half of 2025, with some models hitting as high as 9.47%. That’s across a fleet of over 321,000 drives under active monitoring.
Most boot failures aren’t drive failures at all, though. They’re a loose cable, a wrong boot order setting, or a corrupted bootloader on an otherwise healthy disk. There’s probably a simple fix for your problem, but you’ll only find it if you don’t panic your way into making things worse. Here’s everything you need to know.
Why this error appears and what it’s actually telling you
The main thing to know about this error is that it isn’t a Windows or macOS error. It’s a firmware-level message posted by the BIOS or UEFI before any operating system loads, which means it’s entirely OS-agnostic. The machine powered on, looked for something bootable, didn’t find it in the expected place, and told you so.
It could be a software error or hardware error:
Hardware triggers
The physical causes tend to be the easiest to overlook because they don’t feel like software problems. They include:
- A loose or damaged SATA data cable: One of the most common culprits is that the connection between the drive and the motherboard can work itself loose over time, especially in machines that get moved around. Power cables are worth checking too, at both the drive end and the motherboard end.
- A dead or weakening CMOS battery: The CMOS battery is what keeps the motherboard’s settings stored when the machine is powered off. When it fails, the board reverts to factory defaults on every power cycle, and those defaults don’t always include the correct boot order. In some cases, default settings may exclude NVMe controllers entirely, making a perfectly healthy drive invisible to the boot sequence.
- External storage devices: BIOS and UEFI scan for bootable devices in a configured sequence. If a USB drive or portable hard drive sits higher in the boot priority than the internal OS drive, the firmware attempts to boot from it. When that external device doesn’t carry a valid bootloader, the error appears. This is also very inconsistent, since some systems will skip an invalid device and try the next one in the list while others won’t.
» Worried hardware is the problem? Here’s how to check SSD health
Software triggers
On the software side, the most common causes are:
- BIOS boot order misconfiguration
- A primary partition that isn’t marked as active
- Corrupted boot files
Boot order issues are often the simplest to resolve. Partition and boot file problems require a bit more work but are still recoverable in most cases without touching the data on the drive.
How to tell physical failure from a corrupted bootloader
This is the most important diagnostic question you’ll face, because the answer determines whether you should attempt a repair or prioritize getting your data off the drive first.
Signs that point toward a physical drive failure rather than a software problem include:
- The drive doesn’t appear in the BIOS device list at all
- The drive is detected but reports incorrect or zero capacity
- An HDD produces audible symptoms like repetitive spin cycles or clicking noises
- The error is intermittent without any changes to settings or hardware
- SMART data shows errors when the drive is checked on another system
A corrupted bootloader on an otherwise healthy drive carries no data loss risk on its own. The danger comes from what happens next. If any of the physical failure signs above are present, data extraction should come before any repair attempt. The repair process involves read/write operations that can accelerate wear on a degrading drive and make recovery significantly harder.
If the drive appears in BIOS, reports correct capacity, produces no unusual sounds, and the error is consistent rather than intermittent, a software cause is the more likely culprit, and the fixes in the next sections apply.
» Here’s all you need to know about firmware updates and updating your BIOS
Step-by-step guide to fixing “Reboot and select the proper boot device”
Before running a single repair tool, take a breath. The most common way a recoverable boot error becomes an unrecoverable data loss situation is speed; specifically, people reaching for fixes before they’ve confirmed what they’re actually fixing.
Here is the diagnosis and fix worklow you should follow:
Step 1: Triage before touching anything
The first action is just a check. Open the BIOS by mashing the appropriate key immediately after you turn the PC on (typically Del, F1, F2, or F10 depending on the manufacturer and motherboard make/model), and work through the following steps:
1. Confirm your drive appears in the device list and note its reported capacity
2. If the drive doesn’t appear at all, or reports zero capacity, stop here and prioritize data extraction before any repair attempt
3. Navigate to the Boot or Startup section. On legacy BIOS interfaces this is usually a tab along the top of the screen
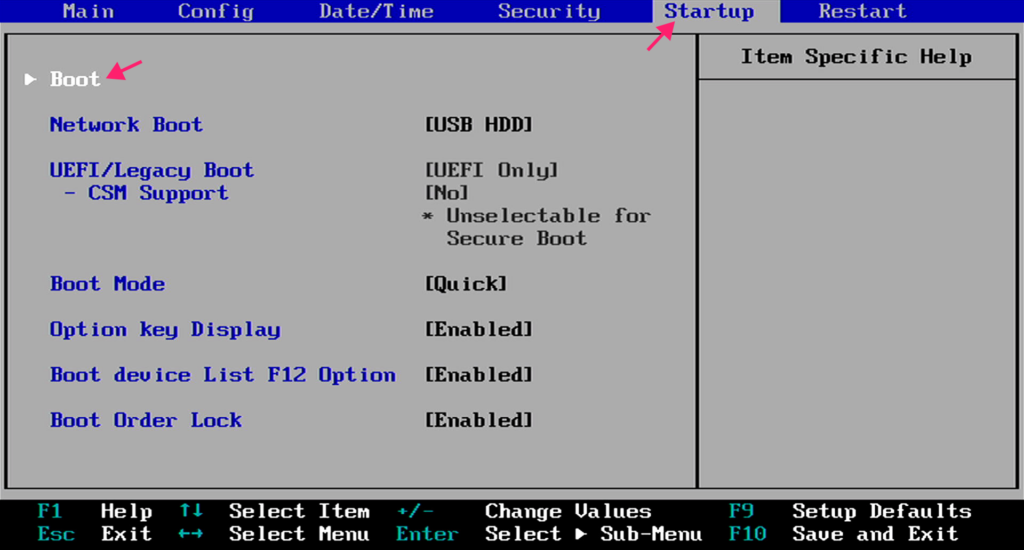
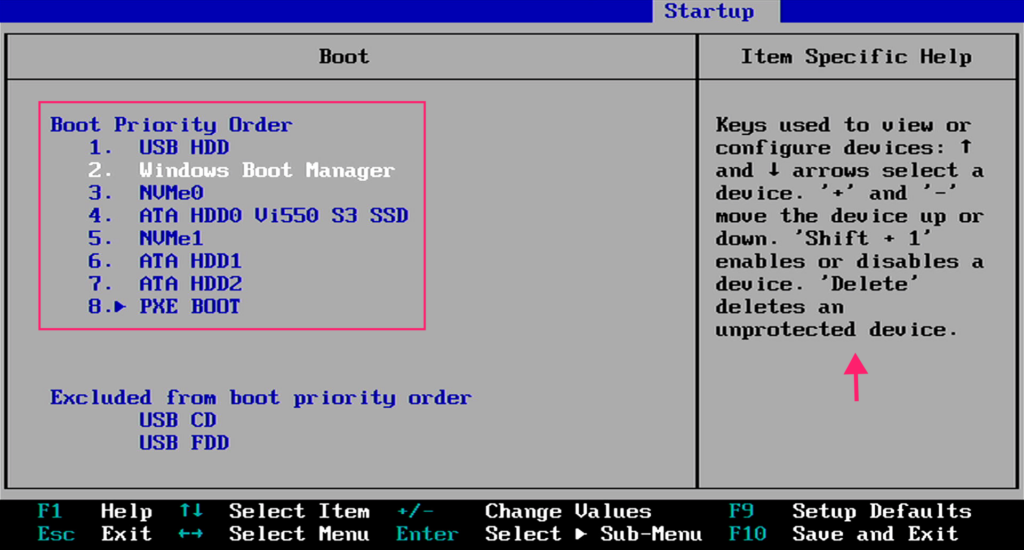
4. On legacy BIOS systems,move the OS drive to the top of the boot priority order using the key combinations shown in the help section to reorder devices
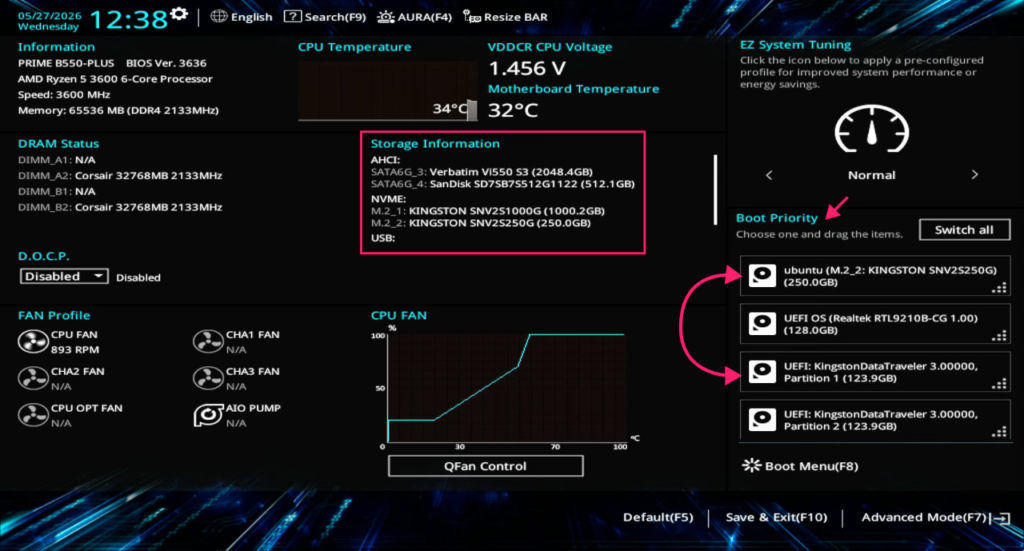
5. On modern UEFI interfaces, boot priority is often shown directly on the main screen and can be updated by dragging and dropping with the mouse
6. Make sure all external devices sit below the OS drive, including USB drives, portable storage, and network boot options
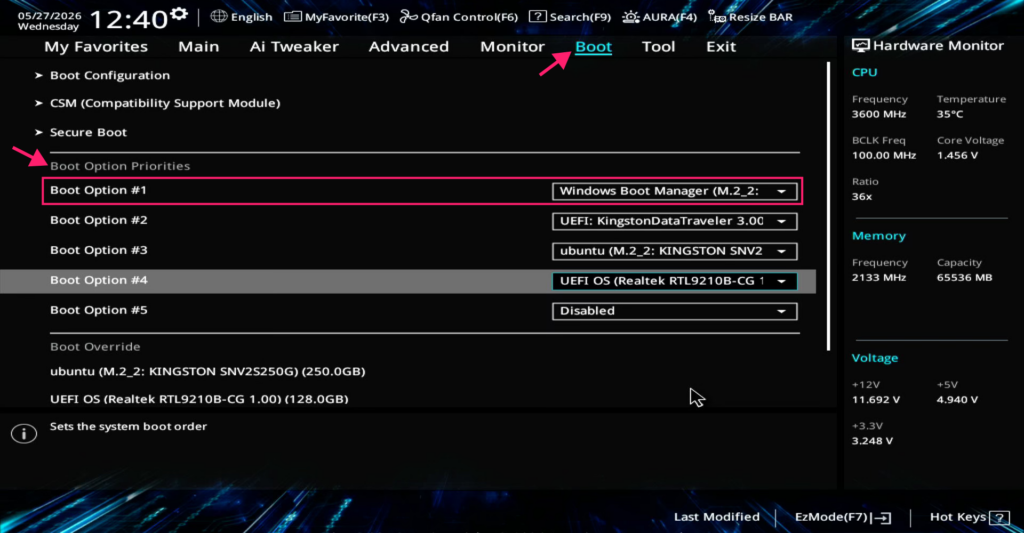
7. Press F10 to save and exit
If this was the cause, the machine should boot normally.
There are also four common mistakes to avoid before you begin:
- Running Startup Repair repeatedly: Startup Repair performs read/write operations on the drive. On a degrading drive, this accelerates wear and can overwrite data, complicating or preventing recovery.
- Performing multiple hard reboots: Repeated forced restarts stress mechanical drives in particular and can create further filesystem corruption.
- Rebuilding the MBR blindly: Commands like
bootrec /fixmbrandbootrec /fixbootmodify the partition scheme. Running them without first confirming the drive is healthy and visible in BIOS can complicate recovery significantly. Note that these commands are only relevant for legacy BIOS and MBR-partitioned systems and don’t apply to UEFI/GPT setups, which covers most modern Windows 11 machines. - Ignoring BIOS entirely: Jumping straight to repair tools when the actual problem is hardware-related is, at best, a waste of time.
Once you’ve confirmed the drive is visible, reports correct capacity, and shows no physical failure signs, move to step 2.
» Learn how to correctly enable and disable Windows Automatic Repair
Step 2: Disconnect external peripherals and reseat internal drive cables
Before opening anything up, start with the simplest possible fix. Shut the machine down completely and unplug all external storage: USB drives, portable hard drives and SSDs, eSATA devices, Thunderbolt storage, and card readers. Power the machine back on.
If it boots normally, an external device was conflicting with the boot sequence, so check the boot priority order in BIOS and make sure external devices sit below the internal OS drive in the list.
If removing external devices doesn’t resolve it, the next step is checking the physical cable connections inside the machine:
1. Shut down and disconnect the power cable, then press and hold the power button for 10 seconds after unplugging to discharge any residual capacitor charge
2. Ideally use an anti-static wrist strap to ground yourself
3. If you don’t have one, touch a bare metal part of the case chassis with the power cable disconnected before making contact with any internal components
Note: It’s unlikely that static discharge would damage modern PCs and components, but the risk is still there and could permanently brick machines so it’s something to be aware of.
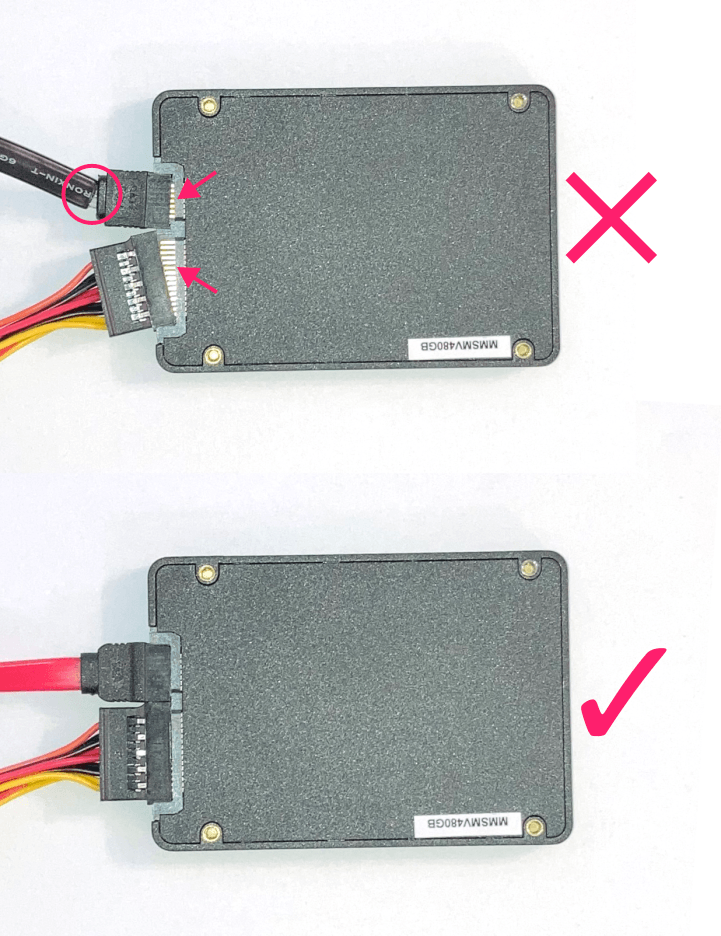
4. Open the case and inspect the SATA data and power cables for visible damage at both the drive end and the motherboard end
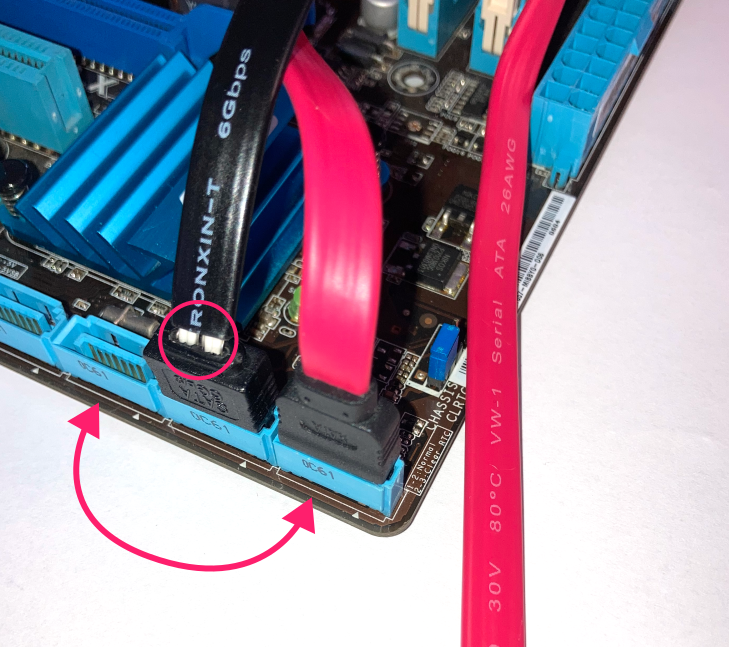
5. Reseat the connectors and make sure each connector is fully pressed in
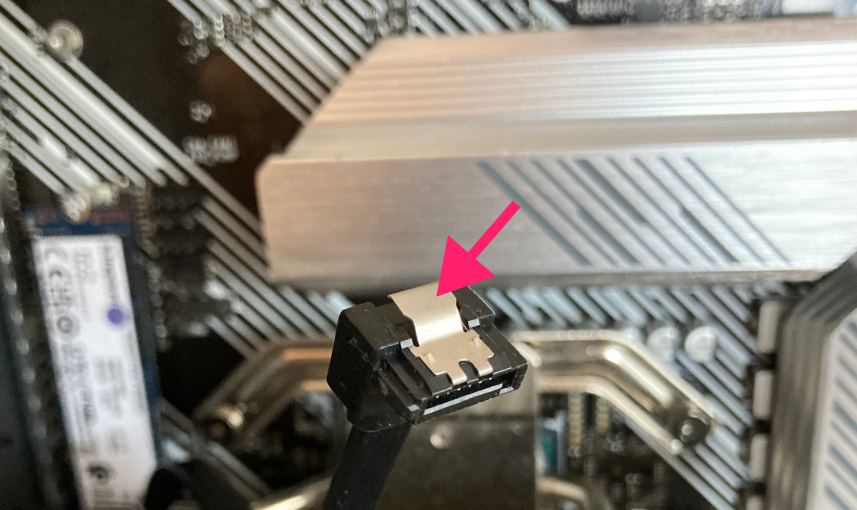
6. Some SATA cables have retaining clips where you must press the tab before pulling the cable to avoid damaging the connector or its mate on the drive or board
7. Try a different SATA port if available since a faulty port can produce the same error as a faulty cable
8. Close the case, reconnect the power cable, and power on
9. Check whether the drive now appears correctly in BIOS before attempting to boot
One important note: laptops and most small form factor systems have storage connected directly to the mainboard, so there are no cables to inspect. If you’re working on a laptop and external peripherals aren’t the cause, move to step 3.
Step 3: Clear the CMOS or reset BIOS to defaults
If reseating cables didn’t resolve the issue, a corrupted or reset BIOS configuration may be preventing the system from finding the boot drive. There are three ways to reset it, depending on what you have access to.
Reset from within BIOS
1. Enter BIOS using the appropriate key for your manufacturer (Del, F1, F2, or F10).
2. Look for a reset option. Naming varies by manufacturer but is typically labeled Load Optimized Defaults, Setup Defaults, Restore Defaults, or simply Defaults
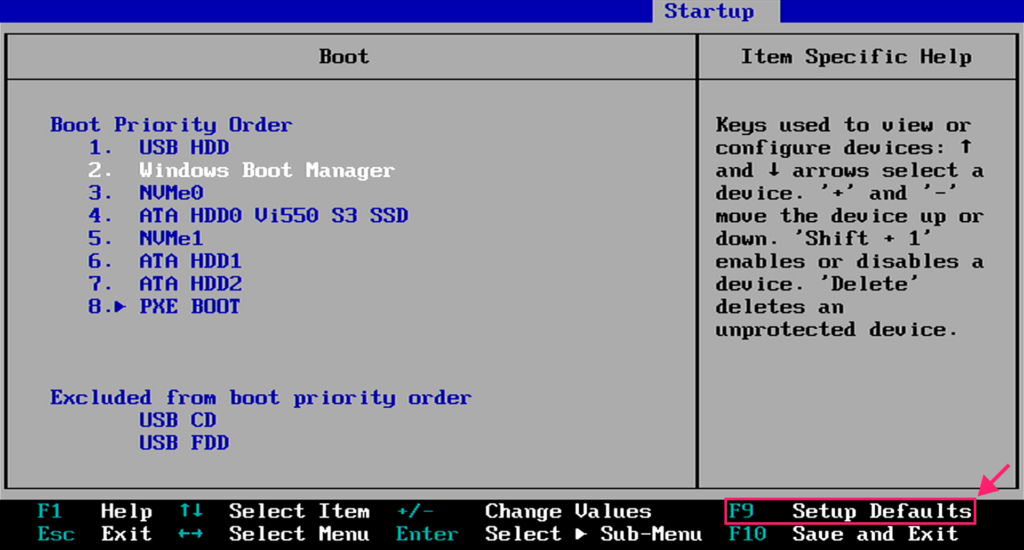
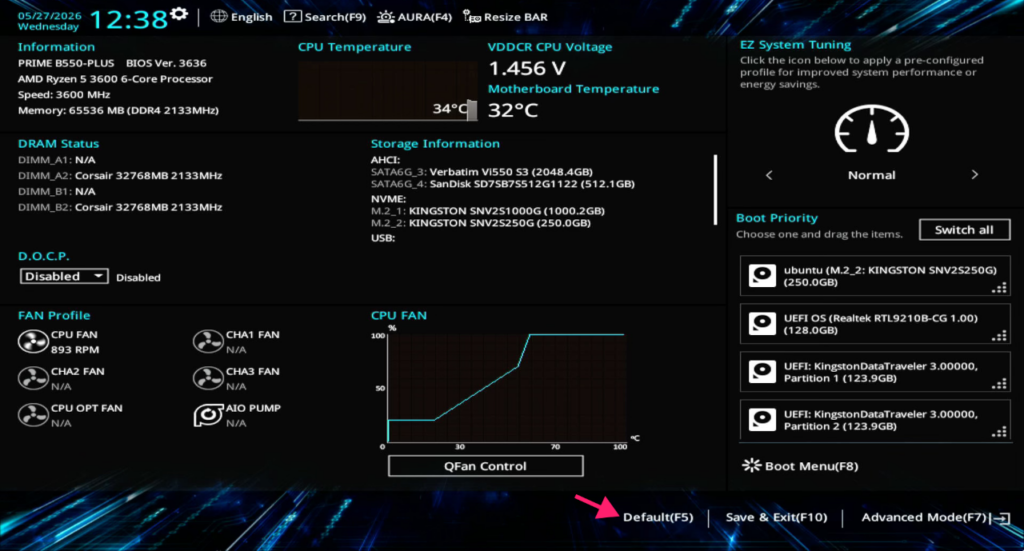
3. Confirm the prompt when it appears
4. Press F10 tosave and exit
Reset via jumper
Use this method when BIOS is inaccessible or the system won’t POST. Laptops rarely have a jumper, so you’ll need to skip this and use the battery removal method below instead.
1. Power off the machine and disconnect the power cable, then press and hold the power button for 10 seconds to discharge residual capacitor charge
2. Ground yourself using an anti-static wrist strap, or touch a bare metal part of the case chassis with the power cable disconnected
3. Open the case and locate the CMOS clear jumper (usually a 2 or 3 pin header labeled CLR_CMOS, CLRTC, or CLEAR). Consult your motherboard manual if you can’t find it
4. Short the pins for 10 – 15 seconds. On a 2-pin header, use a metal object like a screwdriver to bridge the two pins; on a 3-pin header, move the jumper cap from pins 1 – 2 to pins 2 – 3
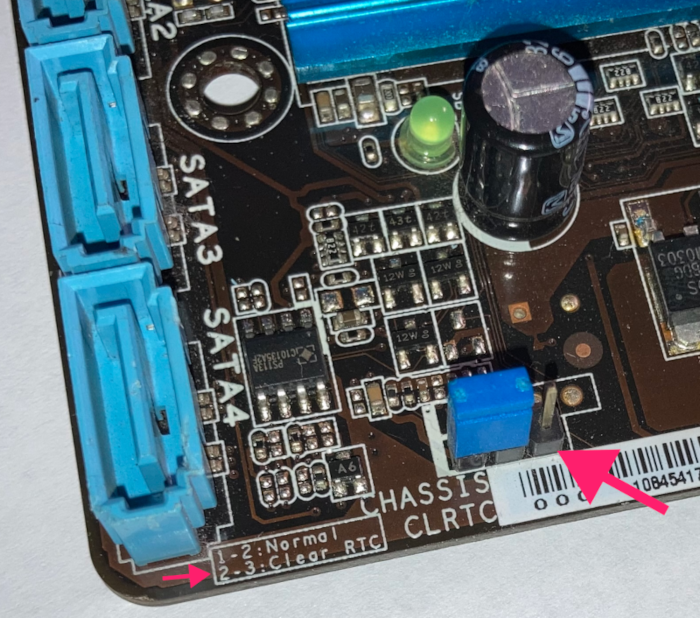
5. Return the jumper cap to its original position on 3-pin configurations before proceeding
6. Close the case, reconnect the power cable, and power on
Factory defaults will load. Boot into BIOS to reconfigure your settings.
Reset via battery removal
Use this method on laptops or boards without a jumper. Note that modern laptops often require substantial disassembly to reach the battery.
1. Power off the machine and disconnect the power cable, then discharge residual power and ground yourself as above
2. Locate the coin cell battery on the motherboard and press the metal retaining clip outward to release it
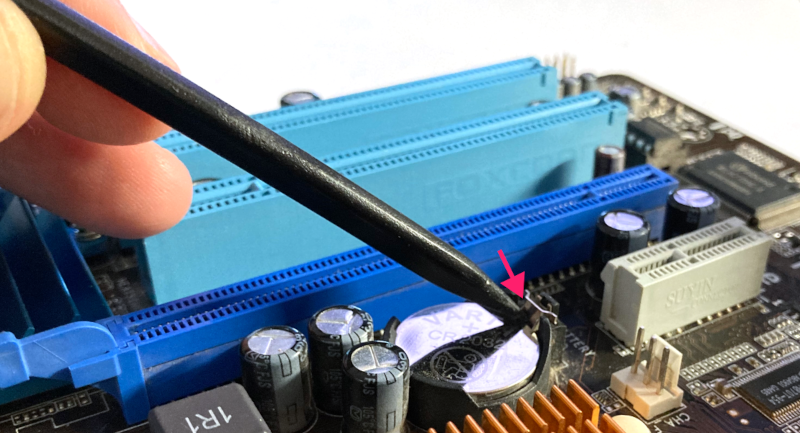
3. If the battery is wire-terminated (common on small form factor boards and most modern laptops), unplug the connector from the mainboard instead
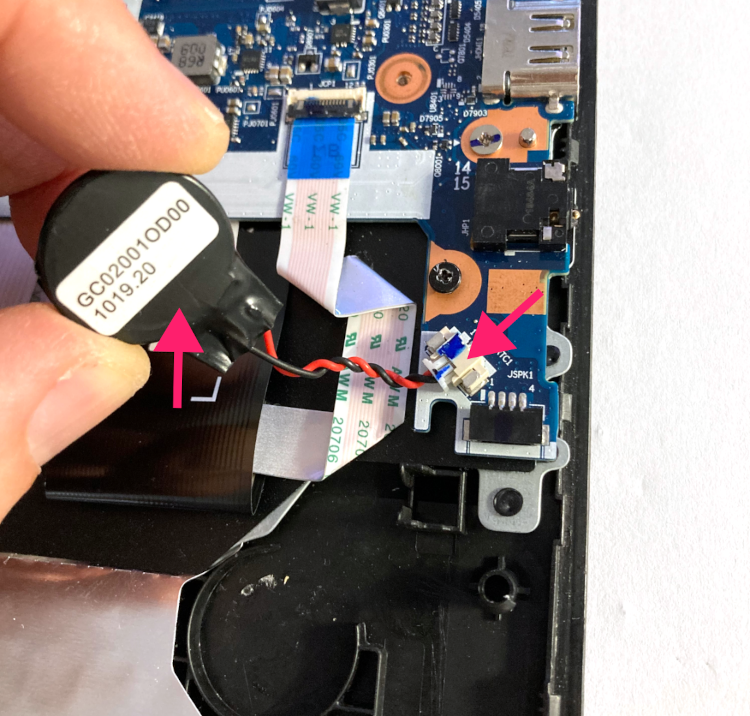
Leave the battery disconnected for 5 – 10 minutes, then reconnect it
Close the case, reconnect the power cable, and power on
Step 4: Rebuild the Boot Configuration Data (BCD) or Master Boot Record (MBR)
If the drive is visible in BIOS and the hardware checks out, the problem is likely a corrupted bootloader. The repair process differs depending on whether your system uses MBR or GPT partitioning. Windows 10 supports both, Windows 11 requires UEFI and GPT. You’ll need a bootable Windows installation media to proceed.
1. Boot from the Windows installation USB or DVD
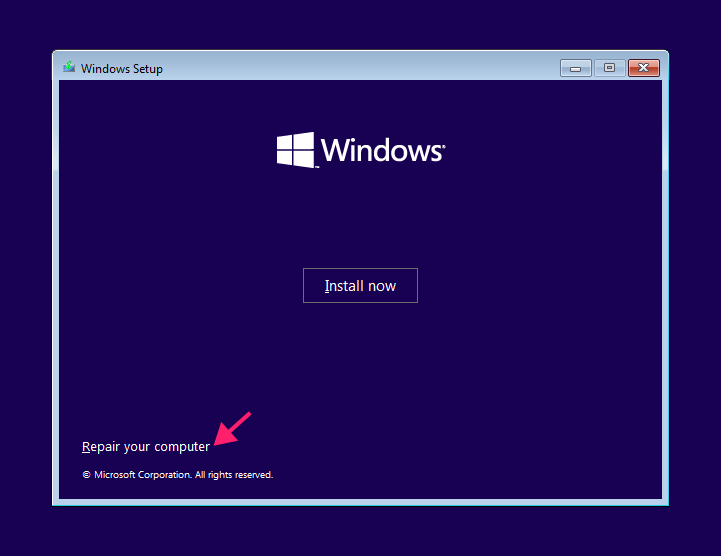
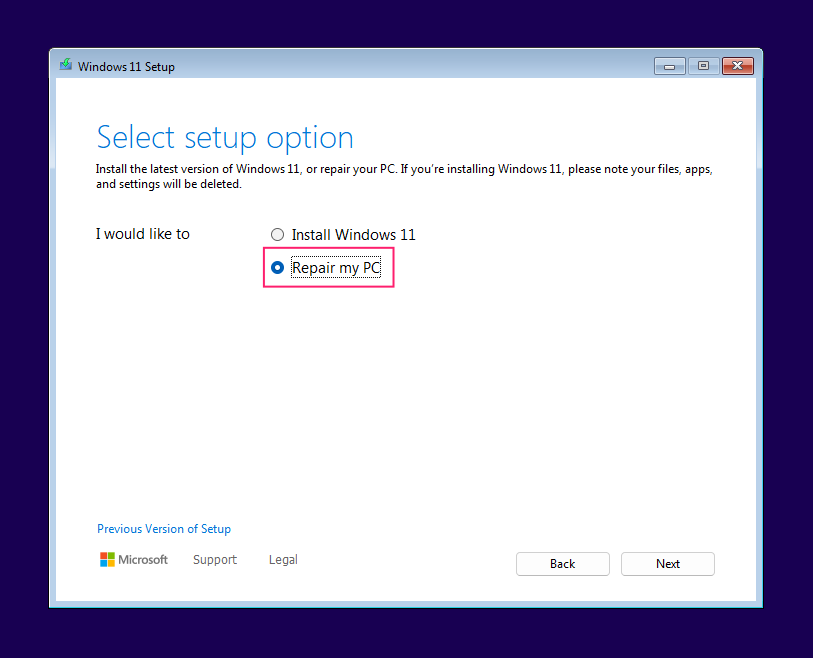
2. SelectRepair your computer (Windows 10) or Repair my PC (Windows 11) at the first setup screen
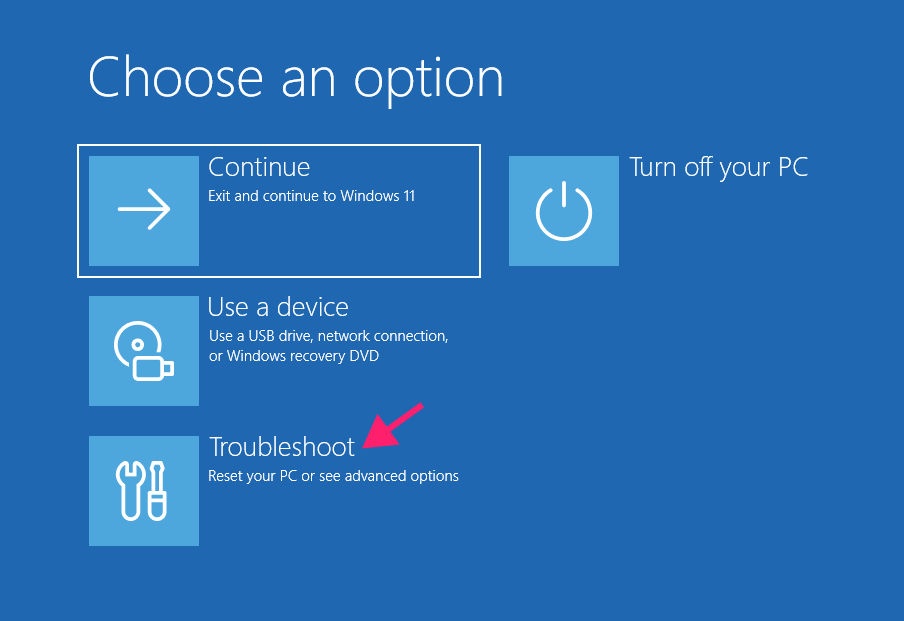
3. Select Troubleshoot
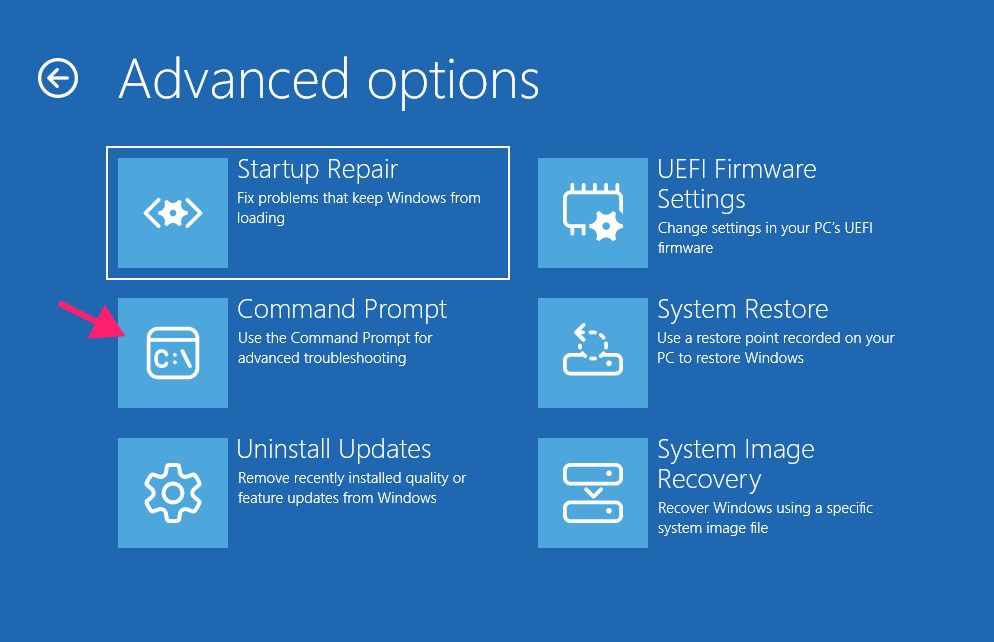
4. Select Command Prompt
5. Run diskpart, then typelist vol to identify your current drive letters
6. Type exit to return to Command Prompt when done
MBR systems (Windows 10, legacy BIOS)
1. Back up the current BCD by running bcdedit /export D:\BCD_Backup (replace D: with the letter of your Windows system drive)
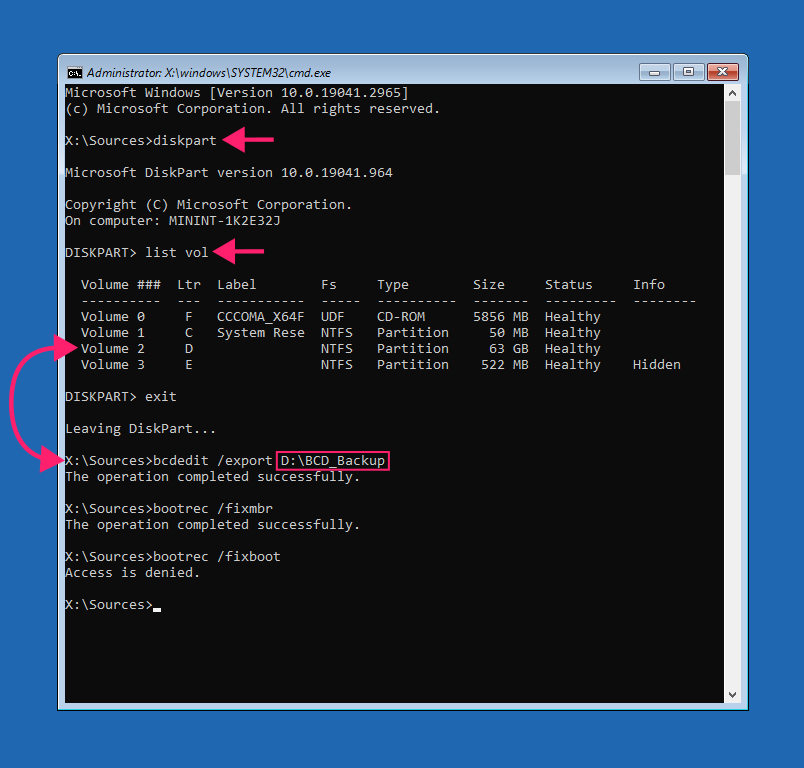
2. Run bootrec /fixmbr to write a new master boot record to the system partition
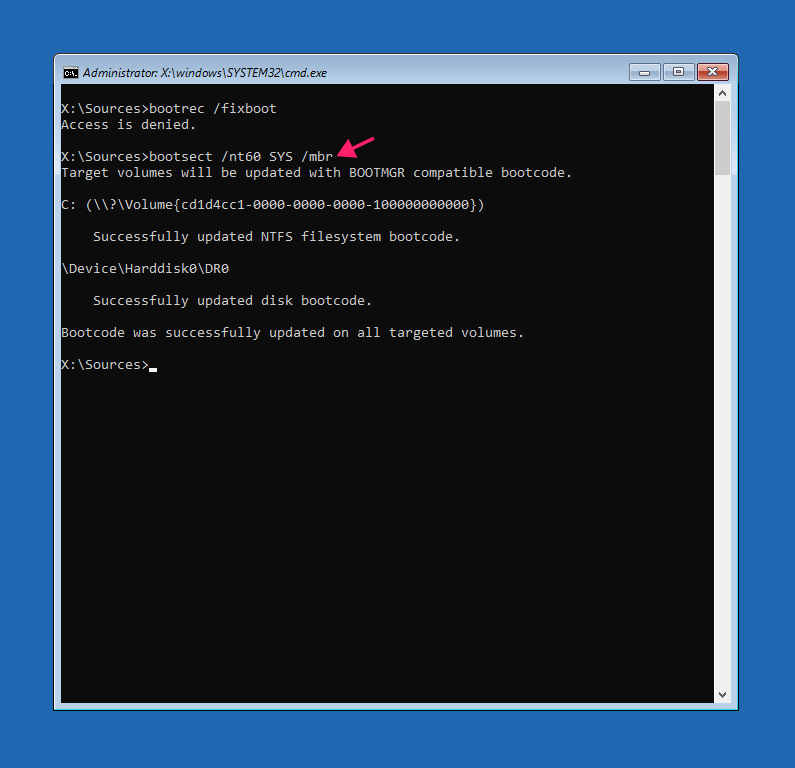
3. Run bootrec /fixboot to write a new boot sector to the active partition. If you get an Access is denied error, proceed to step 8 instead
4. Run bootsect /nt60 SYS /mbr to write the boot sector directly, then run bootrec /rebuildbcd
Alternatively, for a cleaner rebuild:
1. Remove protected attributes and rename the existing BCD by running attrib C:\boot\bcd -h -r -s followed by ren C:\boot\bcd bcd.old
(replace C: with the letter of your system reserved partition)
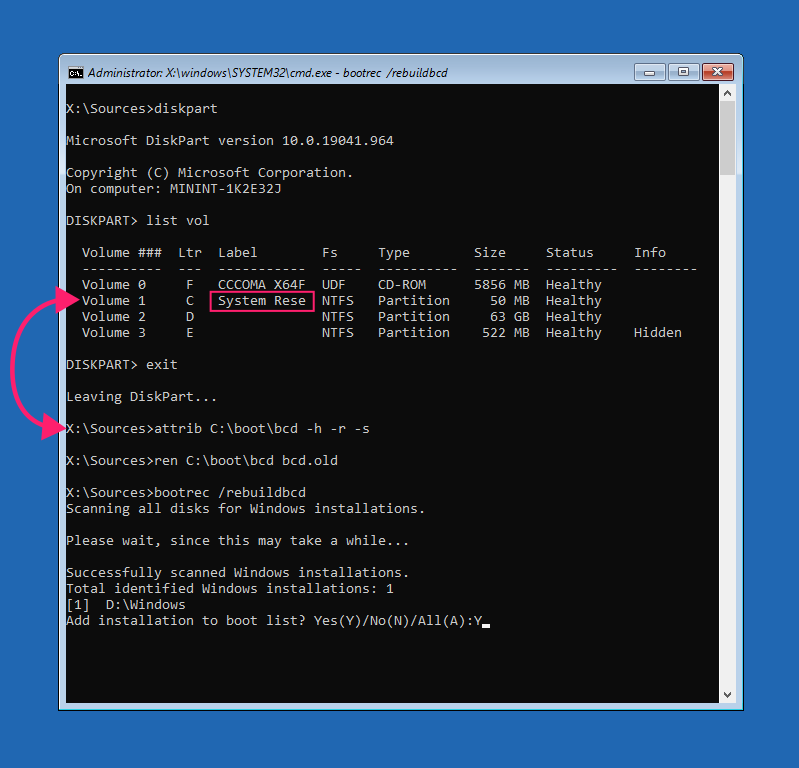
2. Run bootrec /rebuildbcd for a fresh rebuild
3. If rebuildbcd fails, run bcdboot D:\Windows /s C: /f BIOS (replace C: with the system reserved partition letter and D: with your Windows drive letter)
Note: Always use list vol inside diskpart to confirm you are using the correct drive letters before running any of these commands.
GPT systems (Windows 11, UEFI)
Commands like bootrec /fixmbr and bootrec /fixboot are not relevant on GPT systems. Use the following instead:
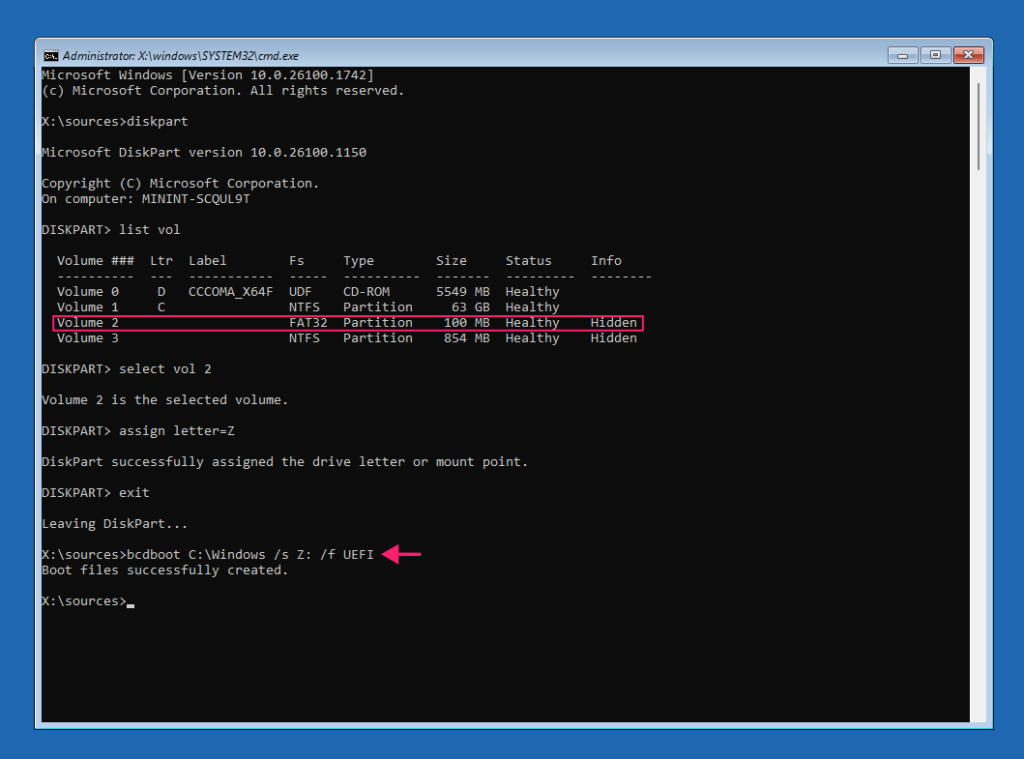
1. Run diskpart and type list volto identify your drive letters
2. Locate the EFI partition (typically around 100MB). If you’re unsure, type list partition and look for the entry marked System
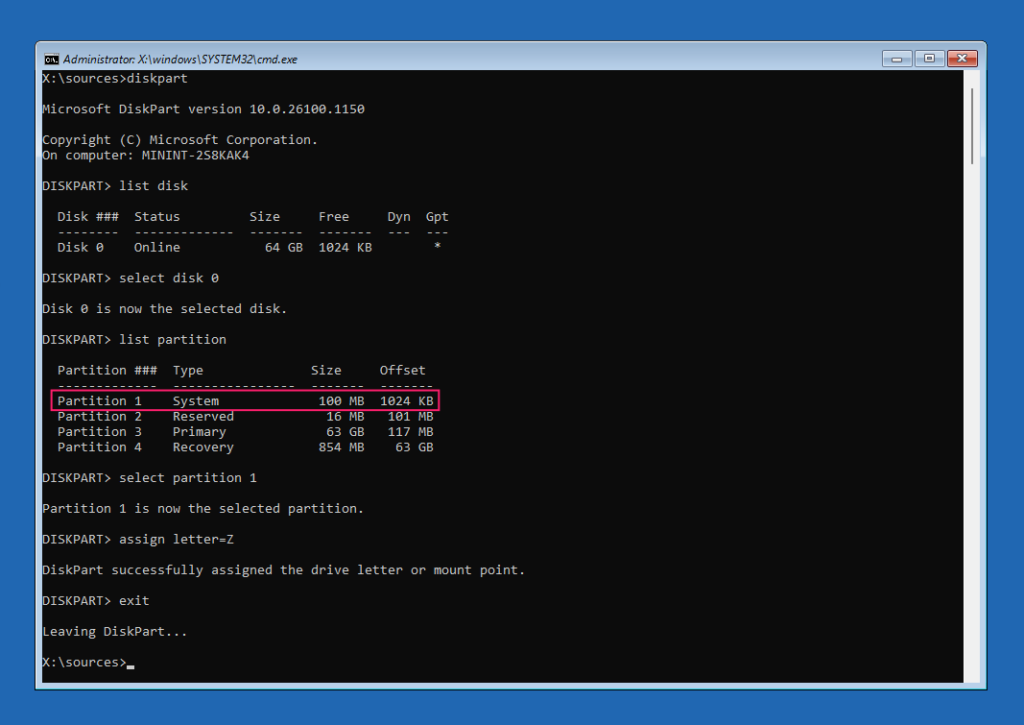
3. Select the EFI partition by running select vol 2(replace 2 with the correct volume number)
4. Assign a drive letter to the partition by running assign letter=Z
5. Type exit to leave diskpart
6. Rebuild the EFI bootloader by running bcdboot C:\Windows /s Z: /f UEFI (replace C: with your Windows drive letter)
Step 5: Verify the OS partition is marked as active (MBR systems only)
This step only applies to MBR-partitioned systems. GPT systems use UEFI to locate the EFI partition directly and don’t rely on the active flag:
1. Boot from your Windows installation USB or DVD and open Command Prompt via Troubleshoot as in step 4
2. Run diskpart
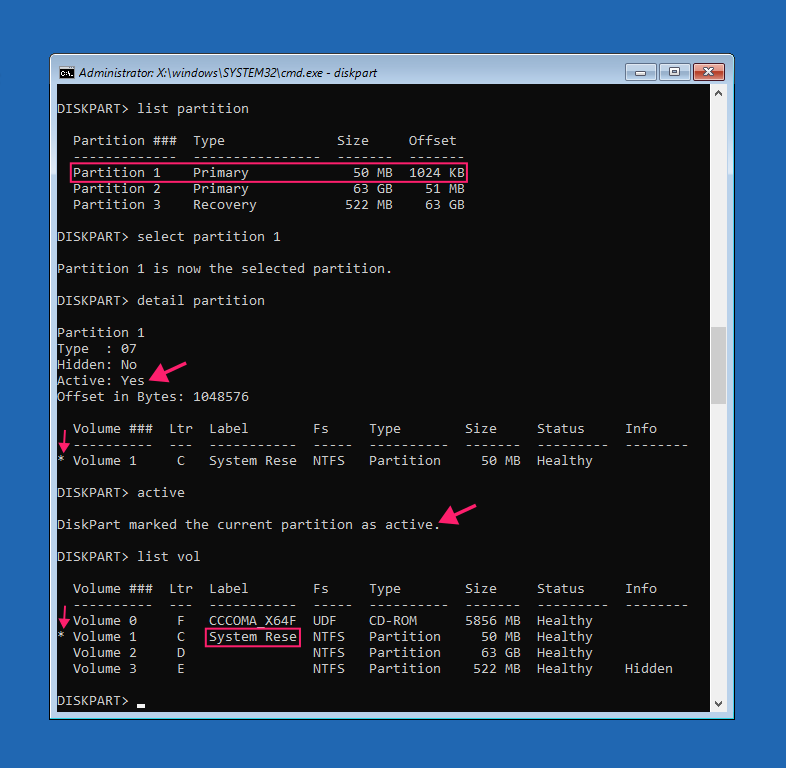
3. Type list partition (the system reserved partition should have an asterisk in front of it, indicating it’s active. If it does, you’re done here)
4. Type list disk to list available disks
5. Type select disk 0 (replace 0 with the number corresponding to your Windows installation disk)
6. Type list partition to list the partitions on the selected disk
7. Type select partition 1 to select the system reserved partition (replace 1 with the correct partition number)
8. Type detail partition and locate the Active row in the output. It should read Yes
9. If the partition is not marked as active, type active to set it
10. Type exit to leave diskpart
Most boot failures are fixable if you don’t rush them
In most cases of the “Reboot and select proper boot device” message, the drive is fine, the data is safe, and the fix is a BIOS setting or a few command-line instructions away. The damage usually comes from the response, not the error itself, such as repeated repair attempts on a struggling drive, blind MBR rebuilds, or hard reboots that stress already-worn hardware.
For individual machines, the triage process in this post gets you there. For IT teams managing a fleet, catching drive degradation before it produces a black screen means monitoring SMART attributes across every endpoint on a scheduled basis, not waiting for users to report that their machine won’t start. Atera’s RMM platform handles that centrally, with threshold-based disk health monitoring across Windows and Mac endpoints, including SMART-based alerts for major SSD vendors. When a drive starts showing wear, you know before the user does.
Frequently Asked Questions
Related Articles

How to set up secure printing across your organization
A secure print checkbox protects exactly one moment in a document's life. Everything else, from unencrypted traffic and unhardened devices to payroll printouts forgotten in a tray, stays exposed. Real secure printing covers the whole lifecycle: release policy, authentication, encryption, hardening, and a fleet that stays monitored long after rollout.
Read now
How to reduce alert fatigue in healthcare IT
In a hospital, a dismissed alert isn't a delayed ticket. It can be a patient deteriorating while the monitor keeps sounding. Cutting alert volume won't fix that on its own, and switching alerts off can make it worse.
Read now
How to prevent configuration drift across your IT infrastructure
Configuration drift rarely breaks anything the day it happens. It hides in a hotfix, a reset default, or a vendor installer, then surfaces weeks later as a failure nobody can trace. Stopping it means defining exactly what approved looks like, closing every side door into production, giving each setting one owning tool, and checking that the baseline itself hasn't gone stale.
Read now
How to reduce alert fatigue across your IT team
Your technicians aren't ignoring alerts because they're careless. They're ignoring them because most alerts have taught them to. Once the stream stops being trustworthy, real failures slip past with the noise. Fixing it means deciding what deserves an interruption, tuning out transient spikes, collapsing alert storms, and automating the fixes you've run a hundred times.
Read nowEndless IT possibilities
Boost your productivity with Atera’s intuitive, centralized all-in-one platform









