
Table of contents
Generate summary with AI

The “Your disk is almost full” notification often becomes a support ticket because it shows up with zero warning right as a user is trying to save an important file or install an update. A Mac configured with the base 256GB tier can fill up in under two years from a few thousand photos, a handful of large app installs, and browser cache that quietly compounds in the background.
None of this is a hardware problem. It’s a storage management problem that shouldn’t need a ticket, but at least it’s got a few quick fixes. This guide walks through exactly how to diagnose what’s eating your storage and reclaim it, starting with the built-in tools macOS already gives you and moving into the more advanced techniques.
» Worried it might be a hardware problem? See our guides to checking harddrive health and checking SSD health
Understanding what’s actually using your storage
Before deleting anything, it’s worth knowing exactly what’s taking up space on your Mac and how much of it you can actually reclaim. Here’s how:
Click the Apple menu in the top-left corner and select System Settings (or click the Settings icon in the dock)


Select General in the sidebar, then click Storage

Review the color-coded bar showing how much space each category (Applications, Documents, System Data, etc.) is using

Click the info icon (ⓘ) next to any category for a detailed, sortable file list

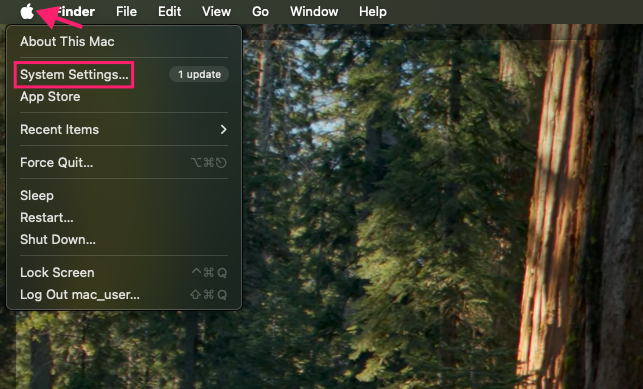
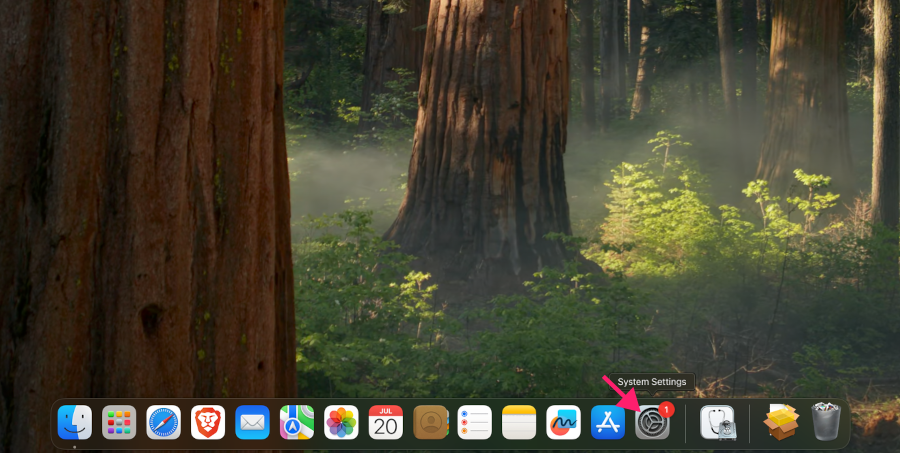
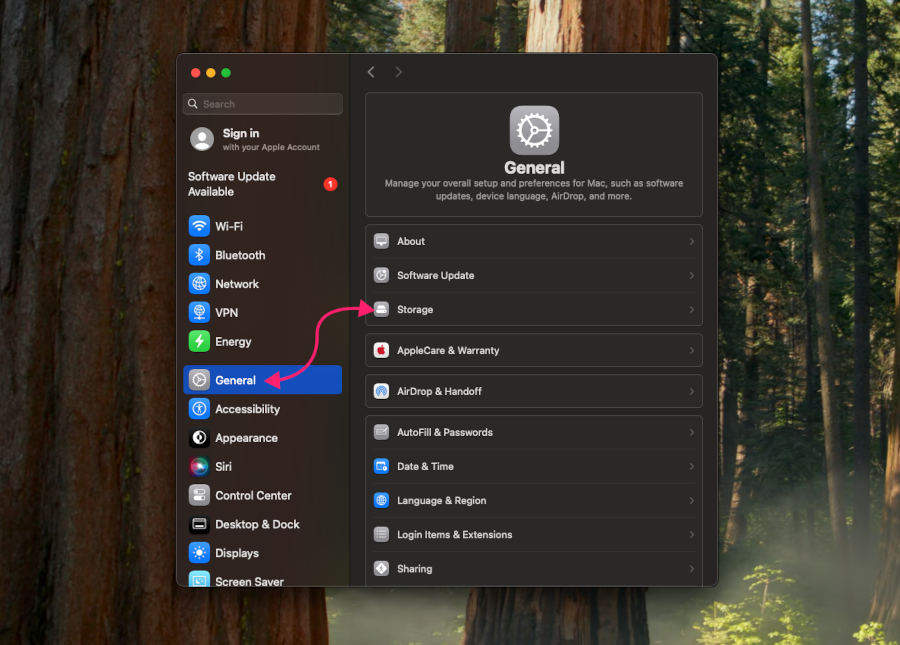
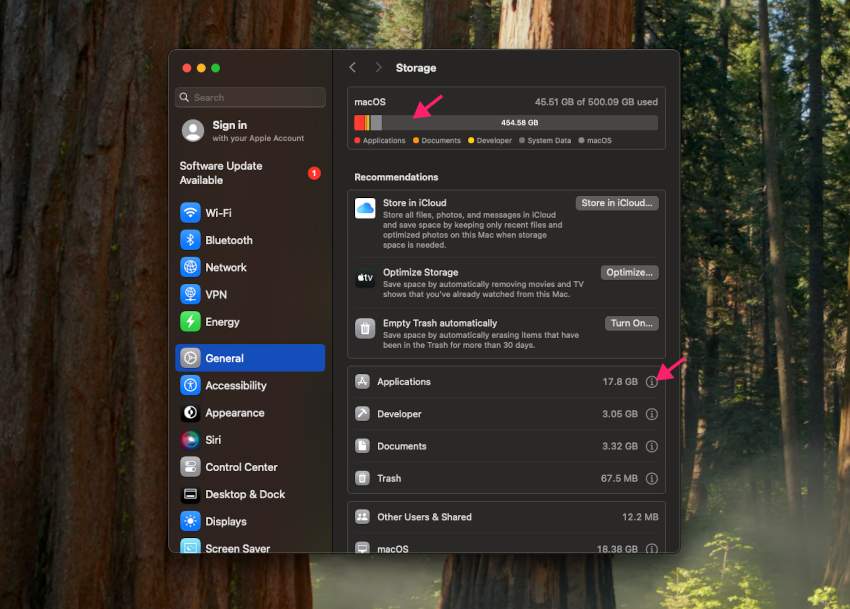
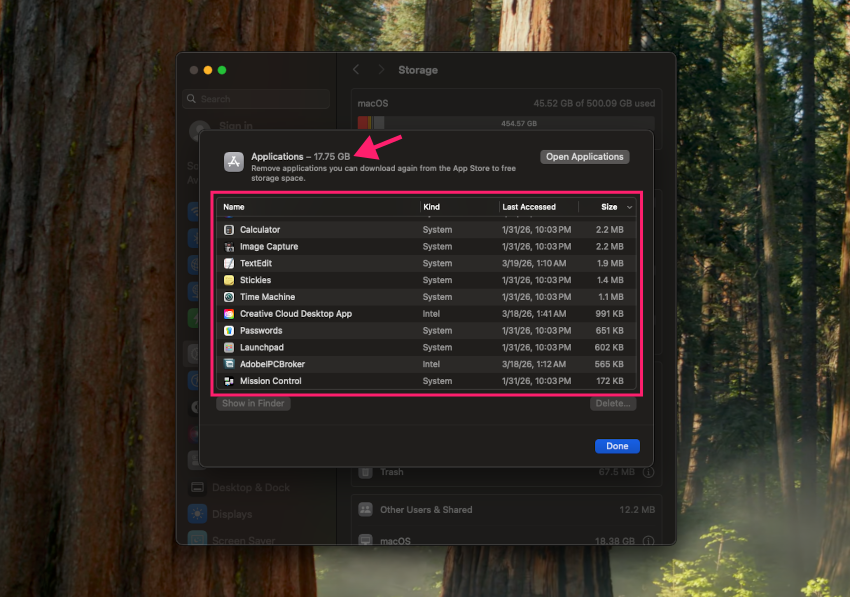
System Data is where most confusion starts. It’s not a single folder you can inspect directly, but a catch-all for anything that doesn’t fit neatly into Applications, Documents, Photos, or the other visible categories like caches, logs, temporary files, and virtual memory swap files. That’s also why it tends to be the category that grows the most without an obvious cause.
If your internal disk is partitioned into multiple APFS volumes, the Storage Settings recommendations panel only scans your home directory’s volume. Files sitting on other volumes won’t show up here and won’t be offered up for cleanup, so if your reported usage doesn’t match what you’d expect, you should check hidden volumes.
Reclaiming space, from one Mac to a whole fleet
The methods below cover the day-to-day cleanup most people need, followed by how the same principles apply when you’re managing storage across multiple endpoints.
Method 1: Run Optimize Storage
Apple’s built-in recommendations are the fastest place to start, since they surface the easiest space-saving wins without requiring you to hunt through folders manually.
1. Open the Storage settings window (Apple menu > System Settings > General > Storage)
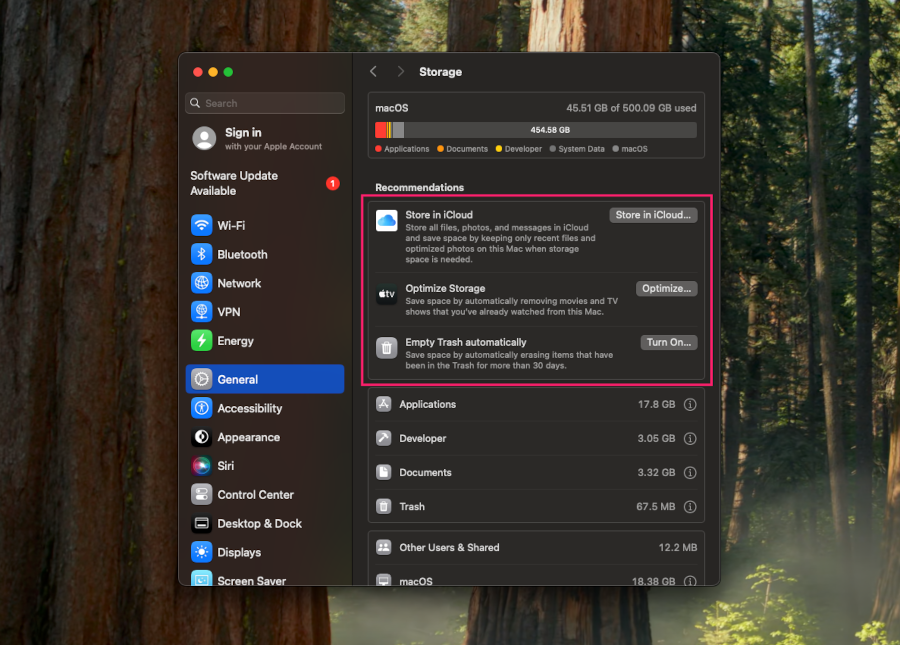
2. Review the Recommendations section for available optimization options:
- Click Store in iCloud to keep only recently opened documents, photos, and videos on your Mac while archiving the rest to iCloud
- Click Optimize next to Optimize Storage to automatically remove downloaded Apple TV movies and shows you’ve already watched, along with old email attachments
- Click Turn On next to Empty Trash automatically to have macOS permanently delete items that have sat in Trash for more than 30 days
Most users see the biggest single gain from iCloud storage, since photo and video libraries tend to be the largest local footprint on a typical Mac.
Method 2: Clear out Downloads and Trash
Downloads folders are where large, one-time files (installers, disk images, PDFs, etc.) pile up and get forgotten. This method targets those directly rather than waiting for Optimize Storage to catch them.
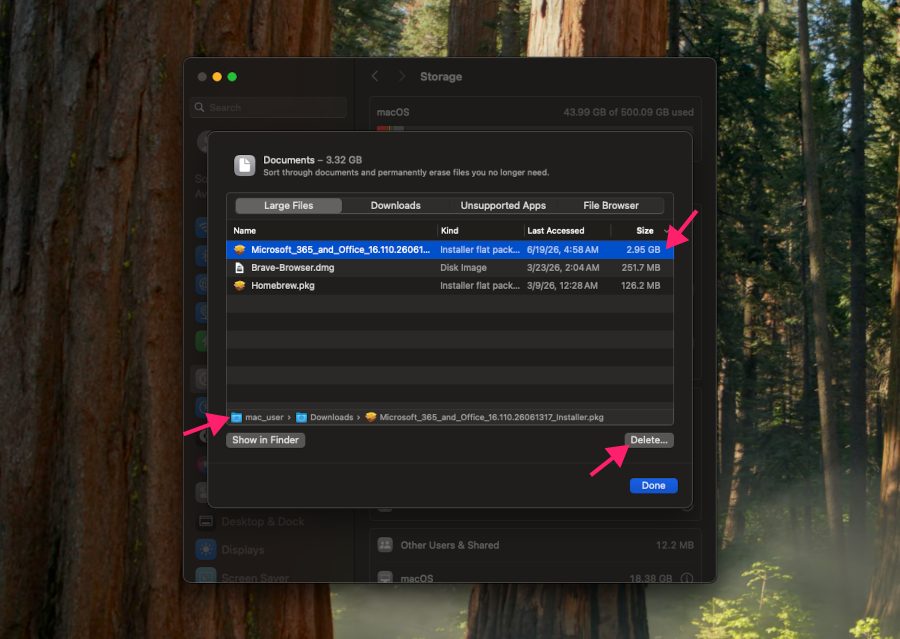
- Open the Storage settings window and click the info icon (ⓘ) next to Documents to view a detailed file list
- Click the Size column header to sort files from largest to smallest
Select a large file you no longer need and click Delete to remove it

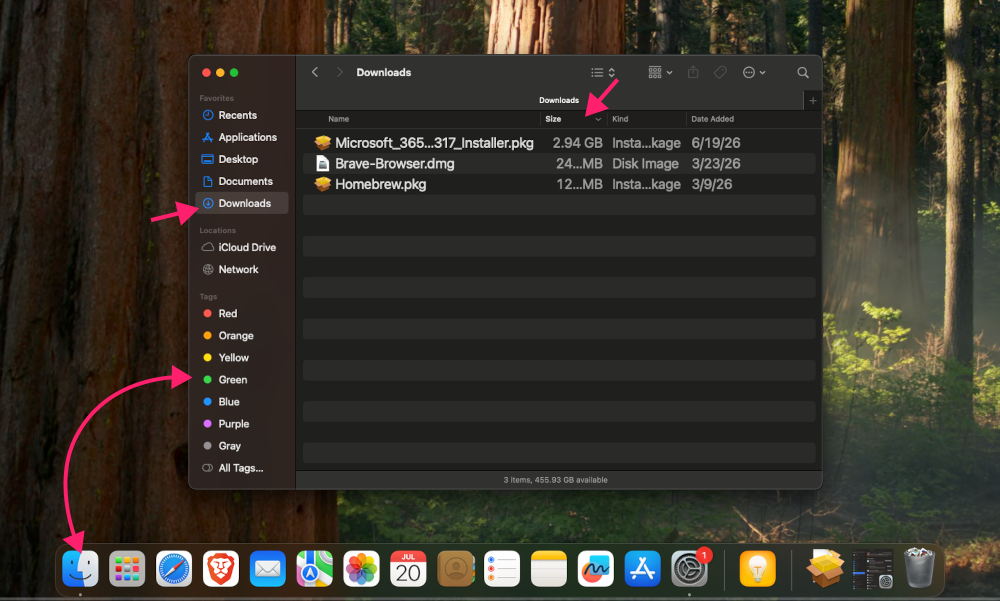
Alternatively, open Finder, select Downloads from the sidebar, and click the Size column to sort by file size

- Right-click any file you want to remove and select Move to Trash, or use the Command (⌘) + Backspace shortcut
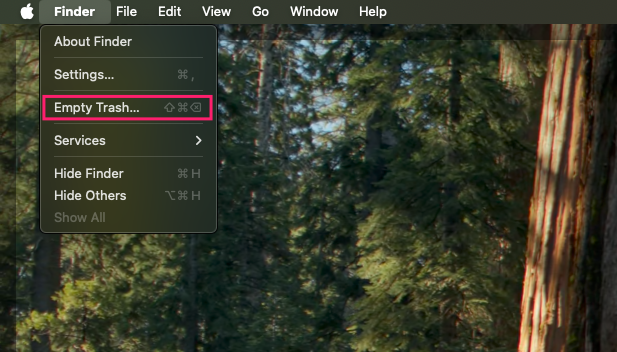
Open Finder > Empty Trash to permanently delete everything in Trash at once

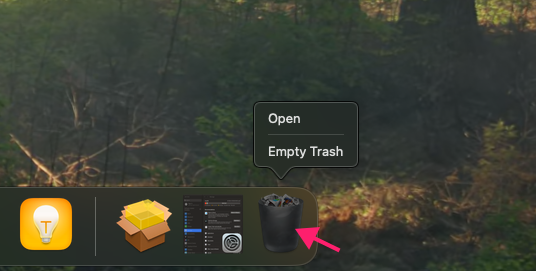
You can also empty the trash from the dock

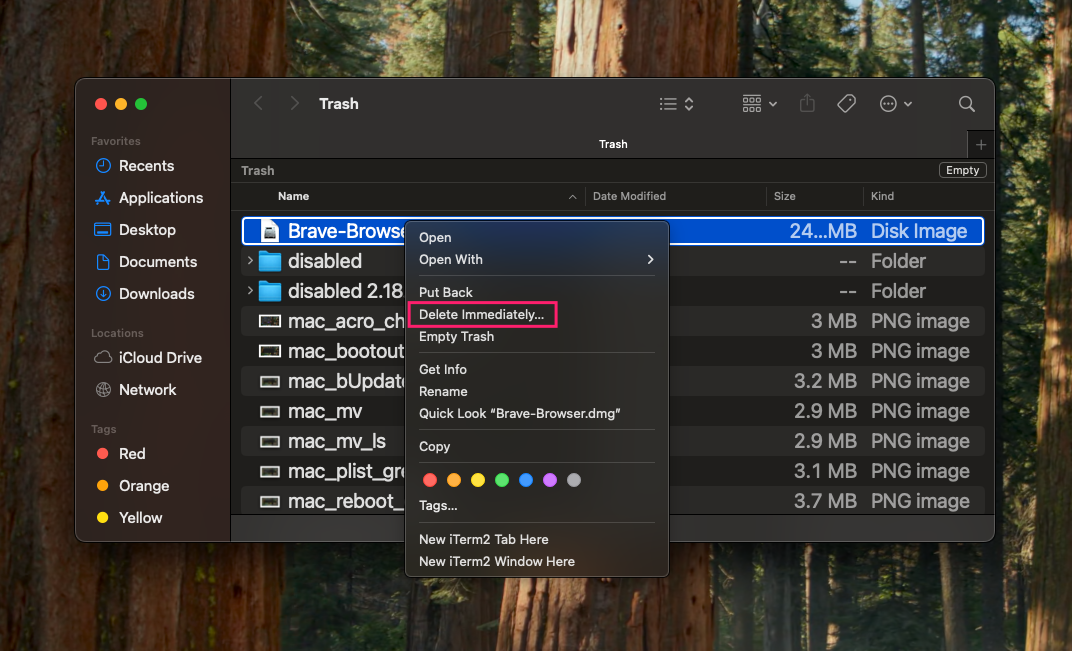
Alternatively, right-click individual files in Trash and select Delete Immediately to remove them one at a time

Method 3: Uninstall apps completely
This method removes an app along with its associated support files rather than leaving orphaned data behind.
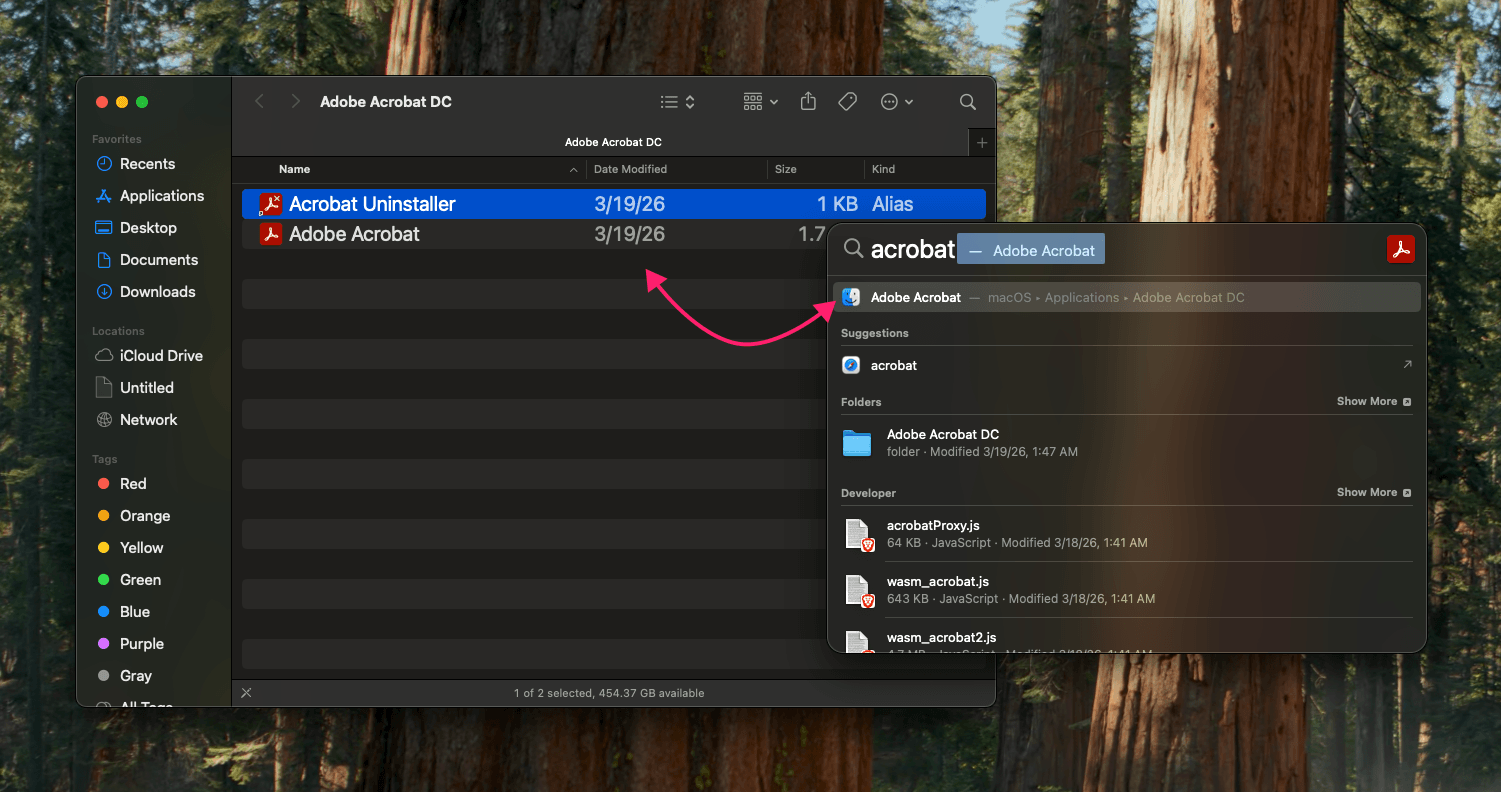
- Press Command (⌘) + Space to open Spotlight and search for the app you want to remove
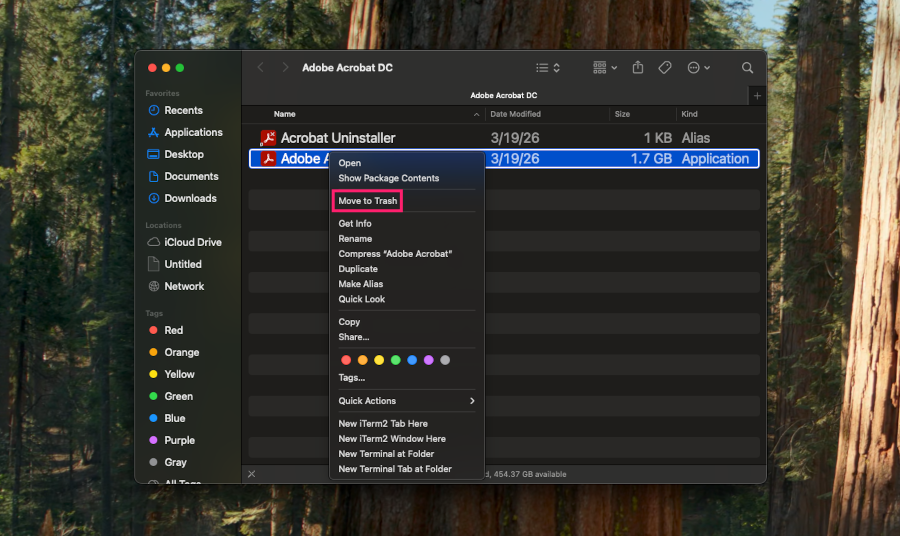
Hold Command (⌘) while double-clicking the app in the search results to reveal it in Finder

- If the app included its own uninstaller, run that first to remove associated files cleanly
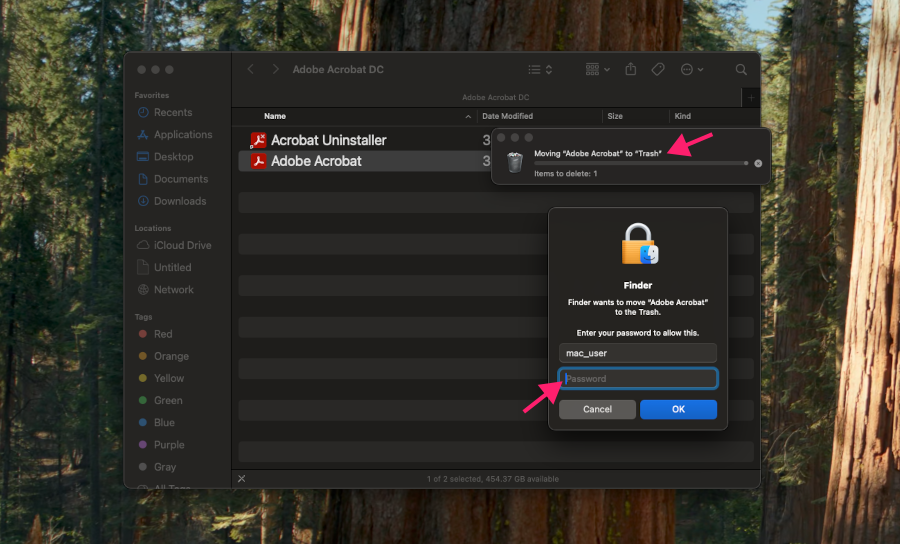
If no uninstaller exists, right-click the app and select Move to Trash (or use File > Move to Trash)

Enter your administrator name and password when prompted to confirm the deletion

- Open Finder > Empty Trash to permanently delete the app, since this method moves it to Trash rather than removing it outright
Alternatively, the Storage settings window lets you skip Finder entirely: click the info icon (ⓘ) next to Applications, select the app, and click Delete directly, or click Show in Finder first to check for a dedicated uninstaller

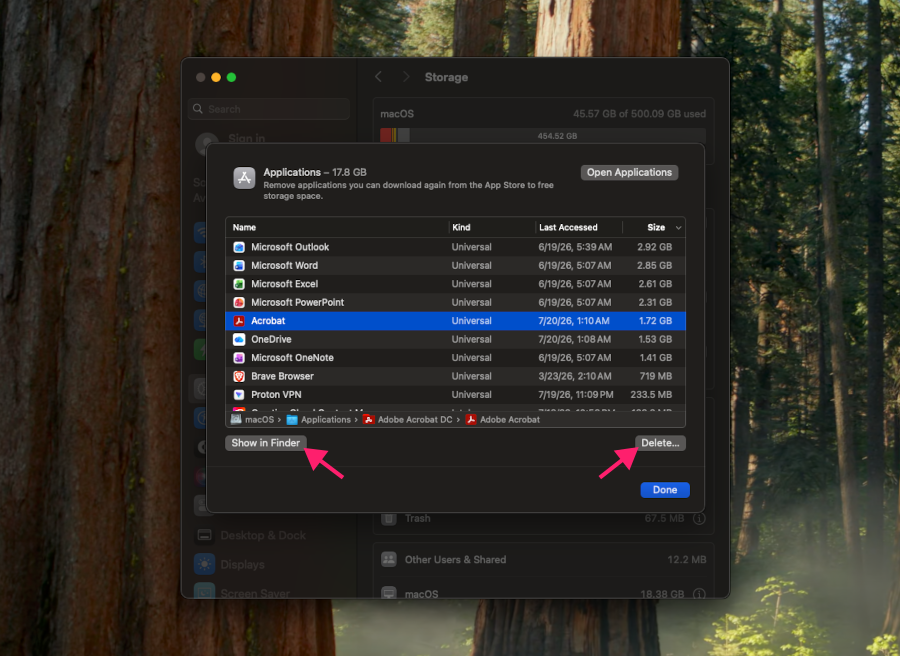
Apps removed this way are deleted immediately rather than moved to Trash.
Method 4: Clear browser cache without losing saved passwords
Cached files and cookies accumulate quickly across regular browsing, but clearing them the wrong way can sign you out of sites or wipe saved preferences. This method removes the cache while keeping credentials intact.
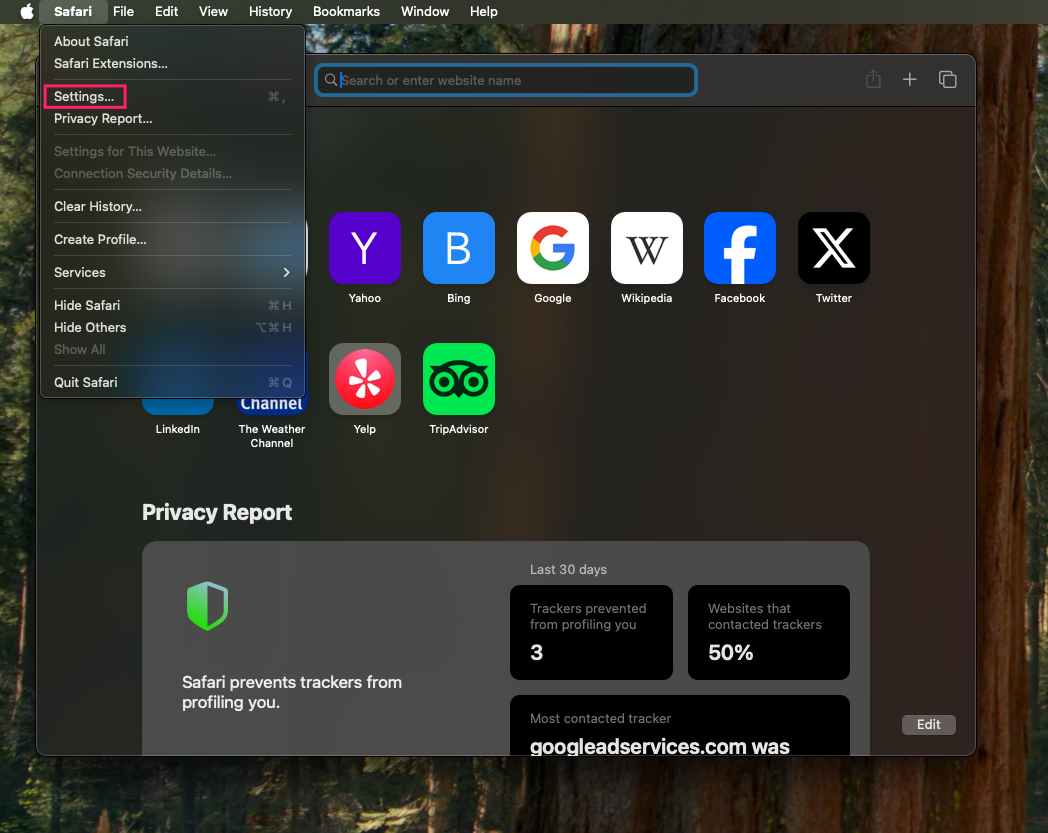
Open Safari and go to Safari > Settings in the top menu bar

Click Privacy, then click Manage Website Data

Click Remove All to clear all cached data and cookies, or select individual sites and click Remove to clear them selectively

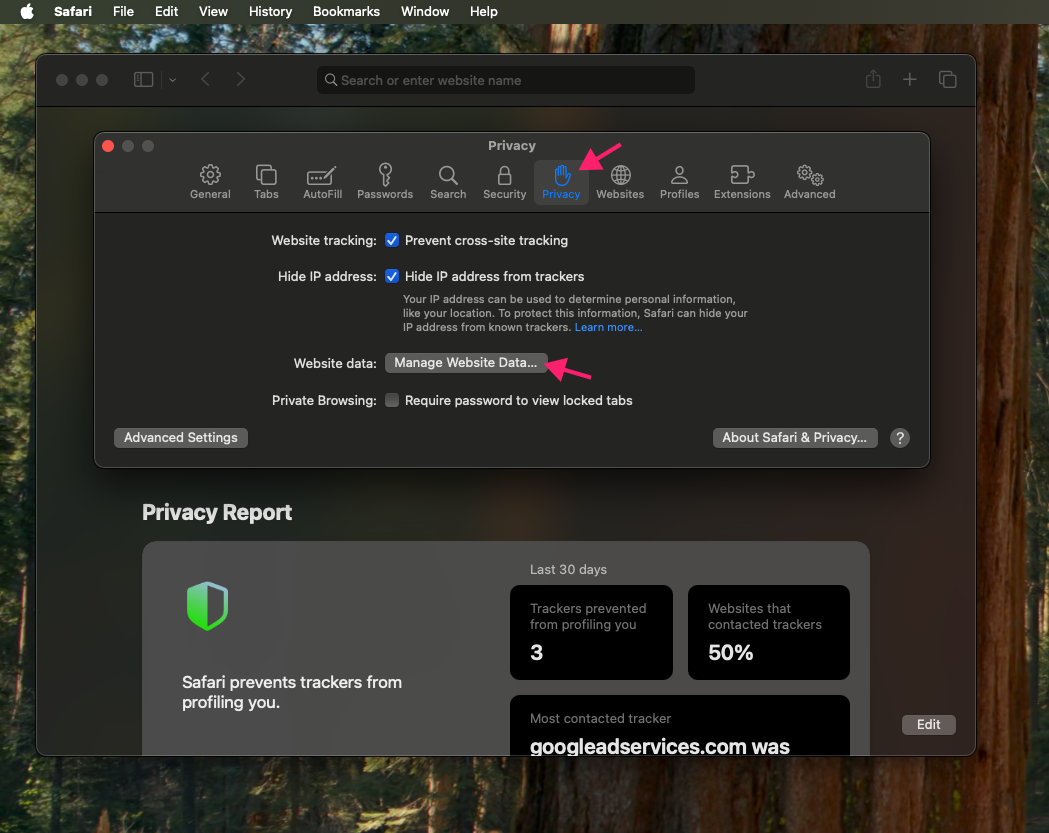
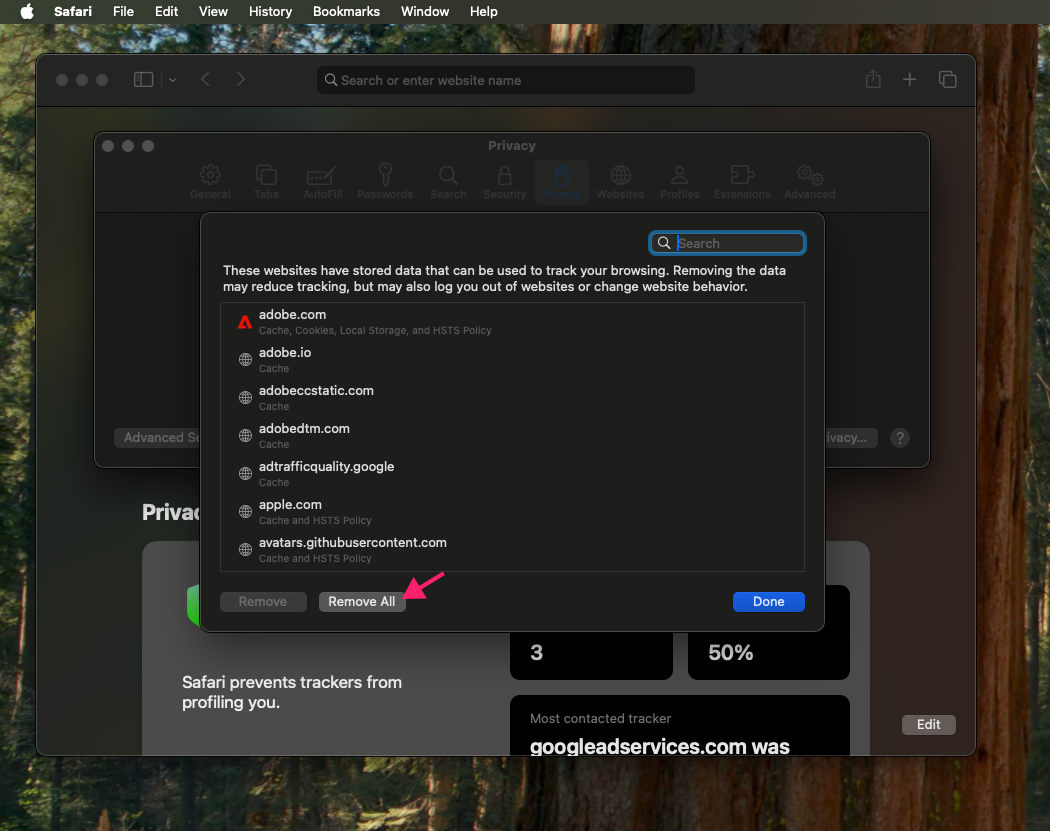
Safari stores saved passwords in Keychain, separate from cache and website data, so this process won’t touch them. Third-party browsers work similarly but keep passwords behind a separate, dedicated checkbox in their clearing options. As long as you leave that checkbox unchecked, clearing cache or browsing data won’t affect saved credentials.
Just be aware that clearing cache and cookies can sign you out of sites and reset preferences tied to that stored data.
Method 5: Review and clear ~/Library caches and logs manually
This method goes beyond what Optimize Storage touches, for cases where cache or log bloat in a specific app is still eating space after the standard methods.
Apple doesn’t document this as a manual process because macOS already auto-clears caches and logs it considers safe to remove under disk pressure. Treat this as a targeted option for a specific app you’ve identified as a space hog, not a routine maintenance step.
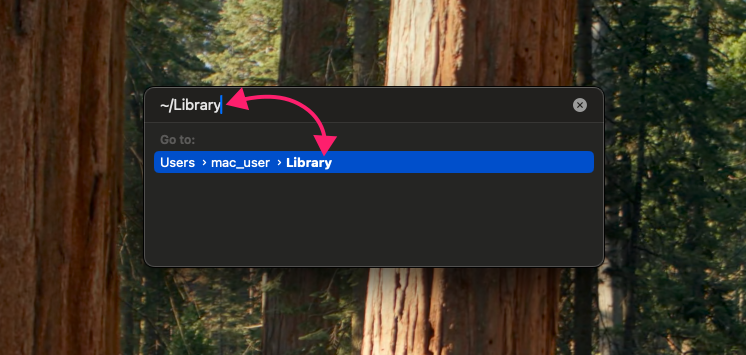
- Press Command (⌘) + Space, type
terminal, and press Return Alternatively, press Command (⌘) + Shift + G, type
~/Library, and press Return
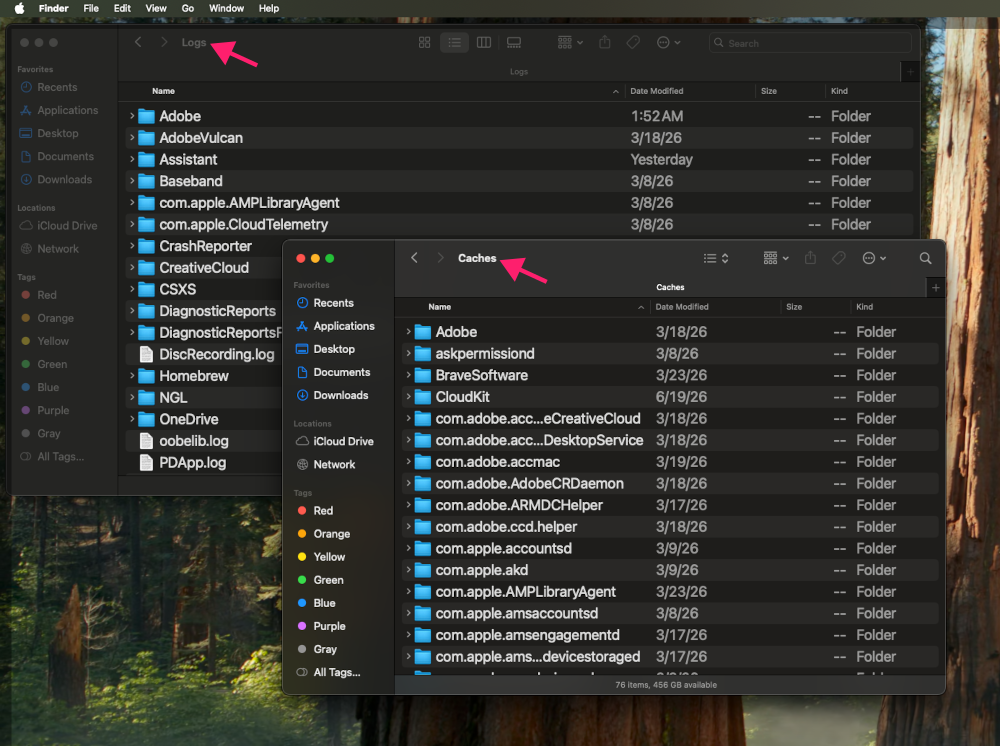
- Navigate to the Caches folder to review cache data by application
- Navigate to the Logs folder to review accumulated log files by application
Delete files only within Caches and Logs and avoid modifying any other folder inside
~/Library, since other folders can hold data applications rely on to function
Method 6: Purge Time Machine local snapshots
This method reclaims space held by local APFS snapshots, which can grow large without appearing as a distinct, obvious category in Storage settings.
- Press Command (⌘) + Space, type
terminal, and press Return - Run
tmutil listlocalsnapshotsdate /to display a list of current local snapshots Run
sudo tmutil deletelocalsnapshots YYYY-MM-DD-TTTTTT(replacing the placeholder with the exact date and timestamp from the previous step) to delete a specific snapshot
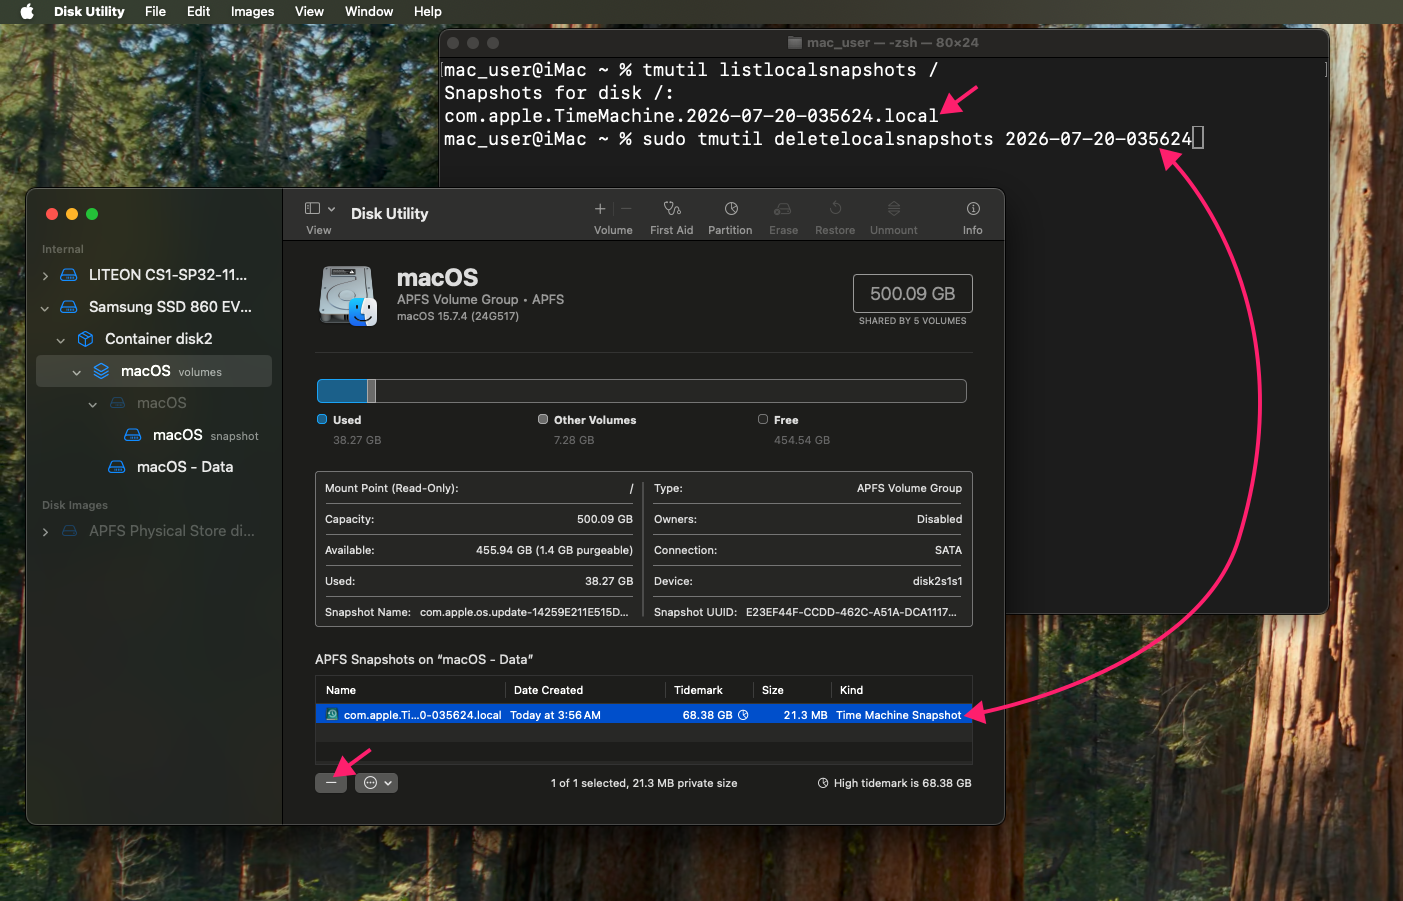
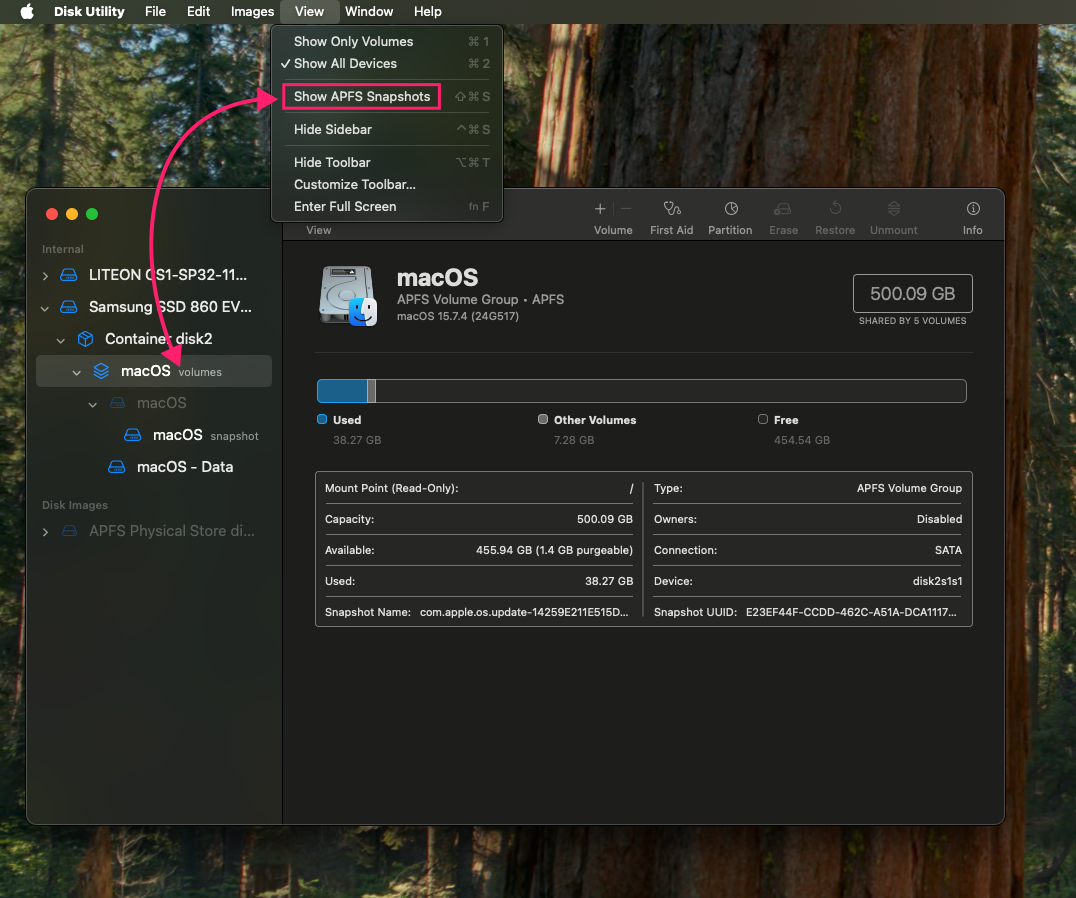
Alternatively, use Disk Utility for a GUI-based approach:
- Press Command (⌘) + Space, type
disk utility, and press Return - Select your Data volume in the sidebar
- Go to View in the top menu bar and select Show APFS Snapshots
Select a snapshot from the list and click the minus (–) button to remove it

Method 7: Scale cleanup across a fleet
Everything above works when you’re maintaining one Mac. It stops being practical once you’re responsible for dozens or hundreds, since manually walking through Storage settings on every device isn’t a realistic maintenance plan.
Instead, deploy an RMM platform to run scripts and monitor storage across all managed Macs from a single console. Atera’s RMM covers this natively for MSPs and IT teams managing Mac fleets alongside Windows and Linux devices. See our Mac agent installation guide to learn how.
You don’t even need to write cleanup scripts from scratch. Just describe what you need in plain language (for example, “clear application caches, remove local Time Machine snapshots older than 30 days, and empty Trash on all enrolled Macs”) and let AI Copilot generate the executable script for you.
Review the generated script, then deploy it remotely through your RMM platform on a recurring schedule rather than running it manually per device.
» Here’s how to enable RMM on Mac
Storage cleanup doesn’t scale on its own
Every method above takes a few minutes on your own Mac. The math changes when you’re the one keeping dozens or hundreds of them clean, since a few minutes per device adds up to a job that never actually ends.
That’s the point where cleanup stops being something you remember to do and becomes something that just runs. With Atera’s RMM, Methods 1 through 6 turn into scheduled, unattended routines across every managed Mac, so storage thresholds get flagged and cleared automatically, well before a “disk almost full” notification ever reaches an end user
» Ready to stop chasing disk-space tickets one Mac at a time? See how Atera’s RMM and AI Copilot can monitor storage thresholds and run cleanup scripts automatically across your entire fleet. Start a free trial
Related Articles

How to reduce alert fatigue across your IT team
Your technicians aren't ignoring alerts because they're careless. They're ignoring them because most alerts have taught them to. Once the stream stops being trustworthy, real failures slip past with the noise. Fixing it means deciding what deserves an interruption, tuning out transient spikes, collapsing alert storms, and automating the fixes you've run a hundred times.
Read now
How to close the IT skills gap on your team
Course completions don't close skills gaps. Technicians finish the training, then hand the first unfamiliar failure straight back to a senior engineer. Real capability gets built on live tickets, incidents, and maintenance windows, with guidance that fades as competence grows.
Read now
How to calculate cost per ticket (and why most teams get it wrong)
Most cost-per-ticket figures are wrong before anyone reads them. Missing overhead, tickets that were opened but never closed, spam and duplicates padding the count, and one month's costs divided by another month's tickets all make support look cheaper than it is. Fix both sides of the division and the number finally shows where technician time and money actually go.
Read now
How to prepare for a software license audit
A vendor audit notice doesn't wait for you to get organized. It demands proof, right now, that every install matches every entitlement you've paid for, and most IT teams find out the hard way how much they don't actually know about their own environment. Getting audit-ready before the letter arrives is the difference between negotiating from strength and paying for months of scrambling.
Read nowEndless IT possibilities
Boost your productivity with Atera’s intuitive, centralized all-in-one platform









