
Generate summary with AI

Every time Windows throws up a “You do not have access rights to Logical Disk Manager” dialog, it’s doing exactly what it’s supposed to do. Disk Management touches partitions, drive letters, and volume boundaries, all easy targets for attackers. Elevation of privilege vulnerabilities accounted for roughly 40% of all Microsoft vulnerabilities disclosed in 2025, per BeyondTrust’s Microsoft Vulnerabilities Report. That’s why it’s blocked to most users at the enterprise level; locking Disk Management behind an admin account is one simple way to cut down a lot of the risk.
Windows 10 reached end of support in October 2025, but plenty of machines are still running it, and Disk Management works the same way on every one of them. Windows gives you several different paths to the same utility, and the right one depends on whether you’re sitting at the machine, working from a script, or troubleshooting a console that refuses to launch at all. Here are all the methods.
» Looking to upgrade to Windows 11? Here’s how to use the Windows 11 update assistant
First, administrator rights are non-negotiable
Disk Management doesn’t have a read-only mode for standard users. Log in without administrator rights and Windows blocks the console outright. You’ll get a “You do not have access rights to Logical Disk Manager” dialog the moment it tries to load, and it applies whether you’re just viewing volume status or actually making changes.
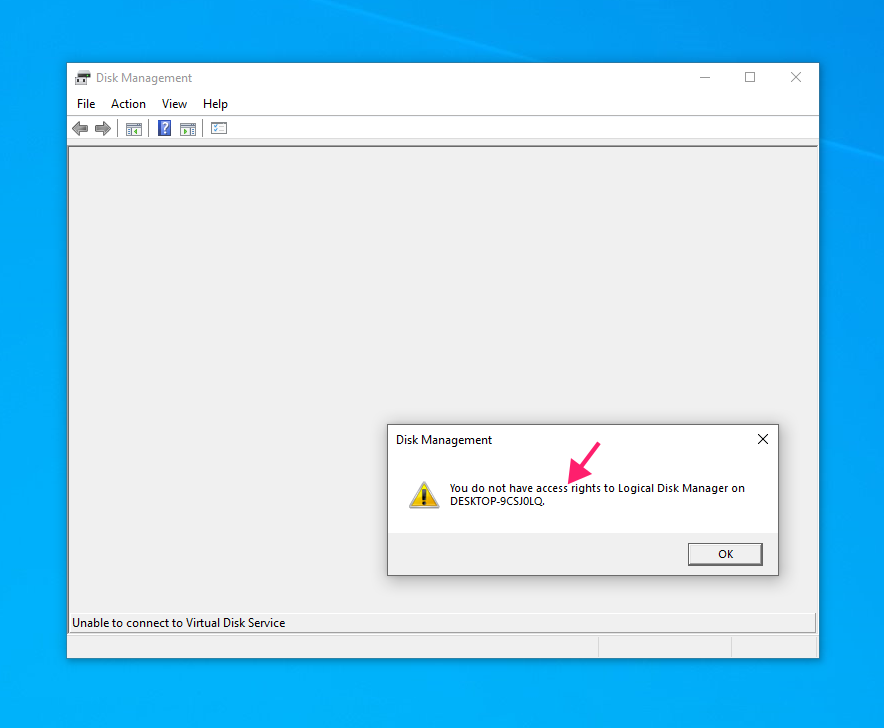
If you’re on a standard account, you need to either log in with an administrator account or have one elevate the session for you.
This is also why every method covered below assumes you’re already working from an admin account. None of the launch paths bypass this requirement.
6 ways to launch Disk Management
Windows gives you six ways to open Disk Management, and which one makes sense depends on whether you’re sitting at the keyboard, mid-CMD-session, or trying to check disk health across more than one machine at once.
Method 1: Windows Search
Fastest option if you’re already at the keyboard and not chasing a specific workflow.
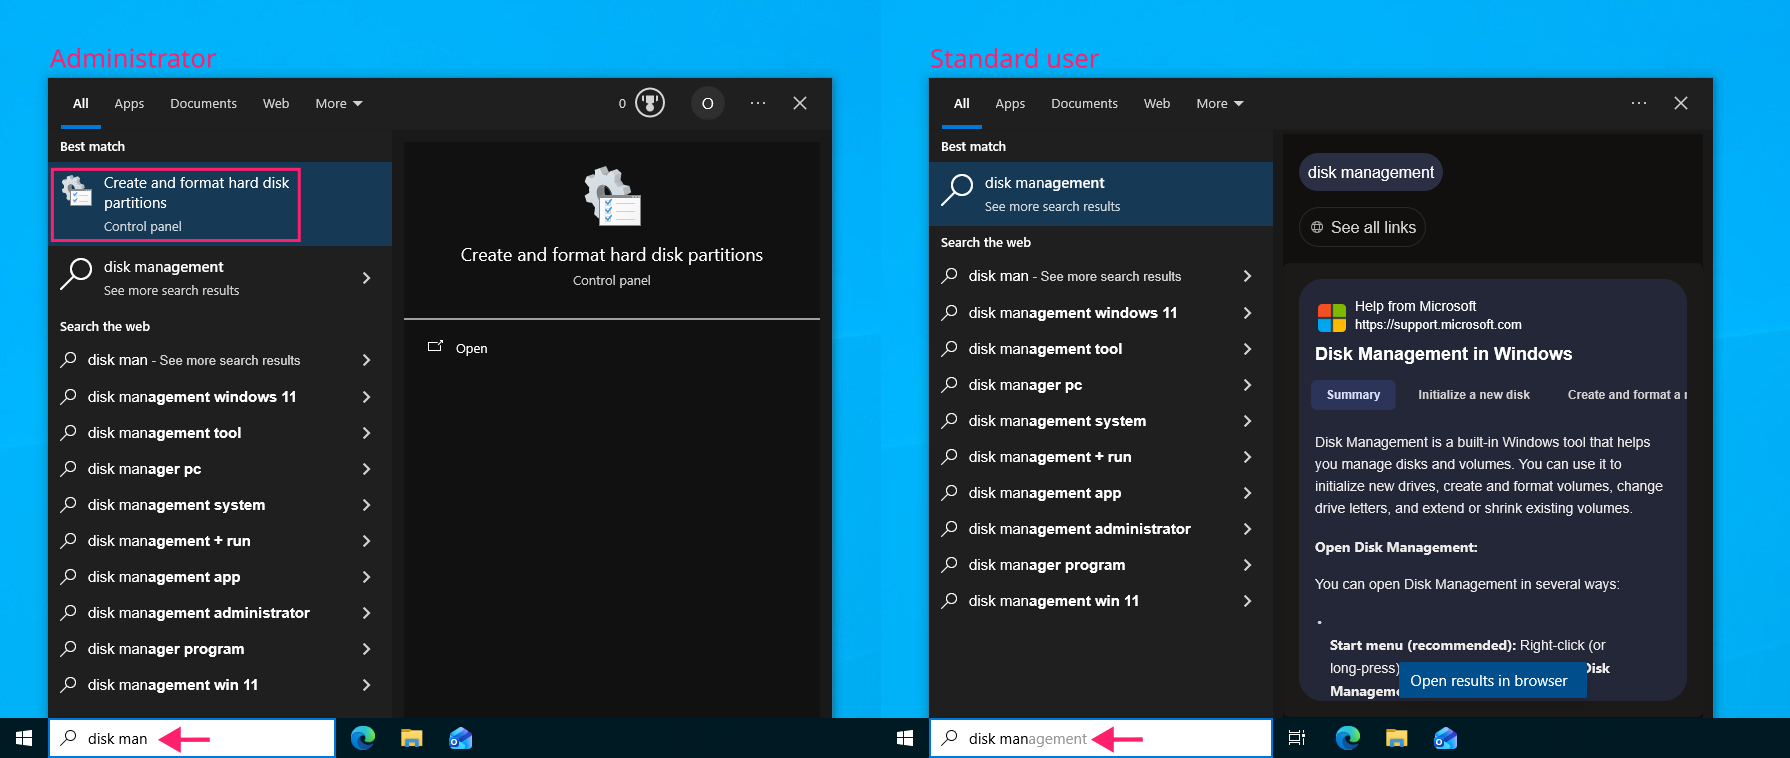
- Click the Search bar (or press Win) and type
disk management - Select Create and format hard disk partitions from the results
If you’re logged in with a standard account, this method won’t get you far because you’ll only see web search entries instead of the actual utility.
Method 2: The Power User menu (Win + X)
The quickest keyboard-only route once you know it, and the one worth building into muscle memory if you open Disk Management often.
- Press Win + X (or right-click the Start button)
Select Disk Management from the menu

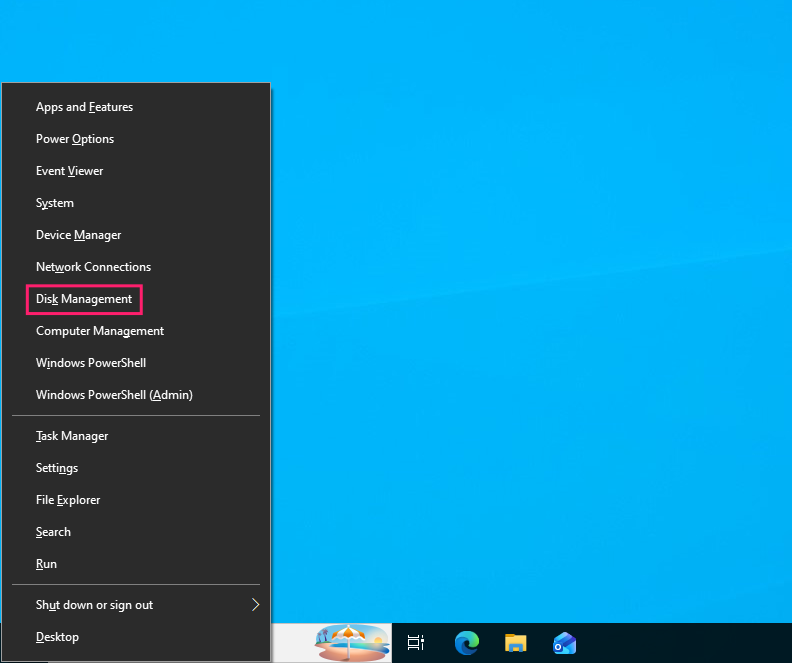
The Win + X menu also supports direct keyboard shortcuts for every item on it, so you can press Win + X > press K to jump straight to Disk Management without touching the mouse.
Method 3: The Run dialog
The go-to for anyone who thinks in commands rather than menus, and the fastest path if your hands are already off the mouse.
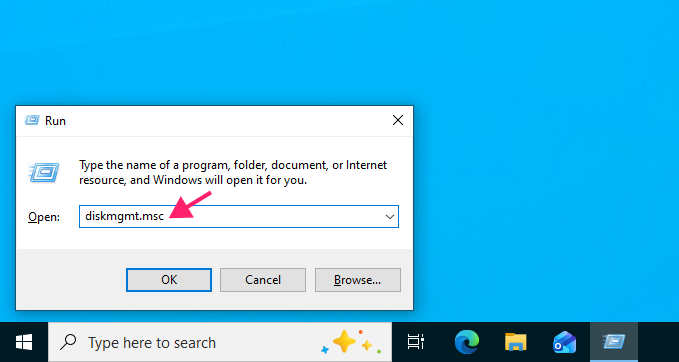
- Press Win + R to open the Run dialog
Type
diskmgmt.mscand press Enter
Method 4: Control Panel and Computer Management
Useful when you’re already navigating Control Panel for something else and want to access Disk Management from within that same session, or when you need the broader Computer Management console rather than Disk Management in isolation.
Press Win + X and select Computer Management (or press G)
In the left pane, expand Storage and select Disk Management

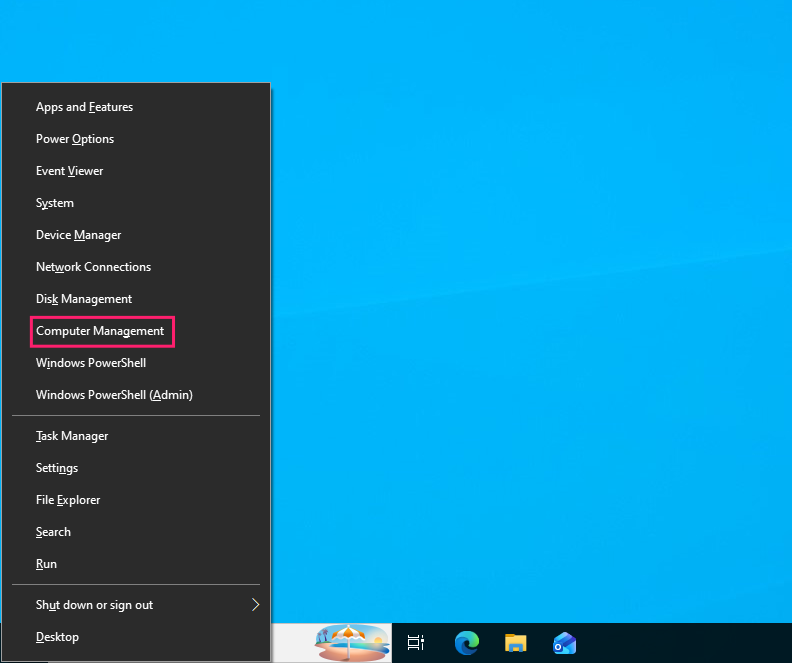
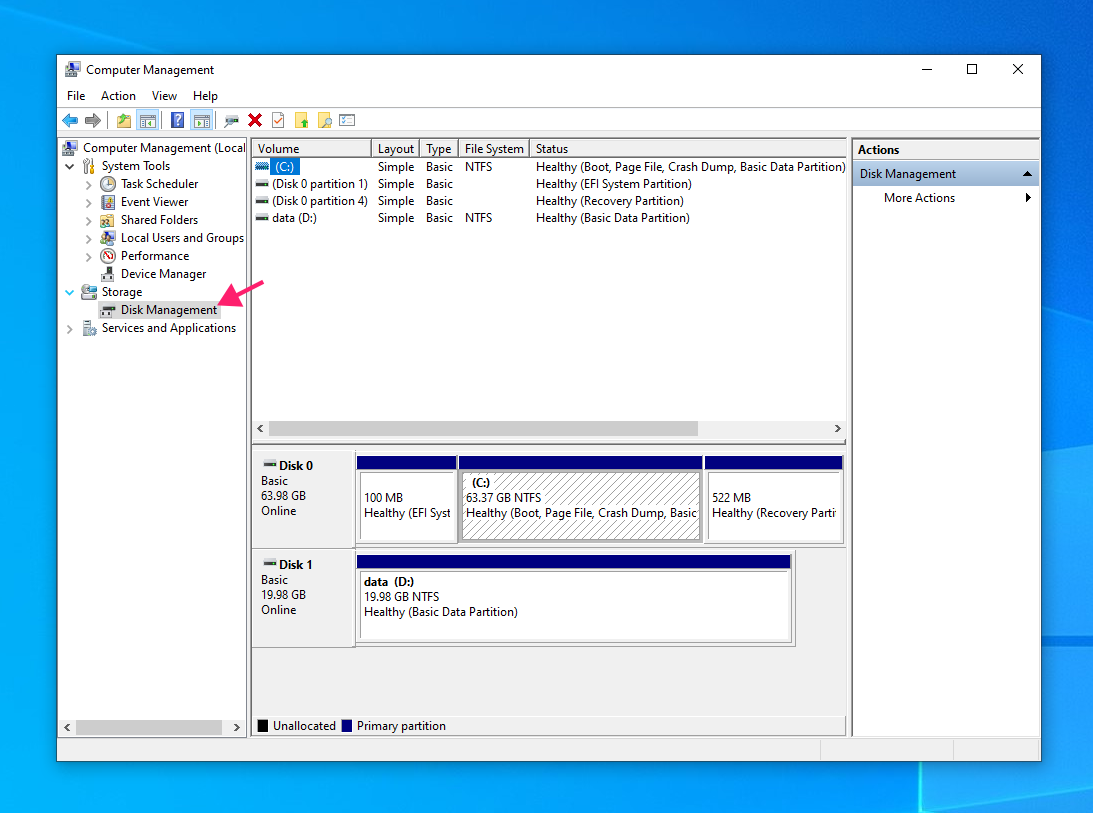
You can also reach it through the classic Control Panel path:
- Press Win + R, type control, and press Enter
If View by is set to Icons, click Administrative Tools, then double-click Computer Management

If View by is set to Category, click Administrative Tools under System and Security, then click Create and format hard disk partitions

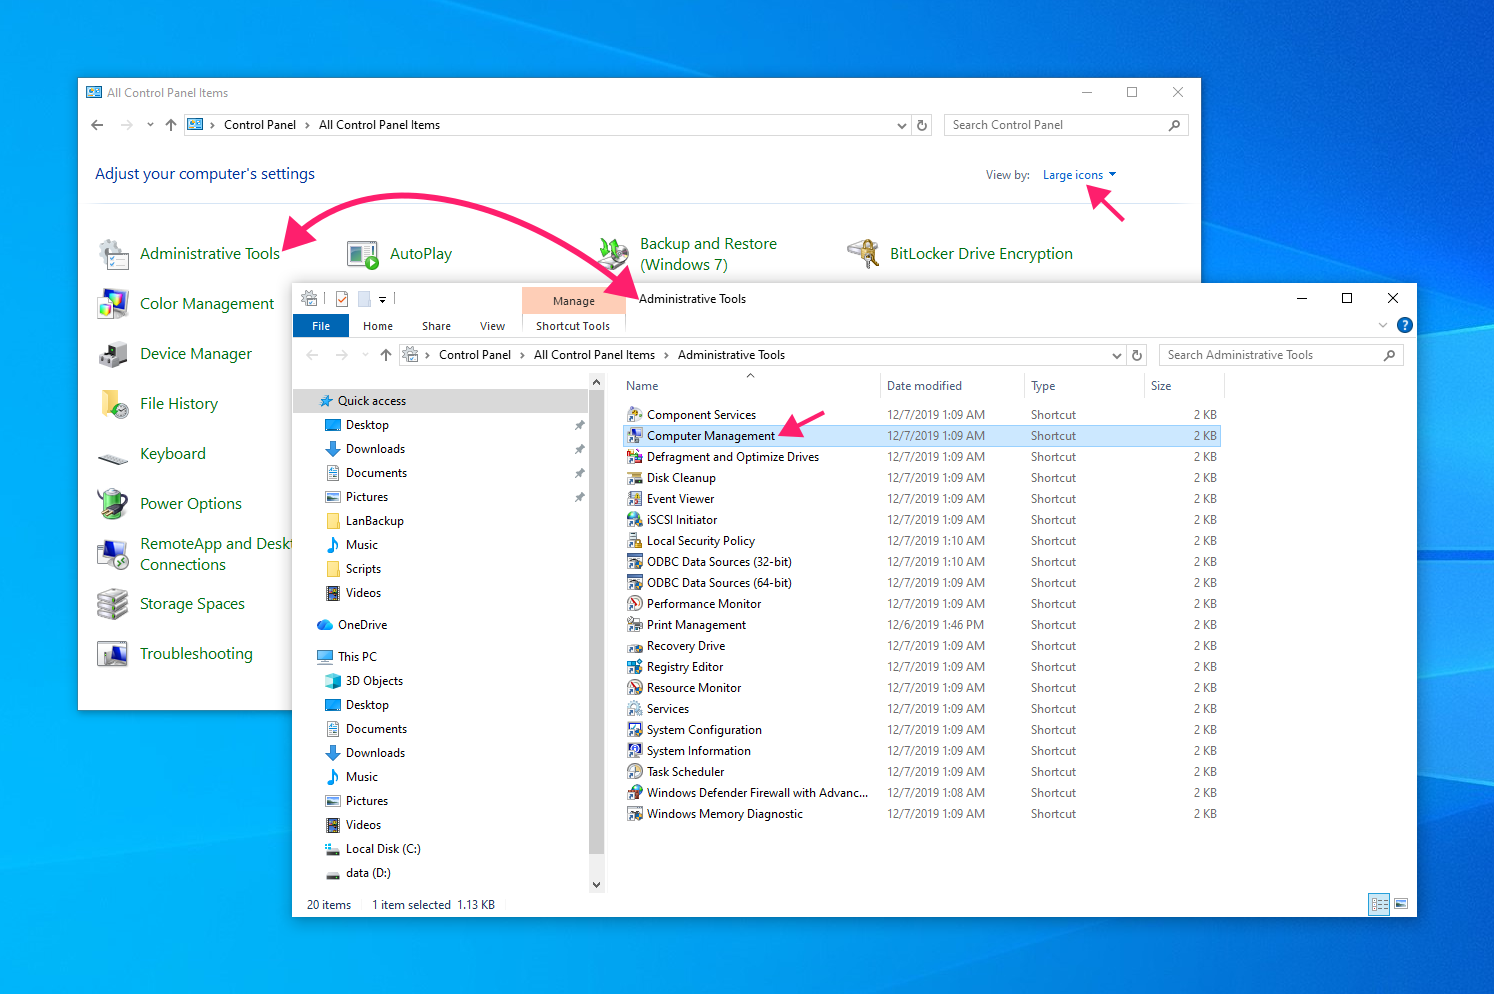
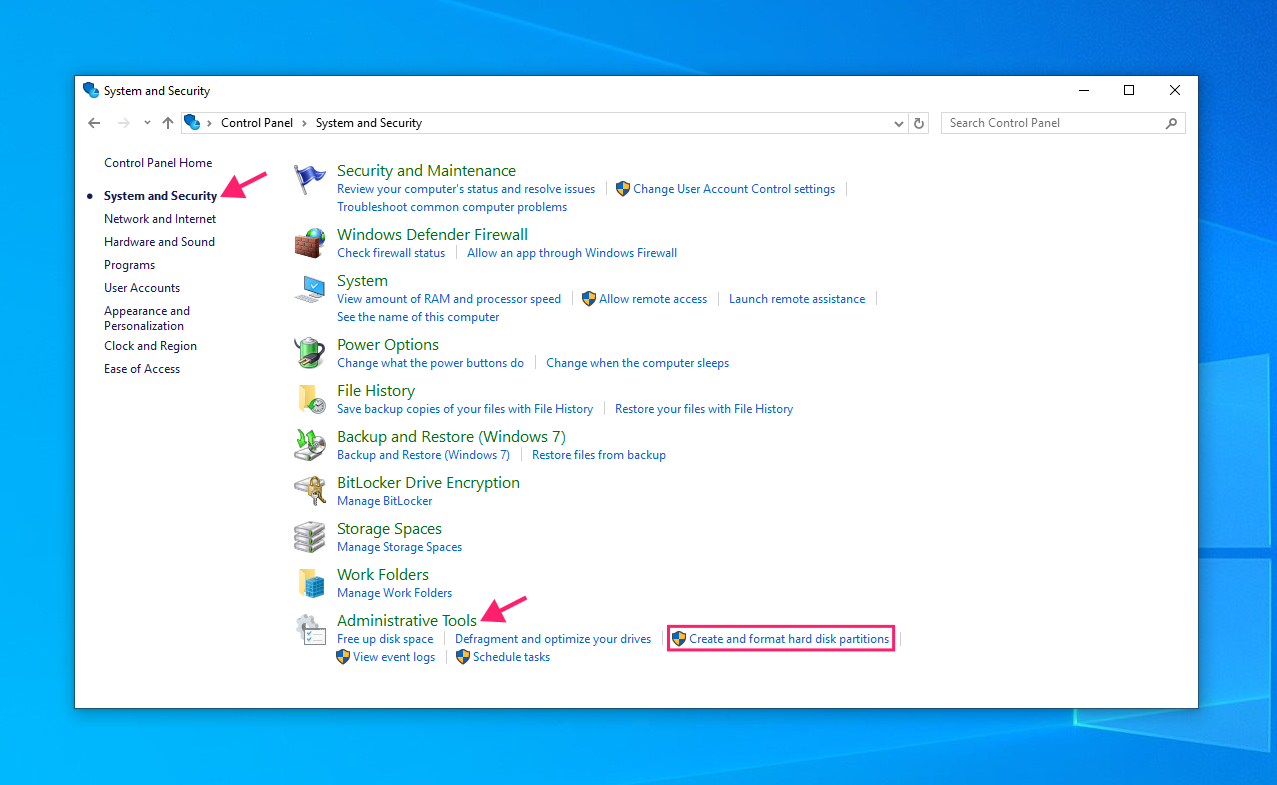
Method 5: Command Prompt
Worth reaching for when you’re already working from an elevated CMD session and don’t want to break your workflow to open a GUI menu.
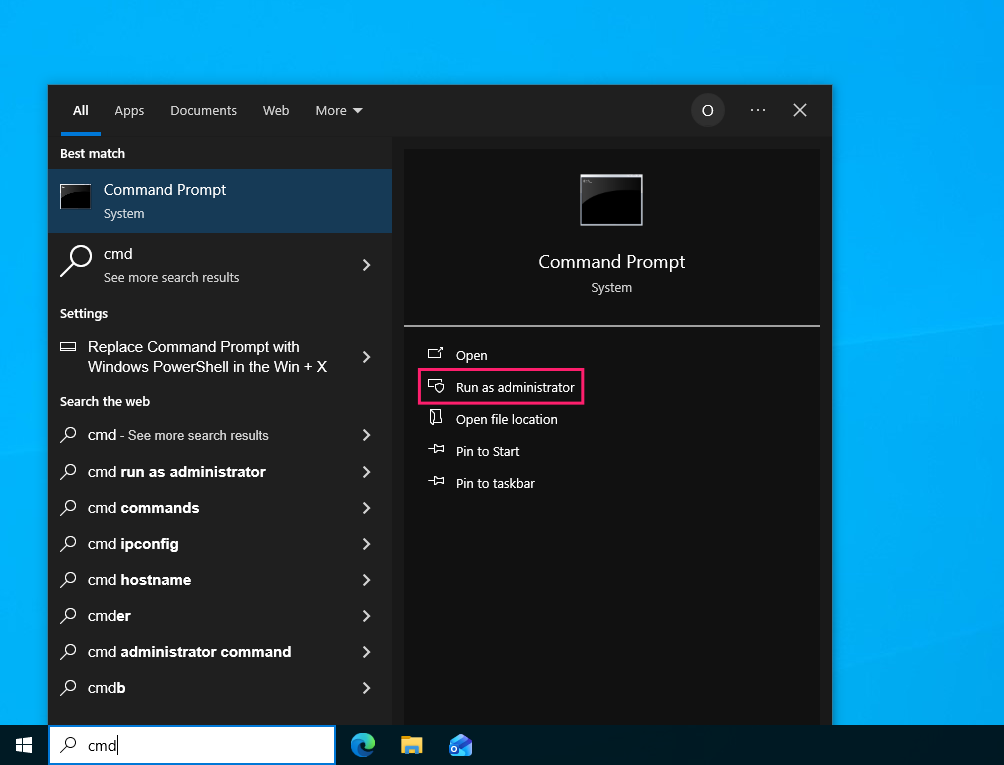
Search for “command prompt” (or cmd), then select Run as administrator

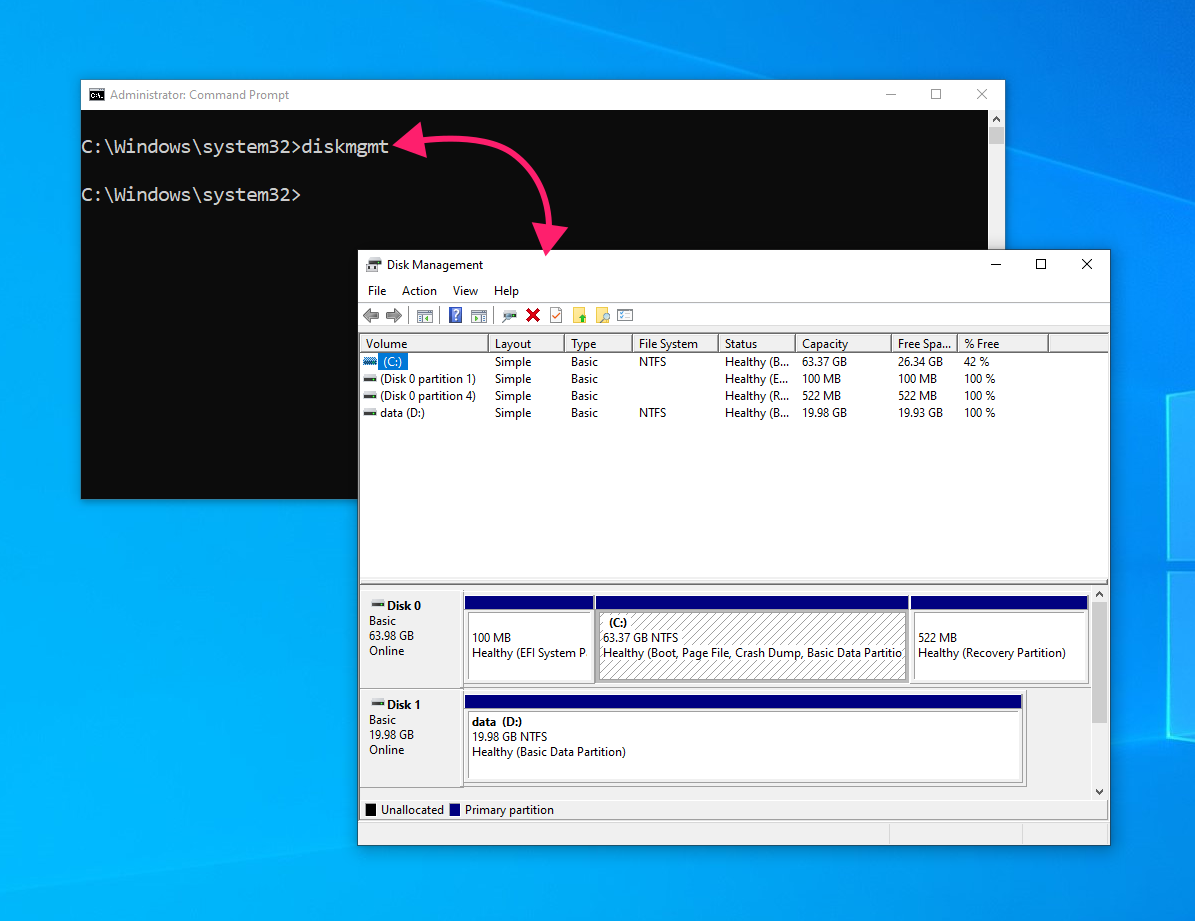
Type
diskmgmtordiskmgmt.mscand press Enter
» Did you know you can set something to always run as admin?
Method 6: PowerShell
Functionally identical to the CMD method, but the natural choice if PowerShell is already your default shell or you’re about to chain other cmdlets after opening the console.
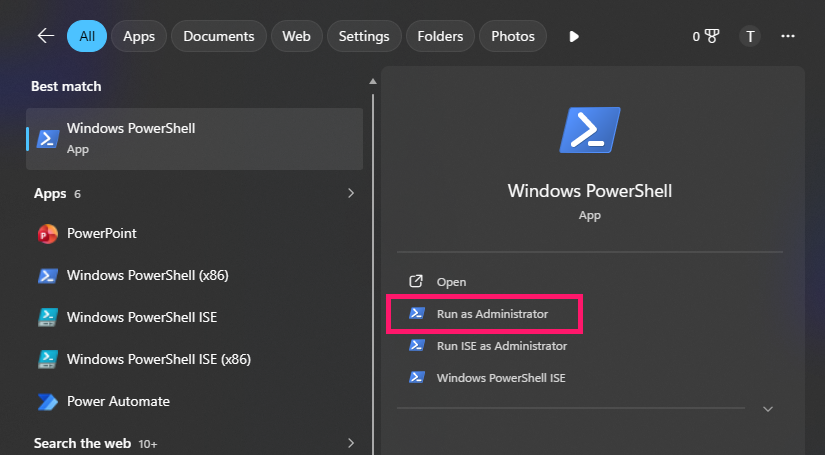
Press Win + X and select Windows PowerShell (Admin) (or press A)

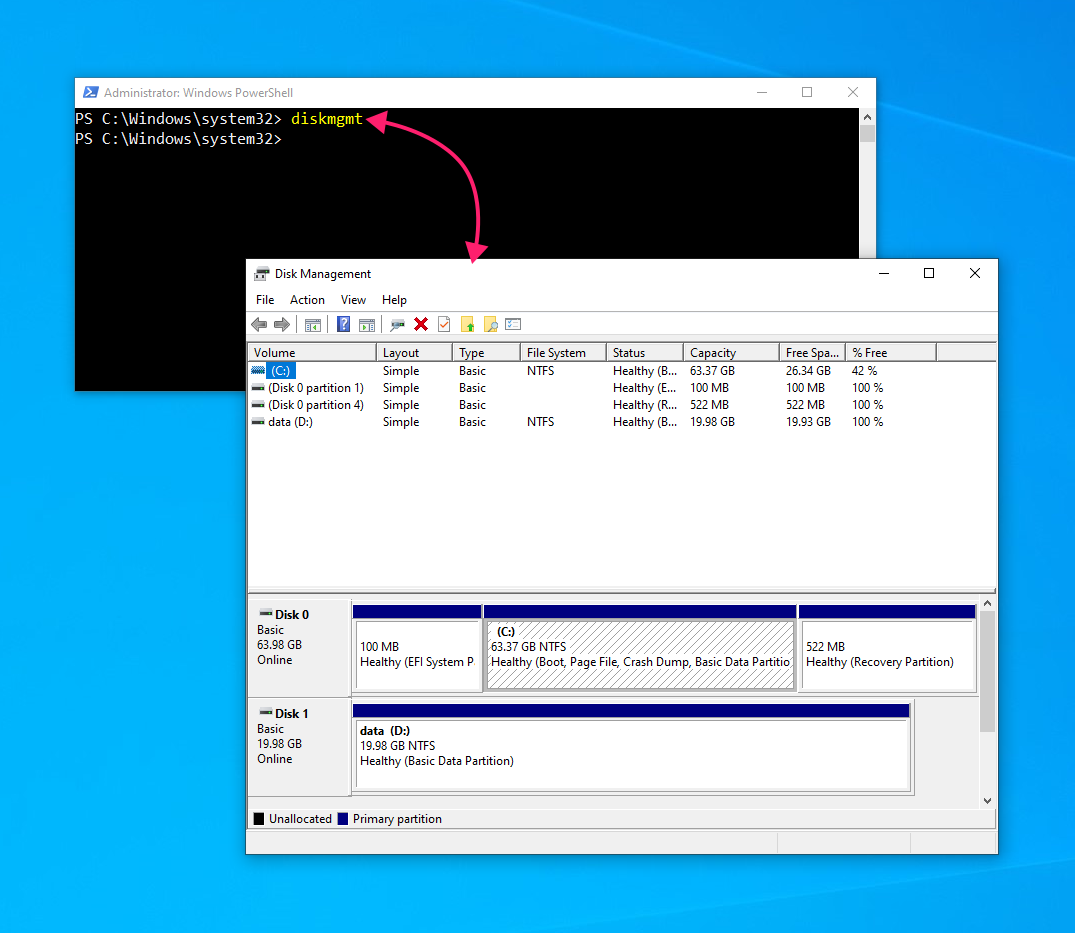
Type
diskmgmtordiskmgmt.mscand press Enter
None of the methods above scale past the machine you’re sitting at. When you need disk and volume data from more than one Windows 10 workstation, storage cmdlets let you pull it remotely instead of walking to each machine individually.
An example script looks like this:
The Script:
Atera does not guarantee the integrity, availability, security, virus-free, safety, lawfulness, non-infringement, rights’ status, or functionality of the scripts. The use of the shared scripts is at your own risk. Scripts are provided “AS IS”. *
# workstations.txt contains the machine name list
$computers = Get-Content .workstations.txt
$sessions = New-CimSession -ComputerName $computers
Get-Disk -CimSession $sessions
Get-Volume -CimSession $sessions
Remove-CimSession -CimSession $sessionsInstead of maintaining this script yourself and running it against a manually kept workstations.txt list, there’s an easier way with Atera. Describe what you want the script to do to AI Copilot, (such as pulling disk and volume data from a machine) and Copilot generates the PowerShell script for you. Then you can save the script to Atera’s script library and deploy it remotely using the RMM platform.
Troubleshooting when Disk Management won’t open
Most of the time, Disk Management opens without a hitch. When it doesn’t, either as an outright error or a console that hangs on a blank loading screen, the cause is almost always one of these reasons. Here’s how to fix them.
Fix a Virtual Disk Service failure
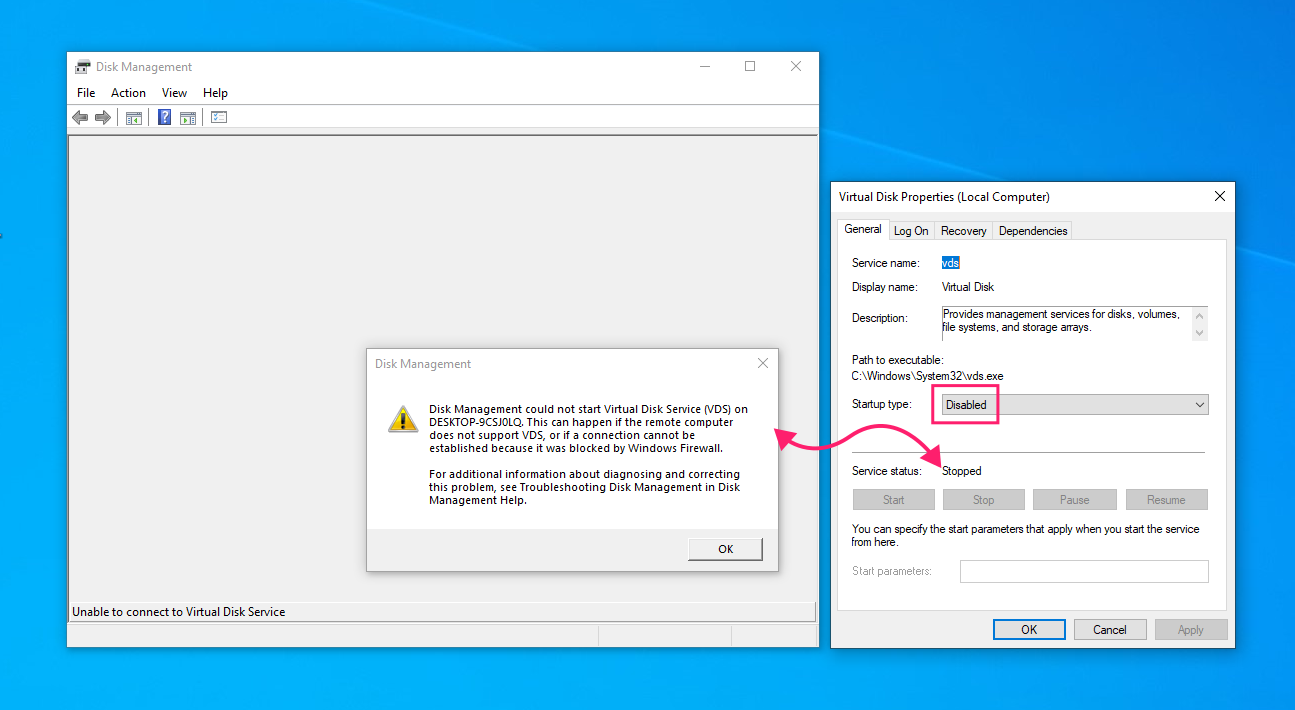
Disk Management relies on the Virtual Disk Service (VDS) to initialize. If VDS is disabled, crashed, or hung, the console either throws an error immediately or hangs indefinitely trying to connect.
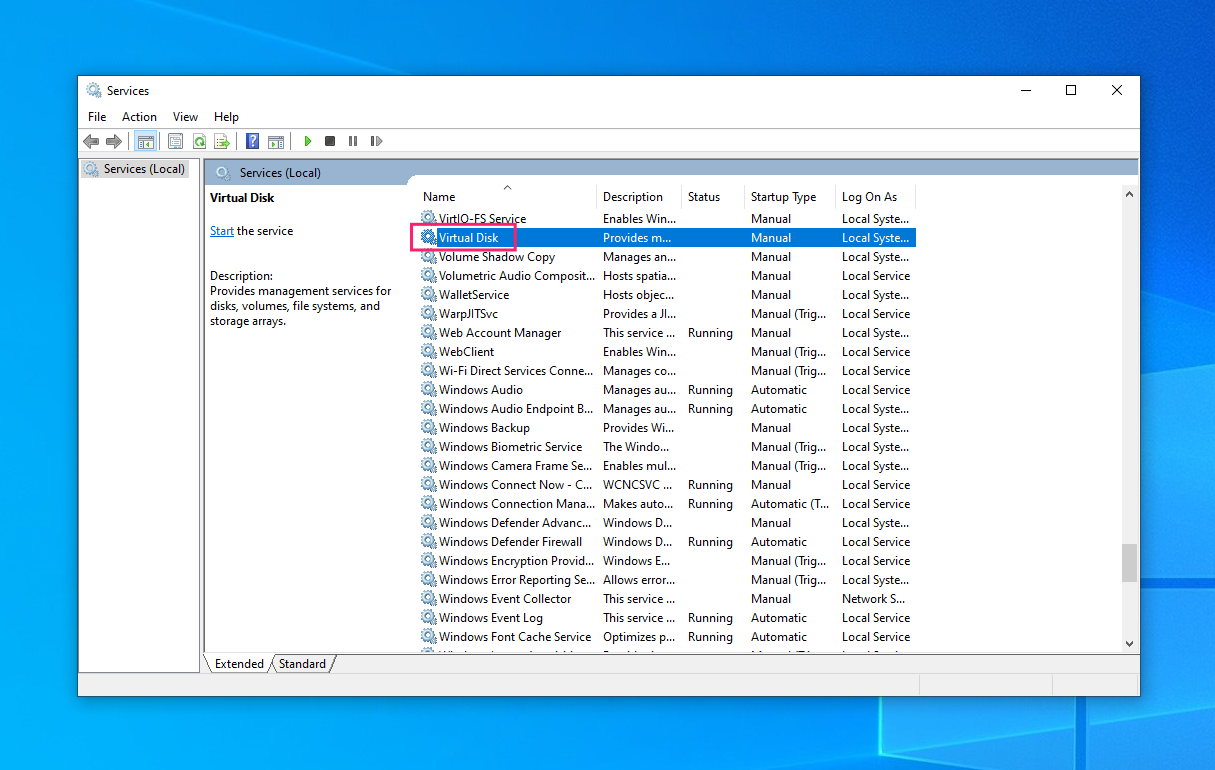
- Press Win + R, type
services.msc, and press Enter - Locate Virtual Disk in the list
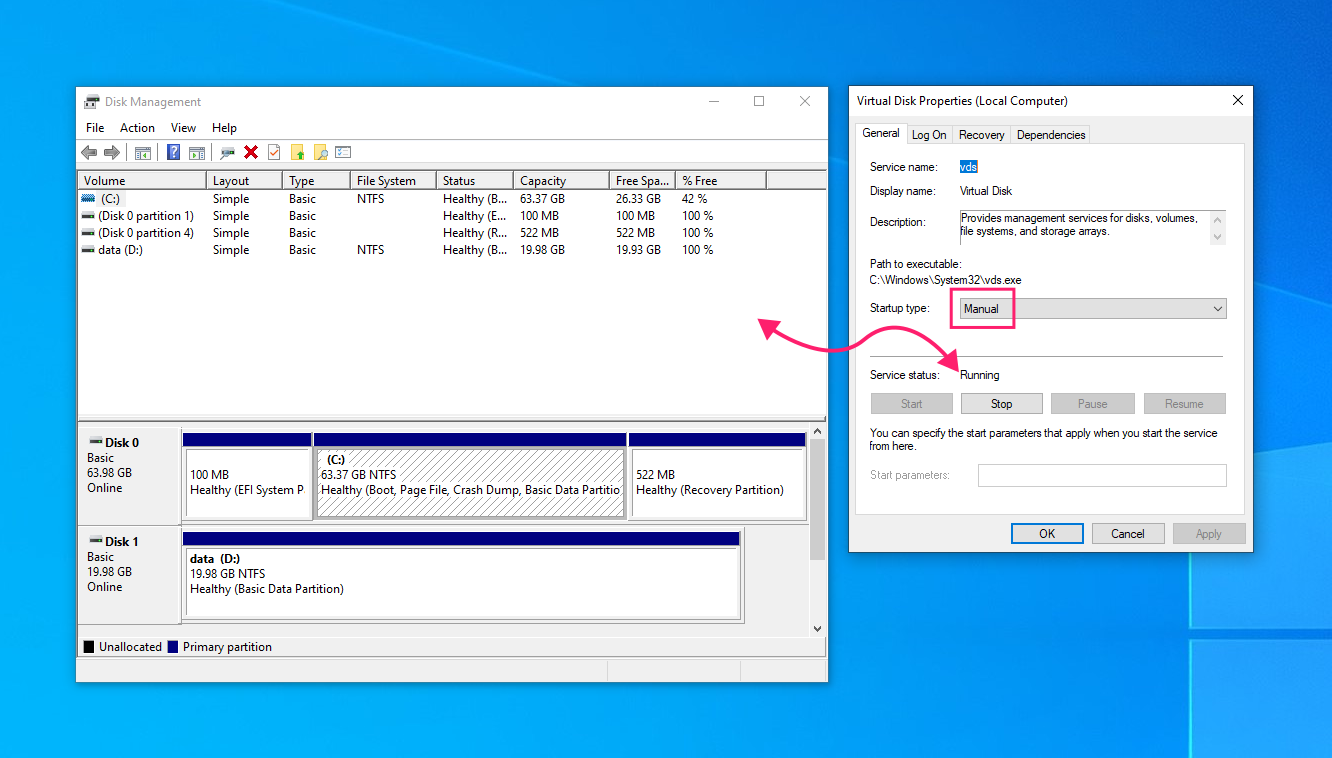
Confirm Startup type is set to Manual. If it’s set to Disabled, change it

Relaunch Disk Management and check that Service status now shows Running


Repair corrupted system files
If VDS is running normally and Disk Management still won’t launch, corrupted system files, including the console framework file diskmgmt.msc itself, can cause a crash or error on open.
- Open Command Prompt as an admin
- Run
DISM.exe /Online /Cleanup-Image /RestoreHealthand let it finish - Run
sfc /scannowand let it finish - Restart the computer, then try opening Disk Management again
» Struggling? Here’s how to use the DISM command correctly
Diagnose deeper VDS or RPC failures
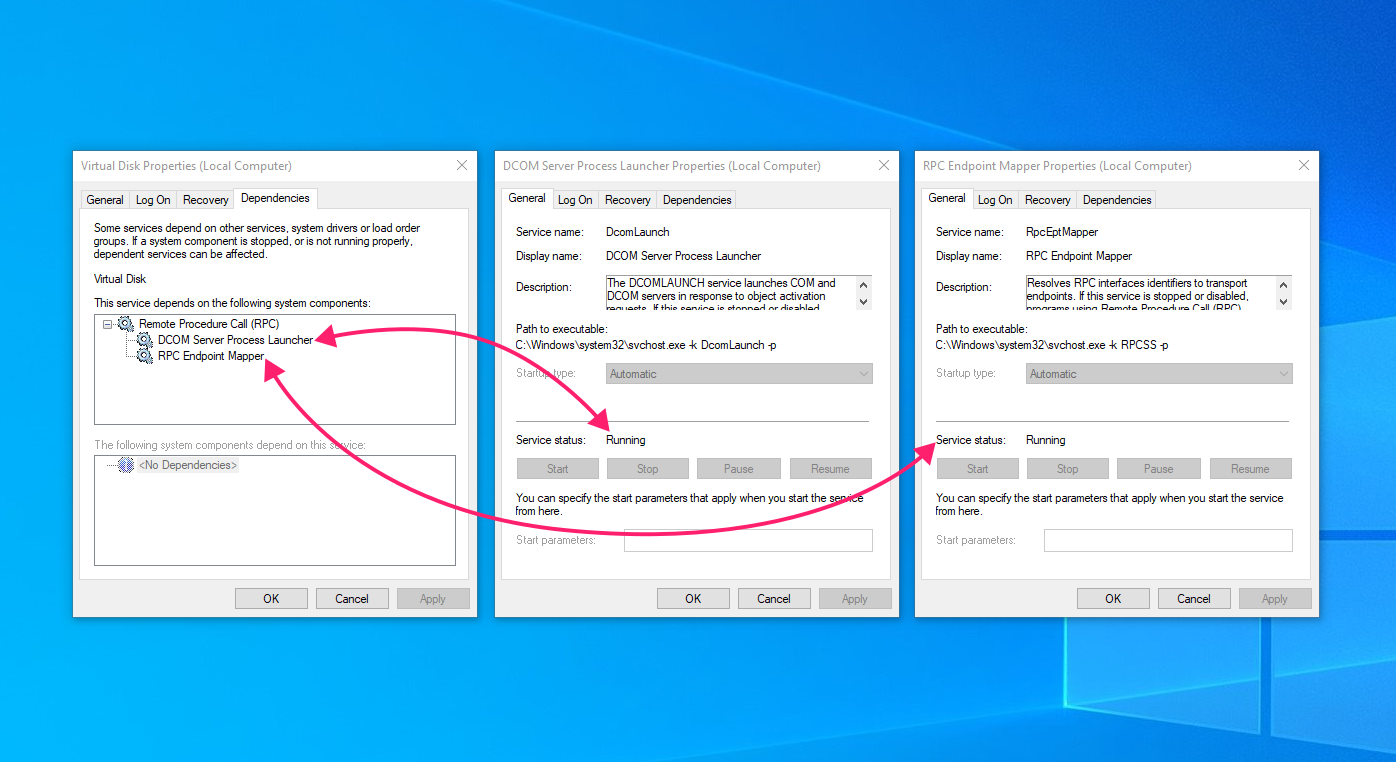
If the fixes above don’t resolve it, the problem may sit one layer down: VDS itself depends on other services, and a failure there won’t always be obvious from the VDS status alone.
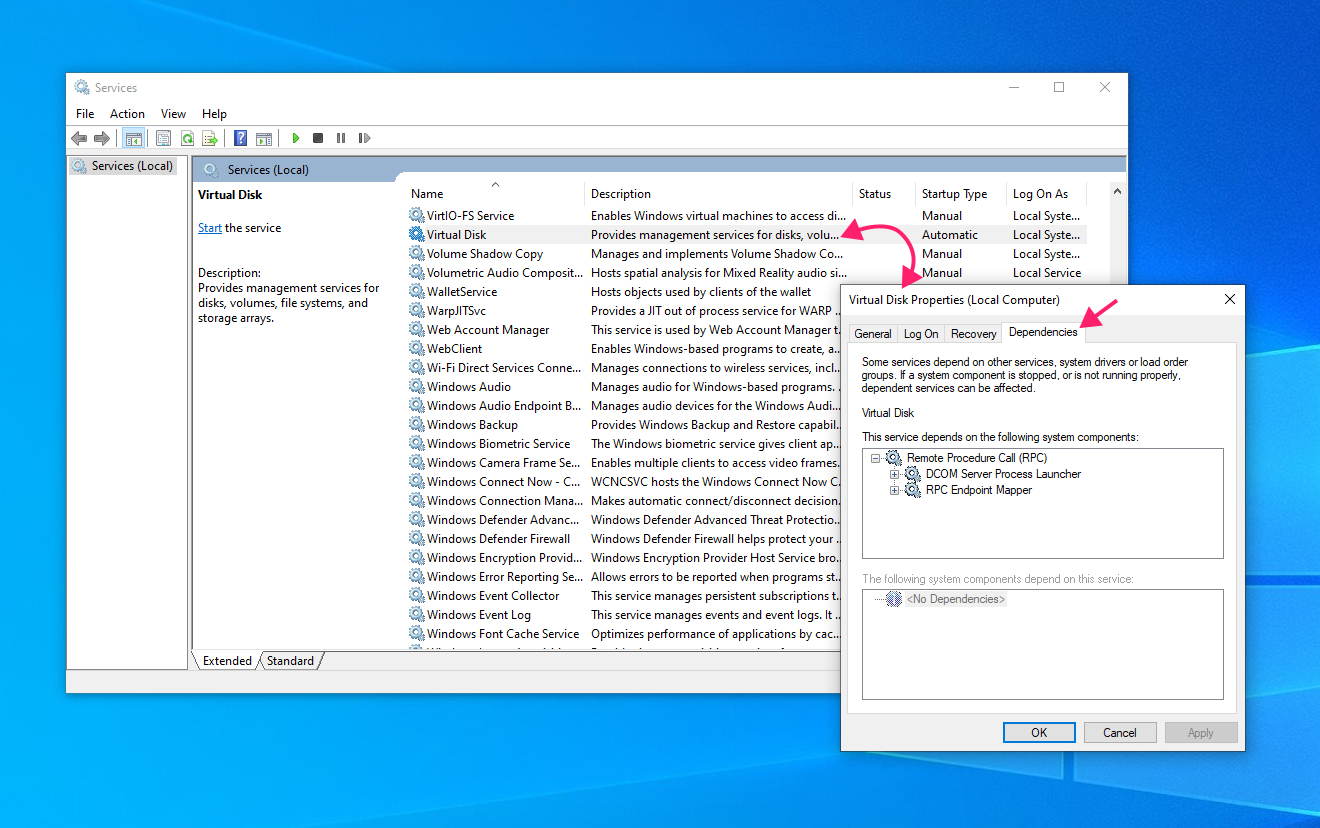
- Open Services (
services.msc), right-click Virtual Disk, and select Properties Switch to the Dependencies tab to see which services VDS relies on, including Remote Procedure Call (RPC) and the RPC Endpoint Mapper

Confirm each dependent service is running. Start any that aren’t

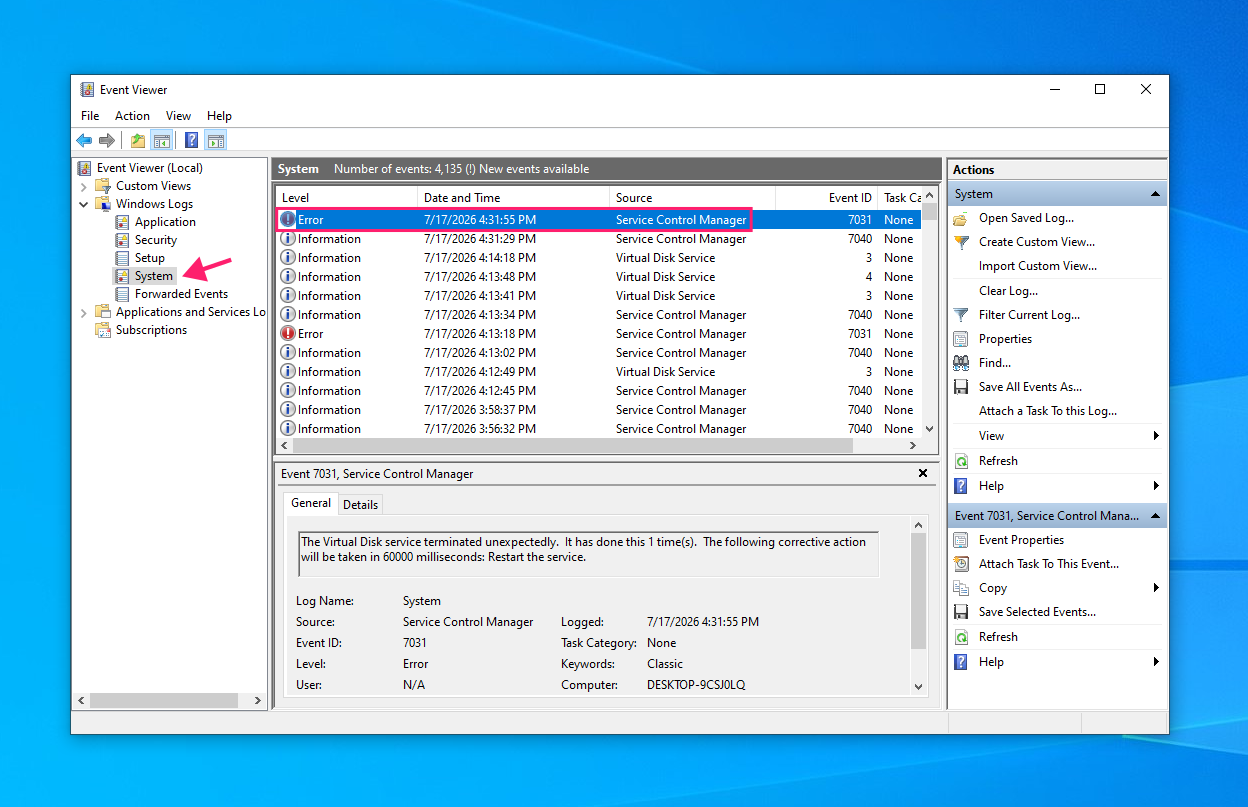
Open Event Viewer (
eventvwr.msc), navigate to Windows Logs > System, and check for errors tied to the Virtual Disk service around the time Disk Management failed to open
» Learn more: How to view and analyze logs with Event Viewer and how to run a PC diagnostics report
Rule out third-party interference
If none of the above turns up an error, third-party software can sometimes interfere with Disk Management’s normal operation without leaving an obvious trace in the logs. Booting into Safe Mode isolates the console from anything that isn’t essential to Windows itself.
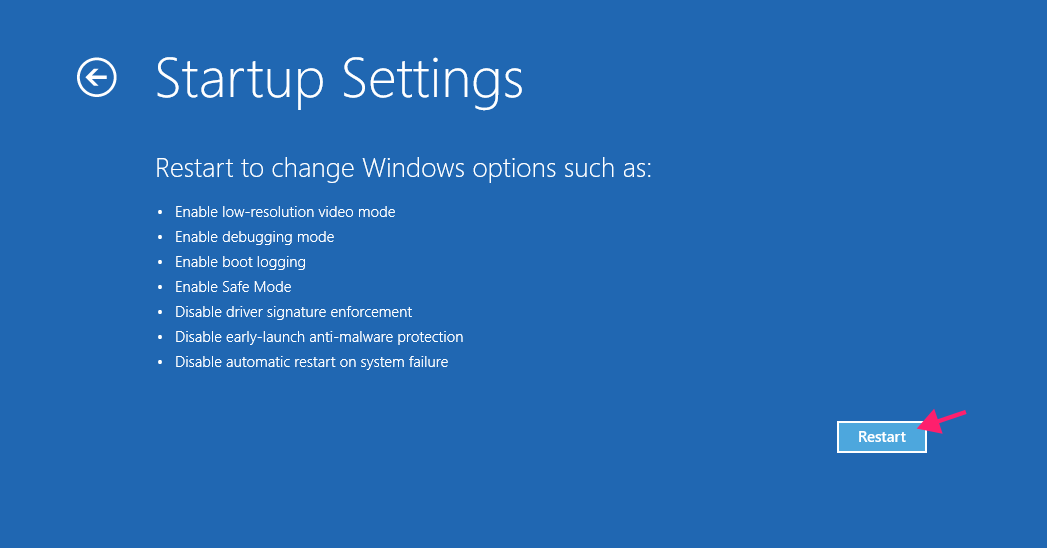
- Press Win + I, go to Update & Security > Recovery, and select Restart now under Advanced startup (or hold Shift while selecting Restart)
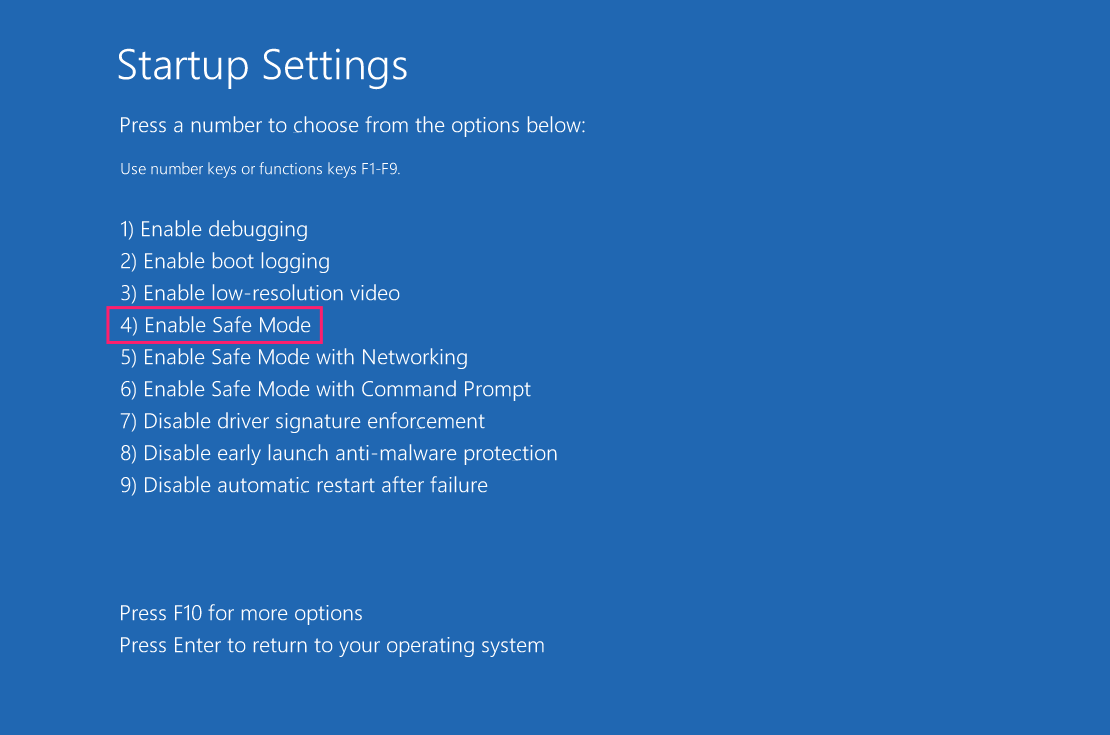
Go to Troubleshoot > Advanced options > Startup Settings, then select Restart

Once the system restarts, press 4 (or F4) to boot into Safe Mode

Launch Disk Management. If it opens normally here, a third-party application on your normal boot is the likely cause, and disabling recently installed software or startup programs one at a time will help isolate which one.
Manage endpoints easier with Atera
Opening Disk Management on one machine takes ten seconds once you know the shortcut. Opening it, or something like it, across dozens or hundreds of endpoints is a different problem entirely that a Run dialog and a keyboard shortcut can’t solve.
That’s where Atera’s RMM simplifies everything for IT teams and MSPs. Instead of scripting your own CimSession loop to pull disk configurations one workstation at a time, you get storage and volume data visible across your whole fleet from a single dashboard, plus scripting and automation profiles built for exactly this kind of scale. If you’re already reaching for PowerShell to manage disks beyond your own desk, Atera’s RMM handles that same work at scale.
» Interested? Try Atera for free
Related Articles

How to reduce alert fatigue across your IT team
Your technicians aren't ignoring alerts because they're careless. They're ignoring them because most alerts have taught them to. Once the stream stops being trustworthy, real failures slip past with the noise. Fixing it means deciding what deserves an interruption, tuning out transient spikes, collapsing alert storms, and automating the fixes you've run a hundred times.
Read now
How to close the IT skills gap on your team
Course completions don't close skills gaps. Technicians finish the training, then hand the first unfamiliar failure straight back to a senior engineer. Real capability gets built on live tickets, incidents, and maintenance windows, with guidance that fades as competence grows.
Read now
How to calculate cost per ticket (and why most teams get it wrong)
Most cost-per-ticket figures are wrong before anyone reads them. Missing overhead, tickets that were opened but never closed, spam and duplicates padding the count, and one month's costs divided by another month's tickets all make support look cheaper than it is. Fix both sides of the division and the number finally shows where technician time and money actually go.
Read now
How to prepare for a software license audit
A vendor audit notice doesn't wait for you to get organized. It demands proof, right now, that every install matches every entitlement you've paid for, and most IT teams find out the hard way how much they don't actually know about their own environment. Getting audit-ready before the letter arrives is the difference between negotiating from strength and paying for months of scrambling.
Read nowEndless IT possibilities
Boost your productivity with Atera’s intuitive, centralized all-in-one platform









