
Table of contents
Table of contents
- Quick fix: restore a file from the user’s Recycle Bin with PowerShell
- What this takes by hand, and what Robin by Atera takes off your plate
- How to recover deleted files, from the Recycle Bin to Windows File Recovery
- How to recover files remotely and make recovery routine across devices
- Take routine file restores off the ticket queue
As an IT technician, you’re almost guaranteed at some point to receive a ticket from a user wanting a deleted file back. Maybe they clicked the wrong folder and emptied the Recycle Bin by mistake, but now there’s a deleted quarterly expense sheet they need for the meeting in two hours. Whether you can deliver depends less on the recovery tool you reach for than on decisions made long before the ticket, such as where the file was stored, how it was deleted, and whether anything was keeping copies.
Recovering deleted files in Windows 11 comes down to knowing which path to try first, when to stop chasing a dead end, and how to configure devices so the next request is a quick restore instead of a salvage job. Windows 11 also changes a few details: the right-click menu hides some options behind Show more options, and File History is off by default, so many devices have no File History data to restore from.
Quick fix: restore a file from the user’s Recycle Bin with PowerShell
If the file was deleted from a local drive recently, it’s most likely still in the user’s Recycle Bin. You can recover it from your own elevated PowerShell session, locally or remotely, without signing in as the user. Running it remotely assumes PowerShell remoting or a script runner such as Atera’s RMM, plus local admin rights on the device. Reading another user’s Recycle Bin also exposes their files, so confirm you’re authorized and that the session is logged. The sections below cover what to do when it isn’t there.
1. Get the user’s SID, swapping in their account name: $Sid = ([System.Security.Principal.NTAccount]'CONTOSOjsmith').Translate([System.Security.Principal.SecurityIdentifier]).Value For Entra-joined accounts, the name lookup often fails. Read the SID from the user’s profile instead:
2. List the items in their Recycle Bin with each one’s original path and deletion date$
The Script:
Atera does not guarantee the integrity, availability, security, virus-free, safety, lawfulness, non-infringement, rights’ status, or functionality of the scripts. The use of the shared scripts is at your own risk. Scripts are provided “AS IS”. *
   $Bin = "C:\`$Recycle.Bin\$Sid"
   Get-ChildItem -LiteralPath $Bin -Force -Filter '$I*' | ForEach-Object {
     $Bytes = [System.IO.File]::ReadAllBytes($_.FullName)
     $Len = [BitConverter]::ToInt32($Bytes, 24)
     [PSCustomObject]@{
       Id           = $_.Name.Substring(2)
       OriginalPath = [Text.Encoding]::Unicode.GetString($Bytes, 28, ($Len - 1) * 2)
       Deleted      = [DateTime]::FromFileTime([BitConverter]::ToInt64($Bytes, 16))
     }
} | Sort-Object Deleted -Descending3. Copy the matching $R item back to its original location, using the Id and OriginalPath from step 2. Check first with Test-Path that nothing already sits at that path. Copying leaves the original in the Recycle Bin as a fallback: Copy-Item -LiteralPath (Join-Path $Bin ('$R' + '<Id>')) -Destination '<OriginalPath>' -Recurse
Confirm the file is back with Test-Path, then ask the user to open it
What this takes by hand, and what Robin by Atera takes off your plate
Robin is an AI technician that remediates Tier-1 and complex Tier-2 technical incidents end to end by autonomously taking real actions on devices, servers, mainframes, and networks, without needing a technician in the loop. The rest of this guide looks deeper at the manual route. This is what each stage takes by hand, next to what Robin does for you.
Stage | By hand | With Robin by Atera |
|---|---|---|
Work out whether the file is gone or misplaced | Ask the user where it was saved, then remote in and search their folders | Robin checks the expected user folder, searches for matching file names, and checks whether the file is hidden |
Search the Recycle Bin | Open the Recycle Bin in the user’s own session, or script it in their user context, or look up the user’s SID, then read their $Recycle.Bin folder from an elevated session | Robin searches the Recycle Bin or Trash for the requested file |
Restore the file | Restore it to its original location and confirm it’s back | Robin restores the file when it’s still recoverable |
Hand off what’s left | Rebuild the context before deciding on the next recovery path | Robin gathers the issue and diagnostic context and follows the configured routing workflow |
How to recover deleted files, from the Recycle Bin to Windows File Recovery
When a user says they deleted a file, the Recycle Bin is the obvious first stop. But it only catches a file removed through File Explorer from a local fixed drive. Shift+Delete, command-line deletions, USB drives, and network shares all skip it. So do files larger than the Recycle Bin’s size limit, which Windows deletes permanently. A mapped drive looks exactly like a local disk, so a file deleted from a server gets reported as “deleted from my computer.”
Time works against you too. Once a file leaves the Recycle Bin, any new write can land on its space, and on SSDs, TRIM can erase it soon after deletion.
Use the table below to match the deletion to the method most likely to work, then follow that method’s steps. Methods 1 to 5 restore from a copy that already exists, and Method 6 scans the drive, so it always comes last. The table’s last column can point you to a later method first, so follow it.
Where the file was | Lands in the local Recycle Bin? | Where to look first |
|---|---|---|
Local drive, deleted in File Explorer | Yes | The user’s Recycle Bin |
Local drive, Shift+Delete or command line | No | OneDrive (if synced), then File History, Previous Versions, and backups |
USB or removable drive | No | Another copy or backup, then Windows File Recovery |
Network share or mapped drive | No | Server shadow copies (Previous Versions) and server backups |
OneDrive-synced folder | Yes for files stored on the device, no for online-only files | The local Recycle Bin, then the OneDrive recycle bin online |
Method 1: Restore from the Recycle Bin
For a recent deletion from a local drive, this is the fastest route and needs no extra tools. The quick fix above covers restoring from an elevated session. If you’re working in the user’s session, use File Explorer:
- Open the Recycle Bin
- Select View > Details so the Original Location and Date Deleted columns are visible
Type part of the file name into the search box

- Check the Original Location column to confirm you have the right file
Right-click the file and select Restore

- Open the original folder in File Explorer and confirm the file is back
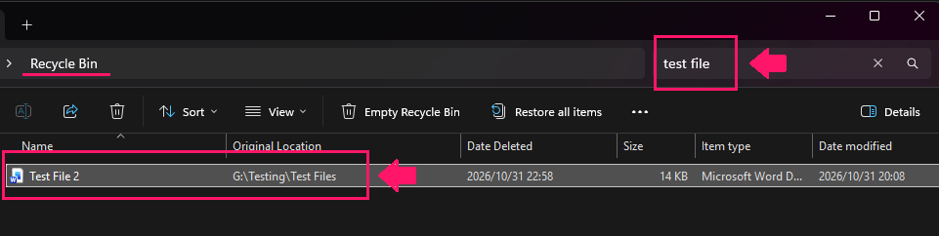
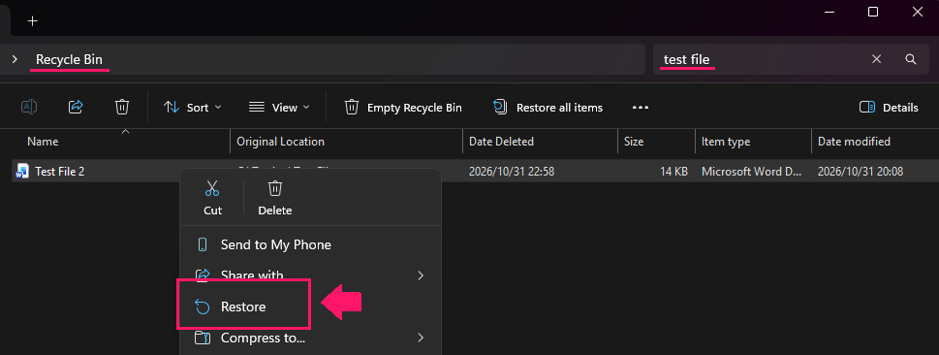
Each user account has their own Recycle Bin, so opening it from your own account won’t show the user’s deleted files. To recover from another user’s Recycle Bin without signing in as them, use the elevated PowerShell steps in the quick fix above.
With Robin by Atera: For a routine deletion, this whole stage doesn’t need a technician. When an employee asks for a deleted file back, Robin searches the Recycle Bin or Trash for it and restores it when it’s still recoverable, so the user isn’t waiting on a remote session before their meeting.
Method 2: Restore from Previous Versions
When the file has left the Recycle Bin or skipped it, an earlier copy may still exist. Previous Versions draws on File History and restore points on a workstation, and on scheduled shadow copies on a Windows Server share. Neither works unless it was configured before the deletion.
Check what’s available before you start. From an elevated prompt, vssadmin list shadows lists local shadow copies and their creation dates. System Protection can be switched off on a device, in which case the list comes back empty. Running rstrui.exe shows System Restore points without starting a restore. A restore point doesn’t guarantee a personal file can be recovered, though, so treat Previous Versions as the real test.
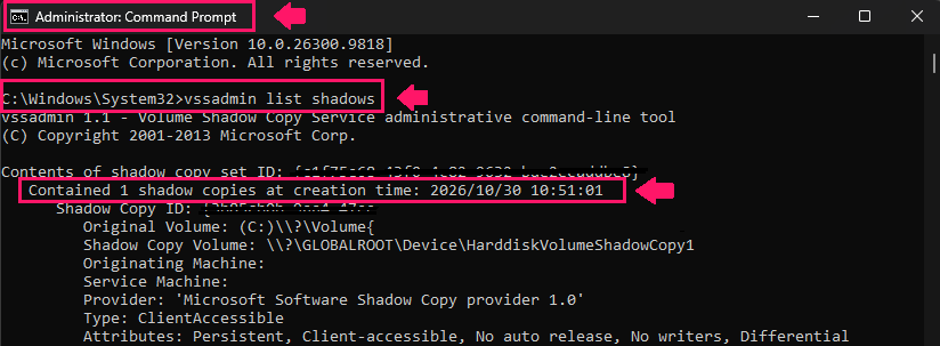
To recover a file through Previous Versions:
- In File Explorer, go to the folder that held the file. For a file that still exists, use the file itself
- Right-click the folder and select Properties
- Open the Previous Versions tab
- Select a version dated before the deletion
- Select Open to browse that version’s contents
Copy the missing file to a safe location. To roll back a file that still exists, expand the Restore arrow and select Restore to instead. Plain Restore overwrites the current version

- Open the recovered file to confirm it’s the right version before replacing anything.
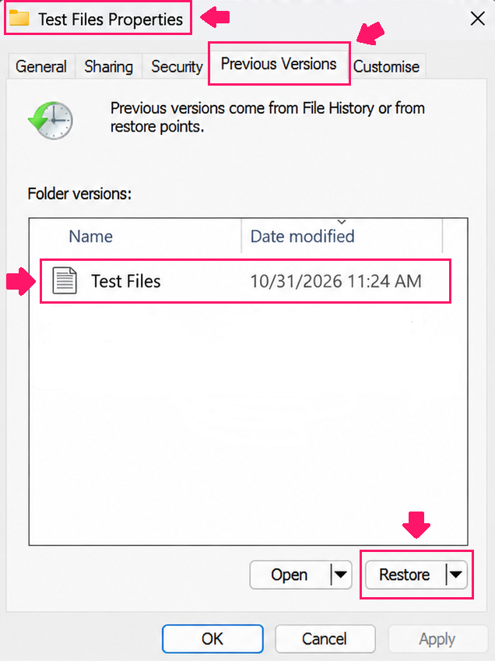
Files deleted from a network share
If the user deleted the file from a mapped drive, the recovery path is on the server. Mapped drives are stored per user, so an elevated session won’t show them. Read the user’s persistent mappings from their registry hive instead, using the SID from the quick fix:
The Script:
Atera does not guarantee the integrity, availability, security, virus-free, safety, lawfulness, non-infringement, rights’ status, or functionality of the scripts. The use of the shared scripts is at your own risk. Scripts are provided “AS IS”. *
Get-ItemProperty "Registry::HKEY_USERS\$Sid\Network\*" |
Select-Object PSChildName, RemotePathThis works only while the user is signed in, because that is when their registry hive is loaded. If they’re signed out, load it first with reg load HKUTempUser C:UsersjsmithNTUSER.DAT, read the same Network key under HKUTempUser, then run reg unload HKUTempUser. Drives mapped by logon script or Group Policy Preferences may not appear here, so ask the user for the share path if the drive letter isn’t listed.
If the drive letter from the ticket appears here, the file lived at that RemotePath. Open that share in File Explorer and use the Previous Versions steps above on the parent folder. This only works if Shadow Copies of Shared Folders is enabled on the server. Confirm it there with vssadmin list shadows, since running the command on the workstation only shows local copies. If no shadow copies exist, go to your server backups.
Method 3: Restore from File History
File History copies a user’s libraries, Desktop, Contacts, and Favorites to an external drive or network location on a schedule. It only helps if it was enabled and completed at least one backup before the file was deleted.
File History is a legacy feature that is off by default, so confirm in Control Panel that it was turned on before you spend time here.
Open Control Panel > System and Security > File History

Select Restore personal files

- Browse to the folder that held the file
- Use the arrows at the bottom of the window to move between backup dates until you find the version you need
- Select the file or folder
- Select the green Restore button to return it to its original location. To avoid overwriting an existing file, right-click Restore and select Restore to
- Open the restored file to confirm it’s the right version
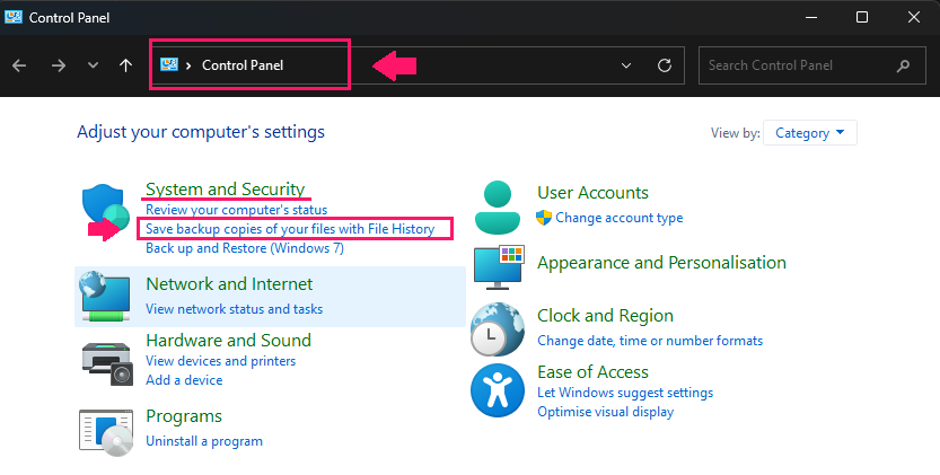
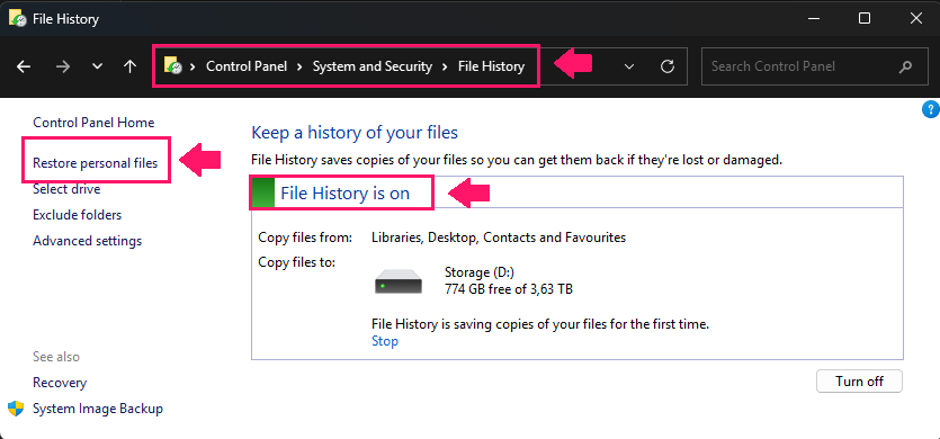
The Restore personal files window runs in the signed-in user’s context. If you can’t use their session, browse the backup location directly. File History stores copies under FileHistory<user><computer>Data on the backup target, with the backup timestamp added to each file name, so you can copy the right version straight from there.
Method 4: Recover from OneDrive and SharePoint
Files deleted from a OneDrive folder, or from a synced folder on the device, go to the OneDrive recycle bin online. Files stored on the device also land in the local Recycle Bin, so check there first after a normal deletion. Deleted items stay there for 30 days in personal accounts and up to 93 days in work or school accounts, unless the organization has changed its retention settings.
The steps below are the same in both account types.
To restore a deleted file:
- Sign in to OneDrive in a browser
Select Recycle bin in the left-hand menu

- Select the deleted file or folder
Select Restore

- Open My files, go to the original location, and confirm the file is back
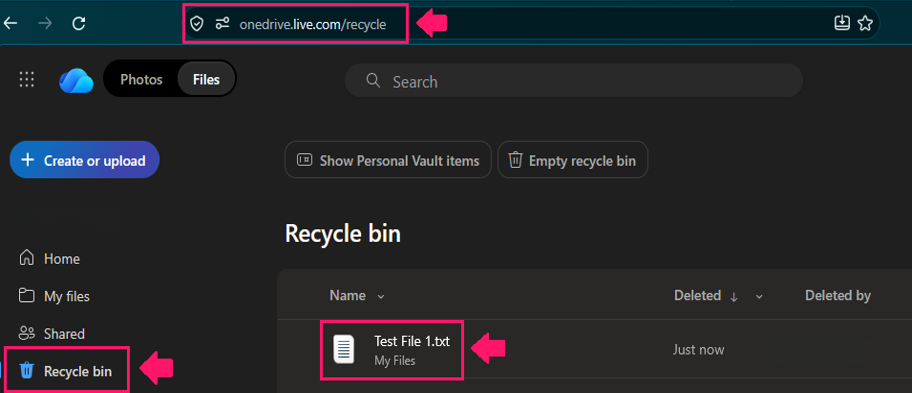
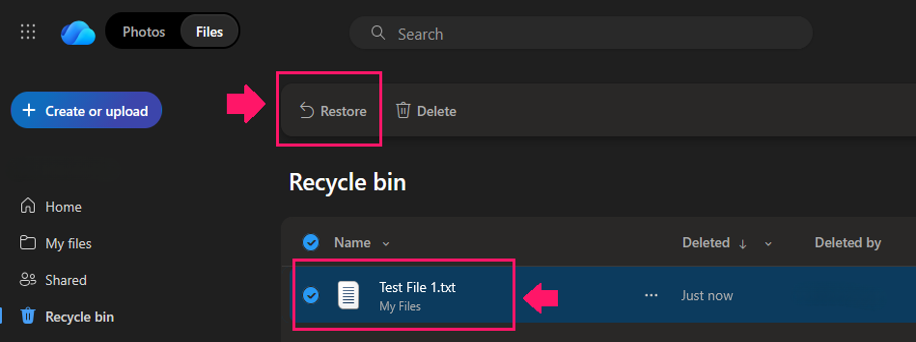
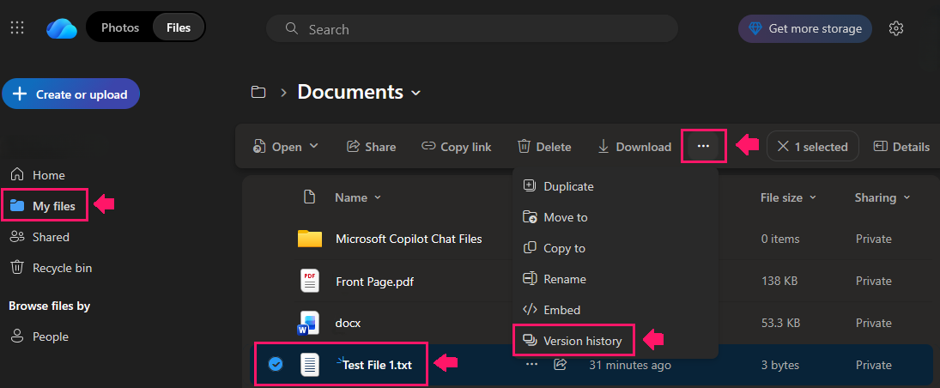
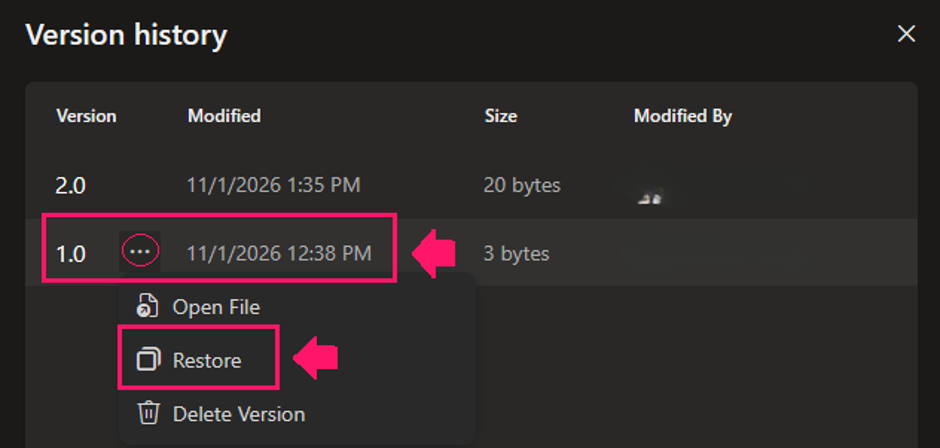
When the file still exists but its contents were overwritten or damaged, use version history:
- In OneDrive or SharePoint, select the file
Open the … menu and select Version history

Select the … menu beside the version you need, then select Restore

- Confirm that version history now lists the restored copy as the newest version, then open the file to check its contents
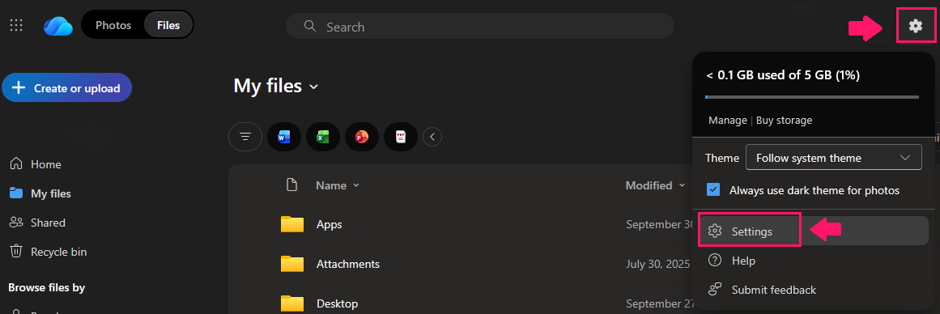
When a user has deleted or overwritten many files at once, for example through a bad sync or malware, use Restore your OneDrive to roll the whole OneDrive back to a point within the last 30 days. Personal accounts need a Microsoft 365 subscription for this.
Select the Settings gear in OneDrive, then Settings

Select Restore your OneDrive

- Choose a restore date
- Review the activity chart and list of changes that will be undone
- Select Restore
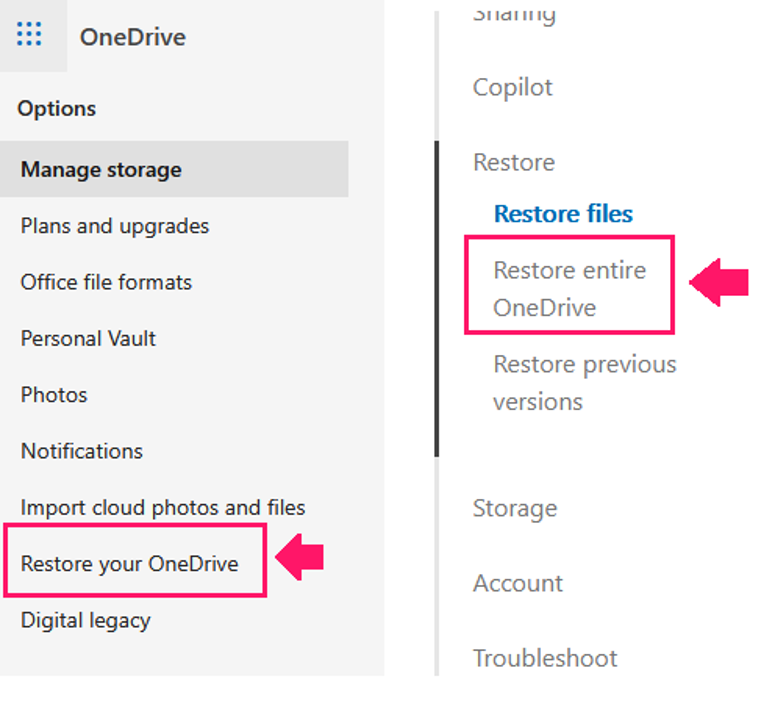
Restoring undoes every change after that date, not just the deletion. Files created after the restore point move to the recycle bin, where they can still be recovered.
If a restored file appears in OneDrive online but not in the user’s File Explorer, the sync client may be stuck. Check the OneDrive icon in the notification area for a sync error or paused status. If sync doesn’t resume, reset the client from the user’s session with %LocalAppData%MicrosoftOneDriveonedrive.exe /reset, or with the executable under C:Program FilesMicrosoft OneDrive on a per-machine install, then relaunch OneDrive if it doesn’t restart on its own within a few minutes. A reset doesn’t delete files, but a large library can take a while to resync.
With Robin: A restore that never reaches the device still ends up as a ticket. When an employee’s OneDrive sync is stuck, Robin verifies OneDrive is present, stops the client, performs the reset, restarts it, and confirms whether sync recovered, so the restored file shows up without a technician walking the user through a reset.
Method 5: Recover lost or unsaved Word and Excel files
Office files are among the most common recovery requests, and many of them aren’t deleted at all. Start by finding out whether the file is gone, misplaced, or never saved.
If the user can’t remember where they saved it, open Word or Excel and check File > Open > Recent, which shows where the file was last opened from. If it isn’t listed, search their profile from an elevated session with a script like this:
The Script:
Atera does not guarantee the integrity, availability, security, virus-free, safety, lawfulness, non-infringement, rights’ status, or functionality of the scripts. The use of the shared scripts is at your own risk. Scripts are provided “AS IS”. *
Get-ChildItem 'C:\Users\jsmith' -Recurse -File -Force -ErrorAction SilentlyContinue -Include '*report*.docx','*report*.xlsx' |
Select-Object FullName, LastWriteTime | Sort-Object LastWriteTime -DescendingBe sure to swap in the user name and part of the file name.
Pro tip: You can deploy scripts remotely with Atera’s RMM. And if you don’t have a script you know off-hand, AI Copilot can help you write it.
For a file that was never saved:
- In Word, select File > Info > Manage Document > Recover Unsaved Documents
- In Excel, select File > Info > Manage Workbook > Recover Unsaved Workbooks
- Open the recovered copy
- Save it to a known location straight away
Unsaved drafts are kept in %LocalAppData%MicrosoftOfficeUnsavedFiles and are cleared over time, so recover them quickly. For files stored in OneDrive or SharePoint, File > Info > Version History opens earlier versions directly in the app.
With Robin: When an employee isn’t sure whether a file was deleted or just saved somewhere unexpected, Robin checks the expected Windows user folder, searches for matching file names, and checks whether a located file is hidden. It returns the matching paths, so the employee can find the file without a technician running searches across their profile.
Method 6: Scan the drive with Windows File Recovery
Windows File Recovery is a free Microsoft command-line tool that scans a local or removable drive for deleted files. Use it only when the file isn’t in any recycle bin and no backup, shadow copy, or synced copy exists. It doesn’t support network shares. It installs from the Microsoft Store, which is often blocked on managed devices, so check that you can install it before you need it.
Before you scan, tell the user to stop working on the affected drive, and confirm you have a second drive for the output. Recovered files must never be written to the drive you’re scanning. On SSDs, run fsutil behavior query DisableDeleteNotify first. A result of DisableDeleteNotify = 0 for NTFS means TRIM is enabled, and a scan is unlikely to find anything.
- Install Windows File Recovery from the Microsoft Store
Open Command Prompt as administrator and run
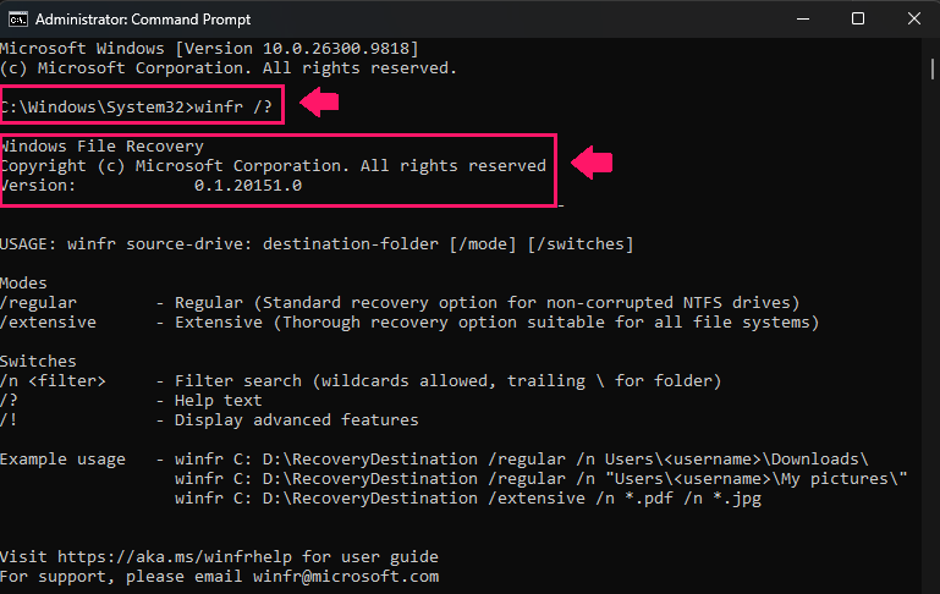
winfr /?to confirm the installed version and available modes
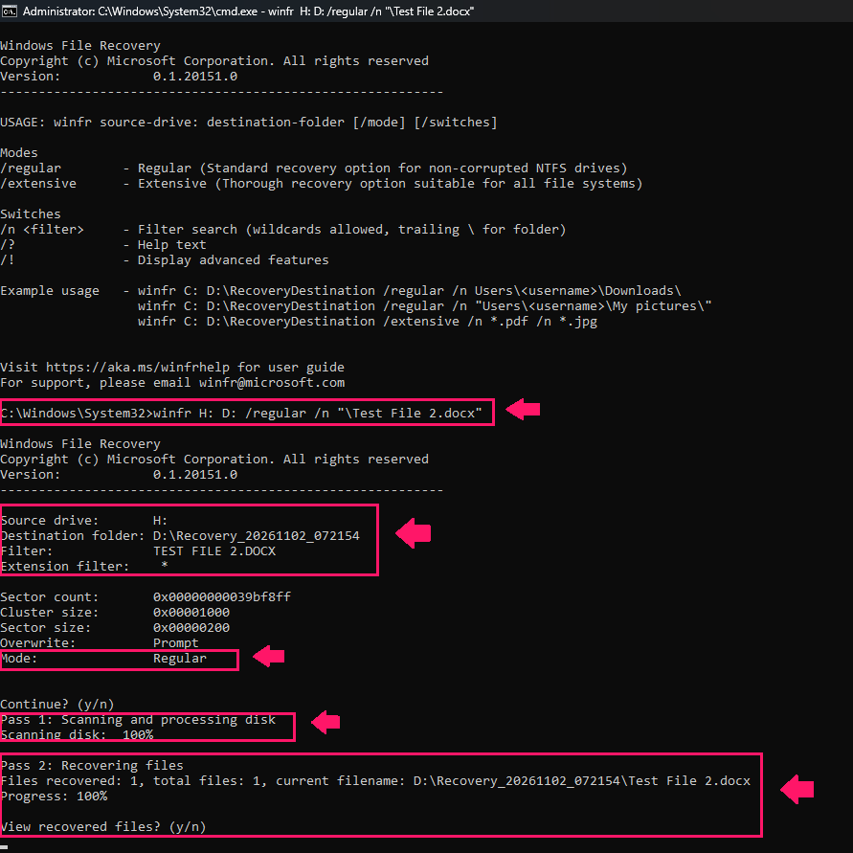
Run a Regular mode scan first. Use it for recently deleted files on a healthy NTFS drive:
winfr X: Y: /regular /n "UsersjsmithDocumentsReport.docx". HereX:is the drive the file was deleted from,Y:is the destination drive, and the/nfilter is the file’s path without the drive letter. Wildcards such as/n *.docxalso work
- Enter
Ywhen prompted to start the scan - Open the
Recovery_<date>_<time>folder that winfr creates on the destination drive and check the results - If Regular mode finds nothing, or the drive isn’t NTFS or may be corrupted, run the same command with
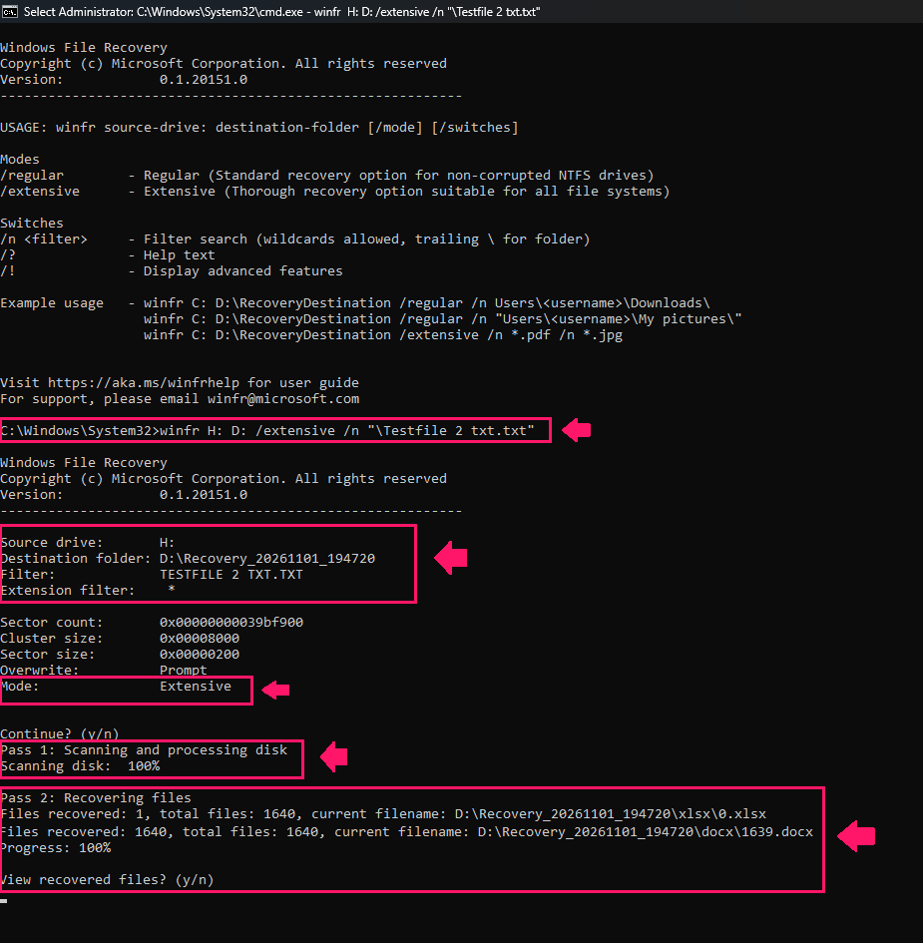
/extensivein place of/regular
Expect different output from Extensive mode. When a deleted file’s records are gone, Extensive mode can still recover it from its contents, but without the original name or folder. Those files are sorted into folders by type and numbered, such as docx1639.docx, and the /n name filter can’t narrow them down. A single scan can return hundreds of files, so search the output by type, size, and date rather than by name.
If both modes come up empty, check that you scanned the right drive with the right /n path, and look once more for copies in OneDrive, File History, Previous Versions, and backups. Beyond that, the file is very likely gone, and more scans won’t change it. If the drive shows signs of physical failure, such as clicking, disappearing from Windows, or SMART warnings, stop scanning. Consider a professional data recovery service only for an irreplaceable file with no backup, and make clear to the user that it’s expensive and success isn’t guaranteed.
Where Robin stops and your technicians start: Robin’s restore use case covers the Recycle Bin and Trash. Server shadow copies, OneDrive admin recovery, backup restores, network shares, and Windows File Recovery scans involve permissions, retention, and the risk of losing more data, so they’re the technician’s responsibility. When a drive may be failing, Robin checks disk status and available SMART or reliability information and returns the findings, so IT can decide on backup, replacement, or further investigation.
How to recover files remotely and make recovery routine across devices
A centrally managed endpoint or server backup lets you restore a file while the user keeps working. The exact labels vary by backup product, but the workflow is the same:
- Open the backup console and find the user’s computer or the file server
- Select a backup dated before the file was deleted or changed
- Browse to the file and select it
- Restore it to a separate folder rather than the original location, so nothing newer gets overwritten
- Open the restored file to confirm it’s intact
- Move it into place, or tell the user where to find it
Atera’s RMM includes backup scheduling and management alongside remote access, so restores and the device they’re for sit in the same place.
With Robin: When Robin can’t find the file in the Recycle Bin, the ticket doesn’t have to start from zero. Robin gathers the unresolved IT issue and diagnostic context, then follows the configured ticket routing workflow, so the technician picking it up already knows the Recycle Bin route has been checked and can go straight to OneDrive, shadow copies, or backups.
How to set devices up so the next recovery is routine
Every recovery method in this guide depends on something that was configured before the deletion. Push the following settings through policy, so they apply to every device rather than only the ones someone remembered:
- Recycle Bin policy: Under User Configuration > Administrative Templates > Windows Components > File Explorer, set Maximum allowed Recycle Bin size as a percentage of each volume, and leave Do not move deleted files to the Recycle Bin disabled. Turning on Display confirmation dialog when deleting files cuts accidental deletions. The same settings are in the Intune settings catalog. If Storage Sense is enabled, set
ConfigStorageSenseRecycleBinCleanupThresholdto match how long you expect deleted files to stay recoverable. - OneDrive Known Folder Move: Deploy Silently move Windows known folders to OneDrive (
KFMSilentOptIn, with your tenant ID) through Intune or Group Policy, and pair it with Prevent users from redirecting their Windows known folders to their PC (KFMBlockOptOut). Desktop, Documents, and Pictures then sync to OneDrive, so deleted files land in the OneDrive recycle bin and keep version history, even after a Shift+Delete. - OneDrive and SharePoint retention: Check version history limits in the SharePoint admin center, and set Days to retain a deleted user’s OneDrive under Settings > Retention so leavers’ files outlast your offboarding process. Where files must survive longer than the 93-day recycle bin window, apply a Microsoft Purview retention policy.
- File server shadow copies: On each shared volume, open the volume’s Properties > Shadow Copies, enable shadow copies, and set a schedule that fits how often files change. The default is twice a day on weekdays, and Windows keeps 64 copies per volume at most, so a busier schedule means a shorter history. This is what makes Previous Versions work on network shares.
» Here’s how to simplify group policy management with Atera
Take routine file restores off the ticket queue
Most deleted files can be recovered, but only if something was keeping a copy before the user hit delete. The Recycle Bin, Previous Versions, File History, OneDrive version history, and your backups each cover a different gap, and Windows File Recovery is the last resort when none of them do.
For routine cases, Robin by Atera takes the first step off your team’s plate. When an employee needs a deleted file back, Robin searches the Recycle Bin or Trash for it and restores it when it’s still recoverable. When a file only appears to be missing, Robin checks the expected user folder, searches for matching file names, and checks whether the file is hidden. Robin is sold separately as an add-on to the Atera IT platform.
» Interested? Try Atera for free or request a Robin demo
Related Articles

How to fix Bluetooth not working in Windows 11
A Bluetooth ticket could mean a radio switched off in Quick Settings, a headset still connected to someone’s phone, a stopped service, a driver Windows Update swapped overnight, or an adapter that has vanished from Device Manager. Guessing burns the remote session. Work the causes in order, cheapest check first, and fix each one on a single PC or across the fleet.
Read now
How to change the time zone in Windows 11 and fix time sync
A user can’t sign in, and the clock is five minutes off. Or an hour. Or it was right yesterday. Wrong time on Windows 11 comes from three places: a bad time zone, a broken sync, or a policy that quietly undoes every manual fix. Find the layer first and fix it there, whether that means one laptop and a tzutil command or every workstation in the domain.
Read now
How to fix a microphone not working in Windows 11
A dead mic is rarely the mic's fault. The problem usually sits somewhere upstream, and one test recording tells you where. From there, it’s a fix sequence that works on any single device, a deeper playbook for the cases where the usual steps fail, and a way to push the same checks across an entire fleet.
Read now
How to fix low disk space in Windows and free up storage
A full C: drive is rarely one big file. It’s update caches, runaway logs, shadow copies, and a user Temp folder nobody has checked in years. Clear the wrong one and you break servicing or lose your recovery options.
Read nowEndless IT possibilities
Boost your productivity with Atera’s intuitive, centralized all-in-one platform