
Generate summary with AI

You reset your default search engine, close the browser, open it again the next morning, Yahoo picks up where you left it. This isn’t a glitch, and it isn’t one of your users forgetting to save a setting. There are usually a few specific reasons for it, most of which have a pretty simple fix that’ll keep you from needing to close off the same ticket multiple times every week.
Why your search engine keeps switching to Yahoo
Three mechanisms account for almost every case of a search engine reverting to Yahoo, and they don’t all deserve the same response:
- Bundled software: Free installers (especially the “Recommended” or “Express” install path rather than the custom one) is the most common reason and frequently includes a toolbar or extension that requests permission to change your browser settings. These are typically classified as Potentially Unwanted Programs (PUPs) or Potentially Unwanted Applications (PUAs) rather than outright malware, because the change is disclosed somewhere in the install flow, even if it’s buried. For example, McAfee Secure Search changes your default search engine, but it does so with your consent, is fully reversible from the browser’s own settings, and it disappears completely if you uninstall the software that brought it.
- Extensions: These aren’t always obviously malicious. Coupon tools, PDF converters, new-tab customizers, and download helpers routinely ask for permission to control your search settings and startup page as part of their normal functionality. Once granted, that permission doesn’t expire just because the extension is useful for something else; it’s a standing permission the extension can exercise at any time, including reasserting Yahoo as your default after you’ve changed it back.
- Device sync: If you’re signed into your browser and sync is enabled, your settings (including your default search engine and any extensions you’ve installed) propagate to every other device signed into that same account. Fix the setting on your laptop, and if a synced desktop still has the offending extension active, the next sync cycle can silently overwrite the fix you just made.
It’s worth noting this problem isn’t Chrome-specific. Since the underlying mechanisms are installer permissions, extension permissions, and account sync, any Chromium or Firefox-based browser is exposed the same way, even if the exact settings menu looks different from one browser to the next.
The problem with legitimate hackers
A legitimate bundled change is different from a hijacker because you were actually in control of the change and can undo it just as easily. A genuine hijacker is much worse because it persists after you think you’ve removed it, may block or grey out the settings UI that would normally let you switch back, and it typically arrived through a channel other than the browser’s official extension store.
A hijacker also doesn’t always live inside the browser’s settings at all. Modifying a desktop shortcut’s Target field to append a URL (or a flag like --load-extension=) after the browser executable is a real, long-documented technique, and it works precisely because Chromium-based browsers legitimately accept a URL as a launch argument.
If your settings, extensions, and sync all look clean but you’re still redirected on launch, right-click your browser shortcut, check Properties, and inspect the Target field for anything appended after the closing quotation mark of the executable path.
» Secure your environment with our posts about browser security tools and security hardening
How to remove the hijacker and restore control step-by-step
Once you know a hijacker’s actually present, the order you work through these steps matters. For example, resetting before checking for a hijacker embedded outside the reset’s scope means you’ll be back here in a week.
Work through this in sequence.
Step 1: Disable sync first
Do this before touching any other setting. If sync is active and another device in the chain still has the offending extension or setting, it will silently overwrite whatever you fix on this machine.
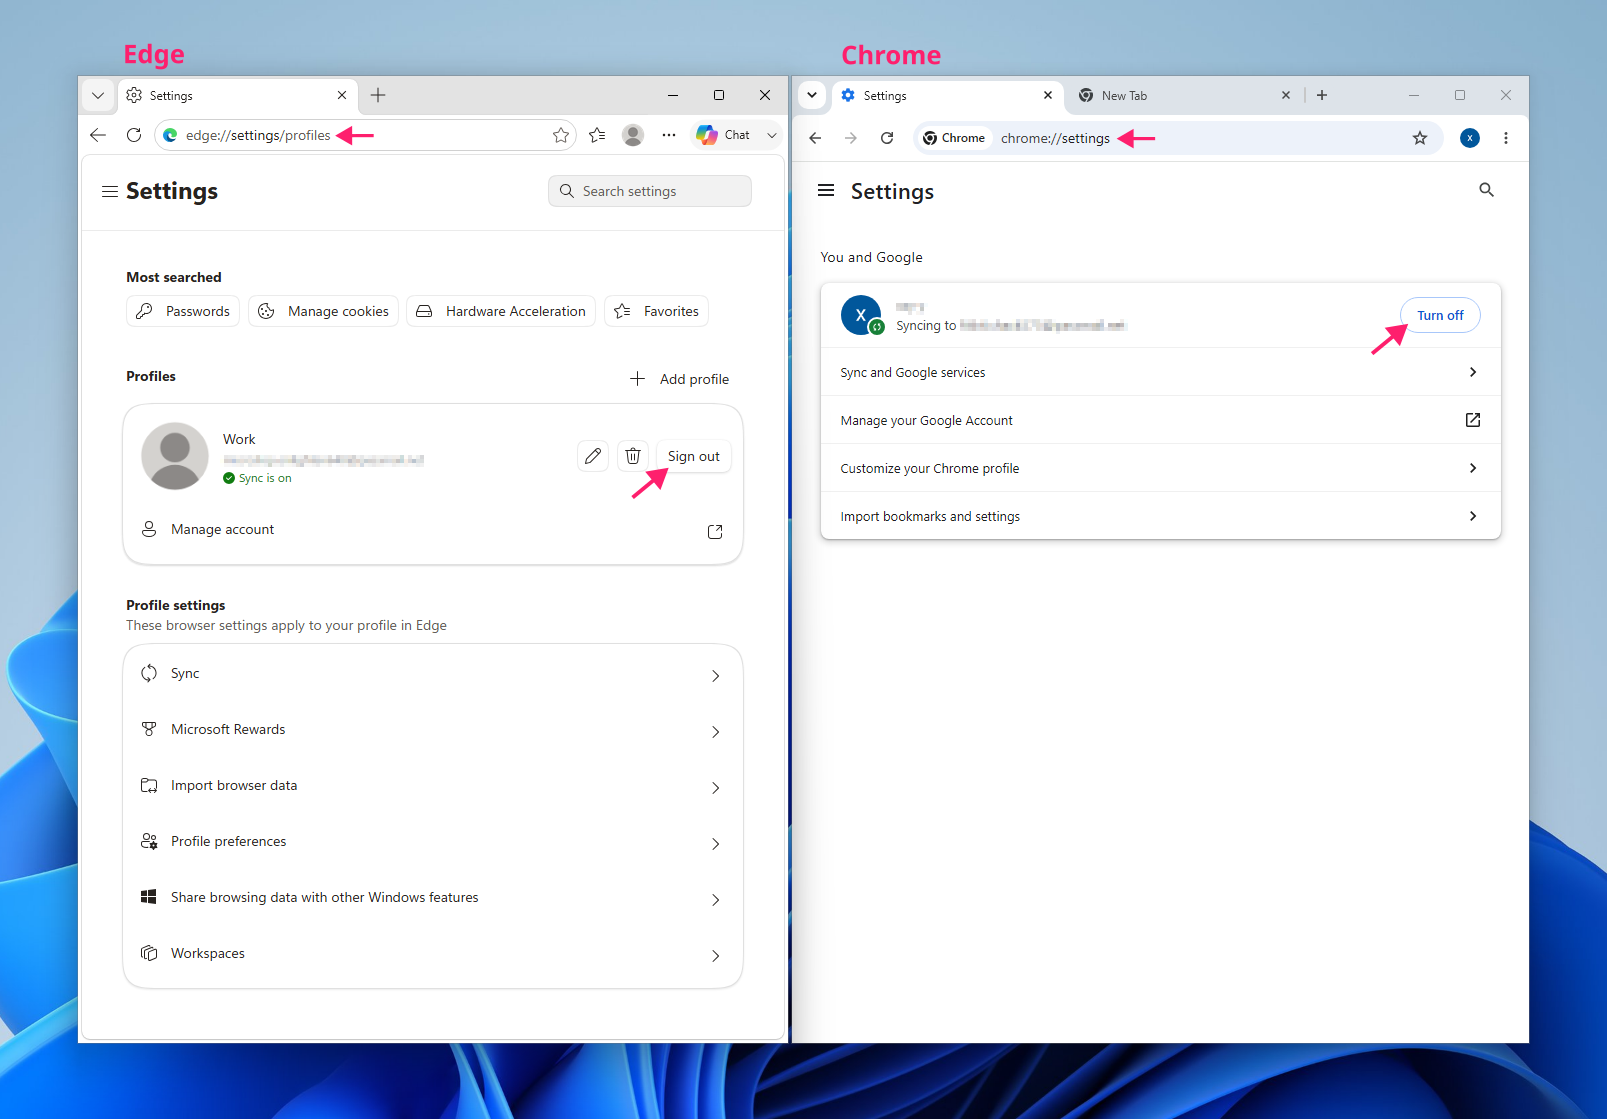
- Navigate to
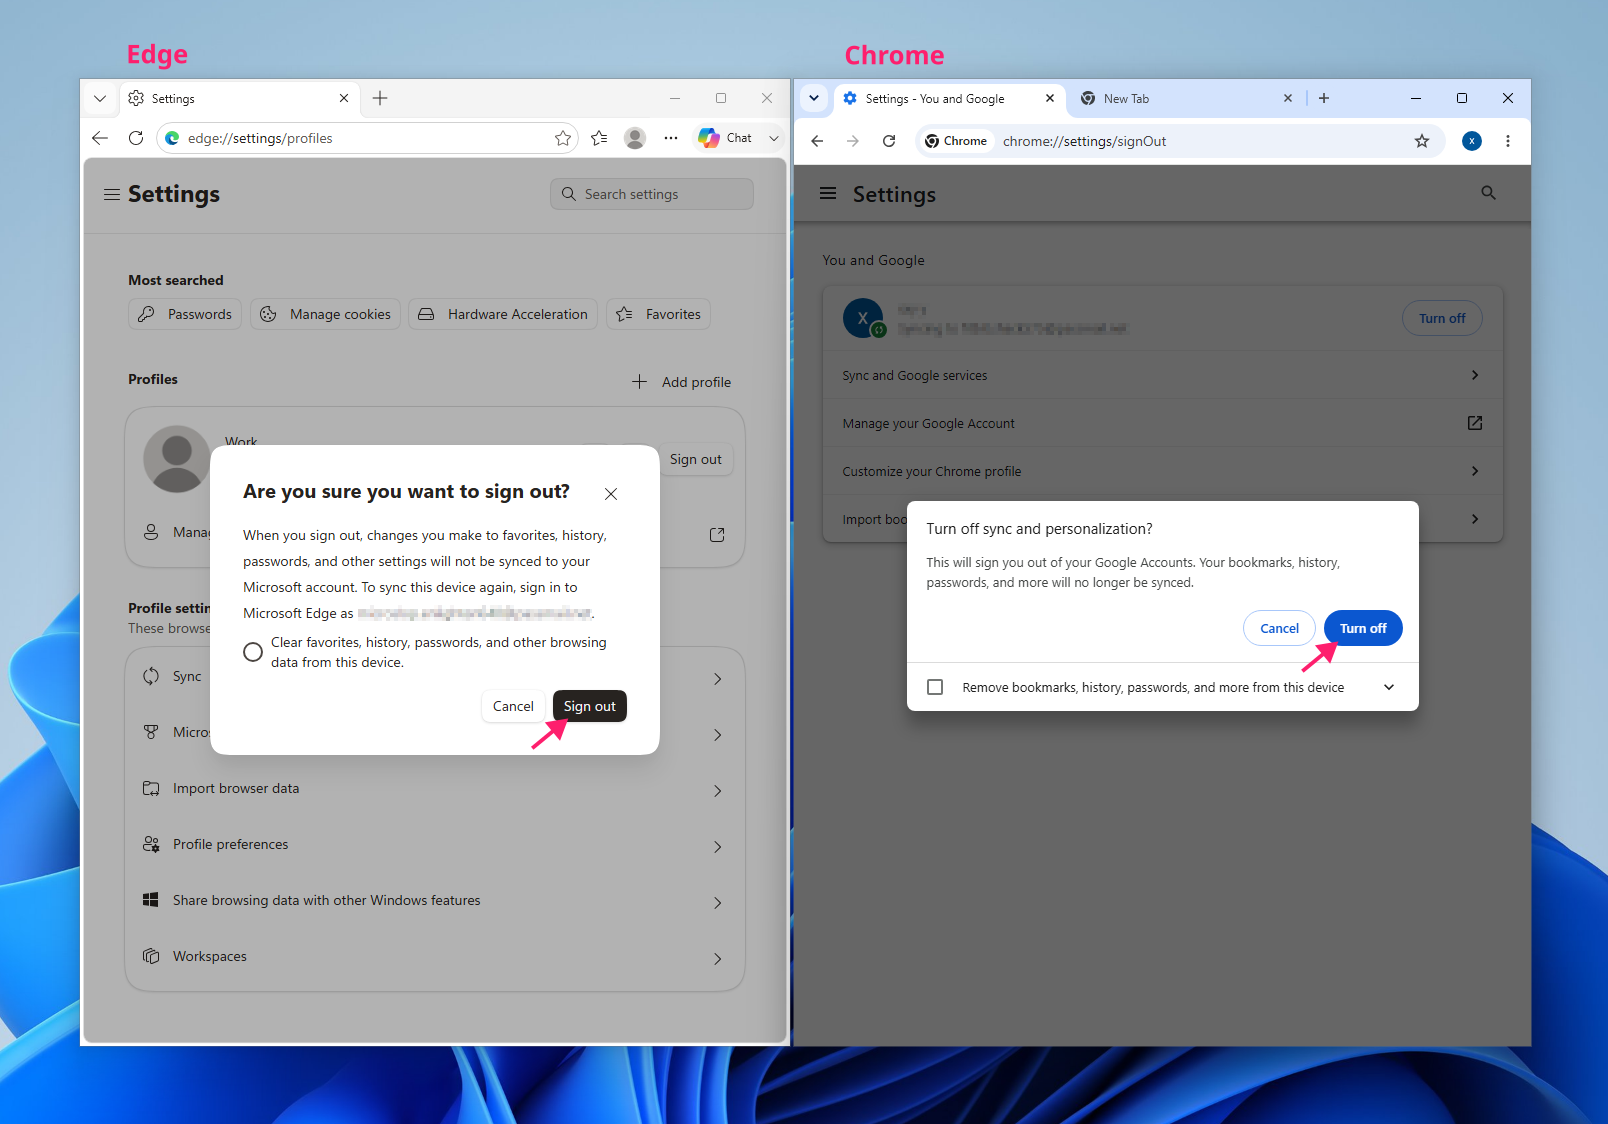
edge://settings/profilesfor Edge or orchrome://settings/peoplefor Chrome Click Sign out for Edge and Turn off for Chrome

You also have the option of removing the synced data from the device

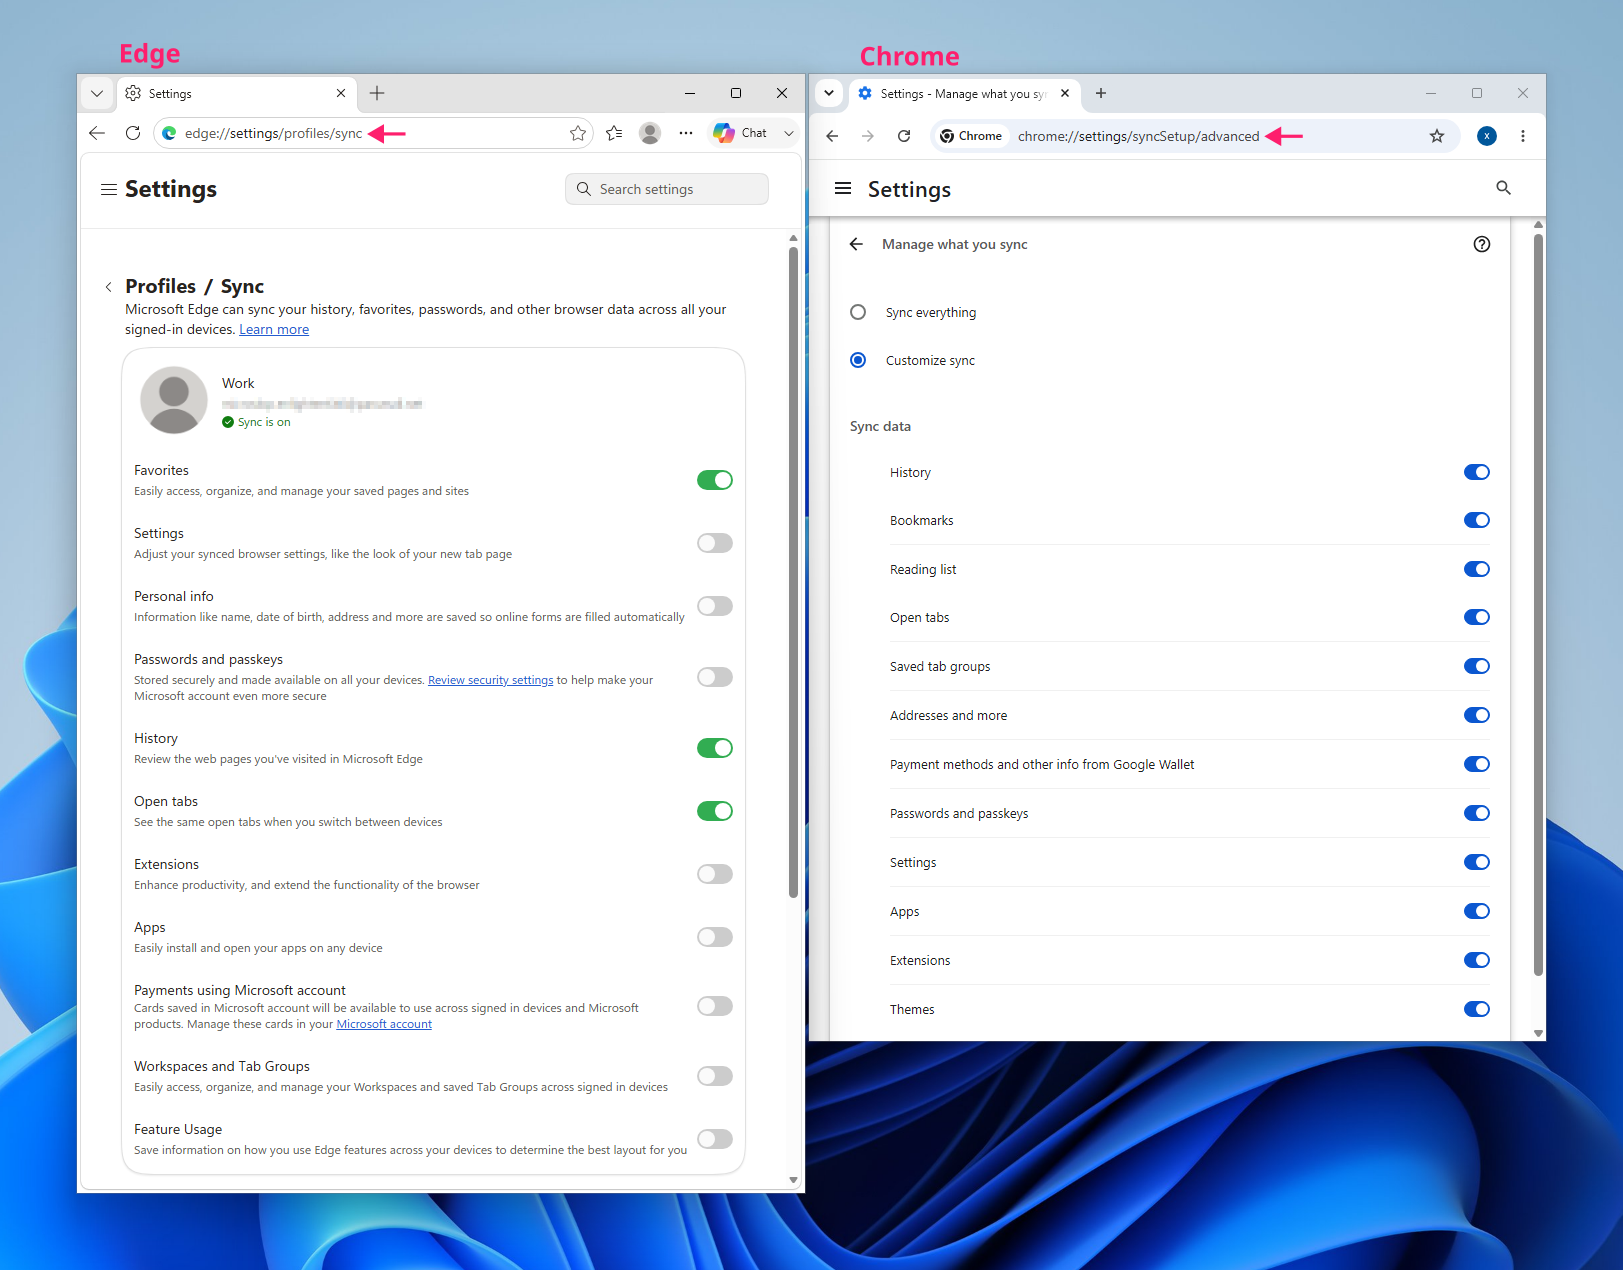
If you’d rather keep sync active but stop specific data types from propagating, Edge and Chrome both offer a granular option: edge://settings/profiles/sync or chrome://settings/syncSetup/advanced respectively, where you can toggle off Settings and Extensions individually instead of signing out entirely.
Step 2: Revert the default search engine and remove the Yahoo entry
With sync disabled, changing the search engine back should actually stick if nothing else is wrong:
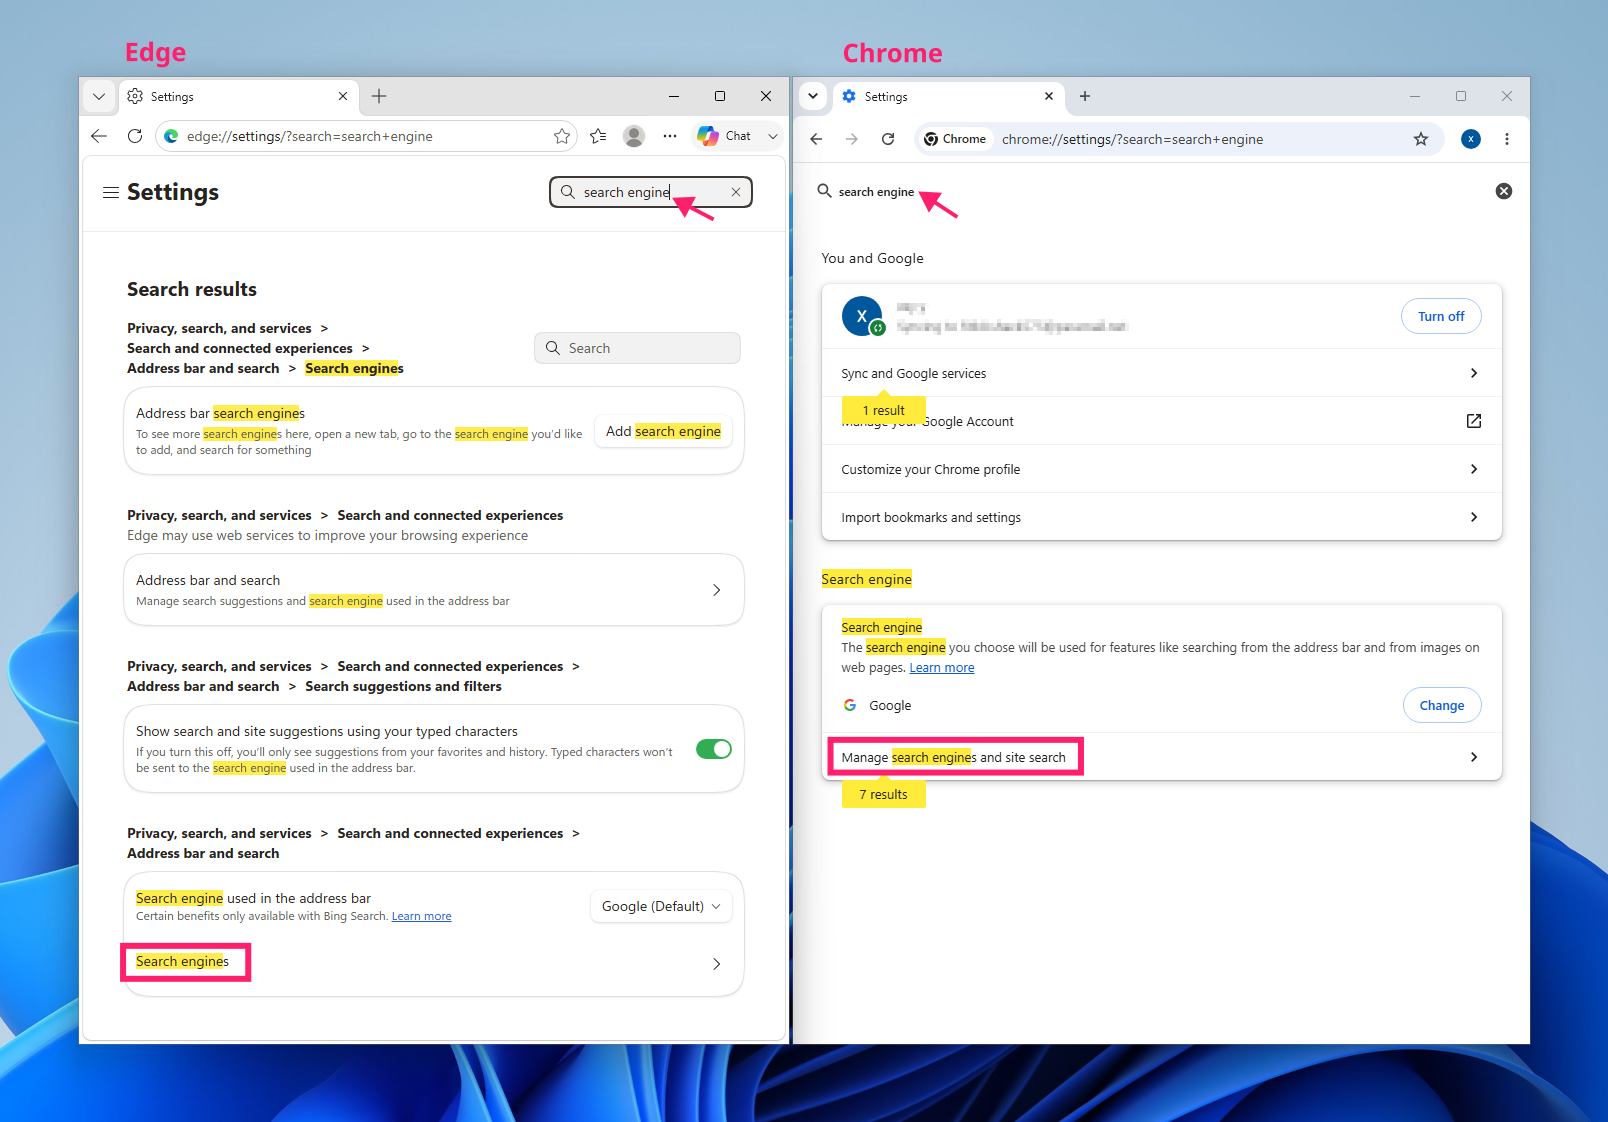
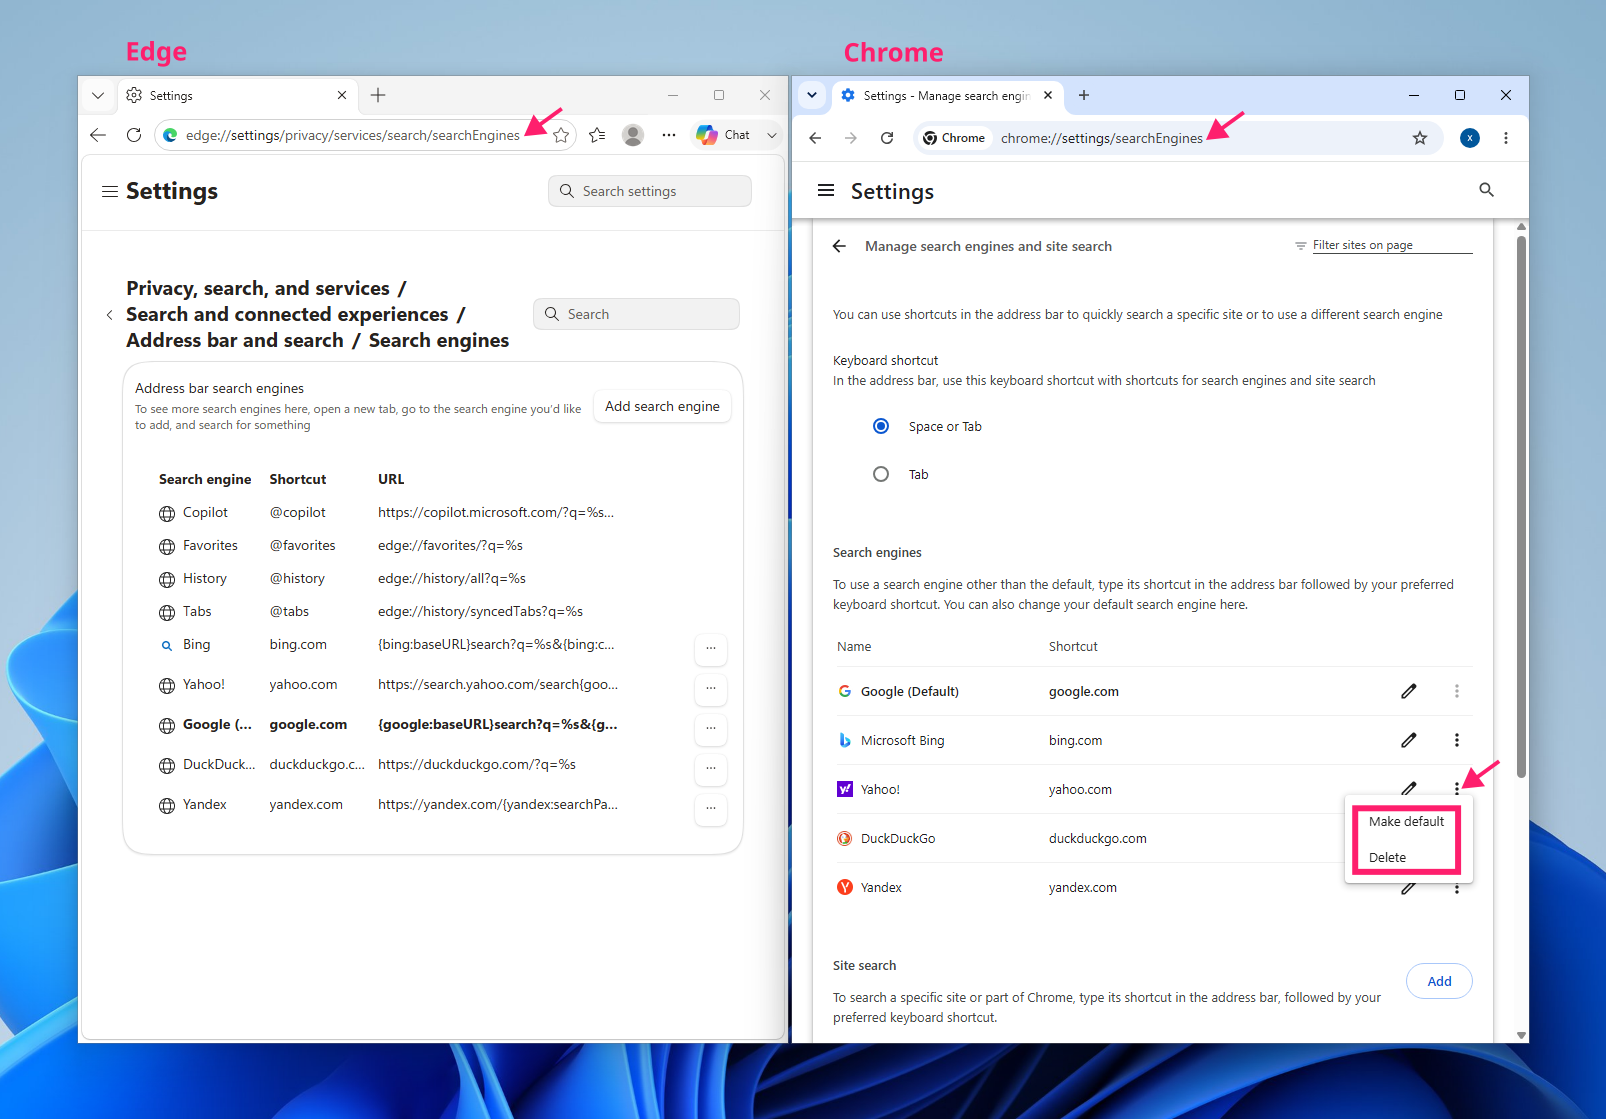
Type “search engine” into the browser’s settings search bar and open the Search engines (or Search engine) results

- Click the ⋮ or … menu next to the Yahoo entry
Select Remove (or Delete) to delete the entry outright, or Make default on your preferred engine if you’d rather leave Yahoo listed but no longer active

Step 3: Remove unrecognized or malicious extensions
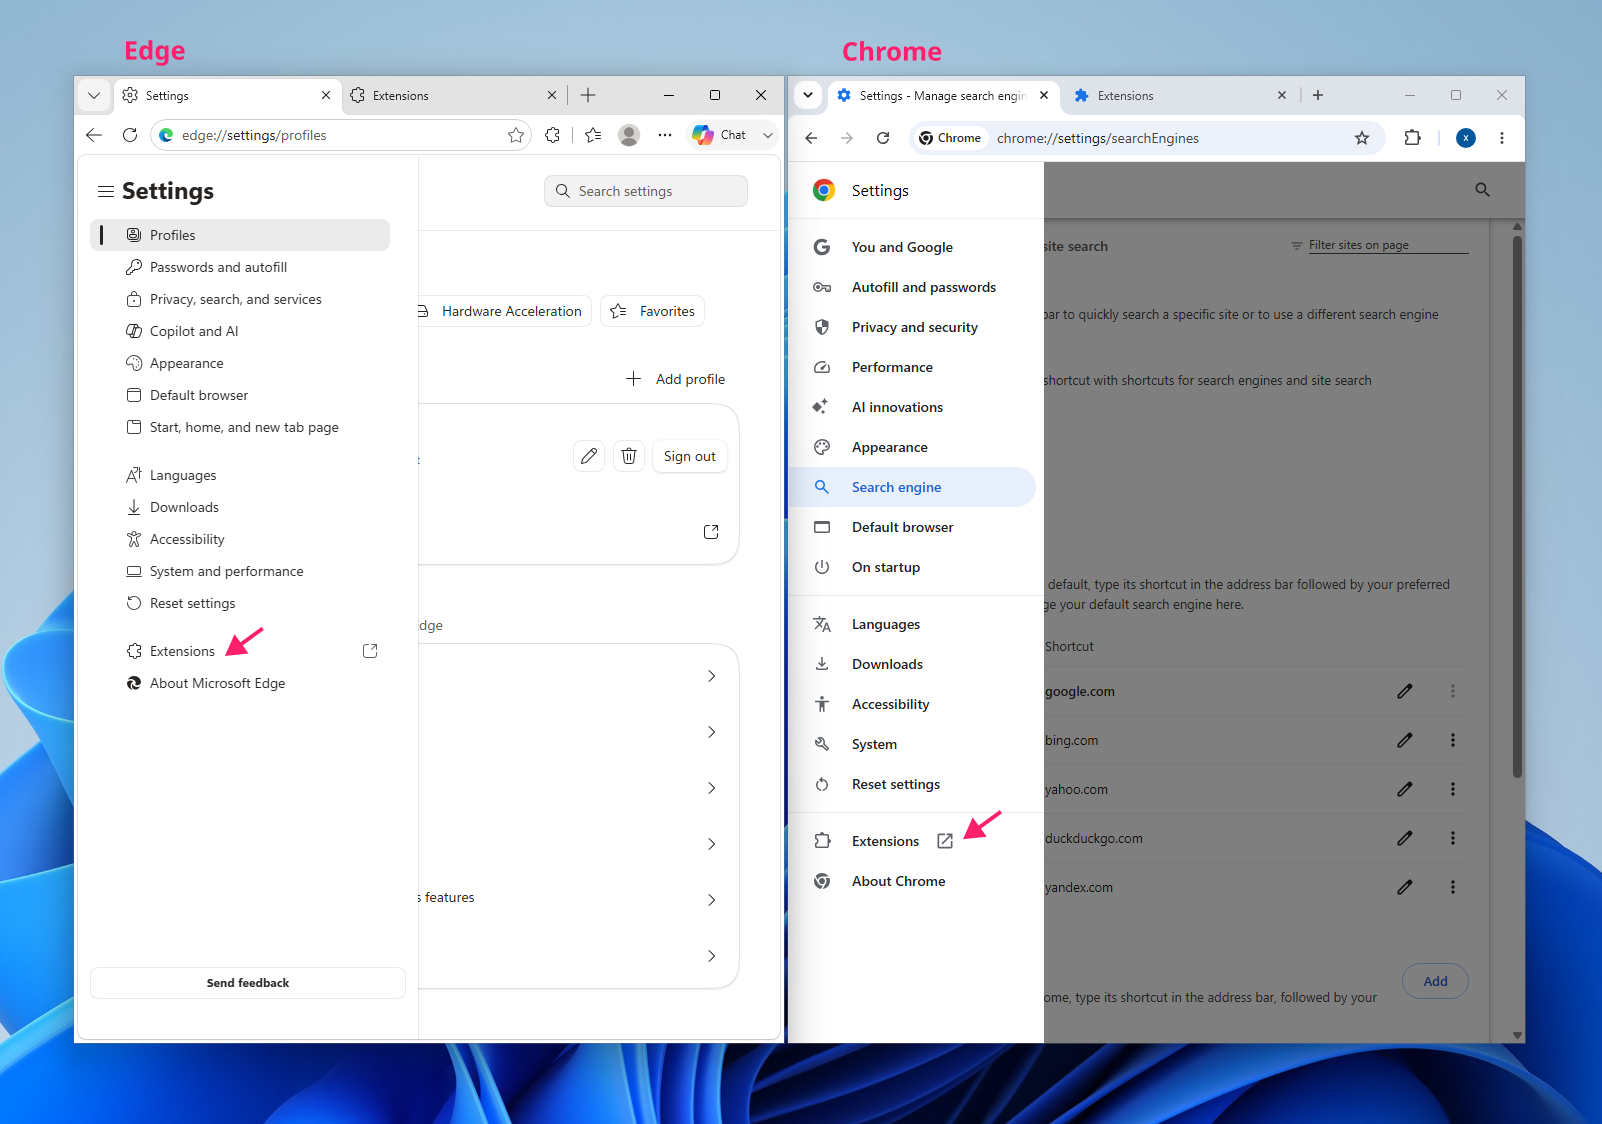
Navigate to
edge://extensions/orchrome://extensions/(in Firefox,about:addons)
- Review each installed extension for anything you don’t recognize or didn’t knowingly install
- Click Remove on any extension you don’t recognize, or use the toggle to disable it first if you want to test whether it’s the cause before deleting it
» Need more help? Here’s our guide to finding chrome extension file locations
Step 4: Clear cached data and cookies
Cached files and site data can carry the hijacker’s tracking scripts even after the extension itself is gone:
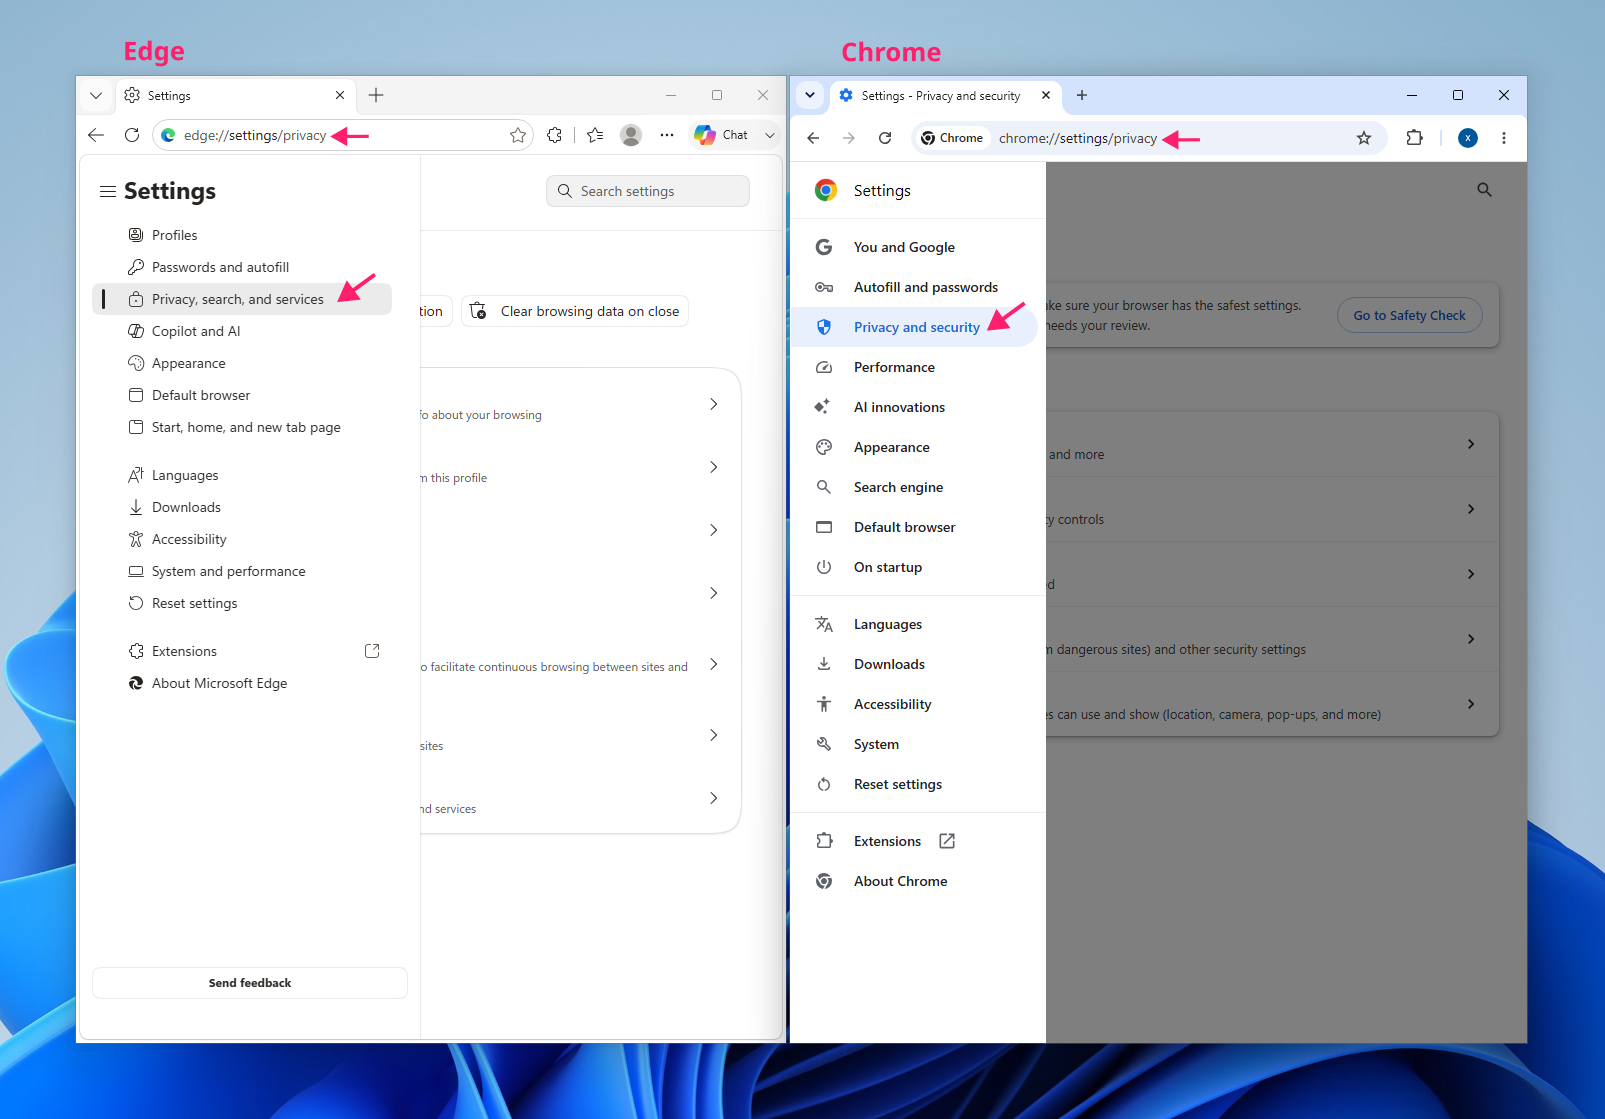
Navigate to
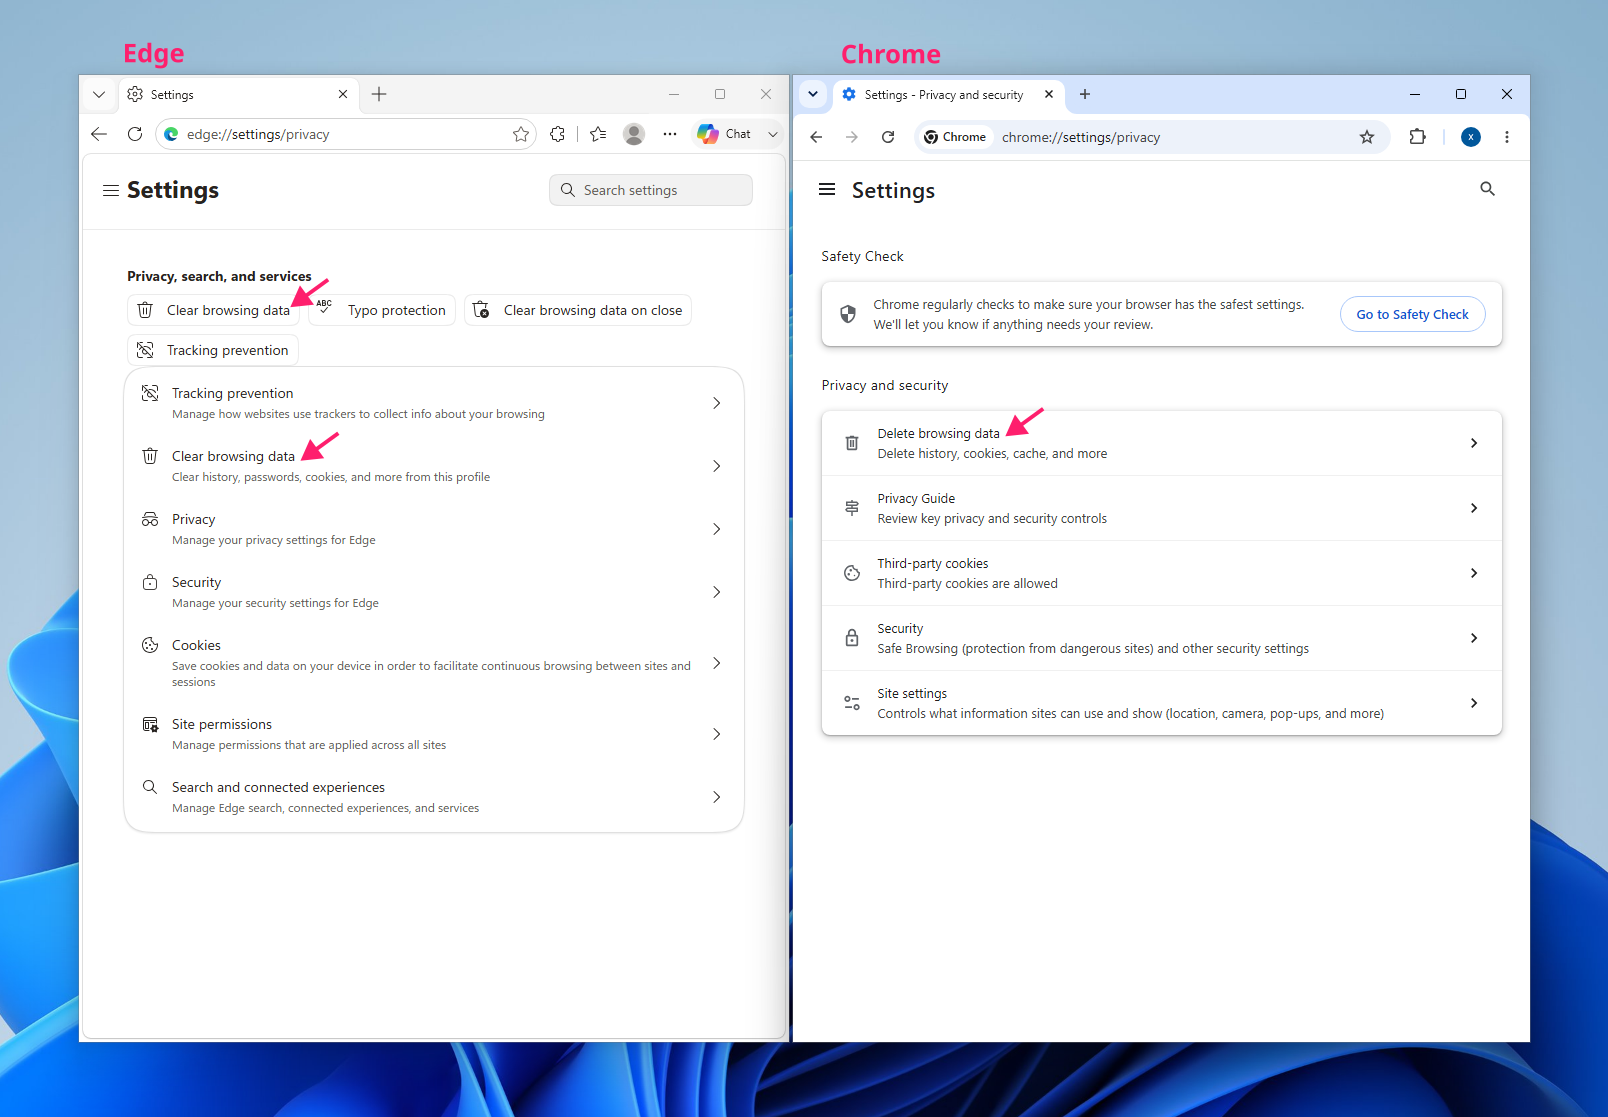
edge://settings/privacyorchrome://settings/privacy(Firefox:about:preferences#privacy, under Cookies and Site Data)
Click Clear browsing data (Edge) or Delete browsing data (Chrome)

- Select Cookies and other site data and Cached images and files
- Choose All time as the range if you’re not sure when the hijacker was introduced, or Last 24 hours if you know it was recent
Click Clear now (or Delete now)

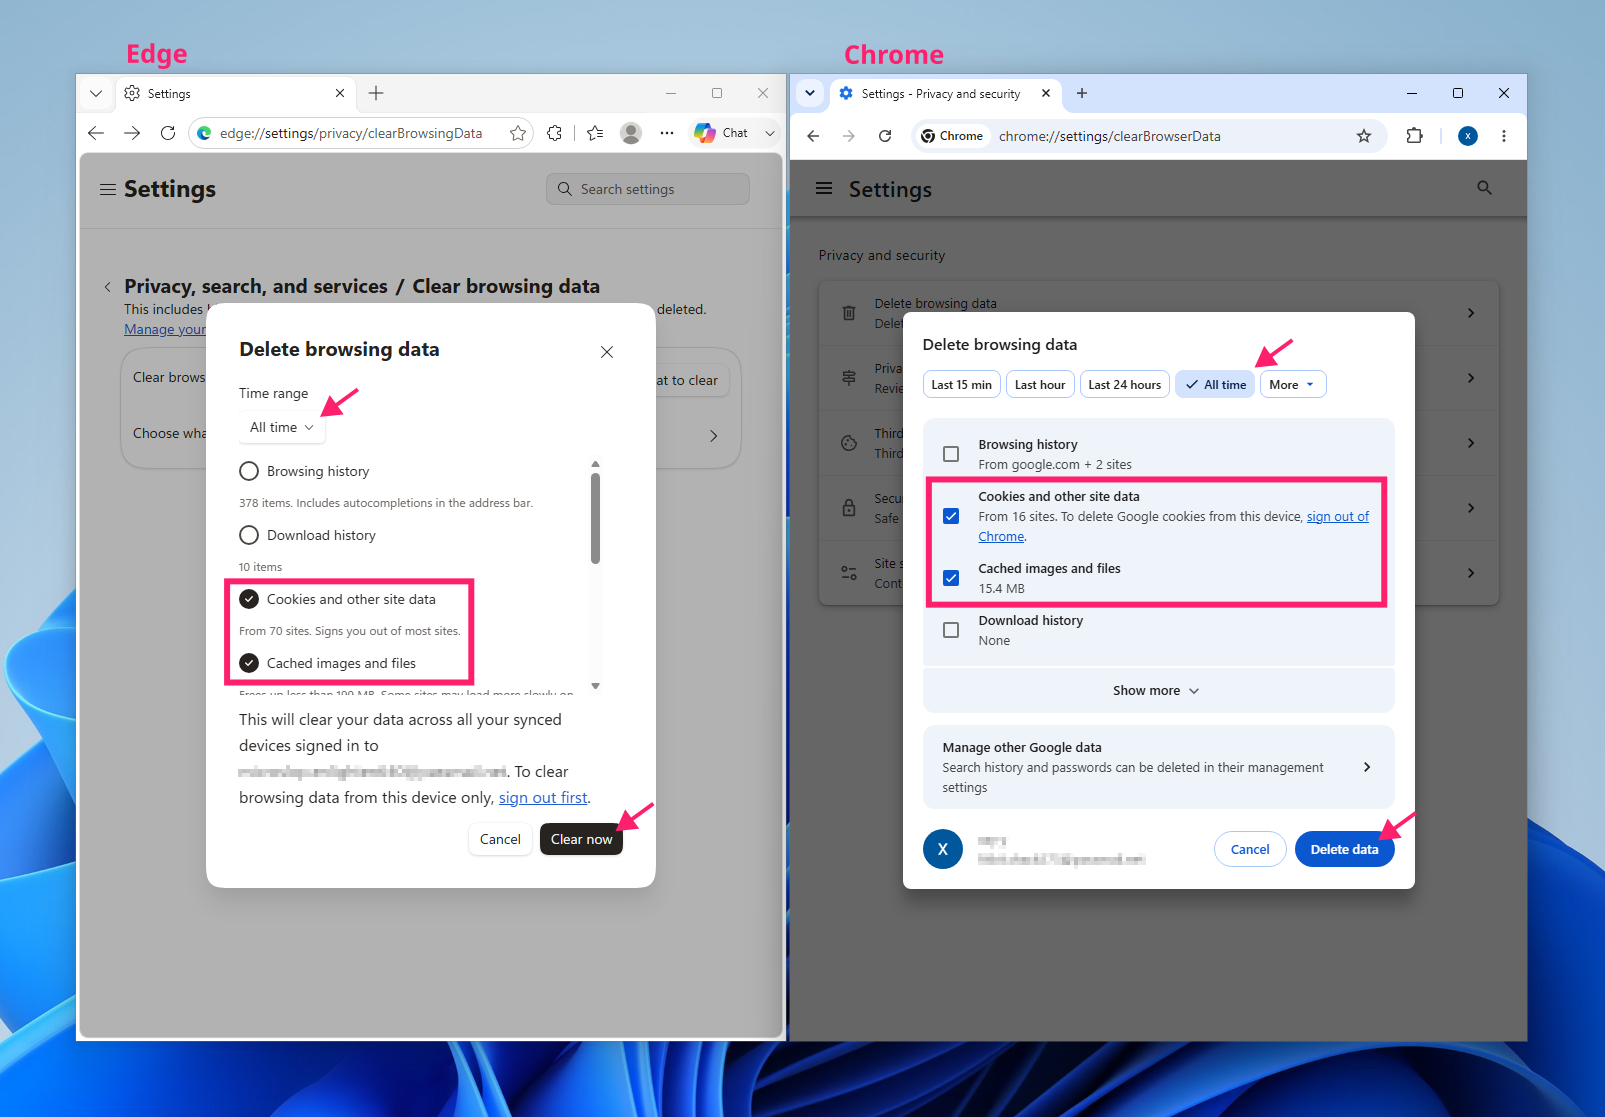
Keep in mind this signs you out of most sites and clears things like active shopping carts, since it invalidates session cookies along with the cache.
» Need help? Here’s how to clear cache in Edge
Step 5: Reset browser settings to default
Navigate to
edge://settings/resetorchrome://settings/reset
Select Reset settings to their default values, then Reset in the confirmation prompt
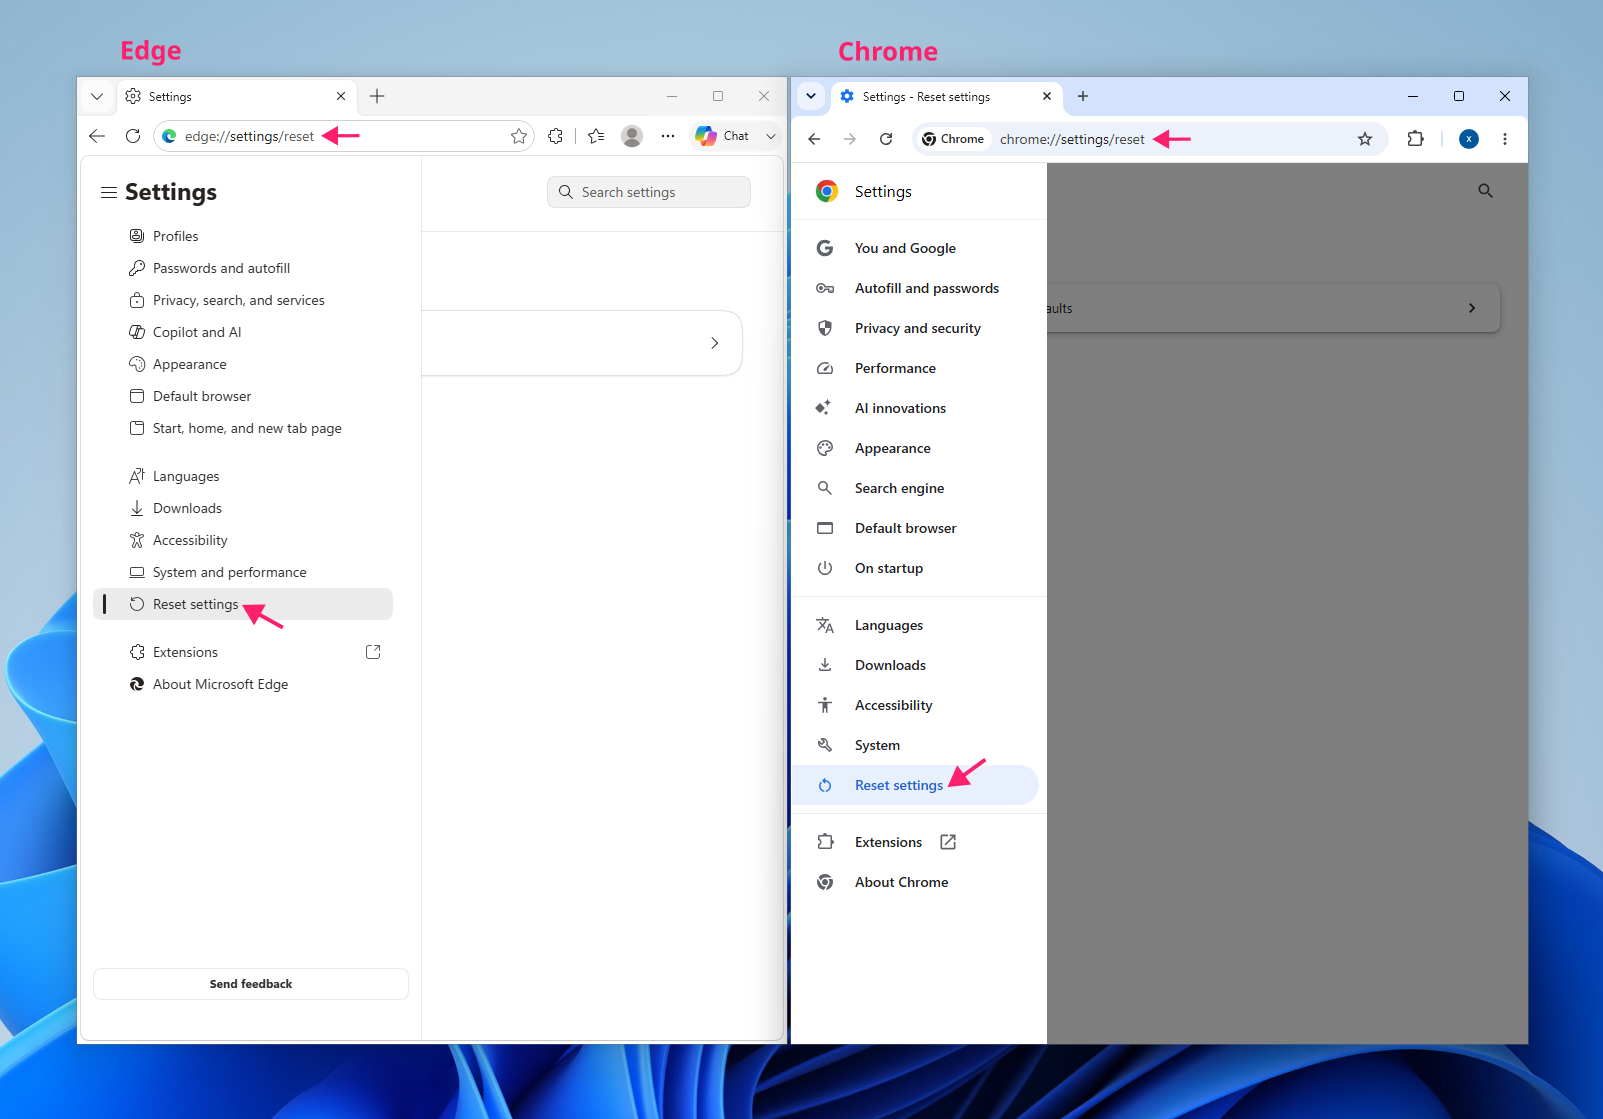
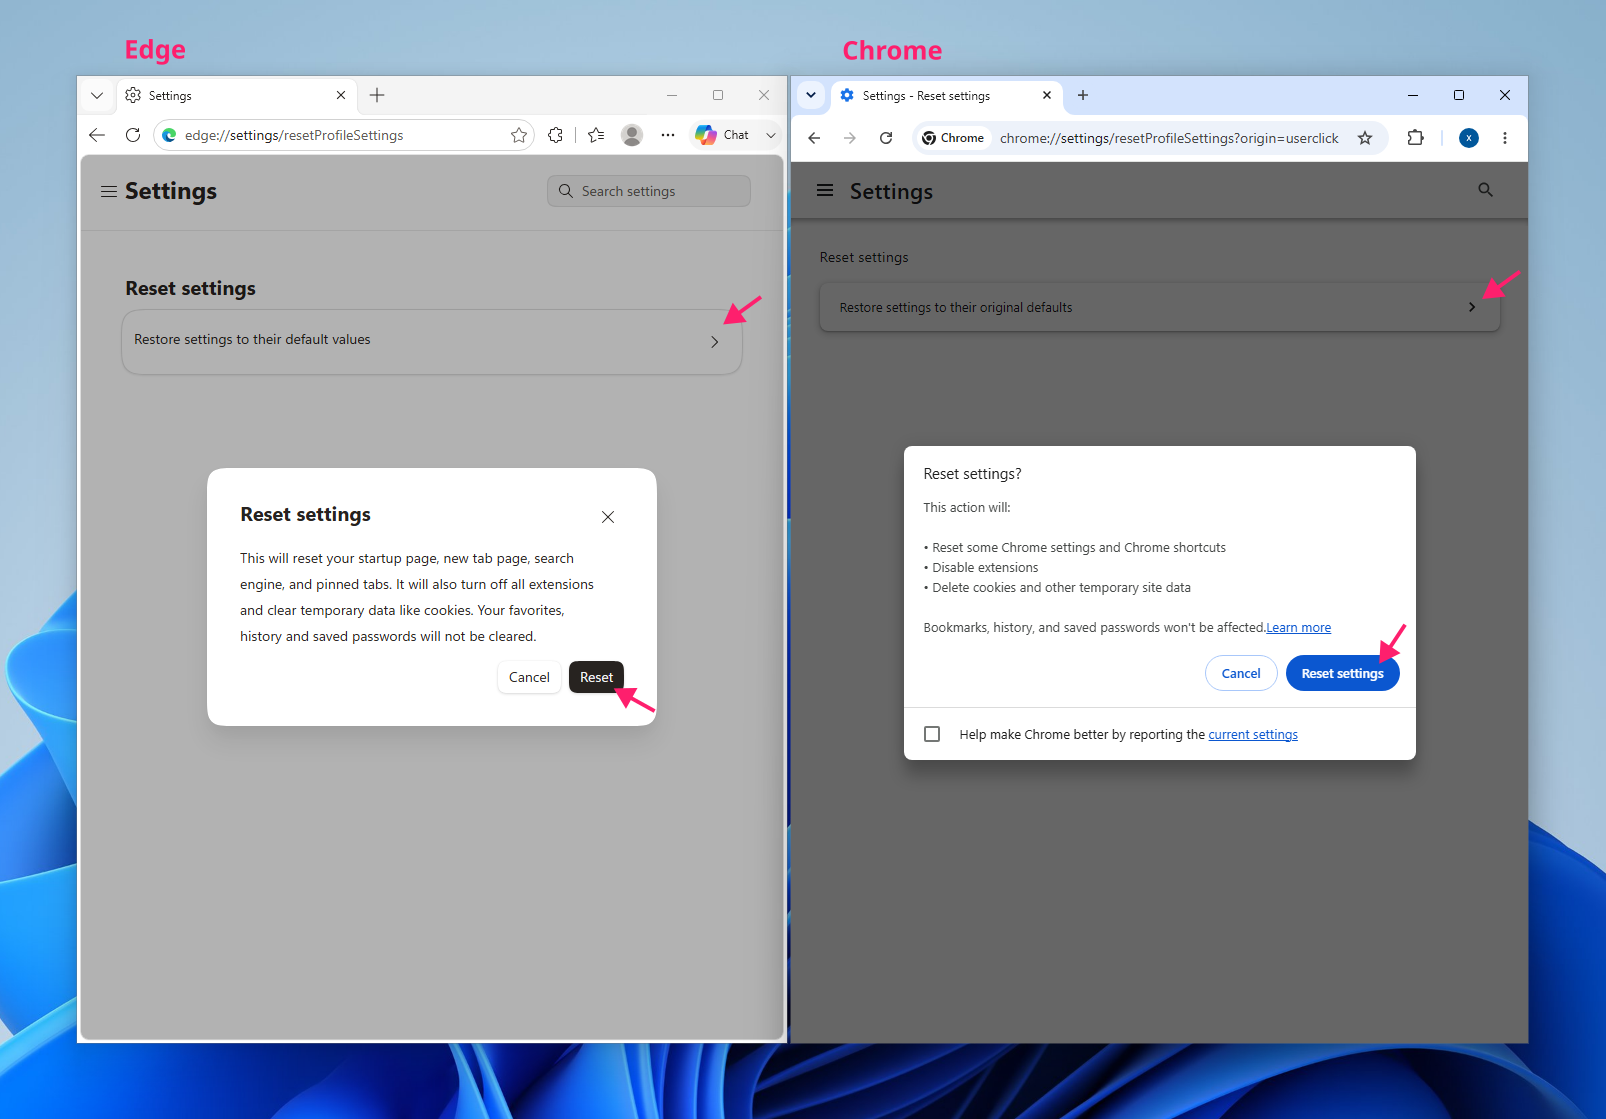
This isn’t a full factory reset, so you’ll stay stay signed in and your bookmarks, history, and saved passwords remain untouched. However, your startup page, new tab page, pinned tabs, and search engine all return to default, and installed extensions get disabled.
Step 6: Run a deeper anti-malware scan
A standard antivirus pass can miss PUPs specifically because many of them arrive through consented installation rather than a traditional malware delivery method, which means signature-based detection tuned for malicious code doesn’t always flag them the same way.
Catching these requires a scan mode built to look for unwanted-but-technically-permitted software, not just outright threats.
Open Windows Security

Select Virus & threat protection, then click Scan options

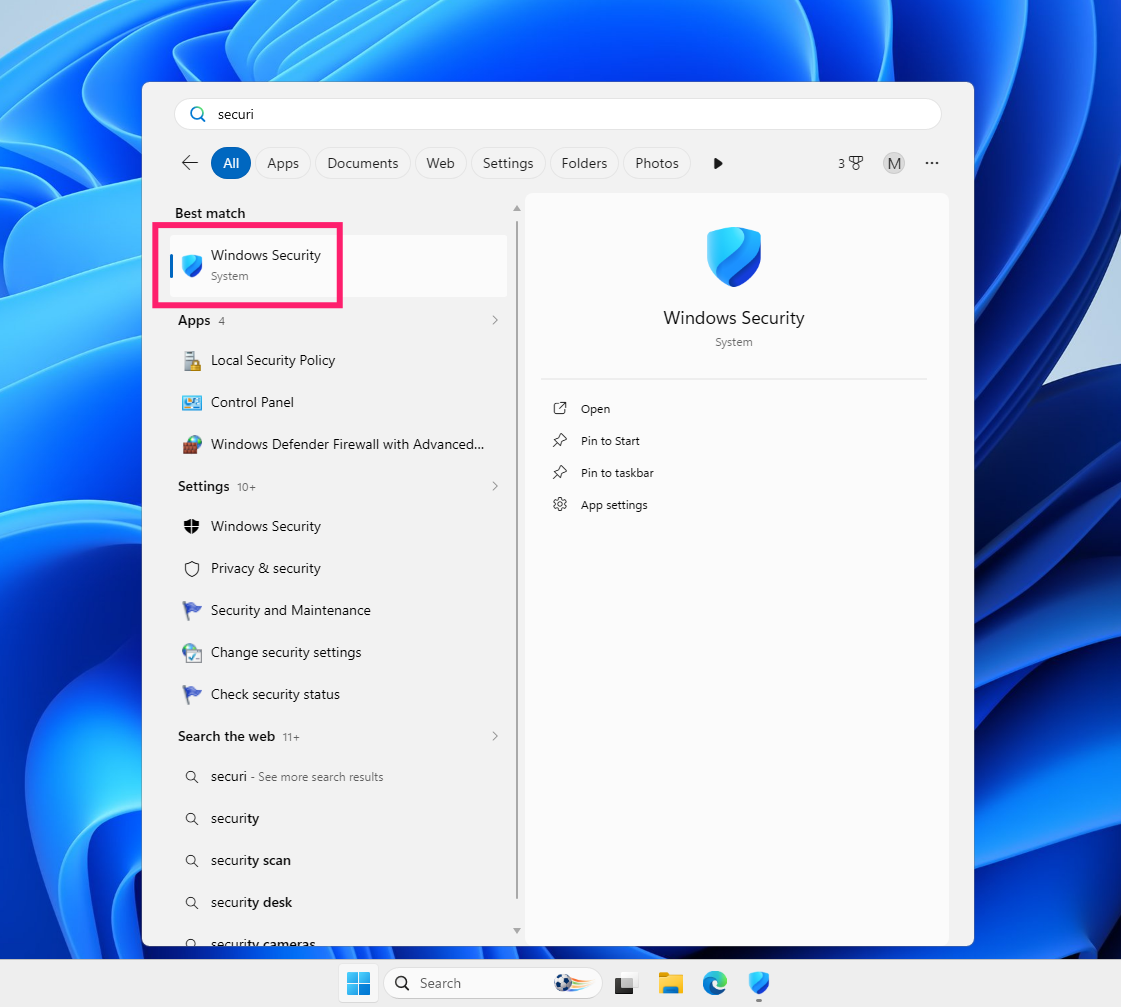
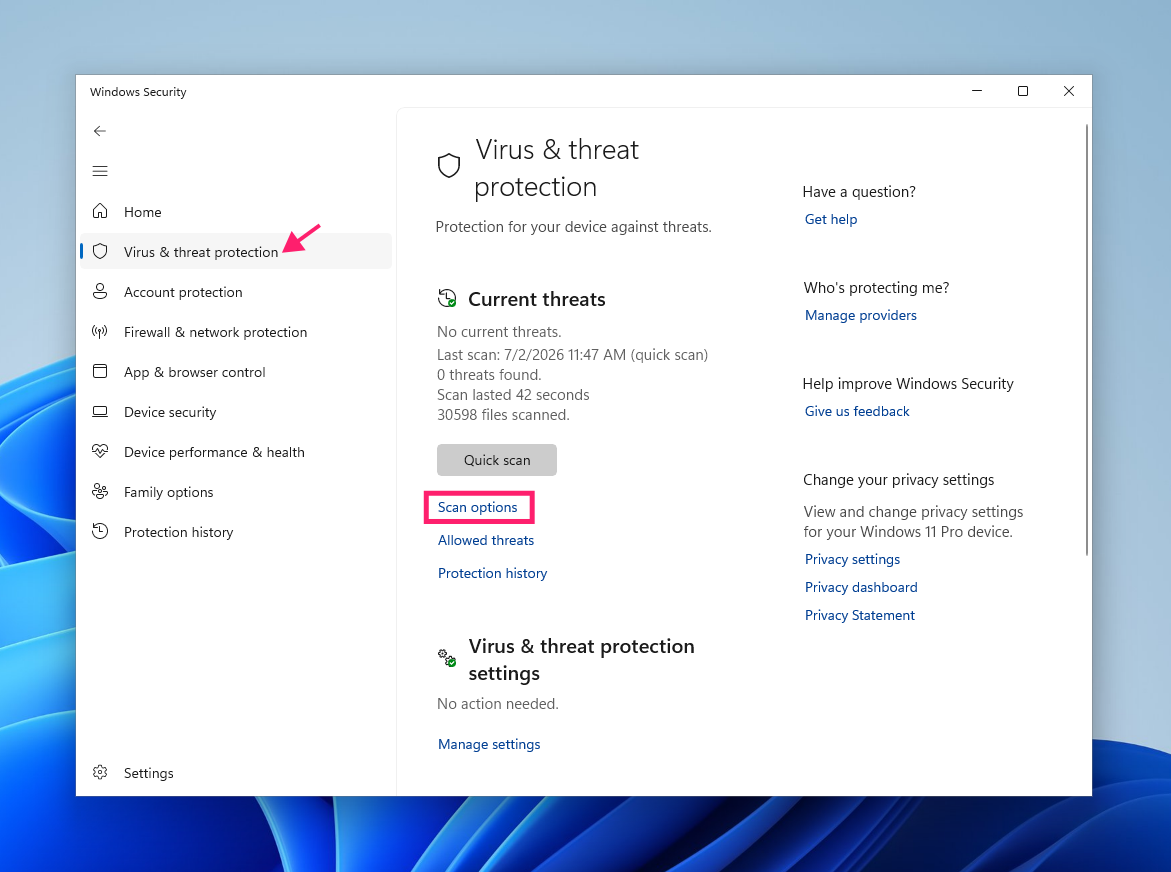
Select Microsoft Defender Antivirus (offline scan) and click Scan now.
For a second opinion, download the Microsoft Safety Scanner from Microsoft’s official site, run the executable, and start with a Quick scan before moving to a Full scan if the quick pass turns up anything.
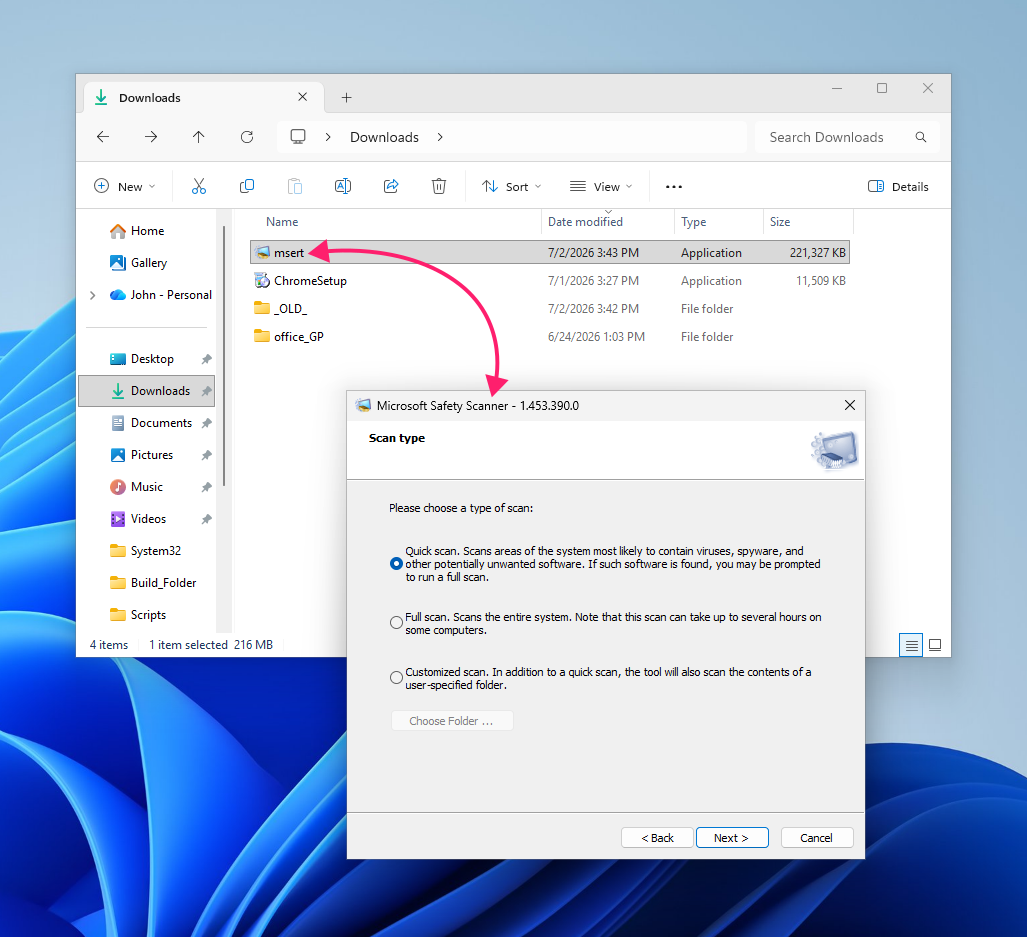
If the problem keeps happening and Microsoft tools turn up nothing, then third-party options like Malwarebytes might pick up something they’re missing.
» Got something you need to install? Here’s how to disable Windows Defender temporarily and completely exclude a folder
Step 7: Consider a full uninstall and reinstall
If the hijacked search engine or homepage comes back after a reset and fresh browser relaunch, the infection is sitting outside what the reset touches; either the user-data/profile directory or a system-level component. At that point, reset alone won’t hold, and a full reinstall is warranted:
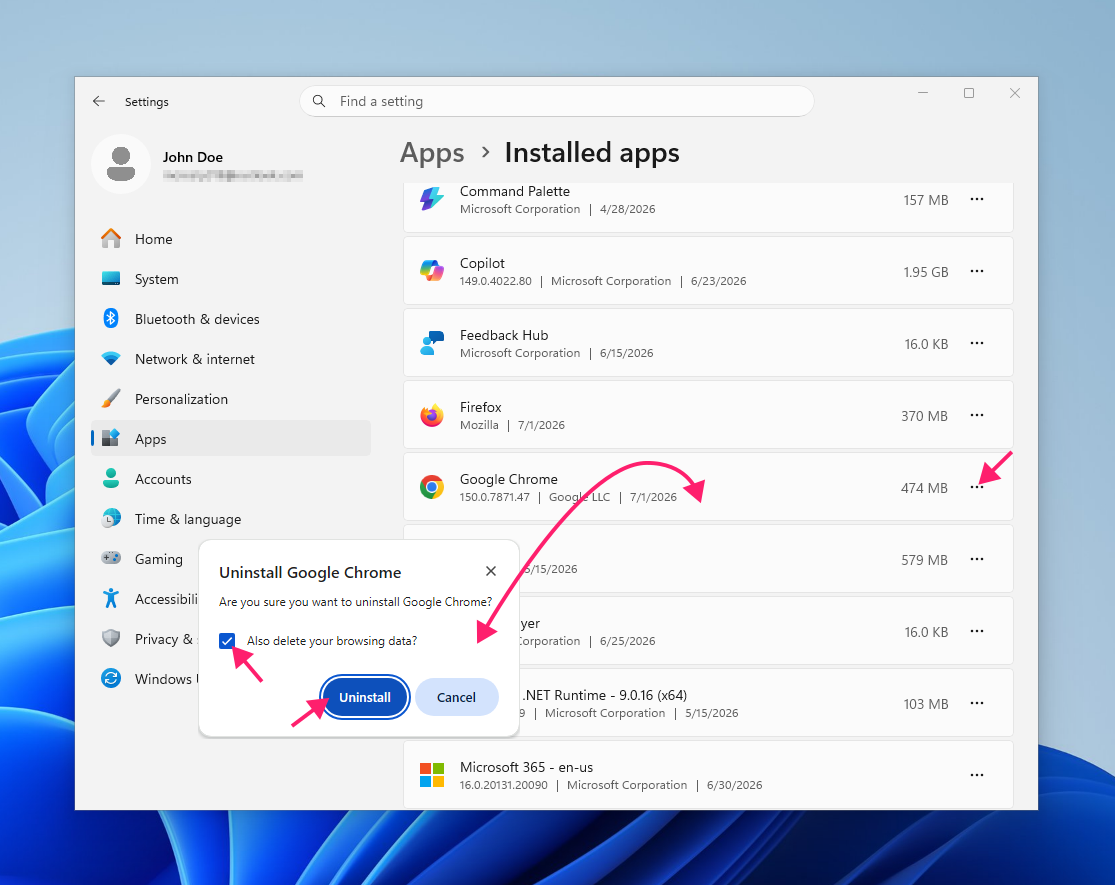
1. Press Win + I and go to Apps > Installed apps.
2. Find the browser, click the … menu next to it, check the box that says “Also delete your browsing data”, and select Uninstall
3. Delete the leftover profile folder if it wasn’t removed automatically:%LOCALAPPDATA%GoogleChromeUser Data for Chrome, %LOCALAPPDATA%MicrosoftEdgeUser Data for Edge
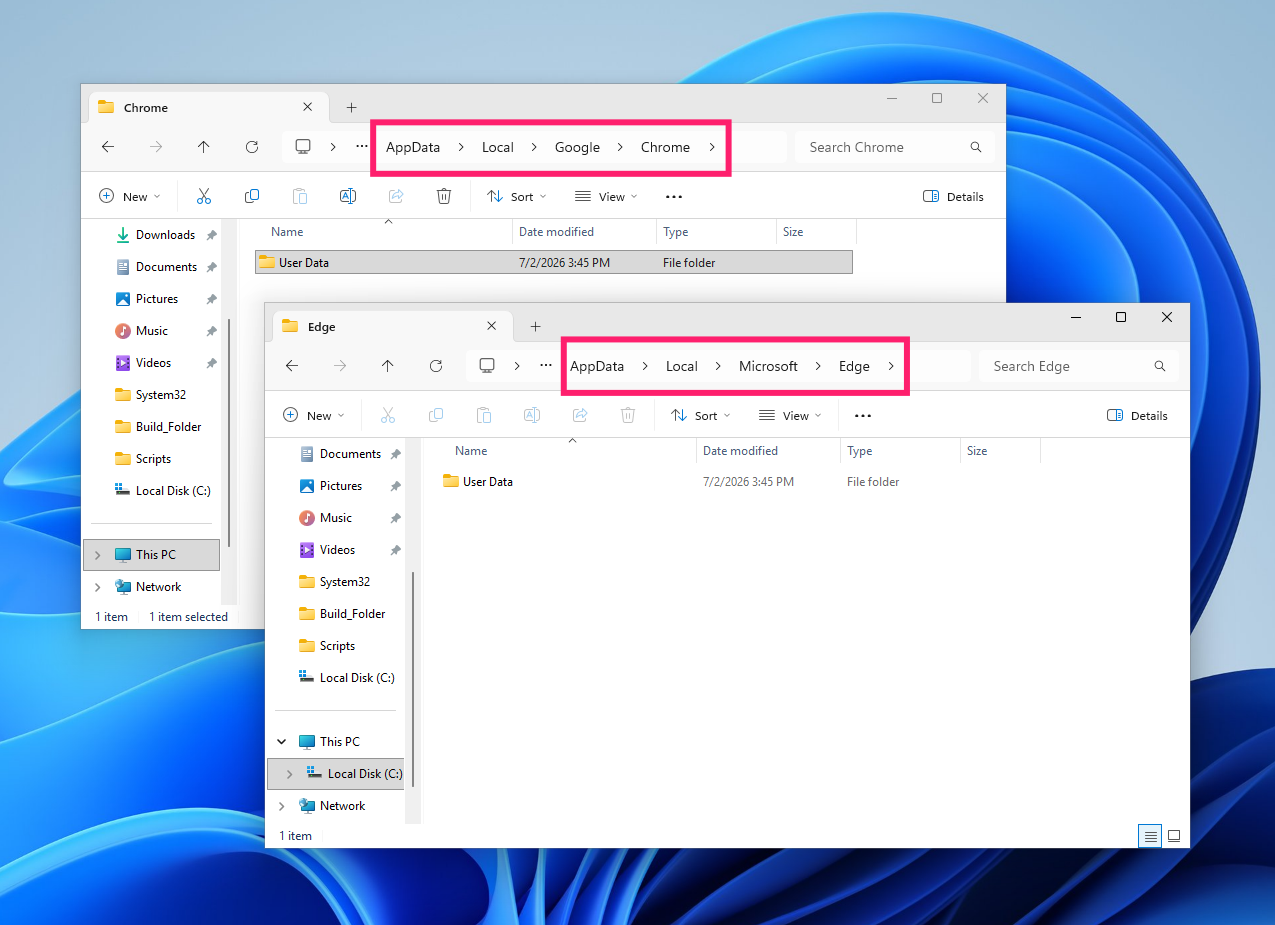
4. Reinstall the browser and sign in
Note: Microsoft Edge is a Windows system component and can’t be uninstalled the way third-party browsers can; if Edge itself keeps failing to hold a reset, the profile-folder deletion above is the closest equivalent to a clean slate.
Step 8: Secure your accounts once the hijacker is gone
Removal isn’t the last step. Session cookies can hold onto authentication tokens, so clearing browsing data invalidates any locally stored session tokens a hijacker’s script may have captured.Beyond that, change the passwords for any account you were actively logged into during the infection window and make sure all other and devices are removed. Start with email and financial accounts, since those carry the most risk if a token or credential was captured before cleanup.
Bonus step: The last resortIf it keeps happening after you’ve gone through all of these steps including the antivirus and malware scan, then there’s likely something living in the system that goes deeper than the installed browser. The only option you have here is to start from the beginning with a clean OS install.» Here are our guides to factory reset Windows 11and reinstall Windows 11
How to prevent it from happening again across your fleet
Everything in the previous section fixes one machine once. If you’re managing more than a handful of endpoints, the manual cleanup is a neverending queue that refills itself every time a user runs another bundled installer.Group Policy Objects (GPOs) let you close off the mechanisms that cause this at the fleet level, so the fix stops depending on catching every individual reinfection.Follow these steps:
Step 1: Block hijacker extensions from installing
Note: Both Edge and Chrome require the corresponding Administrative Templates before their policies show up in Group Policy. Download and install the Microsoft Edge Administrative Template and the Google Chrome Administrative Template from their respective official sources before continuing.1. Open the Local Group Policy Editor
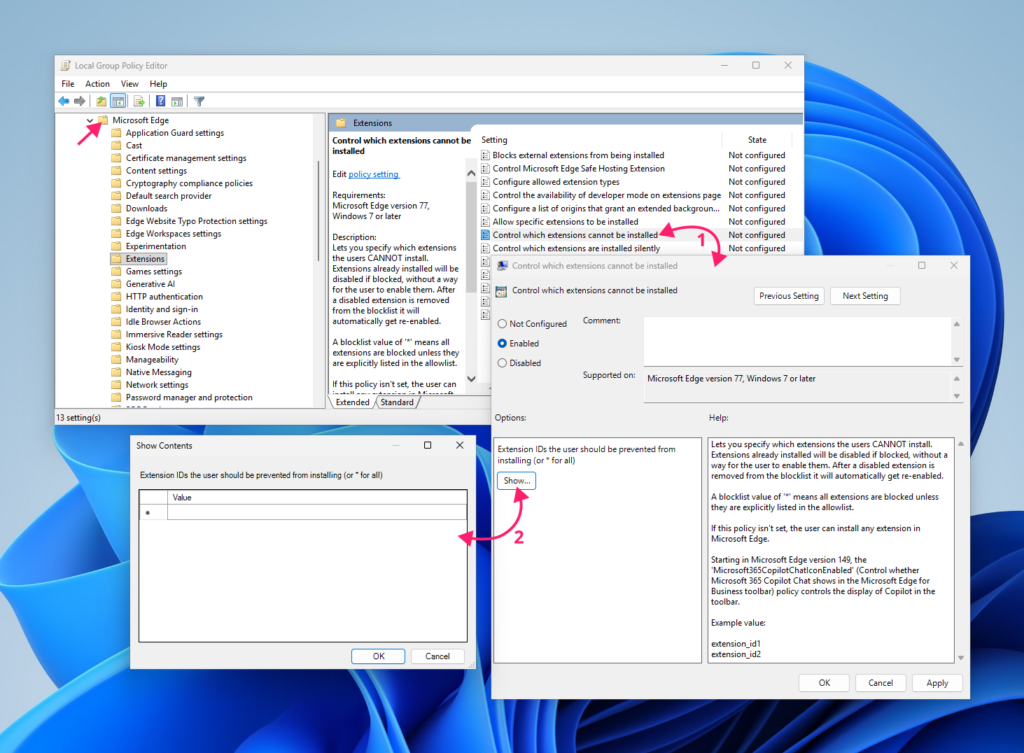
2. For Edge, navigate to Administrative Templates > Microsoft Edge > Extensions
3. For Chrome, navigate to Administrative Templates > Google > Google Chrome > Extensions)
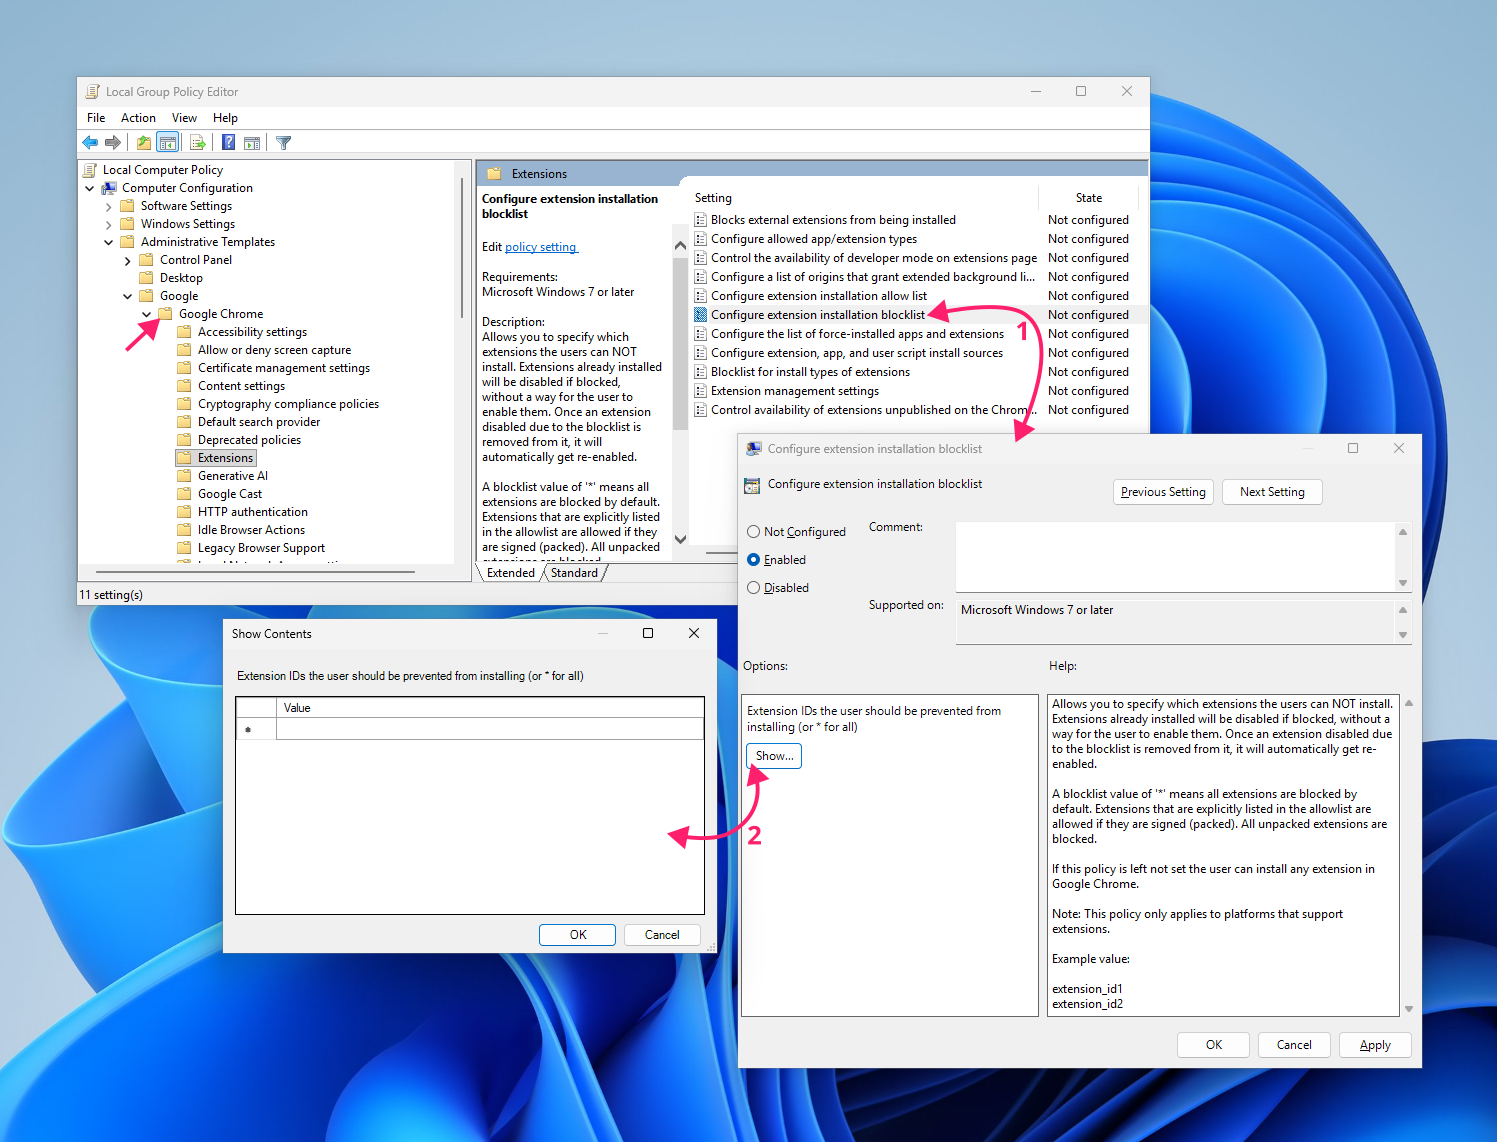
4. Enable Control which extensions cannot be installed (Chrome: Configure extension installation blocklist)
5. Add the specific extension IDs you want blocked, or set the value to * to block all extensions by default and maintain a separate allowlist for approved ones
Setting the blocklist to * is the safer default for most fleets because it means a new hijacker extension can’t install itself just because it hasn’t been individually identified yet.
Step 2: Lock the default search provider
- In the same Group Policy Editor, navigate to Administrative Templates > Microsoft Edge > Default search provider (Chrome: the equivalent Default search provider policy folder)
- Enable Enable the default search provider
Set Default search provider name and Default search provider URL to your organization’s approved search engine

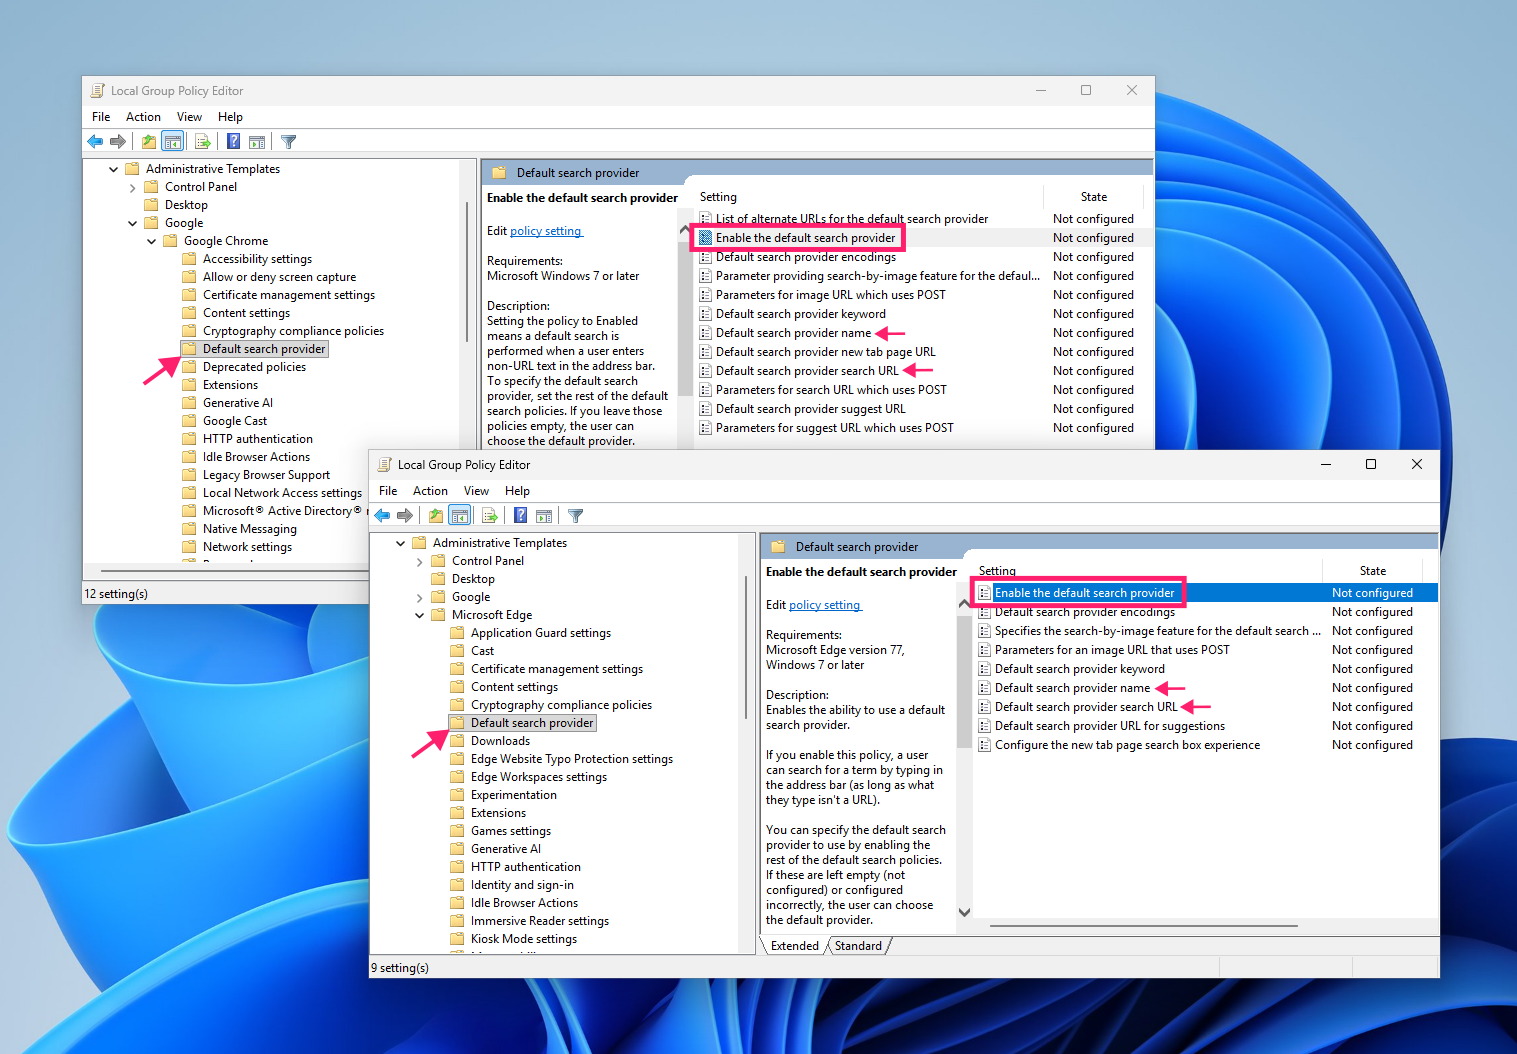
With this policy enabled, users can’t change the default search engine from within the browser at all, which means a hijacker has nothing to overwrite even if it makes it onto the device.
Step 3: Enable fleet-wide PUA detection
- Navigate to Administrative Templates > Windows Components > Microsoft Defender Antivirus
- Enable Configure detection for potentially unwanted applications
Set the mode to Audit Mode initially rather than Block

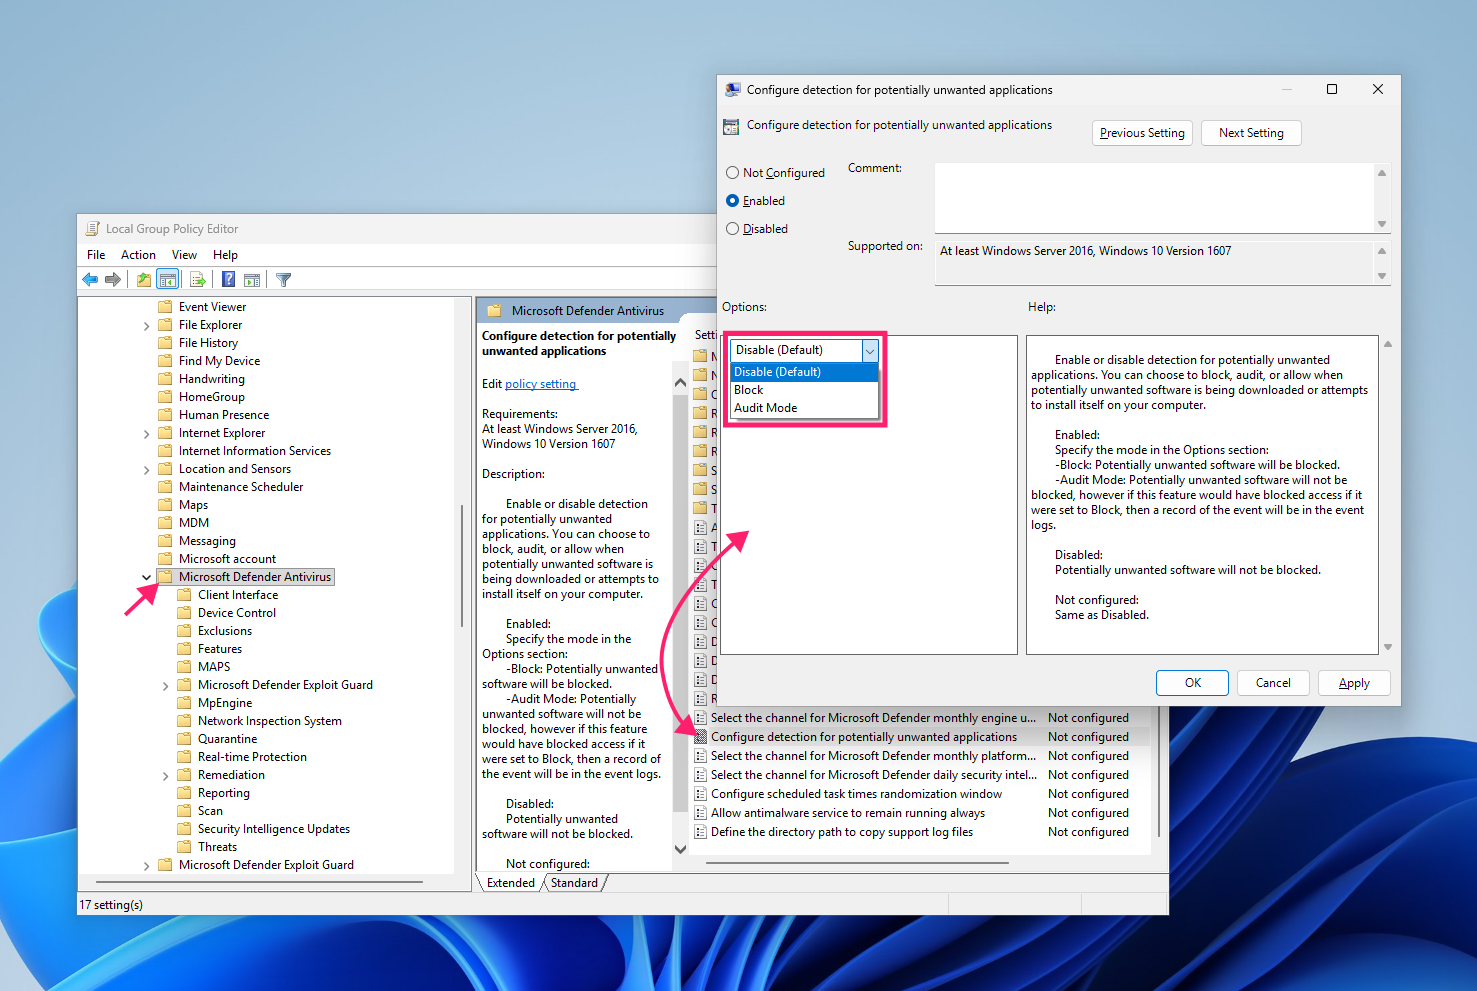
Audit mode logs detections without taking action, which gives you a window to confirm there aren’t false positives (like a legitimate line-of-business tool flagged as a PUA) before switching the policy to Block and enforcing it across the fleet.
» Learn how to simplify group policy management and configure group policies enterprise-wide with Atera
Getting your search engine to stay fixed
A single machine reverting to Yahoo is a five-minute annoyance. The same problem showing up across fifty endpoints because a bundled installer somehow got past onboarding whitelists is a much bigger problem where reset-and-hope stops being a viable strategy. Cleanup restores one browser to normal, but locking down the default search provider and blocking the extension IDs that keep causing this is what actually stops it from recurring.
For IT teams and MSPs managing that fleet-wide version of the problem for confused users, Atera’s automation profiles let you push the same search-provider lockdown and extension blocklist script across every device that needs it instead of walking through the same GPO settings machine by machine. Remote PowerShell execution through the RMM platform handles the ones that need something more tailored than a policy template. The manual fix stays exactly the same; what changes is doing it once in total instead of once per endpoint.
» You can try Atera without risk, payment free for 30 days
Related Articles

What AI data governance reveals about trustworthy AI agents
At a glance, it can be tough to tell the difference between trustworthy and convincing AI agents. Both project plenty of confidence, but only one can show where its information comes from and what it did with your data. Learn how AI data governance makes an important difference in your organization's AI implementations.
Read now
What is MoUsoCoreWorker.exe?
MoUsoCoreWorker.exe isn't malware, and it isn't broken just because it's using CPU. It's the process that actually executes Windows Update once policy decides what to install, when, and where. Here's what triggers it, how to tell normal activity from a genuinely stuck process, and how to verify it's the real thing.
Read now
The Bottleneck Isn’t the Tool. It’s the Operating Model
Beyond adopting AI, enterprises have to reach the absorption stage to find actual value in the technology. Instead of simply adding AI, teams have to develop a new operating model to allow AI to solve IT problems autonomously.
Read now
Enterprises Don’t Have an AI Problem. IT Has an Absorption Problem.
The path to absorption of enterprise AI technology often stalls in the adoption phase, where users might speed up some tasks incrementally. But organizations that move to the absorption stage can get real value from AI, rethinking their operating model to incorporate true autonomy that saves time and helps IT become proactive.
Read nowEndless IT possibilities
Boost your productivity with Atera’s intuitive, centralized all-in-one platform









