
Table of contents
Generate summary with AI

Get the prerequisites wrong when enabling Windows Subsystem for Linux, and you’re staring at error 0x80370102 with virtualization buried in a BIOS menu nobody labeled clearly. According to Stack Overflow’s 2025 Developer WSL was named by 16.8% of professional developers in Stack Overflow’s 2025 Developer Survey, making it one of the more common ways Windows machines run Linux tooling.
Whether you’re enabling it on a single workstation or pushing it across a fleet, the steps are exact and the order matters. Here’s every method that works, what to check before you start, and how to fix it when it doesn’t.
» Did you know you can dual boot Windows 11 and Linux?
What to check before enabling WSL
WSL 1 requires Windows 10 version 1607 (build 14393) or later. WSL 2 requires version 2004 (build 19041) or later, plus the Virtual Machine Platform feature, since it runs a real Linux kernel inside a lightweight VM.
- Confirm the Windows build by pressing Windows key + R, typing
winver, and pressing Enter
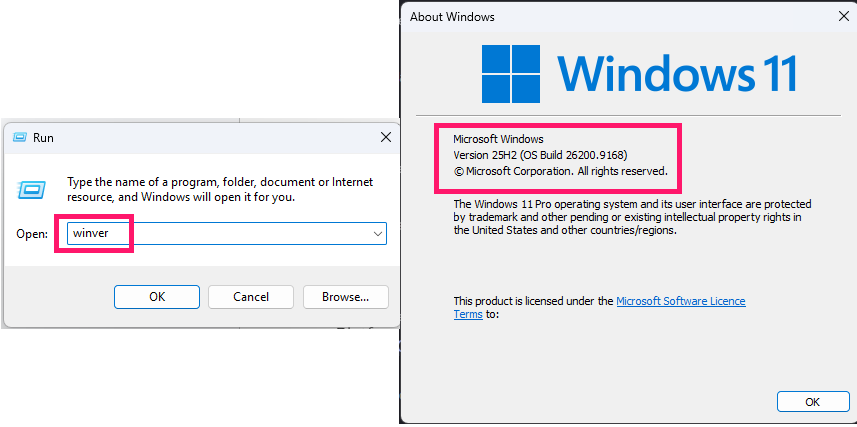
- Verify hardware virtualization (Intel VT-x, AMD-V, Microsoft Hyper-V) is enabled in BIOS/UEFI, checking via Task Manager’s Performance tab, where Virtualization should read Enabled
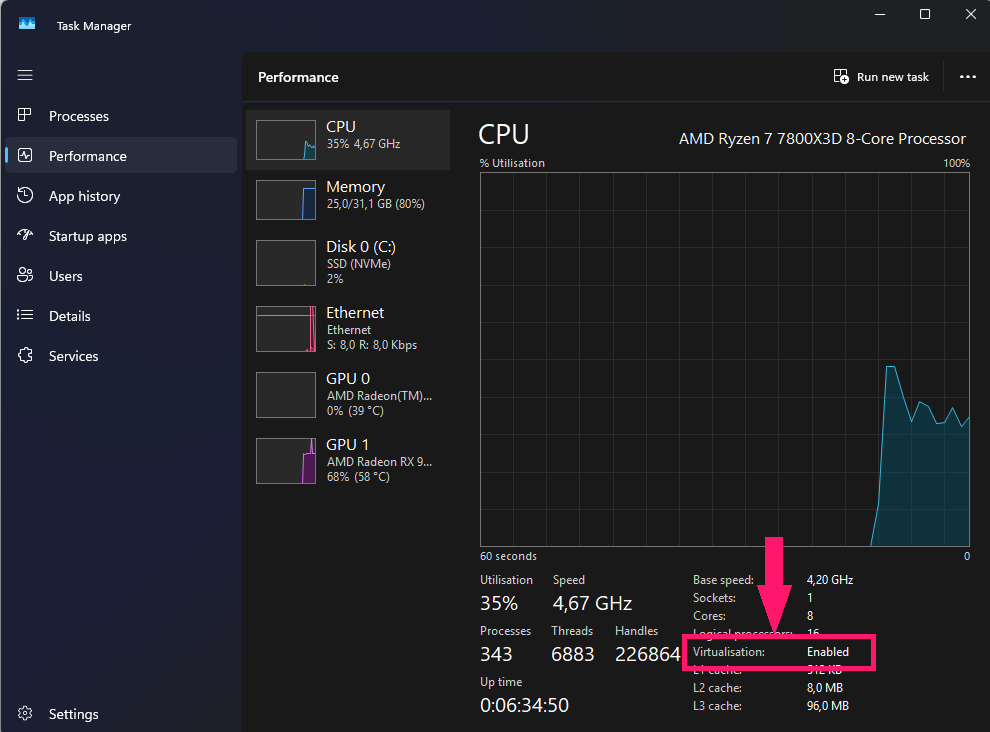
- Confirm Virtual Machine Platform is available before enabling WSL 2 specifically
WSL 1 vs. WSL 2: what changes upfront
The architecture difference determines which of the prerequisites above actually apply:
- WSL 1 translates Linux system calls directly into the Windows kernel, with no virtual machine involved, which is why it doesn’t need Virtual Machine Platform or BIOS-level virtualization
- WSL 2 runs a genuine Linux kernel inside a Hyper-V-based VM, which is what buys it full kernel compatibility, better I/O performance, and Docker support, but requires virtualization
For workloads that need full Linux kernel compatibility, WSL 2 is the right default. If a machine doesn’t meet WSL 2’s virtualization requirements, whether that’s a locked-down BIOS, older hardware, or a VM host that doesn’t expose nested virtualization, WSL 1 is still a viable fallback.
» Here’s how to enable and disable kernel mode
How to enable and disable WSL
Each of these methods gets you to the same end state, whether that’s WSL enabled or WSL disabled. Pick the option that best suits your environment.
Method 1: The “Turn Windows features on or off” GUI
Use this when you’re working on a single machine and don’t need to script or repeat the process.
- Open Control Panel > Programs > Turn Windows features on or off
- Select the Windows Subsystem for Linux checkbox
- If you’re enabling WSL 2, also select Virtual Machine Platform
- Click OK and allow Windows to install the required components
Restart the computer when prompted

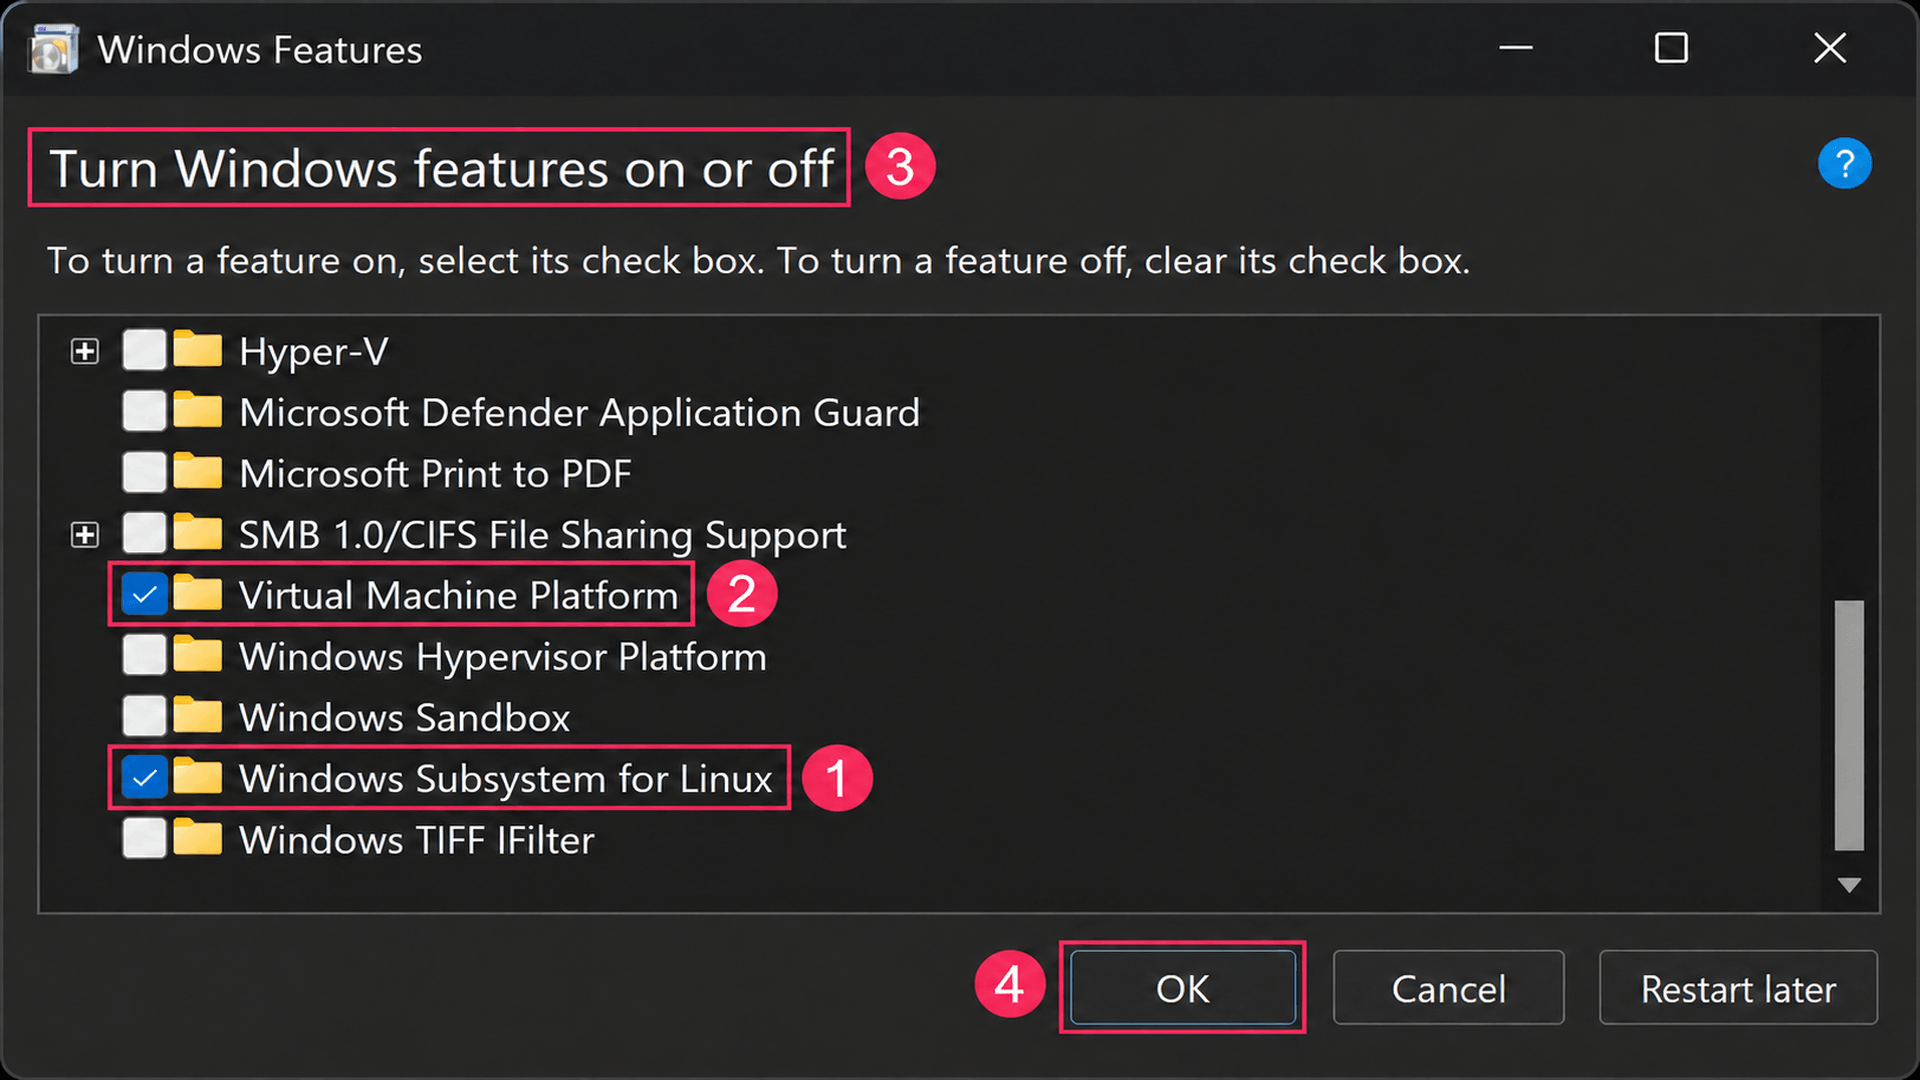
To disable WSL, return to the same dialog, clear the Windows Subsystem for Linux checkbox (and Virtual Machine Platform if it’s no longer needed), click OK, and restart. Clearing the checkboxes deactivates the Windows components WSL depends on; it doesn’t remove any installed Linux distributions or their data.
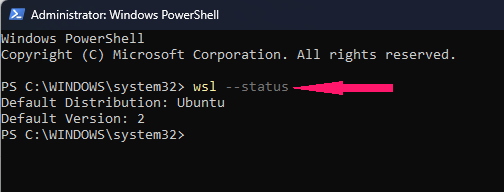
You can confirm the change took place by running wsl --status or wsl --list --verbose in PowerShell or Command Prompt.
Method 2: Command Prompt with dism.exe
Use this when you want a scriptable, command-line equivalent of the GUI toggle, particularly for repeatable one-off deployments.
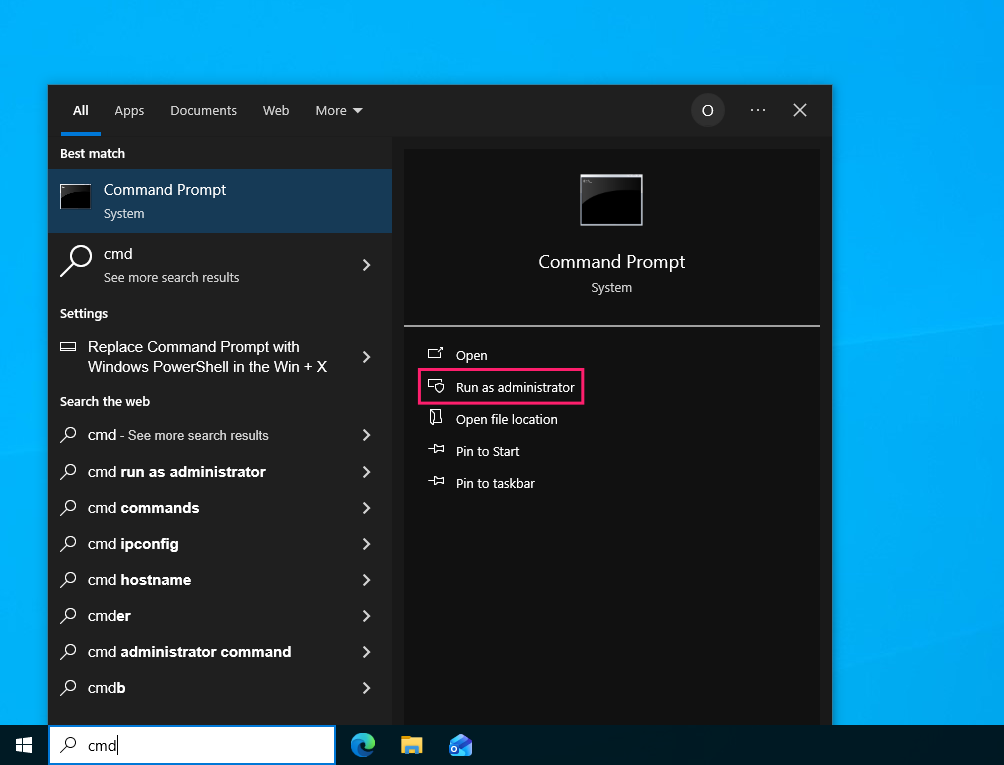
Open Command Prompt as an admin

- Run
dism.exe /online /enable-feature /featurename:Microsoft-Windows-Subsystem-Linux /all /norestart - If deploying WSL 2, also run
dism.exe /online /enable-feature /featurename:VirtualMachinePlatform /all /norestart - Restart the computer once both commands complete successfully
Verify with
wsl --statusorwsl --list --verboseTo disable, run
dism.exe /online /disable-feature /featurename:Microsoft-Windows-Subsystem-Linux /norestart, anddism.exe /online /disable-feature /featurename:VirtualMachinePlatform /norestartif WSL 2 is no longer needed
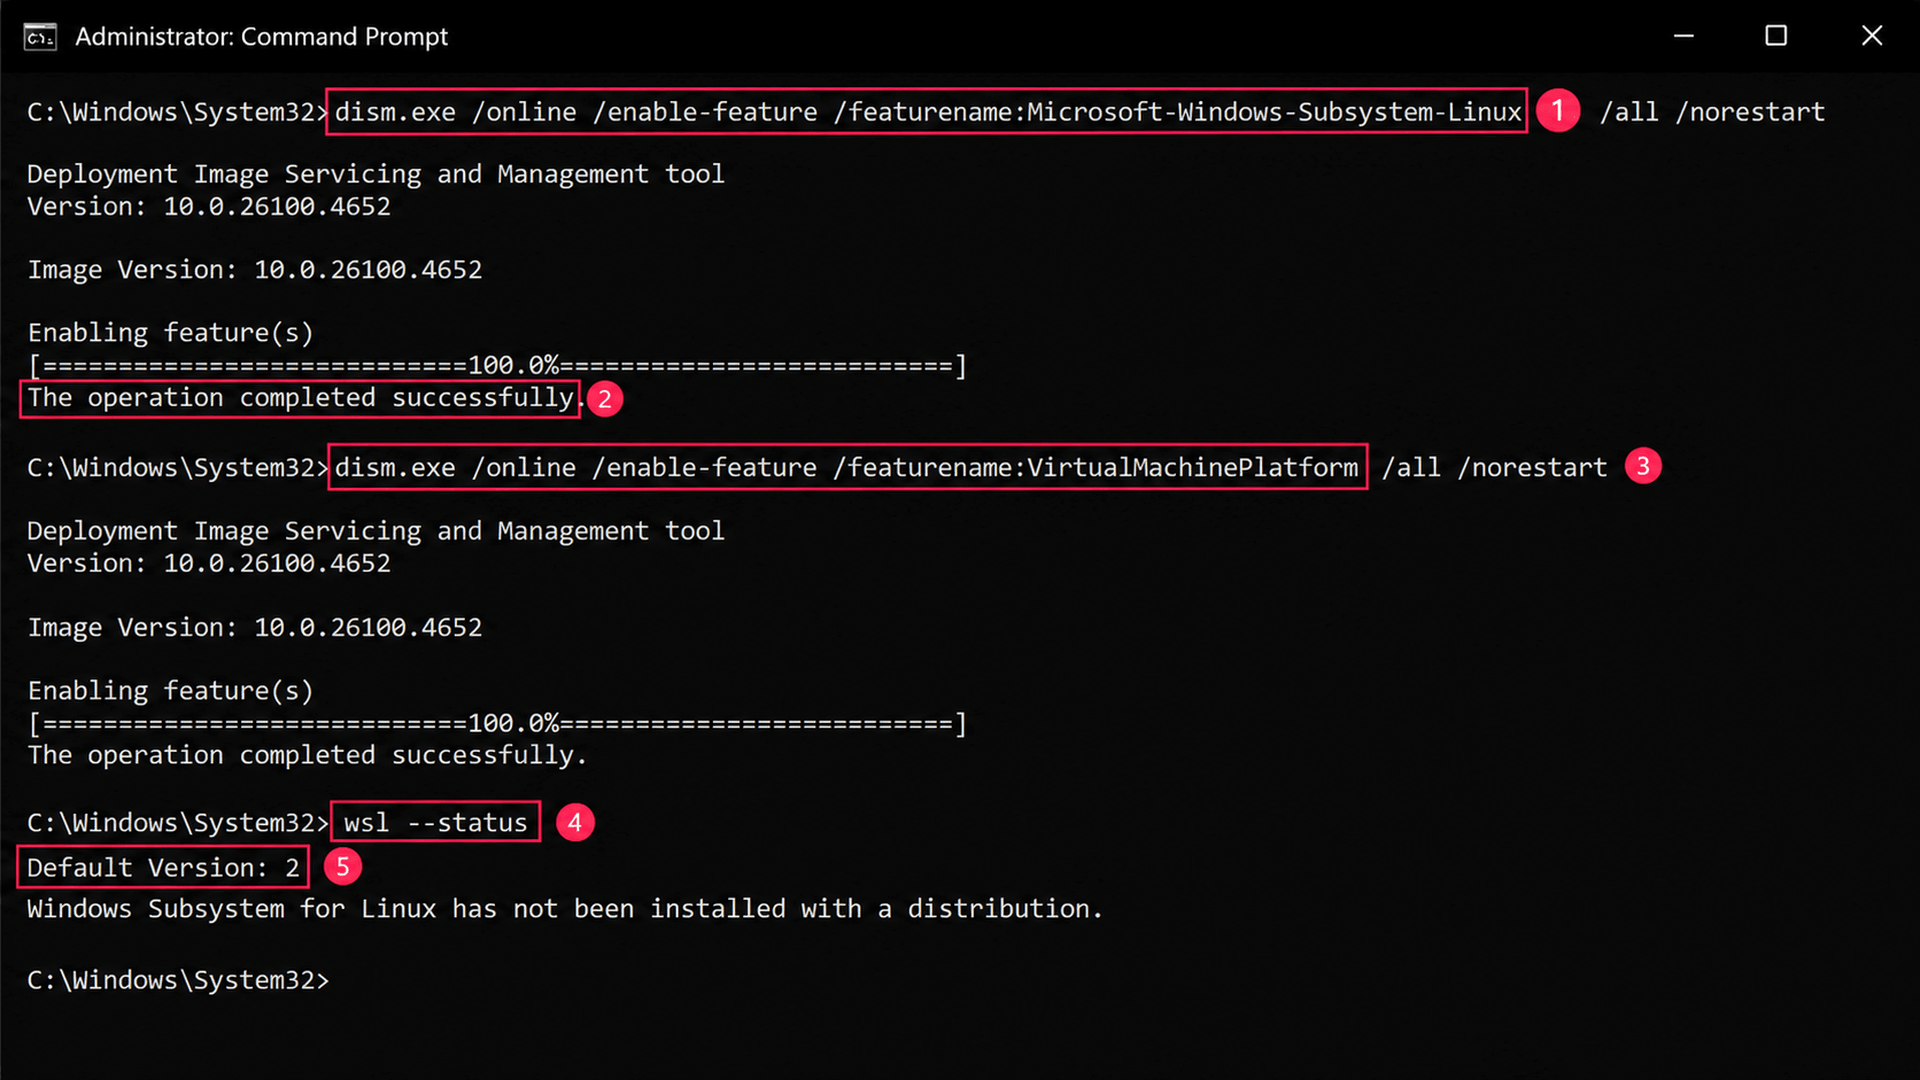
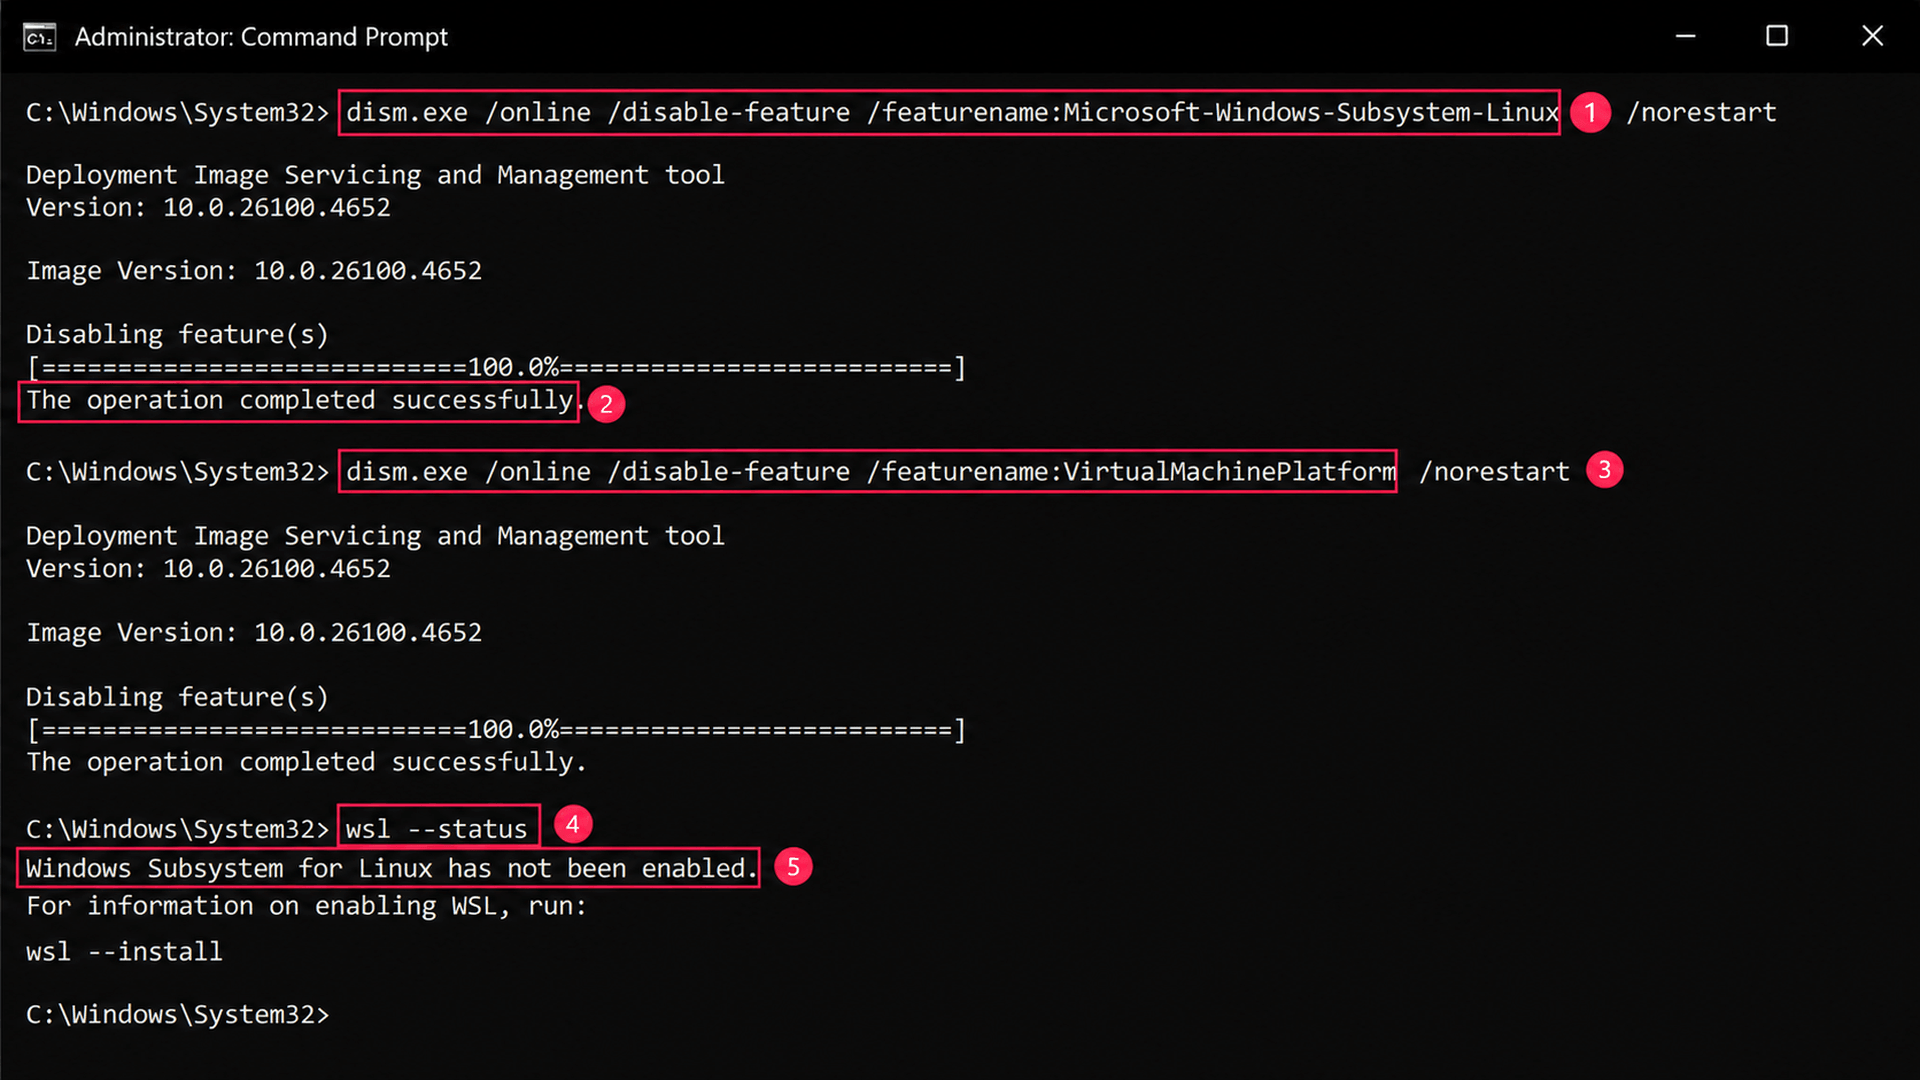
The /norestart flag lets you queue up both feature changes and reboot once, which matters more than it sounds like once you’re doing this across multiple machines. DISM disables the feature without touching installed distributions or their files.
» Learn more about using DISM correctly
Method 3: PowerShell cmdlets
Use this when DISM syntax feels clunkier than you’d like, or when you’re already scripting other administrative tasks in PowerShell and want WSL handled the same way.
- Open PowerShell as an admin
- Run
Enable-WindowsOptionalFeature -Online -FeatureName Microsoft-Windows-Subsystem-Linux -All -NoRestart - If preparing for WSL 2, also run
Enable-WindowsOptionalFeature -Online -FeatureName VirtualMachinePlatform -All -NoRestart - Restart the computer to complete installation
Verify with
Get-WindowsOptionalFeature -Online -FeatureName Microsoft-Windows-Subsystem-Linuxorwsl --status- To disable, run
Disable-WindowsOptionalFeature -Online -FeatureName Microsoft-Windows-Subsystem-Linux -NoRestart, and the equivalent command againstVirtualMachinePlatformif it’s no longer needed
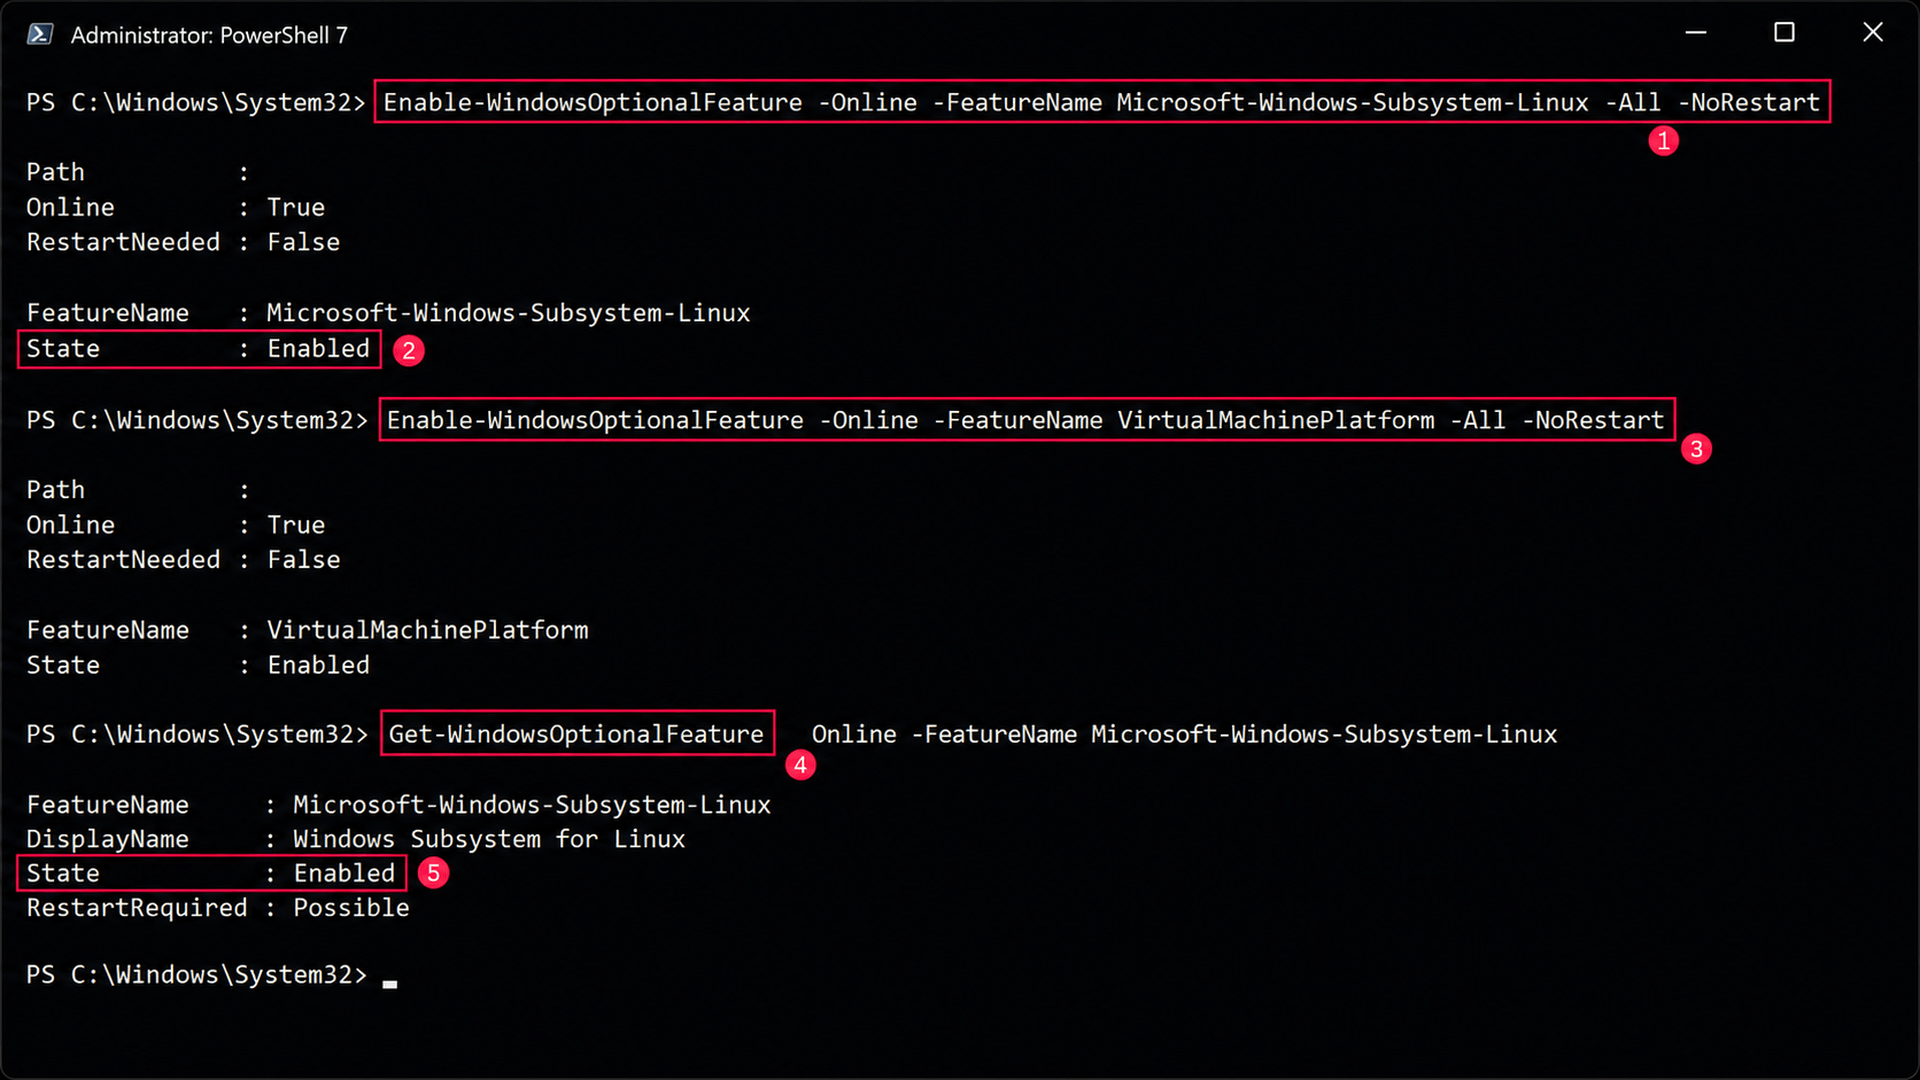
This cmdlet, like DISM, disables the feature while preserving installed distributions and their data, so re-enabling later doesn’t mean reinstalling anything.
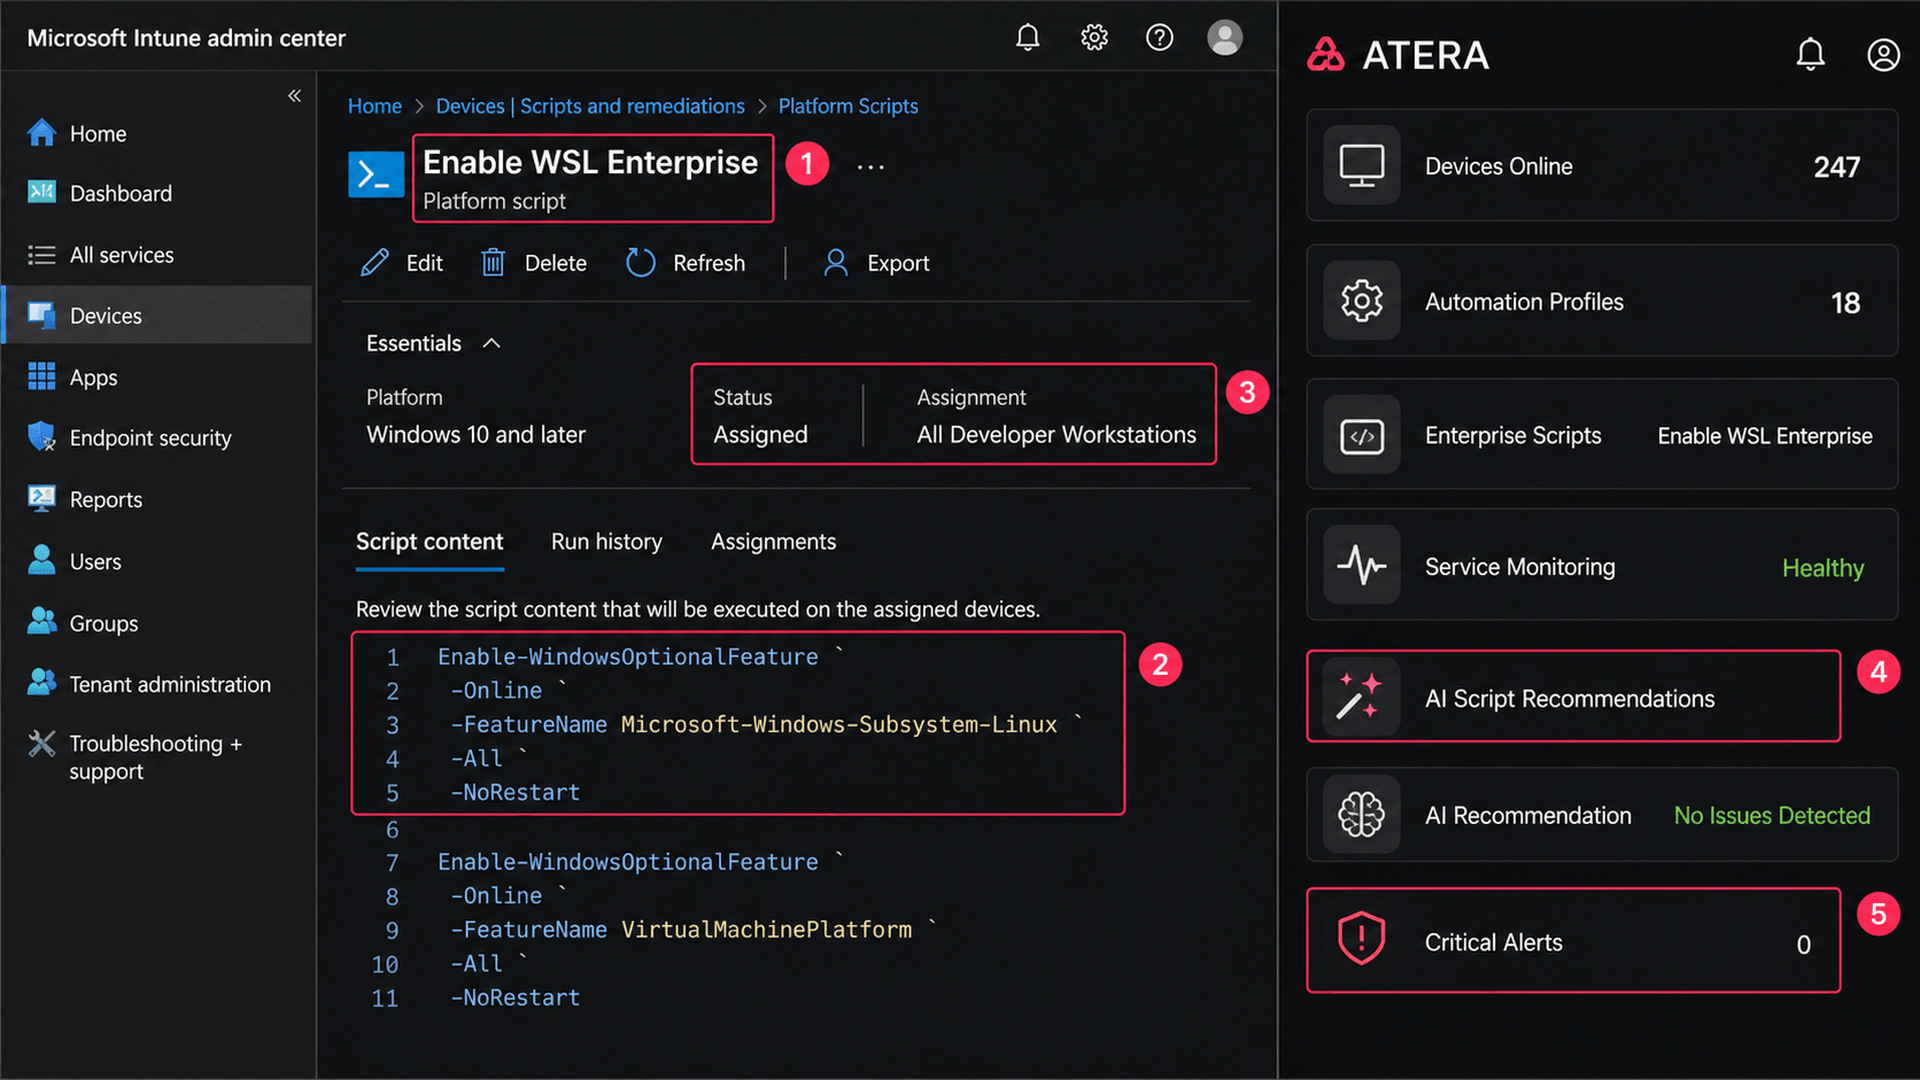
Pro tip: Atera’s AI Copilot can write PowerShell scripts like this for you, then you can deploy the script remotely to specific devices or device groups through the RMM platform.
Method 4: Fleet-scale deployment via Intune or Group Policy
Use this when you’re not enabling or disabling WSL on one machine but standardizing it across a fleet, and clicking through menus and checkboxes on each device isn’t a realistic option.
In Intune, deploy the same Enable-WindowsOptionalFeature or Disable-WindowsOptionalFeature commands from Method 3 as a PowerShell script or remediation package targeted at the device groups that need it. In Active Directory environments, Group Policy handles the supporting security settings and can deploy startup or scheduled scripts for the same purpose. After deployment, confirm success the same way you would locally, with Get-WindowsOptionalFeature or wsl --status, just run against the fleet rather than one machine at a time.
» Learn how to simplify group policy management with Atera
Troubleshooting and long-term management
Most WSL problems fall into one of two categories: something blocked the initial enablement, or something is actively running that’s blocking a clean disable. Here’s how to work through both.
Resolving error 0x80370102
This error means the virtualization support WSL 2 needs isn’t available, almost always because hardware virtualization is disabled or inaccessible at the BIOS level.
- Check hardware virtualization in the system BIOS or UEFI firmware, confirming Intel VT-x or AMD-V is set to Enabled
- Confirm Virtual Machine Platform and Windows Subsystem for Linux are installed by running
Get-WindowsOptionalFeatureordism.exe - Restart the workstation
- Verify virtualization is active in Task Manager > Performance > CPU, where Virtualization should read Enabled
- Run
wsl --statusto confirm WSL initializes before installing or launching a distribution
This sequence isolates the problem to either firmware, Windows feature installation, or configuration in order.
» Don’t miss our guide to firmware updates
Fixing a disable that hangs or fails
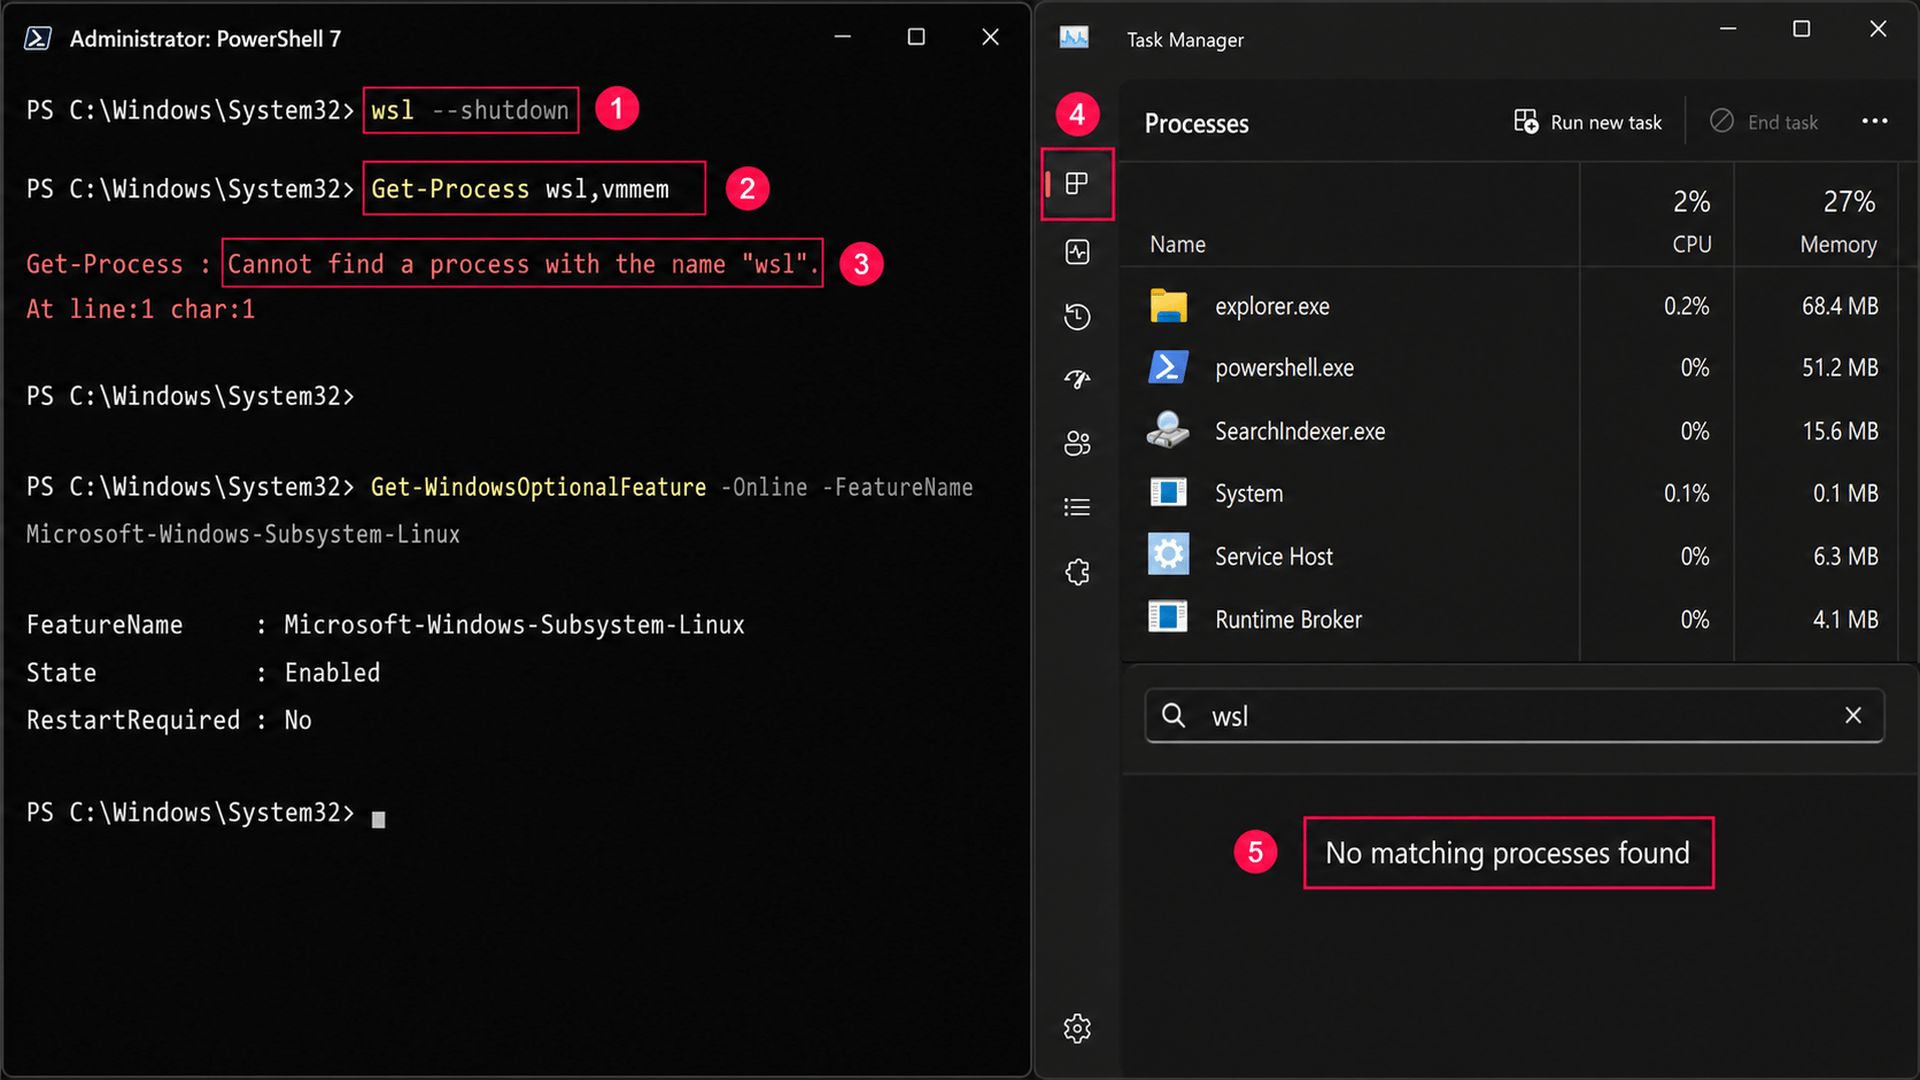
If disabling WSL hangs or fails outright, it’s usually because a Linux distribution is still running in the background or a system file is locked.
- Run
wsl --shutdownfrom an elevated PowerShell or Command Prompt session to terminate all active WSL instances - Confirm no
wsl.exe,vmmem, or related processes remain, using Task Manager orGet-Process - Rerun the
Disable-WindowsOptionalFeaturecommand Restart the workstation if prompted
If the disable operation still fails after this, check Event Viewer and CBS logs for file locks or servicing errors before attempting it again, ideally during a maintenance window rather than mid-workday.
» Want to uninstall instead? Don’t miss our guide to uninstalling a WSL distro in Windows 11
Stop troubleshooting WSL one machine at a time
Enabling WSL on one machine is a five-minute job. Enabling it consistently across two hundred, catching the ones still stuck on WSL 1, and fixing the ones failing on 0x80370102 without touching every keyboard by hand is a different problem entirely. That’s the gap between the steps in this guide and the reality of managing them at scale.
Atera’s remote scripting lets you push the same Enable-WindowsOptionalFeature or dism.exe commands across selected devices or device groups on demand, without waiting on someone to manually work through the checklist machine by machine. Pair that with the RMM platform’s alerting, and version drift stops being something you discover during a support call and starts being something you catch before a user ever notices.
Related Articles

How to set Windows environment variables in PowerShell
PowerShell environment variables can be set at the Process, User, or Machine level, with each scope serving a different purpose. This blog covers how to configure these variables and deploy system-level settings across multiple Windows devices.
Read now
How to install AppImage on Linux
An AppImage that won't launch usually isn't broken. It's missing FUSE, sitting on the wrong filesystem, or lacking its execute bit. Here's every method for running one on Linux, from a single terminal command to pushing it across an entire fleet.
Read now
How to remove write protection from a USB
A drive gone read-only isn't always a two-minute registry fix. Sometimes it's flash memory quietly failing, and every write attempt afterward costs you more of the data you're trying to save. Here's how to tell which one you're dealing with and what to do once you know.
Read now
How to start mysql server on windows
MySQL doesn't fail loudly on Windows. It just doesn't start, and the reason is buried in a locked port, a missing permission, or a my.ini path pointing nowhere. Five methods will get the service running again, but only if you know which one to reach for and what to check when it stalls.
Read nowEndless IT possibilities
Boost your productivity with Atera’s intuitive, centralized all-in-one platform









