
Generate summary with AI

Every Windows 11 install ships with a power plan more aggressive than anything in the default menu, and Microsoft only shows it out of the box on Pro for Workstations. Everywhere else, it’s buried until you go looking for it with a command that unlocks the Ultimate Performance power plan in Windows 11. It’s a deliberate choice because Ultimate Performance strips out the power-saving transitions that cause micro-latencies, which is exactly what you want on a rendering box or a VM host, and exactly what you don’t want on hardware that wasn’t built to run at full tilt around the clock.
Turning it on is a one-line command. Knowing when it’s actually the right call, and how to walk it back cleanly if it isn’t, is the part most guides skip. Here’s everything you need to know.
What the Ultimate Performance plan actually is (and why Microsoft hides it)
Ultimate Performance debuted as a Windows 10 Pro for Workstations exclusive, built on top of the standard High Performance scheme. The difference is aggression. Windows normally throttles CPU states, parks idle cores, and delays waking hardware back up to save power.
Ultimate Performance strips most of that out. The tradeoff is less power management, which means more consistent responsiveness but also higher power draw. It’s aimed at machines doing sustained, latency-sensitive work such as:
- Rendering
- Compiling
- Heavy I/O
- Virtualization hosts
- Anything where a few milliseconds of wake-up lag actually costs something
Why it’s hidden by default
Windows 11 defaults to Balanced, which scales performance and power dynamically based on workload. Microsoft doesn’t publish a detailed technical explanation for why Ultimate Performance stays hidden on standard consumer devices, but the plan isn’t available on battery-powered systems at all.
That’s a default posture rather than a hard block: the same unhide command in Step 1 works on a laptop too, Microsoft just doesn’t surface or recommend it there because the tradeoffs below apply even more on battery power.
It’s most likely because running it on unsuitable systems can lead to:
- Faster component wear: Constant high-amperage discharge combined with elevated heat accelerates chemical aging in the battery, leading to capacity loss and, in worse cases, swelling or failure. Sustained higher power and thermal conditions also push other components past what they were designed to handle long-term.
- Thermal throttling: Consumer laptops and desktops generally aren’t engineered for workstation-grade sustained loads. Push them there and the cooling system can’t keep up, which ironically tanks the performance you were trying to gain.
At the kernel level, Microsoft hasn’t published the exact settings or registry differences between High Performance and Ultimate Performance. But you can assume that the CPU idle states are minimized and core parking is disabled, which is what eliminates the micro-latencies caused by the CPU transitioning in and out of power-saving states.
» Here’s how to enable and disable kernel mode
Step-by-step guide to enabling and deploying it
Every step below requires administrator privileges on the target machine. The GUID (e9a42b02-d5df-448d-aa00-03f14749eb61) is Microsoft’s official identifier for the Ultimate Performance plan and is used throughout.
Step 1: Unhide the plan
Since Ultimate Performance ships hidden on every Windows 11 edition except Pro for Workstations, this step is required first regardless of which machine you’re working on.
- Open an elevated Command Prompt or PowerShell window
Run
powercfg -duplicatescheme e9a42b02-d5df-448d-aa00-03f14749eb61
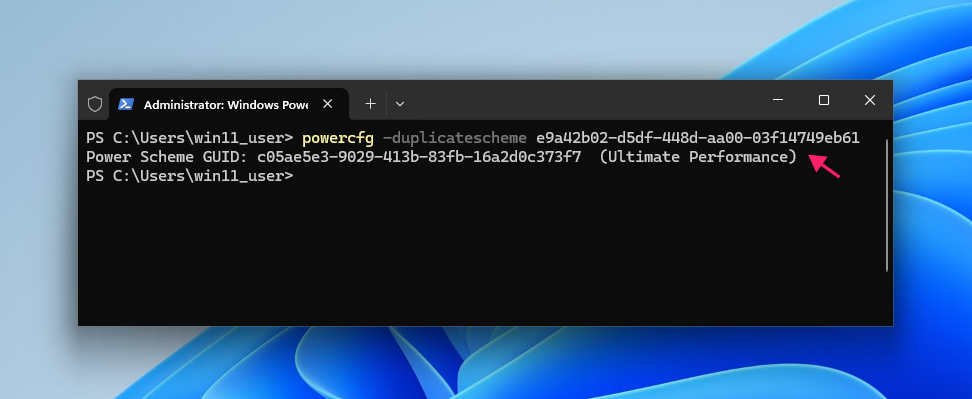
The command returns a new Power Scheme GUID confirming the plan has been added to your list. Note this GUID if you plan to activate the plan from the command line in the next step rather than through Control Panel.
» Did you know you can set a program to always run as admin?
Step 2: Activate it on a single machine
Unhiding the plan doesn’t make it active. Use whichever of these two fits how you’re already working.
Command line
Run powercfg -setactive <GUID>, using the GUID returned in Step 1.
Control Panel
Press Win + R, type
powercfg.cpl, and press Enter to open Power Options directly
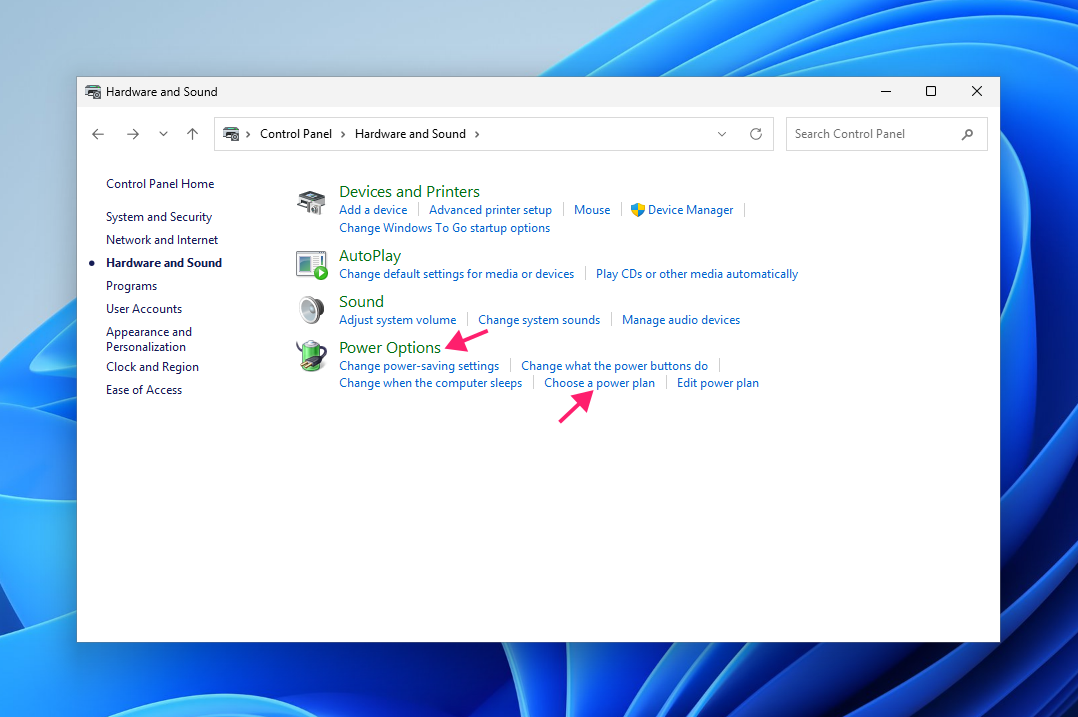
- Locate Ultimate Performance under additional plans
Select the radio button next to it to activate it

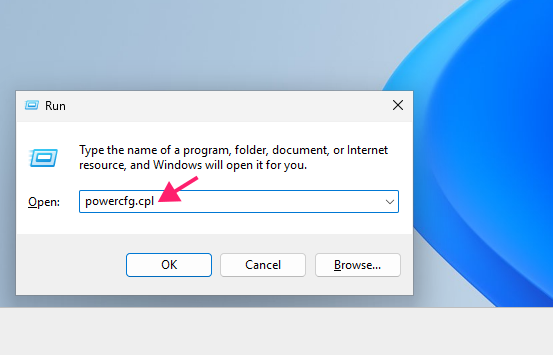
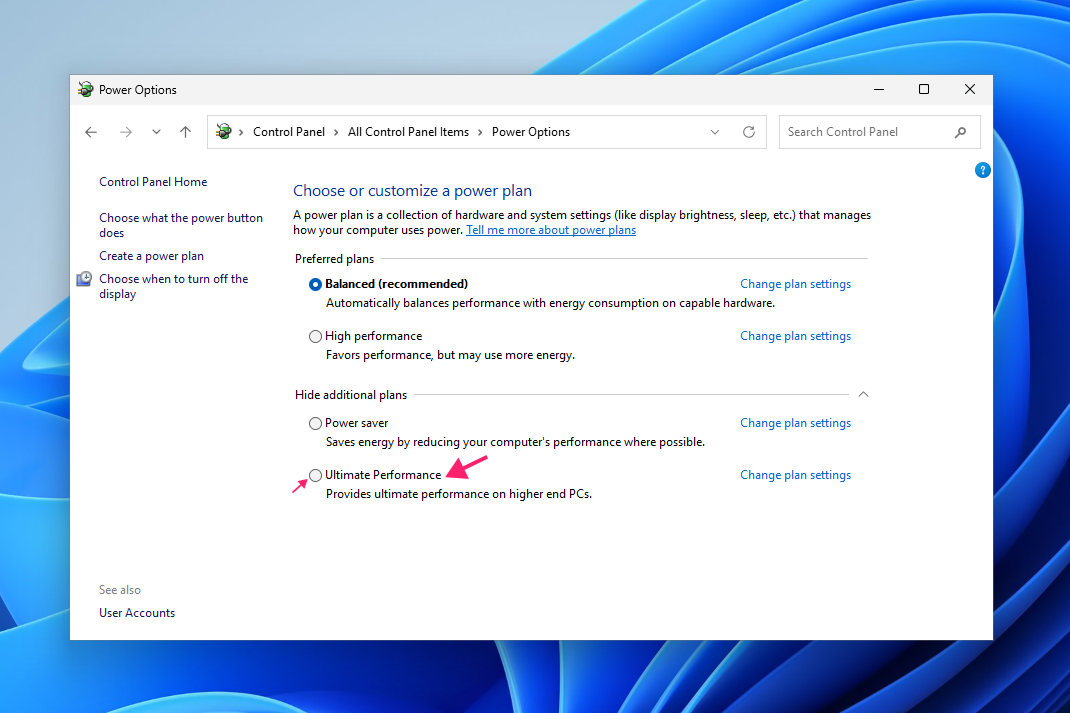
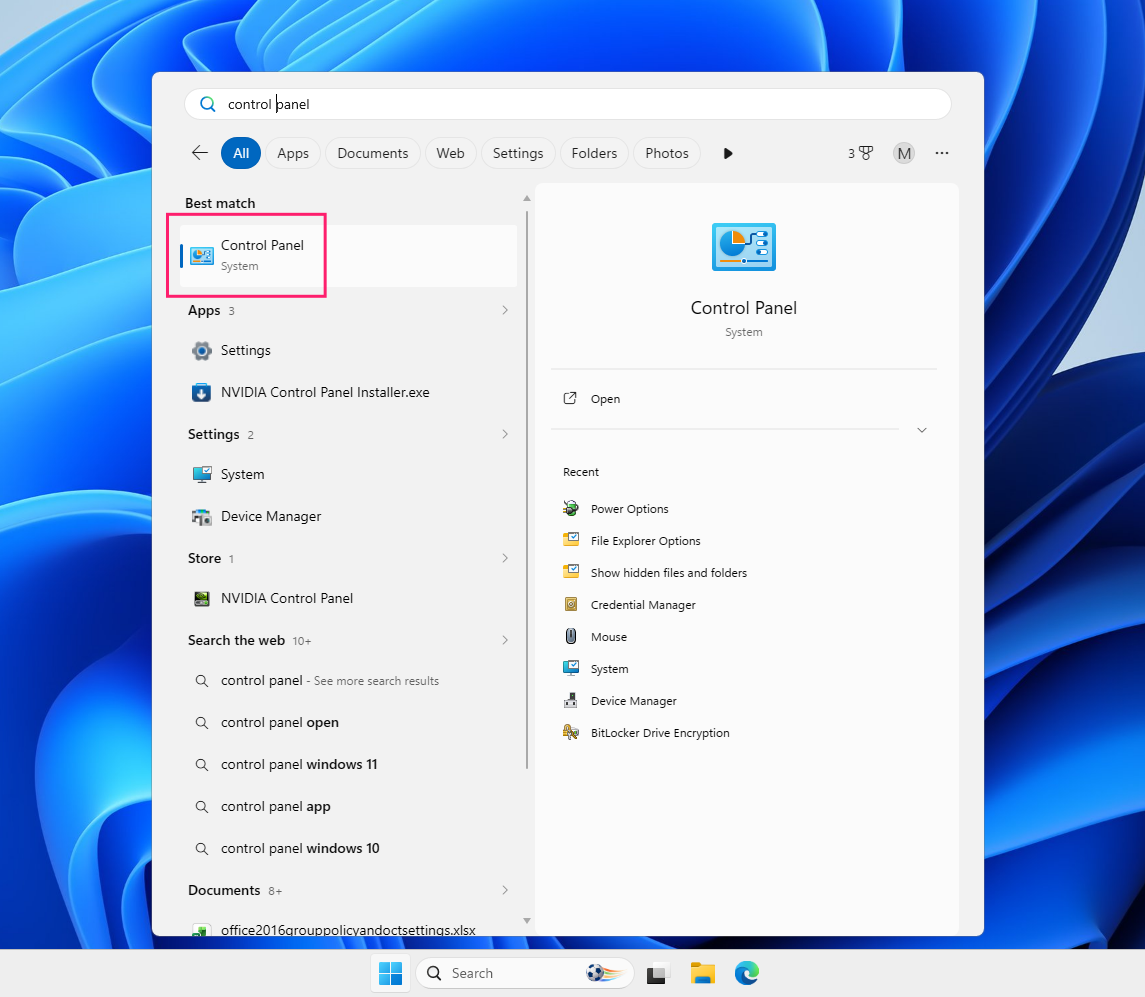
If Control Panel isn’t already open to Power Options, here’s how to get there manually:
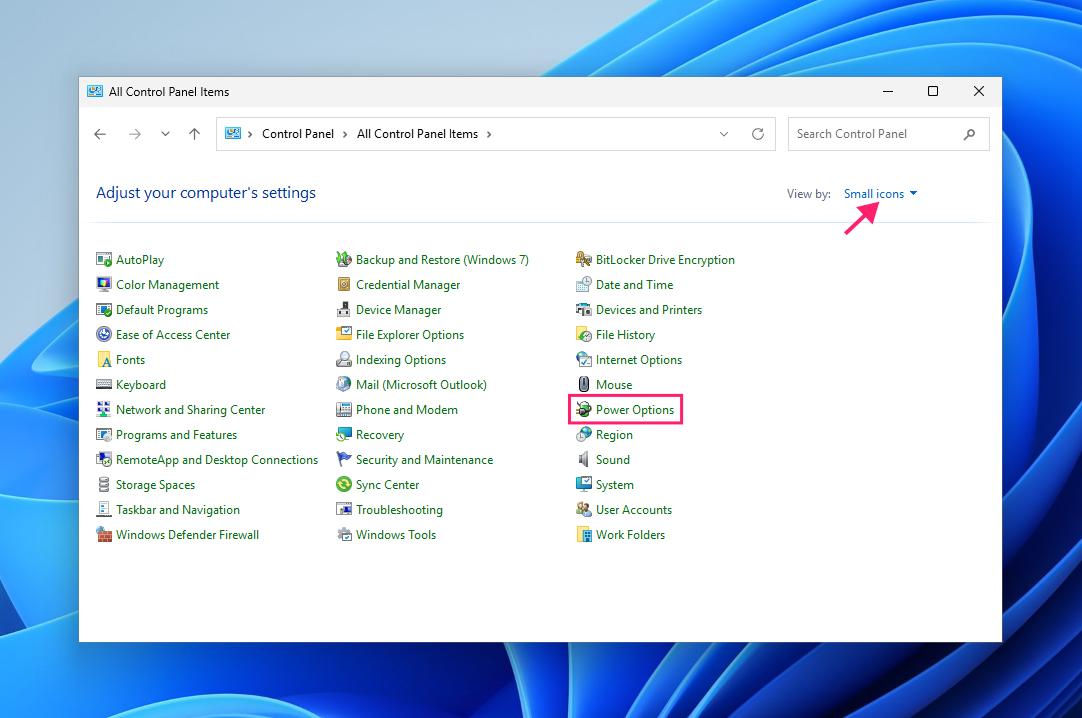
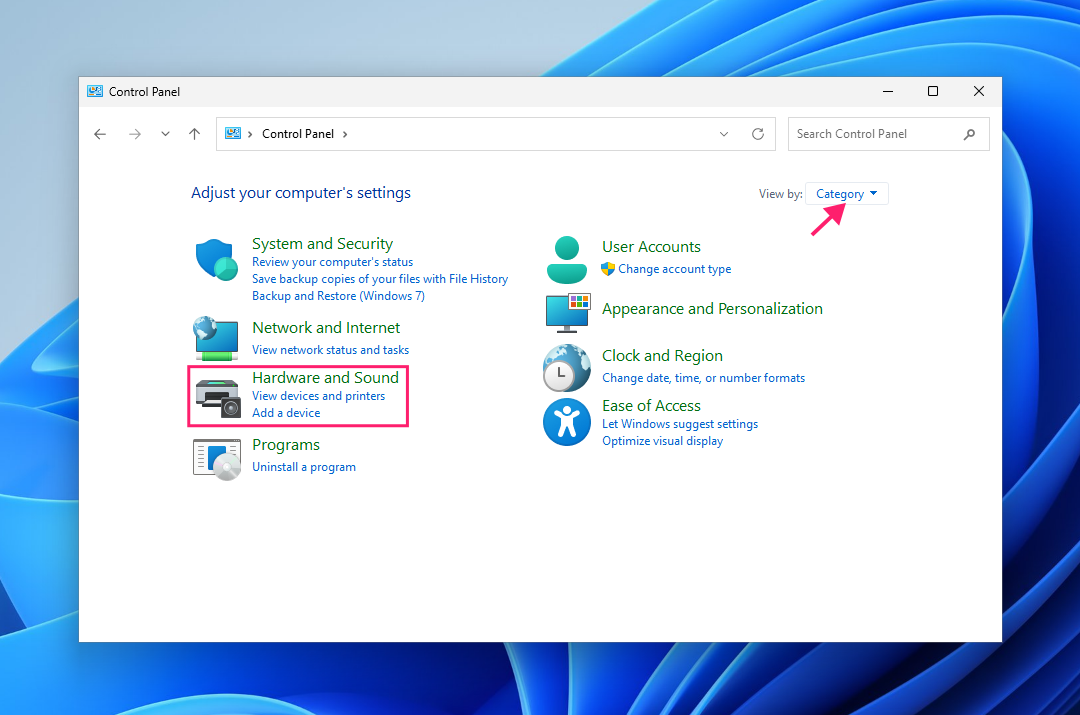
Press Start and search for Control Panel

If the view is set to icons, click Power Options directly

If it’s set to Category, go to Hardware and Sound > Power Options


Step 3: Replicate a customized configuration across machines
Use this when you’ve adjusted Ultimate Performance settings on one machine and want others to match exactly, rather than each one starting from Microsoft’s defaults.
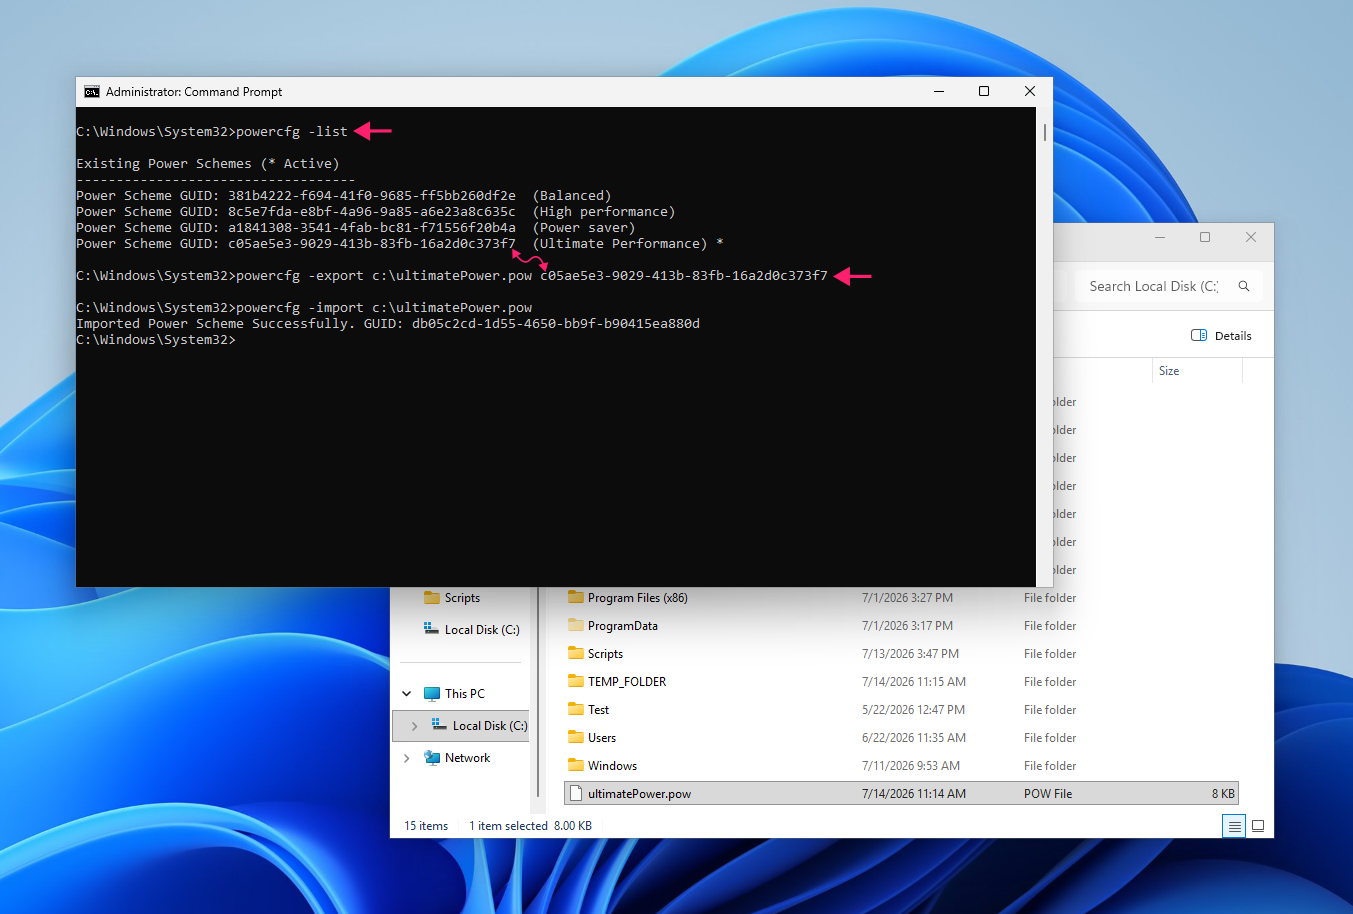
- Open an elevated Command Prompt or PowerShell window
- Run
powercfg -listto view existing power plans and their GUIDs - Run
powercfg -export X:PathtoPPlan.pow <GUID>to export the configured plan, including any customizations, to a.powfile On the target machine, run
powercfg -import X:PathtoPPlan.powto import the plan
Both -import and -duplicatescheme let you specify a GUID for the new plan, which matters for the next step. Keeping that GUID consistent is what lets a Group Policy Object target the same plan across every machine it touches.
Worth noting: -duplicatescheme generates a new random GUID every time it runs, so that consistency only holds when you’re importing the same exported .pow file on every machine, as in this step. Running -duplicatescheme independently on each device (Step 1) will produce a different GUID per machine, which is exactly why the deployment script in Step 4 extracts the GUID dynamically instead of assuming a fixed one.
Pro tip: With Atera, you can ask AI Copilot to write a complex script for you with natural language queries. Then, you can deploy the script remotely to multiple endpoints using the RMM platform.
Step 4: Deploy at scale via Group Policy or Intune
Use this when you’re standardizing Ultimate Performance across a managed fleet rather than configuring devices one at a time.
1. Write a PowerShell script that checks whether the plan already exists via powercfg -list, activates it with powercfg -setactive if it does, or creates it with powercfg -duplicatescheme and then activates it if it doesn’t
Here’s an example:
The Script:
Atera does not guarantee the integrity, availability, security, virus-free, safety, lawfulness, non-infringement, rights’ status, or functionality of the scripts. The use of the shared scripts is at your own risk. Scripts are provided “AS IS”. *
# check if Ultimate Performance already exists
$ExistingPlan = powercfg -list | Where-Object { $_ -like "*Ultimate Performance*" }

# if already present, just set it as active
if ($ExistingPlan) {
    # extract the GUID of the existing plan
    $ExistingPlan -match "([a-f0-9]{8}-[a-f0-9]{4}-[a-f0-9]{4}-[a-f0-9]{4}-[a-f0-9]{12})" | Out-Null
    $ActiveGUID = $Matches[1]
    # set as active
    powercfg -setactive $ActiveGUID
# if it does not exist import and activate it
} else {
    # get the GUID of the new Ultimate Performance plan
    $Output = powercfg -duplicatescheme e9a42b02-d5df-448d-aa00-03f14749eb61
    $Output -match "([a-f0-9]{8}-[a-f0-9]{4}-[a-f0-9]{4}-[a-f0-9]{4}-[a-f0-9]{12})" | Out-Null
    $NewGUID = $Matches[1]
    # set as active
    powercfg -setactive $NewGUID
}
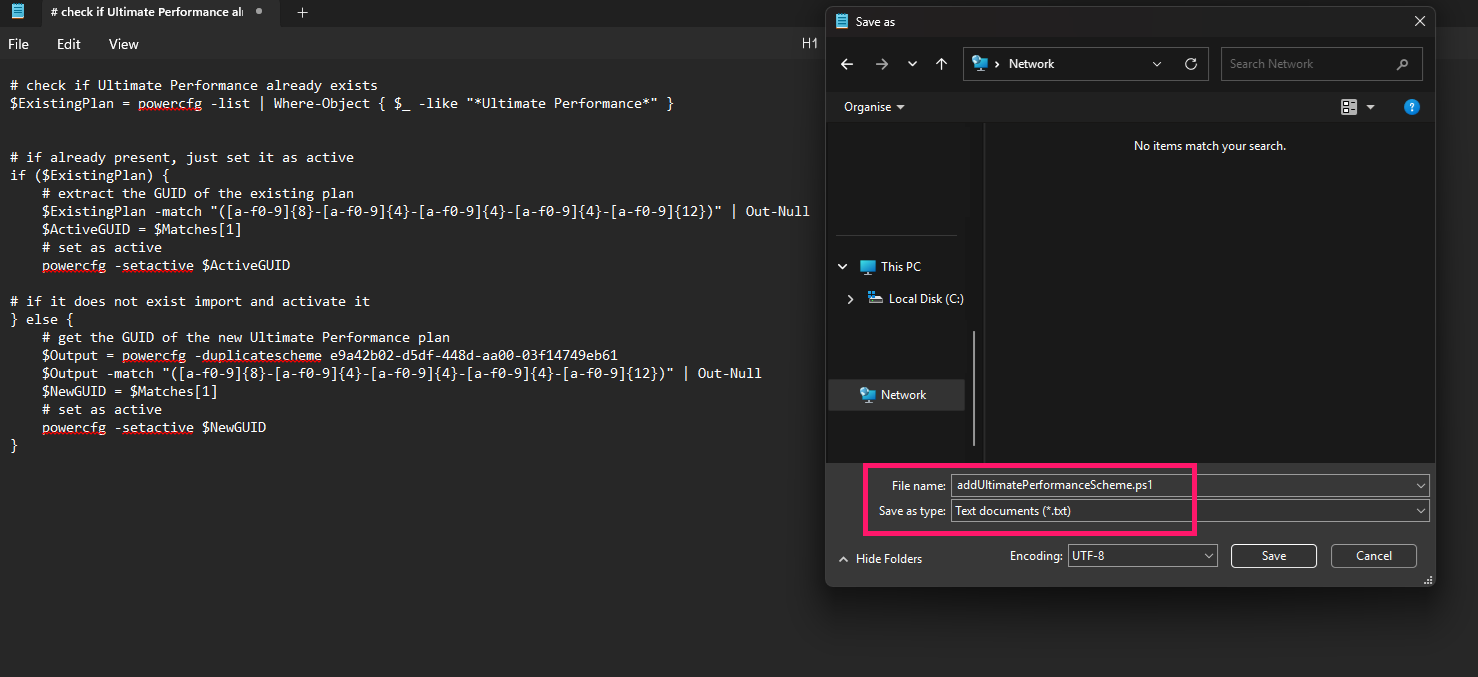
2. Create a text document and save it somewhere where all endpoints on the network can activate it (give it a name likeaddUltimatePerformanceScheme.ps1)
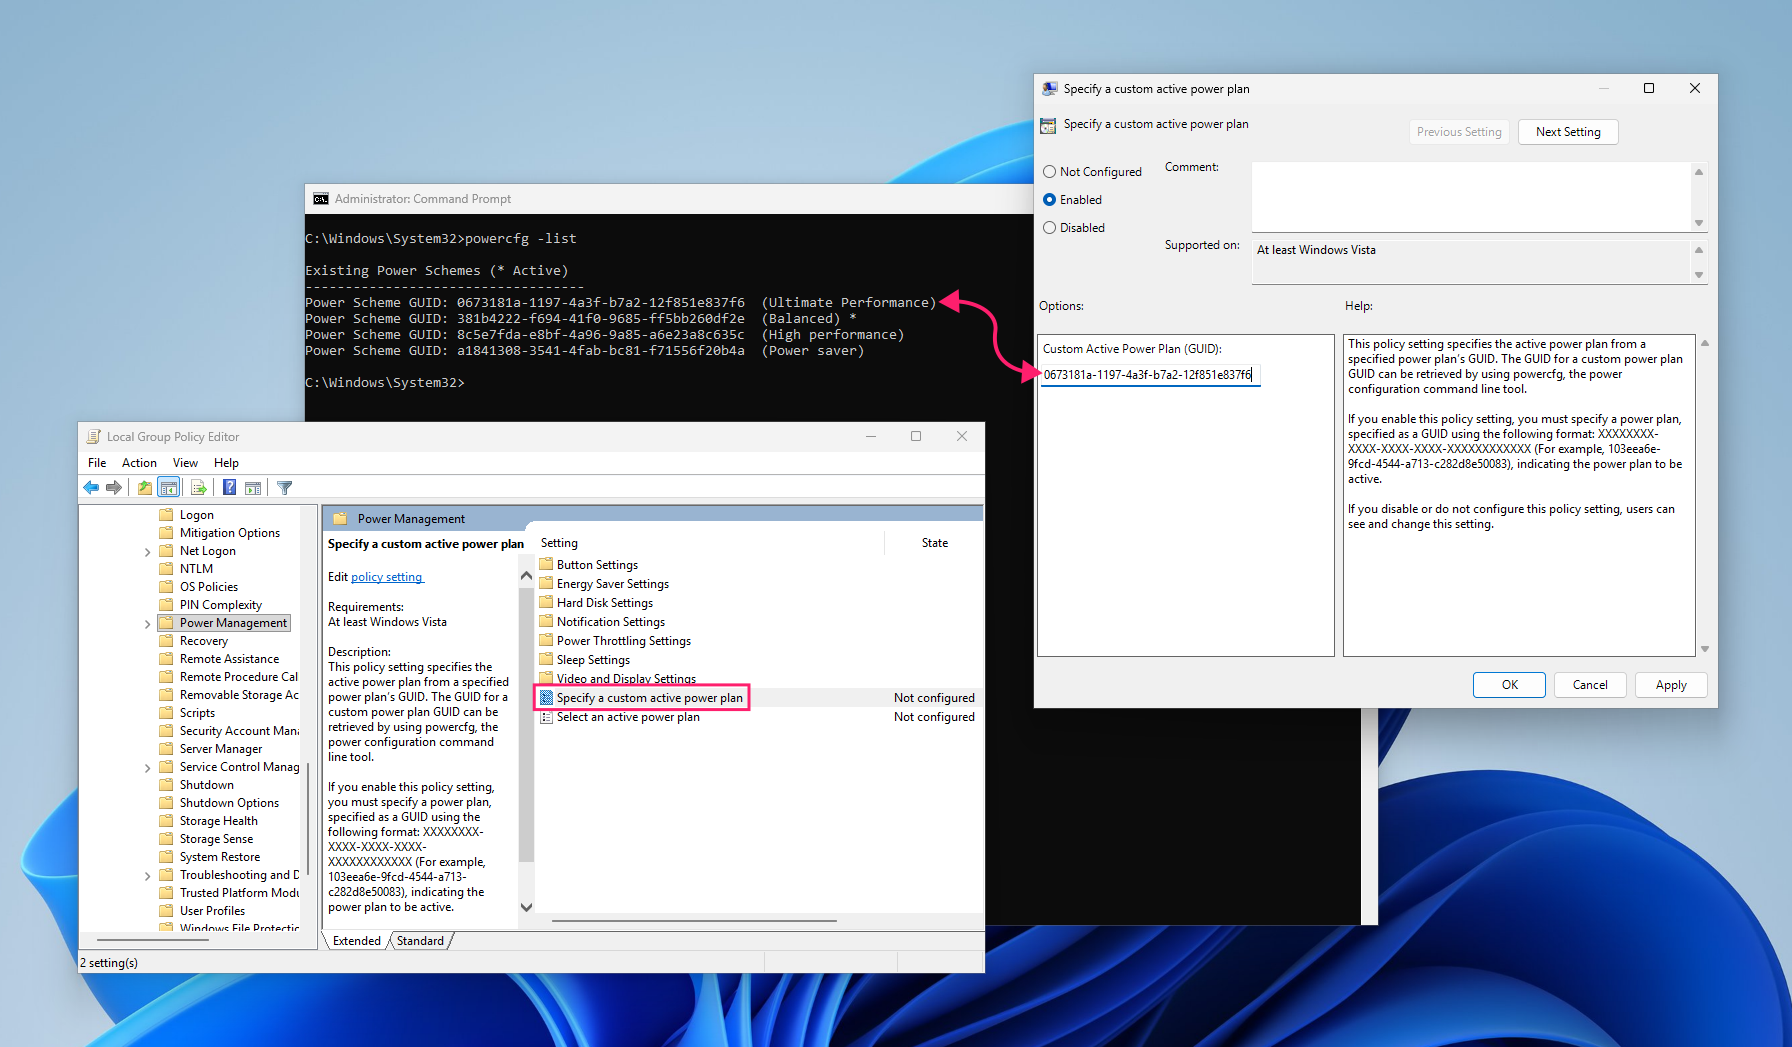
3. In Group Policy, navigate to Computer Configuration > Administrative Templates > System > Power Management > Specify a custom active power plan. This policy only enforces which plan stays active; it does not create or import the plan itself, which is why the script in step 1 is required first
4. For Intune, package the deployment as a detection and remediation script pair. The detection script checks powercfg -getactivescheme for “Ultimate Performance” and exits with a compliant or non-compliant status. The remediation script runs the same duplicate-and-activate logic as the GPO script
5. In the Intune admin center, go to Devices > Compliance > Scripts, create a new script package, and upload both scripts
6. Set Run this script using the logged-on credentials to No, since changing power settings requires elevation – this runs the script in the SYSTEM context automatically, which grants the elevation needed without requiring a signed-in admin session on the device.
7. Assign the script package to your target device groups
» Learn more about installing the Atera Agent with Intune and simplifying group policy management with Atera
Should you leave it enabled permanently?
For most setups, no. Ultimate Performance is worth leaving on only if the machine is AC-powered, well cooled, and handling sustained latency-sensitive work as its normal job, not just occasionally.
If the machine’s job doesn’t demand consistent, latency-sensitive performance, switch back to Balanced or High Performance rather than leaving Ultimate Performance running by default.
How to disable and remove it
If a machine shows instability or excessive heat after enabling the plan, back it out fully rather than just switching away from it.
Control Panel
- Open Power Options and activate a different power plan
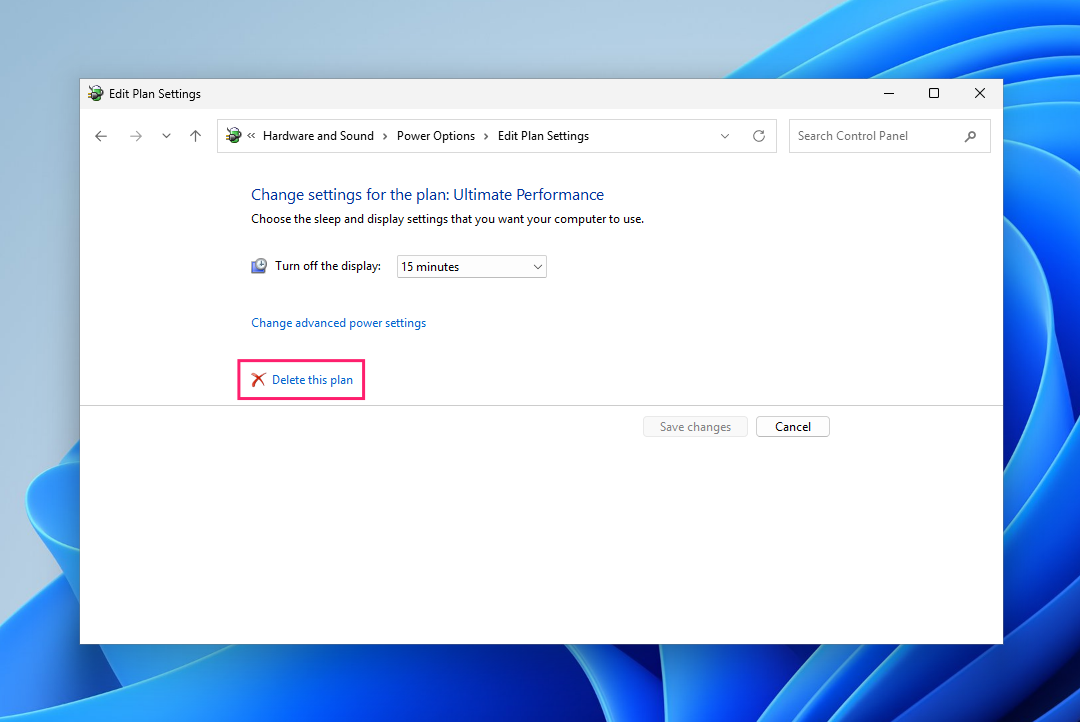
- Click Change plan settings next to Ultimate Performance
Click Delete this plan

Command line
- Open an elevated PowerShell or Command Prompt window
- Run
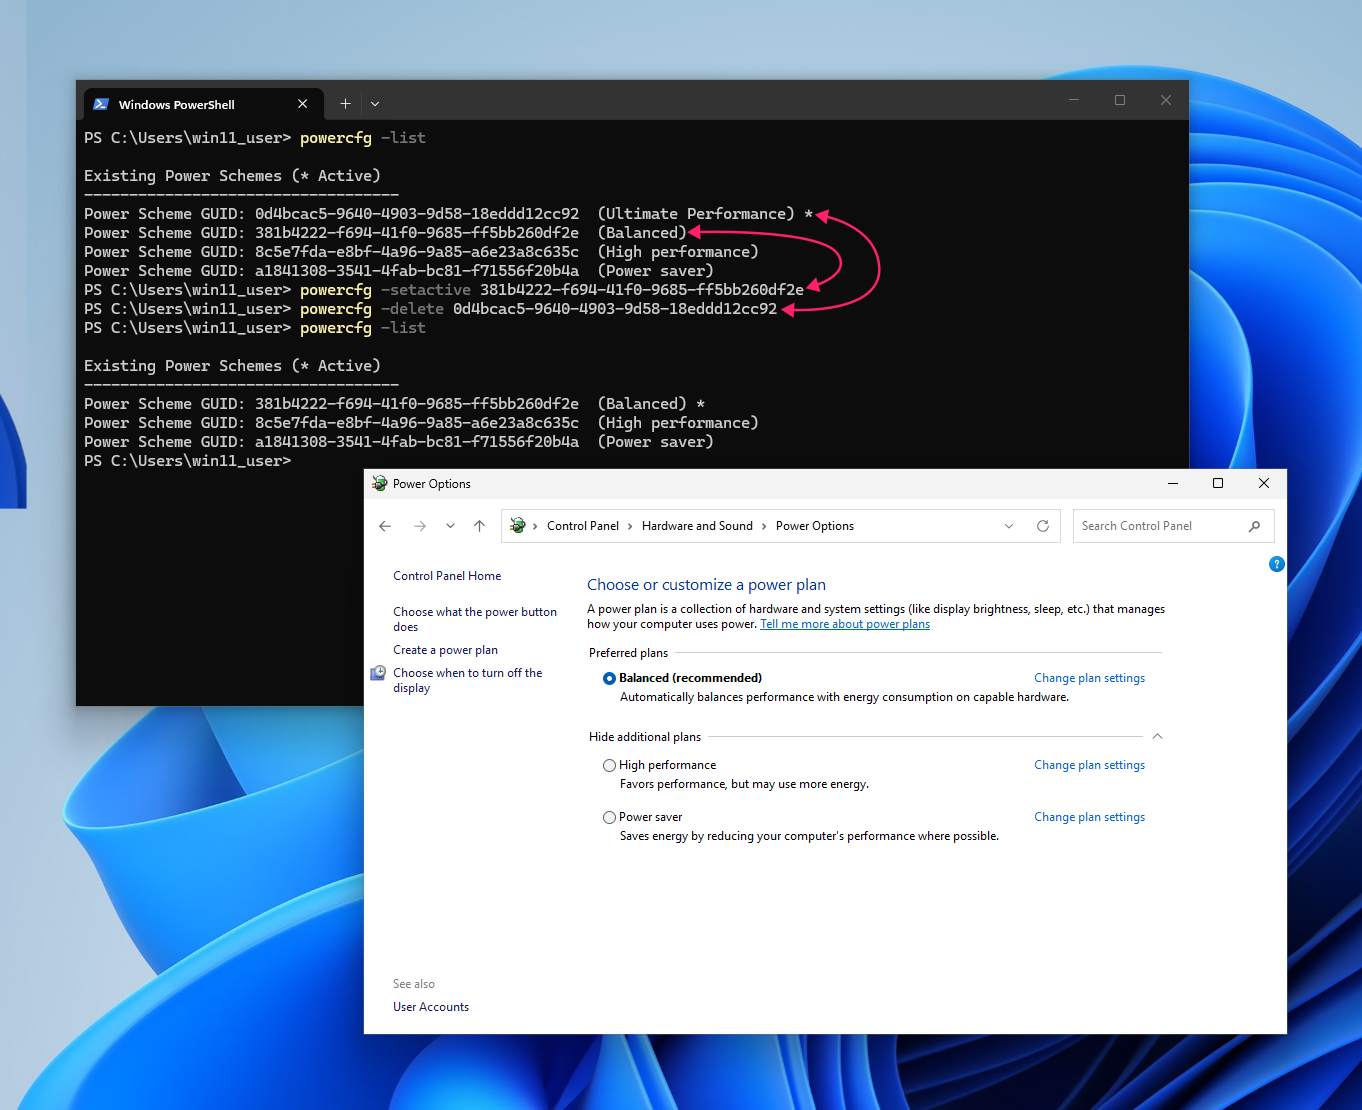
powercfg -listto view current power schemes and their GUIDs - Run
powercfg -setactive <PLAN_GUID>to switch to a different plan before deleting the active one Run
powercfg -delete <ULTIMATE_PLAN_GUID>to remove the Ultimate Performance plan entirely
Not every machine needs full throttle
Ultimate Performance removes the tiny power-saving delays that get in the way on a handful of specific machines. The judgment call is knowing which machines those are, applying it consistently across them, and reversing it just as cleanly when a device doesn’t need it. That’s a manageable decision on one PC. Across a fleet, it’s a policy that needs enforcing, not a setting you configure once and forget.
Scripted deployment and remote management through Atera’s RMM lets IT teams and MSPs push, verify, or roll back a power configuration across every managed endpoint from one console, instead of touching each machine by hand or hoping a GPO landed correctly.
Related Articles

How to reduce alert fatigue across your IT team
Your technicians aren't ignoring alerts because they're careless. They're ignoring them because most alerts have taught them to. Once the stream stops being trustworthy, real failures slip past with the noise. Fixing it means deciding what deserves an interruption, tuning out transient spikes, collapsing alert storms, and automating the fixes you've run a hundred times.
Read now
How to close the IT skills gap on your team
Course completions don't close skills gaps. Technicians finish the training, then hand the first unfamiliar failure straight back to a senior engineer. Real capability gets built on live tickets, incidents, and maintenance windows, with guidance that fades as competence grows.
Read now
How to calculate cost per ticket (and why most teams get it wrong)
Most cost-per-ticket figures are wrong before anyone reads them. Missing overhead, tickets that were opened but never closed, spam and duplicates padding the count, and one month's costs divided by another month's tickets all make support look cheaper than it is. Fix both sides of the division and the number finally shows where technician time and money actually go.
Read now
How to prepare for a software license audit
A vendor audit notice doesn't wait for you to get organized. It demands proof, right now, that every install matches every entitlement you've paid for, and most IT teams find out the hard way how much they don't actually know about their own environment. Getting audit-ready before the letter arrives is the difference between negotiating from strength and paying for months of scrambling.
Read nowEndless IT possibilities
Boost your productivity with Atera’s intuitive, centralized all-in-one platform









