
Table of contents
Generate summary with AI

Setting up Google Chrome on Ubuntu is one of the most common tasks for Linux users, but doing it efficiently requires verifying your environment first. Whether you’re managing a single workstation or a network of devices, ensuring hardware compatibility and proper dependency resolution is the key to stability.
This guide breaks down every step, from verifying SSE3 CPU support to advanced automated deployments via SSH. You’ll learn how to handle restricted environments and keep your browser updated without manual intervention.
» New to Linux? Learn which Linux command sends messages to network interface
Environment readiness for Google Chrome on Ubuntu
Installing Google Chrome on Ubuntu is a straightforward process, but ensuring your environment is ready can prevent an unexpected IT issue during deployment. Before you begin, you must verify that your hardware and software meet Google’s specific requirements for a stable installation.
- Operating system: 64-bit Ubuntu 18.04 or newer
- CPU architecture: A 64-bit Intel or AMD processor (amd64/x86_64)
- CPU features: The processor must support the Intel SSE3 instruction set, which is standard on most modern 64-bit CPUs
» Find out how to check Linux version
How to check compatibility
Before attempting an installation, run these commands in your Ubuntu Terminal to confirm your system is ready:
1. Check Ubuntu version: Run lsb_release -a
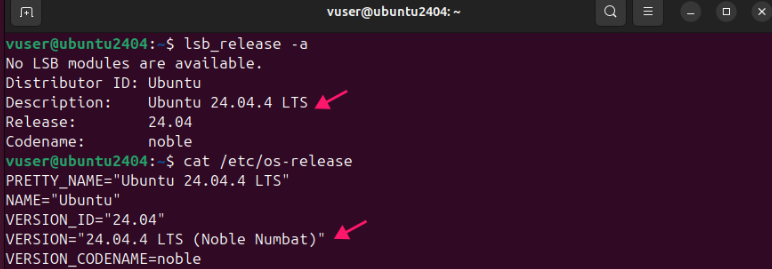
2. Check CPU architecture: Run uname -m or dpkg --print-architecture

3. Verify SSE3 support: Run grep sse3 or check the flags section of the lscpu command
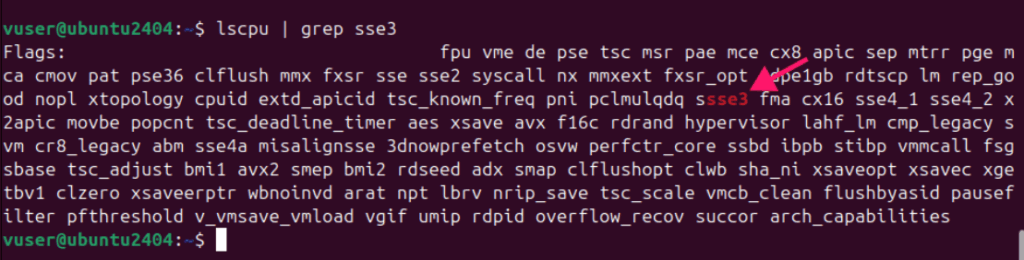
In summary, Chrome is compatible if you’re running at least Ubuntu 18.04 on an amd64 architecture with SSE3 support.
» Find out how to check Ubuntu version
Preparation steps for a smooth installation
Completing these system preparation steps ensures your package manager is healthy and has the necessary resources to install new software.
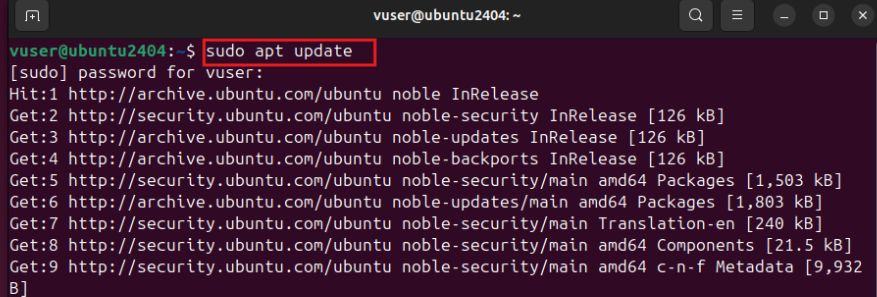
1. Update package index: Run sudo apt update to download the latest list of available packages from your repositories
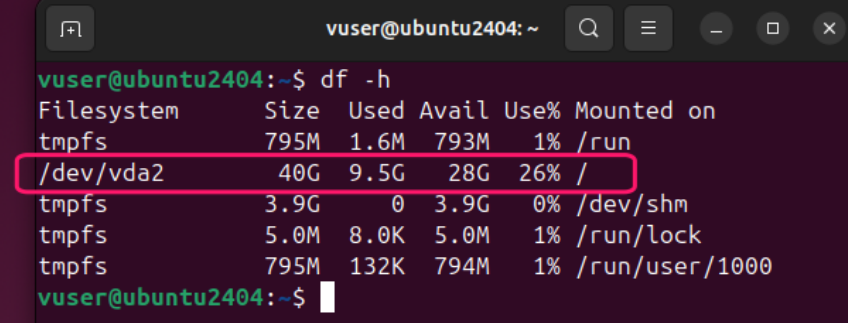
2. Check disk space: A typical Chrome installation requires approximately 500MB of space. Run df -h to check the remaining space on your / mount point
Pro tip: If space is low, run sudo apt clean and sudo apt autoremove to clear cached files and unused packages.
3. Validate user privileges: You must have sudo privileges to install software. Run sudo -v to verify your user belongs to the sudo group; the command should run without errors after you enter your password

» Here’s how to increase IT efficiency in your organization
How to download and install Google Chrome on Ubuntu
There are several ways to get Google Chrome running on your Ubuntu system. Whether you prefer the simplicity of a visual installer or the precision of the command line, each method ensures that Google’s official repository is added to your system so you receive future security updates automatically.
Method 1: Graphical User Interface (GUI)
This approach is ideal for those who prefer a non-technical, visual workflow using the Ubuntu Software Center.
Follow these steps:
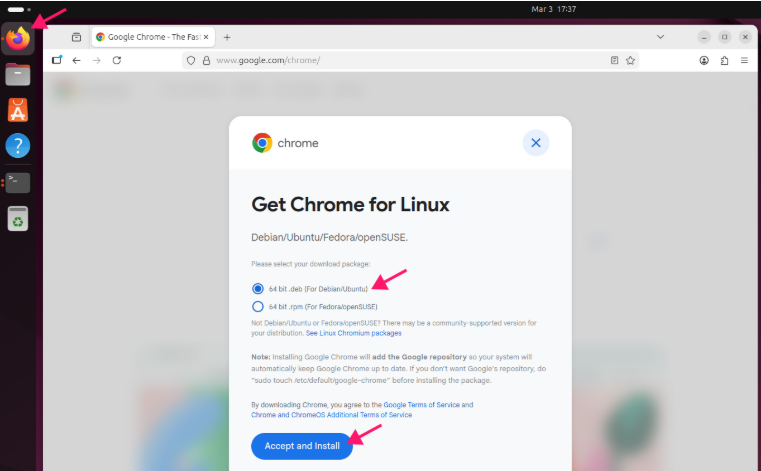
1. Open your web browser (Firefox is usually installed by default) and navigate to the official Google Chrome download page. Select the .deb package, marked for Ubuntu
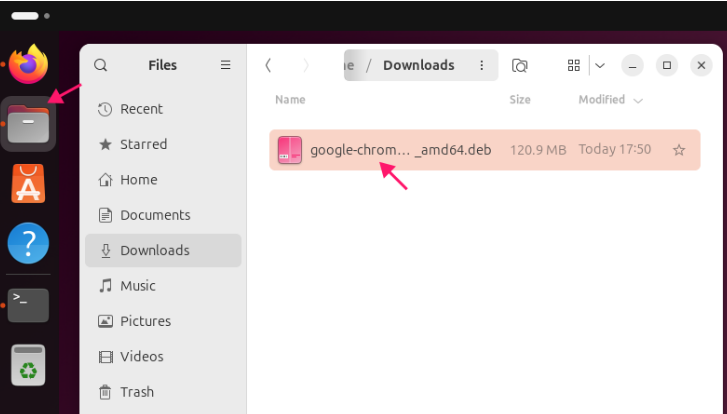
2. By default, the .deb file will be saved in the Downloads folder. Open the Files Explorer and navigate to the folder where the file was saved
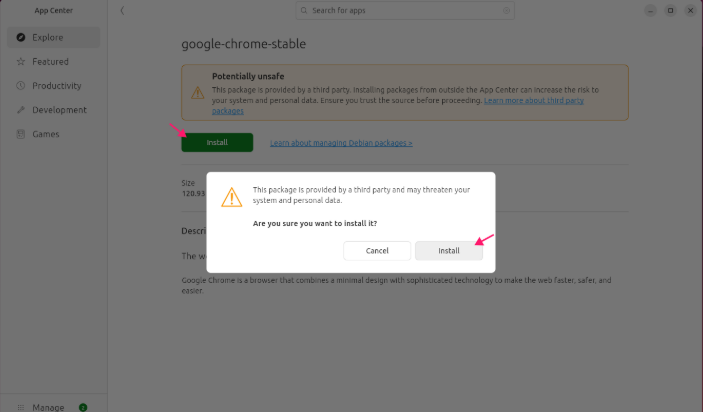
3. Double-click the file to open it in the Ubuntu Software Center app and click Install
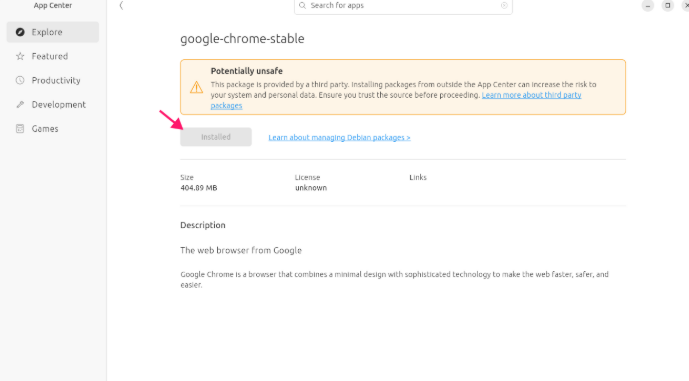
4. The installation process will begin, and once completed, the status will change from “Installing” to “Installed.” You may be prompted to enter your password
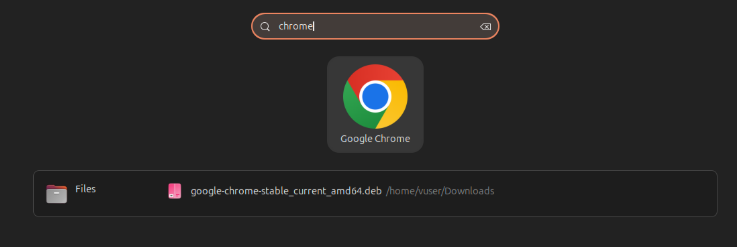
5. Click on the Activities button (top-left corner) or press the Super key (Windows key) and search for “Chrome” to launch it
Method 2: Command-line interface (Terminal)
This is the preferred method for users who want to complete the process quickly without leaving the terminal.
Follow these steps:
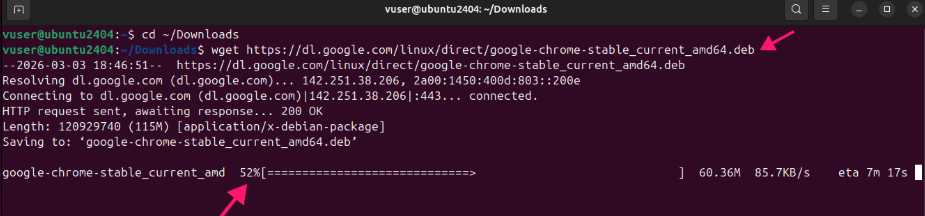
1. Open your terminal and navigate to the folder where you wish to save the file (e.g., cd ~/Downloads). Run wget https://dl.google.com/linux/direct/google-chrome-stable_current_amd64.deb to download the package
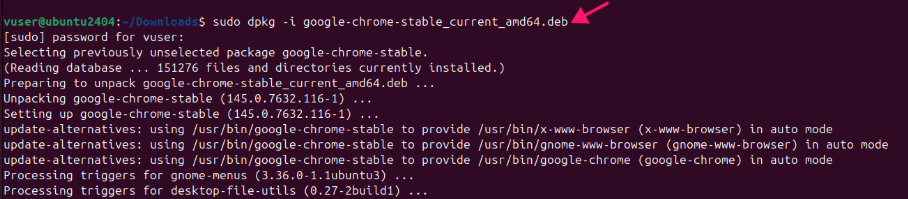
2. Install the package by running: sudo dpkg -i google-chrome-stable_current_amd64.deb
3. Confirm the installation by running google-chrome --version
Keep in mind that when installing from the official .deb, Google’s repository is added to /etc/apt/sources.list.d/ and the signing key is also imported. This means that updates can now be handled via apt.
Method 3: Add the official APT repository
Using the official repository ensures your system fetches the most recent stable version directly from Google’s servers.
Follow these steps:
1. The signing key (https://www.ubuntuupdates.org/ppa/google_chrome) is required to ensure the authenticity of the Chrome packages. You can fetch and add it using the wget command: wget -q -O /tmp/google-linux-signing-key.pub https://dl-ssl.google.com/linux/linux_signing_key.pub

2. Add the GPG key to your trusted store: sudo cp /tmp/google-linux-signing-key.pub /etc/apt/trusted.gpg.d/google-linux-signing-key.asc

3. Add the repository to your sources list: echo "deb [arch=amd64] http://dl.google.com/linux/chrome/deb/ stable main" | sudo tee /etc/apt/sources.list.d/google-chrome.list

4. Update your package list with sudo apt update

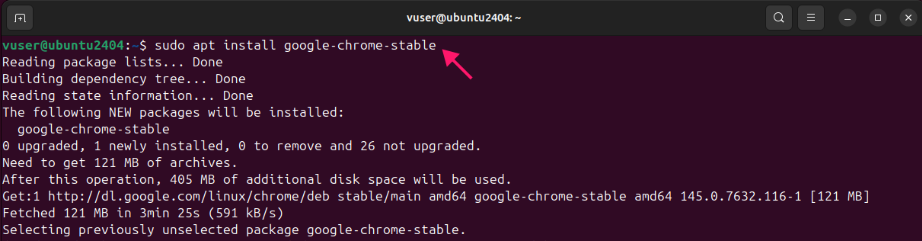
5. Install the browser with sudo apt install google-chrome-stable
Method 4: Installation in offline or restricted environments
In offline or restricted-network environments, IT administrators can still download and install Google Chrome on Ubuntu systems by first obtaining the .deb package on a machine with internet access and then transferring it to the target machine for installation.
Follow these steps:
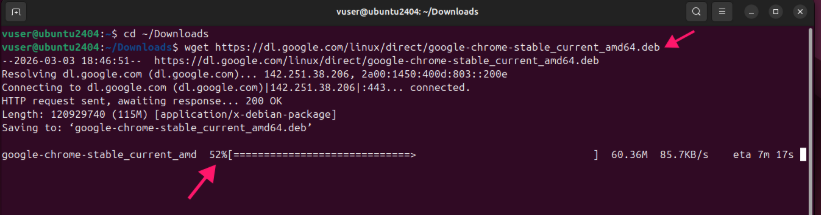
1. Download the latest .deb file on a machine with internet access. To do this run: wget https://dl.google.com/linux/direct/google-chrome-stable_current_amd64.deb
2. Transfer the .deb package to the offline machine. You can simply copy the .deb file to a USB drive
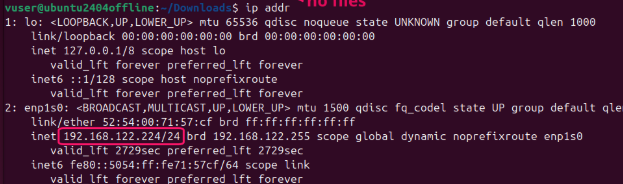
3. Get the IP address of the destination machine using ip addr. On the machine where the .deb file was downloaded runscp <deb_file_name>.deb vuser@<destination_IP>:/<destination_folder>/<deb_file_name>.deb
4. Once transferred, install the package on the destination machine using sudo dpkg -i google-chrome-stable_current_amd64.deb

Method 5: Automated deployment using a Shell script
If you want to automate the install and use it on multiple machines, you can create a simple script, run it locally, and then deploy it remotely so you don’t repeat the same setup each time.
Follow these steps:
1. Open your terminal and create the file: nano install_chrome.sh
2. Paste the following code:
The Script:
Atera does not guarantee the integrity, availability, security, virus-free, safety, lawfulness, non-infringement, rights’ status, or functionality of the scripts. The use of the shared scripts is at your own risk. Scripts are provided “AS IS”. *
        #!/bin/bash

# Exit immediately if a command fails
set -e

CHROME_DEB_URL="https://dl.google.com/linux/direct/google-chrome-stable_current_amd64.deb"
CHROME_DEB_FILE="google-chrome-stable_current_amd64.deb"

echo "Starting Google Chrome installation..."

# 1. Check if already installed
if command -v google-chrome >/dev/null 2>&1; then
    echo "Google Chrome is already installed."
    google-chrome --version
    exit 0
fi

# 2. Update package list and ensure wget is present
sudo apt update -y
sudo apt install -y wget

# 3. Download the installer
if [ ! -f "$CHROME_DEB_FILE" ]; then
    echo "Downloading Google Chrome..."
    wget -q "$CHROME_DEB_URL"
fi

# 4. Install using apt (handles dependencies automatically)
echo "Installing Google Chrome..."
sudo apt install -y ./"$CHROME_DEB_FILE"

# 5. Cleanup
rm -f "$CHROME_DEB_FILE"

# ---- Verification Section ----
echo "Verifying installation..."

if ! dpkg -l | grep -q "^ii  google-chrome-stable"; then
    echo "ERROR: Package not registered with dpkg."
    exit 1
fi

if ! command -v google-chrome >/dev/null 2>&1; then
    echo "ERROR: google-chrome binary not found in PATH."
    exit 1
fi

VERSION_OUTPUT=$(google-chrome --version 2>/dev/null)
echo "SUCCESS: $VERSION_OUTPUT"
echo "Google Chrome installation completed successfully."

exit 03. Save and exit (Ctrl+O, Enter, Ctrl+X)
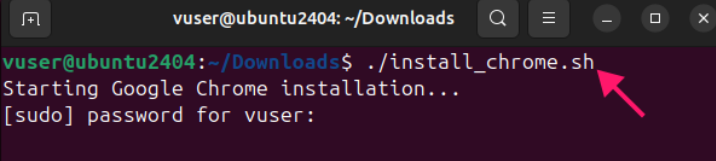
4. Make the script executable with chmod +x install_chrome.sh and run it using ./install_chrome.sh (you’ll still need to enter your sudo password)
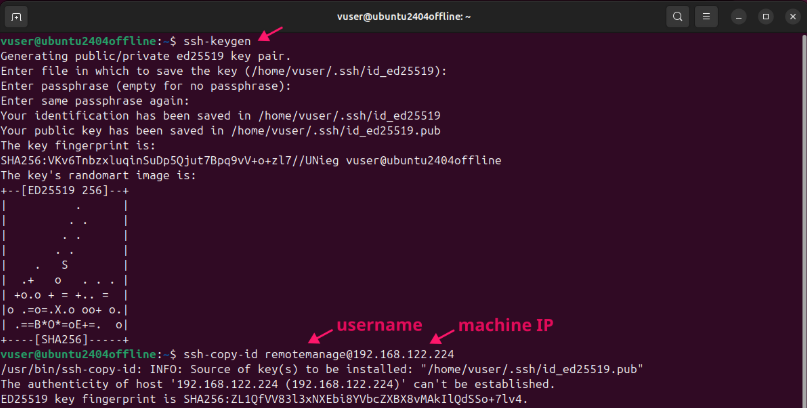
5. To deploy the script remotely, set up SSH keys using ssh-keygen and ssh-copy-id user@remote-machine, then confirm you can log in without a password by running ssh user@remote-machine
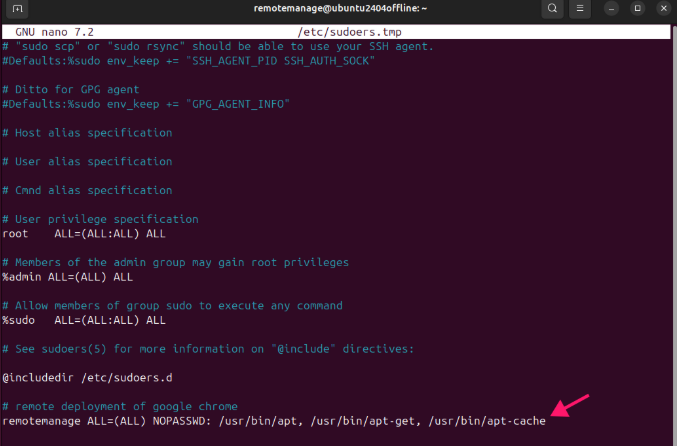
6. While connected to the remote machine, run sudo visudo and add the line user ALL=(ALL) NOPASSWD: /usr/bin/apt, /usr/bin/apt-get, /usr/bin/apt-cache (replace user with your username) to allow apt commands without a password, then save and exit with Ctrl + X, Y, and Enter, and exit the SSH session.
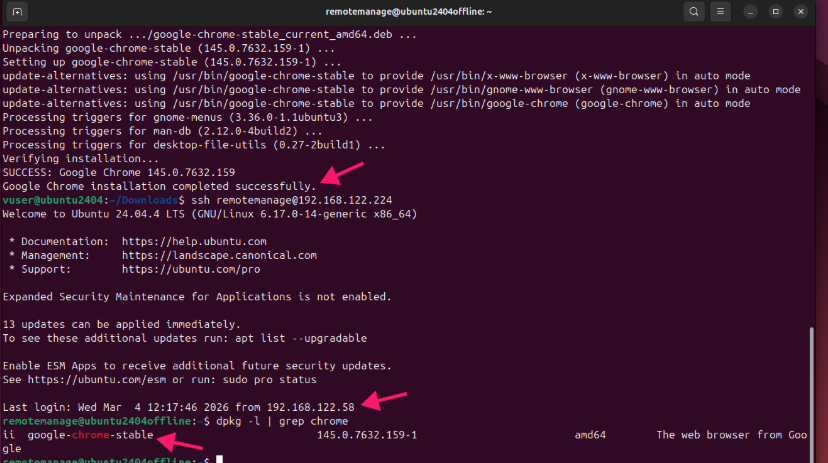
7. Run the script on the remote machine using ssh user@remote-machine 'bash -s' < /path/to/install_chrome.sh

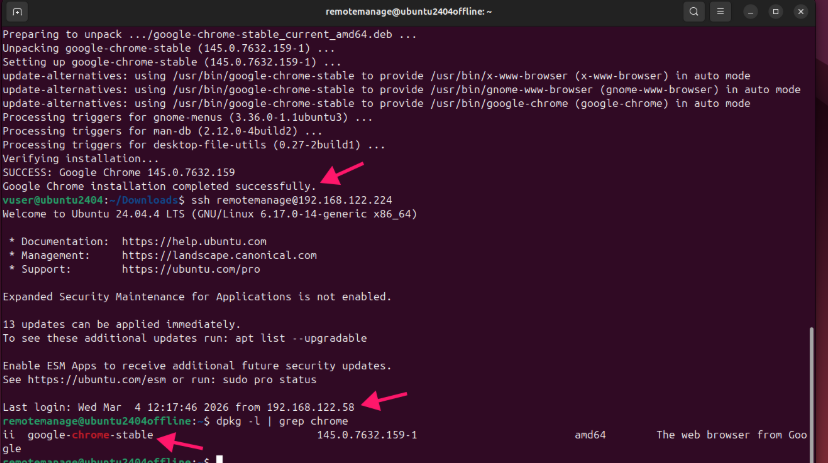
8. Finally, reconnect and confirm the installation by running ssh user@remote-machine to reconnect and dpkg -l | grep chrome to check for the google-chrome package
» Find out about Atera’s Linux RMM for better visibility
Common installation barriers and how to fix them
Even with the right hardware, network restrictions or corrupted databases can block your progress.
Network and firewall issues
If your network uses a firewall or restricted ports, you may see “Failed to fetch” or “Temporary failure resolving” errors. As seen in the image below.
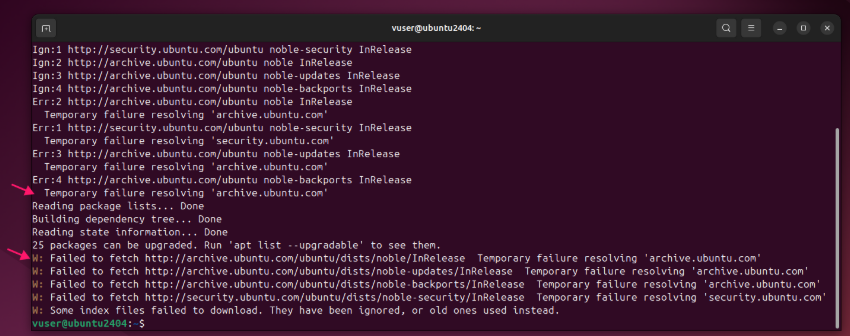
To fix this, run ping -c 4 google.com to ensure you have internet access

» Here’s the best firewall appliances for you
Missing dependencies and broken APT states
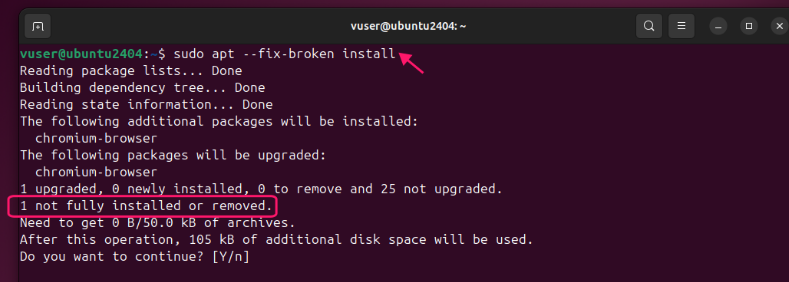
Sometimes the package database becomes corrupted or has missing libraries.
To fix this issue, run sudo apt --fix-broken install to automatically repair the package database
How to update Google Chrome on Ubuntu
You can update Google Chrome manually when you want control over when updates happen, or enable automatic updates to keep Chrome current without intervention.
Update Google Chrome manually
apt can be used to handle updates because it’s linked to the Google repository when you install the .deb package. Open the terminal to run these commands:
sudo apt updatesudo apt upgrade google-chrome-stable
Enable automatic updates
Make sure the Google Chrome repository was added, then install the package that handles automatic updates. Run these commands in the terminal:
ls -l /etc/apt/sources.list.d– you should see google-chrome.list- sudo apt install unattended-upgrades
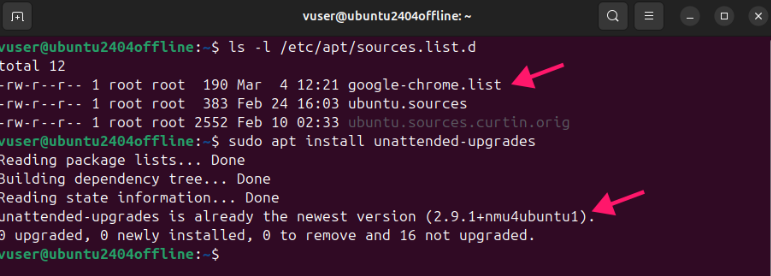
This ensures Chrome will update automatically in the background without you having to run manual updates.
» Here are essential scripts that every IT professional needs to know
Install Chrome on Ubuntu with Atera
Manually verifying hardware flags and running installation scripts on every individual machine can quickly turn into a major IT issue. While these methods work for a single PC, deploying Chrome across an entire network requires a more centralized approach. This is where Atera’s RMM platform becomes essential.
By using Atera, you can push these installation scripts to all your Ubuntu endpoints simultaneously from a single dashboard. Instead of manually troubleshooting broken APT states or missing dependencies on every desk, Atera provides visibility into which computers are ready and which need maintenance. Furthermore, Atera’s AI Copilot can help you instantly generate or refine your Bash scripts for specific environment needs, ensuring that your Linux system configurations are always accurate and consistent.
Frequently Asked Questions
Related Articles

How to decide if you need a dedicated DEX platform, or already have one
"IT feels slow" is the complaint that often sells DEX platforms. Sometimes it signals a real blind spot, but just as often already catches and fixes the problem, and a new scoring layer would only add another console. Telling the two apart takes evidence, and the real gap usually isn't visibility at all.
Read now
How to set up secure printing across your organization
A secure print checkbox protects exactly one moment in a document's life. Everything else, from unencrypted traffic and unhardened devices to payroll printouts forgotten in a tray, stays exposed. Real secure printing covers the whole lifecycle: release policy, authentication, encryption, hardening, and a fleet that stays monitored long after rollout.
Read now
How to reduce alert fatigue in healthcare IT
In a hospital, a dismissed alert isn't a delayed ticket. It can be a patient deteriorating while the monitor keeps sounding. Cutting alert volume won't fix that on its own, and switching alerts off can make it worse.
Read now
How to prevent configuration drift across your IT infrastructure
Configuration drift rarely breaks anything the day it happens. It hides in a hotfix, a reset default, or a vendor installer, then surfaces weeks later as a failure nobody can trace. Stopping it means defining exactly what approved looks like, closing every side door into production, giving each setting one owning tool, and checking that the baseline itself hasn't gone stale.
Read nowEndless IT possibilities
Boost your productivity with Atera’s intuitive, centralized all-in-one platform









