Generate summary with AI

Checking system uptime provides valuable insight into how long your system has been running without interruptions. This metric is crucial for diagnosing performance issues, identifying potential hardware or software problems, and ensuring that updates and patches are applied correctly. Regularly monitoring system uptime helps in maintaining optimal performance and reliability of your Windows 10 or Windows 11 machine. Here’s a detailed guide on how to access this information using various methods.
Why is it important to check system uptime?
System uptime is the amount of time that your machine has been working reliably as part of your computer network and IT environment. The higher the number, the longer your machine has been working for. This number will allow you to monitor your environment, and check for the root cause of issues such as security concerns, lagging applications, or loss of productivity.
It’s important not to confuse Windows system uptime with the general understanding of the word system uptime for business applications. The industry standard for system uptime in terms of business applications is extremely high, as any amount of downtime where an application or website is unavailable will cause direct business losses, customer frustration, and the inability to work as usual. That’s why you regularly hear that a company’s SLA guarantees as much as 99.9% uptime, or even 99.99% uptime. (Although this sounds hard to achieve – remember that even 99.99% uptime still works out to 52 minutes of downtime a year!)
For Windows system uptime – you’re talking about something different. Your system uptime on Windows 10 or 11 will show you how long that specific machine has gone since the last time it needed a restart or a reboot. Keeping your computer on without a reboot for more than a week can start to cause issues such as slowdowns, and there will be times where computers need to be rebooted, for example to finish security updates or ensure patches have been installed correctly. It’s a useful metric to be able to track as a first line of defense to see if a problem can be fixed by an easy restart.
However, on the other side of the coin – if your system uptime metric shows that a machine is shutting down without warning or prompting, or is regularly needing to be restarted to ensure performance – this may indicate that you need to purchase some new equipment or take a deeper look in troubleshooting mode.
Deliver seamless IT experiences for each customer
Outmatch your client expectations with world-class ticketing, billing, & helpdesk capabilities, all managed through a single pane of glass.
Four ways to check system uptime on Windows
In order to get your hands on this information, let’s cover three ways you can find your system uptime metric.
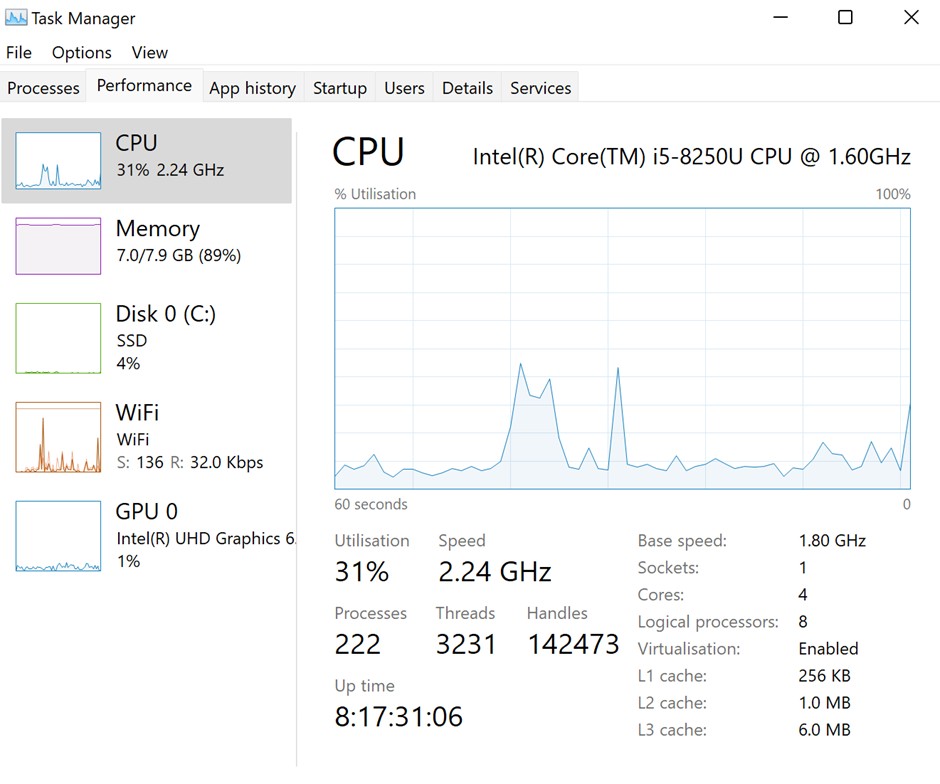
Task Manager
Search for Task Manager from your Start bar, or simply use the CTRL + ALT + DELETE function to open up the new window. On Windows 11 you will likely need to click, “more details”, or if you see the Performance tab, click to get a view of all your performance metrics. At the bottom of the page, you’ll see Up time. This will be written in a DD:HH:MM:SS format, so in the example below, the computer has been running for 8 days, 17 hours, 31 minutes and 06 seconds since its last reboot or restart.
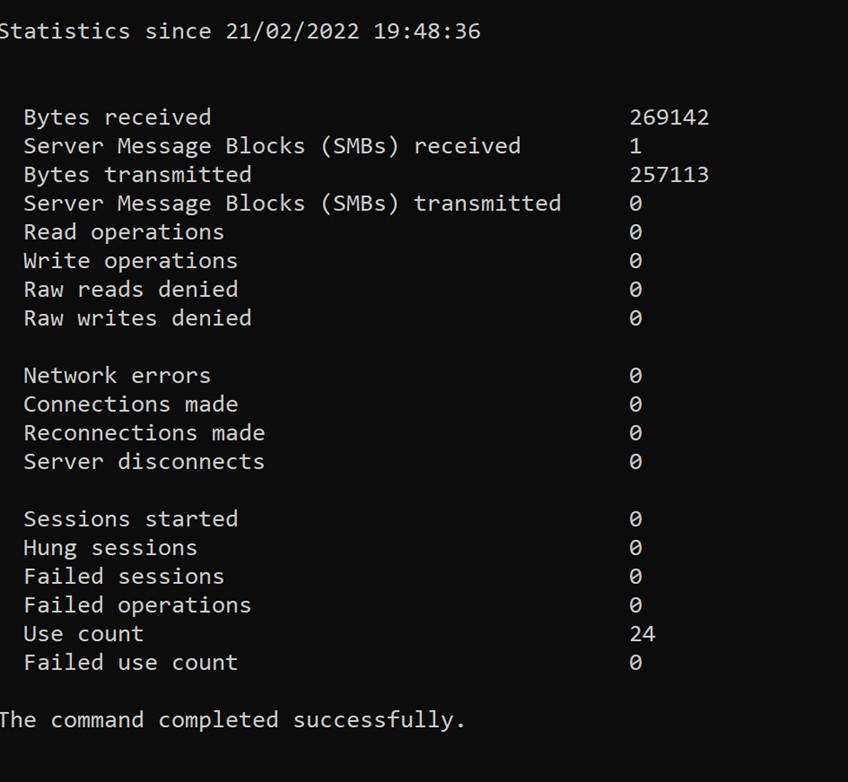
Net Statistics Command
Another way of checking the system uptime on Windows is to use your Command Prompt. On Windows 10, use the start menu to search cmd, or on Windows 11 – head to the magnifying glass and search in the same way.
All you need to do now is to enter “net statistics workstation” (or “net stats server” for server versions of Windows) and click Enter, and you will see a list of information. Towards the top, look for where the page says “Statistics since” and this date will be the last time the system was brought back online. One extra bonus about this approach is that you get some added data, for example read and write operations, network errors, and even a use count.
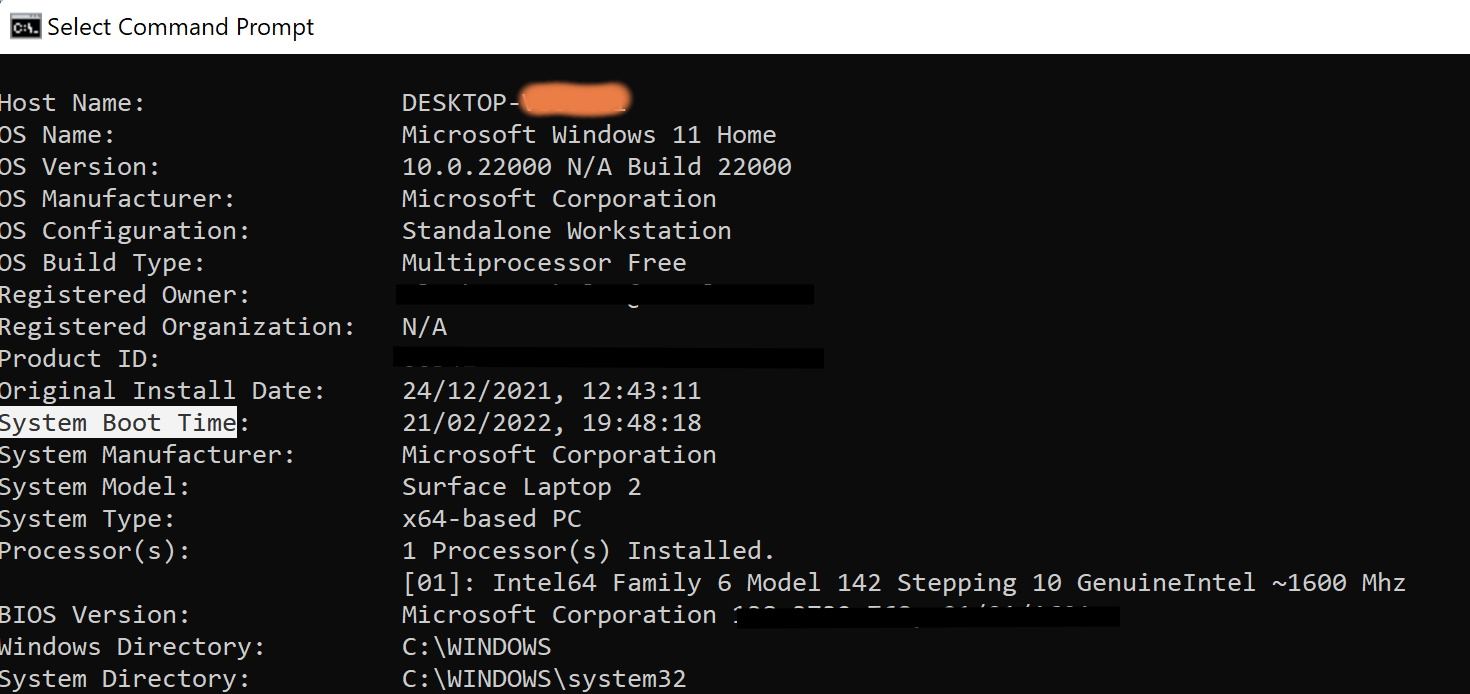
SystemInfo Command
Another route to getting information about system uptime on Windows 10 or 11 is to try the command “systeminfo”. Type it into your Command Prompt in the same way as you did above, and you’ll be able to access a whole load of system information about the machine, its user, and other general system facts and figures. Alongside all of that data, you’ll see a line that says System Boot Time, which will give you the system update information you’ve been looking for.
PowerShell
You can also use PowerShell to find your system uptime in Windows. Just use the command:
- (get-date) – (gcim Win32_OperatingSystem).LastBootUpTime
When you click Enter, you’ll be shown how long it’s been since your last reboot in Days, Hours, Minutes, Seconds and even Milliseconds! You can also see a total of these metrics, which can allow you to assess the age and health of the machine overall.
Checking Network Connectivity Uptime
Remember, sleep mode and hibernation mode do not count as downtime. If you use your machine for an hour, then put it into hibernation overnight, in the morning the uptime will be continuous since you began. You need to physically turn off the computer or restart it to reset these counters.
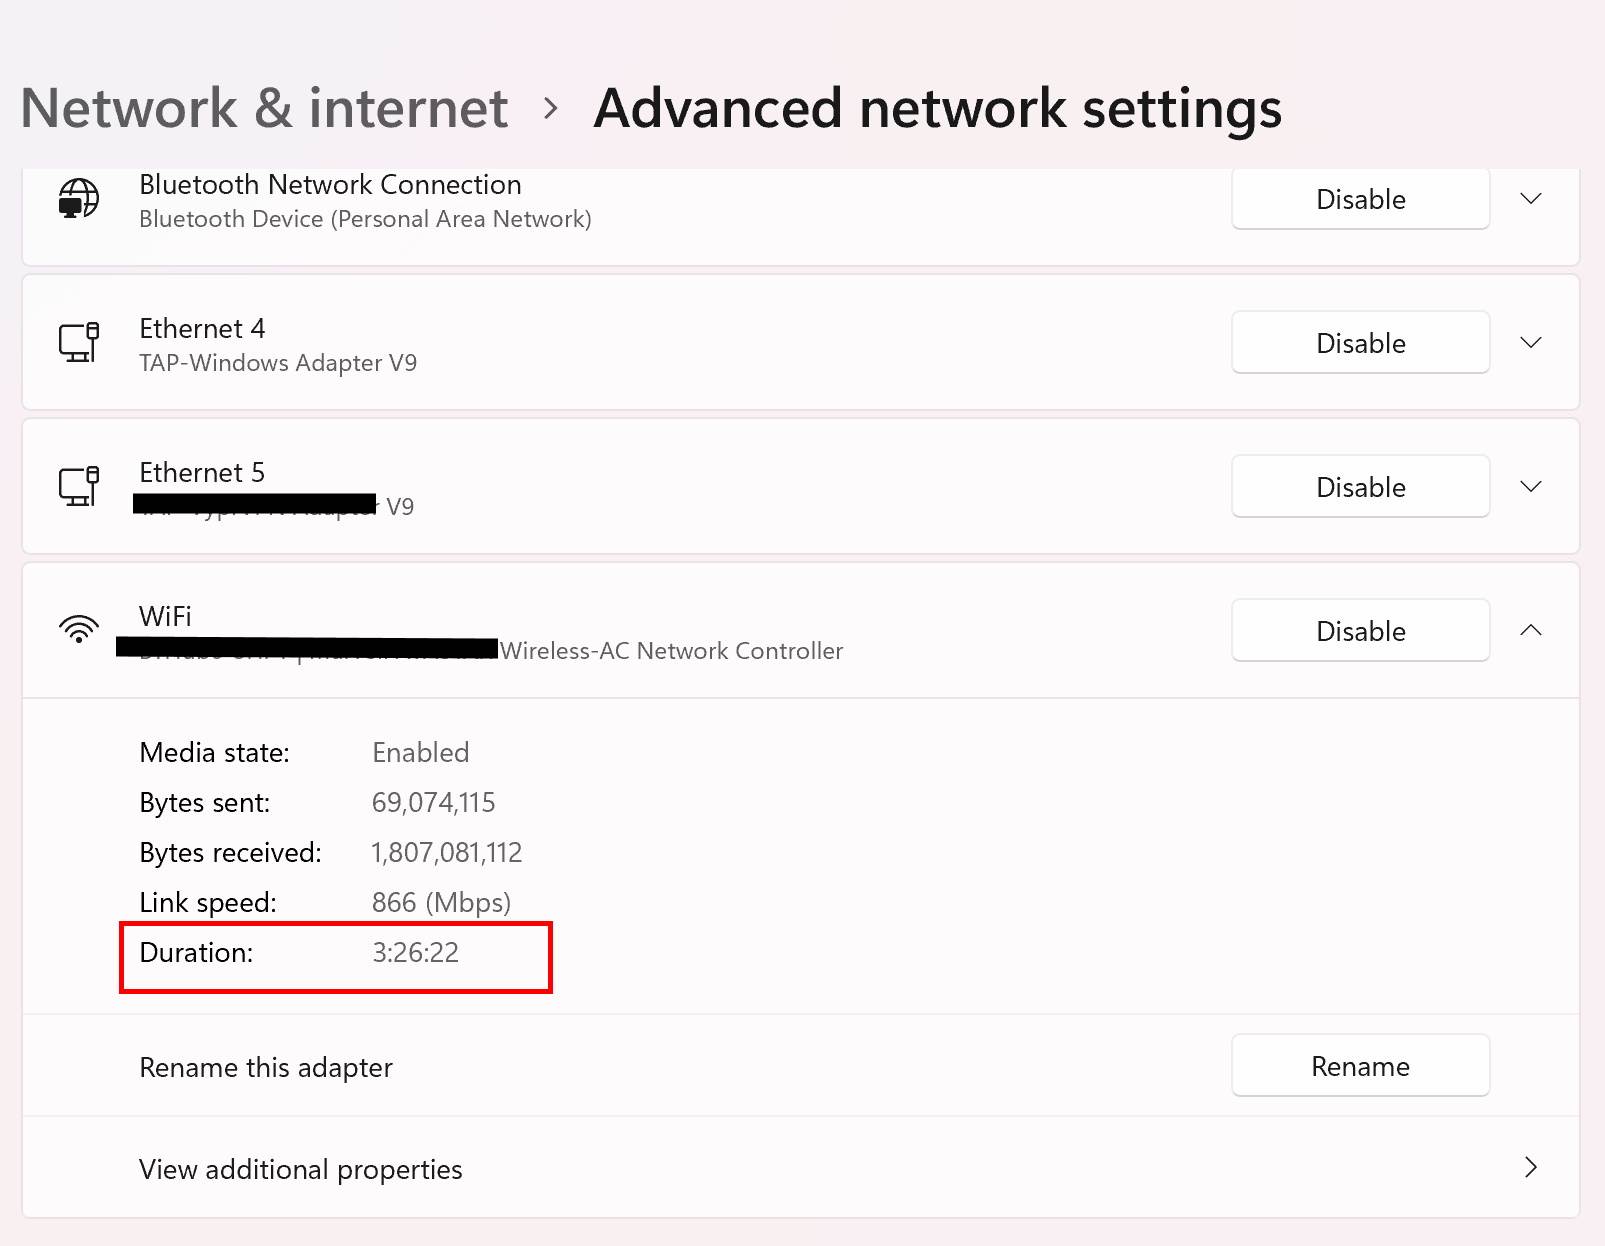
If you want to check how long a computer has been physically connected to a specific network without interruption, you can do this by heading to your Network and Sharing settings. In Windows 10 you can find the Network and Sharing Center, but on Windows 11 you might need to search Network Settings, or just click on advanced network information. Here, you can click on the network that you’re looking to track, and you will see a line where Duration is marked. This number is how long the machine has been continuously connected to the network. If your computer hibernates or goes to sleep, this number will reset.
These methods offer effective ways to check system uptime and performance on your Windows computers. Depending on your needs, whether it’s a quick check or a more detailed analysis, you can choose the approach that best suits you. Monitoring system uptime is crucial not only for maintaining the individual health of your computers but also for ensuring the overall robustness and efficiency of your network.
Optimizing network health with Atera: why it’s essential for your IT System
Maintaining the health of your network is crucial for ensuring smooth operations and minimizing disruptions. A well-functioning network supports efficient workflows, reliable connectivity, and strong security, all of which are essential for productivity and operational success. Regularly monitoring system uptime and network performance is a proactive approach to identifying and resolving potential issues before they impact your business.
Atera’s all-in-one IT management platform provides the tools you need to keep your network in top shape. With Atera, you gain access to real-time monitoring, automated alerts, and detailed reporting that help you stay on top of system performance and network health. By leveraging Atera’s powerful features, you can easily track uptime, address issues promptly, and ensure that your network operates smoothly and efficiently. Try Atera today with a 30-day free trial and experience how our platform can enhance your network management and support your IT infrastructure.
Related Articles

How to disable Windows Defender temporarily
Pausing Windows Defender is sometimes the right call. False positives, performance hits, and controlled testing are some real reasons to do it. But "temporarily" means something very different when attackers move from initial access to lateral movement in under 30 minutes.
Read now
How to fix Windows 11 error code 0xc00000f
A black screen and a boot failure code don't mean your data is gone. Error 0xc00000f means Windows can't find its own boot files, not that your drive failed. Startup Repair, System Restore, and a manual BCD rebuild can get you back up and running before you touch anything riskier.
Read now
How to set up auto login on Windows 11
The Windows 11 login screen is a security feature until it's standing between a kiosk, a build agent, or a digital signage terminal and the job it's supposed to do. Auto login removes that friction.
Read now
How to find the DPI resolution on Windows
Your new 4K monitor looks sharp, but your apps look terrible. That's DPI scaling, and Windows gives you four different ways to fix it, from a two-click Settings change to a registry edit for machines you can't reach through the UI.
Read nowEndless IT possibilities
Boost your productivity with Atera’s intuitive, centralized all-in-one platform