Generate summary with AI

Command Prompt gives you options that File Explorer simply doesn’t, such as partition-level control through diskpart, the ability to wipe a RAW or corrupted drive down to bare metal, and a path to scripting the whole process for repeat use. That last part matters more than it used to.
This guide walks you through exactly how to do it from the command line, from picking the right format type and file system to running the format itself through format or diskpart, scripting it for repeatable deployments, and verifying the drive’s health once you’re done.
» Learn how to use Command Prompt correctly
Choosing the right format and file system
Before you actually format a drive, you need to know what type of format you need and which file system fits how the drive will be used. Misunderstanding this could mean wasting hours on an unnecessary full format or setting up a drive that won’t work with the systems it needs to talk to.
Quick format vs. full format vs. low-level format
These three terms get used interchangeably, but they do very different things to the drive and the data on it.
Format type | What it does | What data gets removed | Time required |
Quick format | Rebuilds the file system and partition table | Files remain recoverable until overwritten | Seconds |
Full format | Removes files and scans the disk for bad sectors, writing zeros to every sector | Data recovery becomes very difficult | Minutes to hours, depending on drive size |
Low-level format (LLF) | Redefines the physical media layout at the factory level | N/A; not performed by end users | N/A |
Pick quick format when you’re reusing a healthy drive and don’t need to verify sector integrity. Pick full format when you’re decommissioning a drive, need bad-sector scanning, or need higher confidence that old data won’t be recoverable.
Note: Low-level format gets misused constantly. True LLF defines the physical layout of the media and isn’t something you can run on a modern drive as an end user since it happens at the factory. When someone says they want to “low-level format” a drive today, what they usually mean is a zero-fill or secure erase procedure using the drive’s own firmware, not an actual LLF.
NTFS vs. exFAT vs. FAT32
The file system determines what the drive can do once it’s formatted, and getting this wrong causes more support tickets than the format type does.
File system | Best for | Key traits |
NTFS | Dedicated Windows OS drive | Required for the Windows boot drive on modern versions; supports file-level permissions, journaling, and compression |
exFAT | Cross-platform portable storage | Natively supported on Windows, Linux, and macOS; supports files larger than 4 GB |
FAT32 | Legacy compatibility | Used when the target device is older or specifically requires it; capped at 4 GB per file |
If the drive is going into a Windows machine as a boot or system drive, NTFS isn’t optional because it’s the only file system Windows will accept for that role, and you get journaling as a safety net against corruption from sudden power loss.
If the drive needs to move between a Windows machine, a Mac, and a Linux box, exFAT is the practical default. FAT32 only comes into play when you’re dealing with older hardware or a device that specifically demands it, and the 4 GB file size ceiling is the thing that trips people up most often.
» Learn more: NTFS vs FAT
How to properly prepare and execute the format
Before running anything destructive, confirm you’re targeting the correct drive. This applies to every method below, so get it right once here rather than re-verifying it for each approach separately.
First identify the correct drive
- Back up any data you need to keep since formatting destroys the file system and may erase data
- Disconnect any non-essential external drives to reduce the risk of selecting the wrong disk
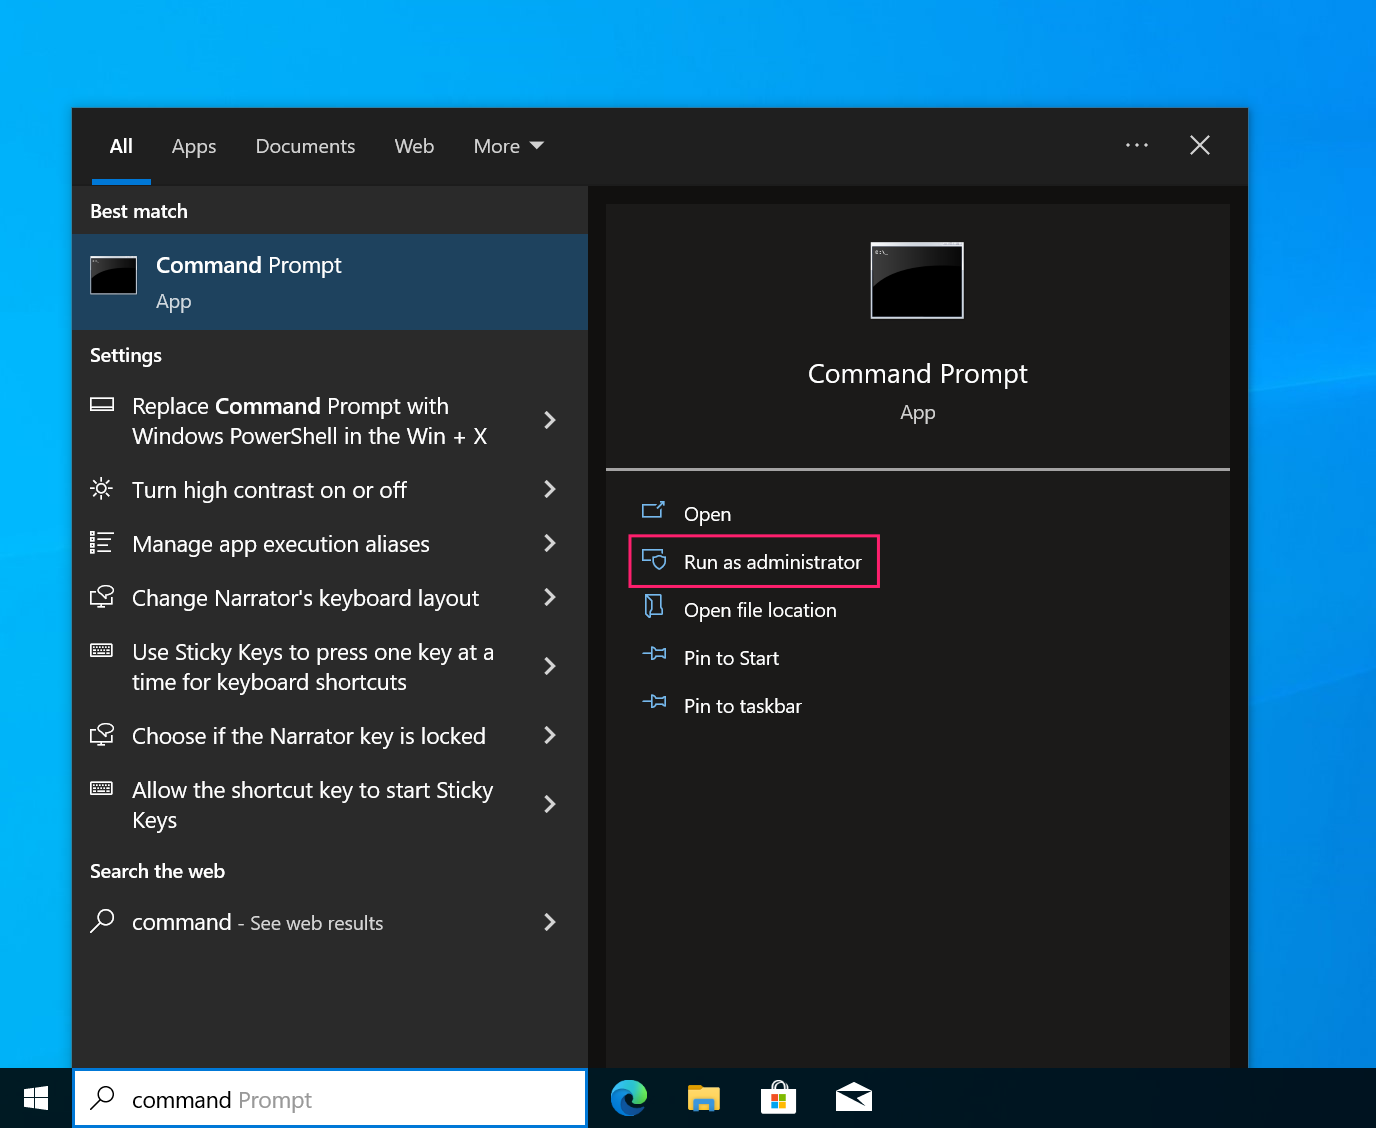
Open Command Prompt as administrator

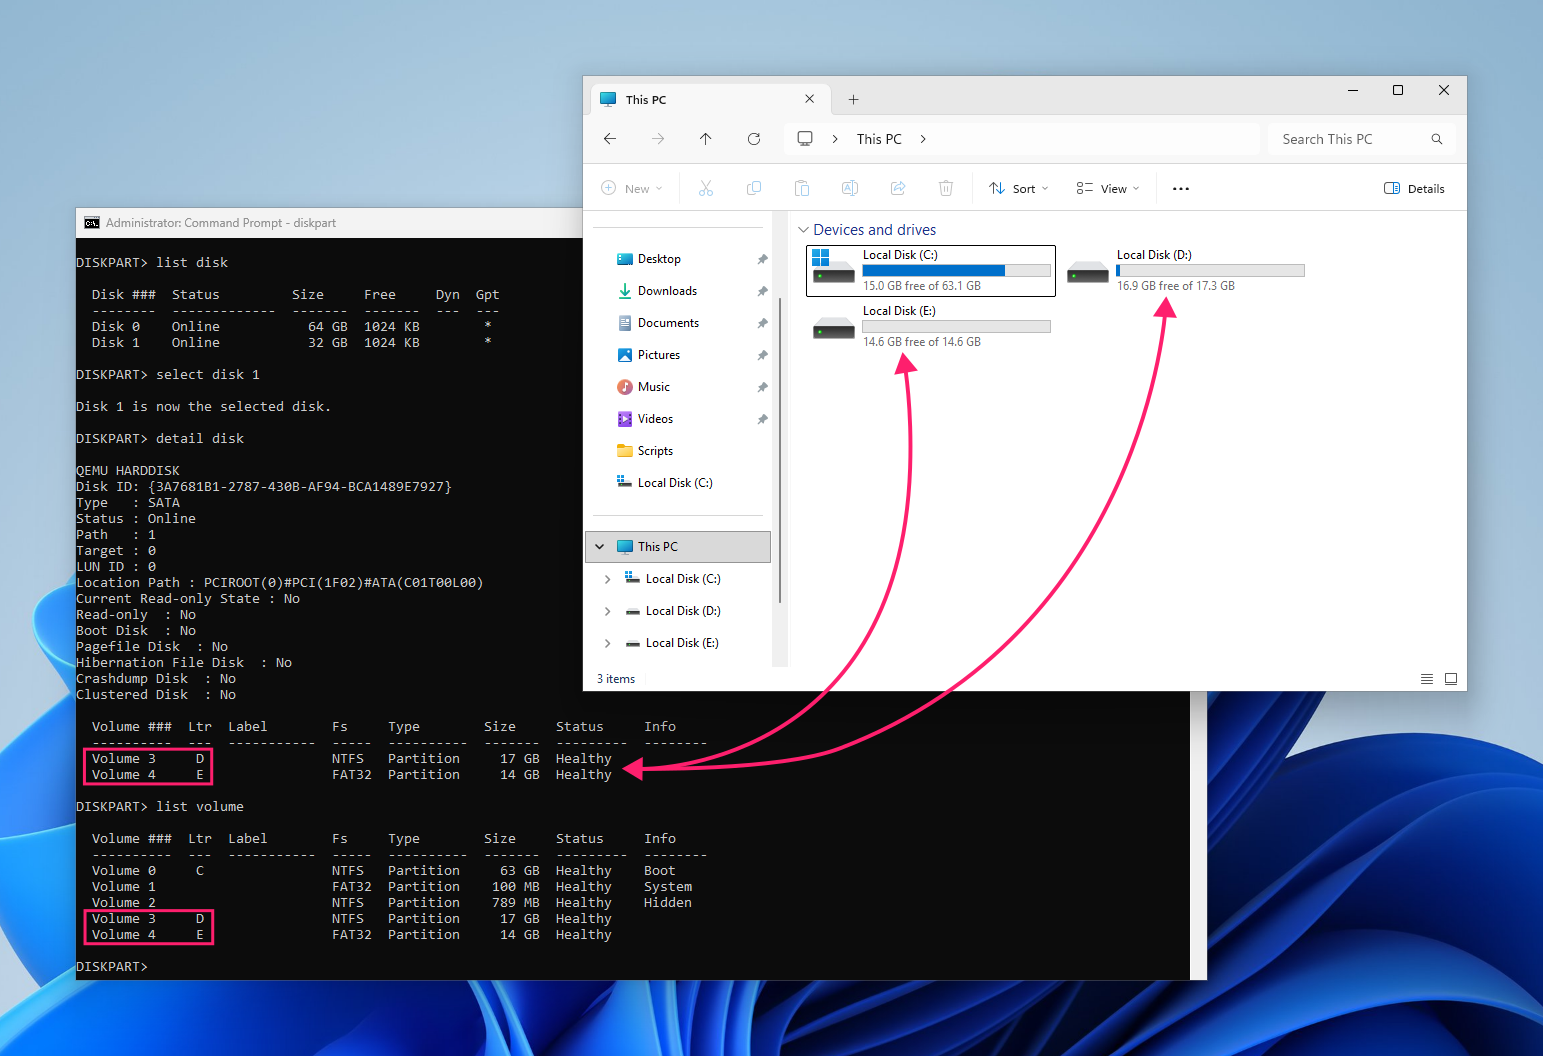
- Run
diskpartto open the partition manager utility - Run
list diskto display all connected disks - Run
select disk <number>to select the disk you intend to format - Run
detail diskto display detailed information about the selected disk and confirm it’s the right one Run
list volumeto cross-check drive letters, labels, and file systems before formatting. You can also cross-check this in File Explorer
- If you lose track of which disk is currently selected, run
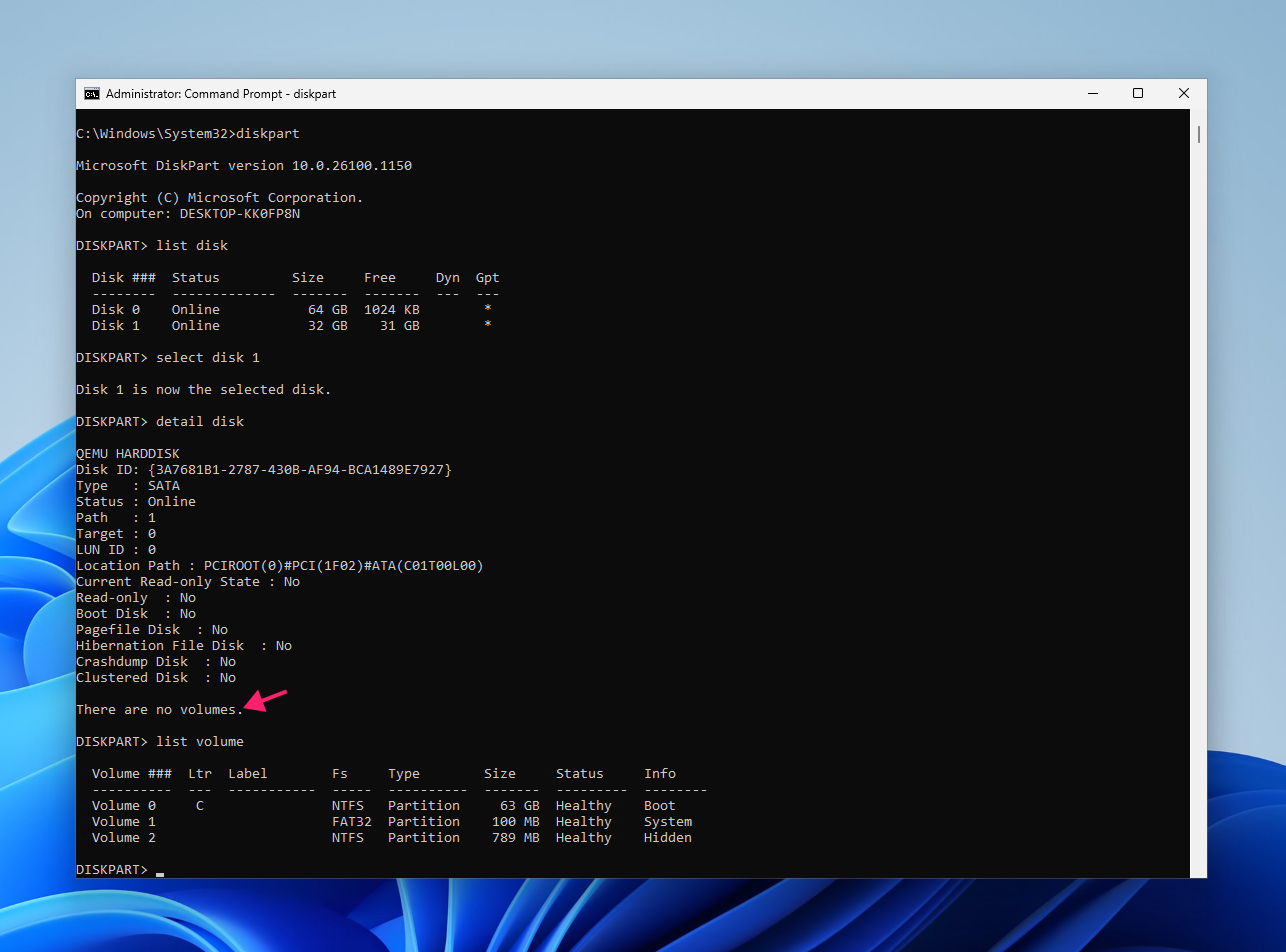
list diskagain, and an asterisk will appear next to the active disk If the drive isn’t partitioned,
detail diskwill return a There are no volumes message, which is expected
- Run
exitto leave thediskpartutility once you’ve confirmed the target
With the correct drive confirmed, pick one of the three methods below depending on what you’re trying to accomplish.
Method 1: Quick format with the format command
Use this when you already have a drive letter assigned and just need a straightforward quick format. It’s the fastest path for a healthy drive you’re reusing.
- Exit the
diskpartutility if you haven’t already - Run
format X: /FS:<FILE_SYSTEM> /Q, replacingXwith your drive letter and<FILE_SYSTEM>with your chosen file system (for example,NTFS) - Optionally, add the
/V:labelargument to label the volume Press Y to confirm the action, or N to abort, then press Enter

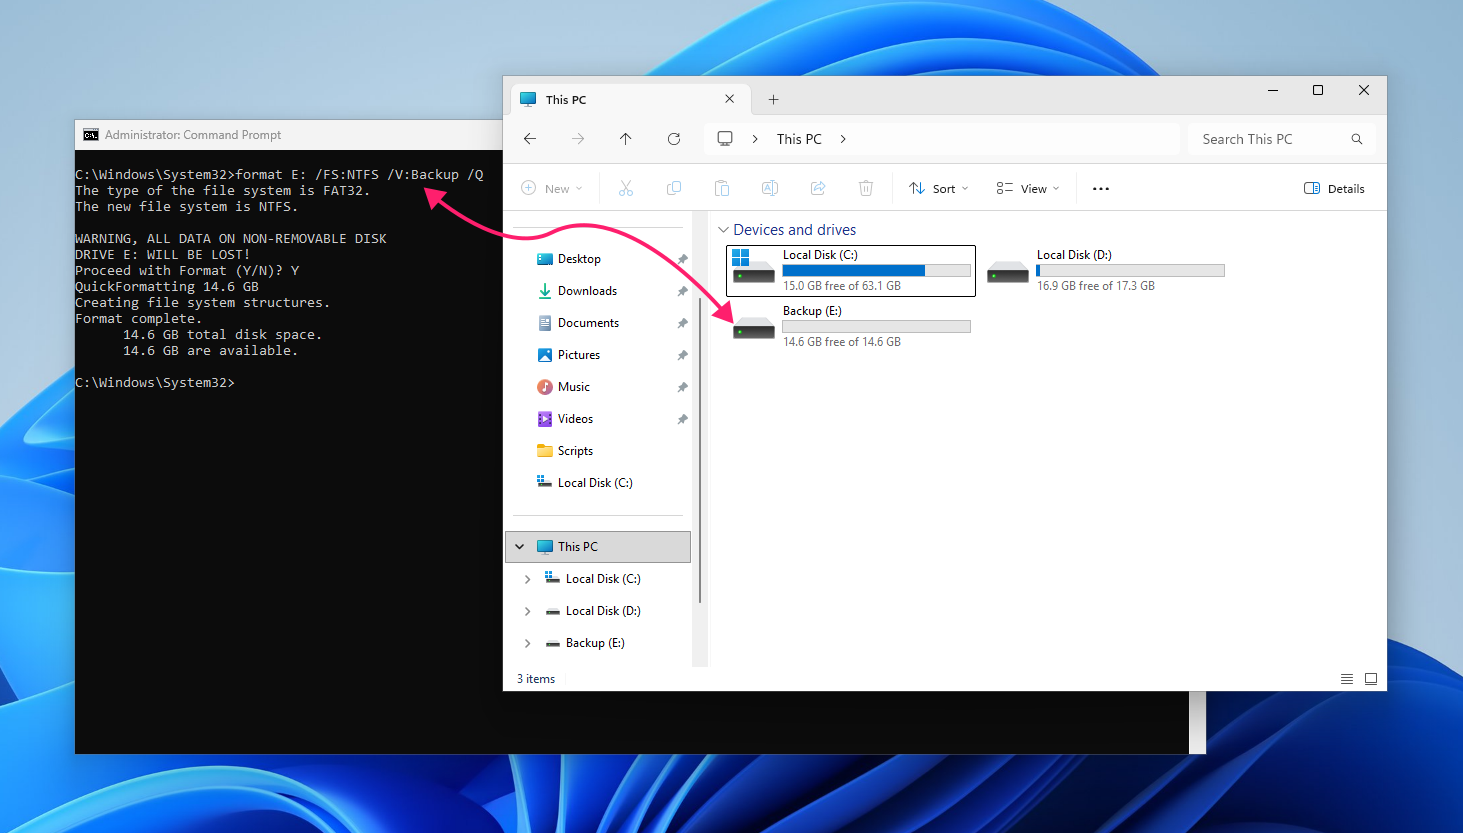
Consult Microsoft’s official format command documentation for the full list of supported arguments and syntax.
Method 2: Reformat an existing partition with diskpart
Use this when you need to reformat a specific partition without touching the rest of the disk, which is useful for a healthy partition that just needs a clean file system.
- Start
diskpartfrom an elevated Command Prompt window - Run
list diskto display all connected disks - Run
select disk <number>to select the desired disk - Run
list partitionto show the partitions on the currently focused disk - Run
select partition <N>to select the specific partition - Run
detail partitionto confirm you’ve selected the right one before proceeding Run
format fs=ntfs quickto perform a quick format on the selected partition using the NTFS file system
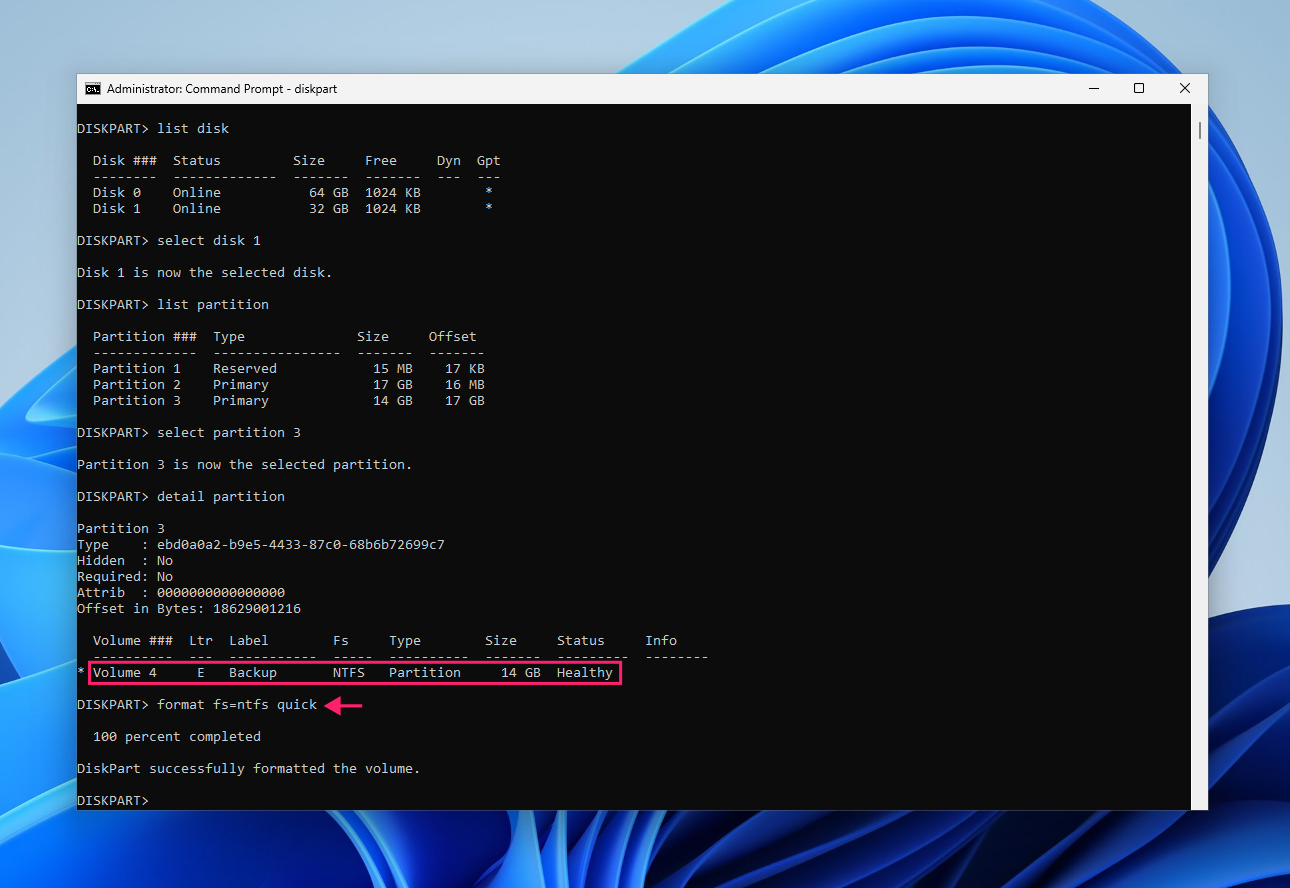
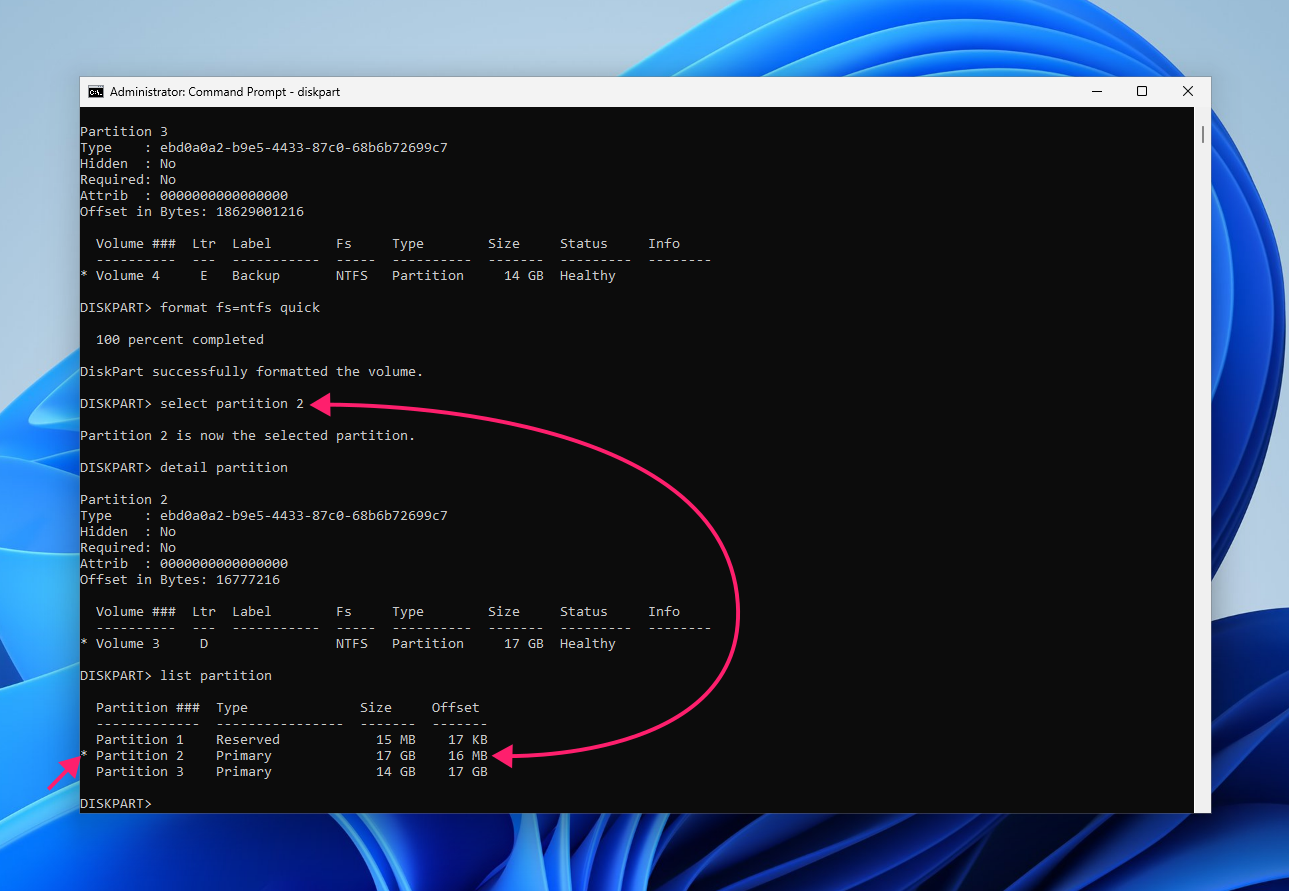
You can switch to a different partition at any point by running select partition <N> (or select volume <N>), then list partition (or list volume) to confirm the asterisk has moved to the newly selected entry.
» Here’s how to use Disk Cleanup in Windows 11
Method 3: Scripting the format for unattended deployment
Use this when you need to format the same way across multiple machines instead of running commands by hand on each one, which is the practical way for IT technicians to cover multiple endpoints.
First, you’ll need to create a DiskPart script file:
- Create a new text document
- Enter your sequence of commands, one per line, such as
select disk 1,clean,convert gpt,create partition primary,format fs=ntfs quick label="BackupDrive",assign letter=D Save it to a location all PCs can reach and name it something like
backup_format_script.txt
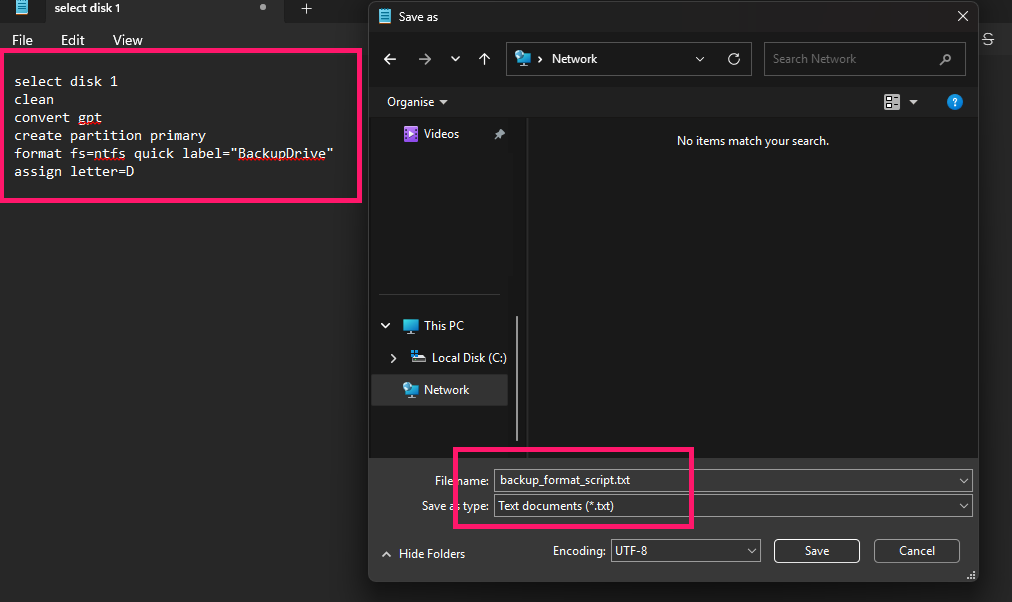
Then, you’ll need to create a batch file:
- Create a new text document
- Enter
@echo offon the first line - On the next line, enter
diskpart /s backup_format_script.txt, pointing to the script file’s saved location Save the file with a
.batextension, such asformat_backup_drive.bat
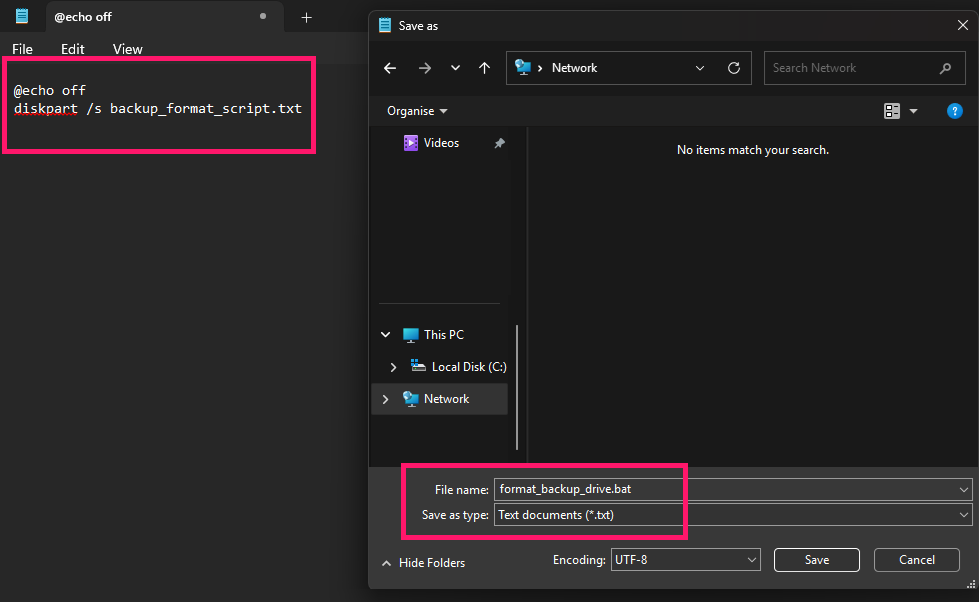
Once you’ve validated the script on a test machine, running it endpoint by endpoint stops being practical past a handful of machines. Atera’s RMM lets you deploy the same batch file remotely through Command Prompt, pushing it out and triggering execution across your managed endpoints from a single console instead of touching each PC individually. Results and any errors are logged centrally rather than scattered across C:Logs on separate machines.
A few things to keep in mind with this approach:
- In order to run multiple DiskPart scripts you need to allow at least 15 seconds between each script (add
timeout /t 15between calls in the batch file). - Error handling is problematic since, by default, a script stops on error. You can use the
noerrparameter can be used (for exampleclean noerr) to continue through non-critical failures. - Logging can be done by saving the output to a file:
diskpart /s format_script.txt > C:Logs%COMPUTERNAME%_backup_format.log.
For more complex deployments, a PowerShell script using cmdlets like Clear-Disk, New-Partition, or Format-Volume is often more practical than a batch/DiskPart combination, since PowerShell returns structured objects rather than plain text, which makes error handling more reliable.
» Confused about the extensions? Here’s how to show file extensions in Windows 11
Handling edge cases and verifying the result
Not every format goes cleanly. Here’s what to do when a drive won’t cooperate, plus how to confirm the drive is actually healthy once you’re done.
Rescuing a RAW or severely corrupted drive
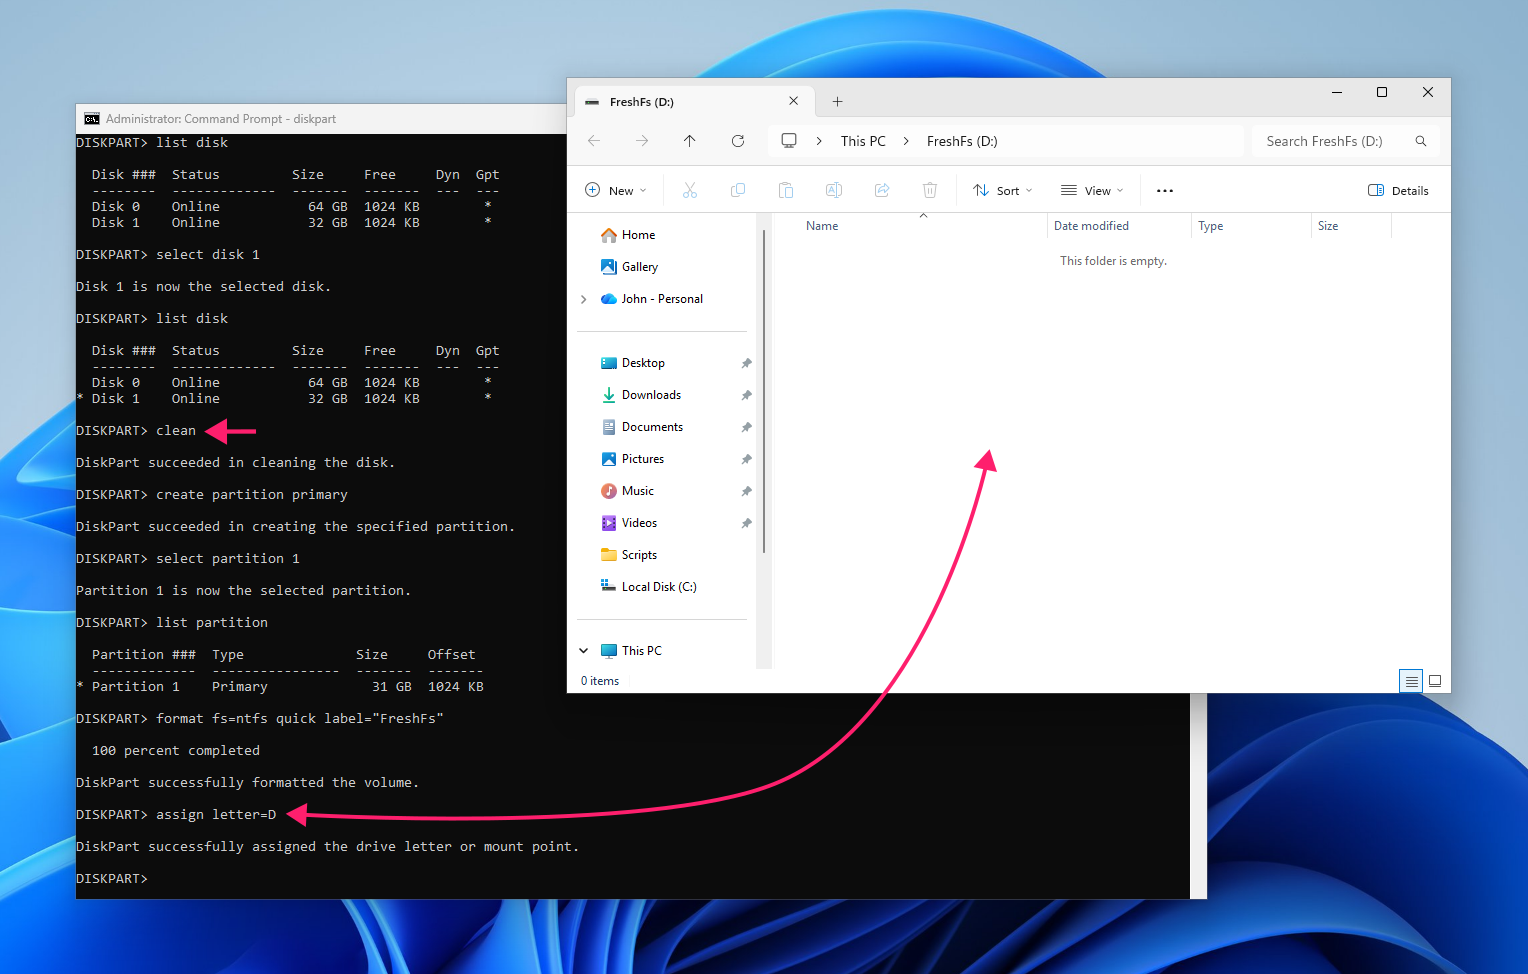
Use this when a drive shows up as RAW or has a corrupted partition table that a standard format won’t touch. It wipes the partition table entirely and rebuilds it from scratch.
- Start
diskpartfrom an elevated Command Prompt window - Run
list diskto display all connected disks - Run
select disk <number>to select the affected disk - Run
cleanto wipe the partition table on the selected disk. If you need a more secure erase, useclean allinstead, which writes zeros to every sector - Run
create partition primaryto create a new primary partition; this automatically shifts focus to the new partition - Run
format fs=ntfs quick label="NewName"to format the new partition Run
assign letter=Dto mount the partition, replacing the drive letter as needed
Resolving write-protected or access-denied errors
Use this when the drive throws a “write-protected” or “access denied” error during formatting. It clears the read-only attribute that’s blocking the operation.
- Start
diskpartfrom an elevated Command Prompt window - Run
list diskto display all connected disks - Run
select disk <number>to select the affected disk - Run
attributes disk clear readonlyto clear the read-only attribute on the selected disk If the issue is specific to a volume rather than the whole disk, run
select volume <N>followed byattributes volume clear readonlyinstead
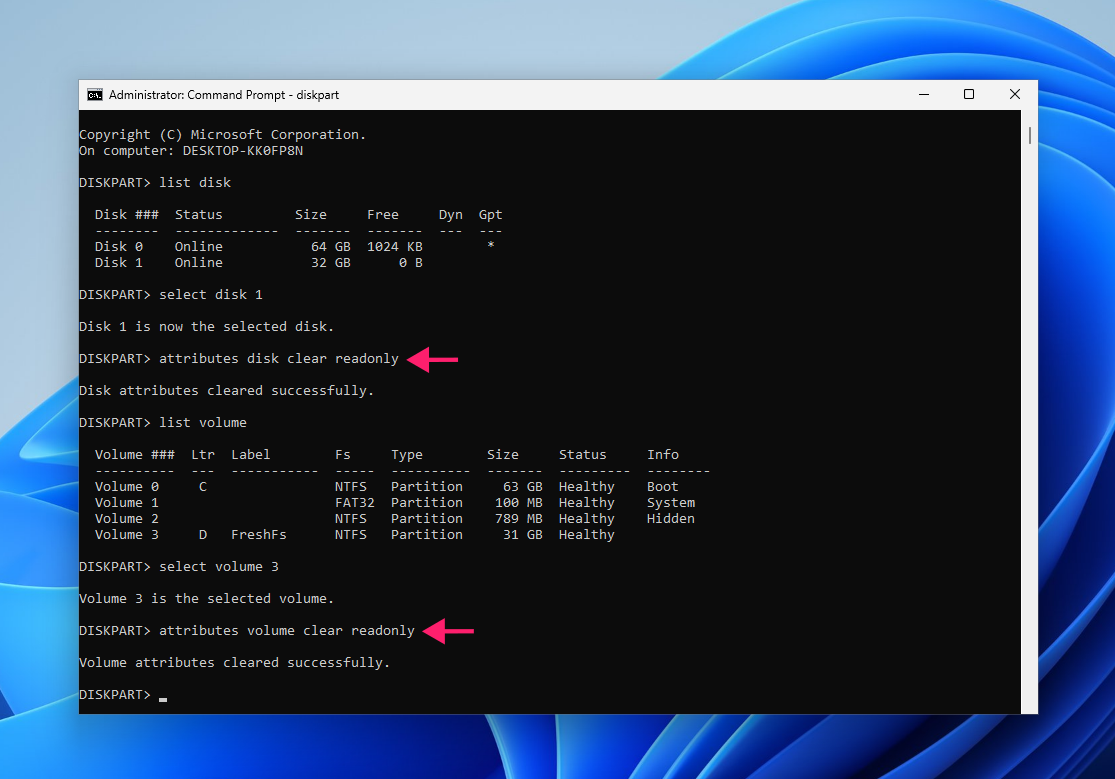
If clearing the read-only attribute doesn’t resolve it, it could also be caused by not running Command Prompt as administrator, a physically failing drive, or a corrupted file system.
» Did you know you can set something to always run as administrator?
Verifying drive integrity after formatting
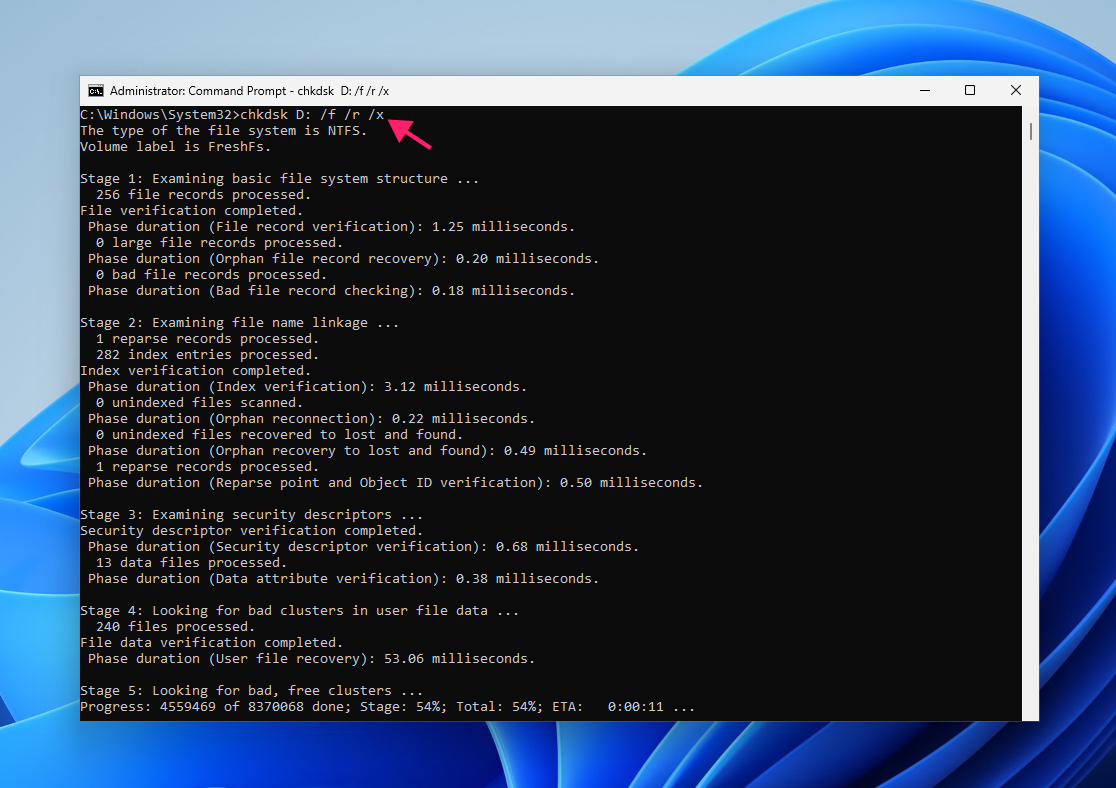
Run this immediately after formatting to confirm the drive’s structural integrity and sector health before putting it back into service.
- Run
chkdsk X:, replacingX:with the corresponding drive letter, to check the file system and logical structure - Add
/fto the command to fix logical errors it finds - Add
/rto locate bad physical sectors and attempt to recover readable information from them Add
/xto force the volume to dismount first, allowing a deeper scan
Command-line formatting gives you control the GUI can’t
Command-line formatting gives you the precision GUI tools can’t. It gives you the right format type for the job, the right file system for how the drive will be used, and a repeatable process instead of a one-off click-through. Once you’ve got that down, scaling it is the next natural step because nobody wants to run the same nine diskpart commands by hand across forty endpoints.
That’s where Atera comes in. IT teams and MSPs managing more than a handful of machines can deploy the same scripts remotely across every managed endpoint, on a schedule, with the results logged centrally instead of scattered across individual terminal sessions.
Frequently Asked Questions
Related Articles

How to reduce alert fatigue across your IT team
Your technicians aren't ignoring alerts because they're careless. They're ignoring them because most alerts have taught them to. Once the stream stops being trustworthy, real failures slip past with the noise. Fixing it means deciding what deserves an interruption, tuning out transient spikes, collapsing alert storms, and automating the fixes you've run a hundred times.
Read now
How to close the IT skills gap on your team
Course completions don't close skills gaps. Technicians finish the training, then hand the first unfamiliar failure straight back to a senior engineer. Real capability gets built on live tickets, incidents, and maintenance windows, with guidance that fades as competence grows.
Read now
How to calculate cost per ticket (and why most teams get it wrong)
Most cost-per-ticket figures are wrong before anyone reads them. Missing overhead, tickets that were opened but never closed, spam and duplicates padding the count, and one month's costs divided by another month's tickets all make support look cheaper than it is. Fix both sides of the division and the number finally shows where technician time and money actually go.
Read now
How to prepare for a software license audit
A vendor audit notice doesn't wait for you to get organized. It demands proof, right now, that every install matches every entitlement you've paid for, and most IT teams find out the hard way how much they don't actually know about their own environment. Getting audit-ready before the letter arrives is the difference between negotiating from strength and paying for months of scrambling.
Read nowEndless IT possibilities
Boost your productivity with Atera’s intuitive, centralized all-in-one platform









