
Generate summary with AI

You press a key and nothing happens, or your keyboard starts behaving differently from normal. A setting such as Filter Keys may be the reason, especially if keystrokes are being delayed, ignored, or repeated differently. These accessibility features are useful for some of your users, but they can be frustrating when enabled by accident or when an application needs quick, precise keyboard input.
In this blog, we’ll explain how Filter Keys work and show you how to disable them on Windows, Mac, and Linux.
What you need to know first about Filter Keys
Filter Keys are accessibility features designed to make keyboard input easier to control, particularly for users with motor difficulties. They can prevent certain unintended keystrokes from being registered, such as rapid repeated presses or inputs caused by holding a key down too long.
The feature varies between operating systems. Windows uses Filter Keys, while macOS and GNOME offer related features such as Slow Keys and Bounce Keys. These settings adjust how the system interprets keyboard input based on factors such as the timing, duration, and repetition of keystrokes.
Essentially, they help users deal with a few potential problems, such as:
- Accidental repetition: Repeated keystrokes caused by hand tremors or involuntary movements can be filtered.
- Brief inputs: Very short key presses can be ignored depending on the configured settings.
- Held keys: The system can prevent an unintentionally held key from generating repeated characters.
- Rapid input: Features such as Bounce Keys can prevent repeated presses within a short period from being registered.
What permissions are needed to disable Filter Keys?
Filter Keys are normally configured at the user level, so a standard user can generally enable or disable the feature without administrator privileges.
The main exception is a managed workstation. If an organization has enforced accessibility settings through Group Policy, mobile device management (MDM), or another administrative control, users may not be able to change the setting themselves. In those cases, only a technician or IT admin can do it.
» Find out how to always run as administrator
When should you disable Filter Keys?
Filter Keys can be useful for accessibility, but they’re inconvenient when an application depends on rapid or precisely timed keyboard input. Here are the main situations where a user might benefit from having Filter Keys disabled:
- Complex shortcuts: Multi-key combinations or keyboard macros may not behave as expected if individual inputs are filtered.
- Keyboard-heavy applications requiring precise timing: Software that depends on repeated or simultaneous inputs may respond differently.
- Other accessibility features are enabled: Settings like Sticky Keys can change how modifier keys and repeated inputs behave, potentially causing unexpected results.
These issues are particularly relevant when troubleshooting reports of keyboard lag, missed keystrokes, or unexpected key behavior. The exact effect depends on the operating system, accessibility configuration, and application involved.
4 ways to turn off Filter Keys in Windows
There are four ways to turn off Filter Keys in Windows, depending on whether you want to use a keyboard shortcut, Windows Settings, the legacy Control Panel, or manage the setting across multiple devices.
Method 1: Use the right shift keyboard shortcut
This is the quickest method and is best for users who simply want to turn Filter Keys off without navigating through Windows settings.
Follow these steps:
- Locate the Right Shift key on your keyboard. Press and hold it for eight seconds
- Release the key when Windows responds
- Filter Keys will be toggled off if it was enabled
Method 2: Disable Filter Keys through Windows settings
This method is better if you want to turn off Filter Keys and prevent the keyboard shortcut from accidentally reactivating it. It’s the recommended approach if you frequently trigger Filter Keys unintentionally.
Follow these steps:
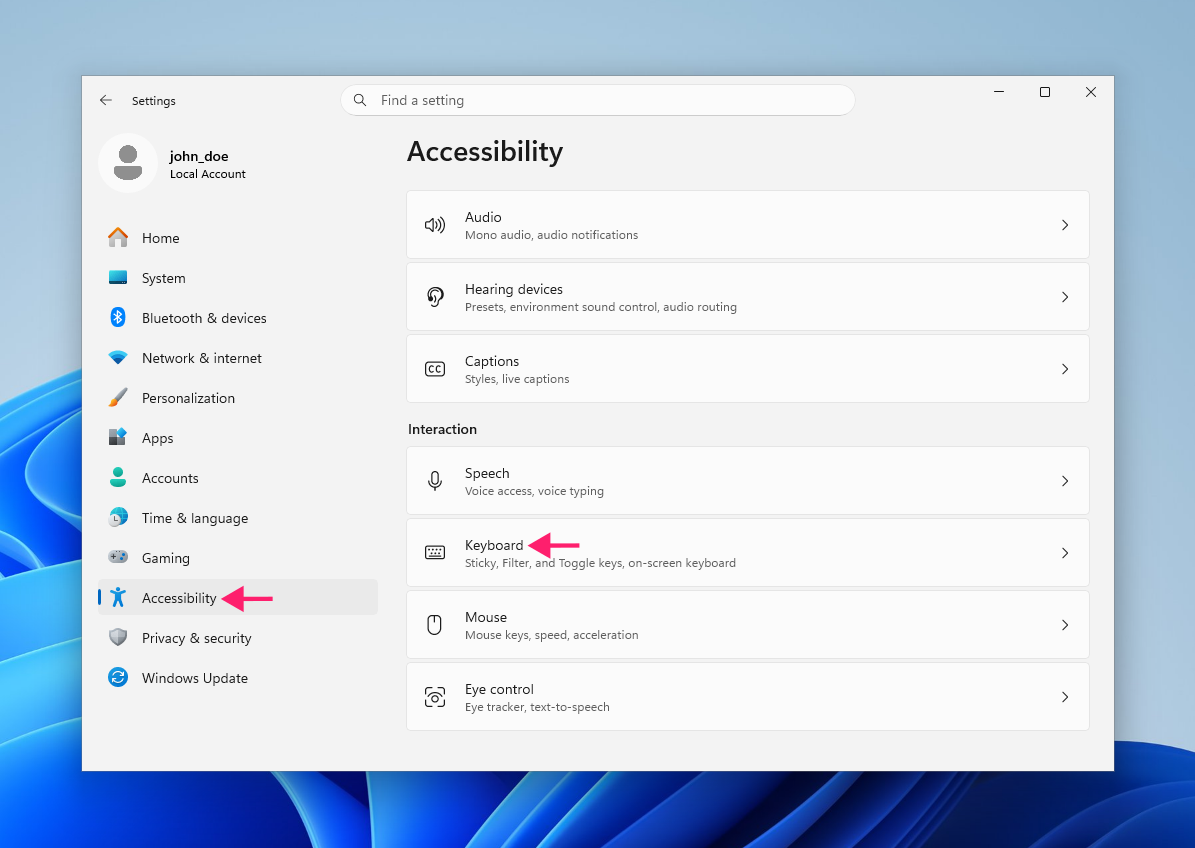
- Press Win + I to open Settings
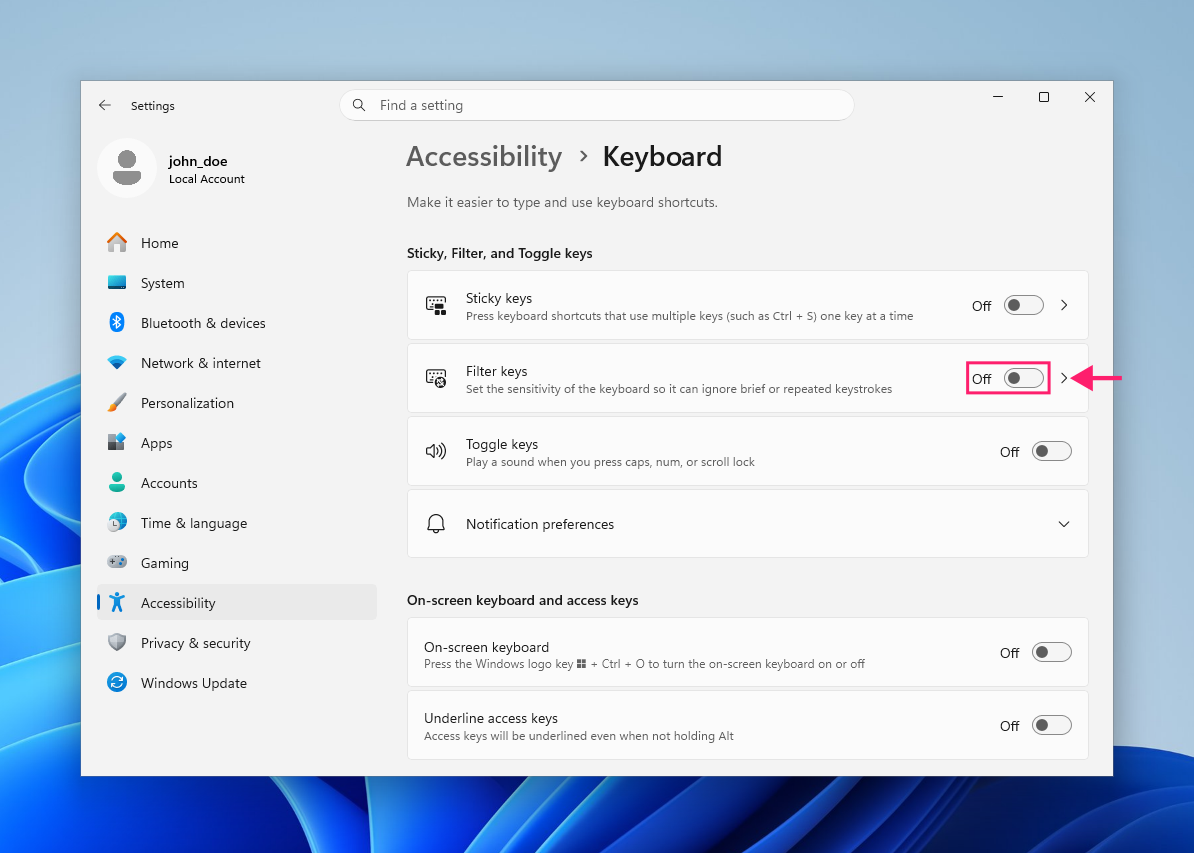
Select Accessibility > Keyboard

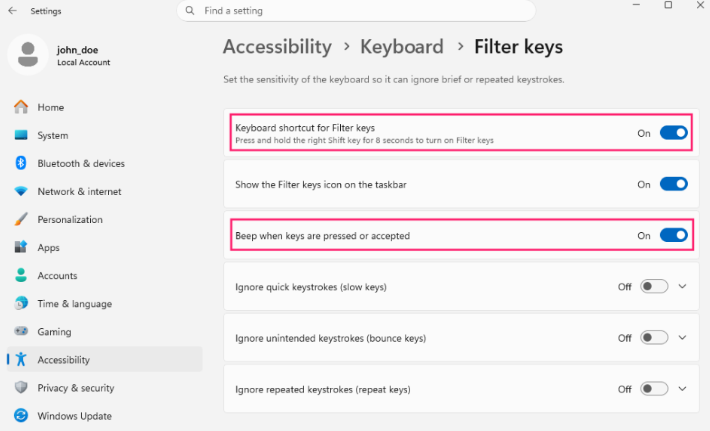
Find Filter Keys and toggle it Off

Also turn off the option that allows the keyboard shortcut to activate Filter Keys

Method 3: Disable Filter Keys through the legacy Control Panel
The legacy Control Panel provides another way to disable Filter Keys and its keyboard shortcut. This method is useful if you prefer the traditional Windows interface or want to access the more detailed Filter Keys configuration.
Follow these steps:
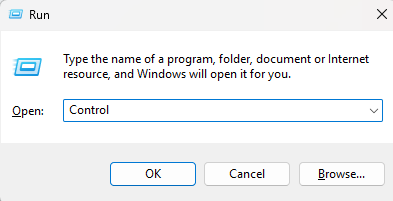
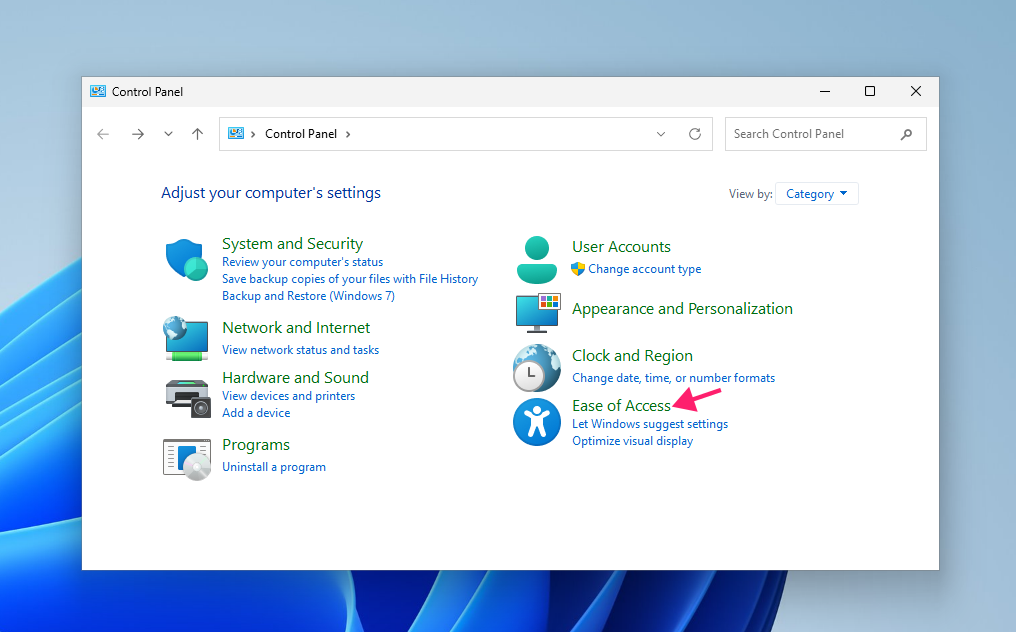
Press Win + R to open the Run dialog. Type control and press Enter

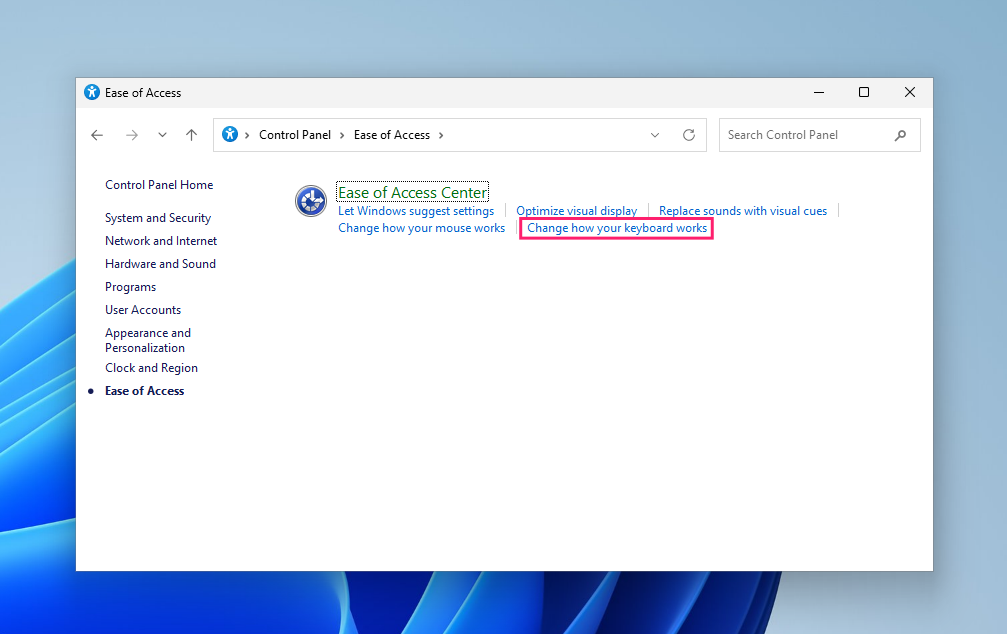
Select Ease of Access

Click on Change how your keyboard works

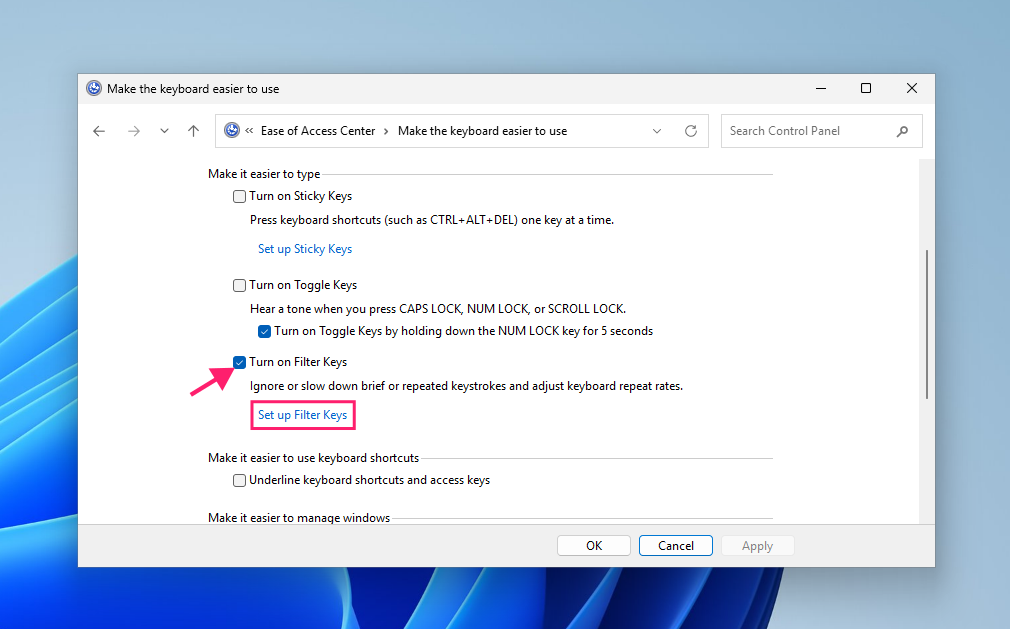
Scroll down and uncheck Turn on Filter Keys

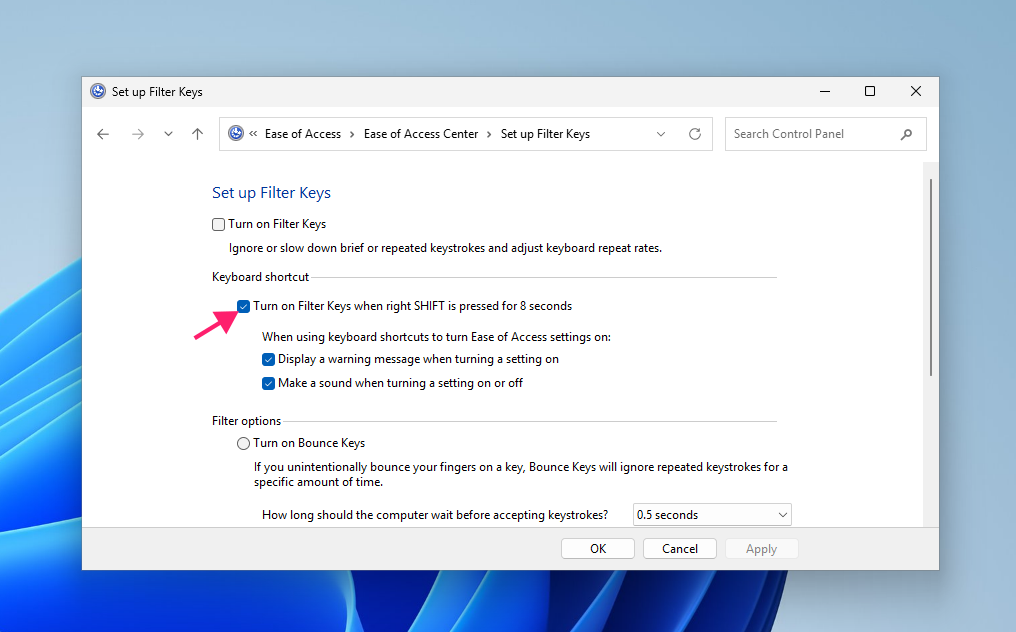
If you want to also disable the keyboard shortcut, click on Set up Filter Keys and uncheck the Turn on Filter Keys when right SHIFT is pressed for 8 seconds option
Method 4: Disable Filter Keys using Group Policy
This method is usually used by IT administrators managing multiple Windows devices across an enterprise environment. There’s no dedicated Group Policy setting for Filter Keys, but admins can configure the settings at scale by modifying the registry. You can deploy the registry change through Group Policy Management.
Follow these steps:
- Open Group Policy Management and select the relevant GPO
- Go to User Configuration > Preferences > Windows Settings > Registry Editor
Modify the Flags value under
HKEY_CURRENT_USERControl PanelAccessibilityKeyboard Response. Set the value to 26 to turn off Filter Keys, the Shift key shortcut, taskbar icon, and sound notification
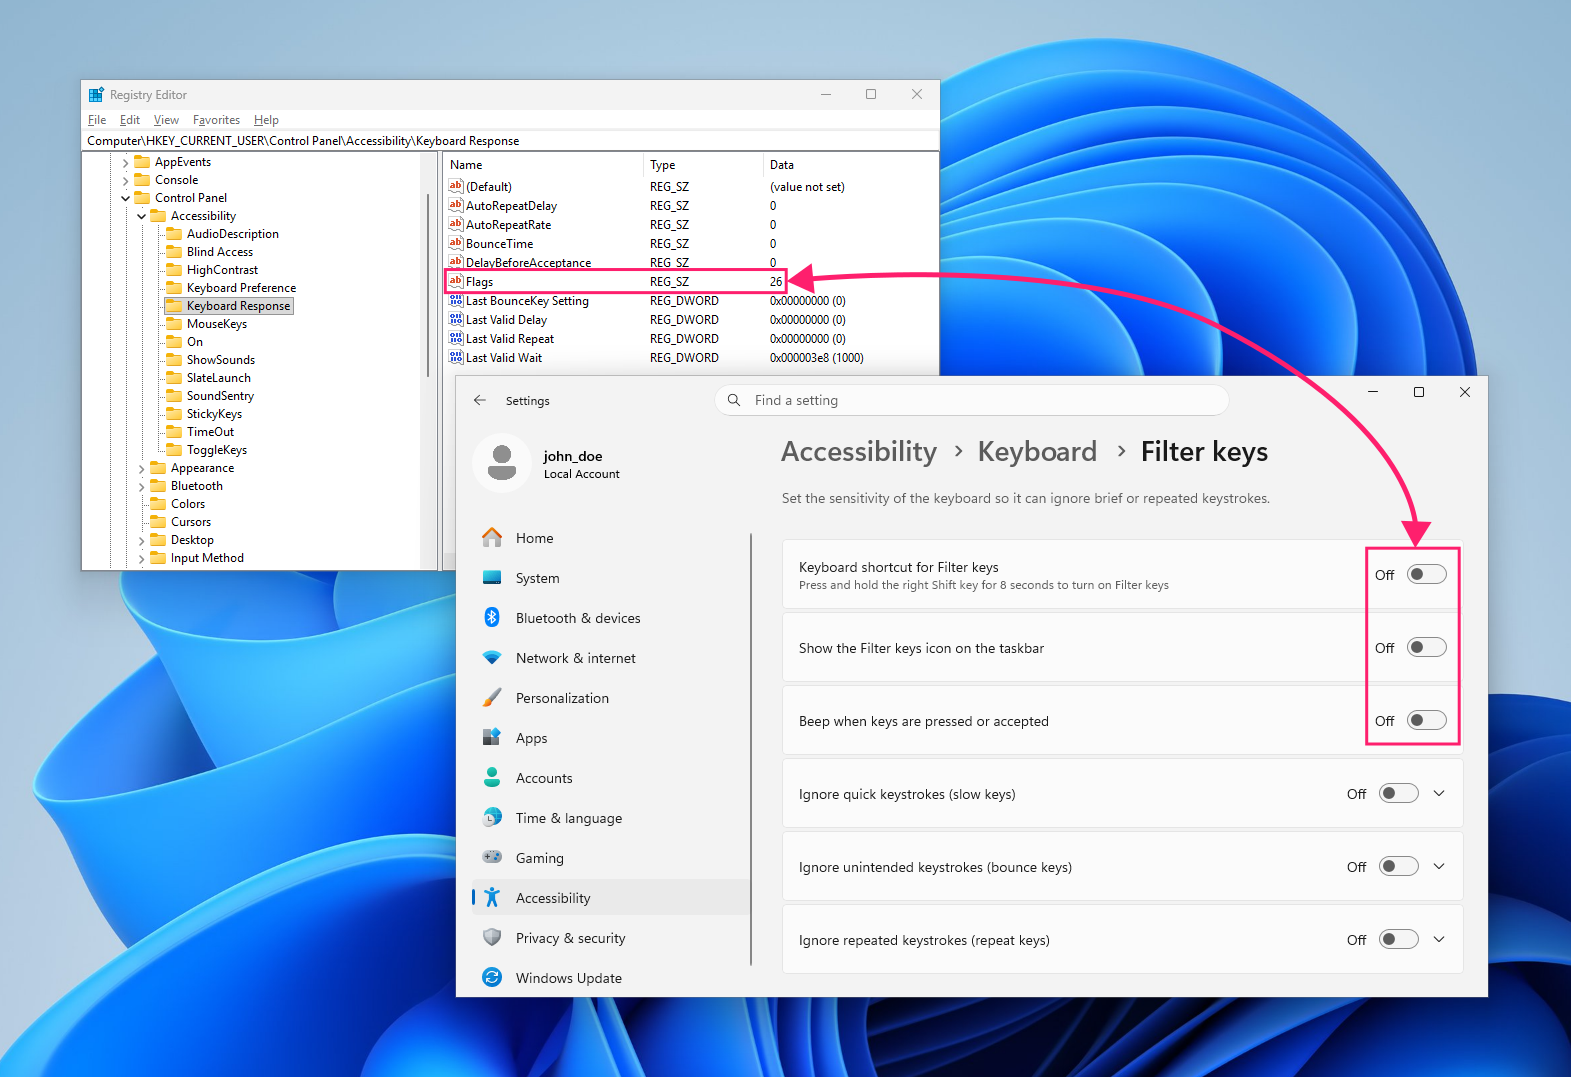
Did you know? With Atera, IT teams can deploy these changes remotely using remote PowerShell scripting. Write a PowerShell script to make the required registry or GPO changes, or ask AI Copilot to create the script for you. You can then add it to your script library and deploy it to specific devices or groups through the Atera RMM platform.
» Learn more about simplifying group policy management with Atera
How to turn off Slow Keys on Mac
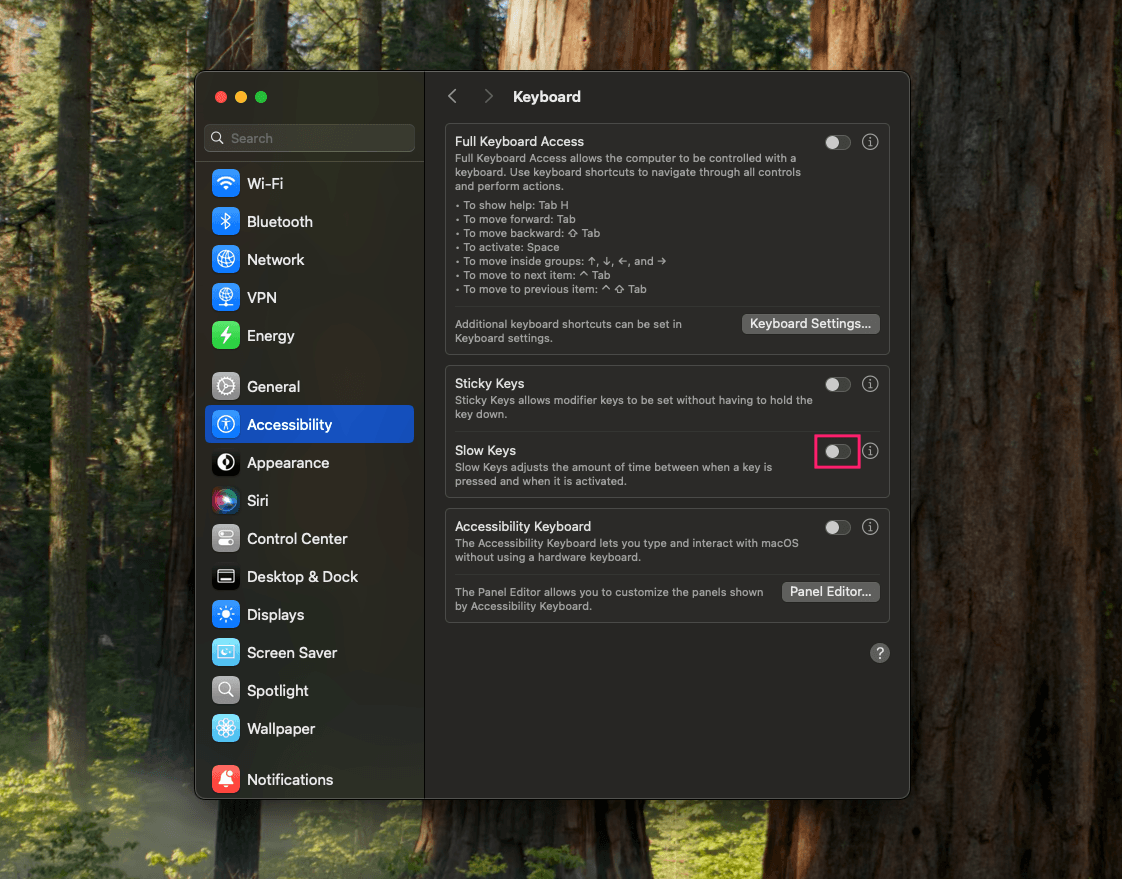
Slow Keys is the macOS accessibility feature most similar to Windows Filter Keys. It makes your Mac wait before registering a keystroke, which can help prevent accidental key presses. You can disable it directly through System Settings if you no longer need the feature or if it was turned on accidentally.
Follow these steps:
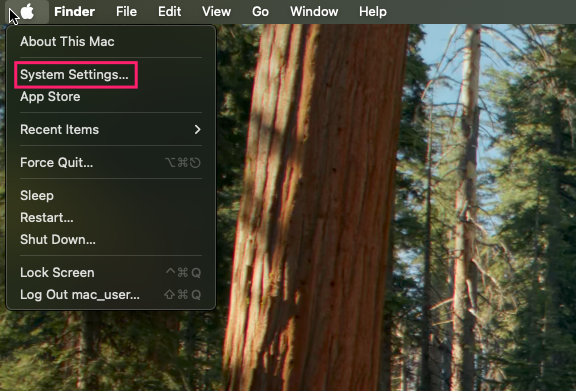
Press the apple logo (top left) on the top menu bar and select System Settings

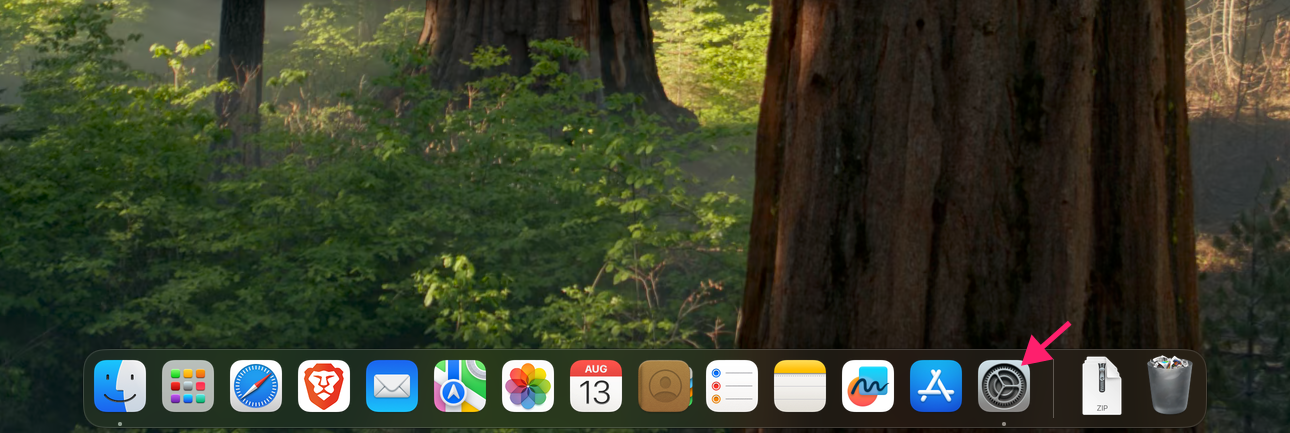
Alternatively, press the settings icon on the dock

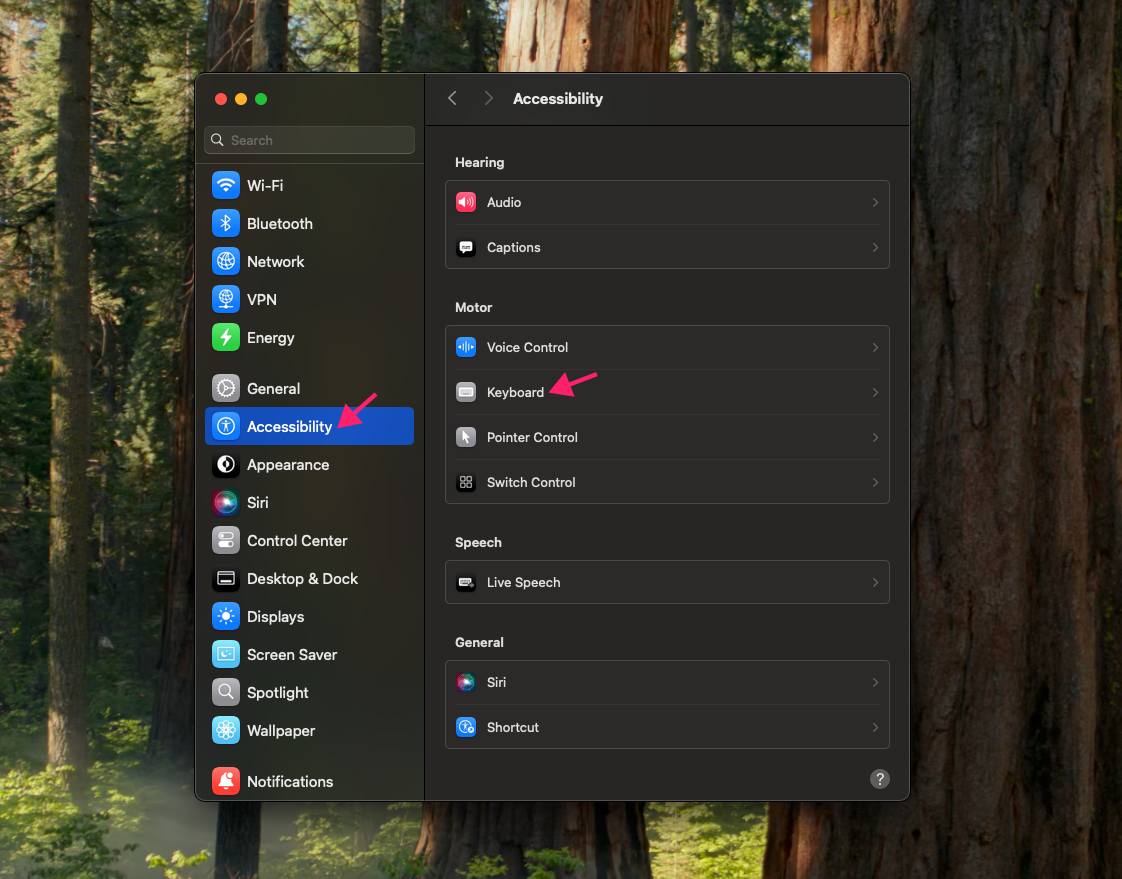
Go to Accessibility > Keyboard

Locate the Slow Keys section and switch it to the off position
» Don’t miss our guide to enabling RMM on Mac
2 ways to disable Slow Keys or Bounce Keys on Linux
There are two ways to disable Slow Keys or Bounce Keys on Linux: through the graphical settings interface or by using Terminal commands.
Method 1: Use the graphical interface
This method is usually best for users who prefer changing settings through the desktop interface rather than using Terminal commands.
Follow these steps:
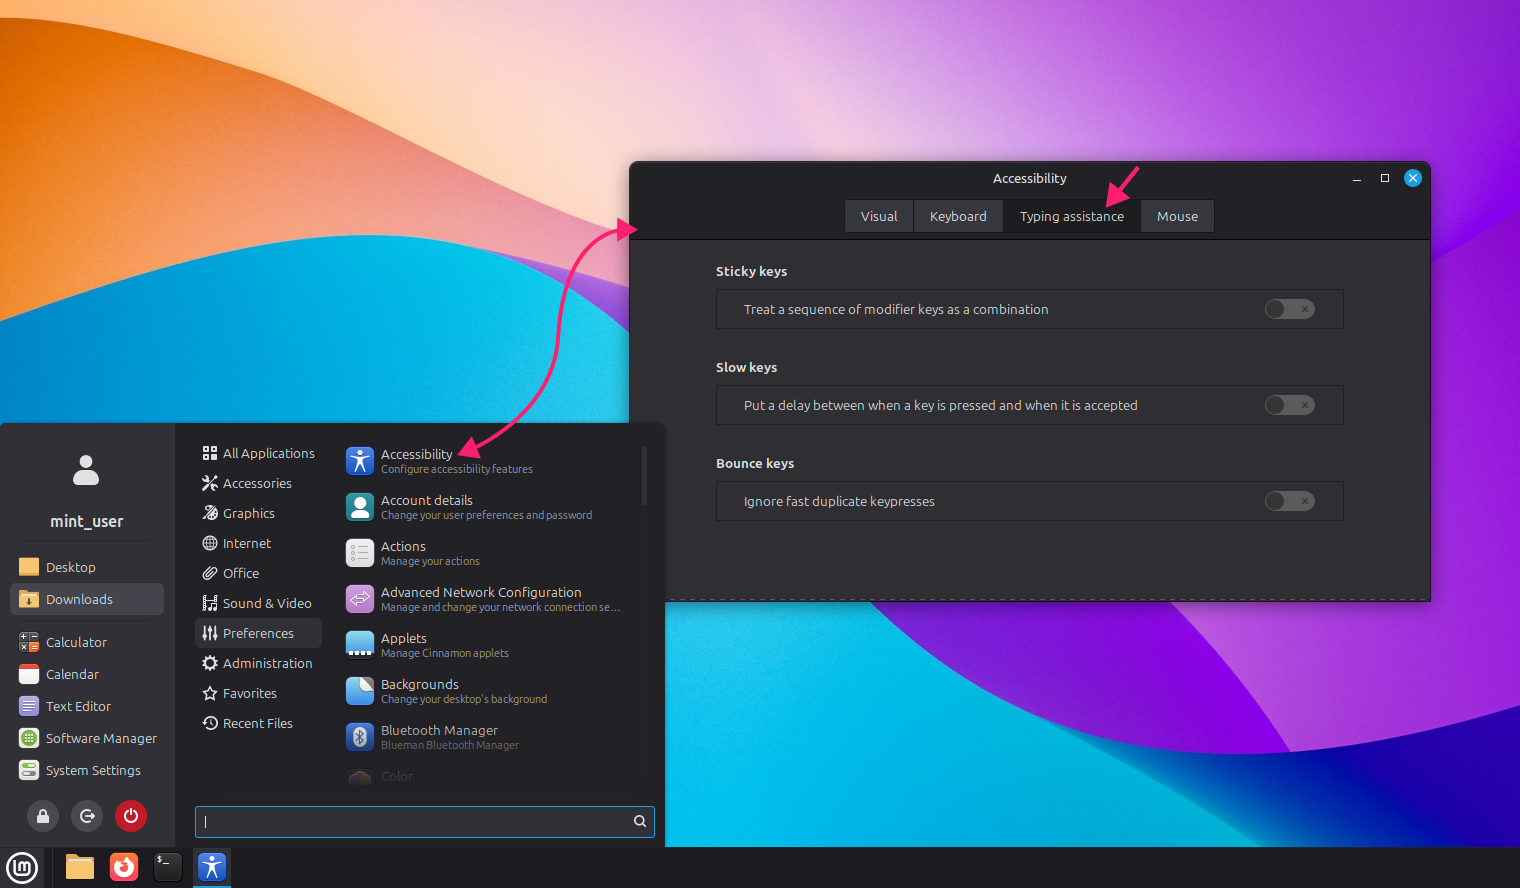
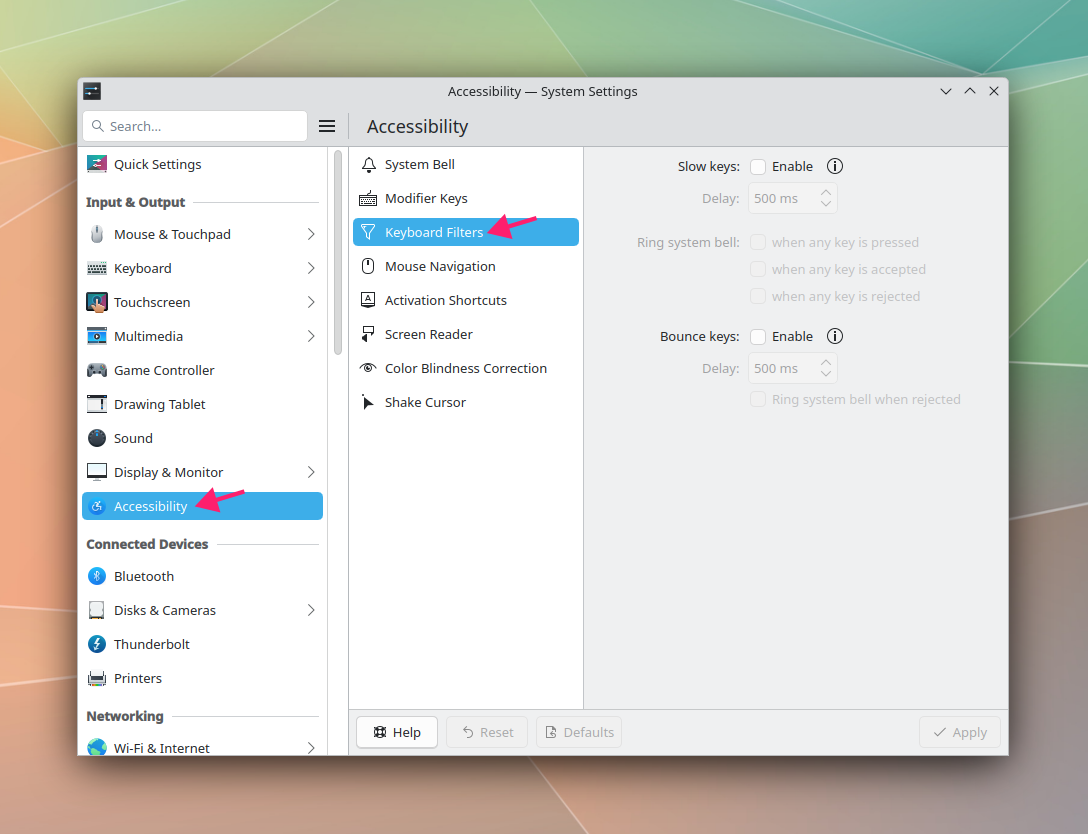
Take note: The exact settings vary depending on your Linux distribution and desktop environment, but you can typically find them under Accessibility settings.
- On Linux Mint Cinnamon, go to Preferences > Accessibility
Click on Typing assistance and enable or disable the desired feature

- On Fedora KDE, open System Settings > Accessibility > Keyboard Filters
Enable or disable Slow Keys or Bounce Keys. In KDE, don’t forget to click Apply after making your changes

» Find out how to check Linux version
Method 2: Use Terminal commands
This method is usually best for more advanced users or anyone who prefers managing settings through Terminal commands.
Follow these steps:
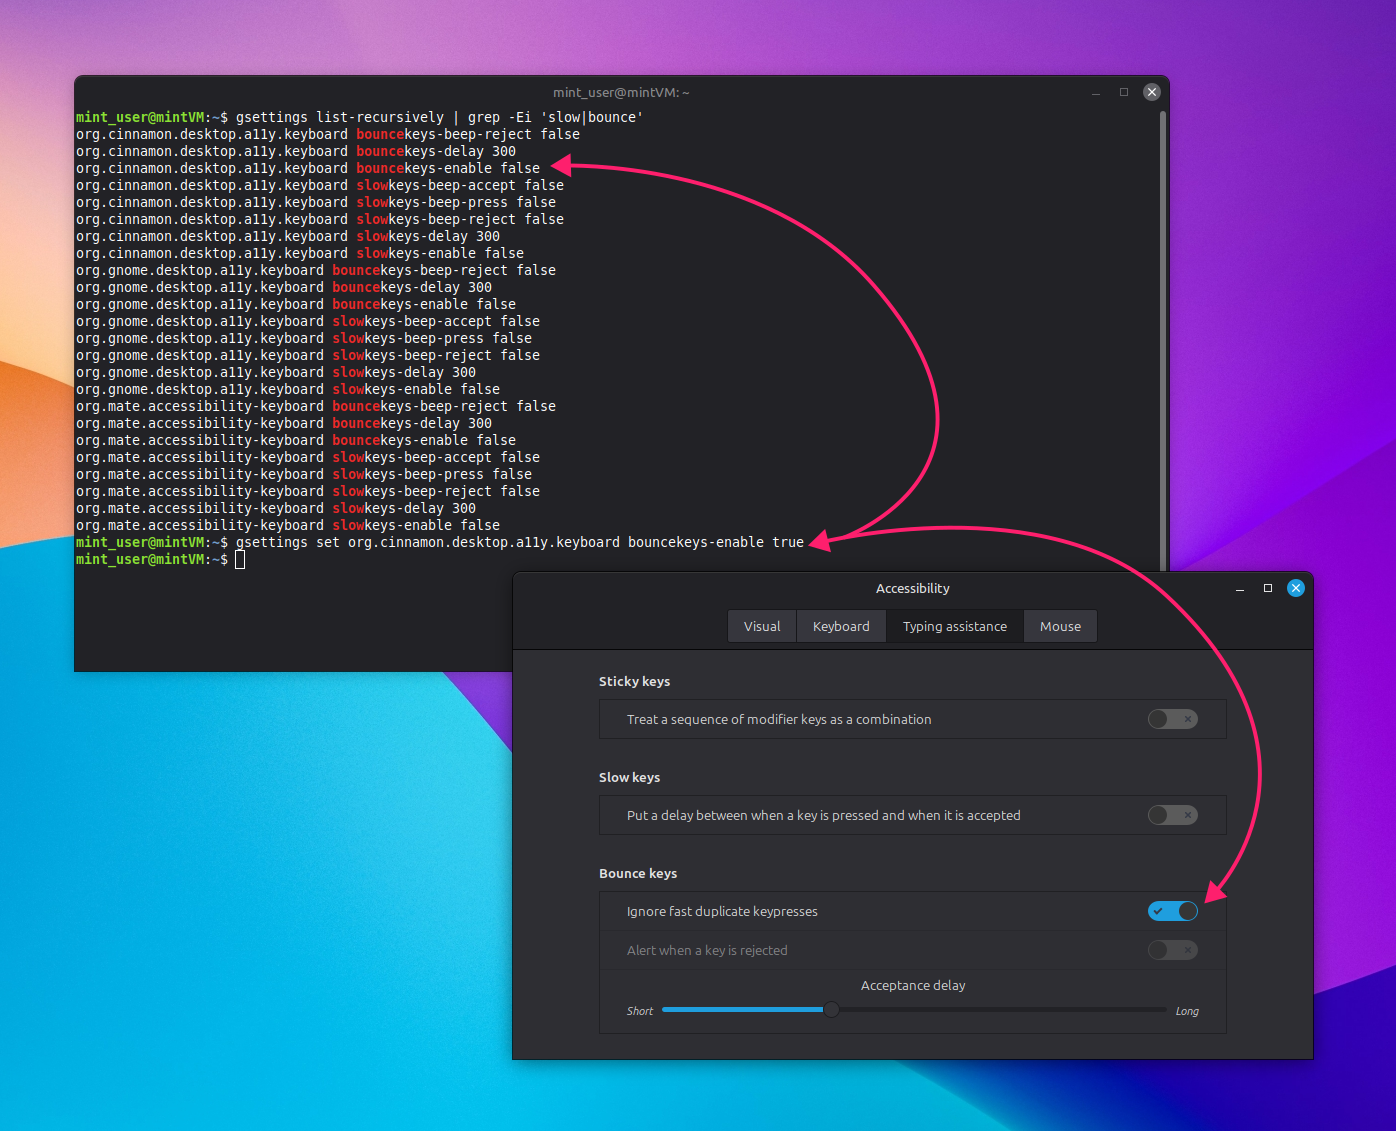
- On Cinnamon and GNOME-based distros, use gsettings. Run
gsettings list-recursively | grep -Ei 'slow|bounce'to view the current relevant settings - To disable Bounce Keys, set the relevant value to
false. Useorg.cinnamon.desktop.a11y.keyboardfor Cinnamon ororg.gnome.desktop.a11y.keyboardfor GNOME On KDE Plasma 6, use kreadconfig6 to check a setting and kwriteconfig6 to update it. To disable Bounce Keys, run
kwriteconfig6 --file kaccessrc --group Keyboard --key BounceKeys false
» Make sure you know how to paste into Linux terminal
How Atera can help
Filter Keys and similar accessibility features can be helpful, but they can also cause confusion when users don’t realize they’re enabled. Whether you’re troubleshooting a single computer or managing settings across an organization, knowing where to find and adjust these options can help get keyboards working as expected.
If you manage multiple Windows devices, Atera’s RMM platform can make the process more efficient by providing centralized visibility and remote access to endpoints. Rather than troubleshooting every device individually, IT teams can monitor and manage devices remotely, respond to issues, and streamline routine IT tasks from a single platform.
Frequently Asked Questions
Related Articles

How to change default printer
A user's printer probably isn't broken, even if they think it is. Windows just quietly picked a different default, and now every print job goes somewhere nobody expected. The fix is fast on one machine and painful across fifty, unless you know exactly where that setting lives and what keeps overriding it.
Read now
How to edit a file in Linux
One wrong sed command or an edit made without sudo, and a five-minute fix turns into a lost afternoon. Editing a Linux file means picking the right tool, protecting yourself first, and knowing how to recover when something goes wrong. Here's the full toolkit, from a single config file to a whole fleet.
Read now
How to close a tmux session
One wrong key combination in tmux doesn't disconnect you, it kills your session and everything running inside it. No warning, no undo, no recovering that half-finished database write. Knowing exactly which command detaches and which one terminates (and confirming what's actually running before you close anything) is what separates a clean session close from an afternoon spent explaining a corrupted file to your team.
Read now
How to activate VENV Python
A virtual environment isn't active just because you created it. The activation command changes by shell and OS, and getting it wrong doesn't always throw an error, it just quietly runs your code against the wrong interpreter.
Read nowEndless IT possibilities
Boost your productivity with Atera’s intuitive, centralized all-in-one platform









