
Table of contents
Generate summary with AI

You install a tool straight from the vendor’s own site, and Windows blocks it outright. It’s not flagged or quarantined, just refused because Windows identified an untrusted or unsigned binary. That’s Smart App Control doing exactly what it’s built to do. Developers, admins running unsigned line-of-business software, and anyone installing niche or older tools run into this constantly, and until recently, disabling SAC even once meant it could never be turned back on without a clean Windows 11 install.
That one-way lockout has changed on newer builds, but the core tradeoff hasn’t. SAC blocks based on signature and reputation, and turning it off removes that specific check, not your entire security stack. Here’s what actually changes when you disable it and the right way to do it depending on your situation.
» Here’s how to use the Windows 11 creation tool and reinstall Windows 11
Understanding Smart App Control before you disable it
Turning off Smart App Control removes one layer of protection, not your entire security posture.
SAC works by checking an app’s cloud-based reputation before letting it run, on top of whatever antivirus or endpoint protection is already in place. Disable it, and unsigned or low-reputation apps that Microsoft Defender (or your third-party antivirus) doesn’t independently catch will be able to execute.
That’s the actual tradeoff, and it’s a reasonable one to make in specific situations, not a decision to make lightly across an entire fleet. If you’re weighing whether to turn it off permanently, the honest answer depends on what else is protecting the machine and how often SAC is actually getting in your way versus doing its job.
System prerequisites and the role of VBS and HVCI
SAC only runs on a clean install of Windows 11 version 22H2 or later. That means machines upgraded in place from an earlier Windows 11 build (or from Windows 10) will never show SAC as available, regardless of how many updates they’ve since received.
This is a deliberate design choice. SAC needs to evaluate a device from a known-clean state, and Microsoft can’t reliably do that on a system that’s been running (and accumulating installed software) since before SAC existed.
SAC blocks apps before execution, but the policy enforcement itself runs in kernel mode, which means it’s only as trustworthy as the kernel underneath it. Virtualization-Based Security and Hypervisor-Protected Code Integrity are what keep that enforcement layer from being silently tampered with or bypassed by something that’s already compromised the kernel.
Essentially, if VBS is disabled on a device, SAC can still be present in Windows Security, but the guarantee behind it is weaker than it looks.
» Did you know you can disable kernel mode?
3 ways to turn off Smart App Control
The three methods below go from simplest to most involved, and covering managed fleets at the end. Start with the standard toggle unless you have a specific reason to reach for something more advanced, like SAC already blocking your way into the UI or needing the change to scale across multiple machines.
Method 1: Check Smart App Control’s current status and disable through Windows Security
Use this method for a one-time permanent change on a single machine, since it’s the simplest path and the one Microsoft expects most people to use.
You should check the current state before you touch anything, since SAC has three possible states and not all of them behave the way you’d expect.
1. Open Windows Security from the Start menu
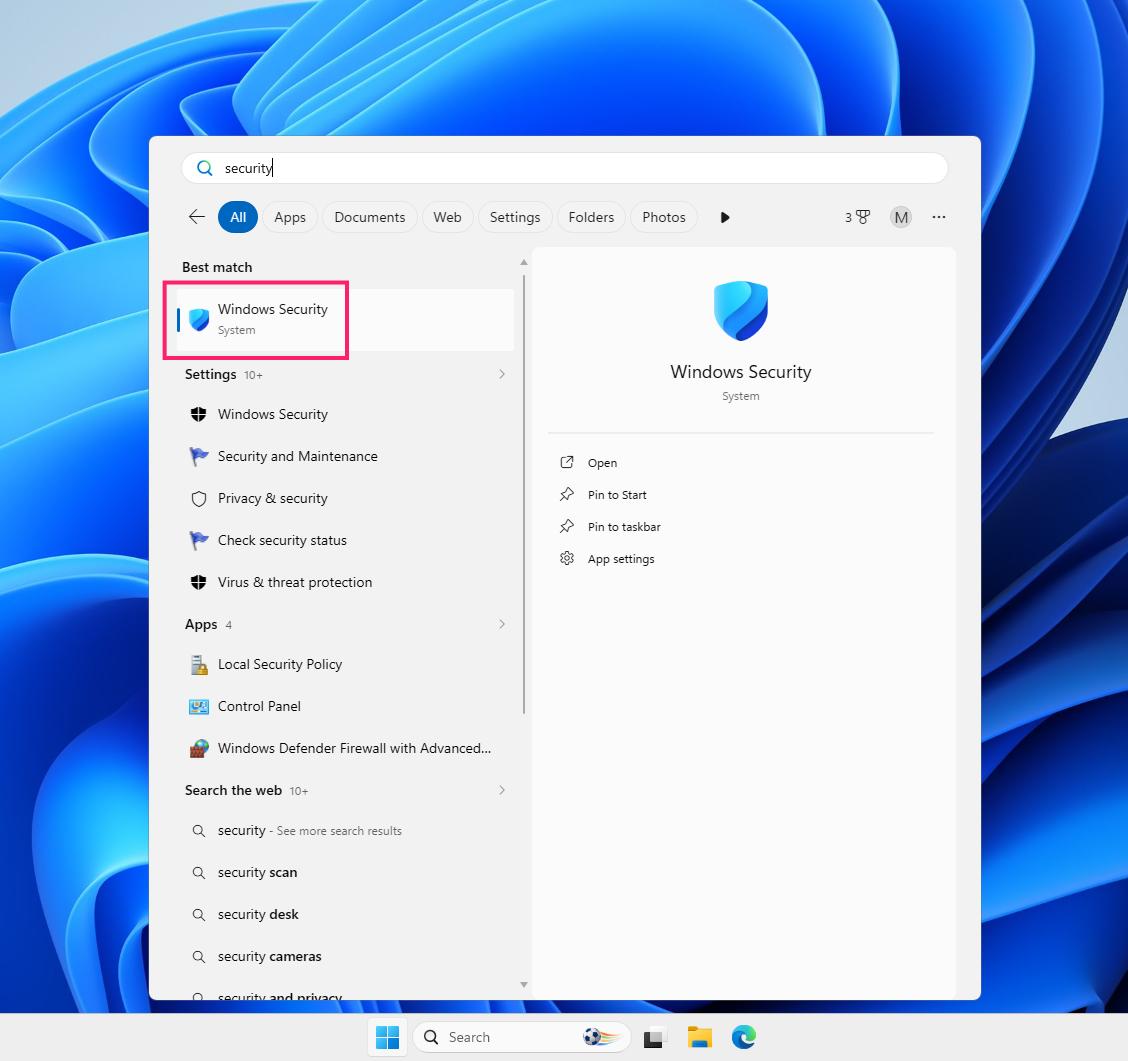
2. Alternatively, use the shield icon in the taskbar

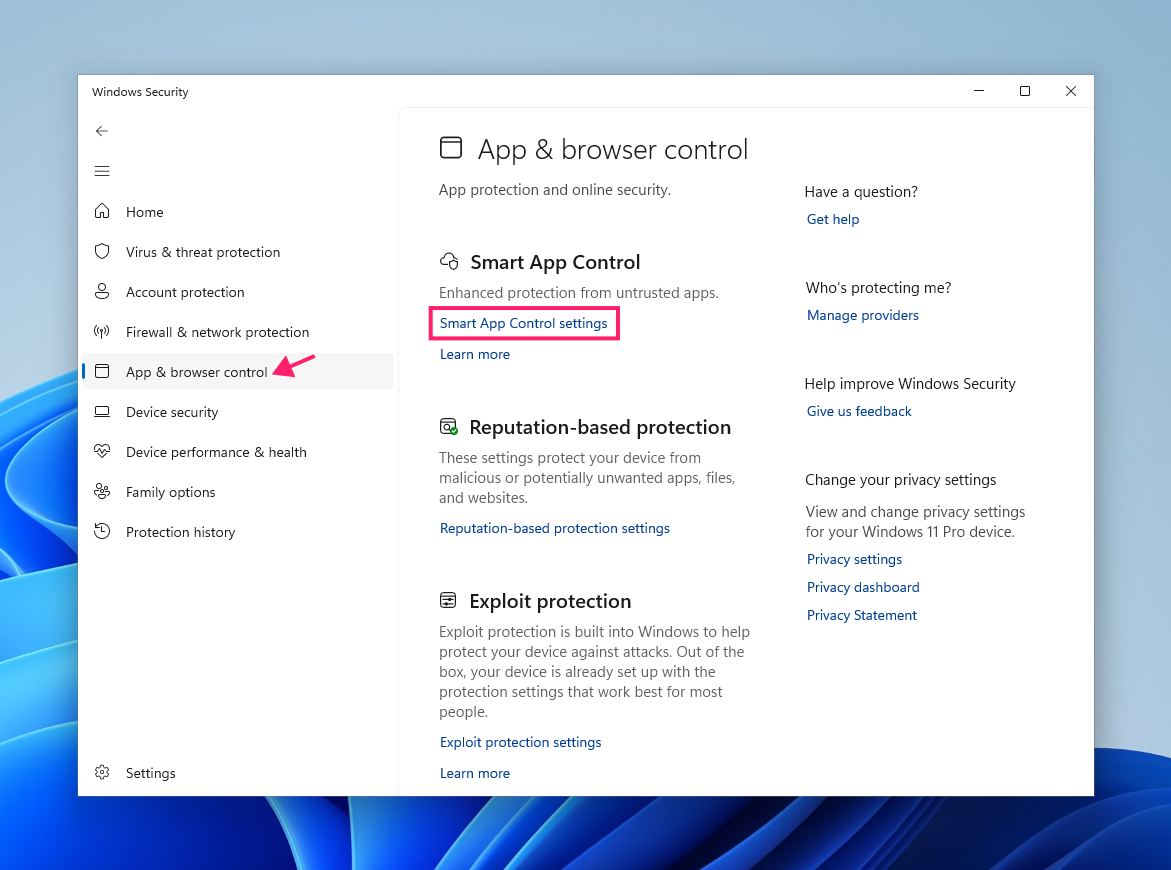
3. Select App & browser control, then click the Smart App Control settings link under the Smart App Control section
4. Note which state is selected: On (actively enforcing), Evaluation (Windows is still deciding if SAC is a good fit for the device), or Off (disabled)
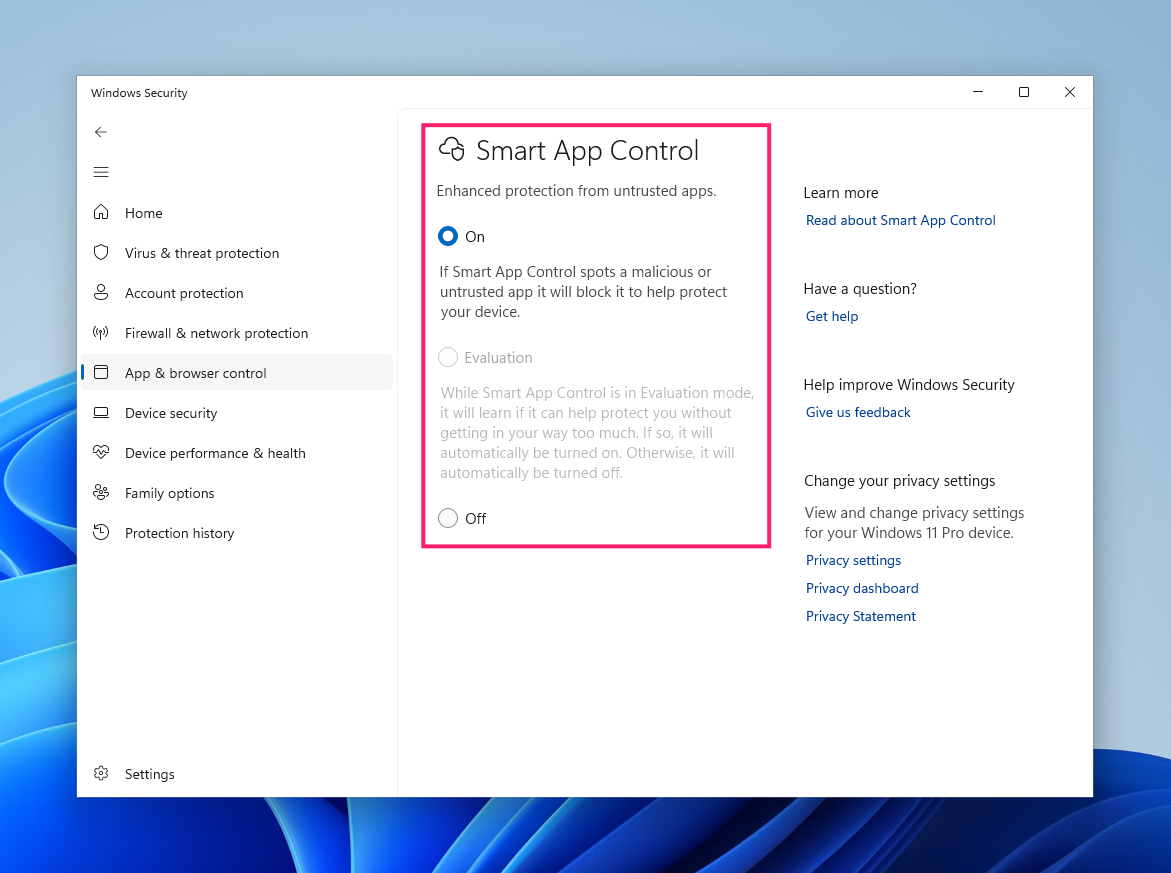
If the setting is greyed out or missing entirely, it’s usually one of three things:
- The device is still in Evaluation mode and hasn’t finished deciding
- The feature genuinely isn’t available because Windows wasn’t clean-installed on 22H2 or later
- SAC was manually turned off in the past and, on builds prior to the reversible-toggle update, that decision locked in permanently until a reset or clean install
5. Select the Off option to disable it
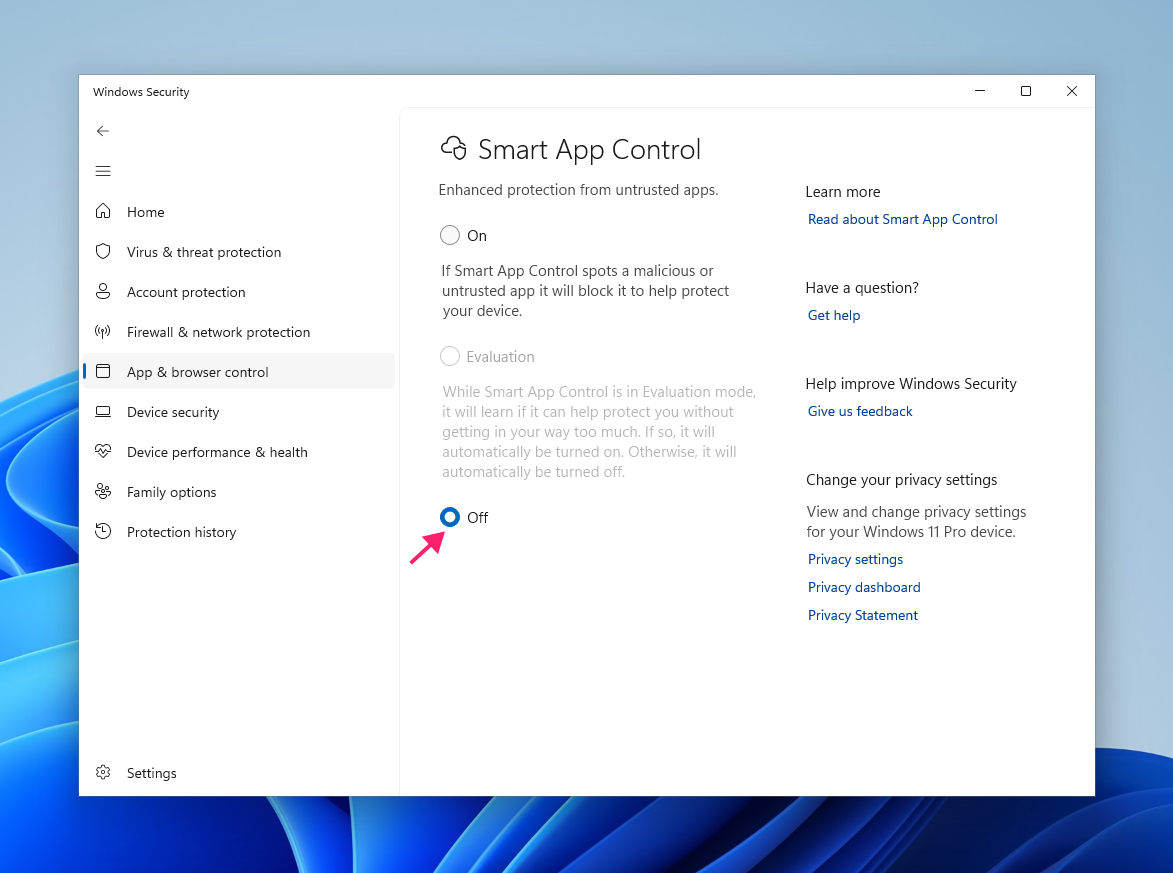
On Windows 11 builds that include the March 2026 update (KB5079391, later replaced by KB5086672 after an installation issue with the original release), this decision is no longer permanent, meaning you can temporarily disable SAC to run an unsigned installer.
You can return to this same screen and switch back to On or Evaluation whenever you want. On earlier builds, selecting Off here is a one-way decision that can’t be undone without a reset or clean install, so confirm your update level before you commit to it.
» Here’s how to disable Windows Defender temporarily and exclude a folder from Windows Defender
Method 2: Disabling SAC from the WinRE Command Prompt
Use this when SAC is already blocking your ability to get into Windows normally, or when you need to make the change offline before the OS finishes booting.
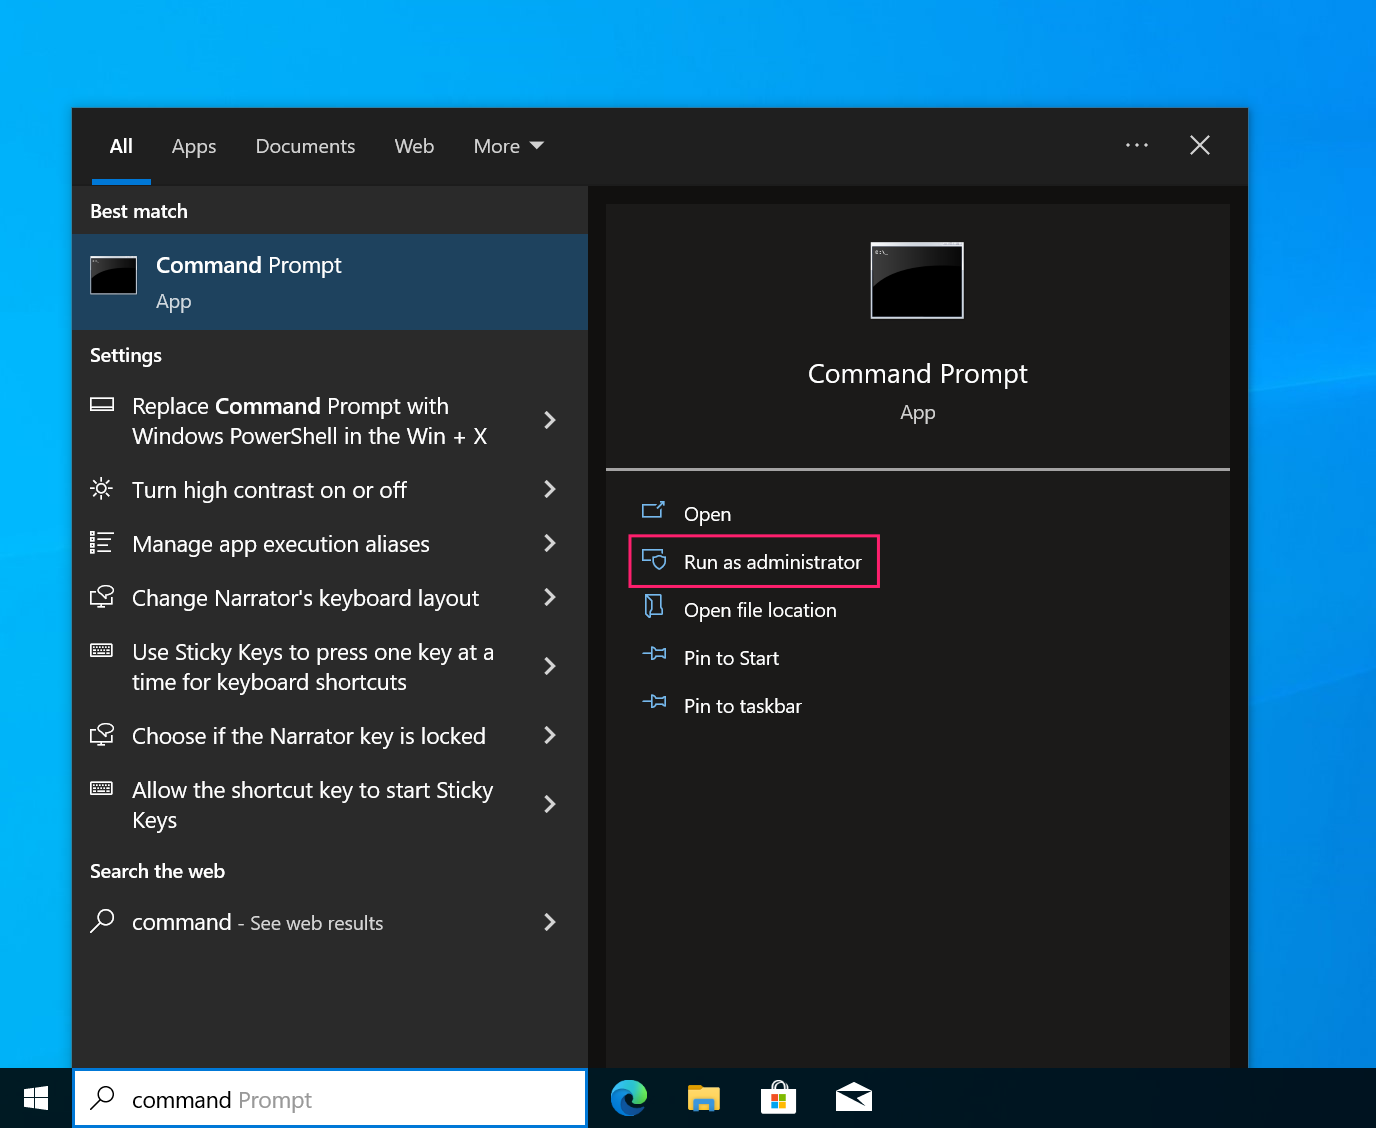
1. Open a Command Prompt window as an administrator
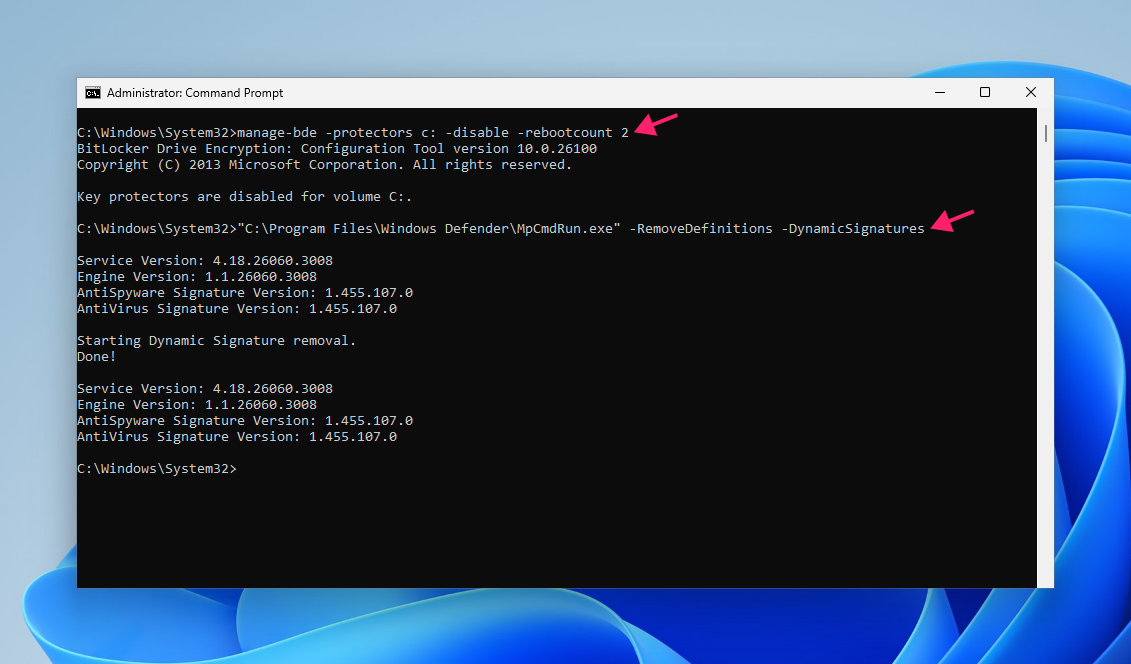
2. Make sure you have your BitLocker recovery key available, then disable BitLocker temporarily with this command: manage-bde -protectors c: -disable -rebootcount 2
3. Clear cached dynamic signatures with this command: "C:Program FilesWindows DefenderMpCmdRun.exe" -RemoveDefinitions -DynamicSignatures
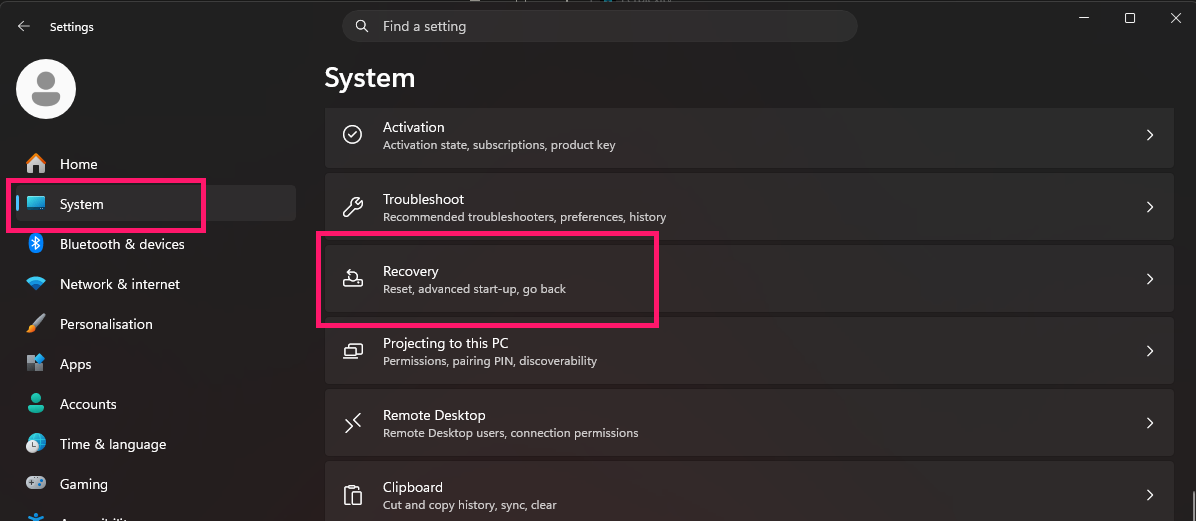
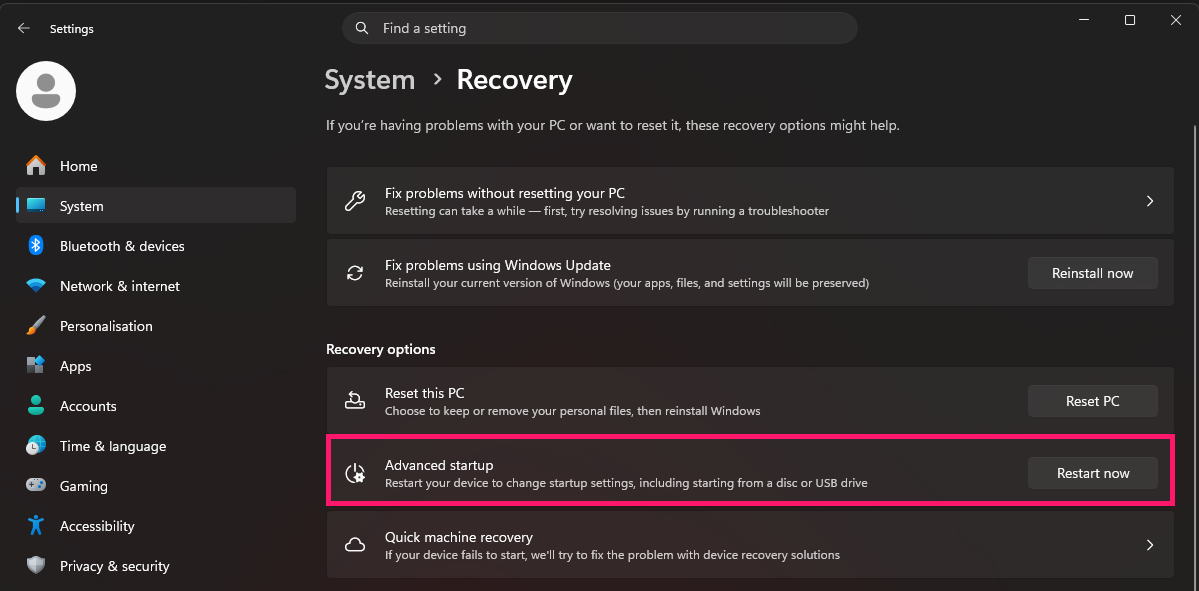
4. Press Win + I, go to System > Recovery, and select Restart now under Advanced startup, then confirm the restart prompt
5. From the Choose an option screen, select Troubleshoot
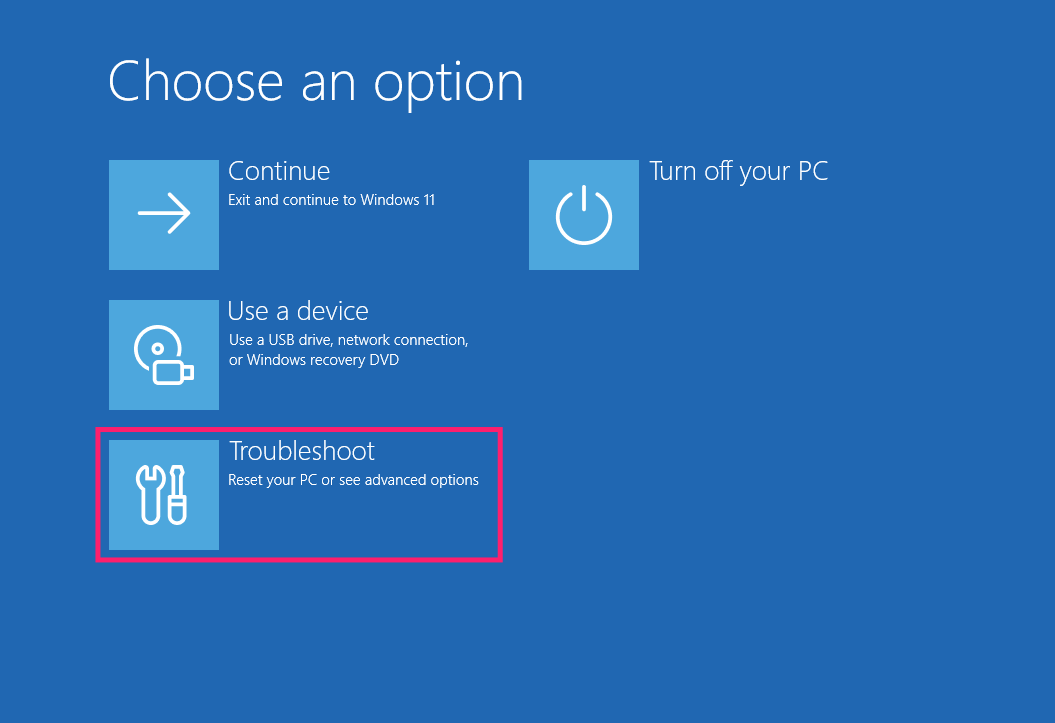
6. Select Advanced options
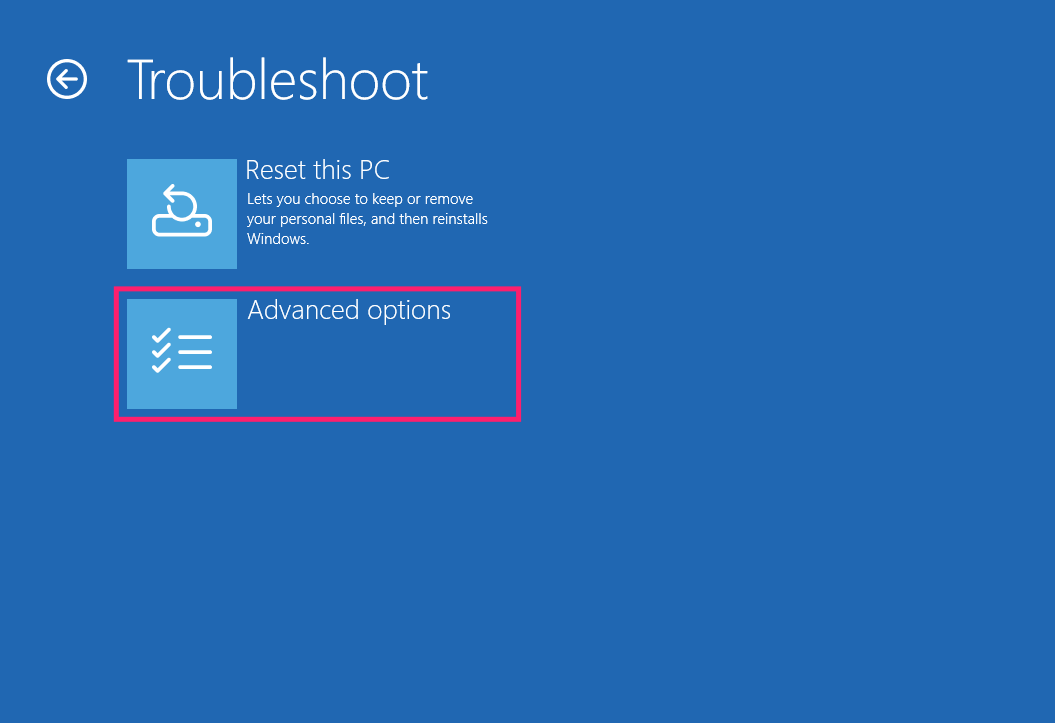
7. Select Command Prompt
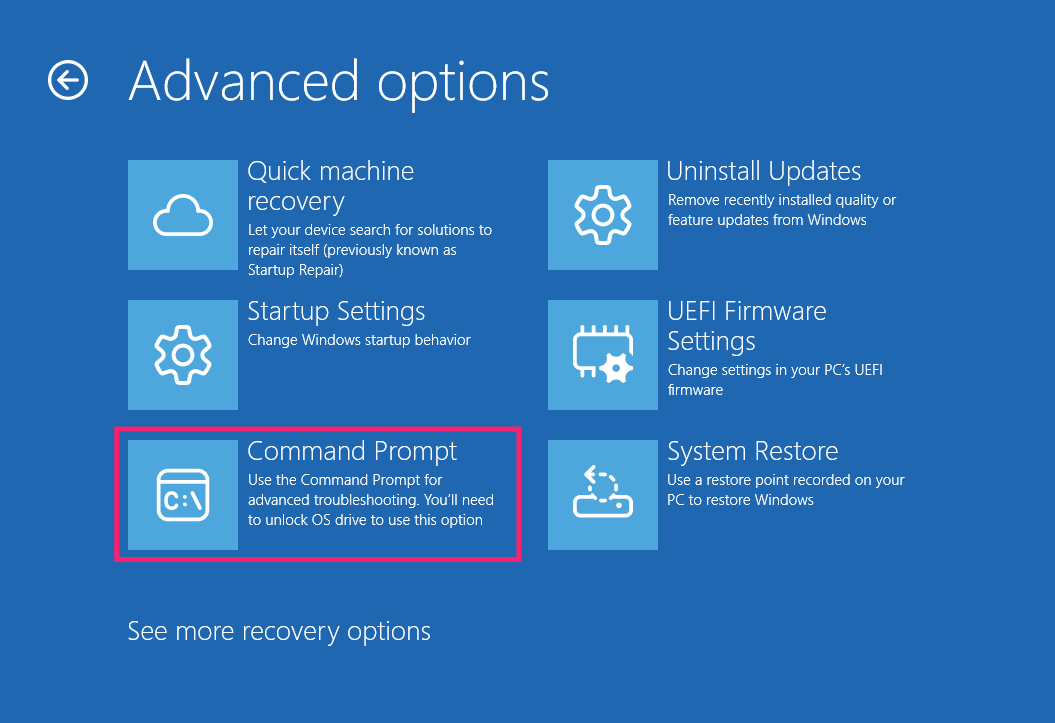
8. Run diskpart then list disk then list volume to identify your system partition, matching it by size and the NTFS file system type (boot and recovery partitions typically show as HIDDEN), then type exit to leave diskpart
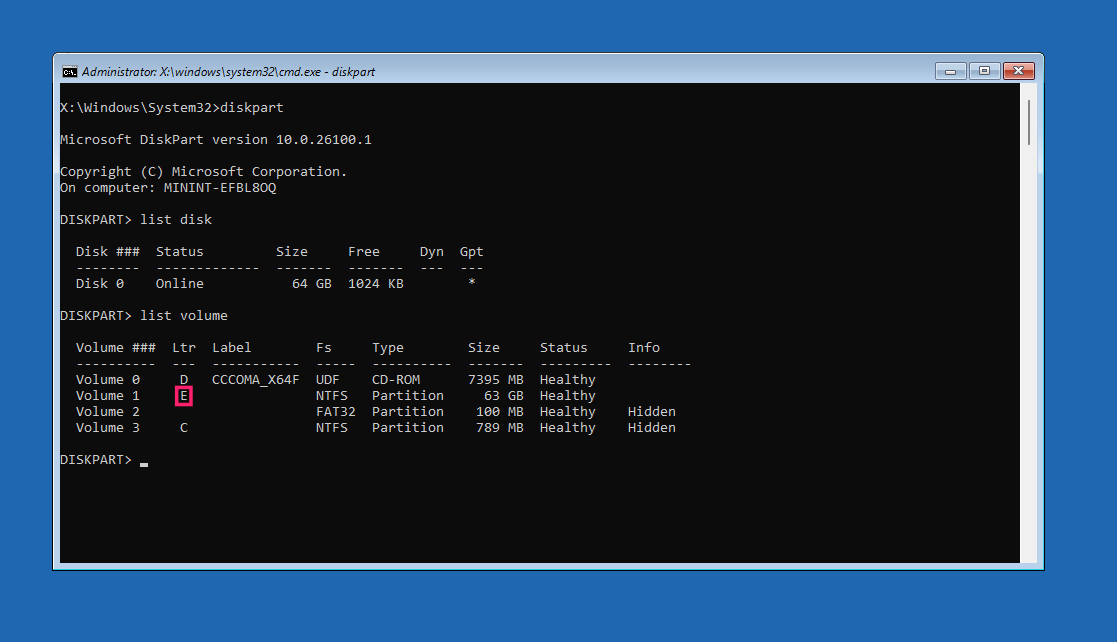
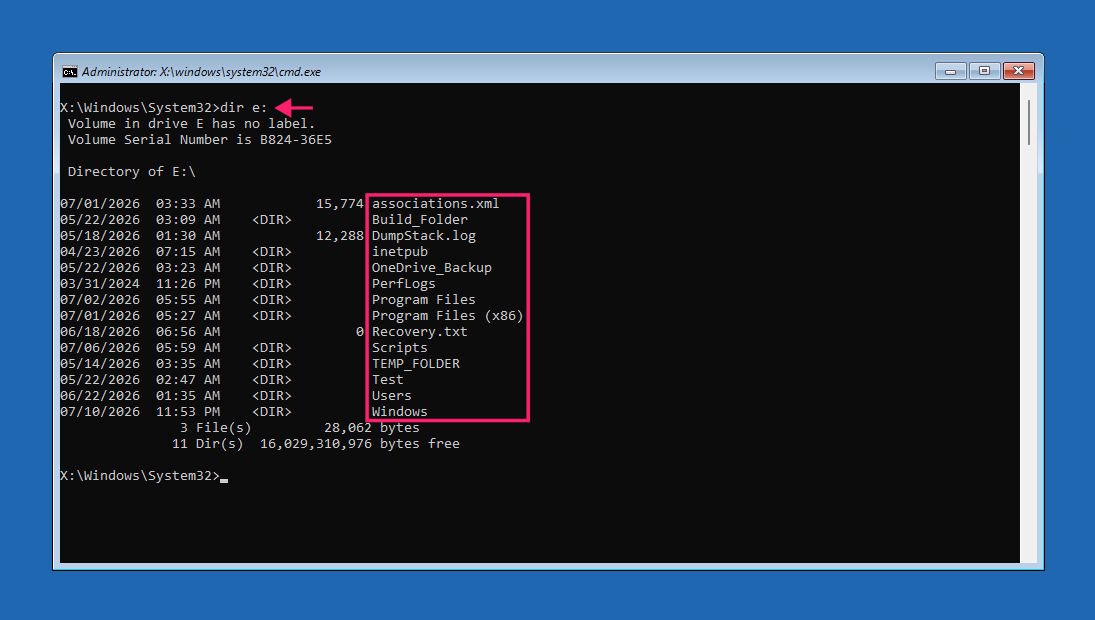
9. If you’re unsure you’ve got the right drive letter, run dir e: (replacing e: with the letter in question) to confirm it holds your expected Windows directory structure
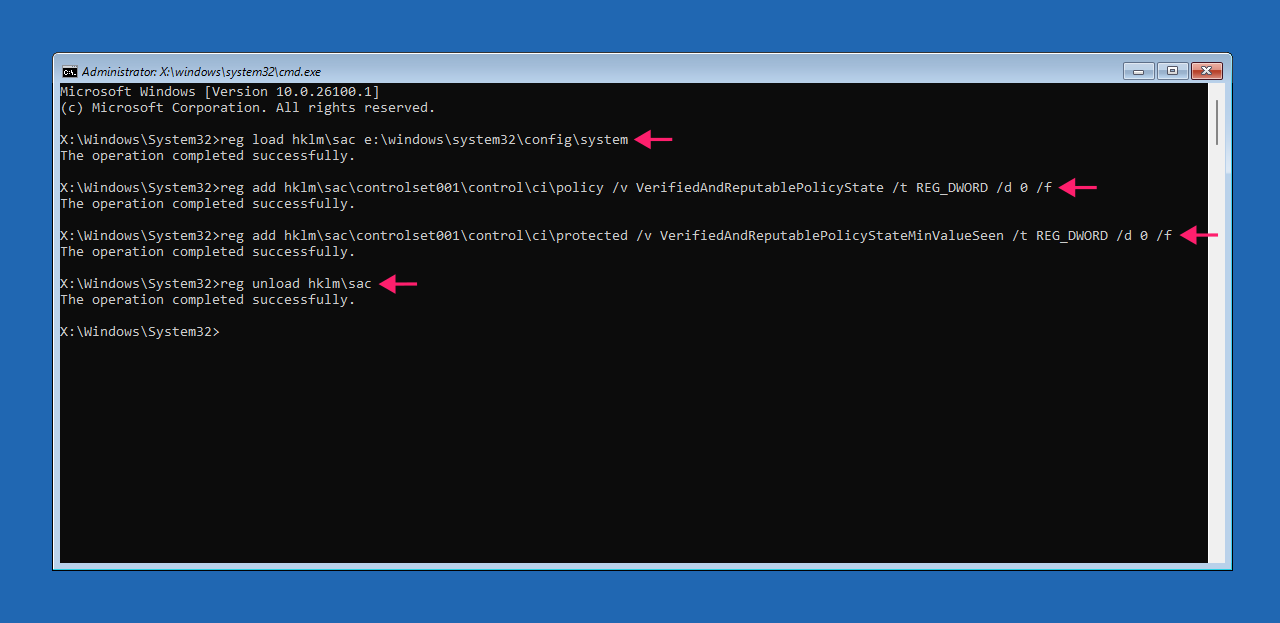
10. Mount the offline registry hive by running reg load HKLMsac e:windowssystem32configsystem (replacing e: with your identified system drive letter)
11. Set the core policy value to Off by running reg add hklmsaccontrolset001controlcipolicy /v VerifiedAndReputablePolicyState /t REG_DWORD /d 0 /f
12. Mark the state as explicitly Off (rather than merely unset) by running reg add hklmsaccontrolset001controlciprotected /v VerifiedAndReputablePolicyStateMinValueSeen /t REG_DWORD /d 0 /f
13. Commit the changes and release the hive by running reg unload HKLMsac
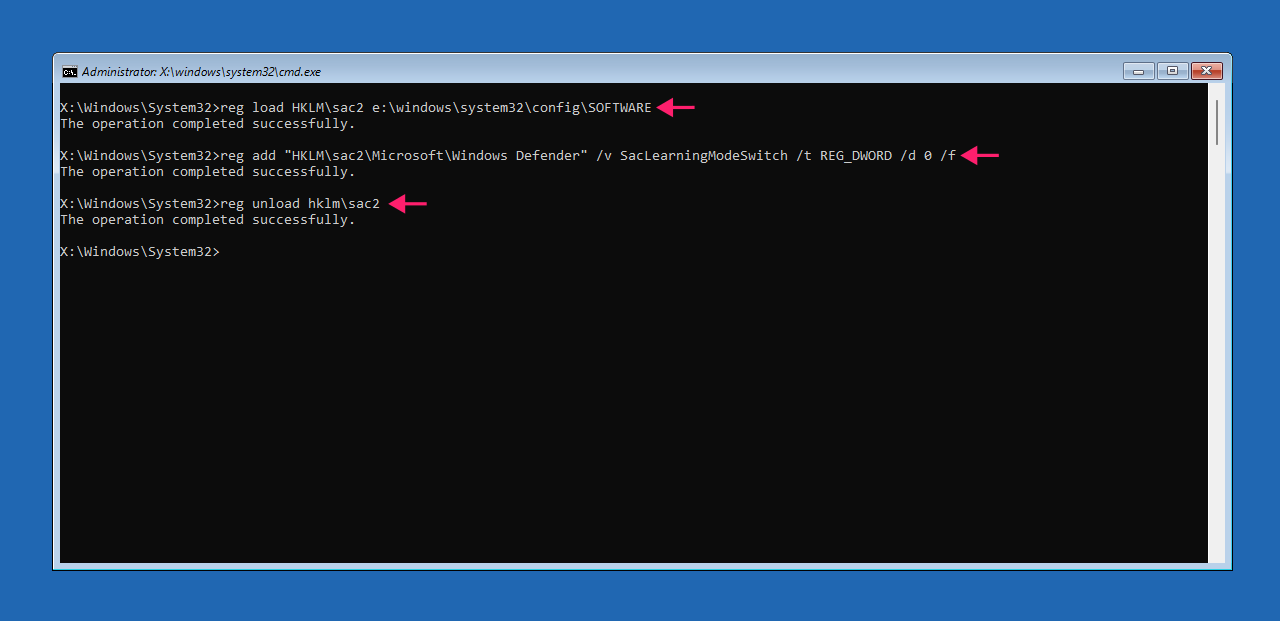
14. Repeat the mount/edit/unload pattern against the software hive: reg load HKLMsac2 e:windowssystem32configSOFTWARE, then reg add "HKLMsac2MicrosoftWindows Defender" /v SacLearningModeSwitch /t REG_DWORD /d 0 /f to stop Defender from silently reverting the change on reboot, then reg unload HKLMsac2
15. Type exit to close the Command Prompt, then reboot normally using Exit and continue to Windows 11
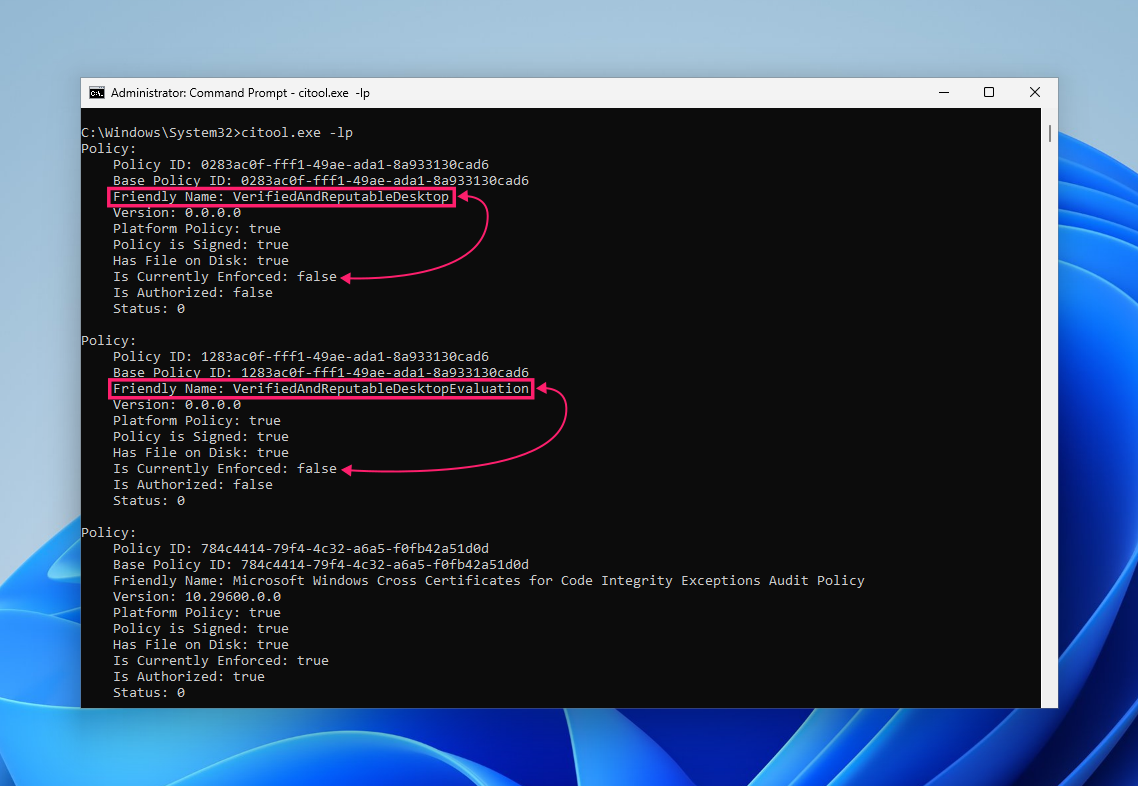
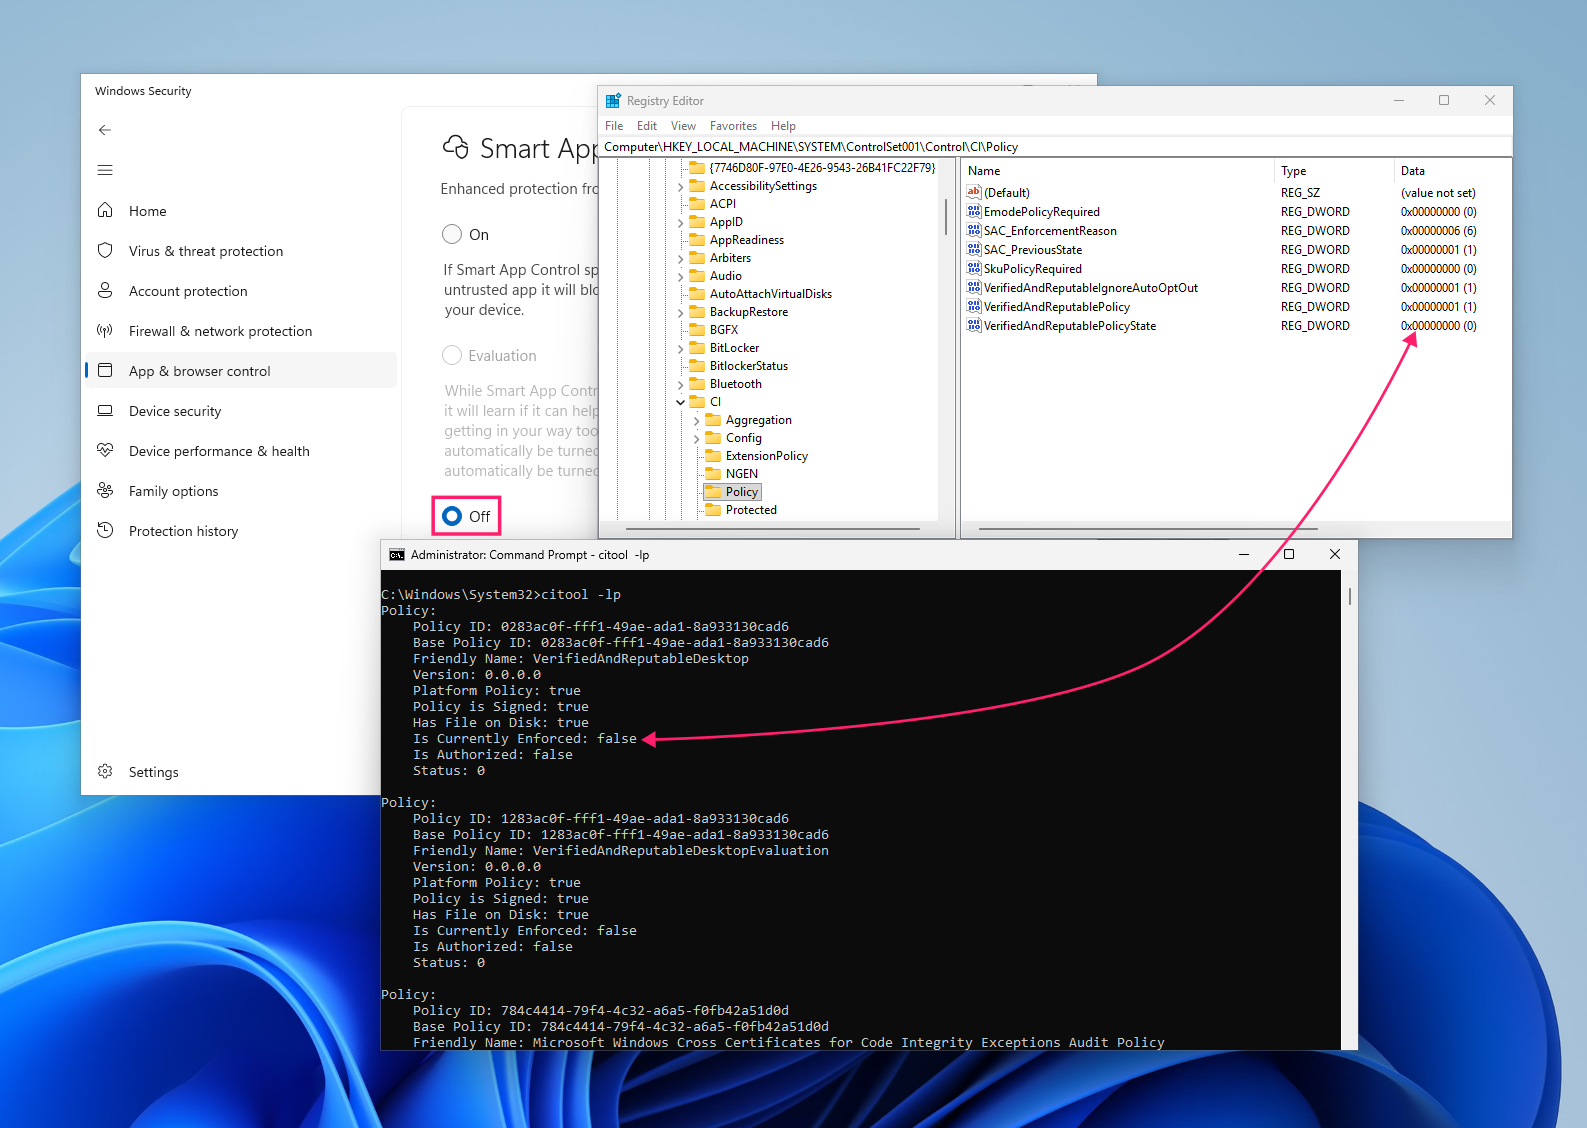
16. Once back in Windows, confirm the change took by opening an elevated Command Prompt and running citool.exe -lp
If Currently Enforced is True for VerifiedAndReputableDesktop, SAC is still being enforced and the edit didn’t take; if it’s False, SAC is off.
This is the most invasive method on this list, since it involves offline registry edits and a BitLocker suspension rather than a UI toggle, so it’s worth reserving for cases where the standard toggle genuinely isn’t reachable.
Method 3: Disabling SAC automatically with a custom .reg file
Use this when you want a repeatable, one-click way to disable SAC without navigating menus each time, particularly across test machines or personal setups you rebuild often.
Create a file (for example,
DisableSAC.reg) containing:Windows Registry Editor Version 5.00
; core policy state (0 = Off, 1 = On, 2 = Evaluation)
[HKEY_LOCAL_MACHINESYSTEMCurrentControlSetControlCIPolicy]
“VerifiedAndReputablePolicyState”=dword:00000000
- Apply the file by double-clicking it, or by running
reg import C:PathToDisableSAC.regfrom an elevated Command Prompt or script - Force the policy to take effect immediately by running
citool.exe -r(or reboot the machine instead) Confirm the change by running
citool.exe -lpin an elevated Command Prompt
If you’re managing more than a handful of endpoints, you typically won’t need to change anything because SAC should be disabled by default on enterprise-managed machines.
However, if this isn’t the case and you need a consistent SAC state without touching each machine individually, you can use this method and scale it directly into a deployable script.
For example, here’s a script you could use:
The Script:
Atera does not guarantee the integrity, availability, security, virus-free, safety, lawfulness, non-infringement, rights’ status, or functionality of the scripts. The use of the shared scripts is at your own risk. Scripts are provided “AS IS”. *
# elevated environment required

if (-not
([Security.Principal.WindowsPrincipal][Security.Principal.WindowsIdentity]::GetCurrent()).IsInRole([Security.Principal.WindowsBuiltInRole]::Administrator)) {

Write-Error "This script must be run as an Administrator."

Exit

}

Write-Host "1. Clearing dynamic signatures and flushing cached policy telemetry..." -ForegroundColor Cyan

& "$env:ProgramFilesWindows DefenderMpCmdRun.exe" -RemoveDefinitions -DynamicSignatures

Write-Host "2. Modifying registry policy states for Smart App Control..." -ForegroundColor Cyan

$PolicyPath = "HKLM:SYSTEMCurrentControlSetControlCIPolicy"

# make sure registry path exists

if (-not (Test-Path $PolicyPath)) { New-Item -Path $PolicyPath -Force | Out-Null }

# set PolicyState to 0 (Off)

Set-ItemProperty -Path $PolicyPath -Name "VerifiedAndReputablePolicyState" -Value 0 -Type DWord -Force

Write-Host "3. Invoking CiTool to refresh active Code Integrity policies..." -ForegroundColor Cyan

# re-evaluate application control policies immediately

& citool.exe -rTo use it:
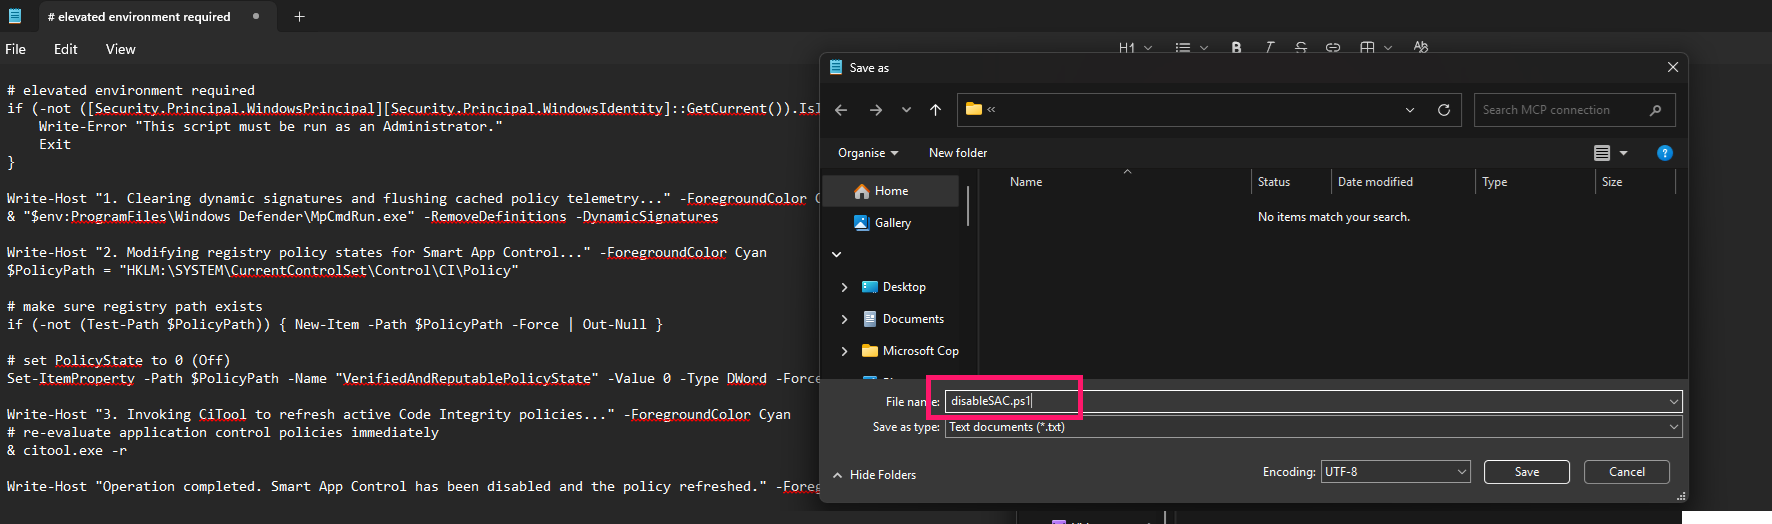
- Copy and paste the script into a text document
Save it to a location all PCs on the network can access and label it something like disableSAC.ps1

- Push that script through your RMM’s scripting or automation profile tooling rather than running it by hand on each device
Pro tip: If you use Atera, you can generate scripts like this and deploy them remotely without having to know anything about writing code. AI Copilot can help you write the script from simple natural language queries, and then you can push the script remotely using the RMM platform connection with minimal effort.
Smart App Control is one layer, not the whole picture
Disabling Smart App Control on a single machine is a five-minute toggle. Doing it consistently across dozens or hundreds of endpoints, without leaving some machines misconfigured and others still blocking legitimate software, is a different problem entirely.
Atera’s RMM lets you push the same registry changes and automation profiles across your whole fleet from one console, so SAC’s status stops being something you have to check machine by machine.
Frequently Asked Questions
Related Articles

How to reduce alert fatigue across your IT team
Your technicians aren't ignoring alerts because they're careless. They're ignoring them because most alerts have taught them to. Once the stream stops being trustworthy, real failures slip past with the noise. Fixing it means deciding what deserves an interruption, tuning out transient spikes, collapsing alert storms, and automating the fixes you've run a hundred times.
Read now
How to close the IT skills gap on your team
Course completions don't close skills gaps. Technicians finish the training, then hand the first unfamiliar failure straight back to a senior engineer. Real capability gets built on live tickets, incidents, and maintenance windows, with guidance that fades as competence grows.
Read now
How to calculate cost per ticket (and why most teams get it wrong)
Most cost-per-ticket figures are wrong before anyone reads them. Missing overhead, tickets that were opened but never closed, spam and duplicates padding the count, and one month's costs divided by another month's tickets all make support look cheaper than it is. Fix both sides of the division and the number finally shows where technician time and money actually go.
Read now
How to prepare for a software license audit
A vendor audit notice doesn't wait for you to get organized. It demands proof, right now, that every install matches every entitlement you've paid for, and most IT teams find out the hard way how much they don't actually know about their own environment. Getting audit-ready before the letter arrives is the difference between negotiating from strength and paying for months of scrambling.
Read nowEndless IT possibilities
Boost your productivity with Atera’s intuitive, centralized all-in-one platform









