
Table of contents
Generate summary with AI

A user calls in convinced their printer is broken. Nothing prints, the driver looks fine, the device shows as ready, but twenty minutes later the actual problem turns out to be that Windows quietly reassigned the default printer to a virtual queue nobody asked for. It’s one of the most common non-issues in the ticket queue, and also one of the easiest to misdiagnose if you don’t know where an OS like Windows actually stores that setting.
The tricky part isn’t the click-path, it’s that “default printer” doesn’t behave the same way twice. It lives in the signed-in user’s profile, not the device, so the fix that worked on one machine can look like it did nothing on another. Add in driver approval policies, a toggle that silently overrides manual selections, and a fleet of machines instead of one, and a five-second setting turns into a genuine troubleshooting exercise.
So here’s how to set a default printer and keep it set across your fleet.
Why default printer assignment breaks in the first place
Printer assignment isn’t a single setting; it’s the intersection of user permissions, a background feature that quietly overrides manual choices, and a handful of other prerequisites that have to be in place:
- Windows stores the default printer inside each user’s profile rather than on the device itself, which is why two people signing into the same machine can each keep a completely different default without conflict.
- Permissions determine whether a printer is even usable as a default. Without Print permission on a shared queue, Windows can’t reliably treat it as the user’s default. Administrative rights mainly govern installation rather than selection.
- Network connectivity issues can cause errors. If the printer is offline, the print server is unreachable, or a Group Policy printer mapping hasn’t finished creating the connection at sign-in, Windows can fail to apply the default and return error
0x80070709.
» Here’s how to change file permissions on Linux and fix the permission denied error
The “Let Windows manage my default printer” feature
This setting allows Windows to automatically switch the default to whatever printer was most recently used, overriding any manual selection. It’s convenient for someone bouncing between their home, office, and client locations, but it also means a manually chosen default won’t stay in place.
The “Let Windows manage my default printer” toggle generates a disproportionate number of support tickets, mostly because users assume something is broken when in reality Windows is doing exactly what it’s configured to do.
Unless automatic switching is genuinely needed for a specific user, disabling it should be a standard step in any default printer troubleshooting process. It has to be turned off before the Set as default option will even appear.
How to set default printer across environments
The steps below cover every environment you’re likely to run into, from a single Windows workstation to a Linux server to an entire fleet of endpoints. Each method serves a different situation, so pick based on the OS in front of you and whether you’re fixing one machine or standardizing across many.
Windows 10 and 11 (Settings app)
This is the standard path for most modern Windows machines and should be your default choice unless you’re working with a legacy system.
Windows 10
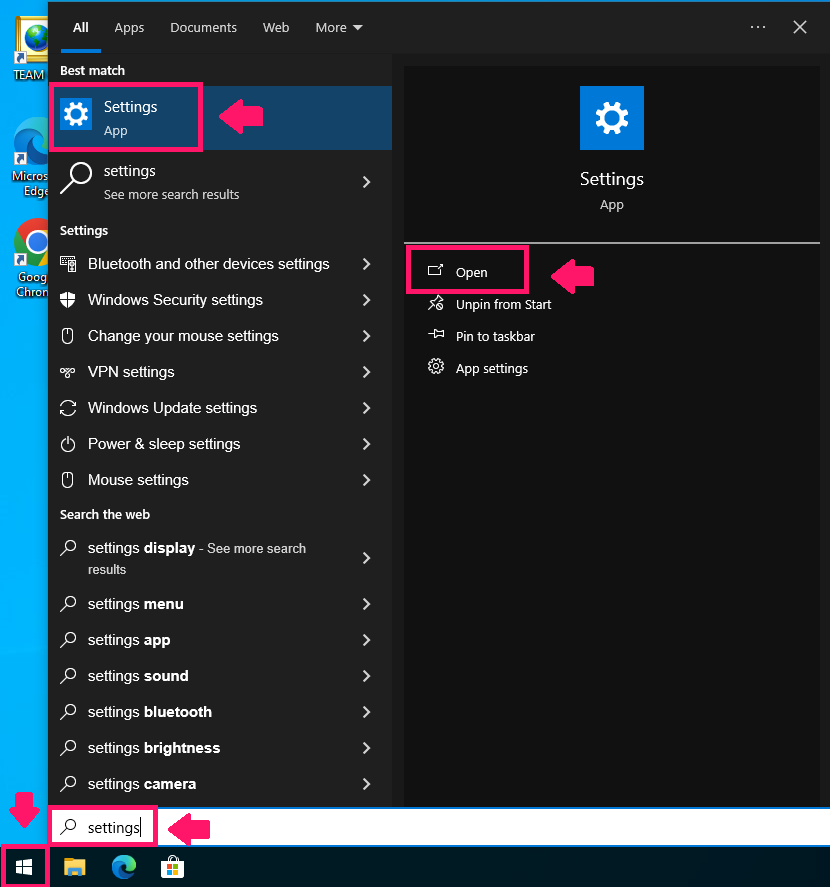
Open the Start menu and go to Settings

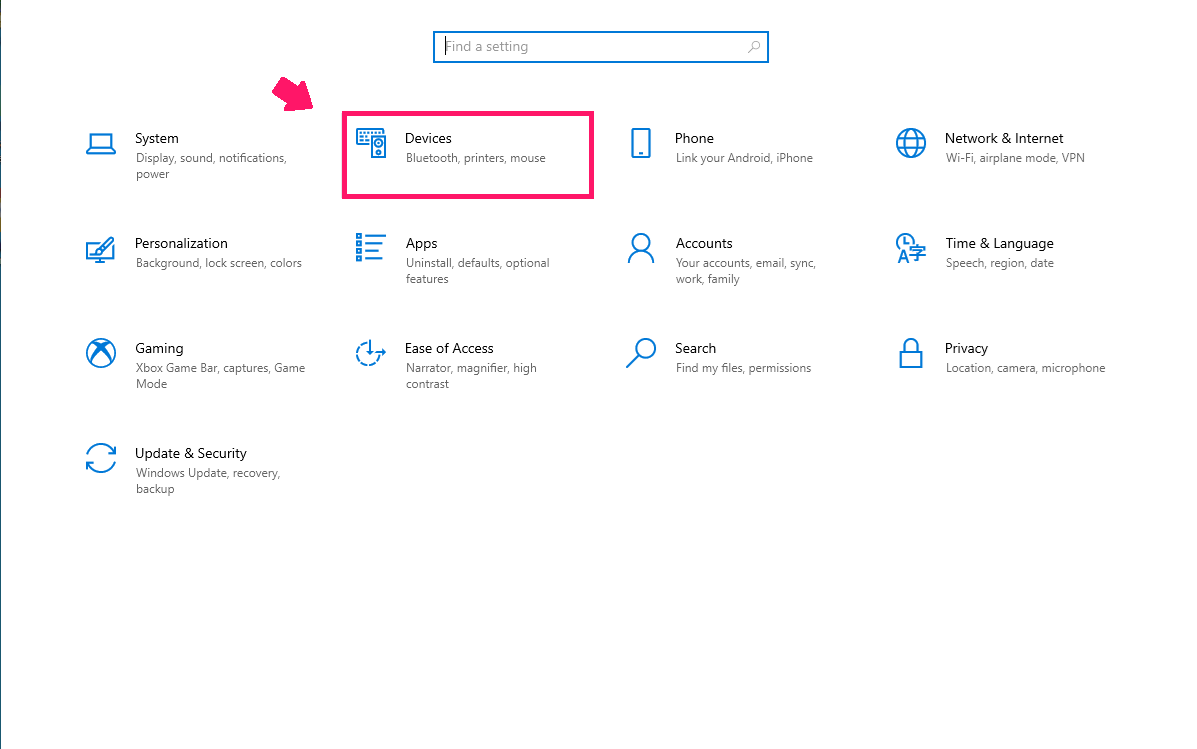
Navigate to Devices

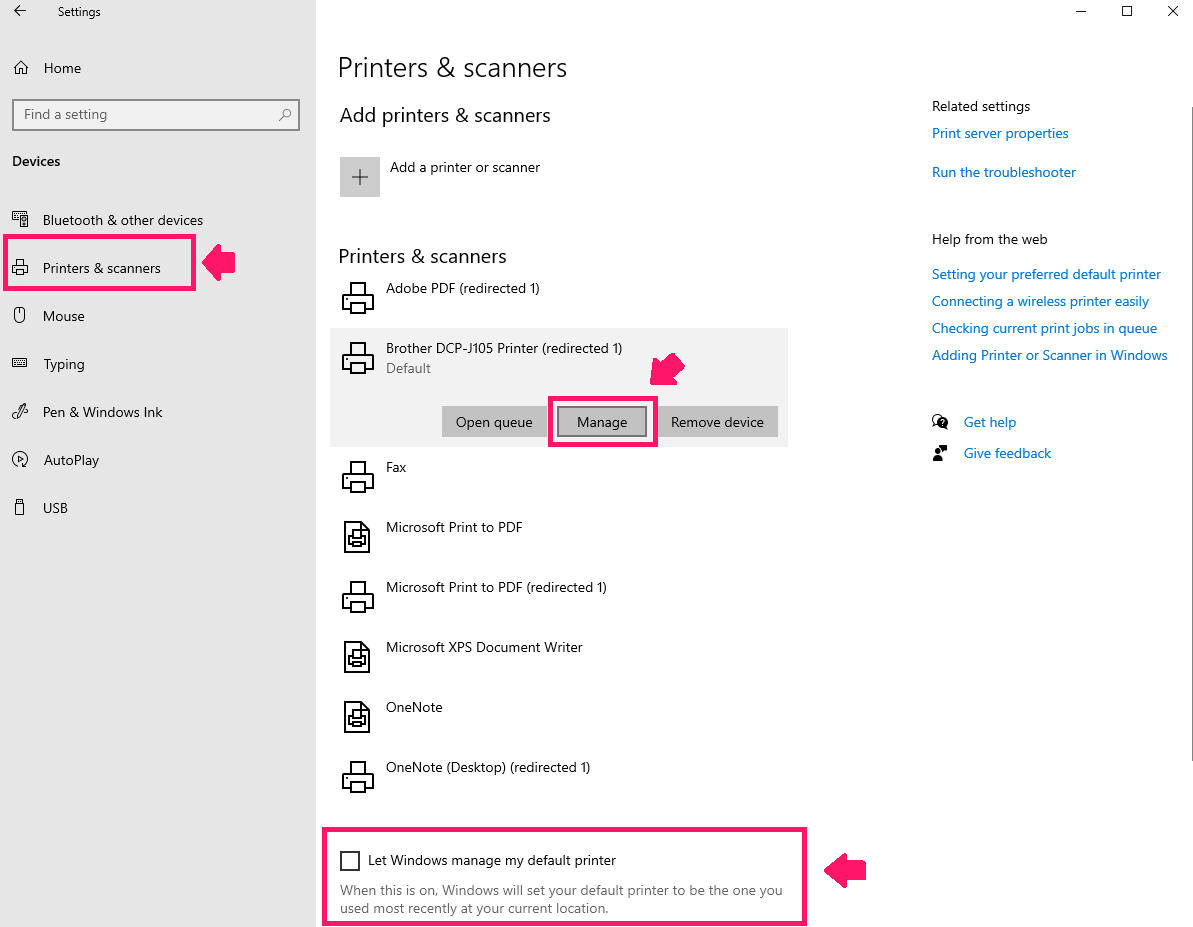
- Navigate to Printers & scanners, scroll down, and turn off Let Windows manage my default printer
Select your target printer from the list, then click Manage

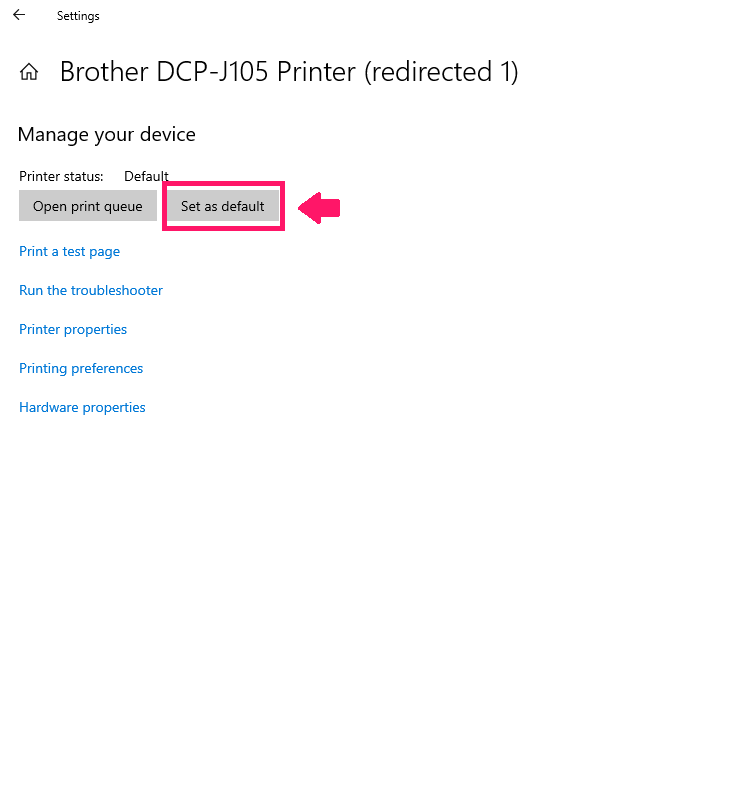
Click Set as default

Windows 11
Open the Start menu and go to Settings

Navigate to Bluetooth & devices > Printers & scanners

- Scroll to Printer preferences and toggle Let Windows manage my default printer to off
Select your target printer from the list

Click Set as default

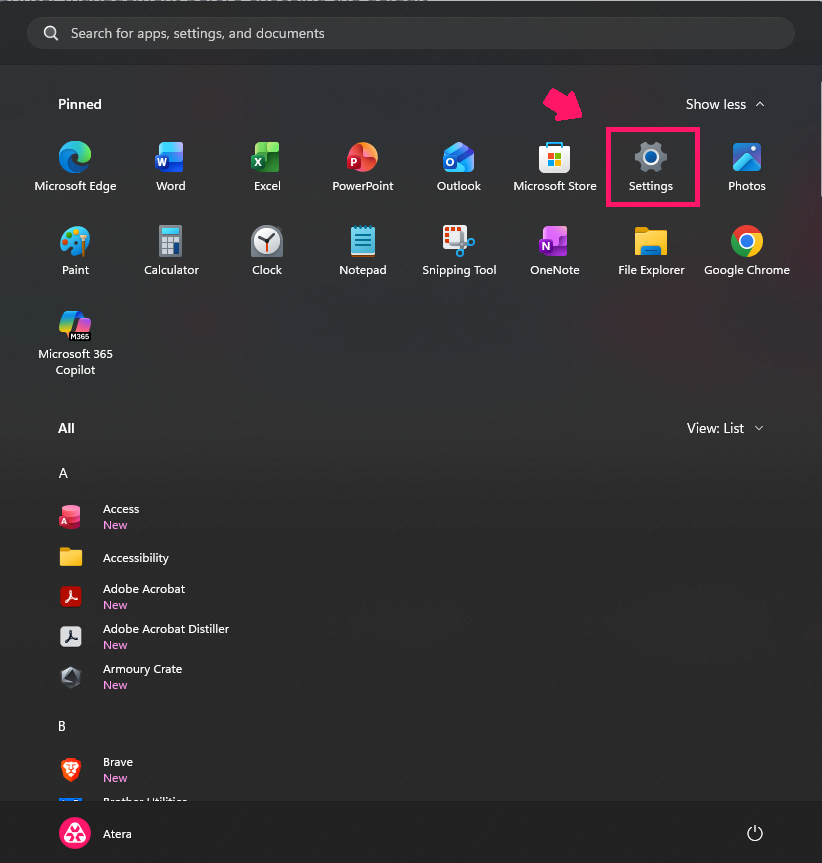
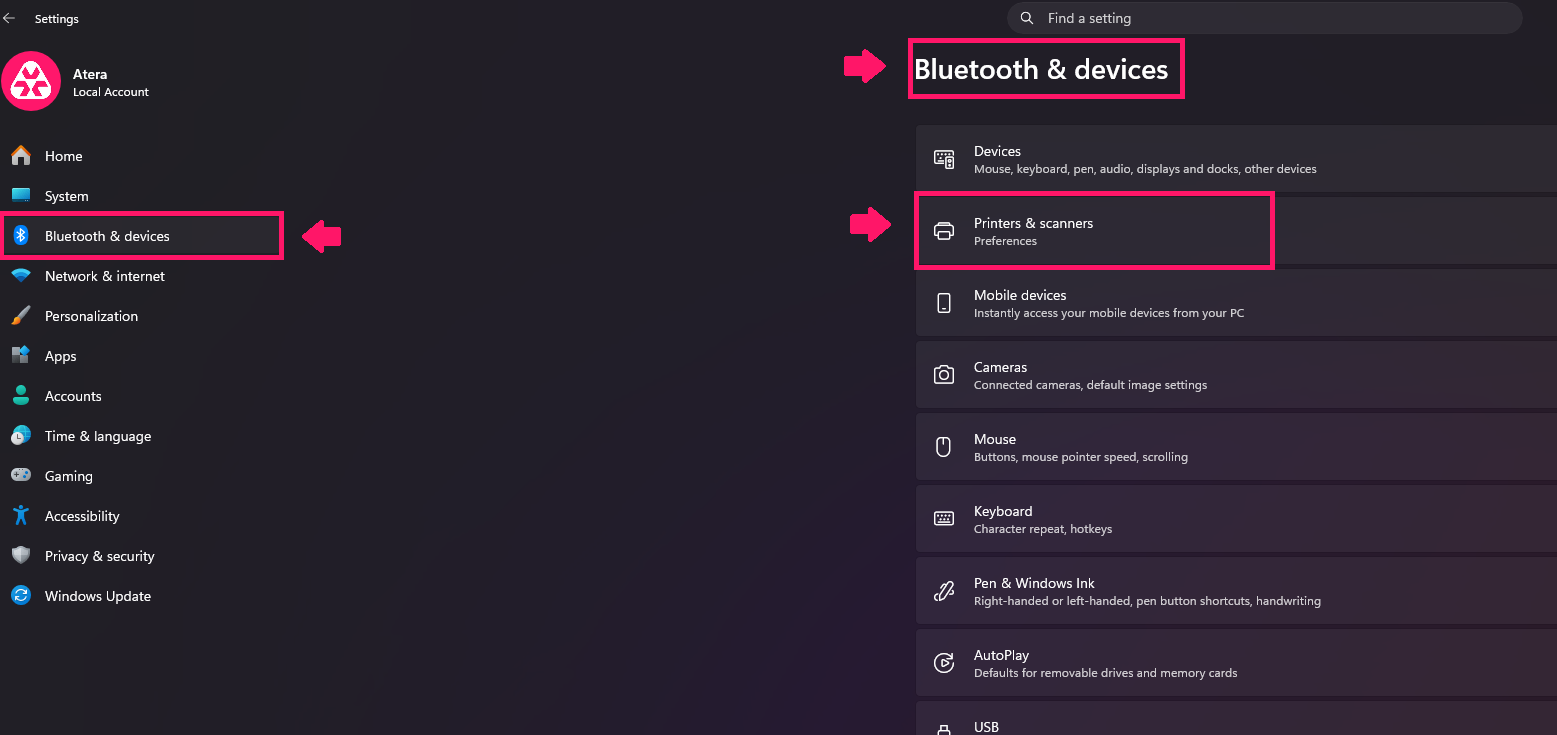
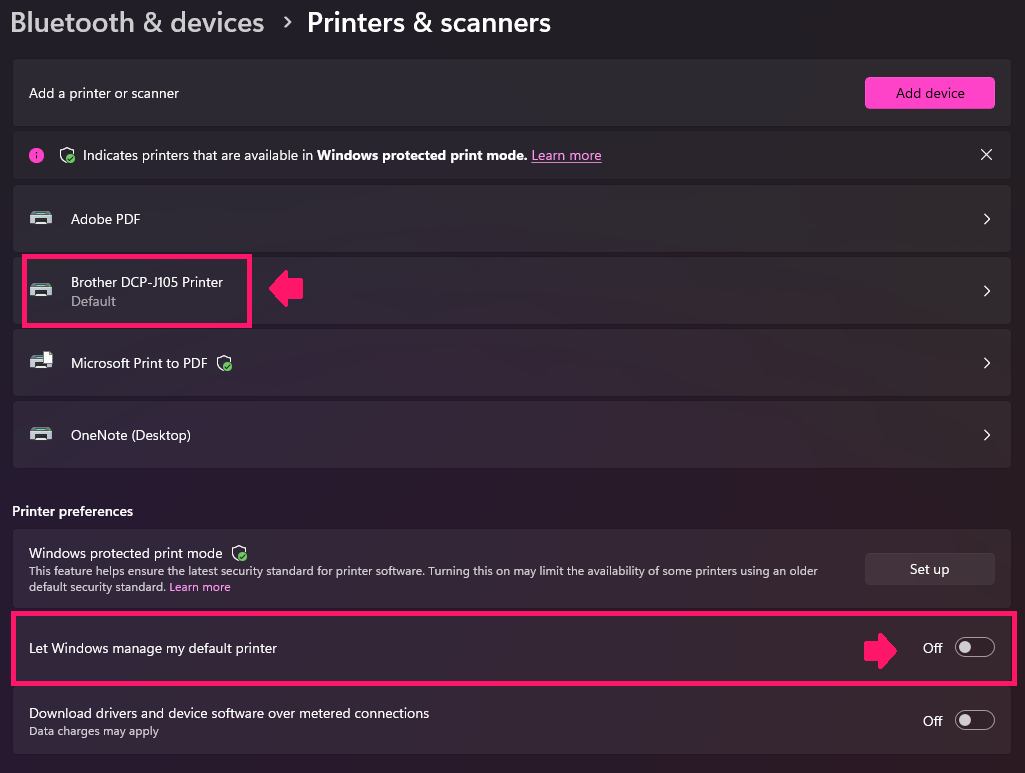
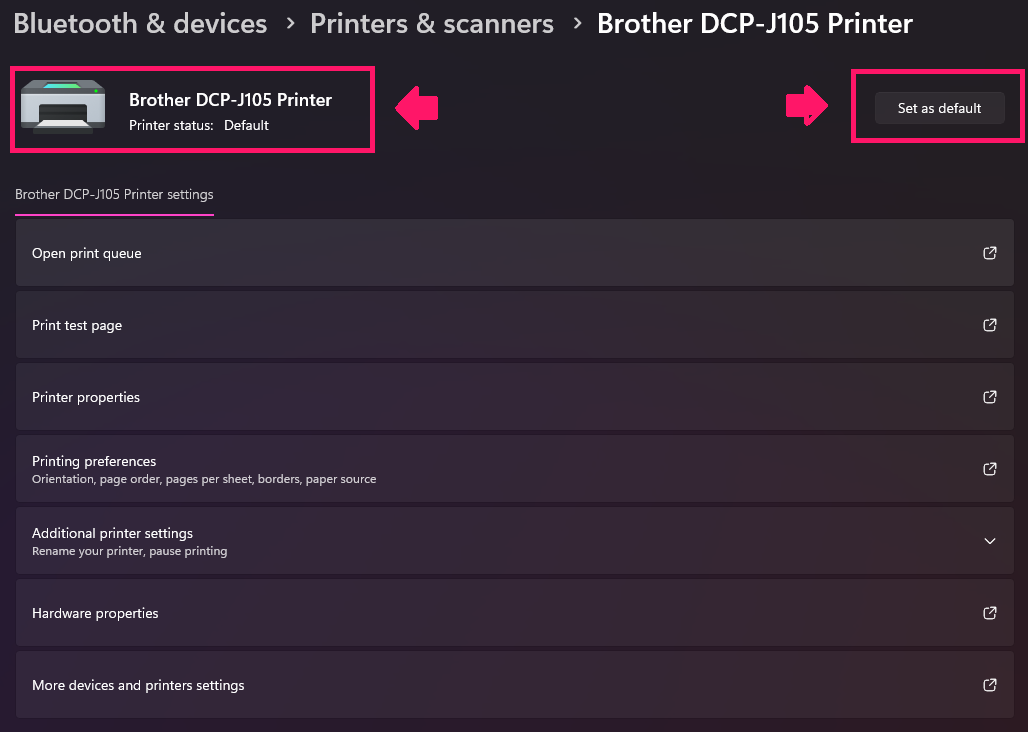
If the Set as default option is missing entirely, automatic default management is probably still active. Go back and confirm the toggle is off.
Classic Control Panel (legacy systems)
Use this path for older systems or legacy network printer setups where the modern Settings app doesn’t show the level of detail you need.
Open the Start menu, type Control Panel, and open it

Select the Hardware and Sound > View Devices and Printers

Right-click your target printer and select Set as default printer

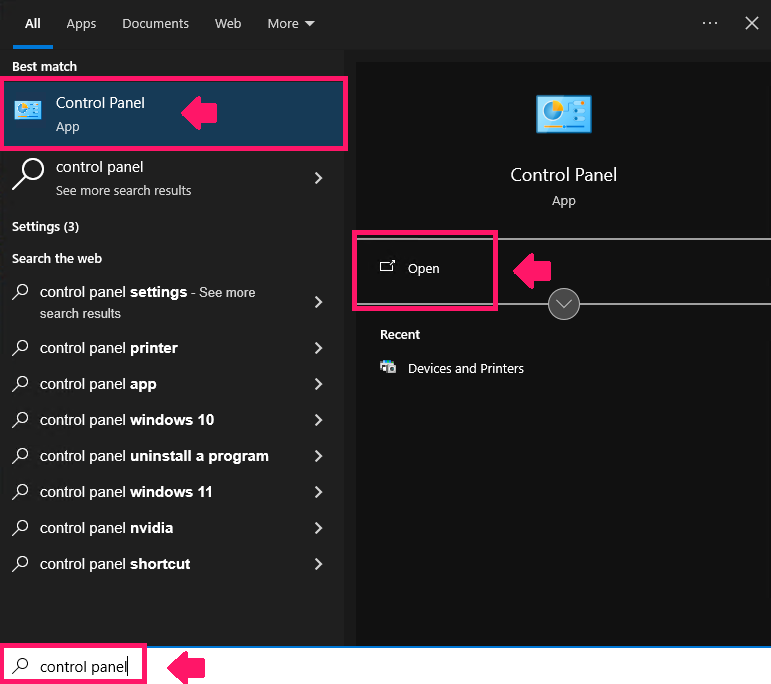
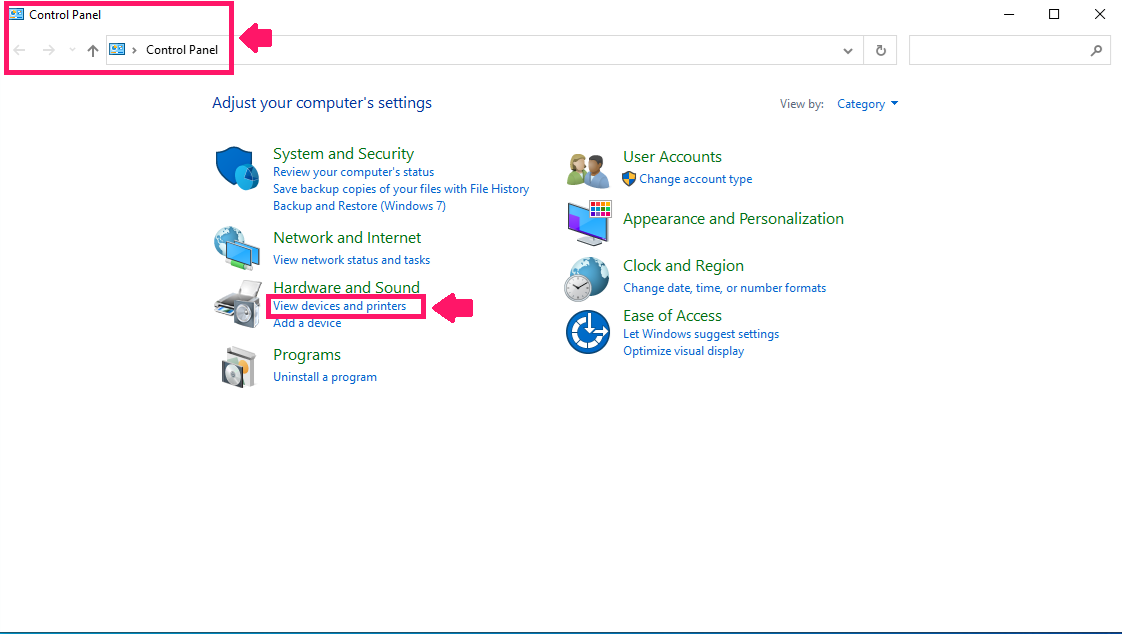
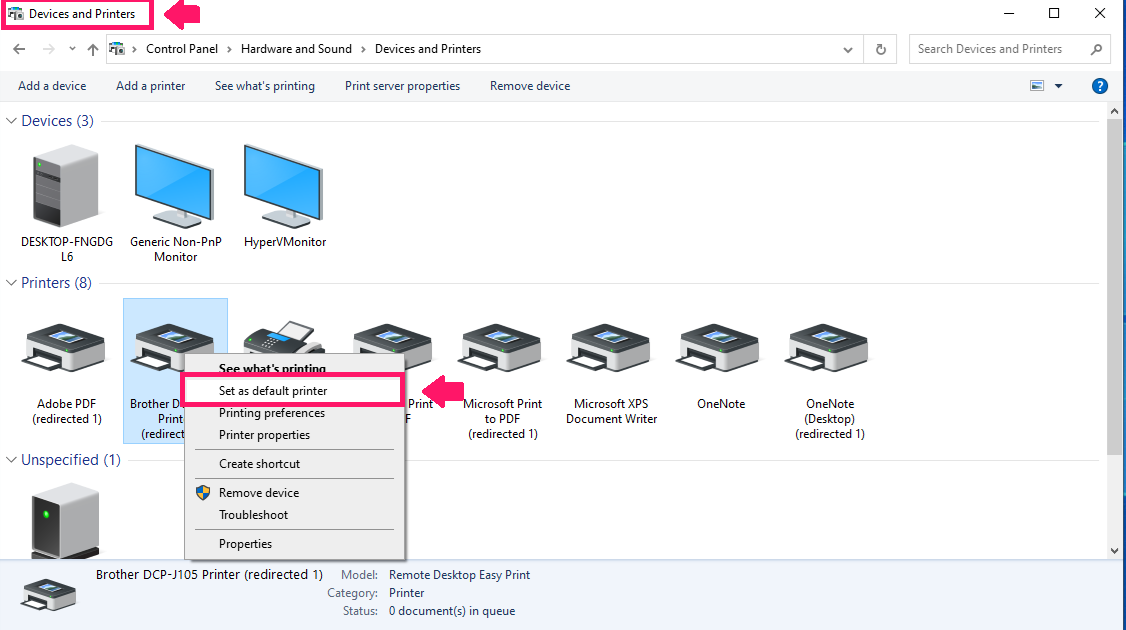
The classic view puts more printer information in one place, which can speed up troubleshooting on older systems or legacy drivers.
macOS (System Settings)
macOS handles this differently, and the choice you make here determines whether the default stays fixed or follows your recent activity.
- Open the Apple menu and go to System Settings > Printers & Scanners
- Open the Default printer menu
- Select the actual printer name, not Last Printer Used
Choosing Last Printer Used means the default will automatically shift to whatever printer was used most recently at your current network location, so it can change between home and office without warning. Selecting a named printer keeps it fixed regardless of what you print to elsewhere.
As a shortcut, you can also Control-click a printer in the list and choose Set Default Printer directly.
» Manage Mac devices remotely by enabling RMM on Mac
Command line (Windows CMD)
This method is useful when you’re working remotely, scripting a fix, or just want to skip the GUI entirely once you know the exact queue name.
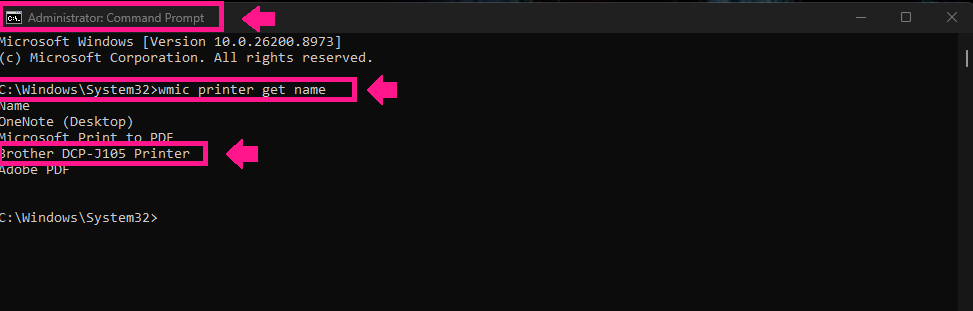
Open Command Prompt as an admin

Run
wmic printer get nameto list installed printer queues
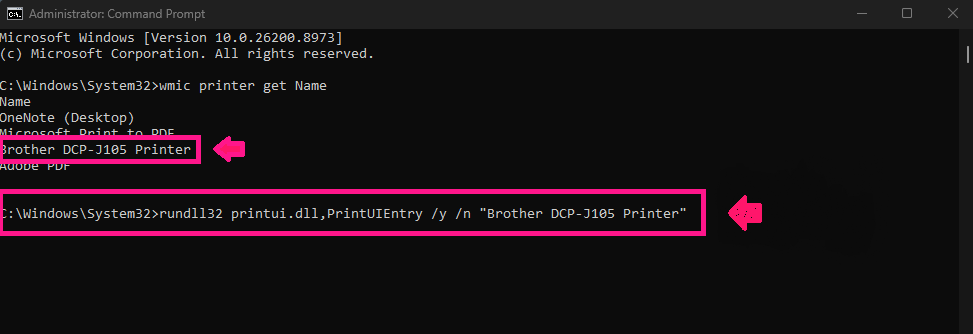
- Identify the exact printer name from the output
Run
rundll32 printui.dll,PrintUIEntry /y /n "Exact Printer Name"to set it as default
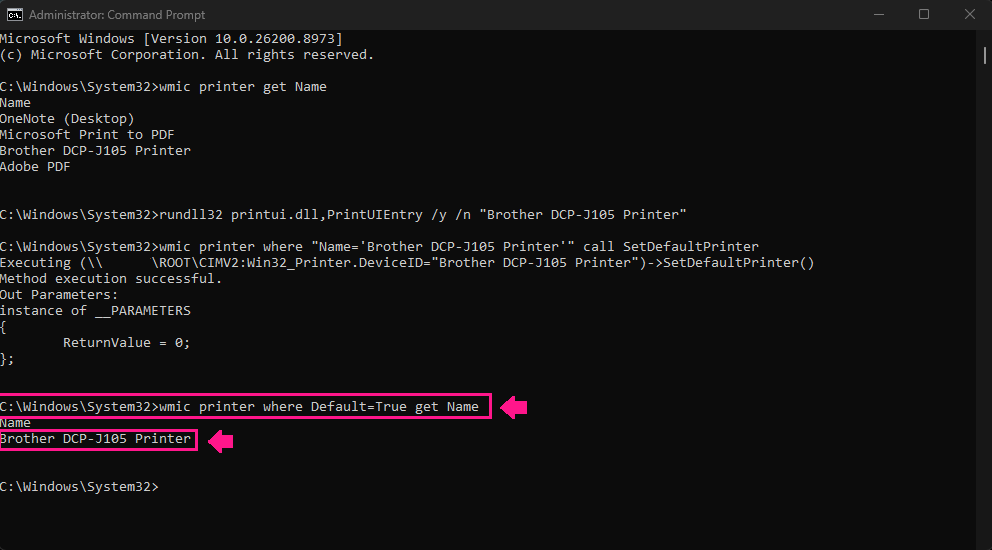
- Alternatively, run
wmic printer where name="Printer Name" call setdefaultprinter; aReturnValue = 0confirms success Verify the change with
wmic printer where Default=True get name
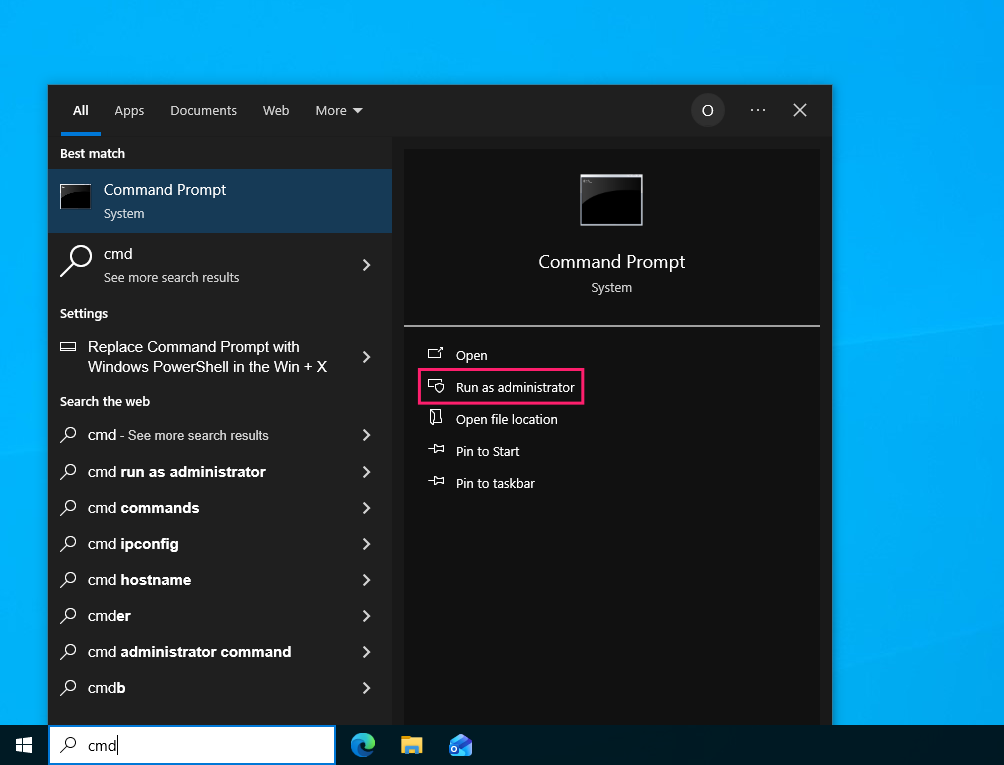
Windows stores the default printer per user, not per device, so make sure you’re running these commands in the target user’s session.
Note: Microsoft has deprecated WMIC, and it’s no longer installed by default on fresh Windows 11 24H2 builds. For long-term compatibility, plan to shift these workflows to PowerShell or CIM cmdlets.
Linux (CUPS and lpoptions)
On Linux, CUPS handles printer queues, and the command line gives you both visibility and control over which one is set as default.
Open a terminal and run
lpstat -p -dto list known printer queues and check the current default
- Run
lpoptions -d "Your printer name"to set the new default Confirm the change with
lpstat -d
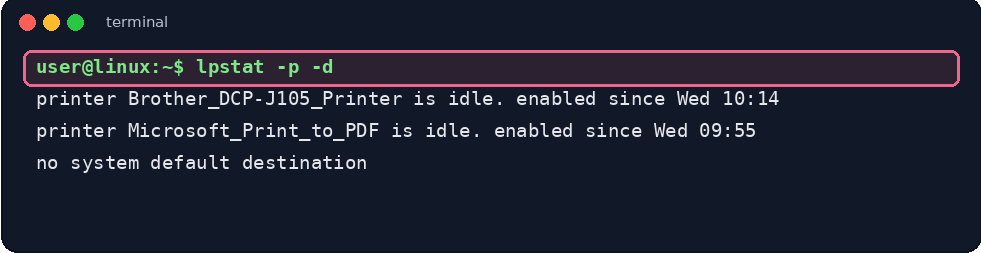
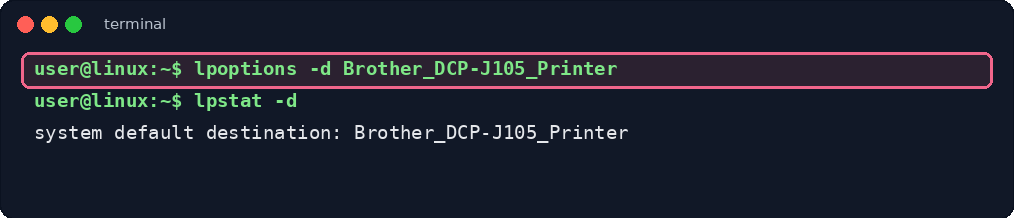
If no printers appear in the first command, the printer hasn’t been added to CUPS yet. Add it first, then repeat the steps above.
» Did you know you can manage Linux servers at scale using Atera’s Linux Agent?
Scaling default printer assignment across a fleet
Once you’re managing more than a handful of machines, setting the default one desk at a time stops being practical. The underlying requirement doesn’t change, but the deployment method does.
Install or map the printer queue first, since Windows can’t assign a default that doesn’t exist in the user’s profile yet. From there, the right tool depends on your environment:
- PowerShell works well for one-off deployments or reusable scripts, and since the default printer is stored per user, the script needs to run in the signed-in user’s context, always read back the result to confirm which printer actually got set, not just that the script ran without error.
- Group Policy fits on-premises Active Directory environments, where Printer Preferences can deploy a queue and mark it default by user OU, department, or site, applying automatically at logon.
- Intune covers cloud-managed devices the same way, deploying a user-context PowerShell script rather than a device-level policy.
- Remote scripting through an RMM platform like Atera lets you target selected devices or device groups directly, run the same PowerShell scripts remotely on demand, and get back a report of which endpoints succeeded and which failed.
» Learn more about simplifying group policy management with Atera
From single desk fix to fleet-wide consistency
Fixing one machine’s default printer takes thirty seconds once you know where the setting lives. Fixing it consistently across fifty or five hundred machines is a different problem entirely, and it’s exactly the kind of repetitive, per-device grind that eats a technician’s day without requiring much actual skill. Manually walking through Settings on each endpoint doesn’t scale, and it shouldn’t have to.
Atera’s remote scripting lets IT teams and MSPs deploy the same PowerShell fix or GPO update across selected devices or device groups on demand, with the results reported back so you know immediately which machines took the change and which didn’t. And if you don’t have the script you need, AI Copilot can write one for you with specific instructions from simple natural language queries.
Frequently Asked Questions
Related Articles

How to turn off filter keys
Filter Keys and similar accessibility features can affect keyboard input and IT productivity when enabled unexpectedly. This guide explains how they work and how to disable them across Windows, Mac, and Linux.
Read now
How to edit a file in Linux
One wrong sed command or an edit made without sudo, and a five-minute fix turns into a lost afternoon. Editing a Linux file means picking the right tool, protecting yourself first, and knowing how to recover when something goes wrong. Here's the full toolkit, from a single config file to a whole fleet.
Read now
How to close a tmux session
One wrong key combination in tmux doesn't disconnect you, it kills your session and everything running inside it. No warning, no undo, no recovering that half-finished database write. Knowing exactly which command detaches and which one terminates (and confirming what's actually running before you close anything) is what separates a clean session close from an afternoon spent explaining a corrupted file to your team.
Read now
How to activate VENV Python
A virtual environment isn't active just because you created it. The activation command changes by shell and OS, and getting it wrong doesn't always throw an error, it just quietly runs your code against the wrong interpreter.
Read nowEndless IT possibilities
Boost your productivity with Atera’s intuitive, centralized all-in-one platform









