
A USB drive that suddenly refuses to accept new files isn’t always a stuck registry flag or a leftover security policy. It could be an uncorrectable error where the controller forces the device into a permanent read-only state on purpose to protect whatever data is still recoverable.
There are a bunch of possible causes, so the real skill in fixing a write-protected drive isn’t knowing every registry key or DiskPart command but telling that hardware scenario apart from the software ones like a stale WriteProtect flag, file system corruption from an unsafe removal, or a Group Policy restriction nobody remembered setting.
Here’s how to diagnose the actual problem and fix it from a single machine to scaled across a fleet.
Why USB drives lock into read-only mode
When a USB drive gets locked into read-only mode, it could either be a software problem or a hardware problem:
Software and file system causes
Most write-protection cases start here, and they’re the ones worth ruling out first. The causes include:
- An unsafe removal mid-write
- A sudden power loss
- An interrupted transfer
Any of these scenarios can leave the file system in an inconsistent state. Instead of risking further corruption, Windows, macOS, and Linux will all mount a volume as read-only until the inconsistency is resolved, which is a deliberate protective response.
Bad sectors on the flash media can trigger the same behavior even when the rest of the drive is healthy. This is exactly what utilities like chkdsk and fsck exist to repair, and in most cases, clearing the underlying file system error is enough to restore write access without touching a single registry setting.
Hardware-level causes
NAND flash cells have a finite number of program/erase cycles, and as a drive approaches that limit, the flash controller may deliberately force the device into a permanent read-only state to preserve whatever data is still intact rather than risk further writes to failing cells.
A failing controller itself can produce the same symptom independent of cell wear. Older USB drives might also have a physical write-protection switch on the casing, which is worth a quick visual check before you assume anything more complicated is going on.
Note: Hardware failures in USB drives aren’t fixable with any computer commands or troubleshooting. In these cases, the best option you have is to retrieve as much data as you can and replace the drive.
Before you touch anything
A few quick checks up front save you from chasing the wrong cause. Confirm these before modifying any settings:
- Inspect the drive for a physical write-protection switch, visible damage, or a loose connector
- Reconnect the drive to a different USB port (and different PC entirely if you can) to confirm whether the issue is device-specific or system-specific
- Confirm you’re working from an account with local administrator privileges, since registry, DiskPart, and Group Policy changes all require elevation
Check whether endpoint security software or an enterprise device policy is enforcing USB restrictions before assuming the fault sits with the drive
How to remove write protection, platform by platform
Once you’ve ruled out a physical write-protection switch and confirmed the drive isn’t already showing signs of hardware failure, the fix itself depends on which operating system you’re working from.
The steps below walk through the native tools for different platforms depending on what OS you’re working on. So pick the method that best matches your situation.
Windows
Windows has a few ways to change USB permissions and protection policies.
With Registry Editor
Use this method when the write protection is being enforced by a system-wide policy key rather than the drive itself, it’s usually the fastest fix when a WriteProtect value has been set somewhere in Windows’ storage policies.
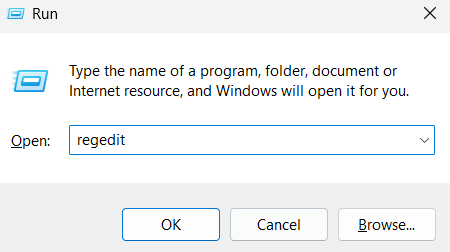
Open Run, type
regedit, and launch Registry Editor with administrative privileges
- Navigate to
HKEY_LOCAL_MACHINESYSTEMCurrentControlSetControlStorageDevicePolicies - Export this key as a backup before making any changes, in case the original configuration needs to be restored
- If the
WriteProtectDWORD exists, set its value to0 Close Registry Editor and reconnect the USB drive, or restart the computer, to apply the change

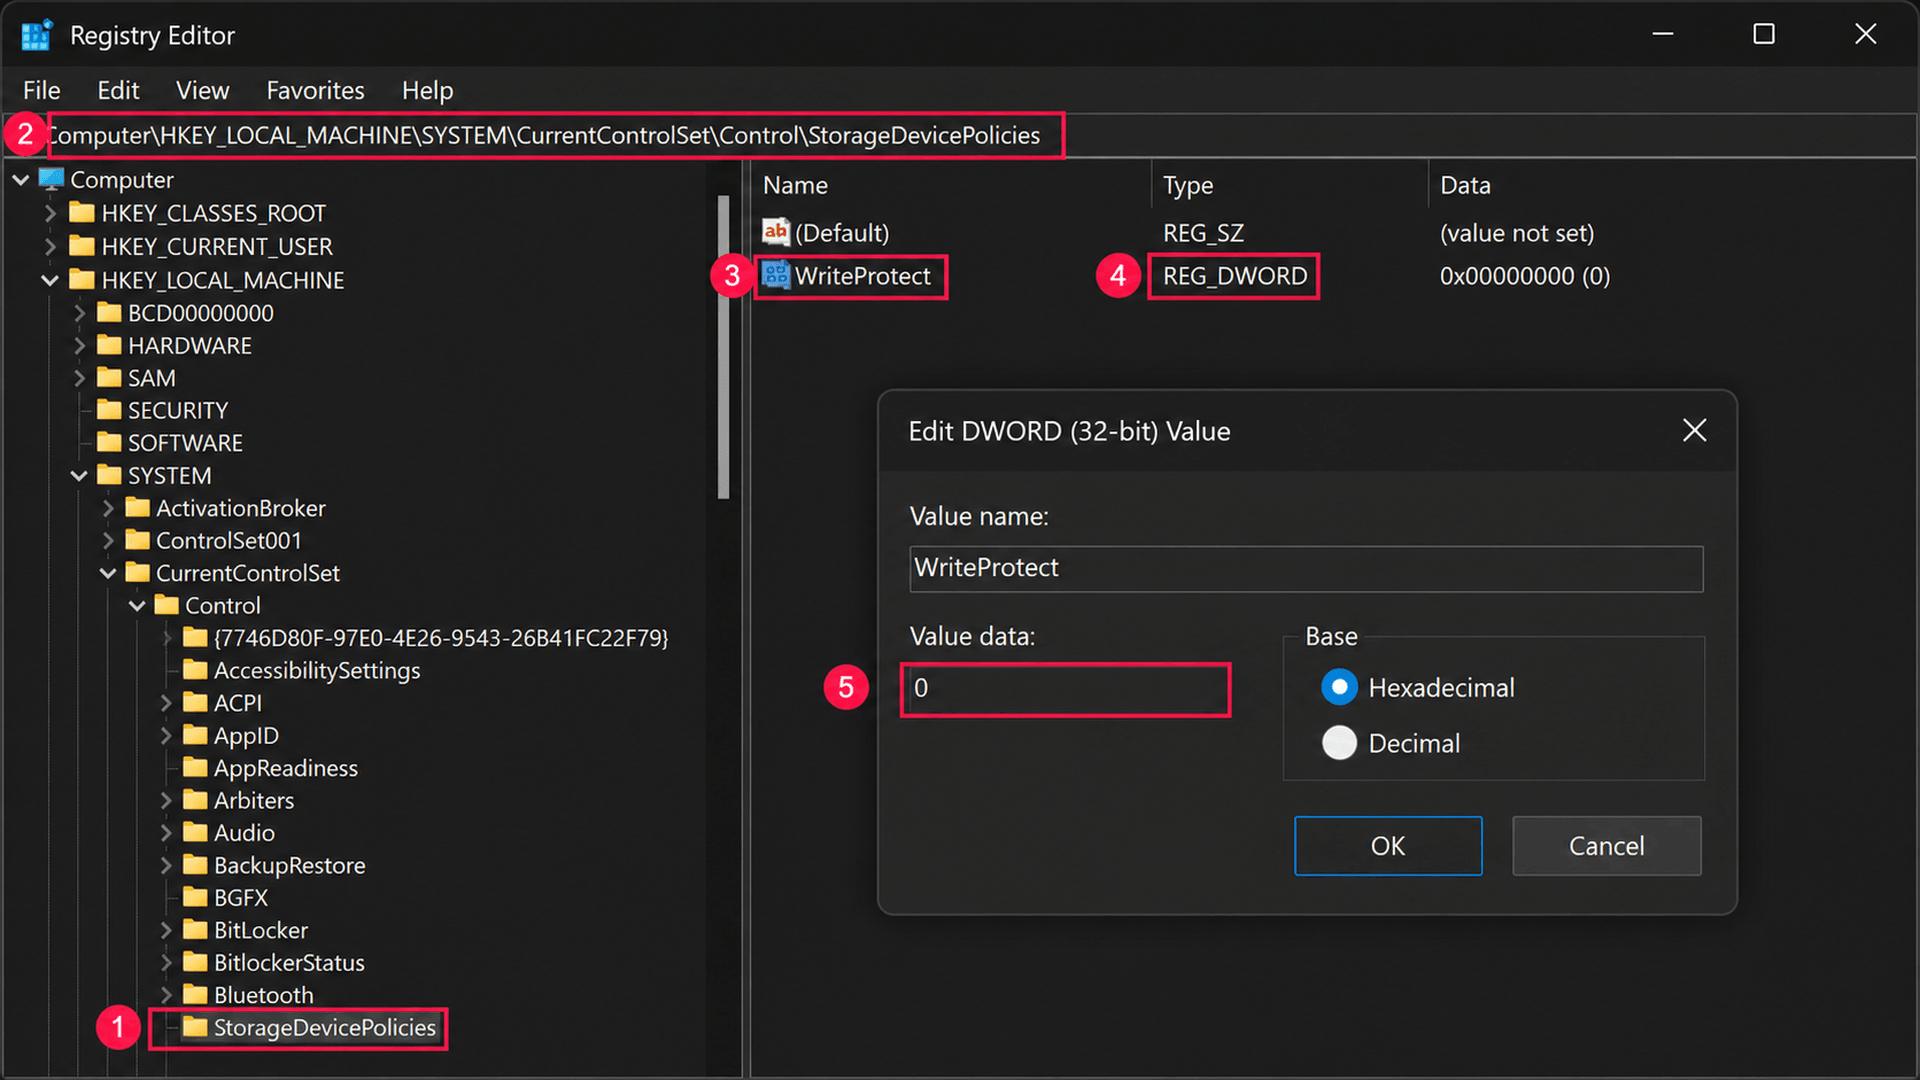
The WriteProtect value controls software-based write protection at the OS level rather than on the device itself, which is why it’s worth ruling out hardware causes first. Clearing this key won’t help if the controller itself is enforcing the restriction.
» Don’t miss our top Registry Editor challenges and solutions
With DiskPart
DiskPart works at the disk-attribute level rather than the registry, making it the right tool when a drive shows as read-only in Disk Management but isn’t affected by a WriteProtect policy key.
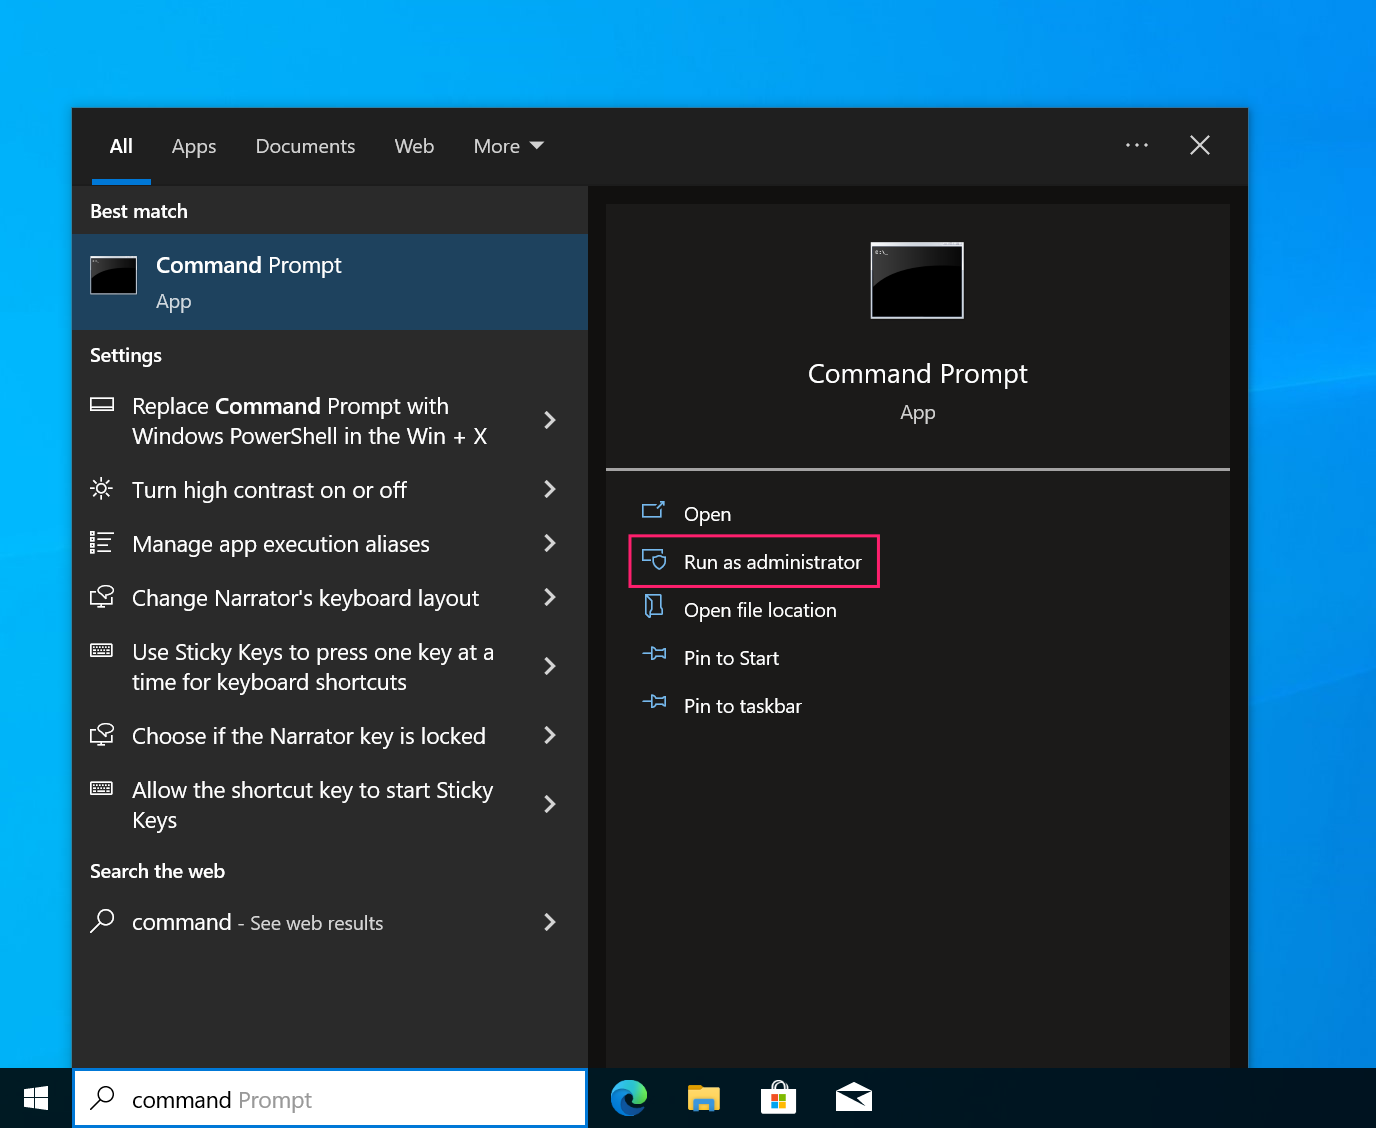
Open Command Prompt as administrator

- Launch
diskpart - Run
list diskto view all connected drives - Run
select disk <number>to target the correct USB drive, confirming the disk number carefully before proceeding - Run
attributes disk clear readonlyto clear the read-only flag Run
attributes diskagain to confirm that Current Read-only State and Read-only both show as No
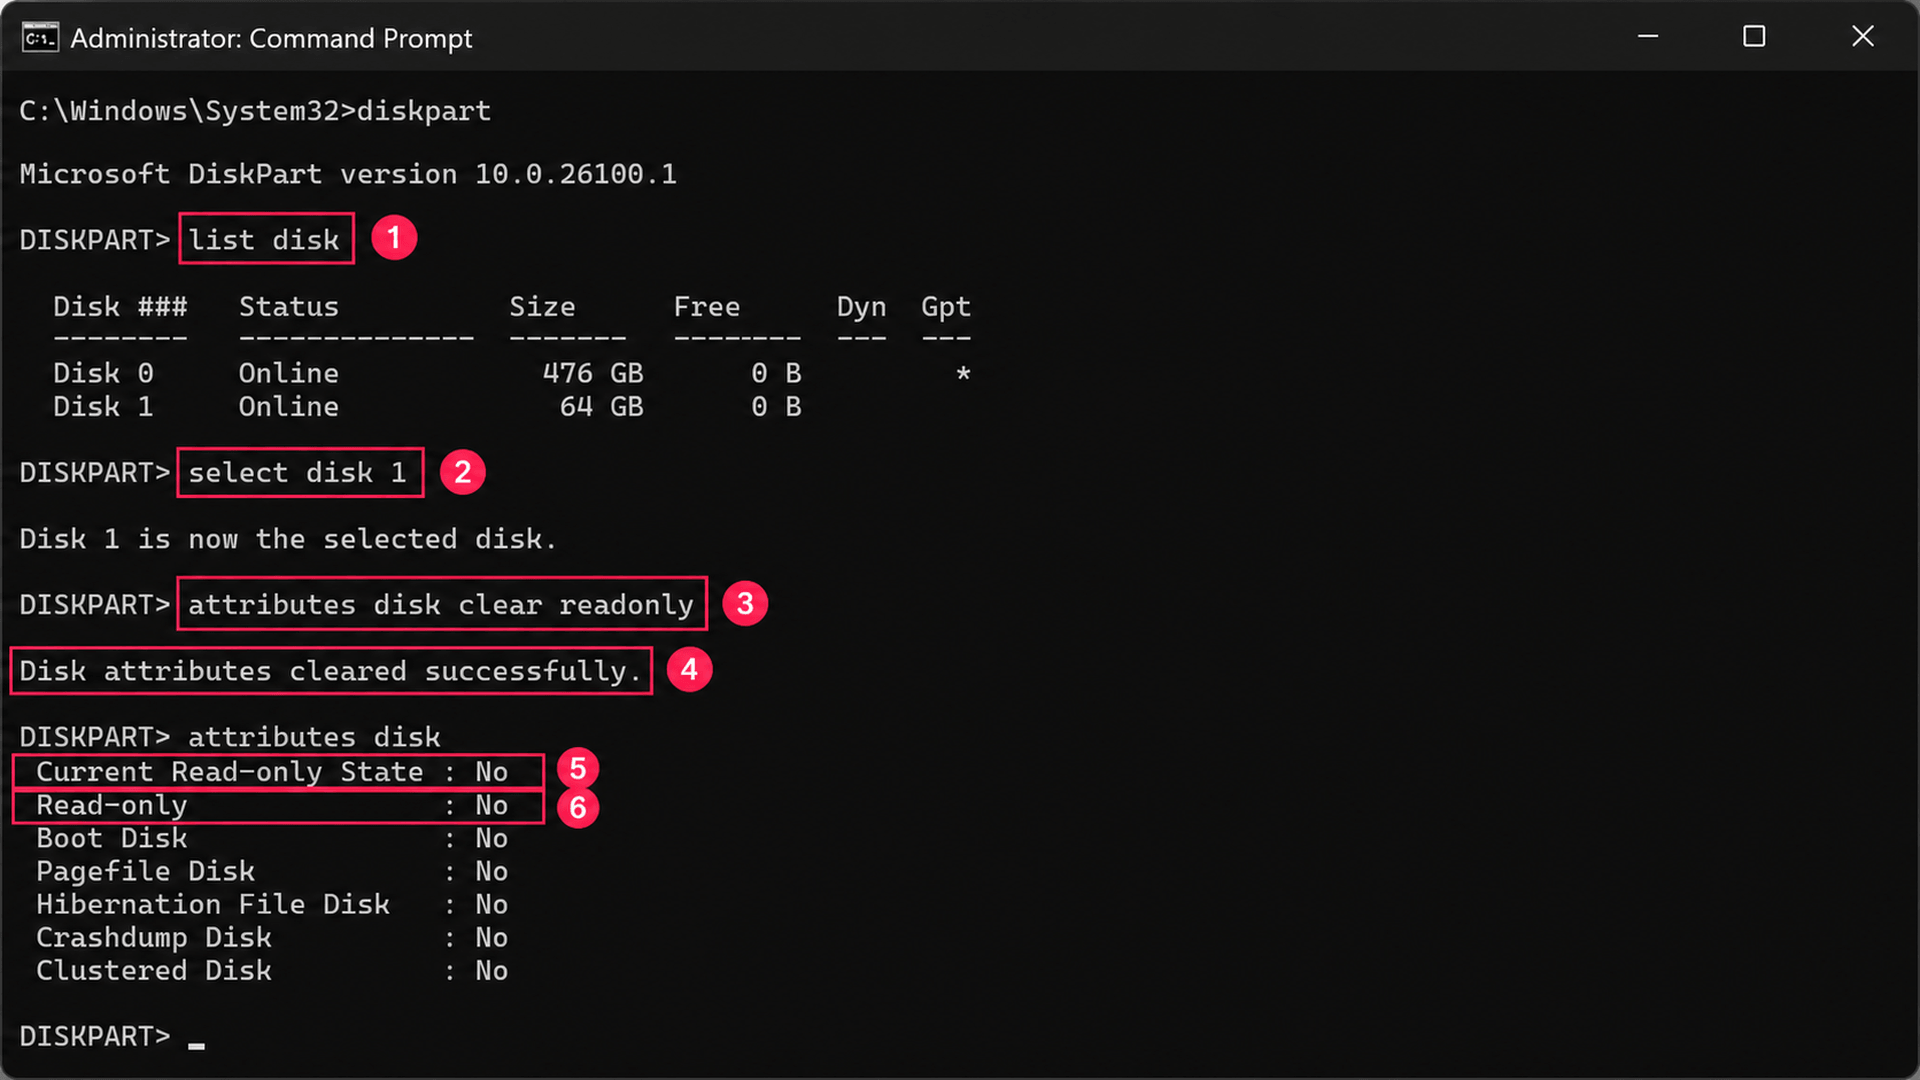
If the read-only attribute returns immediately after clearing it, or the drive stays write-protected across more than one system, that’s a strong signal the cause is hardware failure or controller-level firmware protection rather than something DiskPart can resolve.
» Did you know you can use Command Prompt to format a USB drive?
Controlling at scale with Group Policy and Microsoft Intune
In managed environments, check here before assuming the fix lives on the individual device since a centrally enforced policy will simply reapply itself the next time it syncs, no matter what you change locally.
- In Active Directory environments, review Computer Configuration > Administrative Templates > System > Removable Storage Access in the applicable GPO and confirm whether write access is denied
- In Microsoft Intune, check Device Configuration, Endpoint Security, and Settings Catalog policies for removable storage restrictions affecting the device
- Update or remove the restrictive policy
- Force a policy refresh with
gpupdate /force, or sync the device with Intune Test the USB drive to confirm write access has been restored and the policy no longer applies
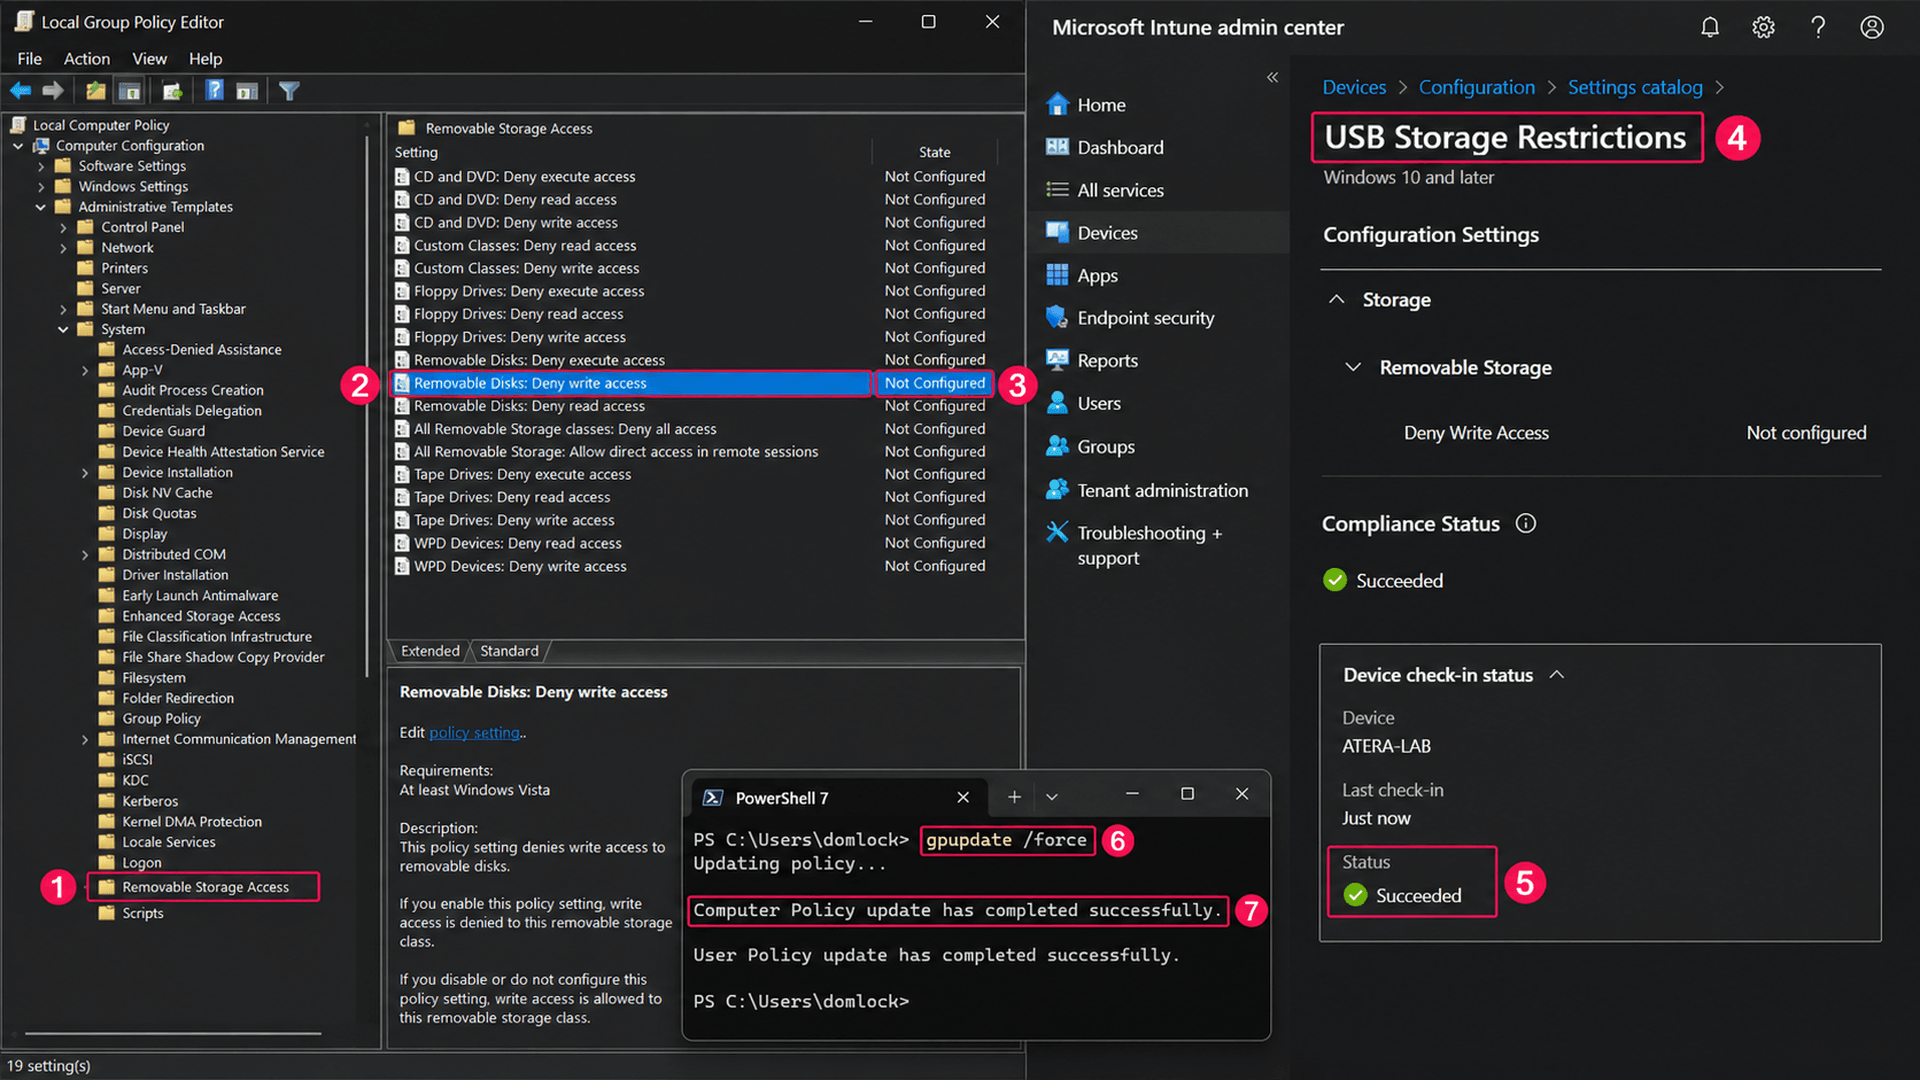
If this same restriction is turning up on more than one machine, chasing it device by device doesn’t scale. Atera’s remote scripting and monitoring through the RMM platform lets you run that verification step across the specific devices or device groups affected, instead of repeating the same check by hand every time a new ticket comes in.
» Learn more about managing group policies easier with Atera
Linux (dosfsck and hdparm)
Reach for these utilities when a FAT-based drive is mounting read-only due to file system inconsistency, or when you need to check whether the kernel itself has flagged the device as read-only.
- Identify the device using
lsblkorfdisk -l - Unmount the partition with
sudo umount /dev/sdX1before making any changes. - If the file system is FAT-based, repair it with
sudo dosfsck -a /dev/sdX1 - Check the kernel’s read-only flag with
sudo hdparm -r /dev/sdX - If the drive supports it, clear the flag with
sudo hdparm -r0 /dev/sdX Remount the drive and confirm write access by creating a test file, for example
touch /mnt/write-test.txt
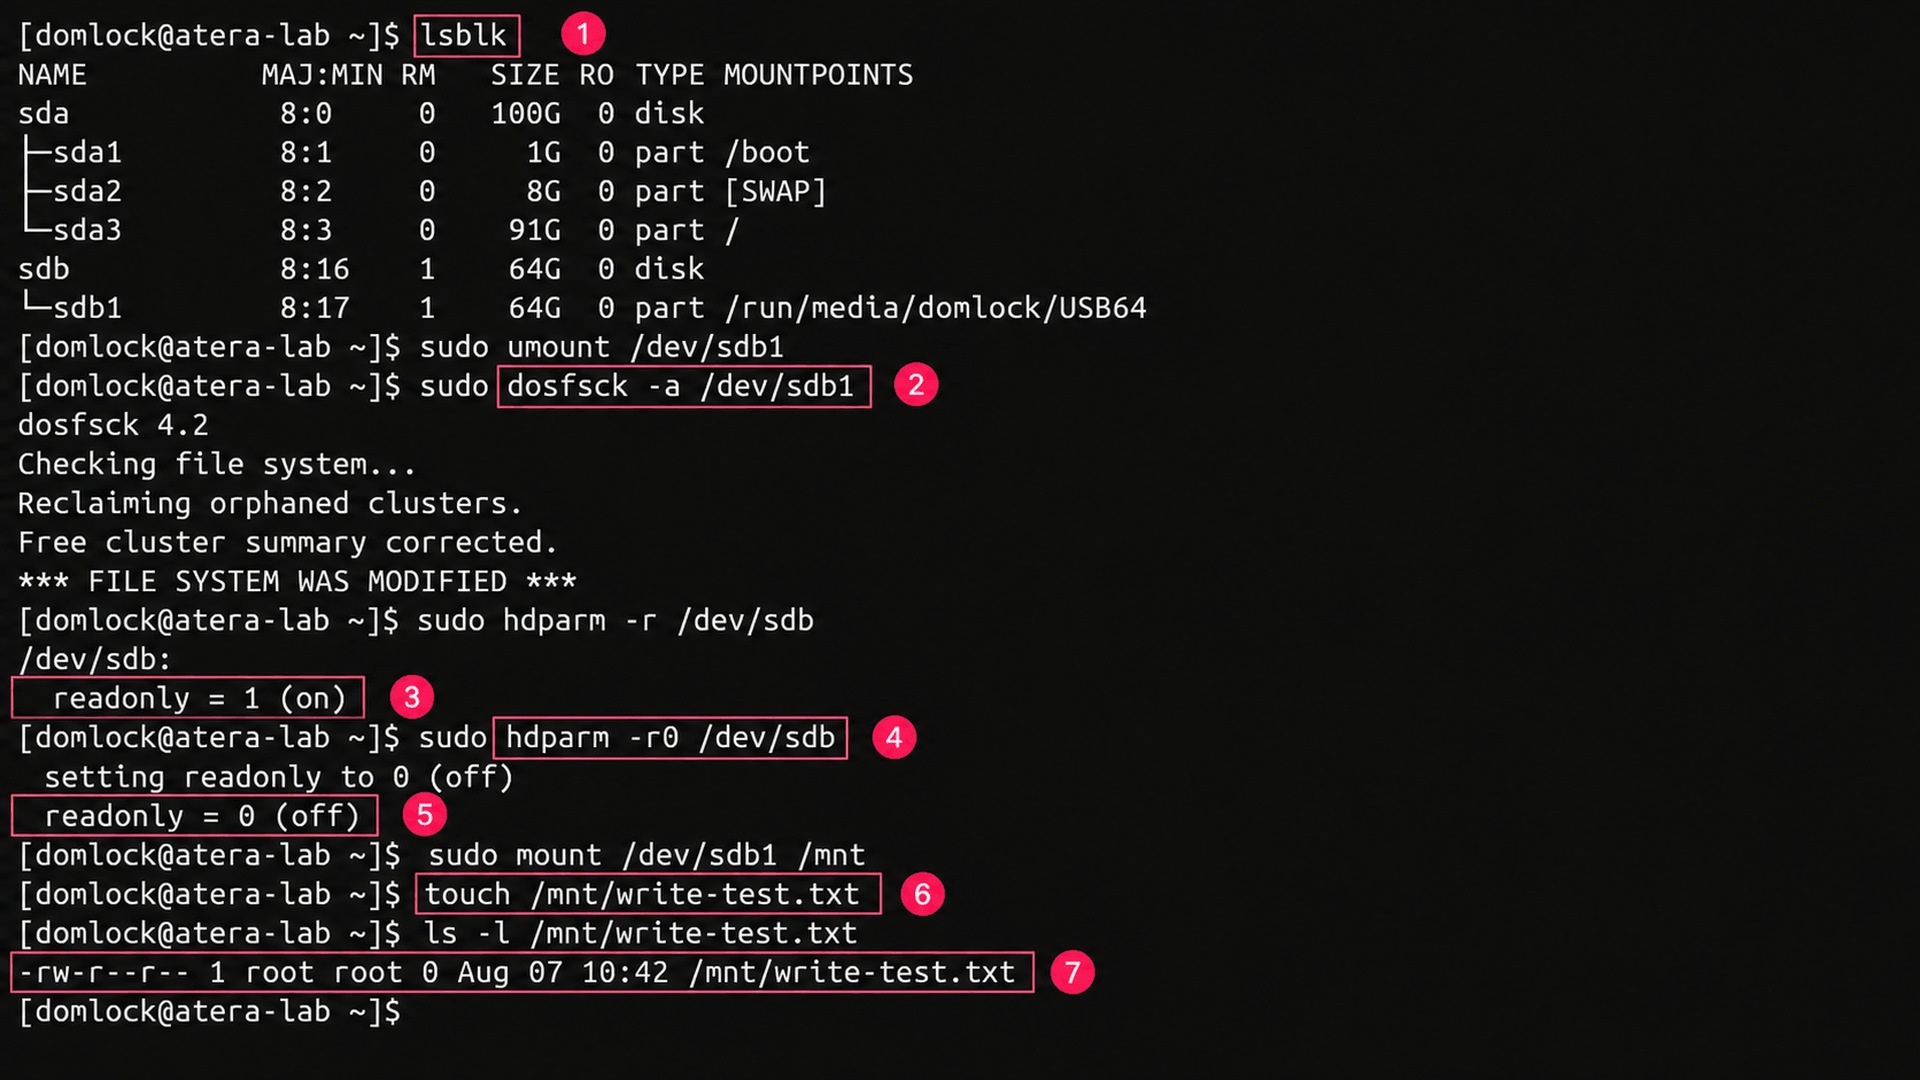
Not every USB controller supports changing its read-only state through hdparm. If the flag won’t clear (or resets on its own), that points to a hardware-enforced restriction rather than something the file system layer controls.
» Here’s how to install Atera’s Linux Agent and monitor Linux servers at scale
macOS Disk Utility and diskutil
This is the macOS equivalent of the Linux workflow above: a file-system-level repair for a volume that’s mounting read-only due to corruption rather than hardware failure.
- Run
diskutil listin Terminal to confirm the correct disk identifier - Run
diskutil info /dev/diskXto check whether the volume is mounted as read-only - Repair the volume using Disk Utility → First Aid, or run
diskutil repairVolume /dev/diskXs1from Terminal - Safely eject and reconnect the drive once the repair finishes
Confirm that files can be created, modified, and deleted
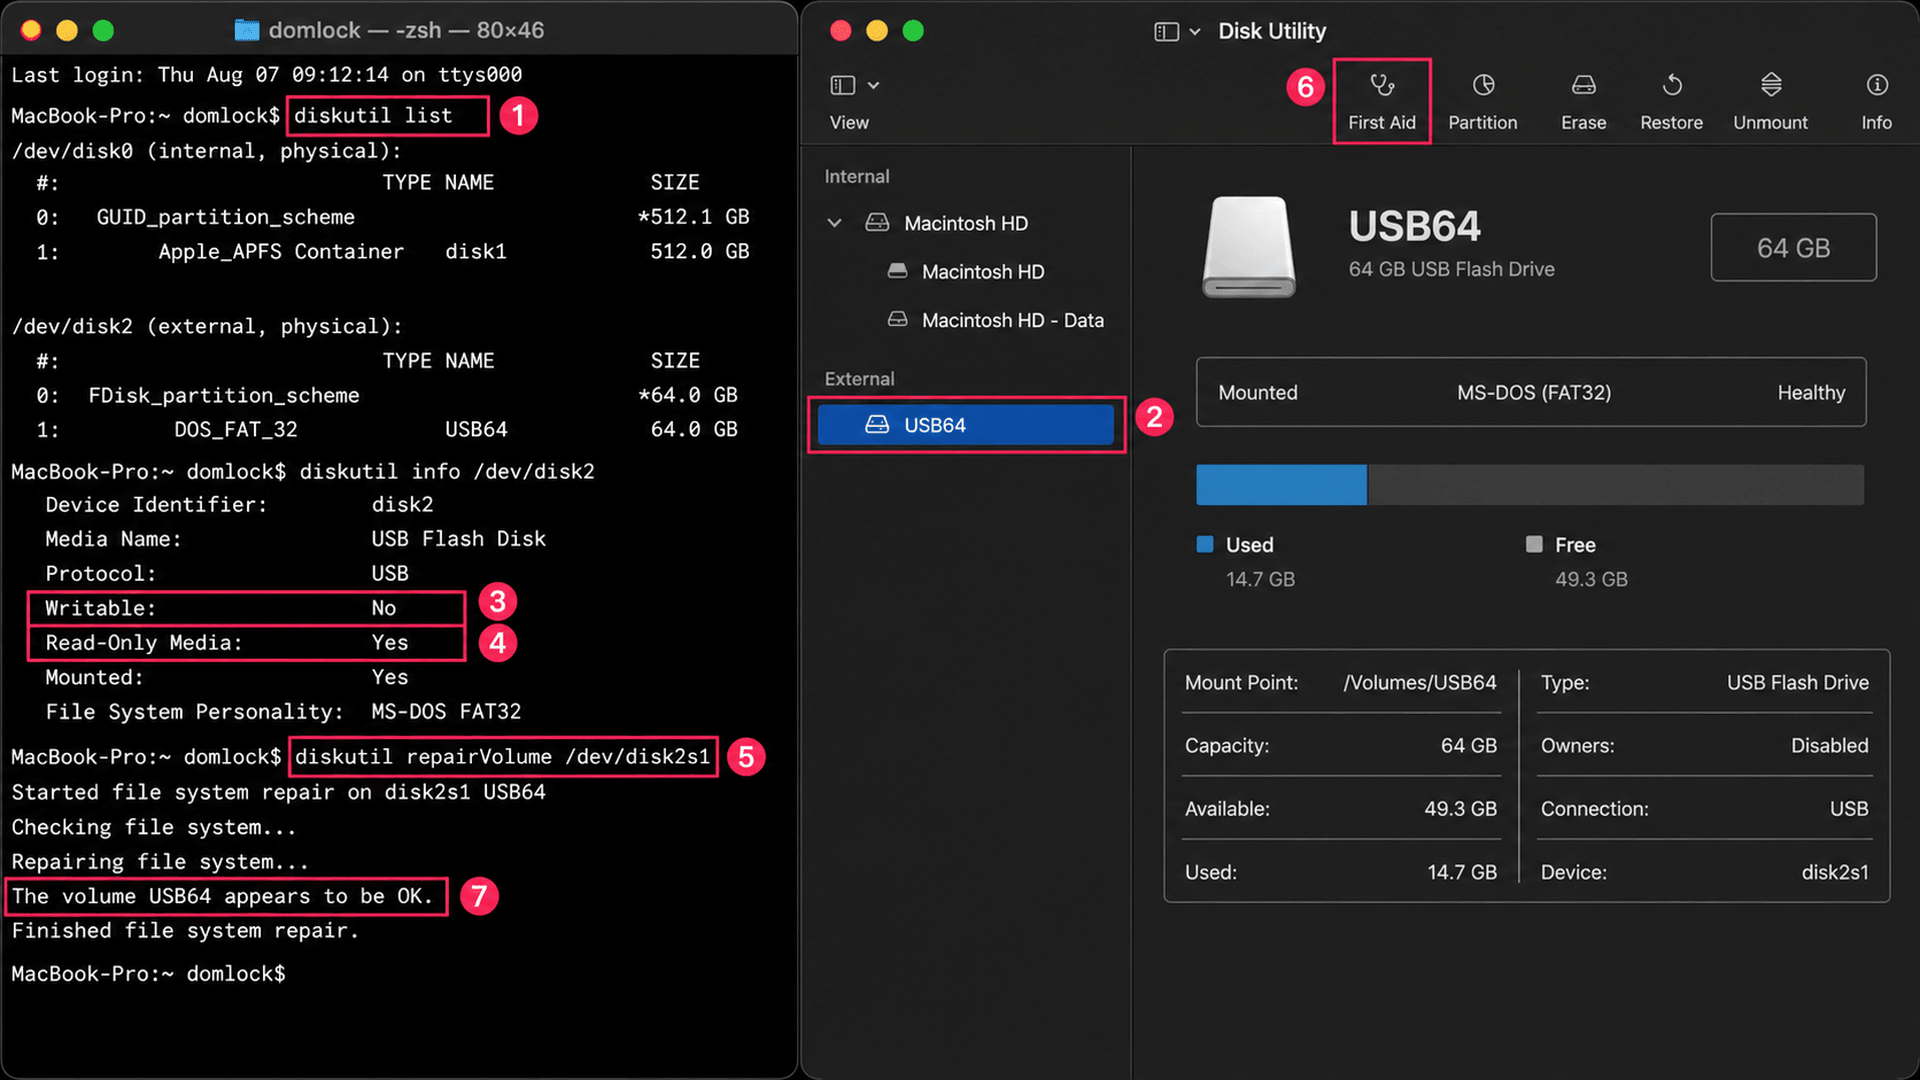
A volume that stays read-only across multiple Macs after a repair attempt is no longer a file-system problem. At that point you’re looking at failing flash memory or controller firmware rather than something Disk Utility can reach.
» Manage your macOS fleet better by enabling RMM on Mac
ChromeOS Files app and Crosh
ChromeOS offers less granular control than the other platforms, so this method is really about confirming the drive is detected correctly before deciding whether formatting is worth attempting.
- Reconnect the drive and open the Files app to confirm it’s detected and check whether it’s mounted as read-only
- Back up any important files before proceeding, since the next step erases the volume
- Select the drive in the Files app and choose Format Device to create a new file system
- If you need to confirm device detection first, open Crosh with Ctrl + Alt + T and run
lsblkto verify the drive is recognized After formatting, reconnect the drive and confirm that files can be created and deleted
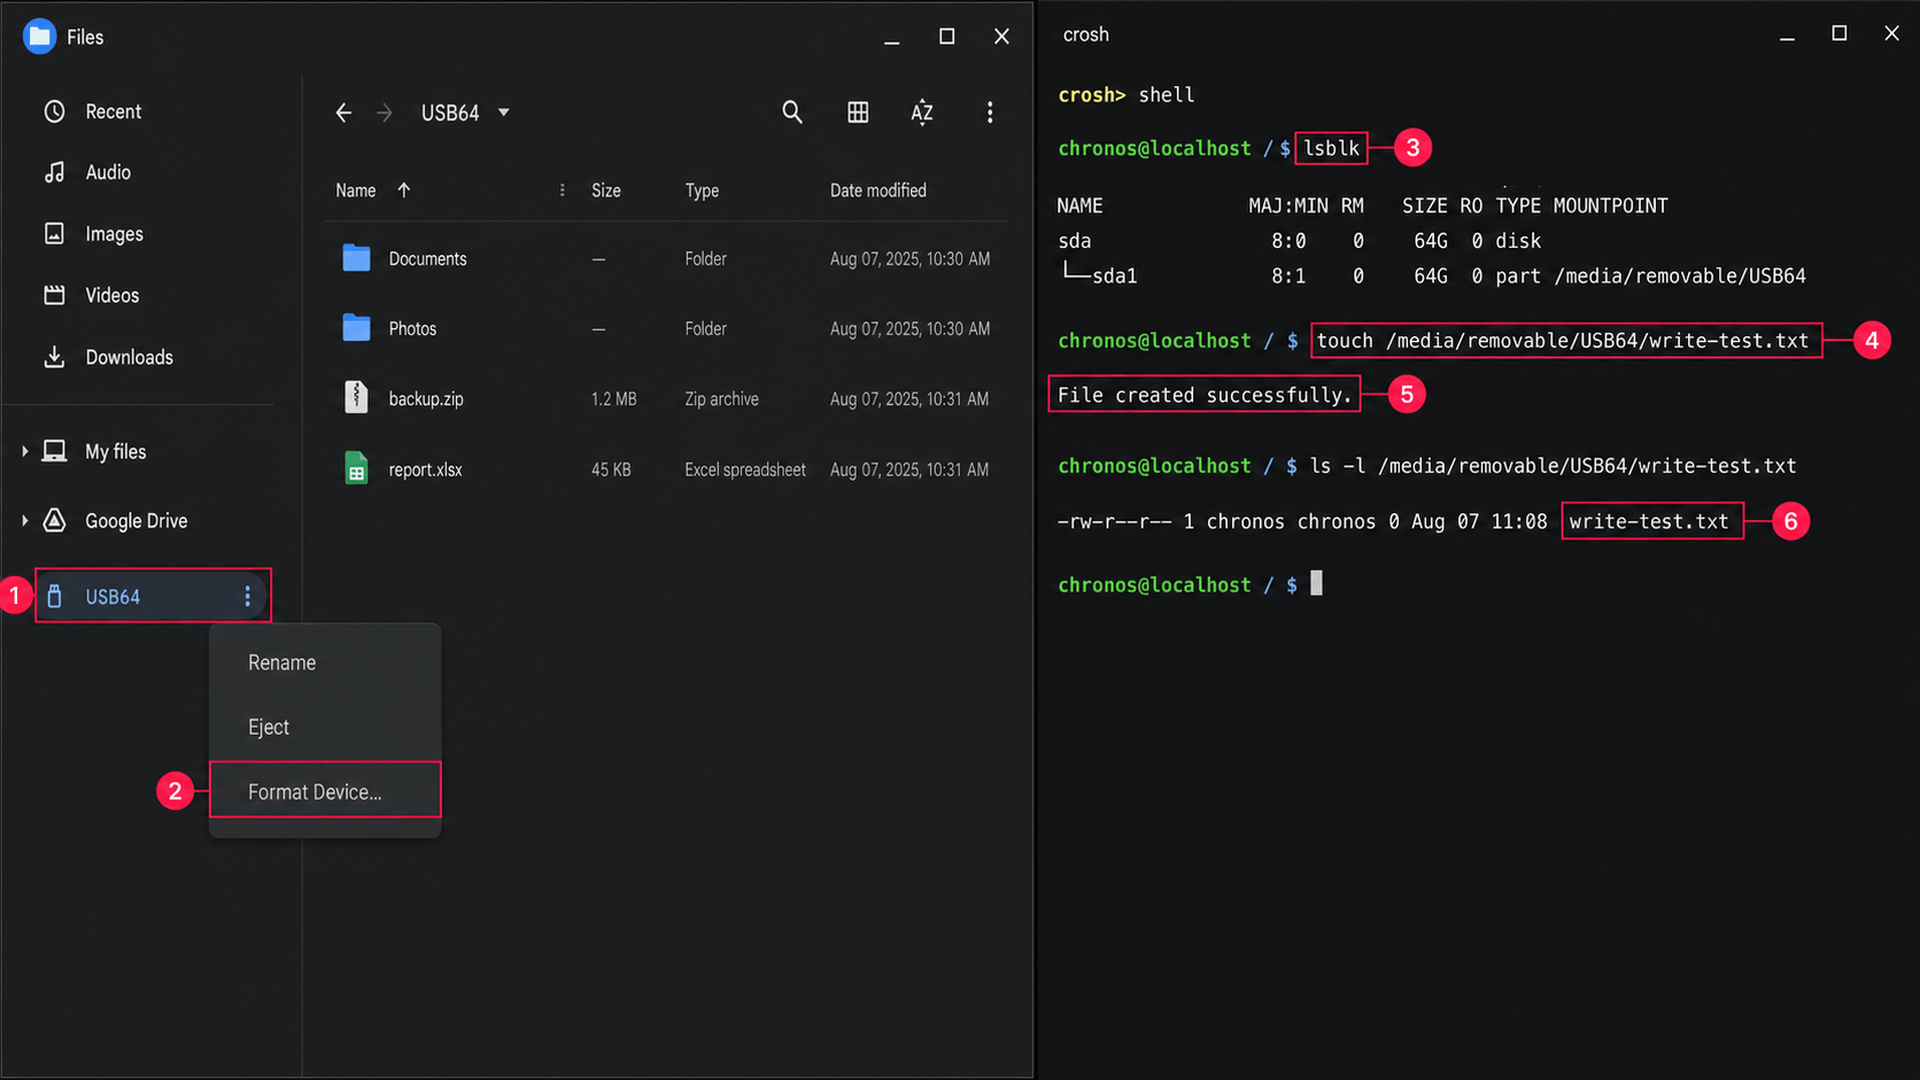
If the drive remains read-only after formatting, test it on a different operating system before concluding the fault is hardware-related. ChromeOS’s more limited toolset makes it harder to distinguish a stubborn file system issue from genuine controller failure.
What to do when the fix doesn’t work
Once you’ve worked through the platform-specific fixes and the drive is still refusing writes across multiple systems, continuing to try repair it just does more harm than good. At this point all you can really do is recover the data and replace the drive.
Recover data and retire the drive
Treat a drive that fails every software fix as hardware failure until proven otherwise. The more you try repair it from here, the more you risk corrupting all the data on it. Instead, follow these steps:
- Copy any accessible files to a healthy storage device immediately, before running any further diagnostics
- Confirm the copied files open correctly rather than assuming the copy succeeded
- If the drive is permanently locked due to NAND exhaustion or controller failure, stop troubleshooting and replace the device
- For drives that held sensitive business data, follow your organization’s media sanitization policy and either physically destroy the device or route it through a certified data destruction or e-waste provider
Choose a file system after reformatting
Once write access is restored, or you’re setting up a replacement drive, the file system you pick affects how likely you are to run into this again:
- Use exFAT for cross-platform use between Windows, macOS, and Linux, and for individual files over 4 GB
- Use FAT32 when compatibility with older devices or embedded systems matters more than file size limits
- Use NTFS on Windows-only environments that need file permissions or support for large files
- Run a full format rather than a quick format if you suspect prior file system corruption, since a full format verifies the media during the process
» Don’t miss our guides to NTFS vs FAT and how to format a USB drive to FAT32
Stop guessing at write protection fixes
Not every write-protected drive is worth troubleshooting by hand, and it’s rarely just one drive. If your team is fielding the same registry key or DiskPart fix across a fleet of managed devices, that repetitive triage is exactly what Atera’s remote scripting lets IT teams and MSPs push out immediately, targeting the specific devices or device groups that need it instead of walking each user through it one at a time.
Pair that with centralized visibility into disk and storage health across your endpoints, and a locked USB drive stops being a one-off ticket and starts being something you catch and resolve before it interrupts anyone’s work.
» Try it out for yourself with a free trial of Atera
Related Articles

How to set Windows environment variables in PowerShell
PowerShell environment variables can be set at the Process, User, or Machine level, with each scope serving a different purpose. This blog covers how to configure these variables and deploy system-level settings across multiple Windows devices.
Read now
How to install AppImage on Linux
An AppImage that won't launch usually isn't broken. It's missing FUSE, sitting on the wrong filesystem, or lacking its execute bit. Here's every method for running one on Linux, from a single terminal command to pushing it across an entire fleet.
Read now
How to enable or disable Windows Subsystem for Linux WSL in Windows 10
Enabling WSL feels harmless right up until a checkbox turns into error 0x80370102 and a BIOS setting nobody documented. WSL now shows up on more professional machines than a standalone Linux install, which means more failed toggles landing on IT's desk.
Read now
How to start mysql server on windows
MySQL doesn't fail loudly on Windows. It just doesn't start, and the reason is buried in a locked port, a missing permission, or a my.ini path pointing nowhere. Five methods will get the service running again, but only if you know which one to reach for and what to check when it stalls.
Read nowEndless IT possibilities
Boost your productivity with Atera’s intuitive, centralized all-in-one platform









