
Table of contents
Generate summary with AI

Install the same application on Ubuntu, Fedora, Arch, and Mint, and you’re juggling four different package managers, four different dependency trees, and at least one distro where the package isn’t in the repo you’re using at all. AppImage sidesteps all of it because you download one file, make it executable, and then run it. No apt, no dnf, no pacman, and no root required.
That simplicity is exactly why “just make it executable” isn’t the whole story. An AppImage that won’t launch is almost never actually broken. It’s usually missing FUSE, sitting on a filesystem that doesn’t preserve the execute bit, or mounted with noexec. Here’s how to get those checks right and everything else you need to know.
» Outdated version? Here’s how to update Linux Mint
What has to be true before an AppImage will run
AppImage’s whole pitch is “no installation.” That’s true in the sense that there’s no package to unpack and no dependency resolver to fight, but it only holds if two host-level conditions are already met:
Confirm FUSE and the execute bit are in place
Check this before you do anything else, since it’s the single most common reason a Type 2 AppImage refuses to launch at all.
Most AppImages you’ll encounter are Type 2, meaning the file is a runtime plus an embedded SquashFS image. On launch, that runtime mounts the SquashFS image, normally through FUSE, then executes the app’s AppRun entry point. If FUSE isn’t installed, the mount step fails before the application ever gets a chance to start.
Two other checks belong in the same pass:
- The file has execute permission (
chmod +xif it doesn’t) - The AppImage’s architecture matches your system, typically
x86-64
Don’t expect a conventional package install to be part of this. AppImages bundle their own application libraries specifically so they don’t depend on whatever happens to be available on the host distro, which is also why testing on the exact distros you plan to support is an important step.
Rule out filesystems that block execution
Reach for this check specifically when you get a permission denied error that chmod +x doesn’t resolve, since the filesystem itself, not the file, is usually the actual cause.
FAT32 and exFAT don’t support native Unix permission bits, so chmod +x has nothing to persist the executable flag to. An AppImage stored on a FAT32 USB drive or exFAT external disk will fail to run regardless of how many times you set the permission. The same failure mode also shows up on Linux-native filesystems like ext4 or XFS if the mount point was set up with the noexec option, which blocks execution outright no matter what the permission bits say.
When you hit this, check the mount before you touch anything else with this command: findmnt -T ~/Applications/MyApp.AppImage
If the output shows noexec, don’t weaken the mount policy to work around it. Move the AppImage to a filesystem and mount point that actually permits execution, such as your home directory.
» Here’s how to change file permissions in Linux and fix the permission denied error
6 ways to install and integrate an AppImage
Every method below gets the same result, an AppImage running and available from your application menu, but they trade off manual control against automation differently. Start with the manual approach if you want to understand exactly what’s happening, or skip to AppImageLauncher or appimaged if you’d rather not do it by hand every time.
Method 1: Install manually via the terminal
Use this method when you want full control over exactly where the file lives and don’t want a background process managing it for you.
- Create a permanent directory for the file:
mkdir -p ~/Applications - Move the AppImage out of Downloads:
mv ~/Downloads/MyApp-x86_64.AppImage ~/Applications/MyApp.AppImage - Apply execute permission:
chmod +x ~/Applications/MyApp.AppImage Launch it to confirm it works:
~/Applications/MyApp.AppImage
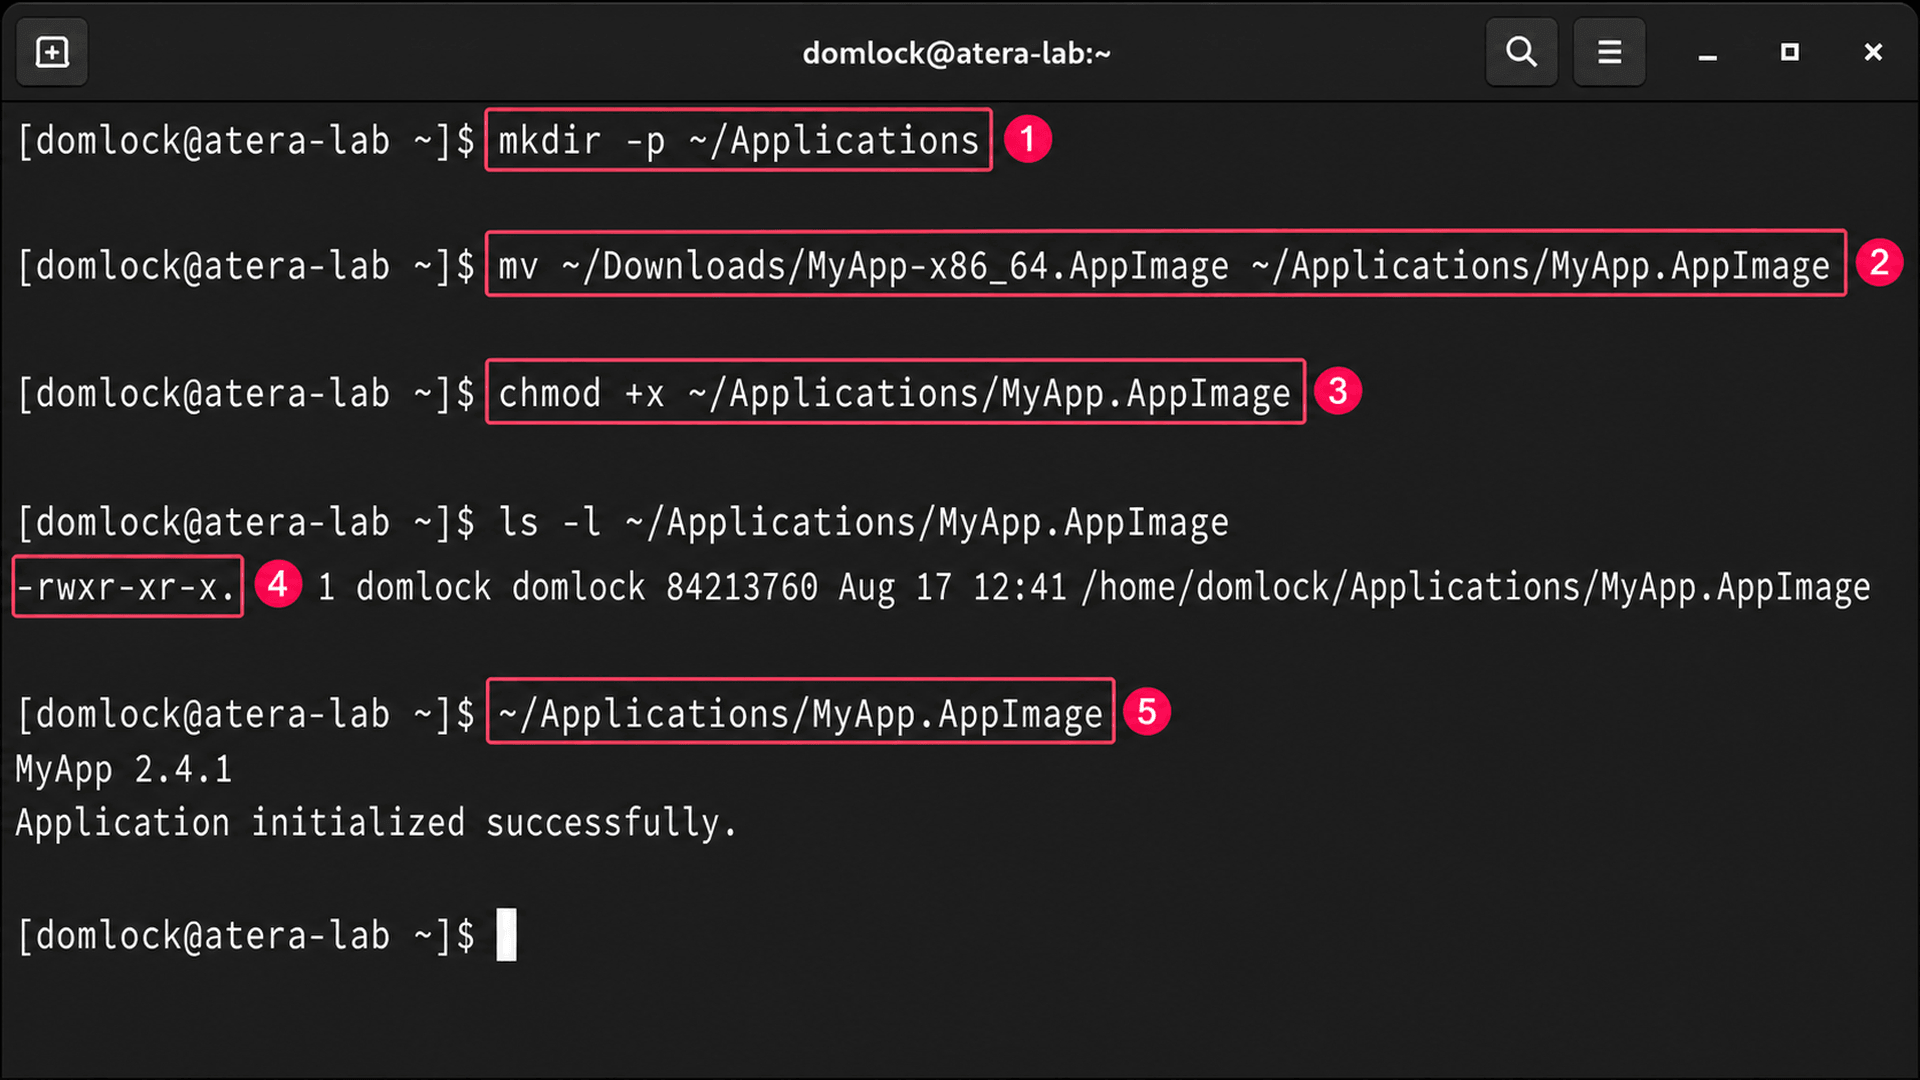
For a system-wide install rather than a per-user one, place the file under /opt instead and set ownership and permissions accordingly. Either way, verify the executable bit before considering the job done with: ls -l ~/Applications/MyApp.AppImage.
$HOME/Applications isn’t an arbitrary choice here. AppImage documentation specifically recommends it as the standard permanent location, and several desktop-integration tools look for AppImages there by default.
» Did you know you can rename a directory in Linux?
Method 2: Register it in your application menu
A manually installed AppImage won’t show up in GNOME or KDE‘s application launcher on its own. This step creates the desktop entry that puts it there.
1. Create the applications directory if it doesn’t exist: mkdir -p ~/.local/share/applications
2. Create a new desktop entry file: vi ~/.local/share/applications/myapp.desktop
3. Add the following contents, adjusting the paths to match your install:
The Script:
Atera does not guarantee the integrity, availability, security, virus-free, safety, lawfulness, non-infringement, rights’ status, or functionality of the scripts. The use of the shared scripts is at your own risk. Scripts are provided “AS IS”. *
[Desktop Entry]
Name=MyApp
Exec=/home/yourname/Applications/MyApp.AppImage
Icon=/home/yourname/Applications/myapp.png
Type=Application
Categories=Utility;
Terminal=false4. Make the desktop file executable: chmod +x ~/.local/share/applications/myapp.desktop
5. Validate the entry: desktop-file-validate ~/.local/share/applications/myapp.desktop
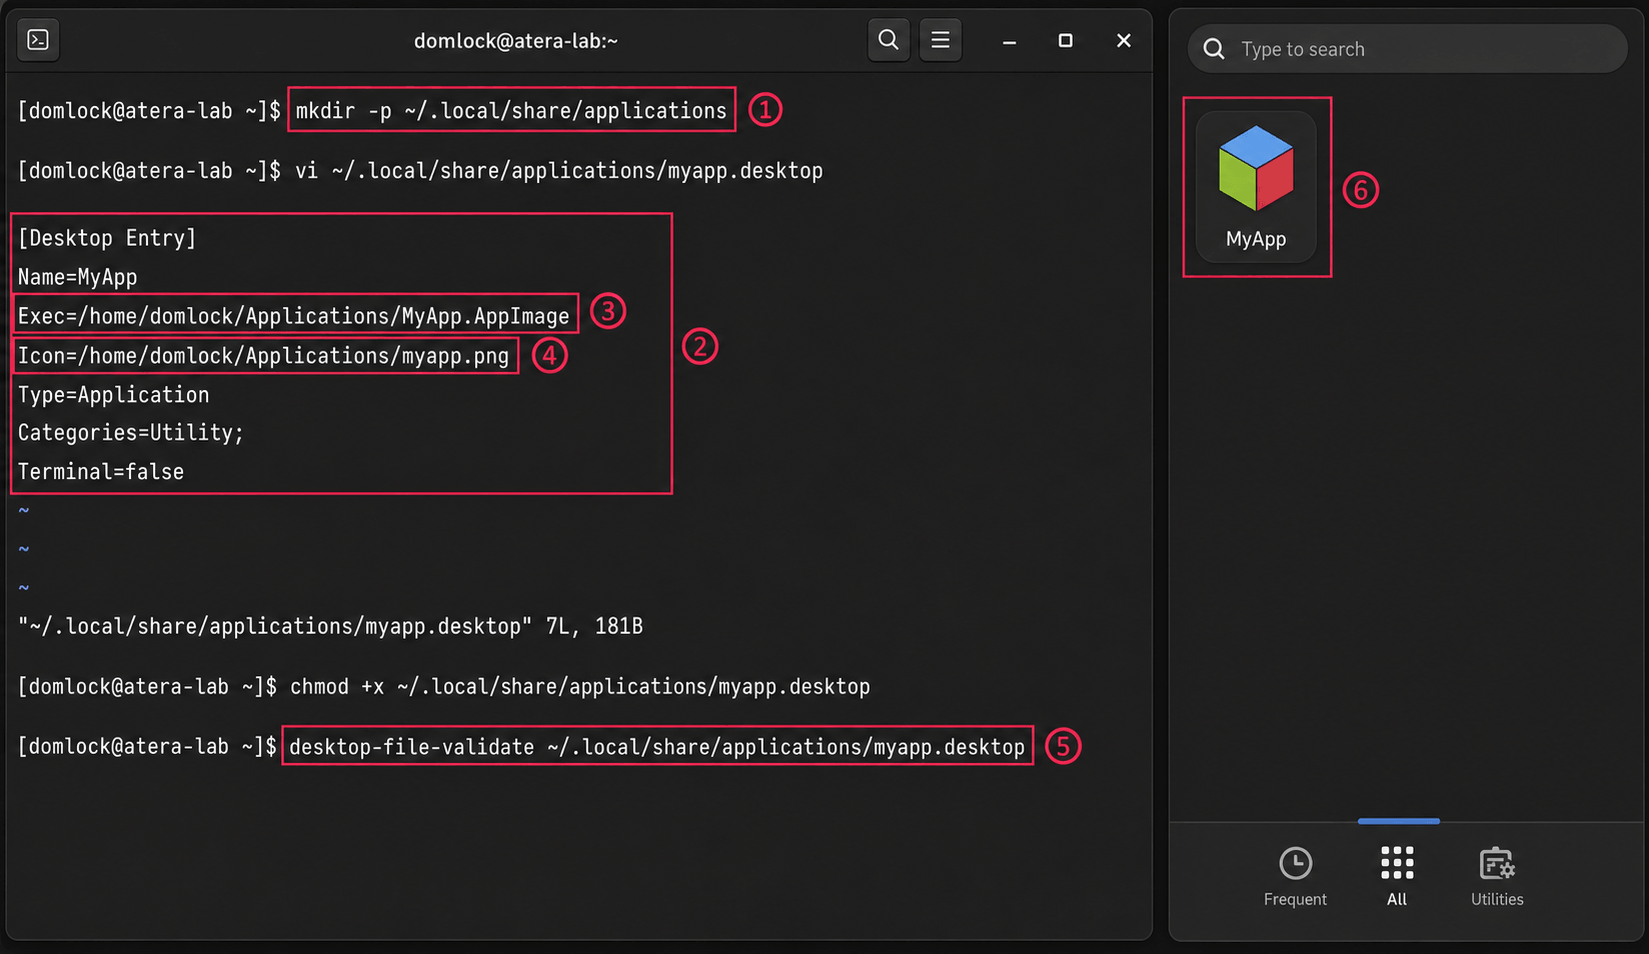
Once validated, open your application launcher and confirm the app appears with the correct name and icon.
Method 3: Let AppImageLauncher handle integration automatically
Use this if you’d rather not repeat the manual steps above for every AppImage you download. AppImageLauncher intercepts the file the first time you run it and handles relocation, permissions, and desktop integration in one prompt.
First, you’ll need to install AppImageLauncher.
On Ubuntu, Mint, and other Debian-based distros:
The Script:
Atera does not guarantee the integrity, availability, security, virus-free, safety, lawfulness, non-infringement, rights’ status, or functionality of the scripts. The use of the shared scripts is at your own risk. Scripts are provided “AS IS”. *
sudo add-apt-repository ppa:appimagelauncher-team/stable
sudo apt update
sudo apt install appimagelauncherOn Fedora:
The Script:
Atera does not guarantee the integrity, availability, security, virus-free, safety, lawfulness, non-infringement, rights’ status, or functionality of the scripts. The use of the shared scripts is at your own risk. Scripts are provided “AS IS”. *
sudo dnf install Grab the current release URL from the Releases page rather than hardcoding a version number, since RPM filenames change with each tagged release.
On Arch:
The Script:
Atera does not guarantee the integrity, availability, security, virus-free, safety, lawfulness, non-infringement, rights’ status, or functionality of the scripts. The use of the shared scripts is at your own risk. Scripts are provided “AS IS”. *
yay -S appimagelauncher- Double-click the downloaded
.AppImagefile from your file manager, no need tochmod +xit first - When the Integrate application? dialog appears, select Integrate and run
Confirm the app launches, then close it and relaunch from your application menu to verify the integration stuck

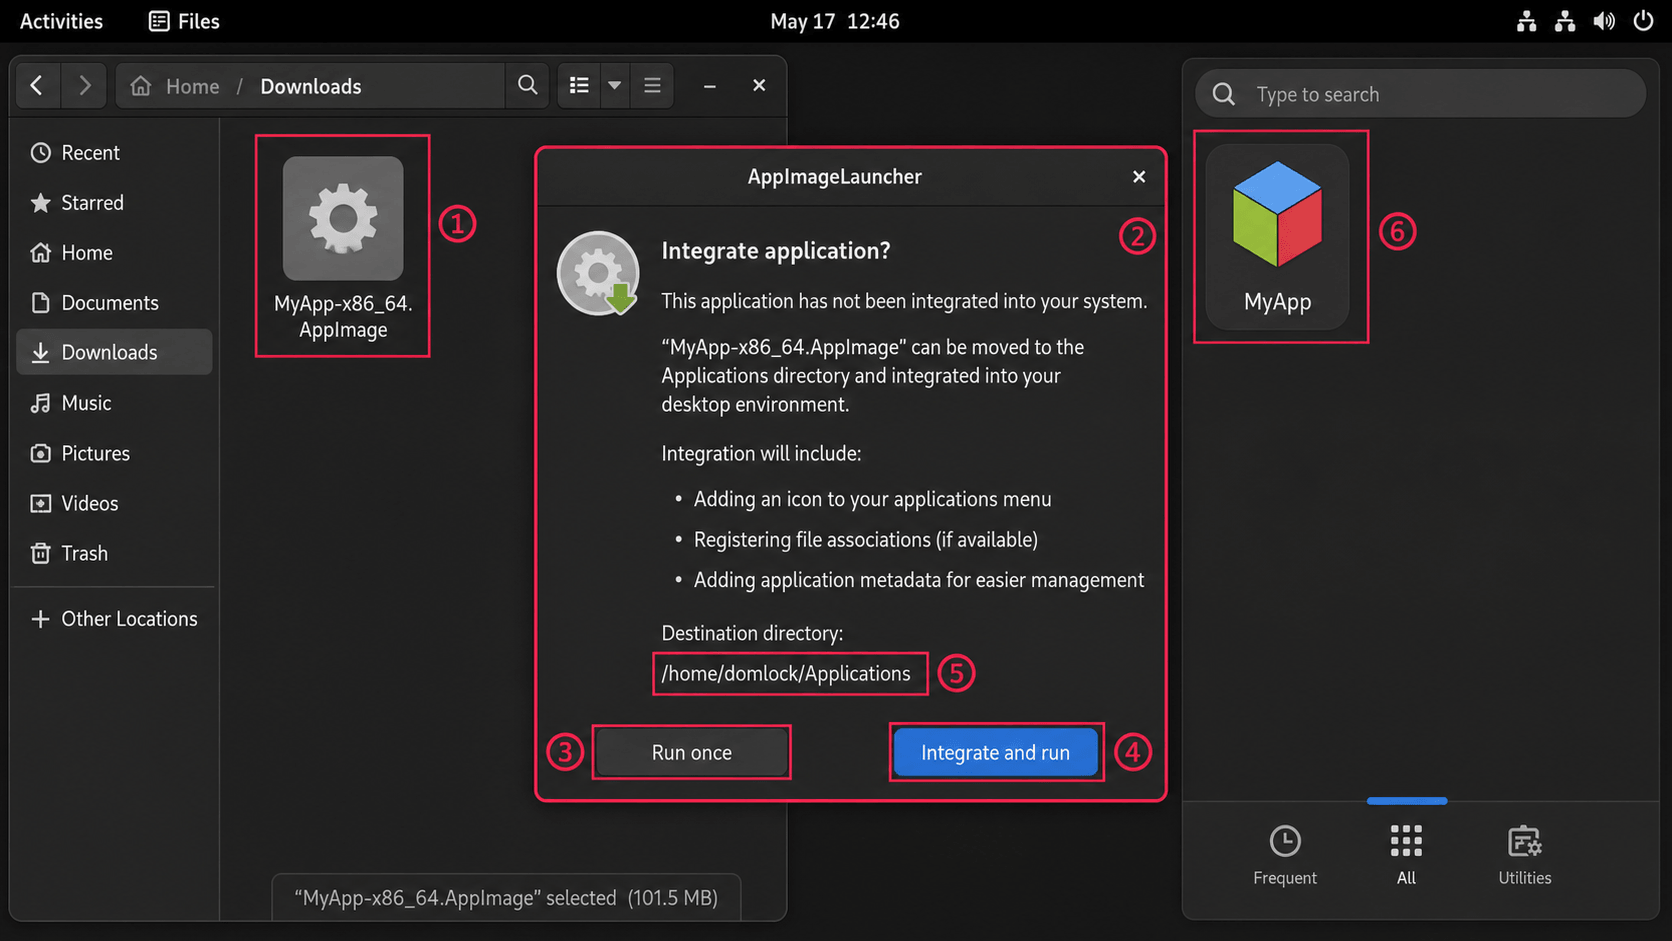
Behind the scenes, this single confirmation moves the file into ~/Applications, generates the desktop entry, and registers the icon.
» Make sure you know how to check your Linux version
Method 4: Run the appimaged background daemon
This is the option to reach for if you want new AppImages integrated automatically the moment they land in ~/Applications, ~/Downloads, /opt, or /usr/local/bin, without a manual double-click step at all.
Note for Fedora specifically: There’s no current, verifiable COPR repository providing appimaged. A COPR project exists for AppImageLauncher, but that’s a different tool and shouldn’t be substituted in. The steps below use the upstream install method instead, which works the same way on Fedora as anywhere else:
- Create the target directory:
mkdir -p ~/Applications - Download the latest appimaged release from the go-appimage project’s continuous release page
- Make it executable:
chmod +x ~/Applications/appimaged-*.AppImage Run it:
~/Applications/appimaged-*.AppImage
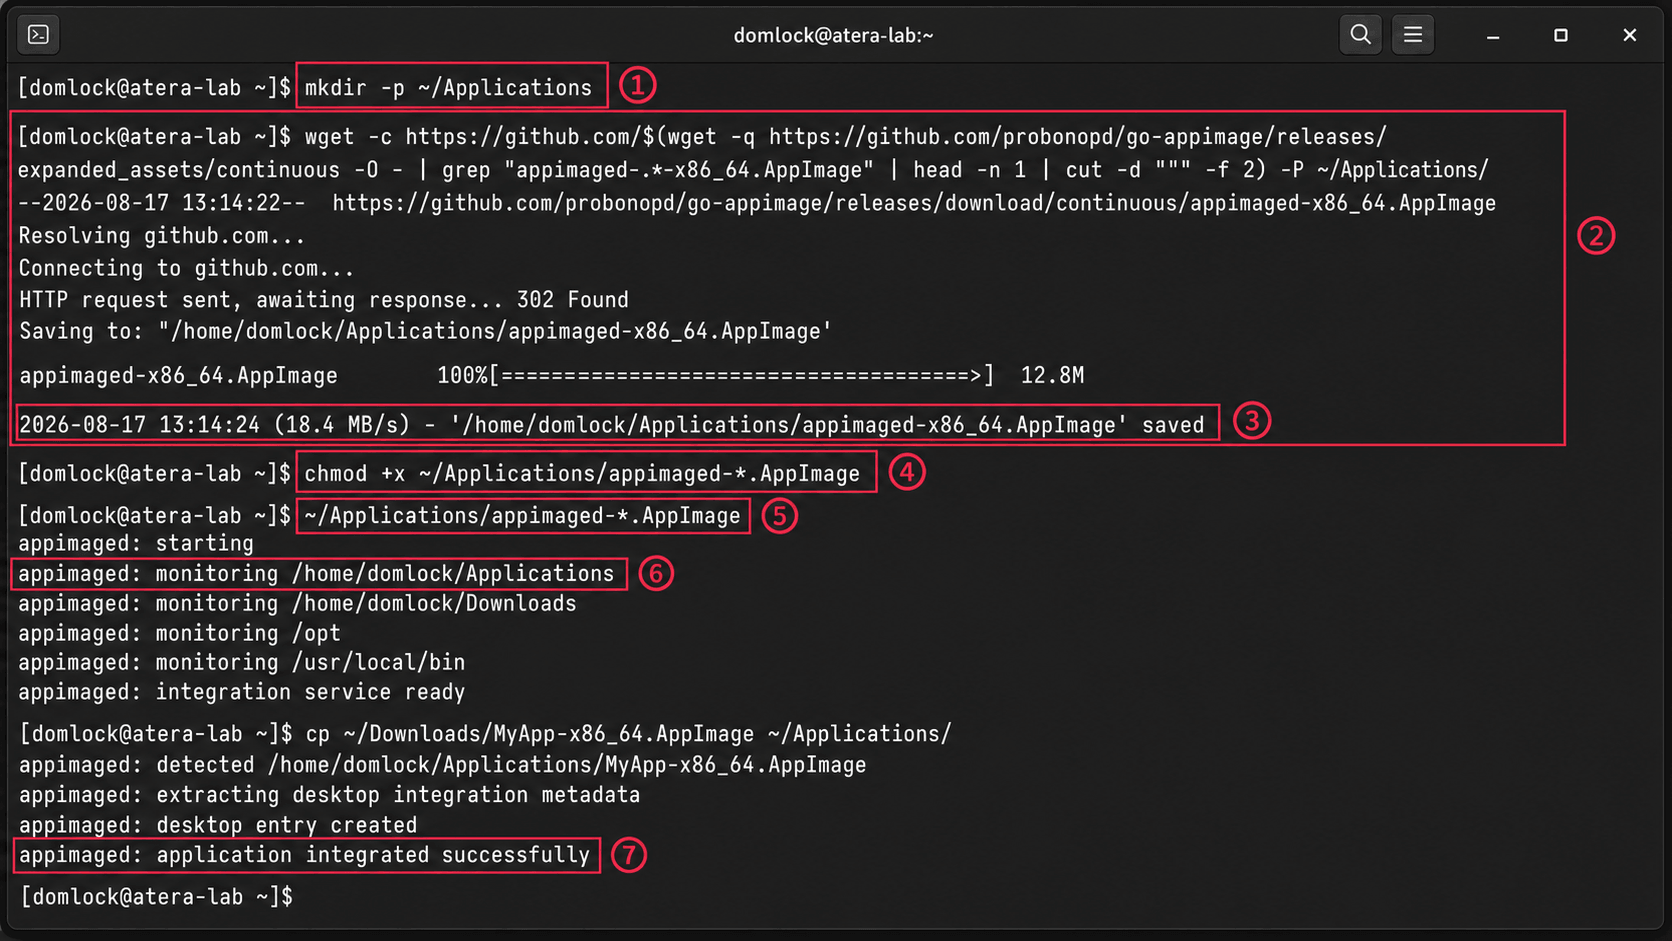
Once running, appimaged monitors those directories continuously and integrates or removes desktop entries as AppImages appear or disappear. Worth knowing before you rely on it in production since the upstream project describes this Go implementation as experimental, and scanning a large ~/Downloads folder can add noticeable filesystem activity.
Method 5: Manage AppImages like packages with AM or AppMan
If you’re used to a package-manager workflow (search first, then install), this gets you the closest equivalent for AppImages. Since both tools are self-contained scripts rather than distro packages, they work the same way regardless of which distro you’re running, including Arch, Fedora, and Ubuntu-based systems like Mint.
- Search for the application:
am -q libreoffice - Install it system-wide:
am -ia libreoffice - For a per-user install without root, use
am -ia --user libreofficeinstead, or the AppMan equivalent:appman -i libreoffice Confirm it registered correctly:
am -f libreoffice
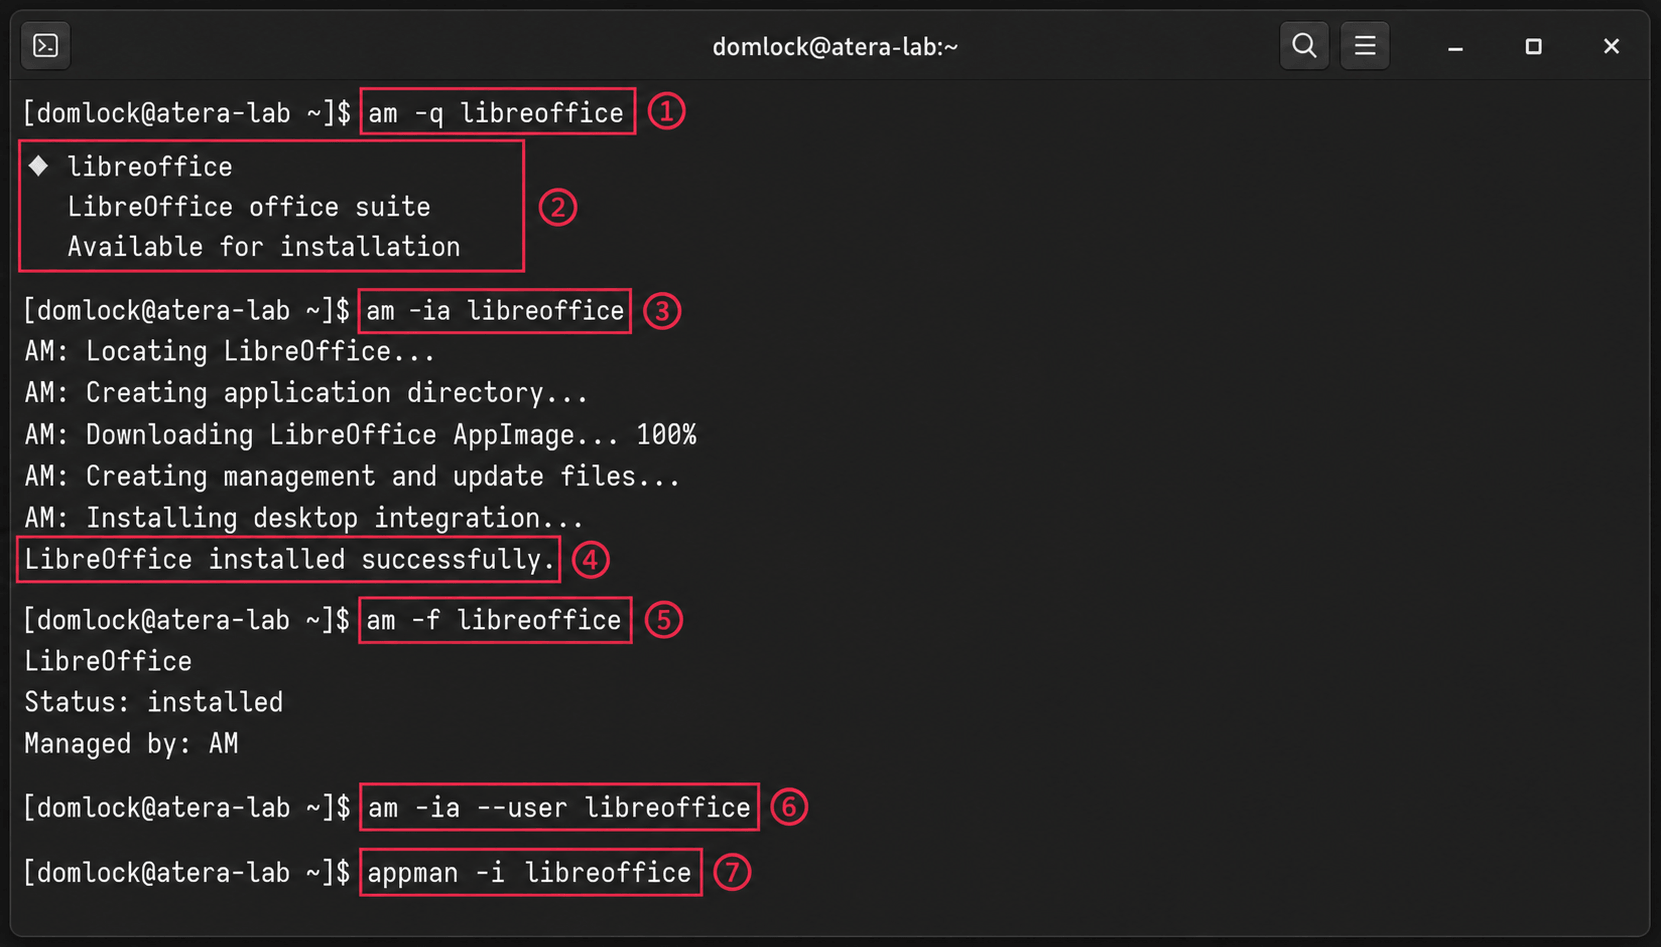
AM and AppMan are handling the same underlying steps as the manual method, creating the app directory, downloading the file, extracting desktop metadata, and adding the menu entry, just wrapped in commands that feel like apt or dnf.
Method 6: Deploy a single script across a fleet of endpoints
All the methods above are fine on one machine, but what if you have to run a software deployment across every endpoint on your network? In that case, you can run a single script across your entire network with the same ownership and permissions every time.
1. Write a single script that handles the full sequence, download, ownership, permissions, and a verification check, so the whole install runs as one unit rather than a series of manual commands. Here’s an example script you can paste into your terminal:
The Script:
Atera does not guarantee the integrity, availability, security, virus-free, safety, lawfulness, non-infringement, rights’ status, or functionality of the scripts. The use of the shared scripts is at your own risk. Scripts are provided “AS IS”. *
sudo mkdir -p /opt/appimages
sudo curl -L "$APPIMAGE_URL" -o /opt/appimages/MyApp.AppImage
sudo chown root:root /opt/appimages/MyApp.AppImage
sudo chmod 755 /opt/appimages/MyApp.AppImage
test -x /opt/appimages/MyApp.AppImage || exit 12. Test the script against a small group of endpoints before wider deployment
3. Deploy it across the remaining fleet once the test group confirms clean
4. Check the actual execution result rather than assuming a completed download means a working install
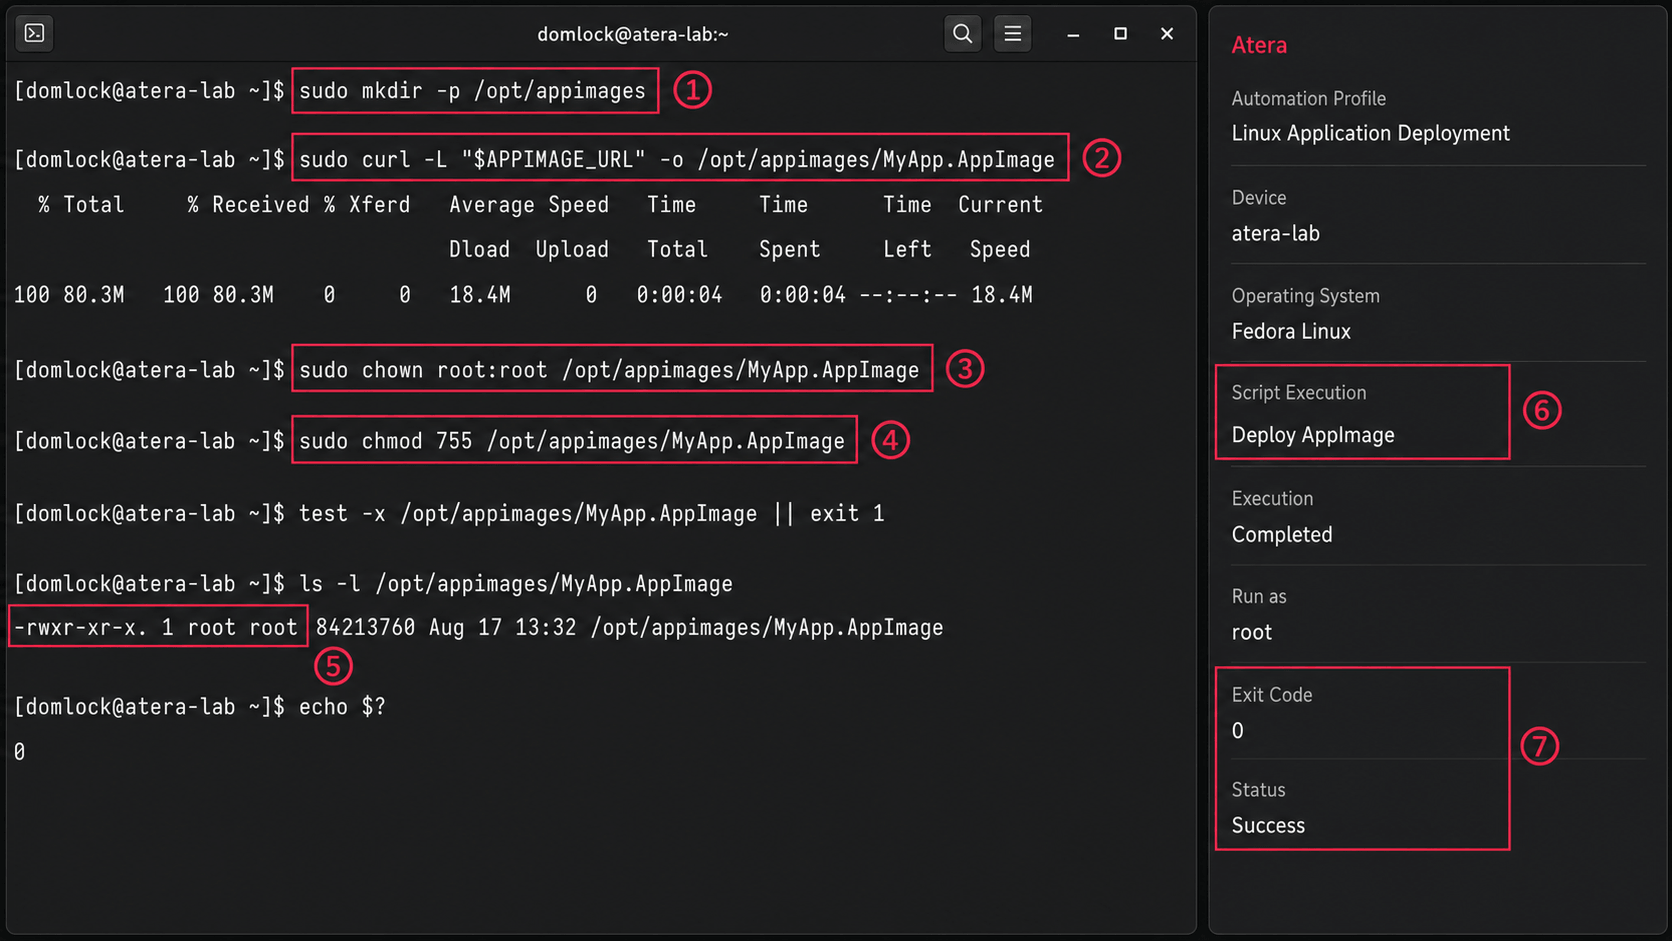
With Atera’s Bash support, you can run this exact script remotely across whichever devices or device groups you select through the RMM platform, then confirm success from the reported exit code instead of waiting on a support ticket. And if you need a more specific script or want some changes, AI Copilot can write it for you.
» Learn more about installing Atera’s Linux Agent and monitoring Linux servers at scale
AppImage installation doesn’t have to be manual
Every method here helps you get a portable application running without touching a package manager. The gap most guides skip is what happens next, when that AppImage needs to run on twenty machines instead of one, with the same permissions, the same ownership, and the same verified source every time.
Atera lets IT teams and MSPs push the same install, chown, and chmod sequence across selected devices or device groups on demand and monitor the result. The install stays exactly as simple as it was on your own machine but just stops being something you have to repeat by hand.
» Did you know you can try Atera for free?
Frequently Asked Questions
Related Articles

How to set Windows environment variables in PowerShell
PowerShell environment variables can be set at the Process, User, or Machine level, with each scope serving a different purpose. This blog covers how to configure these variables and deploy system-level settings across multiple Windows devices.
Read now
How to remove write protection from a USB
A drive gone read-only isn't always a two-minute registry fix. Sometimes it's flash memory quietly failing, and every write attempt afterward costs you more of the data you're trying to save. Here's how to tell which one you're dealing with and what to do once you know.
Read now
How to enable or disable Windows Subsystem for Linux WSL in Windows 10
Enabling WSL feels harmless right up until a checkbox turns into error 0x80370102 and a BIOS setting nobody documented. WSL now shows up on more professional machines than a standalone Linux install, which means more failed toggles landing on IT's desk.
Read now
How to start mysql server on windows
MySQL doesn't fail loudly on Windows. It just doesn't start, and the reason is buried in a locked port, a missing permission, or a my.ini path pointing nowhere. Five methods will get the service running again, but only if you know which one to reach for and what to check when it stalls.
Read nowEndless IT possibilities
Boost your productivity with Atera’s intuitive, centralized all-in-one platform









