
Generate summary with AI

Every Linux admin has been paged for a server that just stopped responding, only to find the real problem was a file system sitting at 100%. A runaway log file, an unrotated core dump, or a build directory nobody cleaned up can quietly eat every available block until a database refuses writes or a web server can’t spawn a new process.
The frustrating part is that “just run df” isn’t always the full answer. Permissions can hide subdirectories from du, network mounts report numbers that don’t match what you’d expect from a local disk, and df and du can disagree about the same filesystem for reasons that have nothing to do with either tool being wrong. Knowing which command to reach for, and what its output is actually telling you, is what separates a five-minute fix from an afternoon of guessing.
» Worried your storage drives are failing? Here’s how to check SSD health and HDD health
What complicates an accurate disk space reading
Before running any of the commands in this guide, you should know that two different tools can report two different numbers for the same disk and that some checks need elevated privileges while others don’t.
Here’s everything else to know:
Permissions and directory traversal
du needs two permissions to return an accurate total:
- Execute (search) permission to enter a directory
- Read permission to list what’s inside it
If either is missing on any subdirectory in the tree, du skips that path and prints a Permission denied message rather than failing outright. What confuses people is that the command still runs and returns a number, but it quietly excludes whatever it couldn’t get into.
A du result that looks suspiciously small on a directory tree you don’t fully own is often a permissions gap, not proof that the directory is actually small.
» Need help with this? See our guides to changing file permissions on Linux and fixing the permission denied error
When you actually need root or sudo
For du, root or sudo matters when you’re scanning directories you don’t have read or execute permission on. Without elevated access, du skips those paths the same way it would for any other permission gap, and the total comes back understated.
For df, root or sudo typically isn’t necessary since it reports filesystem-level statistics that are accessible to any user. However, filesystems like ext2, ext3, and ext4 reserve a block percentage exclusively for the root user, specifically to prevent a complete system lockup if a non-root process fills the disk. That means an unprivileged user checking df won’t see the “true” available figure. If a number looks slightly off from what you expected, that reserved margin is usually why.
Checking disk space on network-mounted storage
NFS and other network-mounted storage introduce limitations that don’t apply to local disks, including:
- Network dependency: Accessing the remote storage requires the network and the remote server to be available. A local disk check never has this failure mode.
- Remote-reported capacity: The capacity figures you see come from the remote filesystem or export. They don’t necessarily reflect the underlying physical storage or your own effective quota on that share.
- Quotas are a separate layer: Whether user or group quota information is even available depends on server-side configuration and protocol support. When a quota is in place, it can make your effective available space smaller than what the filesystem reports as free.
- Permissions and authentication differ from local disks: Access is governed by the network filesystem’s own authentication, identity mapping, and server-side authorization, not the local permission model described above.
Why df and du don’t always agree
It’s common for df and du to report different figures for the same filesystem, but it’s because they’re measuring different things:
dumeasures visible files: It scans the directory tree and adds up the space used by active files and folders.dfmeasures total filesystem blocks: It queries the storage layer directly to report allocated and remaining space, which includes storage blocks that haven’t been released yet, such as space held by a deleted file that a running process still has open.
8 ways to check disk space on Linux
There’s no single “right” way to check disk space in Linux. The best method depends on whether you’re checking one folder or an entire filesystem, whether you’re at a desktop or SSH’d into a headless server, and whether you want a quick number or a full breakdown of what’s actually eating space.
Choose the method below that best suits your situation.
Method 1: Checking a folder’s size via the file manager
Use this when you’re already in a GUI file manager and just need a quick size check on one folder without opening a terminal.
- Open the file manager and navigate to the folder you want to check
Right-click the folder and select Properties from the contextual menu

Look for the Size label to see the current size of the selected folder

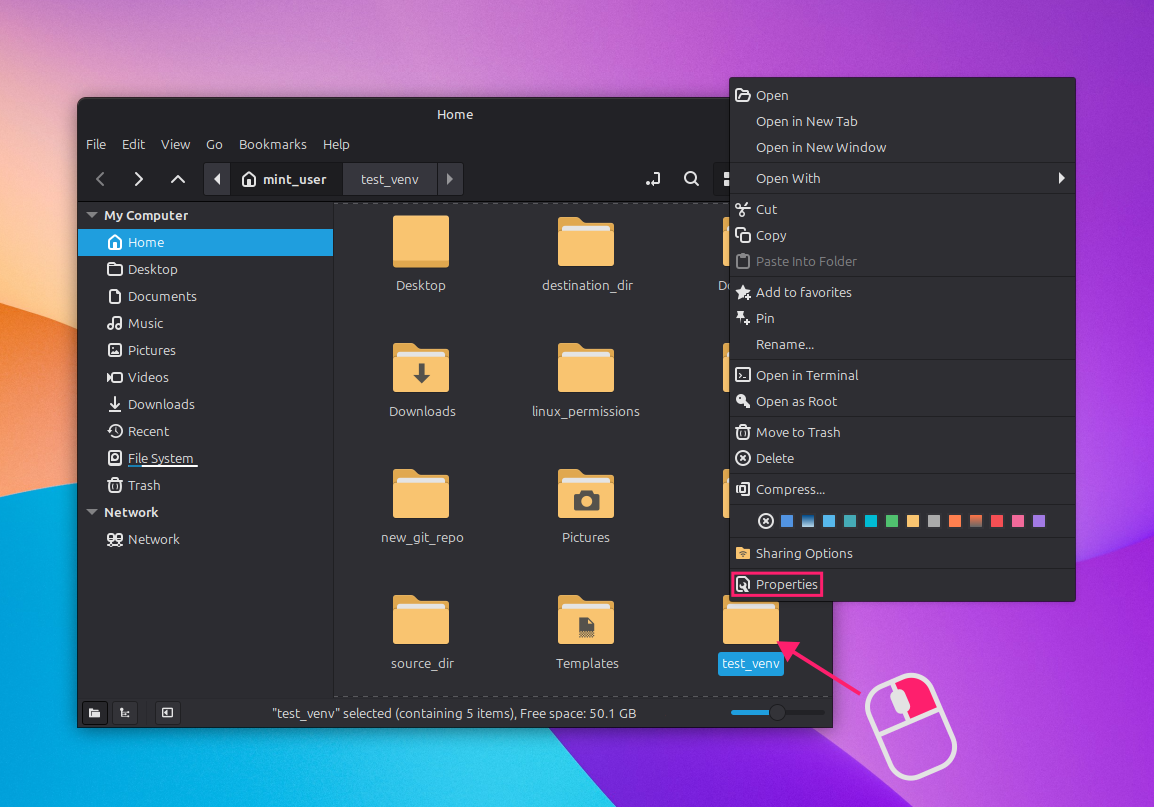
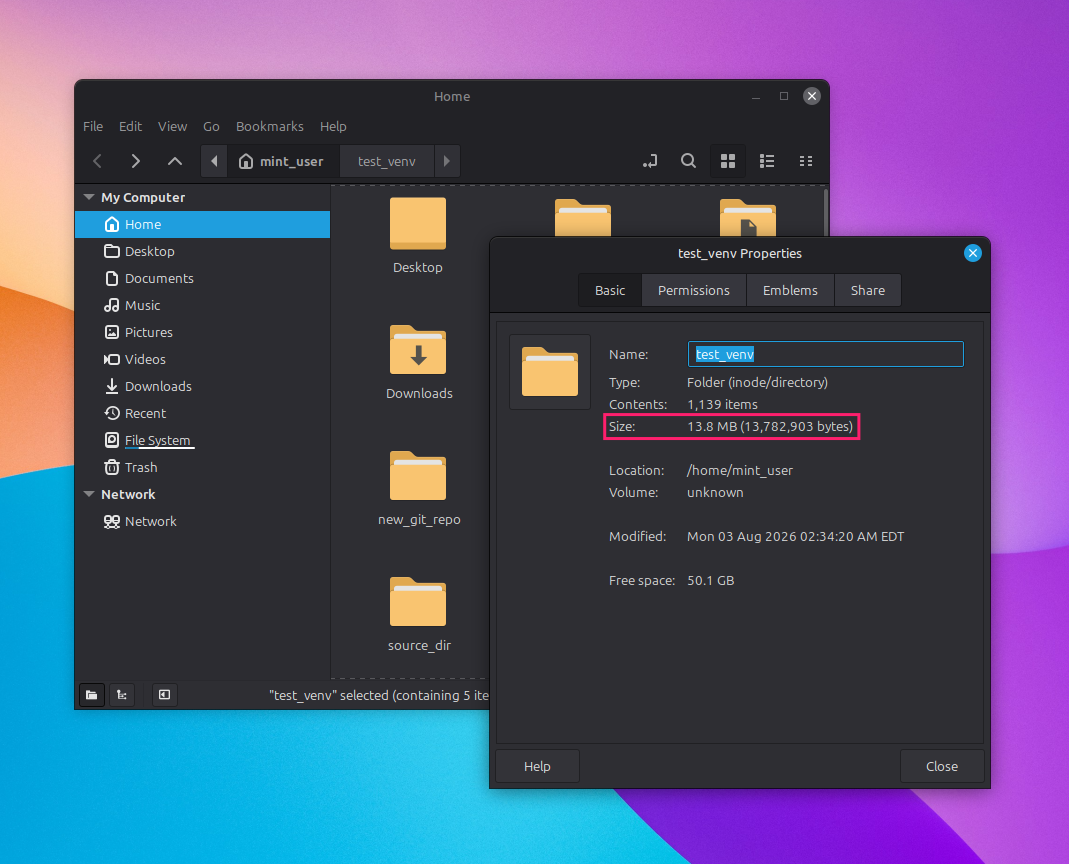
Most file managers also recognize Alt + Enter as a shortcut to open the Properties window directly for whatever item is highlighted, which saves a right-click if you’re checking several folders in a row.
Method 2: Using df for overall filesystem usage
Reach for df when you need a quick, system-wide view of used and available space across every mounted filesystem without drilling into any specific directory.
- Run
dfwith no arguments to list space usage for all mounted filesystems Run
df -hto display those same sizes in human-readable units (K, M, G) instead of raw block counts
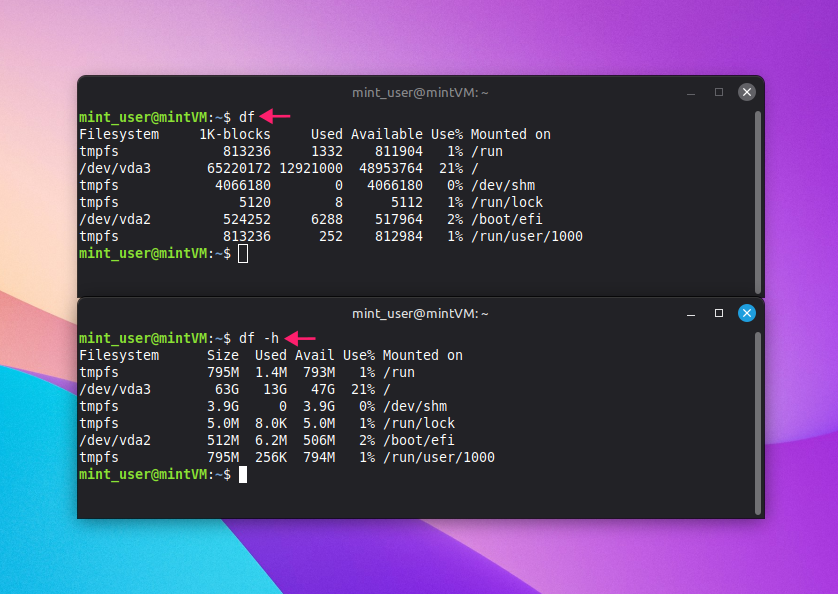
df -h is the version most people reach for day to day since raw block counts aren’t especially useful at a glance.
Method 3: Using du for directory-level totals
Use du when df has told you a filesystem is full or nearly full, and now you need to find out which directory is actually responsible.
1. Run du -sh /path/to/directory to get a single summarized total:
- The
-s(or--summarize) flag reports one combined total for the directory and everything inside it, rather than a line for every file - The
-h(or--human-readable) flag displays that total in human-readable units
2. If a single total isn’t enough and you need a breakdown by immediate subdirectory, run du -h --max-depth=1 /path/to/directory instead.
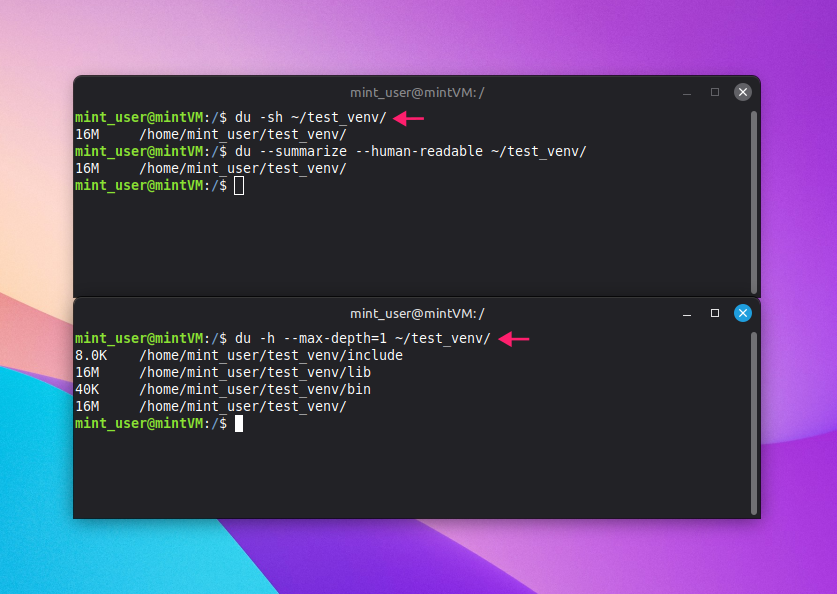
The --max-depth=1 version is usually the more useful starting point in practice, since it shows you which subdirectory is actually full instead of just confirming that the parent directory is full.
Method 4: Using Disk Usage Analyzer (baobab) for a visual breakdown
Baobab is worth using when you want a visual and specific view of what’s consuming space across an entire filesystem.
Search for Disk Usage Analyzer (or baobab) in the applications menu and click the corresponding icon

It can also be launched from the terminal by running
baobab, orbaobab &to launch it detached from the terminal session
From the Devices and Locations view, select the filesystem you want to scan, then navigate to the folder you’re interested in analyzing

To jump straight to a specific directory instead of browsing to it, run
baobab /path/to/directoryfrom the terminal
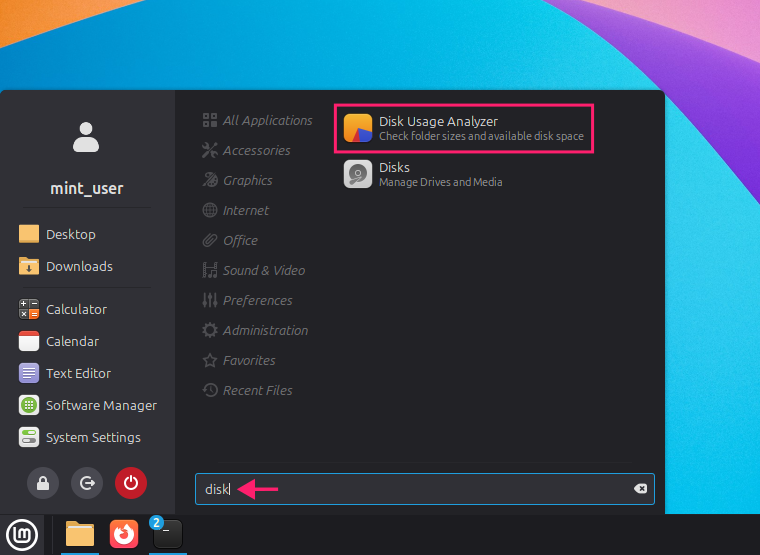
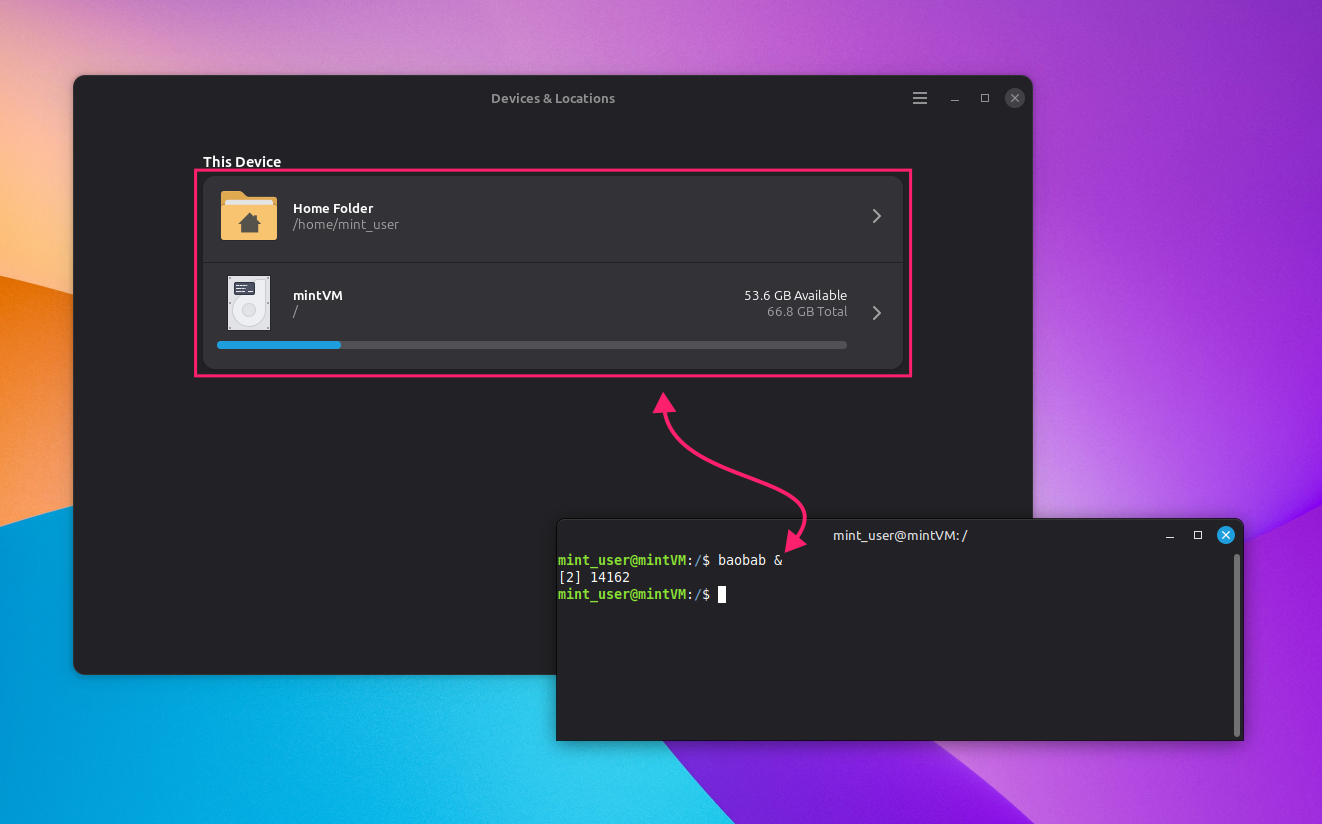
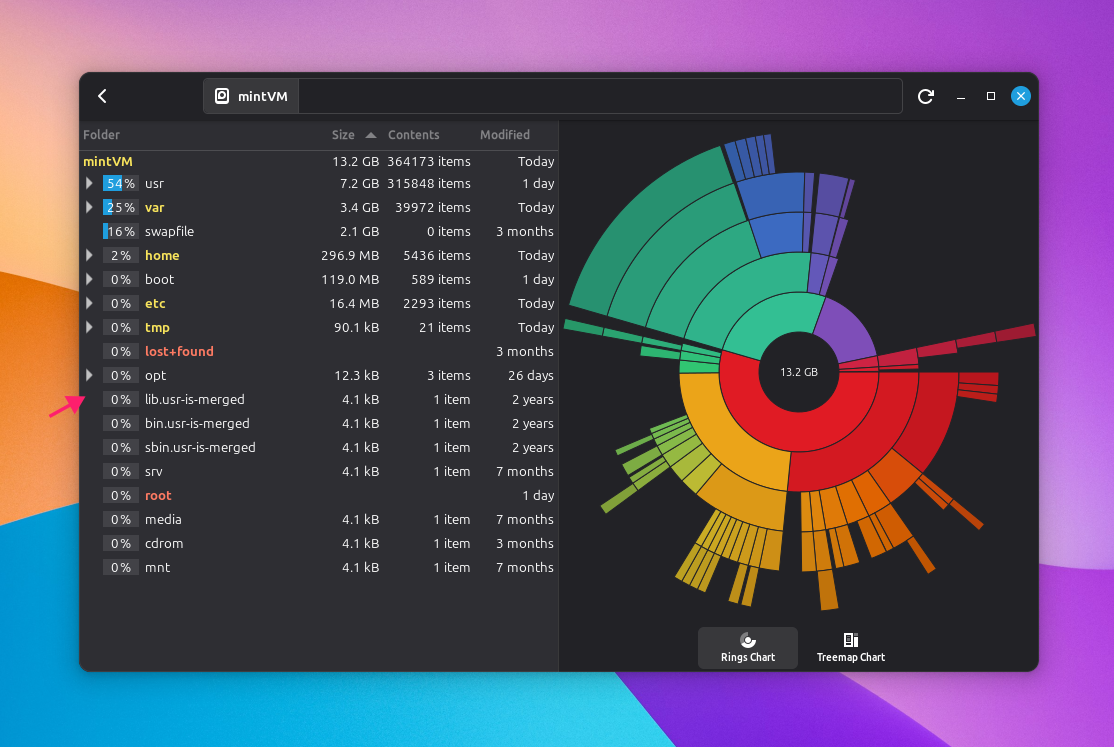
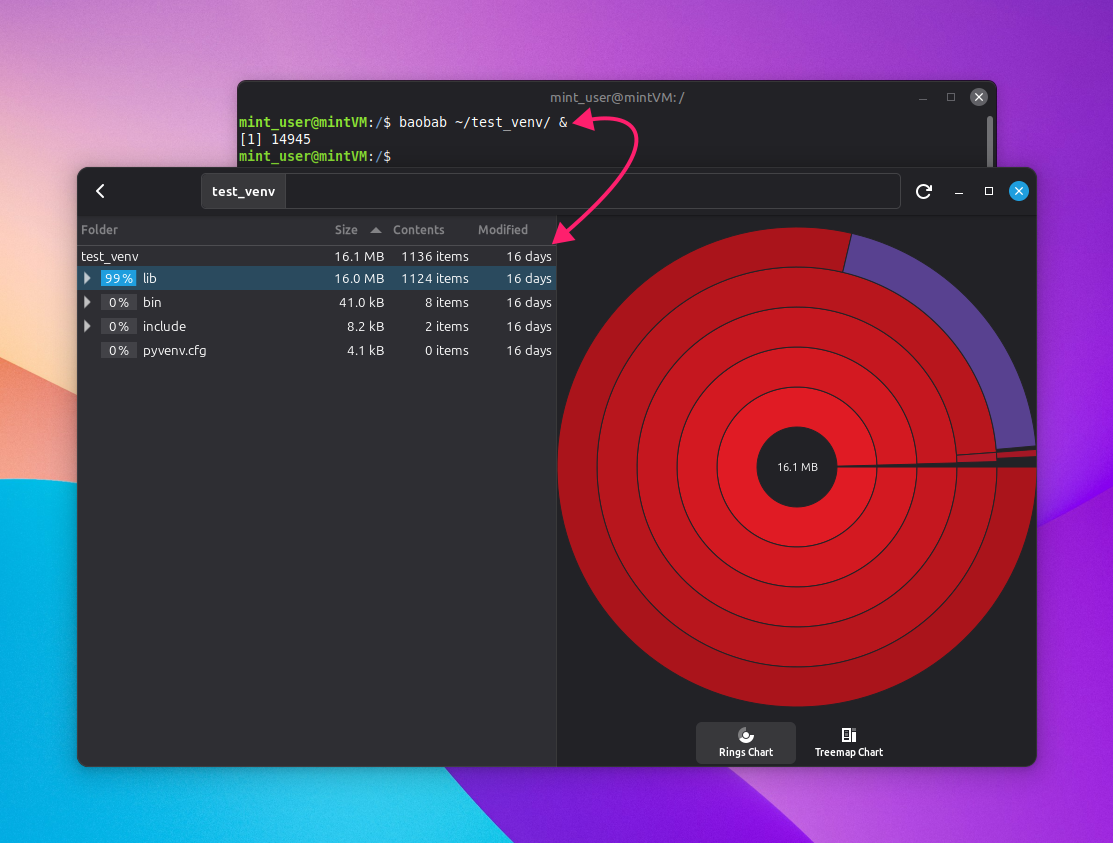
The ring chart and treemap views make it easy to spot which folder is disproportionately large at a glance, which is harder to eyeball from a plain du listing once you’re dealing with a directory tree of any real depth.
Note: baobab is available on distros beyond Ubuntu, not just Ubuntu-based desktop environments.
Method 5: Using System Monitor’s File Systems tab
This is a fast way to check available space across mounted filesystems without leaving a GUI tool you may already have open for other reasons, like checking CPU or memory usage.
Search for System Monitor in the applications menu and click the corresponding icon, or run
gnome-system-monitorfrom the terminal
Switch to the File Systems tab, via the top menu bar, to see used, available, and total space for each currently mounted filesystem

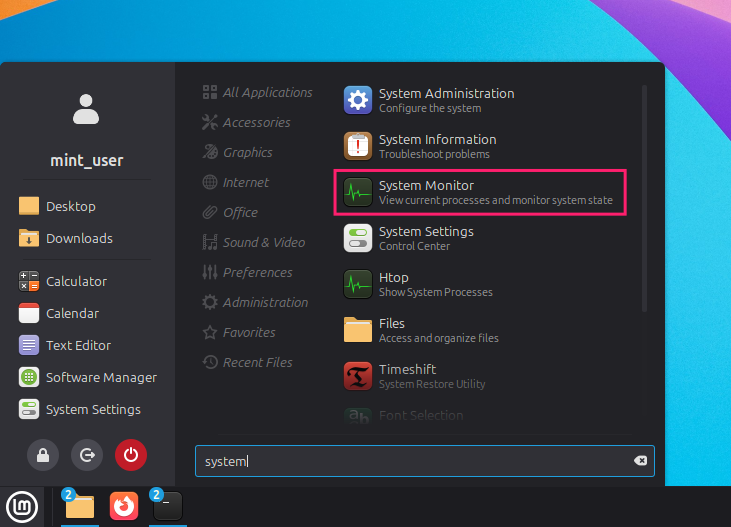
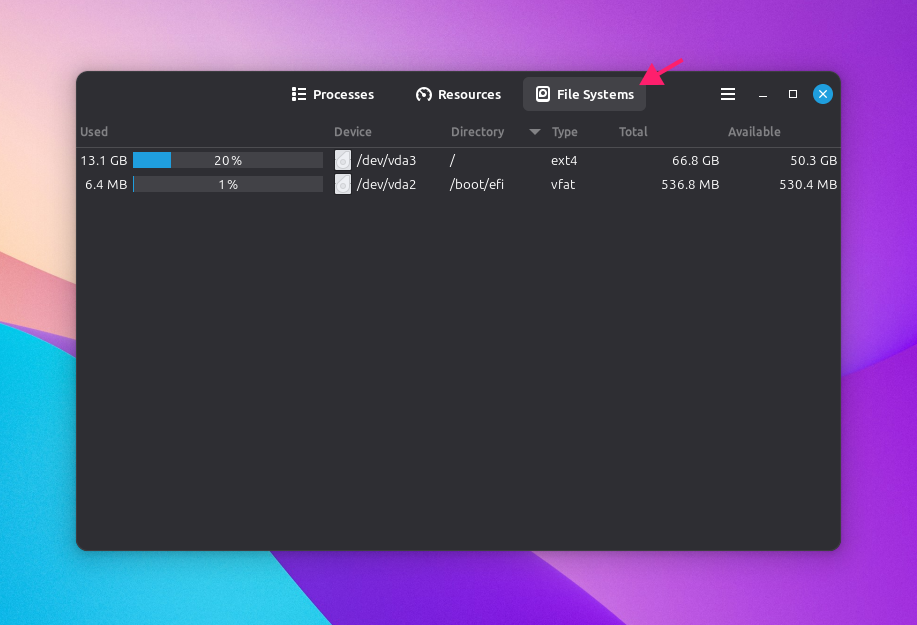
It won’t tell you which directory is responsible the way du or baobab will, but it’s a convenient first check when you’re already working in System Monitor.
Method 6: Using ncdu for an interactive terminal breakdown
Use ncdu when you’re working over SSH on a headless server with no GUI available, but still want the kind of interactive experience baobab offers on a desktop.
Most distros don’t ship with ncdu by default, so you’ll need to install it first with these commands, depending on which Linux version you’re running:
sudo apt install ncduon Debian-based distros like Ubuntusudo dnf install ncduon Fedora and RHEL-based distrossudo pacman -S ncduon Arch-based distros
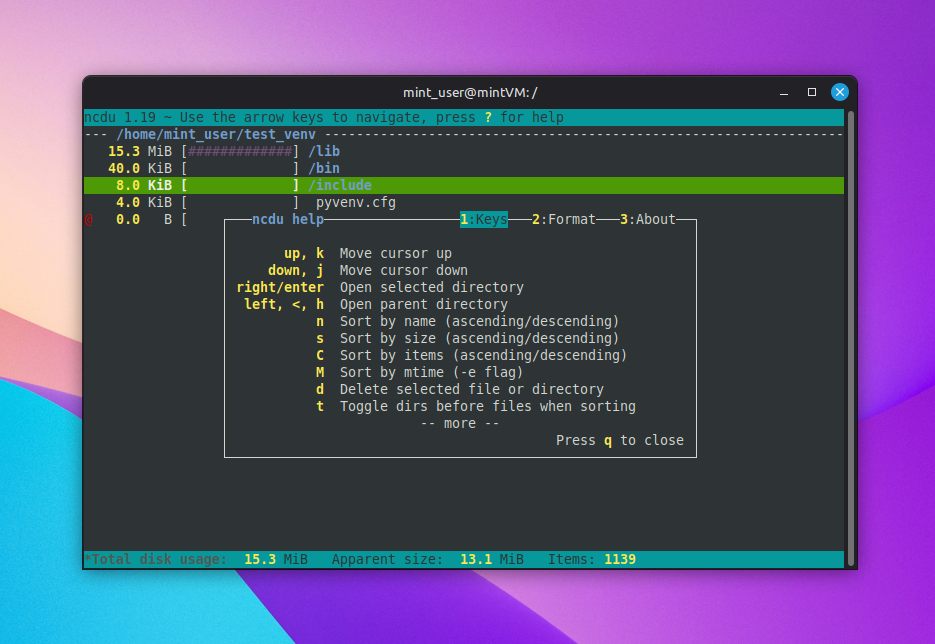
Once installed, run ncdu /path/to/directory to scan a specific directory, or just ncdu to scan the current one. Then:
- Use Up/Down or J/K to move through the file list
- Use Right or Enter to open the selected directory
- Use Left or Backspace to return to the parent directory
- Press ? at any time to bring up the full list of key mappings
Because it’s fully keyboard-driven and runs entirely in the terminal, ncdu is often the fastest way to find a space hog on a remote server where installing a GUI tool isn’t an option.
Method 7: Using lsblk to check space per partition
Use lsblk when you need to see space at the partition or block-device level, rather than at the filesystem or directory level.
- Run
lsblkon its own to list block-device information, including partition size To also see used and available space, use the
-ooption with the specific columns you want:lsblk -o NAME,SIZE,FSTYPE,FSUSED,FSAVAIL,MOUNTPOINTS
- Run
lsblk -horlsblk --helpto see the full list of available columns if you need something beyond the defaults
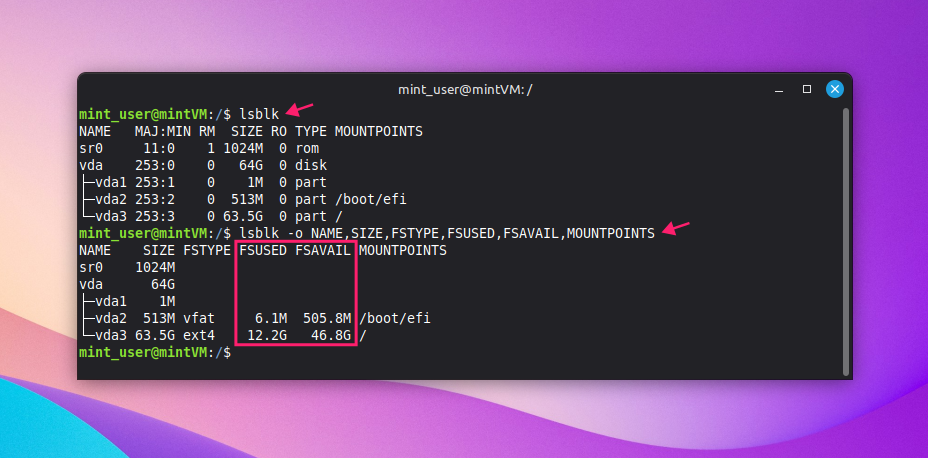
The default lsblk output is useful for getting your bearings on disk layout, but the -o version is the one you’ll actually want when the question is “how much space is left on this partition,” since the default columns don’t include used or available space at all.
Method 8: Scaling disk space monitoring across a fleet
Checking disk space on one server is manageable with the commands above. Checking it across dozens or hundreds isn’t something you can do by SSHing into each box manually.
Some teams handle this with DIY tooling:
- Ansible’s
ansible.builtin.setupmodule can pullansible_mountsfacts across multiple hosts without installing a permanent daemon - A Prometheus setup with
node_exporteron each server can expose filesystem metrics for Alertmanager to fire threshold-based alerts on
Both work, but they also mean building and maintaining the alerting logic yourself. Atera’s RMM platform is a much simpler way of handling this natively. Threshold-based alerts fire automatically when a disk crosses a defined capacity threshold, and depending on how a site, customer, device, or severity is configured, those alerts can create a ticket without a technician needing to be watching for it. And if you need to check specific features or fix problems, AI Copilot can help you write complex scripts that you can deploy remotely to specific endpoints and groups.
» Learn more about monitoring Linux servers at scale
Troubleshooting common issues
There isn’t a lot that can go wrong when it comes to checking disk space, but here are the two most common scenarios and how to fix them:
Recovering space held by deleted but open files
Sometimes df reports a disk as nearly full, but du can’t find anything close to that much space in use. This usually means a process is still holding a file open that’s already been deleted, which is a scenario worth checking whenever the numbers from df and du don’t line up.
- Run
lsof +L1to list files that have been deleted but are still held open by a running process Pipe the output through
numfmtto make the file sizes human-readable:lsof +L1 | numfmt --header --field=7 --to=iec(the seventh column is the SIZE field)
Once you’ve identified the file, reclaim the space without killing the process by truncating it through its file descriptor:
truncate -s 0 /proc/<PID>/fd/<FD>
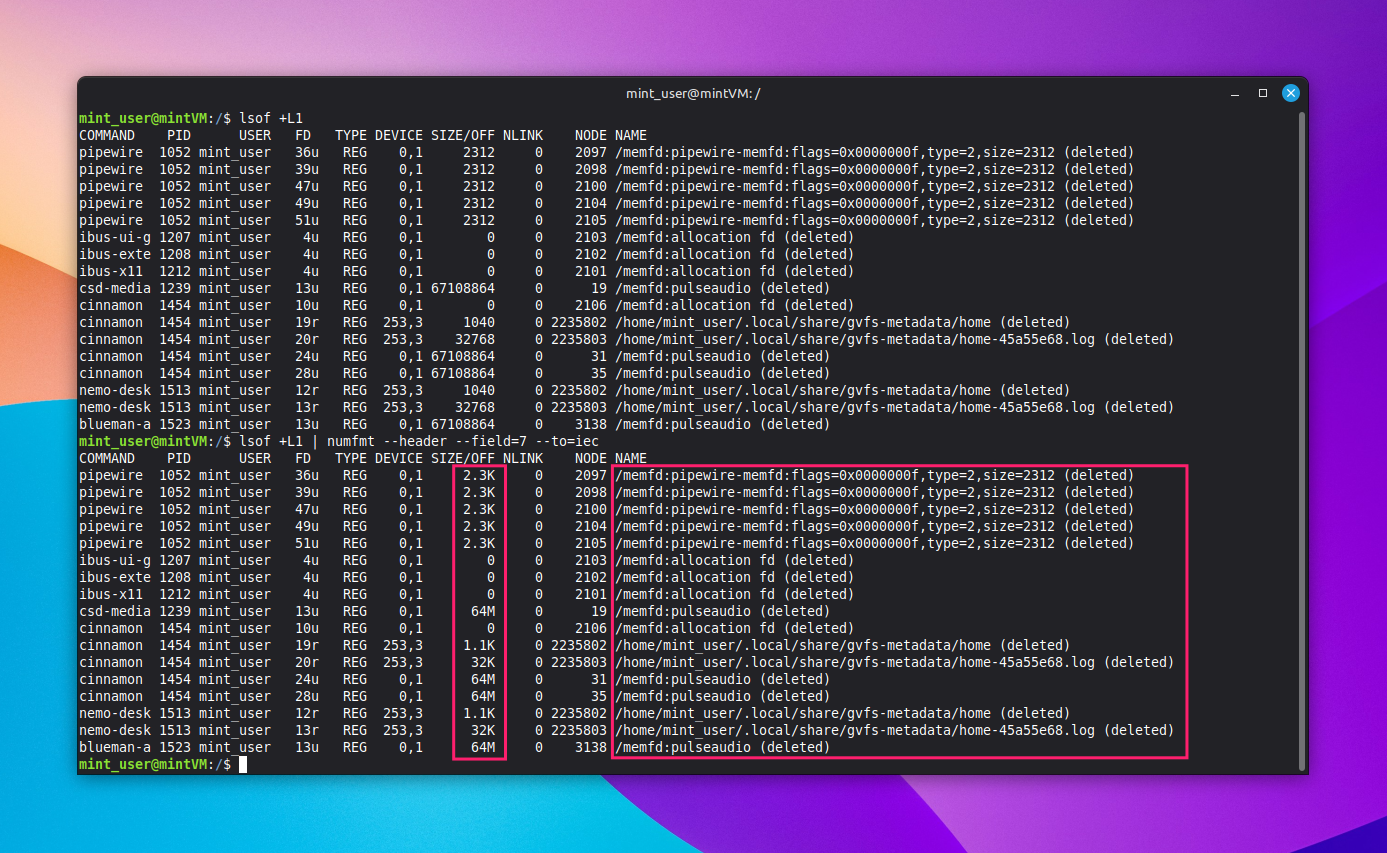
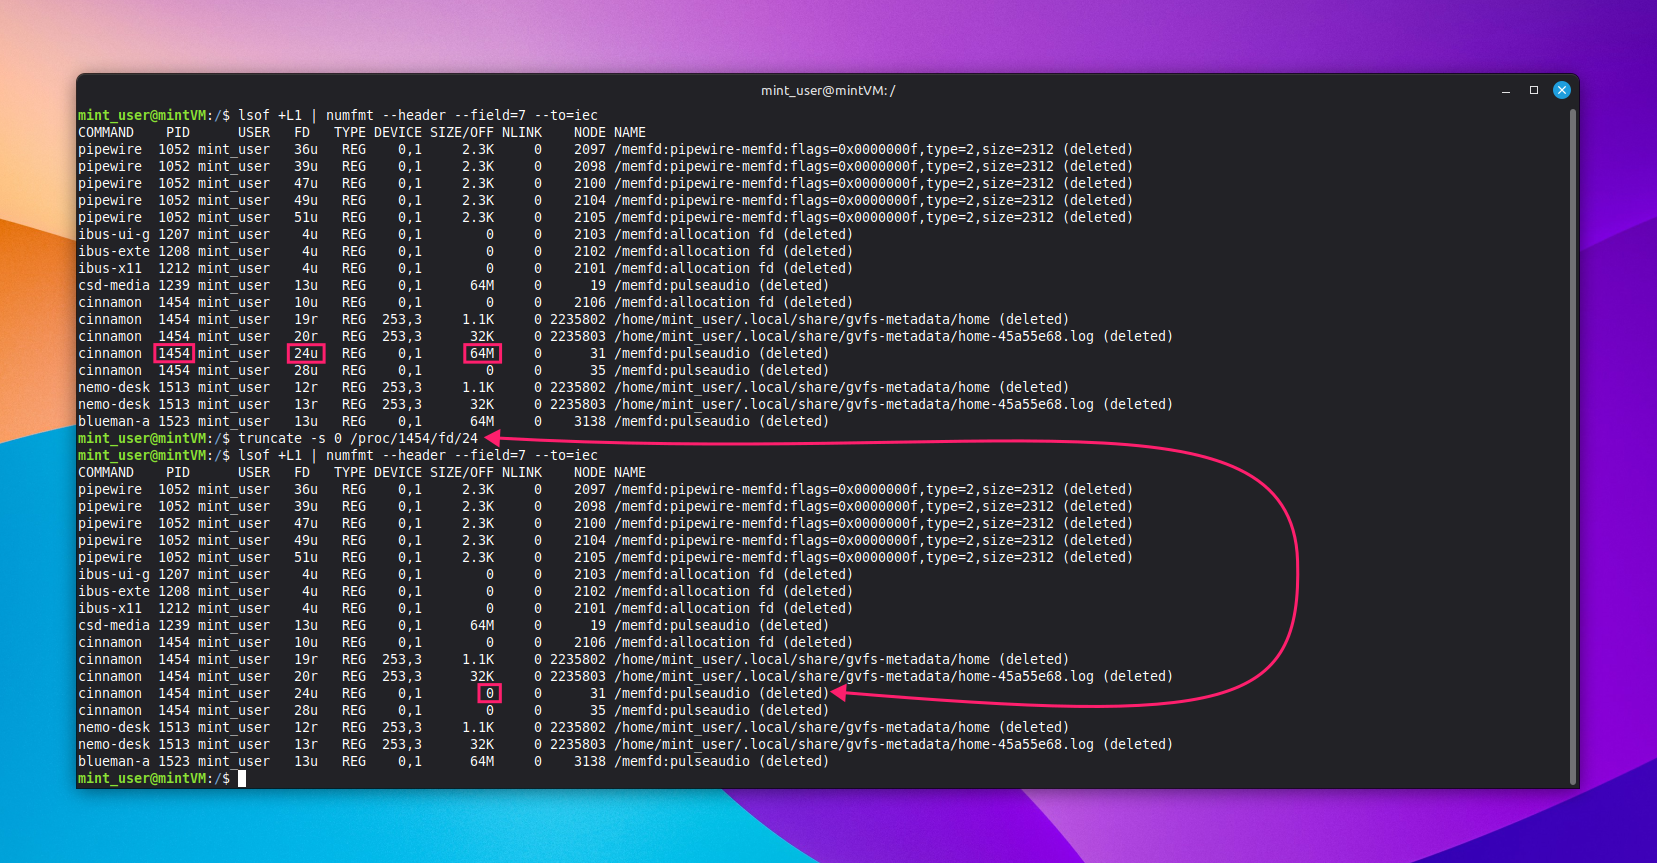
The file descriptor needs to be open in write (w) or read-write (u) mode, which you can confirm from the FD column in the lsof output.
Diagnosing inode exhaustion
A disk can show plenty of available block space and still refuse to create new files. When that happens, the filesystem has likely run out of inodes rather than storage blocks. Every file and directory consumes an inode regardless of its size, and a filesystem with millions of tiny files (like a mail queue or a cache directory) can exhaust its inode allocation long before it runs low on actual space.
Run df -i to check inode usage instead of block usage. The -i (or --inode) option swaps the output columns to show total inodes, used inodes, and free inodes per filesystem.
Look at the IUse% column the same way you’d check the Use% column in a standard df run. A filesystem at or near 100% inode use will reject new file creation even if its available block space looks completely healthy.
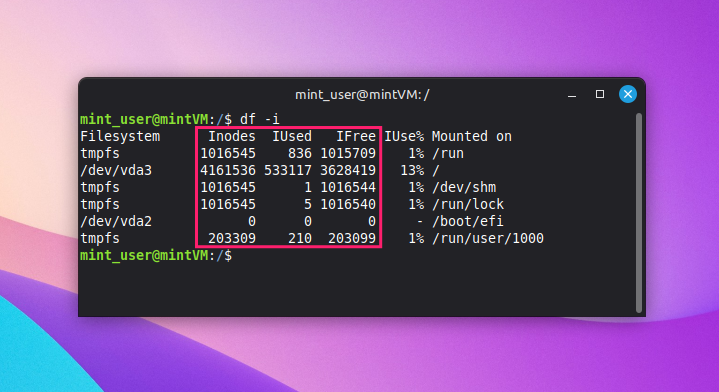
To fix inode exhaustion, first find the worst offender with find / -xdev -printf '%hn' | sort | uniq -c | sort -rn | head -20 to see which directory has the most files, then clean it up.
Common causes include:
- Mail queues (
postsuper -d ALLorpostqueue -f) - Cache directories (
rm -rf /var/cache/app/*) - Stale session files (
find /path -type f -mtime +1 -delete)
Disk space monitoring that scales with you
Running these commands well on one machine solves today’s problem, but disk space issues don’t stay isolated to one machine for long. The same full-disk scenario that took down a single server can just as easily hit twenty of them overnight, and manually SSHing into each one to run df isn’t a feasible strategy.
Atera’s RMM platform helps IT teams and MSPs manage disk space and Linux performance at scale before it becomes a problem. Threshold-based alerts flag disks approaching capacity across your fleet before a technician has to go looking for the problem, and remote scripting lets you clear space or investigate directly without hopping between sessions.
» See our guide to installing Atera’s Linux Agent or start your free trial today
Related Articles

How to turn off filter keys
Filter Keys and similar accessibility features can affect keyboard input and IT productivity when enabled unexpectedly. This guide explains how they work and how to disable them across Windows, Mac, and Linux.
Read now
How to change default printer
A user's printer probably isn't broken, even if they think it is. Windows just quietly picked a different default, and now every print job goes somewhere nobody expected. The fix is fast on one machine and painful across fifty, unless you know exactly where that setting lives and what keeps overriding it.
Read now
How to edit a file in Linux
One wrong sed command or an edit made without sudo, and a five-minute fix turns into a lost afternoon. Editing a Linux file means picking the right tool, protecting yourself first, and knowing how to recover when something goes wrong. Here's the full toolkit, from a single config file to a whole fleet.
Read now
How to close a tmux session
One wrong key combination in tmux doesn't disconnect you, it kills your session and everything running inside it. No warning, no undo, no recovering that half-finished database write. Knowing exactly which command detaches and which one terminates (and confirming what's actually running before you close anything) is what separates a clean session close from an afternoon spent explaining a corrupted file to your team.
Read nowEndless IT possibilities
Boost your productivity with Atera’s intuitive, centralized all-in-one platform









